- How can I lay out a portal under the stove in a wooden bathhouse?
- Made of metal
- Facing cladding
It is important not only to install a heating unit of suitable power, but also to provide all the conditions for its proper operation. Therefore, let's talk about constructing a portal for a brick sauna stove. We have collected as much useful information as possible for you so that you understand how to correctly implement one of the key stages in creating a comfortable microclimate and ensure your own safety.
General description of the design
In fact, this is a special frame made around the heating source. U-shaped, it, as a rule, visually stands out from the general background, although it can be made of the same material as the masonry. Its other common names are “gate” or “front entrance”, given precisely because of its appearance.
It can go both into the living room - a separate kindling room - and into the rest room. In the latter case, the aesthetics of execution are especially important.
An already finished structure cannot be adjusted in any way - if changes are needed, it will have to be built anew. Therefore, it is worth paying special attention to its design: to calculating the dimensions and quantity of materials.
When a portal needs protection
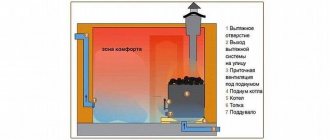
In the event that the room is small, and the heating equipment is too powerful and therefore not only heats itself up, but also overheats everything around, including the surrounding air. In such a situation, the frame must be made of heat-resistant material to prevent its rapid failure. At the same time, you will protect yourself from burns and excess heat.
Preparing the oven
Before you work on the chimney, the stove should already be in its intended place.
But first, it should be heated in the yard for the first time. It is necessary to do this, because during the first fire the industrial heat-resistant paint usually sets and partially burns out. It “smoke” a little when fired and smells. This is normal, this is how it should be. By the way, it was also a good idea to try out new stones in the yard - sometimes they give off a stench that stings the throat and eyes. It is better to experience this in the fresh air, and not in the steam room.
Assemble the stove according to the instructions, install it on a flat and solid base, place some piece of at least a ventilation pipe on the chimney pipe (at least 2 meters long) and heat it thoroughly once. At the same time, find out if there are any design defects, if it smokes, in general, get to know each other.
On a note! Heat for the first time with normal wood, not garbage, and most importantly, wait for natural cooling after the wood has completely burned out. In this case, the paint polymerizes correctly.
Why do you need a portal for the stove in the bathhouse?
It performs several functions at once:
- Practical - covers the places where the walls meet the insulation of the fuel channel, preventing drafts and destruction of the masonry.
- Aesthetic – when properly finished, it is a stylish design element that visually decorates the remote firebox and the interior of the room as a whole.
- Protective – absorbs excess heat, preventing the air in the room from overheating, and also prevents accidental touches to the hot metal surfaces of the firebox.
It turns out that both the safety and the duration of the trouble-free functioning of the steam room, and even the general appearance of the room, depend on its presence.
Dimensions
When determining dimensions, it is necessary to comply with safety requirements and evaluate the dimensions of the room and stove. Before building a structure, it is necessary to correctly calculate the dimensions and the project as a whole. Remaking the structure is practically impossible only if you break it down and rebuild a new portal. The size of the future portal and decorative design depend on the scale of the oven.
Important criteria must be taken into account when designing :
- Height and width of the stove;
- Clearance width (when the furnace wall expands and heats up during operation);
- Masonry technique;
- Calculation of the width gap between the masonry and the wall of the bathhouse.
When calculating the number of components for the portal, you need to divide the area of the masonry by the area of one side of the building material (multiply the width of the element by its length). Another 10% of the total amount of laying material is added to this value. This will help to avoid shortcomings in the event of damage and breakage of building fragments.
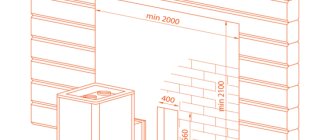
Important! According to SNiP rules, the shortest distance from the stove to the combustible wall material is at least 38 cm. The height is below the top edge of the stove.
The sides can have a size from 30 to 50 cm. It is better to take more than to start a rework later. The height of the portal can be extended to the ceiling, or limited to a comfortable height. The shape of the structure can be either rectangular or square, if the dimensions are greater in height than in width.
Features of the portal for the stove in the bathhouse
During operation, the heating unit becomes hot. The heat released in this way affects both the air and all surfaces of the room. And if the heating of the wooden walls adjacent to the firebox is too strong, they can char, begin to smolder (already at 100°C) or even catch fire (at 300°C).
To prevent a fire, shielding is done - precisely with the help of “gates”, frontal or side, depending on the location of the channel, which in the first case goes into the steam room, in the second - into the adjacent cabin, recreation area or even onto the street.
Properly implemented, the “front entrance” completely and reliably covers all fire hazardous areas in the room, and also protects each wooden element from fire. You can buy it ready-made.
How can I lay out a portal under the stove in a bathhouse?
Suitable materials include:
- brick;
- a natural stone;
- tree;
- metal;
- tile;
- drywall.
Now let's look at the most popular solutions in more detail.
Tree
Both noble and simple breeds are widely used. “Gates” are made from boards, timber, plywood and even from laminated chipboard or MDF boards.
An indisputable advantage is the ability to implement a variety of design solutions. You can imitate dozens of natural structures, cut out sophisticated patterns and detailed images.
The main disadvantage is the deformation of the material over time - to reduce the likelihood of this undesirable effect, experts use one or more of the following solutions:
- pre-dry the wood with special care;
- make concrete or stone inserts, install a heat-reflecting screen;
- use rocks of different hardness (but always with good fire resistance);
- the future “gates” are varnished, and they are covered in several layers;
- glue boards or beams together, but only with a non-water-based composition.
Drywall
It attracts with its light weight (with sufficient strength) and affordable cost, but it must be additionally finished - for the aesthetics of its appearance - for example, painted or plastered. You can also line it with artificial stone - this is also a common decorative solution.
Metal
It serves either as a frame - a supporting structure for less solid materials, or as a decorative element when decorating the stove portal in a bathhouse. With the help of corners and stripes, they decorate the “gate” quite effectively, while at the same time using such practical advantages as resistance to temperature changes and easy cleaning.
True, you need to remember about the strong heating of the same steel or cast iron: if you touch such a shield during the kindling process, you can get a serious burn. Therefore, exclusively sheet “front entrances” are not relevant; combined ones, for example, tiled ones, are much more widely used.
Stone
Its advantage is its solidity and even respectability of appearance: decorate the firebox with it, and the analogy with a classic fireplace will simply suggest itself. Moreover, both natural and artificial varieties are suitable. Among the most popular volcanic and metamorphic options:
- soapstone;
- granite;
- slate;
- coil.
They can be used to make a frame located in close proximity to the door. At some distance from the fire, it is permissible to use sedimentary rocks that do not absorb soot, for example, marble, shell rock, travertine, sandstone.
The material can withstand temperature changes better than plasterboard or wood, but it is also more expensive and weighs more - when choosing, keep in mind that it puts more stress on the supporting elements.
Tile
It attracts with its beauty: it can be with a smooth glossy or embossed coating, with an ornament or pattern of any degree of complexity. It does not absorb soot, is not afraid of moisture, and does not require special care, which is also convenient. True, it can crack when heated, which means it is used only as a cladding, which is laid on a heat-resistant base.
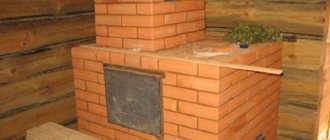
In such a situation, brick looks like a priority choice, so below we will separately and in detail consider what advantages it has and how to make a portal in a bathhouse from it. But first, some more useful information about general actions.
Preparation of tools and materials
An experienced specialist will need:
- cement-sand mixture;
- metal profiles;
- minerite;
- basalt cardboard;
- wood glue;
- self-tapping screws;
- Master OK;
- level-level;
- screwdriver (drill);
- jigsaw;
- clamps.
Construction process
When starting work, the master performs the following actions:
- Cuts a rectangular hole in the wall - in the place where you are going to install the remote firebox and in accordance with the dimensions indicated in the passport of the heating unit (at a distance of 30-100 cm on both sides from the center of the channel).
- Mounts a metal frame made of profiles in the resulting opening, fixing sheets of mineralite on it, filling the gaps with masonry of 2 bricks.
- Places basalt cardboard in the provided gap (for insulation).
To fasten the stone, a cement-sand mixture is used, plywood and drywall are fixed with self-tapping screws, and wooden boards are also fixed with glue. The upper part of the “gate” can be turned into a shelf.
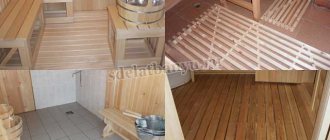
Look at the photos of sauna stoves: portals can be designed in dozens of different options, each more attractive than the other. Charge yourself with an idea and turn it into an easy-to-implement project.
Calculation and dimensions
This is a mandatory step, which allows you to determine the width and height of the frame in relation to the firebox, as well as the consumption of building materials.
Having chosen the appropriate dimensions, it is necessary to find the area of the structure and provide a margin on each side. For example, with a built-in opening of 1.5 x 1.5 m, the “front entrance” should be approximately 0.7 by 0.5 m.
Based on this, it will not be difficult to calculate the number of stones or bricks needed: you just need to divide the area - total and piece - and take an additional 10% of the resulting number.
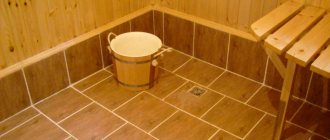
What stages does portal cladding include?
The process of decorating the construction of a stove with your own hands is carried out depending on the chosen facing material. Each sample has its own, let’s look at their description in more detail.
Laying brick, artificial or natural stone products should begin with the preparation of a cement mortar. To prepare the cement-sand mixture, mix dry sand, clay and water in a ratio of 1:2:0.5 in a special container using a trowel or drill with an attachment designed for this.
Step-by-step instructions for laying the furnace portal:
- installation must begin from the lower base of the stove;
- After laying out the first row, use a level to check its evenness. If horizontal or vertical unevenness occurs, the structure may become distorted;
- lay out the second and subsequent rows, taking into account that the seams between the masonry in different rows do not converge in one line;
- clean excess solution from the front side of the oven;
- unstitch the seams, this will give the finish a more neat appearance.
After all the basic work has been completed, you can add suitable decorative elements to the structure.
Technological order of wood cladding:
- cut pieces of predetermined sizes with a jigsaw;
- clean the cut wood with sandpaper;
- pre-paint with a fire-resistant compound, then leave to dry;
- prepare a side heat-reflecting screen made of stainless steel and heat-insulating material, panels;
- attach the boards to the screen using heat-resistant glue and self-tapping screws to insulate the wooden elements.
For lining the stove, heat-resistant gypsum cardboard is used, which can withstand and reflect up to 30 minutes of exposure to fire.
To attach drywall to the wall, a metal frame is erected from profiles and iron corners. After fixing the material to the frame, additional top decor will be required, for example, plaster, putty or painting.
For decoration, it is worth laying only durable, moisture-resistant and heat-resistant tiles, such as porcelain stoneware, terracotta or clinker tiles, and tiles.
The tiles are not attached directly to the stove wall because they cannot allow heat to pass through. As a rule, specialists set requirements to do the following:
- leave gaps and holes on the wall for ventilation;
- cover with fire-resistant material, for example, fire-resistant plasterboard, glass-magnesium sheet or mineralite slabs;
- lay the tiles correctly, and the permissible distance from the wall to the tiles should be at least 15 centimeters.
The measures described above will help to achieve and reliably maintain the aesthetic appeal of your stove and significantly preserve its heat and steam during lighting, as well as prevent fire and moisture penetration into the stove.
Today, in construction stores you can find in stock and purchase any ready-made main entrances from different samples from the manufacturer. The main rule that we recommend remembering when choosing a high-quality stove input is its moisture resistance and fire resistance. In addition, you need to know and follow the recommendations and advice on fire safety when operating electric and conventional sauna stoves.
Step-by-step installation instructions
After calculations and design on paper, the specialized specialist begins the actual work:
- Mix the solution using cement and sand of medium or fine fraction.
- Lays bricks - sequentially, from the base, one level after another.
- Takes into account the ligation of seams when creating rows - they should go like a “ladder”, and not an even vertical line.
- Use jointing when the masonry of the portal for the sauna stove is completed to prevent surface roughness.
Afterwards, you can additionally decorate the “front entrance”, for example, with tiles, but this is not necessary, since if the work is done correctly, it already looks quite aesthetically pleasing.
How to fold a sauna portal
As with any large-scale construction, a preliminary construction plan is required.
To ensure an exact match between the expected and the obtained results, it is necessary to measure all sides and adhere to the planned dimensions when laying the walls.
- Clay - 2 parts.
- Sand - 1 part.
- Water - 0.5 parts.
Construction of walls
Having marked a place for the door, they continue to work, erecting the side parts to the right and left of them. There is nothing complicated here, you need to be careful.
To ensure the quality of the resulting frame, bandage the seams.
Remove excess cement with a trowel so that there are no unnecessary reliefs on the wall.
A hammer is used to level the height of all bricks. Tap each brick so that the walls come out even along the stove.
Decorative completion
On the front side of the stove, where the firebox and woodshed are located, you can lay out various figures. For example, as most people do, line up the front frame with the letter P. You can alternate bricks around the firebox: white with red, yellow with white, etc.
How to Frame
Here you need to remember that it must be reliable and at the same time look beautiful. Theoretically, you can make a wide range of construction and design decisions: give preference to a combination of drywall and tiles, wisely using the advantages of both materials, and play on the solidity of natural stone. The choice of a specific option depends on a combination of the following factors:
- how the walls are finished, how high their fire resistance is;
- how the room is decorated, what design reigns in the interior;
- what budget do you have and how much are you willing to spend on the “gate”;
- do you have construction skills and/or practical experience working with any material;
- what you personally like best and best suits fashion trends.
The classic solution today is finishing the stove portal in a brick bathhouse with tiles. It is not subject to decay or fire, is relatively inexpensive and allows you to bring almost any design idea to life.
Preparation of material
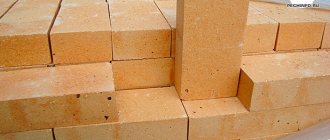
Only large cobblestones are suitable for a closed heater
Not all cobblestones are suitable for a bathhouse. The easiest way to find suitable materials is to go to a specialty store, where they will offer a lot of options to choose from. They are significantly different from stones of natural origin, which not only will not bring benefits, but will also harm your health. The main characteristics by which you need to make a choice are:
- Heat resistance is the ability of a material to withstand high temperatures.
- Heat capacity is the ability of cobblestones to retain heat.
- Environmental friendliness. Many materials can release harmful substances when heated.
- Capacity for thermal expansion. The less the stones expand in volume when heated, the better.
The size of the material is very important. It depends on the type of heating device. Small-sized specimens are suitable for electric stoves, but for wood-burning stoves with an open heater, filler of various sizes is suitable - from 6 to 20 cm in diameter.
Possible difficulties
Fitting and cutting - in practice, these operations take too much time. Therefore, it is easier to calculate the length and height of the “front entrance” in order to use only whole bars, boards and other piece products.
The presence of a door at the firebox can make access difficult. If it is removable, it is better to dismantle it, carry out all the work calmly, and then install it again.
Vertical and horizontal deviations arise not only due to lack of experience, but also due to uneven floors or walls. So it is imperative to carry out constant level checks - it will help to avoid mistakes.
Gate equipment
Another way to combat increased draft, which causes wood to burn out too quickly and not completely, is to install a damper on the chimney.
A damper is a valve that closes the chimney exhaust duct and blocks the draft:
- In the closed position there is practically no draft - almost no air is sucked in through the blower and combustion doors.
- In the fully open position of the gate, the thrust is maximum - this is the kindling mode.
- By partially retracting the damper, you can reduce the draft so that the wood does not burn, but smolders. This way you can steam on one tab longer than usual.
In factory long-burning furnaces, the gate is made rotary. In a summer cottage it is easier to make it movable. To do this, you just need to cut the sheet to size and make a gap in the chimney. You can pull out such a flap by the tongue.
More about protective screens
They are used to protect the surfaces closest to the heating unit from the harmful effects of emitted infrared radiation, reducing the spread of infrared waves.
They are panels, sheet or built (depending on the material used) around the entire perimeter, in a corner or in some part of the room. There can be two types.
Made of metal
They are made of steel or cast iron, fixed around the heating device, with the required clearances. Small distances are necessary to maintain proper air convection. To ensure the possibility of adjustment, they are not fixed rigidly - with bolts on the floor.
There are 2 types of them:
- frontal - exposed to direct infrared radiation coming from the firebox;
- lateral - perceive already reflected infrared waves.
They become even more effective after painting with a fire-resistant composition.
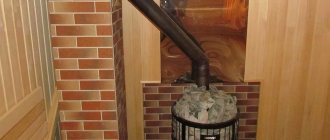
Made of brick
Such protection is laid out after you have equipped the portal for the stove in the bathhouse - in half a brick (fireclay, hollow, fireproof), with technological gaps measuring 6 cm or more and with air ducts in the lower part, located at a distance of over 25 mm from each other.
The erected screen should rise 25-30 cm above the firebox, then it will fully reveal all its advantages, namely:
- stability in conditions of high humidity and temperature;
- low thermal conductivity, and hence the risk of injury - accidental burns are practically excluded;
- transfer of soft heat from the heating unit;
- long-term preservation (accumulation) of heat.
Long-burning potbelly stove
The potbelly stove has become a real symbol of Russia since the times of the Revolution and Civil War.
This is the name given to the simplest iron stove of a cylindrical or cubic shape. Its advantage was that the smoke channel - an ordinary iron pipe - could be taken out anywhere - through a wall or roof, into a window.
Taking the simplicity and practicality of a potbelly stove, you can make a small stove that will embody some simple ideas that significantly increase its efficiency, safety and environmental friendliness.
Basic scheme
The classic potbelly stove has a cylindrical design. However, it is difficult to do this when making it yourself, so you need to take a cube or parallelepiped as a basis.
Contains the following structural elements:
- Firebox. This is the chamber in which fuel combustion occurs, most often wood. The walls and bottom of the firebox must be thick, since they bear the main temperature load. There is a door in the front for storing firewood in the firebox; if desired, it can even be equipped with heat-resistant glass.
- Ash pit (ash pan). The compartment under the firebox is separated from it by a grate. The ash pan is also equipped with a door, only of a smaller size. It is used to remove ash and ash. which fall through the grate from burnt firewood. But this is not the only point of the ash pan - air is sucked in through the ash door and passes through the fuel layer from below, ensuring the best combustion.
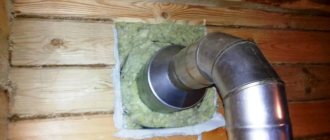
- Smoke channel. To arrange it, a round hole is cut out in the upper part of the stove, a piece of steel pipe is inserted into it and scalded. In the future, you can attach other sections of the pipe here or use a factory sandwich chimney with special locks.
Expert opinion Dmitry Konstantinovich Levin
Some manufacturers of homemade stoves believe that the design with a blower and grate is not suitable for a sauna stove - it creates too much draft, which prevents complete combustion of the wood. Instead, it is proposed to lay the firewood directly on the bottom of the stove, and ensure air flow by drilling several round holes in the lower part of the combustion door and equipping them with a sliding damper.
How to make a door
The door is made of a thick sheet of metal. For fastening, you can use store-bought factory hinges or make your own. To seal the fit, an asbestos thread is used - it is wedged in a groove cut by a grinder.
If there is a suitable sheet of heat-resistant glass, it is inserted as follows: cut a window in the door and grind the cut area. Then they lay the glass, lay asbestos fiber around the perimeter, invisibly from the outside of the part, after which, using small steel tongues, I make tacks on each side.
The turning handle of the latch is easiest to make from the outside.
Homemade secondary gas afterburning system
The main disadvantage of a potbelly stove is its low efficiency. A stream of air passes quickly and strongly through the entire oven, carrying with it not only unburned food, but also heat. As a result, the case does not warm up sufficiently and gives off less heat. To solve this problem, a simple but ingenious modification was invented.
By placing two steel sheets above the firebox, the smoke passage channel can be significantly increased the length of the path that burnt gases travel before exiting through the chimney opening:
- The first horizontal sheet is welded directly above the firebox so that a channel remains for the passage of gases in the rear part of the stove.
- The next sheet is cooked higher, offset so that the passage is now at the front of the oven. It turns out that smoke, gases and heat, once in this labyrinth, snake through it all the way to the chimney. Along the way, they give off all the accumulated heat to the sheets, side walls and top plate of the oven.
If you drill several holes from the bottom from the back and cover them with a screen made of steel sheet, then at the top point, when fresh air, but already heated by the screen wall, meets unburned gases, the process of afterburning secondary gases will take place in the channel, which will lead to a significant increase in efficiency ovens.
Wall decoration
It is a “pie” made of a thermal insulation layer and a metal sheet. The first reflects the received energy and distributes it evenly, the second prevents smoldering and fire.
You can choose one of the following insulation materials:
- basalt cardboard – characterized by excellent insulating properties, including noise absorption, and is not subject to rotting;
- mineral wool – non-flammable, resistant to stable exposure even to very high temperatures;
- BSTV (bazvata) is environmentally friendly, but hygroscopic.
Facing cladding
It is attached with a binding solution to a heat-insulating base - for the decoration of the “gate”. Look at the photos of the portals of sauna stoves designed in this way - they look very impressive.
The following materials are in demand for decoration:
- tile terracotta - made of baked clay, durable, wear-resistant, resistant to mechanical stress, with the possibility of painting and glazing;
- clinker - similar to the previous one, only of a different shape (resembles a brick);
- tile - with a decorative surface covered with patterns, prints, ornaments of any complexity;
- porcelain stoneware - with a chic texture that imitates noble stone, non-flammable, effectively resisting abrasion;
- soapstone - with special resistance to impacts, environmentally friendly, interesting gray-green shade.
Recommendations for performing the work
- The creation of a furnace portal must be approached after careful preparation.
- Correct preliminary calculations will help achieve the desired result.
- In order not to complicate the work with alternating layouts, make a wall entirely of white brick, which is very easy to decorate using paint.
- If you do not have masonry skills, it is better to entrust the work to a professional.
But despite the simplicity of this device, the brick portal is the main element of decoration in the bathhouse. Nothing will decorate it better than a self-made portal, a photo of which you will be proud to show to your friends and acquaintances.
More about firebox rules
For your own safety, as well as for long-term, normal and problem-free operation of the heating unit and “gate”, adhere to the following recommendations:
- Splash water onto the stones carefully, without flooding them, in small portions - 50-100 ml, gradually reducing this volume.
- Use a fan to wet as much of the area as possible.
- Try to direct the liquid between the stones to obtain the hottest and dryest steam possible.
- Follow the sounds - when you hear the water hissing, you will understand that the temperature in the room is dropping.
- Pay attention to the color of the soaked stones - if they acquire a crimson glow, it means you are steaming correctly.
Rules for heating a bath
The bathhouse is ready when the water immediately evaporates when it hits the heater.
The tactics for heating a bathhouse are constantly being improved, taking into account the experience of generations. Rules for preparing and heating the room:
- the room is put in order, the floors are washed, the leaves left over from the brooms are swept away;
- garbage is carefully swept away in the immediate vicinity of the stove;
- before heating the stove, the room is ventilated for about 30 minutes;
- using a scoop, the ash chamber and grate are cleared;
- the stove is inspected for damage;
- the open heater is rinsed;
- tanks are filled with water;
- traction is checked;
- using kindling from natural materials, the stove is lit;
- Firewood is added as it burns.
A heated heater is characterized by instant evaporation of splashed water. When you first apply water, a layer of ash flies off, so it’s better to turn away. Having finished heating the bathhouse, close the windows and ventilation, pour a ladle of warm water onto the heater and prepare for the bathing procedures.
Common mistakes and recommendations
Choosing insufficiently high-quality materials and trying to save on resources are the most common causes of breakdowns, malfunctions and fires. In relation to the bathhouse, such negligence is unacceptable. An equally popular mistake is failure to maintain the distance even between the brick screen for the sauna stove and the walls. There are enough ways to competently minimize indents and gaps for this, so you should not allow errors in centimeters. Also, you should not make the decorative side the dominant criterion for choosing protective equipment and structures.
Fire protection system in the partition
To achieve maximum heating efficiency in a bathhouse, it is advisable to place the stove in a partition. In this case, it will heat the partition, and not the outer wall or corner, which is much more rational and profitable, since firewood or gas will be well saved.
The partition in the bathhouse near the stove should be well protected. All the same methods are suitable for this as for the usual placement of the furnace. You can use all the techniques described above (brick, tile, metal) both for the outer wall and for the partition.
A brick partition in a bathhouse near the stove will be the most convenient option. It should be noted that brick partitions are often found in wooden bathhouses. Basically, they are made there for design reasons because of the beautiful facing bricks, but the option with a stove is much more functional.
The result is a highly efficient bathhouse for heating; the partition-stove in it is located in the center of the building and does not lose heat. In this case, the portal around the furnace is made lighter. For its construction, it is appropriate to use the same brick as for the rest of the partition. In this case, you will not need to purchase additional materials. If the design requires it, you can use any other option.
Fire safety requirements
When installing any sauna stove, it is necessary to strictly comply with fire safety requirements, since the walls of the device heat up to fairly high temperatures during its operation. In order to ensure maximum safety and not have problems with regulatory organizations, it is recommended to install the stove in accordance with the provisions prescribed in SNiP 41-01-2003 (Chapter 6.6).
- The first thing that needs to be done is to equip a reliable foundation for the main structure of the stove, which will be adjacent to the wall dividing the room. The foundation should be covered with heat-resistant material and then with metal sheet. Asbestos sheets were previously used as heat-resistant insulation. Today on sale you can find panels of pressed mineral wool, which is less dangerous from an environmental point of view, sheets of foam glass or EZHKAKH (heat-resistant structural mica plastic).
- It is also necessary to provide a metal flooring in front of the combustion door, which will prevent the wooden floor from catching fire and simplify debris removal. The size of the pre-furnace sheet must be at least 400×800 mm.
- If the partition between the steam room and the dressing room is wooden, then the opening through which the fuel channel will pass must be separated from the wood by brick or stone masonry. The distance between the stove and wooden walls should be 400÷450 mm.
In the version shown, the owner chose to fill the opening with bricks
- Provided that an opening is installed along the end part of the wall through which the combustion channel will pass, a gasket made of heat-insulating material (mineral basalt wool or cement-fiber sheet) with a thickness of 40÷50 mm, the distance between the part of the wall built from combustible material and the outer wall oven can be reduced to 250 mm. If thicker thermal insulation material is installed, the safe distance can be 125 mm.
- The distance between the ceiling of the bathhouse and the surface of the stove should not be less than 1200 mm.
- The distance from the edge of the combustion door to the nearest door must be at least 1250 mm.
- If you purchased a non-factory-made stove, or the device is independently made from sheet metal, then it is best to cover it with brick. Thus, it is possible to protect the structure of the bathhouse from fire, and people taking water procedures from burns. Factory products, as a rule, are made with double walls, between which thermal insulation material is laid or convection channels pass through.