Chimney lining is carried out in cases where the previously built brick chimney of a stove or fireplace began to lose its throughput, often becoming clogged with combustion products. At the same time, the draft is significantly reduced, due to which smoke periodically fills the rooms of the house, and the heating efficiency sharply decreases.
Chimney lining
There are several ways to solve this problem. But one of the most effective is to “ennoble” the internal surfaces of the brick walls of the chimney shaft with special liners. These sleeves have smooth internal surfaces, so that smoke does not encounter obstacles and does not linger in the channels. It smoothly “slides” along the smooth walls, coming out, while leaving virtually no fuel combustion products on the surface of the liner.
Silicone sealants for structures made of stainless steel, glass and other materials
When wondering how to seal a chimney made of stainless steel, glass, plastic or ceramics, you should pay attention to fireproof silicone.
This material promotes close contact of structural parts with each other and reliable insulation. The main advantages of the silicone composition:
- thanks to elasticity, the quality of contact is maintained for a long time, even when, due to high temperatures, structural elements are deformed and change position relative to each other;
- after completion of the polymerization process, the material becomes very durable;
- silicone is absolutely waterproof;
- the material has a high degree of resistance to ultraviolet radiation and other weather conditions;
- Silicone is characterized by high thermal and heat resistance.
Silicone sealants come in two types:
- Acidic. They release acetic acid during hardening, which can damage the pipe or roofing. Such a remedy will definitely not help in solving the problem than sealing a chimney made of stainless steel or a material of natural origin: cement, stone or concrete, as it can contribute to the formation of corrosion of metal elements, destruction of the areas of the pipe and roof in contact with it.
- Neutral insulation products, unlike acidic ones, release water and alcohols into the environment when they harden. This is a suitable sealant for stainless steel chimneys.
An additional advantage of silicone-based products is that as a result of heating, the iron oxide contained in it turns brown, which makes the insulation more invisible against the background of a roof or brickwork.
How is this useful?
Advantages of the brick chimney lining method:
- in most cases there is no need for dismantling;
- the sleeve is easily replaced with a new one; in comparison, reinstalling a brick structure is more difficult;
- the work does not take much time;
- the walls of the smoke exhaust shaft are reliably protected from gases and condensate;
- thanks to the smooth internal surfaces of the sleeve, cleaning can be done less frequently;
- provides a long period of operation.
Chimney lining process
You can update the chimney using the liner method.
The procedure involves choosing a liner based on material, type of section and cross-sectional area. An insert is placed in the chimney along the entire vertical section of the outlet channel.
The problem with the destruction of internal surfaces is solved by two methods:
- dismantling the old pipe and laying a new one;
- lining of a brick chimney.
The first option is labor-intensive and requires certain costs. Requires disassembly, purchase of materials, payment for the work of a mason. They refuse to replace the furnace structure and make inserts into the existing pipe.
The essence of the process and the need
Over time, soot accumulates on the inner walls of a brick chimney, as a result the passage narrows and draft deteriorates. The rough surface is affected by temperature changes, condensation and aggressive smoke components. Insufficient removal of combustion products disrupts the operation of the heating system, causing the draft to stall.
Lining means installing a pipe into an existing chimney. Stove makers advise performing the operation during the construction phase of a fireplace or stove. The home is constantly heated, the inner surface of the masonry is destroyed and over time, installing a liner becomes necessary.
How is it useful?
Ceramic pipes have smooth walls on which soot does not settle
Smoke from the boiler firebox passes inside the liner and does not come into contact with the rough plane of the brick. The insert can be installed without waiting for damage and destruction of the smoke exhaust channel. Gas condensate in the pipe is an aggressive composition of moisture and chemical oxides.
When wood and coal burn in the firebox, vapors and carbon dioxide are formed, moisture is released from the firewood and exits with the air through the chimney. The difference between the external and internal temperatures in the pipe leads to the formation of drops and their settling on the walls. Soot is oxides of sulfur and nitrogen that interact with moisture and destroy the surface.
In what cases is this necessary?
Lining is an alternative to reconstructing a chimney to restore efficiency. The procedure is relevant if there is no possibility of rebuilding the pipe or installing a new one. Lining is only possible in chimneys with low temperatures of exhaust gases and in high heating systems.
A chimney is an engineering structure; the safety of a home in terms of fires depends on its quality. Sometimes the pipe is made of hollow stones or there is dried mortar and fittings left inside on the walls.
Is there a need for a sleeve?
It is better to install the sleeve during the construction phase of the building. The insert is bricked up as the shaft is laid out from brick. If you didn’t do this initially, you will have to return to the process over time. Cladding a completed house is more difficult. We will have to partially destroy the masonry, break the decorative cladding and restore everything again.
The urgent need for lining brick chimneys is caused by the following reasons:
- Initially, the combustion product removal system was designed and built with errors;
- constant use of a fireplace or stove connected to a brick chimney is assumed;
- long channel length;
- if according to the project the mine should be lined, but this was not done;
- the shaft passes through a cold attic and due to the temperature difference, condensation forms;
- the chimney is made of brick inside the outer wall of the building;
- condensation streaks appear from the seams of the brickwork of the shaft;
- depressurization of the smoke channel;
- the shaft quickly becomes clogged with soot and requires frequent cleaning;
- The smoke exhaust passages were laid not by professional stove makers, but by inexperienced masons.
In all other cases, the owner performs the sleeve at his own request.
Chimney liner
Lining a chimney is the introduction of a steel or ceramic pipe assembled from separate segments into an old brick duct. Let's consider the main advantages of such a reconstruction:
- an increase in the thrust indicator due to the fact that the sleeve, as a rule, has a round shape. This form is most suitable for high-quality removal of combustion products;
- smooth inner walls of pipes installed as a sleeve eliminate the possibility of rapid clogging of the channel with soot;
- Heat losses in this design are minimized.
For brick chimneys, a liner is used - installation of a steel channel inside the structure
Before reconstructing the smoke exhaust duct using a sleeve, it is recommended to carry out preparatory work. Preparation for the reconstruction of a brick chimney is carried out in the following order: first, the reliability of the brickwork and the permeability of the internal channel are checked. Next, in accordance with the size of the internal channel, the cross-section of the pipes that will act as a sleeve is selected.
After completing the preparatory work, the chimney is lined directly. Let's look at this process step by step:
- First of all, you need to climb onto the roof and dismantle the brickwork. This is a necessary event that allows you to free up the channel for mounting the sleeve.
- At the second stage, the sleeve is installed. In most cases, this process is carried out from the top of the old chimney to the bottom. First, the lower part of the sleeve is fixed to the ropes and immersed to the required level in the brick channel. Then the next module is inserted into the first segment, etc. At the joining points of individual segments of the sleeve, it is necessary to disassemble the brickwork in order to make a reliable connection of the pipes.
- Next, the free space between the inner wall of the brick channel and the outer wall of the sleeve is filled with a suitable thermal insulation material.
- After placing the thermal insulation, a protective cap is placed on the end of the sleeve. It is necessary to protect the new smoke exhaust duct from precipitation and debris.
- At the end, the brickwork is sealed, which was dismantled to join the structural elements of the sleeve.
There must be free space between the sleeve and the brick walls, which is filled with insulating material
The essence of the sleeve and its advantages
Before you rush to reconstruct a chimney, you need to understand what lining is, as well as find out the advantages of the process.
Most chimneys have a rectangular channel cross-section. For masonry, ordinary red or decorative bricks are used. Over time, large soot build-ups appear inside the channels, efficiency decreases, and traction completely disappears. The problem lies precisely in the shape of the section, as well as the rough surface of the brick.
Round and oval canals have smooth inner walls. Soot does not cling to the walls.
In order not to build a new chimney, they came up with lining. The procedure involves inserting a pipe inside the channel without destroying the brickwork. The best option is a stainless steel sleeve, but ceramics, asbestos or polymer can be used.
Benefits of lining the chimney duct:
- traction is enhanced due to the smooth surface of the sleeve;
- heat losses are reduced, efficiency increases;
- no turbulence occurs inside the round channel;
- the service life of the channels increases due to the resistance of the sleeve to condensate;
- the tightness of the chimney improves.
The sleeve insert forms a new channel for the removal of combustion products, and the brickwork acts as a casing.
Smoke duct lining
Chimney lining or lining is a universal method for reconstructing smoke exhaust and ventilation ducts, which involves the use of special fire-resistant compounds. The most popular means used for the reconstruction of chimney ducts are:
- Mordax;
- Mosan.
The main element that is part of the first product is granite chips. This product is produced in Finland, so it has good quality characteristics. To obtain the necessary solution that will allow you to repair a chimney made of brick, this product is mixed with lime, as well as cement mortar and water. Mosan is a domestic analogue of Mordax, which is made on the basis of perlite.
Both of the above products are distinguished by the fact that they easily adhere to brick and concrete materials. The main advantage of this reconstruction method is that it is done without dismantling the brickwork. After reconstruction, the walls of the internal chimney channel become smooth. Thus, the traction in the system increases and its cleaning is simplified.
As a rule, lining is done very quickly. The entire reconstruction process takes no more than 3–4 hours. Let's consider the order of work during the lining:
- First of all, it is necessary to clean the internal channel of the old brick chimney, removing all soot and other foreign elements from it.
- Next, the canal is moistened.
- At the third stage, a blowing tool (brush) is immersed in the channel, which sprays the composition onto the inner walls of the channel.
- Spraying the mixture is repeated 3 times. Each of the previous layers must dry before applying the next one.
System calculation rules
The purpose of their implementation is to select the optimal height and cross-section of the gas exhaust channel to ensure effective traction. The last characteristic is very important. If possible, it is best to have professional calculations done. If not, you can use averages. There are three main sizes that are widely used:
- Six. This is a square-shaped pipe having a row of six blocks. The dimensions of the internal channel are 250x250 mm. Used for Russian stoves and fireplaces, where minimal resistance to the flow of heated gases is required.
- Five. The chimney with a rectangular cross-section is formed by five elements. Section 125x250 mm. It is used for heating and cooking-heating devices.
- Four. A structure made of four bricks in a row. Size - 125x125 mm. Installed for low-power solid fuel boilers and kitchen stoves.
When choosing the height of a future structure, the following standards should be taken into account:
- If the roof covering is fire hazardous, the structure is placed at least 150 cm above it. For non-flammable materials, this value is 50 cm.
- The minimum distance between the grate head and the grate is 500 cm.
- When constructing a chimney on a ridge or at a distance of no more than 150 cm from it, the height of the part is 50 cm above the roof level.
- When installing a structure at a distance of 150 to 300 cm from the ridge part, its length is equal to the height of the ridge.
- If the structure is further than 300 cm from the ridge, it is allowed to be built below it. But the line drawn conditionally through the ridge and deflector should have a slope of 10°.
Correct order of work
This type of work such as lining a brick chimney does not fall into the category of complex activities. It is used to restore high-quality smoke removal when the owner of the house does not have the opportunity to completely redo the chimney duct.
Sleeving is performed in one of two ways:
- a steel liner for the chimney is installed;
- The FuranFlex system is used, but it can only be used for gas heating appliances with low combustion product outlet temperatures.
Before lining a brick chimney, a number of preparatory measures should be carried out:
- it is necessary to identify existing damage, including on the brickwork, and check the entire structure for strength;
- Next, you need to examine the tightness and integrity of the chimney system, and also find out the degree of clogging;
- in addition, you need to check the cross-section of the pipe and make sure there are no obstacles throughout the entire channel;
- after this, it is necessary to determine what cross-section the pipe has and its compatibility with the intended sleeve in order to prevent narrowing of the chimney;
- before installation work, you need to understand the design of the future sleeve;
- At the end of the preparatory stage, free access to the work sites is ensured.
The rules for performing pipe and stove work, dated 2006, state that it is advisable to install chimney pipes near partition structures and near internal walls that are built from fireproof materials. When there are no walls or partitions, mounted pipes are used.
The pipes are laid in the following order:
- the channel wall made of bricks is dismantled in the place where the heat generator is planned to be installed (the size of the disassembled surface is equal to the length of the elements that ensure condensate collection), a hatch is installed for cleaning the smoke exhaust pipe;
- the specified elements are fastened in the channel;
- ropes of the required length and sufficient strength are mounted to a straight section of pipe with hooks;
- the inserted pipe is placed in a brick smoke exhaust duct at a height that makes it possible to insert the next nozzle (read: “Do-it-yourself brick chimney”);
- gradually lowering the rope, the remaining pipes are attached until the channel is completely passed;
- the voids between the pipes and the walls of the brick channel are filled with non-flammable material that provides thermal insulation;
- a pipe is mounted on the head of the channel, onto which an umbrella is attached to the chimney pipe to protect it from precipitation;
- the disassembled chimney opening is filled with bricks.
Stage 3. Head construction
After the main installation work on lining the chimney with your own hands, we proceed to the design of the mouth of the lined chimney. This process requires adherence to the following rules:
- The sleeve/case insert must rise above the smoke shaft;
- A cover plate should be installed around the sleeve that protrudes (if there is none, a tile is made of metal or of cement-sand mortar with a slope away from the pipe itself);
- It is necessary to install a cuff near the pipe to prevent moisture from getting between the pipe and the shaft. Or arrange a mortar ledge with a gap for expansions;
- The direction of the pipe mouth is vertical, cut is horizontal;
- The protruding part above the roof and in the attic must be thermally insulated;
- It is advisable to install an umbrella that will prevent precipitation from entering the pipe (which is especially important when the condensate drain is not connected to the sewer);
- To increase the height of the pipe and further design it, it is better to use sandwich pipes with factory-made parts;
- Thermal insulation of sleeves should not be carried out with bulk materials, this is not permissible;
- To make ventilation channels, a cuff with a cone is used, or vents are made in the surfaces of the shaft (side), below the cover plate.
Features of installation of liners made of different materials
In modern construction, stainless steel, ceramics or a polymer sleeve are used to reconstruct the chimney. Ceramic liner and polymer are difficult to install. Most often, when lining chimneys with your own hands, stainless steel is used.
Preparatory work
Regardless of the type of liner chosen, a number of preparatory measures are performed before starting liner:
- Using a powerful flashlight, they inspect the smoke shaft from the inside. The degree of destruction, soot contamination, the presence of fallen pieces of mortar, bricks, and bird nests are determined.
- Use metal scrapers, brushes and other devices to clean the chimney. Bricks protruding from the masonry will prevent insertion of the liner. They try to knock down all the protrusions with a hammer or pry bar.
- Measure the length as well as the diameter of the chimney. The dimensions are transferred to the diagram, indicating all rotations and degrees of angles.
- The part of the chimney adjacent to the boiler or stove is dismantled. The installation of the shaped element will begin from this place.
- The bottom of the smoke shaft is cleared of debris and leveled if necessary.
After the preparatory measures have been carried out, the inserts necessary for the sleeve are purchased.
Installation of a stainless steel liner of round, rectangular or oval cross-section
Sleeving a small shaft with stainless steel without turning is carried out according to the following principle:
- All elements of the sleeve are assembled into one structure. The joints are treated with heat-resistant sealant, and the top is wrapped with aluminum-based adhesive tape.
- Two belts, cables or strong rope are secured to the bottom of the pipe with a clamp.
- The sleeve is carefully lowered down the shaft until it touches the bottom. If the length of the chimney is short, a lightweight stainless steel pipe is immersed by hand without using cables.
- The liner from below is connected to the inlet of the boiler or furnace and a condensate collector is installed. The sleeve is removed from the street above the brickwork of the chimney, and a protective cap is put on top.
Stainless steel lining of a long chimney with turns is carried out differently:
- The smoke duct is dismantled at the entrance to the boiler, as well as all areas where shaped connectors will be installed.
- First, the lower part of the sleeve is assembled from flat sections of the pipe up to the first shaped connector. The liner is lowered to the bottom of the shaft, connected to the inlet of the boiler or furnace, and a condensate collector is installed below.
- A shaped connector is installed on the second free end of the steel sleeve. A flat section of stainless steel is connected to it until the next turn of the shaft. The procedure is repeated until the sleeve is removed from the shaft.
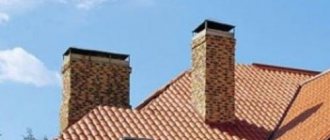
Features and design of the chimney
The design of a brick chimney coming from a fireplace, stove, solid fuel and gas boiler is a shaft that forms a straight channel or a channel with turns. The upper part of the structure is raised above the roof, and a protective cap is placed on top.
Principle of operation
When the boiler is burning, the temperature at the bottom of the duct is higher than at the outlet. Due to the difference, a pressure difference is formed. The higher this indicator, the better the traction. Combustion products are freely discharged to the street, and oxygen enters the firebox to support combustion.
Approximate cost of work
The cost of rehabilitation depends on the materials and design of the future chimney liner. For installation of a 1 m long liner you will have to pay approximately 2.5 thousand rubles. After measuring the length of the shaft and multiplying the results by the cost of the selected liner, you can roughly calculate the cost of rehabilitation.
We hope that the information provided will help you choose the appropriate sleeve method and complete all the work yourself. We invite you to subscribe to other useful articles. Share information on social networks. Maybe some person is similarly looking for ways to solve a similar problem.
Methods for lining smoke exhaust ducts
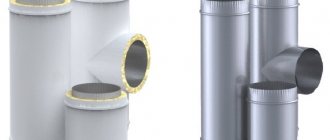
The sleeve is a cylinder of a certain cross-section, made of fire-resistant material, which can be assembled into a pipe of any length.
Lining a brick chimney can be done in three ways, which differ from each other in the materials used, cost, and some installation features.
- Lining of smoke exhaust channels with polymer liners. A special pipe made of fiberglass-reinforced polymer is inserted into the chimney, which, when heated, becomes flexible and fills the smoke exhaust paths, no matter how tortuous they may be. After the polymer hardens, the inside of the chimney is a smooth pipe with a wall thickness of about 2 mm. But there are serious temperature restrictions in the use of this material: It can withstand temperatures up to 250C⁰, so it can be used to remove combustible gases only from boilers with liquid or gas fuel.
- Chimney lining using steel modules. Lining the canal using this method does not require its destruction. This material is durable and relatively inexpensive. One of the biggest advantages of using steel modules is the ease of execution. This material can be used for the reconstruction of smoke exhaust systems, heating and cooking stoves, heaters and fireplaces operating on any type of fuel. But there is also a drawback: in this way it is impossible to line winding smoke exhaust channels.
- The chimney liner is a corrugated stainless pipe. This material can be used for furnaces with a low temperature of combustion products, since this pipe has rather thin walls and will quickly burn out at high temperatures. In addition, soot will definitely be deposited on the inner surface. Due to the ribbing, corrugated surface.
Based on the above, it is not recommended to use a corrugated stainless pipe for lining the chimney of a bathhouse.
Advantages of a steel chimney pipe
Chimney pipes are made of metal, ceramics and brick. Metal pipes are currently in greatest demand. Of all the varieties of this material, it is recommended to choose steel. Steel pipes for chimneys are coated with special solutions that make the material resistant to all adverse effects of the internal environment of the chimney.
When choosing a pipe, it is necessary to take into account the parameters of the heating devices and the fuel used. The material from which the pipes are made must withstand higher temperatures than the fuel can create.
When using some types of heating devices, chemically active substances are found among the under-oxidized combustion products. They can damage a chimney that is not sufficiently resistant to chemicals. Some unburned particles can ignite, creating sparks. Therefore, the material from which the pipe is made must be fireproof.
The advantages of steel pipes are:
- Easy to install. Steel pipes do not require the installation of a special foundation; they do not require complex engineering solutions or special installation tools. You can install them yourself without prior preparation. Due to the plasticity of the material, complex technical structures can be created.
- Light weight. They are easy to transport, you can lift and move them yourself without a team of workers, which also simplifies installation.
- High temperature resistance. Steel products are suitable for appliances operating on any fuel. They do not melt at maximum temperature loads.
- Chemical inertness. Steel does not interact with chemical reagents that can form as under-oxidized combustion products. These substances are not capable of destroying it.
- Corrosion resistance. This advantage applies to pipes that have a special coating and stainless steel. The material itself quickly corrodes. It is worth considering that in addition to the internal environment, the chimney pipe is affected by external unfavorable factors, for example, precipitation. Preference should be given to coated pipes.
- Smooth inner walls. Combustion products settle on the rough surface, turning into soot, which gradually reduces the clearance. This reduces the draft in the chimney. Steel is completely smooth, the risk of soot settling on their surface is minimal.
Requirements for the exhaust duct
Good traction is maintained due to the tightness of the structure, as well as the condition of low soot accumulation and condensation formation. These parameters are the basic requirement for all chimneys. It is important to correctly calculate the cross-section so that there is no smoke inside the room.
Types of chimney liners
In most cases, round pipes are used. They differ in size and type of material. Possible design options for the future chimney liner:
- polymer inserts;
- steel products;
- corrugated pipes;
- asbestos-cement;
- ceramic.
The first of the varieties is characterized by plasticity, this property is more pronounced when heated. As chimney communications, such pipes are used only with reinforcement in the form of a fiberglass layer. Thanks to plasticity, all small irregularities on the inner surface of the brick structure are filled. The thickness of the polymer liners is 2 mm.
Disadvantages include temperature restrictions. Thus, it is not recommended to expose sleeves made of polymer material to gaseous substances whose temperature exceeds +250°C. This means that it is preferable to install them in facilities where a heating system operates on gas or liquid fuel.
Steel products are used in most cases. Their popularity is due to ease of installation and reasonable cost. To install such liners, it is not necessary to disassemble the chimney. The advantage of steel products is strength, resistance to negative external factors and high temperatures. In addition, installation does not require experience; you can do the work yourself.
Steel products can be installed in chimneys that remove combustion products of all types of fuel. Often sleeves of this group are used to reconstruct the smoke exhaust system. They are installed in fireplaces and stoves. The disadvantage of this method is the difficulty of lining sections of a chimney of non-standard configuration. Steel pipes are not flexible, so if such a need arises, a section of the chimney of the required length with the required number of bends is formed.
Corrugated pipes are made of stainless steel. They are easy to install and can be used in areas with complex configurations. However, corrugated communications cannot withstand high temperatures. This is due to the fact that their walls are too thin. When exposed to extreme temperatures, they can burn out. For example, such pipes are not installed in a bathhouse.
Asbestos-cement communications are inconvenient to install and are quite fragile. However, they are offered at a reasonable price. Such products cannot be used in facilities where temperatures reach +300°C. Due to the roughness of the internal walls, asbestos-cement channels will have to be cleaned frequently.
Ceramic pipes are characterized by long-term operation and reliability. They are characterized by smooth internal surfaces, which does not allow soot to linger on the walls. Pipes of this type are offered at a high price and are characterized by heavy weight. Sometimes it is necessary to partially dismantle the structure, which will allow the installation of such sleeves.
Service price
The cost is calculated individually based on the length of the pipe and the type of material used to make the inner liner.
By consulting with our specialists, you can find out how much cladding will cost for your home. You can be sure that it will cost much less than installing a new pipe. The ideal condition of the smoke exhaust channels is not only a mandatory requirement that must be met for the legal operation of heating equipment. This is a matter of safety for people in the premises. According to statistics, carbon monoxide poisoning occurs quite often during the heating season. This substance has no odor, so people do not notice the problem and quite often end up in the hospital in serious condition. If there are children in the house, then poor draft in the chimney can be fatal.
Specialists from Ventgazservice LLC will restore the patency of smoke channels using special inserts. This will provide good traction and prevent the rapid accumulation of soot. Our priorities are compliance with industry standards and safety.
Polymer sleeve
Lining a chimney with polymer pipes is a relatively recent technology that appeared just a few years ago. Many are still wary of this method, fearing problems with operation and with the use of polymer in general. But, surprisingly, the material is quite resistant to temperature changes.
Polymer sleeve
Preliminary work before installation is no different from previous types of “liner”; you need to inspect the chimney and correct all the shortcomings. Further, the installation process with a polymer sleeve includes several main steps:
- A “sleeve” of appropriate length and dimensions is placed inside the channel.
- The second stage involves pumping compressed air inside.
- The third stage is similar to the second, but instead of air, the sleeve is filled with steam.
Thus, in the first case, the sleeve is leveled, and with the help of steam, the seams and cracks are sealed, that is, the walls are perfectly smooth and airtight. Please take into account the fact that it is impossible to install such a chimney yourself; you need to use special equipment. So, when choosing this method, remember that it is more expensive and requires not only special skills, but also equipment. However, all costs are ultimately recovered.
Key mistakes when lining
The main mistakes include:
- Partial liner (not along the full length of the shaft).
- Using a knee instead of a special support element.
- Crumpling of the edges of pipes (if we are talking about stainless steel) during transportation, connection (of segments to each other) or lowering into the shaft.
- Jerks of the cable when lowering the sleeve.
- Narrowing of diameter.
- Too sharp turns (if we are talking about a polymer liner).
- Use of bulk thermal insulation (between the sleeve and the brick shaft).
- The absence of a U-shaped water seal - if the condensate is discharged directly through the hose into the sewer.
Please note: every mistake is quite serious. If you allow them, you can complicate your task in the future (if you need to replace the liner), or worsen the operation of the boiler.
What is a spark arrester, why is it needed on a chimney, and how to make it?
How effective is a Chimney Sweep log for cleaning a chimney?
Related Posts
What are the reconstruction methods?
There are two ways out of this situation:
- Reworking the chimney shaft.
- Lining (sleeve, insert) of the smoke exhaust channel.
Let's consider each option separately.
Relaying a smoke exhaust pipe involves significant financial investments: dismantling or disassembling the channel, purchasing new material, delivering it to the reconstruction site, loading and unloading work and paying for the services of a good stove-maker.
Believe me, the amount is very significant. An additional disadvantage is that the premises where such work is carried out will not be usable for some time.
Option two: reconstruction of the chimney using the lining method.
In simple terms, lining is the insertion of a piece of new pipe into the smoke exhaust ducts. This is permitted by the rules for installing chimneys.
Nuances and requirements for lining the chimney of a gas boiler
Before lining, you need to clean the brick chimney from soot.
A chimney lining is a necessary solution if the pipe is made of brick. The presence of the insert does not protect against the appearance of condensation drops, but with the help of the lining it is possible to ensure organized moisture removal.
Before lining a brick pipe, you need to prepare:
- inspection of the chimney outlet;
- checking the section shape;
- identifying the degree of contamination;
- pipe cleaning;
- checking for tightness and functionality.
The cross-section is most often represented by a rectangle with dimensions of 14 x 27 cm; before installation, the dimensions of the sleeve, its length and shape are determined. Attention is paid to the cross-sectional area, because the insert in the channel narrows the outlet.
Types of lining
Sandwich pipe lining
The principle of behavior of lined liners and their placement in the channel is the same, but the liners differ in material, so there are certain nuances for each type.
Specialized stores offer inserts:
- made of polymers;
- of steel;
- from corrugated pipe;
- polymer sleeve;
- made of stainless steel.
Polymer sleeves
A plastic pipe is installed inside the operated chimney. PVC products are reinforced with fiberglass fabric and, when heated, acquire plasticity. As a result of this property, irregularities and spaces on the clinker surface are filled. After hardening, the internal area becomes smooth, and the wall has a thickness of 2 cm.
The downside of the application is the temperature limitation. Lining a chimney made of brick with plastic is done with exhaust flows up to +250°C, so they are installed to work with low-power units.
Application of steel elements
Corrugated pipe lining
A structure made of a rolled pipe is placed in the straight section of the chimney, or rectangular, square, oval and round shapes are made with your own hands. Sheets are taken with a thickness of 0.5 to 1.5 mm. In channels made of steel materials, it is possible to provide the required modules for cleaning, inspection, and containers for accumulating condensate in accordance with the standards.
Steel products are used for fireplaces using various types of fuel. The material resists acids and is not subject to plaque deposits. The disadvantage is that only straight sections can be lined with this method; winding pipelines cannot be equipped.
Using corrugated pipe
Manufactured using various types of stainless steel, the pipe shells are made of two layers. The positive thing is that flexible liners are used for complex channels with turns. The products do not require connecting elements. Double-layer inserts significantly reduce the diameter of the air duct; this must be remembered when choosing.
Polymer sleeve
Polymer sleeve for chimney lining
The sleeve is made of copolymer resin and reinforced with fiberglass. The insert is used to combat condensate drops; it is used to treat low-temperature chimneys and those coming from powerful boilers.
Types of polymer products:
- Fitfire is a liner containing two layers, the maximum element has a length of 60 m. After installation, the chimney duct has a diameter of 80 - 500 mm. The manufacturer specifies a service life of 50 years; the hose is used to remove low-heat gases.
- Fitfire HT 1000 is used in pipelines of sauna and fireplace hearths with high smoke heating. The sleeve consists of three layers, the middle one is a reinforcing mesh.
When lining the chimney with a polymer sleeve, the internal protection is obtained without seams, with a smooth surface.
Stainless steel pipe
The material is one of the most popular types. The products work for many years and do not deform due to high temperatures or corrosion. Lining a brick chimney with a stainless pipe is often used because... There is a large assortment of ready-made inserts for sale, sometimes products are made by hand, taking into account the dimensions.
The inserts are made from stainless steel sheets with a thickness of 0.8 - 1.5 mm. To connect and turn the channel, standard tees and pipes are used, but to install them you need to know the exact layout of the chimneys. Sleeves with a rectangular cross-section are installed only on straight sections of chimneys.
Types of liners used
The principle of placing sleeves in the chimney is the same. But the liners themselves may differ in the material they are made of, so the installation process of each type has its own nuances. Today, specialized stores offer sleeves made of stainless steel, special heat-resistant polymers, asbestos cement, and ceramics.
Stainless steel sleeves
Sleeves made of stainless steel have very good durability, as they are highly resistant to high temperatures and the corrosive effects of combustion products and condensate. A wide range of liners made from this material is designed for chimneys of various configurations, lengths and cross-sections - you can choose the right model for specific initial conditions.
Round stainless steel pipe for lining a chimney.
- Round pipes with a diameter of 60 to 1000 mm, made of sheet metal. The thickness of the steel from which the products are made can vary within 0.5÷1.5 mm. For complex shapes of chimney channels that have turns located at different angles, manufacturers have provided the necessary transition parts, which are selected individually in each specific case. However, to select them, you should know in advance the exact detailed diagram of the chimney system.
Rectangular liners
- Inserts with a square or rectangular section are rarely used, since they are very inconvenient to work with. They are only suitable for chimneys or ventilation ducts that have a smooth channel without changing direction. The most common size of rectangular liners is 140x270 mm.
Sleeves with a cross-section in the shape of an ellipse
- Stainless steel liners with an elliptical cross-section are often used for chimneys with a rectangular cross-section. They are made of metal with a thickness of 0.5÷0.6 mm. The most popular sizes of these products are 200×100 and 240×120 mm. In terms of throughput, this approximately corresponds to round pipes with a diameter of 150 and 200 mm, respectively.
Installation of a corrugated sleeve in the chimney.
- Corrugated insert-sleeves, made of various grades of stainless steel, the walls of which consist of two layers. This type of pipe is good because it can be used for chimneys with a complex configuration, that is, with the presence of turns and bends, as it has good flexibility. In this case, the insert does not require additional connecting elements, which means that the risk of depressurization of the chimney system at the joints of individual sections of the pipe is eliminated.
However, when choosing this type of sleeve, you should remember that there is also a limitation - it is not recommended to use a corrugated insert with a diameter that will reduce the cross-section of the chimney by half or more.
Prices for stainless steel sleeves
Chimneys
Corrugated stainless steel inserts are available with diameters from 80 to 350 mm.
Although the flexibility of the corrugated sleeve allows it to be used in any type of chimney, and it has no joints, this option is not considered durable and reliable for constantly used heating devices. Practice has already proven that, despite two layers of metal, a pipe can burn out in literally 4–5 years. And the corrugation ribs themselves become a “trap” for soot deposits to settle on them.
Ceramic chimney liners
Sleeves made of ceramics are considered the most durable and reliable. Therefore, they are most often used to restore damaged chimneys. Like stainless steel liners, ceramic liners come in a variety of shapes and sizes—they come in round, elliptical, rectangular, or square with rounded inside corners. The connection of individual sections of the tab is carried out using a tongue-and-groove lock or in a socket.
Ceramic inserts in the chimney.
The ceramic version of the liners is used for straight chimneys, since the range of rotary modules for this type of liner is very small. Therefore, if necessary, ceramics are combined with parts made from other materials, selecting them according to shape and size.
Combined lining of the fireplace chimney during its construction.
Ceramic modules are produced in heights of 330, 660 and 1330 mm. The wall thickness of the liners ranges from 4 to 20 mm. The diameter of round liner models can vary from 120 to 450 mm.
Prices for ceramic liners
Ceramic pipe
Ceramic sleeves have perfectly smooth inner walls, while the outer walls may have minor defects in the form of roughness or small depressions. But this does not in any way affect the quality of the chimney as such.
Ceramic sleeves in a brick pipe
If we highlight the advantages and disadvantages of ceramic liners-inlays, then their main performance characteristics immediately appear.
The advantages of ceramic inlays include the following qualities of such products:
- Large heat capacity and the ability to accumulate heat.
- Excellent resistance to high temperatures. Ceramic sleeves can withstand heating up to 1400 degrees, without any damage or changes in the structure of the material.
- The material is resistant to open flames, so it is not afraid of possible fires of soot deposits.
- Ceramic products are inert to corrosion processes and the effects of aggressive acids.
- The smoothness of the internal surfaces virtually eliminates the occurrence of turbulence when combustion products exit. That is why a minimal amount of soot settles on such material.
- Thanks to all these listed qualities, ceramic liners have an enviable durability in use.
However, we should not forget that this material also has its negative qualities:
- Ceramic modules have a fairly large mass, which complicates both their transportation and installation work.
- The material is hygroscopic, that is, it is able to absorb moisture.
- Fragility of the material. The modules do not withstand external mechanical influences, that is, special care is required during their transportation and installation.
- It takes a certain amount of time to warm up the ceramics.
- To correctly install ceramic blocks in the chimney duct, you must have certain skills. Therefore, to carry out the work you will have to invite a specialist, whose services are not cheap. Add to this the considerable cost of the products themselves.
- When installing a ceramic insert into an already built chimney, you will have to dismantle the wall of the chimney shaft. There are simply no other options.
Ceramic inlays are great for brick chimneys, fireplaces, and sauna stoves. They have also proven themselves well in pipes connected to solid fuel heating boilers.
Asbestos cement tabs
Asbestos-cement pipes, in fact, are not intended for arranging a chimney or as an insert in a brick chimney of a stove, fireplace or boiler. Despite this, they are actively used for these similar purposes. And also for extending the chimney or ventilation duct.
Asbestos-cement pipes are often used to extend old brick ventilation ducts. The rationality of their use with heating equipment is highly questionable.
Asbestos in such products serves as a reinforcing material, since it is a fiber. And the main binding substance is cement, which provides rigidity and strength to the products.
Fire safety is one of the determining qualities of a material when choosing chimney liners. Therefore, it is imperative to take into account that asbestos-cement pipes are capable of operating at temperatures not exceeding 300 degrees. At higher temperatures, such a pipe can easily crack. That is why this option is suitable only for the upper part of the pipe, since heated gases, reaching this area of the chimney, cool to non-hazardous temperatures.
In addition, with some reservations, pipes made of this material are suitable for gas heating appliances with low power.
Lengthening the height of the chimney using an asbestos-cement pipe is carried out in cases where there is insufficient draft in the furnace, and the formation of condensate in the shaft increases noticeably.
Asbestos-cement pipes are not intended for installation as liners in chimney pipes. So, using them in this role, the owner takes on considerable risk
Some home owners, seduced by the availability of the material, still install asbestos-cement pipes as a liner. To prevent a wrong choice, it is worth explaining how this material usually reacts to the aggressive effects of combustion products.
Asbestos cement has a porous structure. Therefore, both smoke and vapors will easily penetrate into its thickness. Due to the fact that the material has low thermal insulation abilities, condensation occurs when hot gases collide with low temperatures. When condensate is mixed with soot, oxides are formed, which also penetrate the pores of asbestos concrete, slowly corroding the pipe walls.
Therefore, shells appear on the internal surfaces, in which soot settles more actively, narrowing the internal diameter. As a result of these negative processes, traction deteriorates and the efficiency of the heating device decreases, since the fuel does not burn completely.
You may be interested in information about why there is no draft in the furnace and why
Prices for asbestos-cement pipes
Asbestos-cement pipe
Taking into account all the processes listed above, we can expect that replacing an asbestos-cement pipe with a new sleeve will be required within 10-15 years. For such a design, the period is clearly insufficient.
In addition, it is always necessary to remember the dangers of asbestos to human health. It is for this reason that EU countries have completely abandoned products containing this substance. Russian manufacturers claim that they use chrysotile asbestos in their products, which has lower toxicity compared to its European counterpart. However, given the conditions in which the material will be used, it is still not worth the risk. Moreover, there are other options with more suitable characteristics.
Conclusion - you should think very carefully before using asbestos-cement pipes to line a chimney. Although many home owners still choose such products because of their low price, turning a blind eye to all the negative aspects of the issue.
Polymer sleeve "Fitfire"
The polymer sleeve is not yet as popular among Russians as the above materials. Perhaps because its cost is quite high, and some - simply due to the lack of necessary information.
But it is worth recognizing that the results that this method of lining a chimney shows in practice fully justify the considerable cost of the sleeve itself and the work on its installation.
A sleeve laid in the chimney duct before it is heated.
“Fitfire” is an inlay produced in the form of a sleeve consisting of several layers. The maximum length of the polymer sleeve is 60 m, the diameter after final installation is from 80 to 500 mm, and the service life of this material, declared by the manufacturer, is at least 50 years.
Sleeves are produced in several types. Thus, for low-temperature and high-temperature heating devices, the composition of the polymer used in the manufacture of the insert differs. The purpose of the liner is indicated in the material labeling. For example, the Fitfire sleeve is used for chimneys to which low-temperature boilers are connected. Well, “Fitfire NT 1000” is installed in the pipes of stoves and fireplaces.
It should be noted here that the hose is used for sanitizing chimneys built from different materials - brick, metal or concrete.
Structural structure of the Fitfire polymer hose.
The sleeve consists of three layers:
- The inner layer is made of modified polyethylene, designed for use at high temperatures.
- The middle layer of the sleeve is a fiberglass mesh impregnated with a polymer resin that hardens when exposed to high temperatures.
- The outer layer consists of a special protective dense but elastic material that can withstand significant stretching.
Using a polymer sleeve to rehabilitate a chimney allows you to obtain a protective channel completely without joints. In this case, there is no need to dismantle the brick shaft.
The Fitfire tab takes the shape of any chimney. In this case, there is no need for additional fastening. This sleeve makes the channel walls smooth, which simplifies the movement of gases, normalizing draft.
The polymer sleeve has excellent flexibility, so it can be easily laid in turns of up to 30 degrees in difficult areas of chimney ducts.
The material, unlike metal and asbestos cement, is resistant to aggressive condensate components, which is why its service life is longer compared to other inlays.
The process of lining a chimney using Fitfire will take no more than 5–6 hours in total. When carrying out work, the hose is passed through a pipe shaft that has been previously cleared of soot deposits. In this case, a reserve of 300÷400 mm is left in the upper part of the chimney.
Laying a Fitfire polymer hose into a brick chimney.
Then, special equipment is connected to the lower end of the sleeve, which fills the inner space of the sleeve with hot steam. In this case, the material softens under the influence of temperature, the sleeve swells, distributing along the walls of the main chimney. When cooled, the polymers harden, maintaining their adopted shape.
Some Russian craftsmen have gotten used to doing without special equipment. By installing the hose in the chimney and expanding its lower edge using a metal pipe, the stove is heated. At the same time, flows of hot combustion products and air act on the material of the hose, expanding and pressing it against the walls of the main chimney. However, in order to obtain high-quality lining of the shaft, it is recommended to entrust this work to specialists who, with knowledge of the matter and compliance with technology, will install the liner.
So, a flexible polymer hose can solve several problems at once in protecting the main chimney channel:
- The acquired smooth surface does not retain condensation, which immediately rolls down.
- Soot deposits do not collect in the rounded corners, so normal draft is maintained in the furnace.
- There are no pores on the inner layer of the sleeve, so it does not absorb moisture and combustion products.
- The material is resistant to the aggressive effects of acids formed during the interaction of combustion products and condensate. Therefore, it is not damaged or destroyed during operation of the heating device.
Based on the above, lining the chimney with a Fitfire polymer sleeve can be called the most effective and reliable option today.
Two factors stand out among the disadvantages of this sanitization method. Firstly, the high cost of the material itself and its installation. And secondly, the need to attract a professional team with special equipment.
However, with any chosen method of sleeving, it is better for an inexperienced person not to undertake such a task. The risk of a poor-quality result is too great, and the stakes are too high - you can completely ruin the existing chimney.
Video: The process of lining a brick chimney with a “Fitfire” liner
Causes of destruction of brick chimneys
There are natural and artificial factors that contribute to the destruction of smoke exhaust channels. Natural factors include:
- temperature changes;
- aggressive chemicals that are part of the smoke;
- condensation arising due to the difference in temperature inside and outside the channel.
Natural factors have a detrimental effect on brick structures, since brick does not have an anti-corrosion effect and quickly wears out with temperature fluctuations. Metal pipes cope with these factors much better, however, they also have their vulnerabilities.
In turn, artificial factors are no less, and sometimes even more destructive for brick channels. Let's look at them:
- incorrect technology for making brickwork, which refers to installation errors, can cause weak draft in the chimney structure;
- low quality of materials from which the smoke exhaust channel is assembled;
- operational errors;
- other errors during system installation.
Chimneys made of brick are destroyed most quickly.
Errors in the installation of this communication are perhaps one of the most common problems. During operation, improper design of the system affects its operation; the amount of condensate in the channel increases, which in the cold season leads to icing of the internal walls. Freezing of condensate destroys the mortar and thus spoils the masonry. In addition, improper design affects the traction performance in the system.
During the installation of a chimney, the use of low-quality bricks that have not undergone the hardening procedure properly leads to rapid wear. Using poor quality materials may cause a fire in the future. Destruction of the chimney structure can also occur due to mechanical stress. In any case (regardless of the cause of the destruction), experts recommend immediately responding and carrying out the necessary repair work.
More about sleeve methods
Lining the chimney can also be done using a flexible stainless steel pipe. It is worth noting that this will not be the best option. Such a pipe has its drawbacks: the corrugation will not be an obstacle, but on the contrary will help condensate and soot accumulate + the service life of the structure is reduced due to the small thickness of the walls.
There is another way to “level” the chimney: line the inner surface of the channel with a fire-resistant mixture. Thanks to this, the brick surface of the chimney pipe is smoothed, because the mixture closes all the cracks. In this case, the smoke channel does not decrease significantly in size. If you have a large smoke channel height, you should make a technological hole at the bottom. After the lining work is completed, it must be laid. This will cost you less than lining a chimney; in this case, the price will be much lower. However, it will not provide guarantees of tightness.
It is easier to install the liner when the chimney is being installed, i.e. at the construction stage. This will be both more reliable and save your family budget. Therefore, be sure to take this issue into account during the construction stage. Don't ignore him!
The main thing to remember is that the correct lining of the chimney is, first of all, the safety of your home and the health of your loved ones!
Installation of a stainless steel chimney
Modular chimneys are now a favorite, since with their help you can easily come up with and install a system of any configuration, without worrying about damage to the operation of heating equipment or draft.
The preparatory stage includes calculations of the chimney, drawing up a sketch and marking out the walls for fastenings. The last operation makes it possible to determine as accurately as possible the total length of the structure, the required number and type of parts for connecting the sections.
Assembling the internal chimney
Installation of a stainless steel chimney begins with a heat generator.
- An adapter is put on it, the connection is coated with sealant, then fixed with a clamp. Then single-wall pipes are inserted and interspersed with components. The modules are installed to a depth equal to half their outer diameter.
- After the channel for access to the roof has been formed, a ceiling-passage assembly is formed - homemade or (better) factory-made. A sandwich pipe is brought out through the roof, a corner passage, a cone, a skirt and a cap-head are put on it.
- After final adjustment of the elements, the internal seams of the chimney are treated with sealant. If they prefer to leave the structure collapsible, then use heat-resistant polyurethane foam only at the joints of the modules.
Single-layer pipes are insulated, all joints are waterproofed using seals and sealant.
Installation of external structure
In this case, the first stage is no different:
- First, in the same way, put an adapter on the heating device pipe, ensure its tightness, then attach the clamp. Then a horizontal section is installed, which is led out onto the street through a passage unit.
- Below the exit of the horizontal section of the chimney structure, a bracket having a plate for installing an inspection and a condensate drain is fixed on the wall, then these elements are installed.
- A vertical channel is assembled, which is secured with brackets to the wall every 1500-2000 mm. If the chimney is heavy, then additional fastenings are made at the joints of bends and tees.
A cone and a cap-head are installed at the top.
Installation of a smoke exhaust duct
The simplicity of the chimney design allows, if you have some experience, to calculate and make it yourself. Laying a brick chimney with your own hands will significantly save financial resources.
A short instruction will help you design and build a chimney correctly, as well as line it.
- At the first stage of the work, it is necessary to correctly calculate the main characteristics of the smoke exhaust duct:
- traction force;
- pipe diameter and height.
With the correct diameter, as the height of the chimney increases, air circulation also increases. The basic requirements for how to build a brick chimney, as well as provisions for the choice of material, structure size and installation procedure, are set out in the main regulatory document SNiP 41-01-2003 “Heating, ventilation and air conditioning”.
- Before making a chimney out of brick, it is necessary to provide for its lining at the construction stage;
Installation of smoke exhaust pipes
- Installation of smoke exhaust pipes begins from the heating facility. Each subsequent pipe link is inserted into the previous one. To protect the structure from moisture, it is necessary to use a special heat-resistant sealant;
- All joints are fixed using clamps;
- When laying, it is necessary to completely prevent the pipes from coming into contact with other communications (gas, water, electrical wiring, etc.);
- It is necessary to provide for the installation of a door for cleaning the smoke exhaust duct during its operation;
- If pipes are planned to be located near flammable finishing items, they must be insulated;
Brick chimney laying diagram
- When laying a stainless pipe through the roof, it must be insulated with mineral wool;
Insulating the pipe from the roof elements using mineral wool
When laying bricks, special attention is paid to the evenness of the walls and the accuracy of the corners; During laying, it is necessary to provide technological holes and a place for installing the door to clean the channel from the formed soot; The outer part of the fireplace (stove) chimney can be lined with tiles or decorative bricks;
Photo of how to build a brick chimney, taking into account all the important structural elements
- It is necessary to build the chimney as vertically as possible. The fewer turns and inclined sections, the more efficiently the smoke will be removed from the brick fireplace (stove) to the outside. The length of horizontal sections should not exceed one meter.
General description: what is Furanflex?
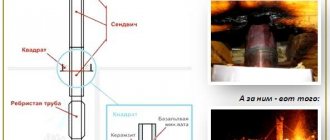
To understand what Furanflex is, let's start from the very beginning. A chimney is a duct (pipe) that runs from a stove, fireplace or boiler through all of these to the top and out through the roof. Very often the chimney duct is made of brick.
A sleeve (sleeving) is an insertion of a pipe made of a different material into a brick chimney. At the exit we have a pipe in a pipe, and in this case the smoke will not come into contact with the brickwork, but with an additional pipe placed (a sleeve, which is usually made of ceramics, steel and a polymer sleeve).
Pipe lining with Furanflex
A correctly installed sleeve protects the chimney channel from fouling with soot, and also protects from condensation and exposure to high temperatures. As a result, the service life of the channel is significantly extended, and the likelihood of its breakdowns and blockages is reduced.
During installation, it is unwound, lowered into the chimney channel, straightened along the entire length and secured at the top (at the pipe outlet) and at the bottom (at the place of attachment to the stove). Next, a plug is placed on the hose from below (it is blocked), and a special installation is connected from above, through which hot steam is supplied to the hose.
Under steam pressure, the hose expands along its entire length, pressing against the walls of the air duct. Under the influence of temperatures, the sleeve becomes elastic and is then glued to the brickwork, at which point the installation process ends. At the same time, both fireplace and stove chimneys can be lined in this way.
Where and what is it used for?
Furanflex is used for lining, that is, to protect the main chimney channel. Moreover, even if the protective liner fails, replacing it is both cheaper and easier than replacing the main chimney duct.
The use of Furanflex is justified in the following cases:
- To protect the smoke channel during its construction.
- To protect an existing smoke channel.
- To restore a smoke duct that has become unusable (and it usually doesn’t matter what exact reason led to the failure of the smoke duct).
Typically, lining in this way is used for lining chimneys located in low-rise private buildings. Somewhat less often - for channels located in baths or saunas. But there is no prohibition on the use of this technique for chimneys in industrial systems.
Material and characteristics
The Furanflex protective sleeve consists of several structural elements (layers or segments), so it makes sense to consider them all.
Sleeve segments:
- internal segment - made of thermoplastic polyethylene, used exclusively at the installation stage and used to hold the middle layer (segment) - after installation it is immediately removed from the channel;
- middle segment - made of thermosetting polymer resin using fiberglass (330 g per square meter), and there are usually several layers of fiberglass (about four);
- outer segment - made of polyester fabric (if we are talking about Furanflex Black or Ventiflex), or from fiberglass with Kevlar reinforcement (if we are talking about Furanflex RVW).
General information about Furanflex material
Product Specifications:
- Basic length: up to 30 meters.
- Basic sleeve diameter: from 60 to 1000 millimeters.
- Wall thickness: from 2 to 3 millimeters.
- Tensile strength: exceeds 400 N/mm.
- Maximum smoke temperature (with prolonged exposure): up to +250 degrees (if we are talking about Furanflex Black), or up to +700 degrees (if we are talking about Furanflex RVW). One-time short-term temperature rises up to +500 for the Black model and up to +1000 for the RVW model are allowed.
- Maximum channel bend angle: 45 degrees.
- Minimum ambient temperature: no more than -50 degrees.
- Service life: from 10 to 30 years with proper installation and subsequent operation.
Briefly about the manufacturer
The Furanflex company is based in the Russian Federation, and its products are aimed specifically at the CIS market. The company has a representative office in Ukraine.
Considering that the described products are rare in the construction market of the CIS countries and the choice of them is small, the Furanflex company can be called a fairly large manufacturing company of such devices. This is the largest manufacturer of chimney hoses and the most popular in Ukraine, Russia and Belarus.
Sleeve installation steps
Below we will look at how to properly perform sleeving in different ways (according to the type of materials discussed above). Please note: it is quite difficult to do this kind of work yourself if you do not have extensive experience in construction.
Preliminary work
Before you start lining, you need to prepare the existing smoke channel.
Step-by-step actions ( the instructions are relevant for any sleeving methods
):
- The condition of the chimney from the inside is assessed. To do this, you need to visually inspect it with a flashlight. Attention should be paid to the level of contamination and damage, if any.
- It is checked to see if there are any obstacles inside: protruding bricks, sagging mortar, protruding pieces of reinforcement, or contamination - bird's nests and other debris. If problems are found, they should be eliminated.
- Just in case, you can double-check the length and cross-section of the channel.
- The channel is cleaned mechanically (with a brush). Optional but recommended item.
- Part of the smoke shaft from below is disassembled (the area adjacent to the boiler/fireplace and the areas in which the fittings will need to be installed.
- The bottom of the shaft is leveled.
Next, we will consider the features of the sleeve in each method.
Lining with a ceramic pipe (video)
Stainless
If the chimney is small and has no turns, the work looks like this:
- Only the lower section of the main shaft is being dismantled.
- The sleeve is assembled from its component elements. The elements are fastened together with aluminum tape. For gas and liquid fuel boilers, a high-temperature sealant (intended for temperatures up to 300°) is additionally used; for solid fuel boilers, a heat-resistant sealant is used (for temperatures up to 1200°).
- A rubber strap or crimp clamp is attached to the bottom of the sleeve.
- There are 2 cables attached to the belt or clamp.
- On the cables, the sleeve smoothly lowers to the bottom of the shaft.
- If the total length of the sleeve is small, and the elements are connected to each other reliably and firmly, it can be lowered into the chimney, holding it from above with your hands (then this point will replace points 3-5).
- A floor element with a condensate drain is mounted below.
- The pipe is brought out above the masonry and the head is mounted.
If the chimney is long and/or has rotating sections and shaped elements:
- The main shaft is disassembled from below, at the places where the shaped elements are installed.
- The lower piece of the sleeve is assembled from several elements and immersed in the shaft (with a rubber belt/clamp, on 2 cables - as described in the list above). A floor element with a condensate drain is mounted in the lower part. The lower segment must be lowered through the disassembled hole above (not through the very top of the chimney).
- The shaped element is installed.
- The next (higher) segment of the sleeve is assembled from several elements and descends through the hole (disassembled shaft) located above.
- The segments are fastened to each other (with aluminum tape and sealant).
- In a sequential manner, the sleeve is assembled from several segments, from bottom to top.
- The pipe is installed above the masonry.
- The head is mounted.
If corrugated hose is used:
- The sleeve is cut into segments of the required length (if it is necessary to use shaped elements), or into 1 piece along the full length of the chimney.
- The lower part of the shaft is dismantled.
- If shaped parts will be used, the masonry in the places where they are installed will be dismantled.
- The sleeve descends from top to bottom, to the bottom of the shaft.
- At the bottom, a rigid section of stainless pipe with a steam trap is added.
- The corrugation is brought out 20-30 cm above the mouth of the shaft. Ideally, the upper section (extending outwards) should be made of a regular (not corrugated) stainless round pipe - for this it is attached to the upper end of the corrugation on an adapter.
After the work has been done, the disassembled masonry is put back together and the head is mounted.
How is sleeving done with a round stainless steel pipe? (video)
Polymer
The installation steps are as follows:
- The lower part of the shaft and the places where the shaped elements will stand (if any) are disassembled.
- The rolled up sleeve rises to the top of the roof.
- A special segment with a pressure gauge and a valve is attached to the upper part of the sleeve, through which air will be released during installation.
- The sleeve is immersed in the chimney and goes down to the bottom.
- An air compressor is connected to the hose and air is supplied. Under its pressure, the polymer stocking straightens, taking the desired shape.
- After straightening the stocking, instead of air, steam is supplied, under a certain pressure and temperature, and remains inside for the required time (determined by the manufacturer, depends on the length of the chimney and on which product is used). When exposed to steam, the stockings harden.
- The compressor and the upper mounting element (with pressure gauge and valve) are turned off.
- A condensate drain is mounted below.
- The upper end is cut to the level of the shaft, and the tip is mounted on top.
How is sleeving done with Furanflex polymer stocking? (video)
How to line a chimney with your own hands?
Before starting lining, you need to inspect the chimney to identify cracks, blockages, protrusions and protruding fittings, determine the configuration of the smoke shaft, the size of the liner cross-section and its length.
Then it is important to prepare the surface of the pipe:
- assemble the sleeve design of the required size;
- install the sleeve into the pipe;
- fill the space between the old pipe and the sleeve with non-flammable material, for example, mineral wool;
- cover the edge of the pipe with a shield that protects the space between the sleeve and the pipe from precipitation.
A stainless steel sleeve involves installing a tee for condensate accumulation and an element for inspecting the chimney, so it is necessary to disassemble the lower part of the brick pipe, where it is adjacent to the heating source, and secure the first module.
The entire structure is assembled separately and then inserted into the pipe. After installing the sleeve, the disassembled part is restored.
When a layer of soot builds up inside the chimney, its performance deteriorates. This phenomenon is especially noticeable on stone chimneys, where the surface is not smooth enough and has many roughnesses. This allows the soot to settle easily.
Asbestos pipe
The only advantage of using an asbestos pipe for chimney lining is its low price. The list of disadvantages is more impressive:
- does not tolerate temperature changes well, can be destroyed by frost because it absorbs moisture;
- significantly inferior in heat resistance to other materials;
- The inner walls are rough, so soot easily settles on them.
Since the material is very fragile, it is difficult to install such inserts, although it can be done without the help of specialists. Asbestos pipes are not suitable for lining chimneys, so they are used extremely rarely.
Selecting materials
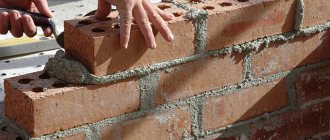
Only solid fire-resistant blocks are suitable for building a chimney. Recommended brands from M150 to M200. The material is available in three grades.
- 1st grade. With normal firing time. Even, smooth and dense. No crumbled areas. The color is bright red. When tapped, the sound is clear and clear.
- 2nd grade. Unburnt parts are pale orange. Porous, loose, with defects. They sound dull when tapped. They are characterized by weak frost resistance and heat capacity, low density.
- 3rd grade. Burnt bricks. They are distinguished by their dark red color. Pores, burrs and chips on the surface are visible. When tapped, the sound is excessively ringing. They are fragile, not frost-resistant, and do not retain heat well.
The chimney should be assembled only from first grade material. It is allowed to use the third, but only for arranging the foundation. The use of the second grade is excluded.
Instagram brigadir74
For the construction of the chimney, only high-quality first-class bricks are used
- Decoration Materials
Cladding the facade of a house with bricks: how to do it right
Ceramic insert
The ceramic liner has excellent corrosion resistance. Ceramic inserts are made of round or rectangular sections in different sizes, so you can easily choose an insert for any chimney. The main advantage is durability. Ceramic liners have good performance characteristics, improve traction, and if installed correctly, they will ensure the tightness of the system.
The disadvantages of ceramic liners include their high price. Another disadvantage is the heavy weight. During installation, it is necessary to use winches or other auxiliary mechanisms, since it is difficult to lower a heavy pipe by hand. Theoretically, you can do the installation yourself, but to do this you need to have certain skills. Difficulties arise not only during insertion, but also during connection. Typically, partial disassembly of the chimney is required.
Three options for independently arranging a chimney outside
There are 3 options where a person without special training can do everything with his own hands. The first option concerns brick pipes, which do not need lining, but you need to seal the joint with the roof. After this comes the frame version and the option with ready-made factory solutions.
Option number 1: we arrange a brick pipe
Waterproofing the pipe on the roof should be carried out before laying the roofing material. If the roof is already in place, you will have to partially dismantle it. The entire perimeter of 50–70 cm around is removed, plus you need to remove the lower part of the roof from the pipe to the edge of the slope.
Scheme of sealing the perimeter of a brick pipe on a pitched roof.
The materials we need are a wall metal profile. You can bend it from galvanized steel with your own hands or buy it ready-made. The profile consists of 4 parts, which are superimposed on each other during installation.
It is definitely better to buy an external apron for the pipe, and it is advisable to buy it together with the roofing material, it is easier to choose the color.
The so-called tie is a sheet of roofing iron with sides curved on the sides. It is laid from the bottom of the pipe to the edge of the slope and placed under the lower section of the wall profile.
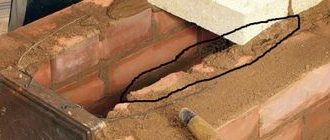
In order to hermetically connect a brick pipe with a wall profile, we need to cut a groove about 20–30 mm deep on the pipe with a grinder. The curved edge of the profile is inserted into this groove.
Under the wall profile, a groove is cut around the entire perimeter of the pipe.
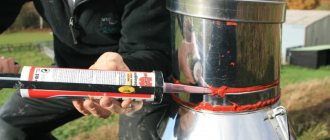
Next, we insert the curved edge of the profile into the groove and fill the groove with sealant. Then we fix all 4 parts of the profile and the tie, fastened from below with self-tapping screws and press washers. Roofing material is laid on top of this entire structure.
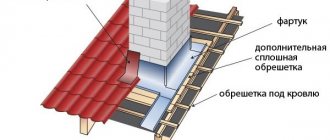
Scheme of arrangement of the upper apron for the chimney.
The upper apron is attached to the pipe with self-tapping screws along the entire perimeter. It must extend onto the pipe by at least 100 mm. The lower part of the apron is often made of soft bituminous materials. It is pressed around the corrugated roof and glued to this roof with mastic or special glue.
The apron must be glued to the roof.
The scheme works something like this: the main amount of moisture is removed from the pipe by the upper apron, but if this barrier does not cope with its task and moisture gets under the roof, then it will be collected by the wall profile and the water will flow down the tie from the roof.
Scheme of double waterproofing of the roof in the sector adjacent to the chimney.
Option No. 2: frame installation
This method is well suited for insulating and lining the chimney with corrugated sheets, siding and other similar materials. To begin with, the base is sheathed with a metal profile; later we will attach corrugated sheeting to it. It is better to make the frame from a wall profile under plasterboard; it is wider than the ceiling.
The metal profile frame is more durable.
It is not difficult to work with a metal profile, but if you are not confident in your abilities, you can build a frame from wooden blocks. True, the wooden frame will need to be well impregnated with fire retardants, antiseptics and a water-repellent composition. Between the frame slats, slabs of dense mineral wool are laid to insulate the pipe.
Chimneys are insulated only with slabs of dense mineral wool.
Corrugated sheeting or any other sheet material is screwed to the frame slats using self-tapping screws and press washers. The whole structure is crowned with an umbrella for protection from the rain.
Sectional diagram of an insulated and lining pipe.
Option No. 3: ready-made solutions
There are no problems at all with round pipes now. Special flexible aprons are produced for them. Based on experience, such an apron can be installed in a couple of hours maximum. Photo instructions for installing such an apron are given below.
Step-by-step instructions for installing a flexible connection unit for a round pipe.
- Select the pipe diameter you need and cut a hole in the soft polymer cone;
- Pull the cone onto the pipe, the connection should be tight;
- Crimp the lower ring of soft metal to the shape of the roof;
- Thickly lubricate the perimeter under the ring with sealant;
- Screw the ring to the roofing material using self-tapping screws and press washers.