Concrete foundations and wooden beams have different hygroscopicity indicators. Direct contact of these materials leads to rapid rotting of the lower crown.
Rotting occurs due to the fact that moisture from concrete in contact with damp soil will be actively absorbed by the wood laid above.
Destruction can be prevented by installing a waterproofing barrier between the foundation and the bottom row of the timber wall. The drier the foundation material, the fewer problems will arise if the waterproofing seal between the base of the house and its wooden walls is broken.
Is foundation waterproofing necessary before installing timber?
A layer of waterproofing is absolutely necessary before laying the bottom row of timber walls. A moisture barrier will prevent the wood from absorbing excess moisture.
Even well-dried timber contains about 15% water. An increase in humidity does not pose a threat to the safety and strength of wall materials.
However, when there is an excess of water inside the wood, optimal conditions are created for the development of mold. In the process of life, bacteria will inevitably damage the log. And this is already fraught with a deterioration in aesthetics and a change in the geometry of the beam, and a decrease in its mechanical strength.
It is necessary to ensure the foundation is waterproofed from the effects of groundwater and precipitation. This will prevent the concrete from cracking after freezing and the thawing of moisture trapped in it.
Video description
Description of the “stretch” caulking technology in the video:
This technique is practiced both using natural traditional materials and modern insulation materials, and if the material is represented by a tape or roll, caulking is much easier and faster. When caulking, standard tools are used: a wooden spatula and a wooden hammer.
- “To set” method
This method is used if significant gaps larger than 5 mm in size have formed during the shrinkage of the house.
From the selected material, carefully twist the tourniquet and fold it into loops. The space between the logs is filled with rolled loops, filling wide gaps and minor cracks as tightly as possible. A special spatula and a wooden hammer are used.
Method “to set” Source galich-dom.ru
With this technique, it is recommended to use rolled tape materials, since twisting strands of fibrous materials with the subsequent set of loops is a complex matter. But in general, seams can be sealed with any materials.
What materials are used for waterproofing?
The following types of waterproofing materials are distinguished:
- Coating;
- Rolled;
- Combined.
The last type is most widespread because it allows you to create the most durable water barrier. It consists of a layer of coating material, on top of which roll insulation is laid. Coating allows you to fill all the unevenness of the concrete surface and simplify the laying of the rolled material.
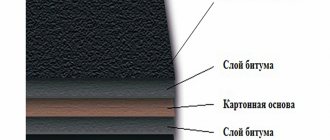
Most often, viscous liquids based on bitumen are used as coatings. Roll material (roofing felt) serves as the main water barrier. In addition to waterproofing, roofing felt creates a damping layer between the not always perfectly smooth surface of concrete and timber.
Rolled waterproofing is rarely used as the only protection. Dense roofing material or glass insulation used for these purposes can contribute to the appearance of moisture both under and above the waterproofing layer. This happens due to the low elasticity of materials that are unable to provide a tight fit to concrete and timber.
Coating mastic waterproofing is also not able to guarantee the creation of a reliable barrier to moisture. Under the weight of the wall materials, it will be squeezed out and points of contact between unprotected wood and concrete will arise. Coating materials perform best when used as waterproofing for the lower part of the foundation in contact with the ground.
When and how many times should you caulk?
In addition to understanding how to caulk a log house, you need to know when to do the work. Wooden houses are most susceptible to shrinkage during the first year and a half of operation, then over the course of 5-6 years the shrinkage occurs slowly and fades away completely. Caulking is carried out in three stages:
- Primary . Immediately after the construction of the log house is completed. Despite the installation of inter-crown insulation, the joints are additionally sealed with the selected material. Due to the upcoming shrinkage of the house, caulking can be done with a low density.
- Secondary . Produced one year after the construction of the house. The log house will shrink by almost 80%. It is necessary to tightly caulk the cracks that appear and prevent the remaining material from hanging down.
Secondary caulk Source ytimg.com
- Third caulking . Produced 4-6 years after the start of operation of the house. The log house is caulked tightly. All joints in which the insulation has been lost over time are filled.
Double caulking is an indispensable condition for creating an ideal thermal contour of a building. The third time it is necessary to caulk if there is no external cladding of the house. If the outside of the house is insulated with finishing material, there is no need to seal the joints a third time.
Isolation stages
Insulation of the foundation and log house from moisture is carried out in several stages.
Install a drainage pad under the foundation. This stage is carried out even before pouring the foundation, immediately after preparing the trench. Layers of sand and crushed stone are successively poured onto the bottom of the trench. After backfilling, each layer is carefully compacted. The total thickness of the drainage pad should not be less than 30 cm.
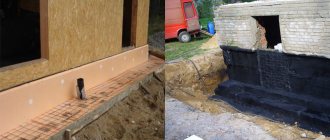
After pouring, drying and removing the formwork, the foundation is treated with coating waterproofing in the form of mastic. A better effect can be achieved if you use combined waterproofing, i.e. stick a layer of waterproofing or roofing material on top of the mastic. An additional water barrier can be created by insulating the foundation with penoplex or other non-hygroscopic thermal insulation.
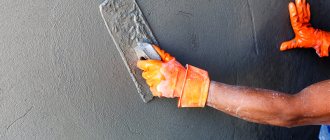
The upper section of the foundation is waterproofed. It should have as smooth a surface as possible. This will eliminate the occurrence of cavities and irregularities in which moisture can concentrate. When the foundation is prepared, it is coated with mastic. Depending on the type of mastic used, it must be applied in a cold or heated state.
Rolled waterproofing is installed. The sheet material should have overlaps along the edges of the foundation of 5-10 cm. It is necessary to provide overlaps at the joints of adjacent waterproofing sheets (at least 15 cm).
It is necessary to lay the insulation so that the material fits tightly to the base. Leaving air bubbles and folds is unacceptable.
General requirements for inter-crown insulation
Regardless of the material of manufacture, inter-crown insulation must meet standard operational requirements.
- Elasticity and density of insulation. The material must compensate for changes in the size of the cracks and not lose its original properties throughout the entire period of operation of the structure. The absence of natural shrinkage is an additional advantage.
- Low thermal conductivity. Values cannot exceed these tree parameters.
- The ability to breathe. The insulation should not hermetically separate the crowns; the wood breathes, gives off and absorbs moisture. The process cannot be interrupted after the space between the crowns has been insulated.
- Resistance to external influences. The insulation should not rot, and various insects should not live in it. The highest quality materials have an insect repellent effect.
- Safety for residents. All environmental characteristics must comply with sanitary requirements.
Interventional insulation for timber must be of high quality
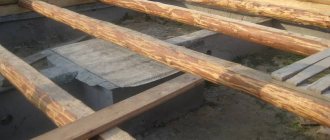
Technology of laying timber on the foundation
The lower crown can be attached to the foundation in two ways: from above or from below. In the first case, fastening is performed with anchor bolts. Through holes are drilled in the timber. Holes are also prepared in the concrete foundation in appropriate places. Their depth is selected to match the length of the anchor bolts, taking into account the cross-section of the beam.
In places where drilling is done, the moisture-proofing layer will be damaged, so before laying the first row, it makes sense to apply an additional amount of mastic at the fastening points.
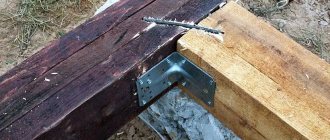
Fixation from below involves the use of embedded elements installed at the stage of pouring the foundation. You can use through threaded studs and pieces of reinforcement.
The height of the reinforcement segments is selected so that it is enough for 2/3 of the section of lumber. The fastening nut at the stud is tightened until it is completely embedded in the wood. Excess studs are cut off with a grinder.
Video description
Caulking timber: how it happens is shown in the video:
To understand how to properly caulk a house made of timber, we will consider in detail the methods of caulking with various materials.
Caulking technology with fiber insulation:
- Moss or flax tow is applied to the gap with fibers across it, then, holding the material, it is pressed deep with force with a special spatula.
Caulking tow Source fasad-exp.ru
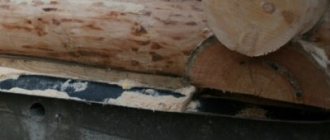
Methods for sealing gaps between the foundation and the first crown
The reasons for the appearance of cracks are flaws in the geometry of lumber and concrete pouring.
The cracks are sealed with the following materials:
- Polyurethane foam;
- Cement mortar;
- Tow;
- Wooden blocks.
It is advisable to limit the use of cement mortar and foam. They are hygroscopic and their direct contact with wood will lead to gradual decay of the latter. Therefore, it is best to eliminate gaps with tow and wooden blocks cut to size.
Tool for getting the job done
To properly caulk a log house, you need to use special tools.
To properly caulk a log house, you need to use special tools. Otherwise, the insulation will lie superficially in the cracks, which will lead to the formation of cold bridges. Mostly professionals use special caulks made of steel or metal. The first one is better. You can also make wooden caulks from dense woods - beech, walnut, oak. It is desirable that the tool have a rubberized handle for ease of work.
The main type of caulking tools:
- Stacked caulk. It is a kind of flat chisel with a blade width of 10x0.6 cm. It is used for stuffing the seams between logs with insulation.
- Crooked caulk. The same chisel, but curved in shape. Used for caulking house corners and rounded cracks. The width of the blade in this case is half that of a type-setting caulk.
- Road caulk. It has a fork-shaped shape and is used for caulking cracks using the “stretching” method. The blade here has parameters of 170x15 mm. Depending on the width of the gap, you can use wide, medium or narrow caulk.
- The caulk is broken. It has a wedge-shaped blade 30-35 mm wide. This tool is used to widen narrow cracks and fill them with insulation.
- A mallet is used to assist all types of instruments. Using such a rubber hammer, push the seal into the cracks.
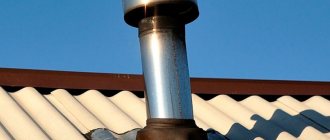
Installation of protective ebb
The main purpose of low tide is to prevent moisture from appearing at the junction of the wall and the part of the foundation protruding outwards. They are made of metal or plastic.
Plastic castings are lighter and are not afraid of corrosion, but they are easily damaged during operation. Metal ones require monitoring of the condition of the protective paint, but in the case of complex foundation geometry, it is easier for them to give the required shape.
When installing basement flashings, a number of points need to be taken into account.
- Installation must be done before cladding the external walls.
- The presence of slopes helps maintain tightness. They are created from a cement mixture. The optimal slope of the slope surface is 15 degrees.
- The sills can be attached to the wall and to guides made of galvanized profiles or bars. They are nailed to the wooden base with ordinary nails, and the material is fixed to the profile with self-tapping screws.
To ensure tightness, the ebbs should be overlapped. Internal and external corners can be made from scraps of the ebbs themselves.
Caulking rules
Caulking of a log house is carried out in two stages - immediately after construction and after some time, when shrinkage occurs. Primary (or rough) caulking can be carried out in two ways: with laying insulation during the process of assembling the walls or performing one-time work upon completion of construction.
Each log house requires high-quality caulking, which is performed in two stages
1 way
Lay the bottom row of logs on the base.
Layed logs of the log house and inter-crown insulation between them
Then the insulation is spread on top so that the ends of the material hang evenly on both sides. Next, lay the second crown, and again a layer of insulation. This is repeated until the very top of the log house. After all work on the construction of the log house is completed and the roof is installed, the protruding ends of the seal are driven into the gaps between the beams using caulking.
The result of caulking a log house
Method 2
Caulking begins after installation of the roofing system on the log house. Insulation (preferably tape) is applied to the seam of the bottom row and, using a tool, is pushed into the gaps between the logs along the entire length, leaving hanging edges 5-7 cm wide. Then these edges are folded in, formed into a roller and hammered inside the seam. Repeat the procedure in the next row and so on until the top of the structure.
The second stage of caulking is carried out after shrinkage of the log house - after 1-2 years. The selected insulation is applied to the cracks between the crowns and driven tightly inside. You should always start work from the bottom row, and be sure to do it along the perimeter of the log house.
Insulation padding
You cannot caulk one wall first, then the second, and so on. In addition, each row is caulked both from the outside and from the inside to avoid distortions in the structure. The insulation raises the frame by 5-10 cm, and its uneven distribution contributes to the vertical deviation of the walls. In some cases, the log house is caulked for the third time - 5-6 years after construction. During this time, the wood completely shrinks and new gaps form.
Gaps between crowns
There are two ways of caulking - “set” and “stretched”. The first is used to eliminate wide gaps between logs, the second is usually used during primary caulking, when the gaps are still narrow.
To work, you need tools - a set of caulking tools, a road worker and a mallet. As a rule, metal caulks are used, although many craftsmen make them themselves from hardwood.
This is interesting: Why does the stove smoke in the bathhouse?
Typical construction mistakes
Well, our work was going smoothly:
- Removed excess soil from under the joists.
- The entrance to the steam room has been moved.
- The electrical was redone.
- They installed a sewer system.
- They hid the water pipes.
- The floors were insulated and a base was laid under the screed.
- The water floor pipes were laid.
- The doors were reinstalled.
- We soaked the walls of the washing room twice (so as not to absorb moisture from the screed).
- We cut a window in the steam room.
- A new vapor barrier was installed.
- They poured the screed.
- And we left for a technological break, having repaired the customer’s snowmobile before leaving, which he was very happy about.
A few days later the team returned and continued work.
Washing room:
- They erected a frame wall and covered it with imitation timber.
- The floors were covered with porcelain stoneware.
- Drywall was secured to the walls on guides and the area was lined with washable tiles.
- We came up with and installed a folding shelf (an example of how even in a small room you can create conditions for showering, washing, and massage treatments).
Steam room:
- The floor and side were covered with porcelain tiles.
- They put up a “floating” frame.
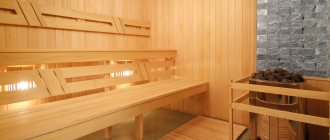
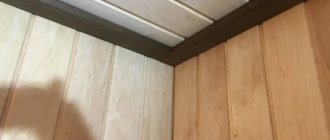
- The steam room was lined with natural linden block house.
- We made shelves, a bench, and installed faucets.
- We mounted a decorative shutter on the window, installed lamps, lampshades, and hung decorative branches.
- On the outside, we interestingly decorated the hole from the removed vertical beam at the entrance to the steam room.
And again a break - for technological drying of the block house and its drying out. But they didn’t leave right away - the customer asked to impregnate the entire bathhouse from the inside, having seen how the guys had impregnated the walls of the washing room and the frame wall. While the material was drying, not entirely pleasant news arrived: the hackwork of the furnace installers still made itself felt. During one of the furnace fires, the wall above the furnace firebox began to smolder closer to the rest room. Only the customer's observation saved the fire. And the efficiency with which the Tajik assistant cut out the smoking crown from the side of the rest room.
And so we came for the third time. Everything is almost “native”. The heating works great. The Asian gatekeeper even overdid it - all the rooms of the bathhouse (the rest room, the toilet, and the kitchen) were heated to 45 degrees! Platbands, cladding, etc. It just got twisted in places.
Well, nothing - a couple of hours to eliminate the consequences of the flood, a few hours to caulk. An hour to clean the bathhouse and surrounding area, loading tools into cars. And then 2 hours of steam testing with the permission of the owner of the bathhouse (the stove began to be heated in advance). It turned out beautiful and functional! A real Russian “steam log cabin” - hot, but not harsh, embracing warmth from all sides - from the stove, from the wall, and from the floor.
There is a choice of water here - ice or boiling water, there is also a window for ventilation or breathing (not necessary - lower the shutter and it will be as if it never existed), smooth lines of transition between wood and stone, soft light and wide warm shelves complete the atmosphere of complete relaxation. Need to take water treatments in a cooler place? Please! The shelf can comfortably accommodate an adult lying down or three people sitting. Underneath there are 2 hygienic showers - cold and hot. You can also take a “blow” of water from a sprinkler while sitting.
Or you can fold back the shelves, go into the shower corner and shower while standing. Or just take a shower. Water does not stagnate on the floor - 2 drain ladders are made. The bathroom is equipped with everything necessary - toilet, sink. At the customer’s request, a washing machine was also installed there. The boiler remained in its original place. All pipes are “hidden”.
And, importantly, we managed to get everything done before the end of winter! But the owner of the bathhouse had a cherished dream - this winter to have time to dive from the bathhouse into the snow. It turned out to be heartwarming, just as a bathhouse should be! * the only controversial solution is backrests made from boards on the walls
They were installed at the request of the customer. But it won’t take long to dismantle them if the owner of the bathhouse makes such a decision
* the only controversial solution is backrests made from boards on the walls. They were installed at the request of the customer. But it won’t take long to dismantle them if the owner of the bathhouse makes such a decision.