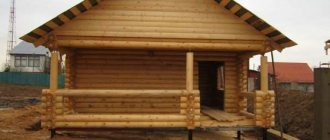
The key to the longevity of any structure is a reliable foundation. Pile driven foundations made of wood, often larch, were used by our ancestors for centuries in the construction of baths. Nowadays, they have been replaced by screw analogues, which, for ease of immersion in the ground, are equipped with a cone-shaped tip and blades on the surface of the pipe. What the floor in a bathhouse on screw piles should be like will be discussed in today’s material.
The floor in the bathhouse is on screw piles
Step-by-step construction instructions
It is not difficult to build a blind area for a house on a pile-screw foundation if you have basic construction skills and strictly adhere to the technology for performing this work.
To make the structure reliable, it is made of two layers:
- The bottom layer is intermediate (drainage made of clay, crushed stone, coarse sand), which is carefully compacted.
- The top layer is the finishing coating (cement, asphalt, tiles).
The construction of a protective path for a house on a pile-screw foundation is carried out in the following order:
- Along the perimeter of the building, a depression is made in the ground of the required width and depth of 25-30 cm;
- Clay is poured into the bottom of the trench in a layer of 10-15 cm and compacted tightly;
- to improve waterproofing, roofing material or thick polyethylene film is laid on the clay;
- Gravel mixed with sand is poured on top of the roofing material.
The next stage is the formation of a drainage system. An additional ditch is dug along the edge of the trench perimeter, the bottom of which is also covered with gravel and sand. A pipe with holes for drainage is laid in the ditch, below the level of the blind area.
There must be a gap between the plinth and the concrete screed; for this, a damper tape is attached around the perimeter of the plinth. Upon completion of work, a curb is installed along the outer edge of the protective path.
If paving slabs are chosen as the finishing coating, then the curb is first fixed, and then the steps will be as follows:
- another layer of geotextile is placed on the layer of gravel and sand so that one of its edges goes to the base and the other to the curb;
- the edge of the geotextile that extends onto the base is coated with sealant for a better fit to the wall;
- a sand-cement mixture is poured on top in a ratio of 1 part sand and 5 parts M500 cement, which is thoroughly compacted;
- then the tiles are laid, starting from the base;
- the gaps between the tiles and between the covering and the curb are filled with a mixture of sand and cement or quartz sand;
- After laying the tiles, the protruding parts of the hydrotextile are cut to the same level as the finishing coating.
Installation - stages and features
In this section, based on the studied videos, photos and literature, we have created a step-by-step guide to completing the installation diagram. So, do-it-yourself sewerage for a bathhouse is mainly made in the form of a two-chamber septic tank, which is why we will consider the installation of this device.
In order to begin construction work, we need to know the concept of such quantities as depth and quantity of materials. If it is not difficult for you to fill with concrete, then you can do without the services of specialists. It is worth noting that installation of the device as a whole will take 4 days if the work is carried out by four people.
Pit preparation
Excavation work can be carried out using specialized equipment or manually. The second option is best given preference if there are stones in the soil or it is a sandy type. It is advisable to use an escalator in all other cases. The installation depth should depend on the location of the pipe through which the drain is transported from one point to the next.
The sewage system in the bathhouse with your own hands should be located below the freezing level of the soil. It is worth noting that this depth should be at least a meter lower. The distance from the pipe to the septic tank is 80-120 cm, which means a minimum depth of 2.5 meters.
The dimensions of the pit are affected by the flow of water that will flow into the structure. It is worth noting that this indicator is influenced by the frequency of using the bathhouse. After completing this stage, we level and concrete the bottom.
Installation of formwork
To build formwork, there is no need to purchase new materials at all, since it will be enough to use old boards. To do this, they need to be knocked down into shields, which are then carefully immersed in the pit. A water recovery system can increase the level of strength by adding reinforced mesh to the structure. To make the mesh, you need to choose a wire cross-section of 10-15 cm.
The reinforcing mesh is attached to the formwork for pouring concrete. If the features of the laying scheme include the absence of a bottom, then reinforcement is a mandatory component of the process. The formwork can be secured using stakes that are placed in the hole.
Pouring formwork
To create an ideal solution, you need to mix 1 part of cement and two portions of sand or gravel. It is better to carry out the concreting process simultaneously, but if this is not possible, then pouring can be done in layers. To prevent water runoff from seeping into the soil in the future, you need to compact the solution so that it has a dense consistency. Before starting work, it is necessary to install a drainage and inlet pipe that will transport drainage through the structure.
Floor installation
The installation scheme for this structure involves using a ready-made slab or creating it yourself from concrete. It is worth noting that the thickness of the concrete cover should support two adults. Also, the autonomous sewage system must have a hatch that will provide access to the mechanism. It can be made from any available material, but you can also buy it in a special store.
After the ceiling is completely ready, the installation of a filtration well begins, which is located at a distance of 2 meters from the septic tank. It is worth noting that the pipe from the sump should be laid at an angle of 1.5 meters. This requirement will create a gravity flow of water. Once these processes are completed, you can safely begin operating the sewer system.
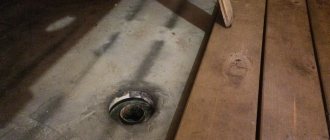
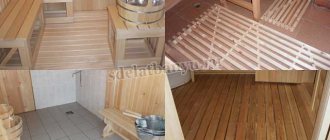
Krimeatech › Blog › Shower floor in a bathhouse on a pile foundation.
I will present one of the options for how to make a pouring, warm
the floor in the bathhouse is on a foundation made of piles.
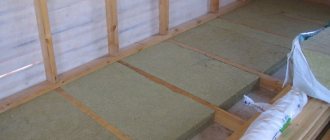
In order not to reduce the height of the ceiling, I hemmed the black floor from a 25x100 board directly to the bottom of the trim beam, and additionally hemmed 50x100 logs to the frame at 60 cm intervals from below. As a result, the black floor did not “eat up” a single millimeter of height, and also along it you can walk freely.
Next, we need to set the slope, for this we cut slats with a thickness of 2 cm to 5 mm, the thickness of each row was calculated according to the available dimensions and the desired slope. We get a slope of 2 cm by 1.4 meters.
I decided to insulate it in two layers. The first layer was made from 30 mm thick EPP already available at home.
And for the second layer, I chose some fashionable and expensive PIR board 50 mm thick. This plate has very low thermal conductivity, is non-flammable, can withstand high temperatures, and also has double-sided foil coating.
I first laid out both layers and checked the slope, since I thought that the slabs would have to be cut diagonally, but it turned out that if I didn’t cut it, the slope would also be normal. During installation, the seams were additionally joined with polyurethane foam.
In the end, everything turned out great, the slope also remained within 2 cm by 1.4 meters (center point). You can also walk freely on the insulation without fear that it will get wrinkled.
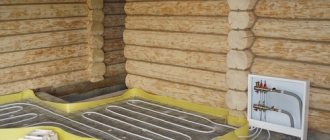
Now the fun part, waterproofing the floor
For this we will use an EPDM membrane, you can find the characteristics on the net, there is plenty of information, but it is important to remember that you need EPDM! The option of using such a membrane is not very budget-friendly, not only is its price very low-budget, but it can also only be bought in certain sizes and there can be a lot of surplus, and this affects the final cost
We align, spread as necessary and turn in the corners for easier further installation.
Next, we attach the logs and the finished floor. Initially I wanted to use 200x100 logs, but two problems arose: firstly, it was the same problem with the ceiling height, and secondly, there was a noticeable difference between the height of the floors in the steam room, relaxation room and outdoor terrace. Therefore, from the already purchased logs, I made a size of 150x100 using a manual circular saw.
The logs were attached to galvanized supports for the timber, on each side with two 10x100 plumbing screws and, additionally, for calming purposes, with several more 6x70 screws, although this extra screw holds the weight of more than a ton per cut.
The gap between the logs and the floor is about 2 cm, there is also a gap of about cm at the ends near the wall, that is, there will be no log in the water.
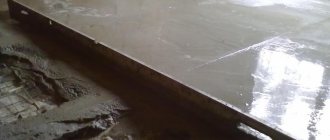
Next, everything is “simple”, we wrap the membrane along the existing bend of the trim on the wall and fasten it
An attentive reader will notice that the trim protrudes from the level of the wall, since the trim is a 200x200 beam, and the wall is a 145x145 beam and a step was formed, which also needed to be wrapped with a membrane
Here we need to make a retreat. Since the entire floor pie from the subfloor to the finished floor was as much as 30 cm, and this is without the height of the subfloor itself, it is still an additional 12 cm, this greatly raised the floor level in the steam room and greatly reduced the height of the ceiling. Hence such manipulations with the subfloor and complex work around the membrane piping. And if we foresee this in advance and raise the height of the bathhouse an additional couple of steps, then in the end we will get a simpler installation, but at the same time this will increase the overall height of the building and the height of the zero floor, which may not be very good.
We attach the membrane to the wall on an edge roofing strip made of aluminum, there are straight ones and there are angular ones, it doesn’t really matter which one to use, it all depends on the needs. I took the corner one, because I wanted to insert the membrane into the seam of the beam, but in the end I secured everything along the wall and it was possible to use a straight strip.
In fact, the membrane bends superbly, stretches and does not stiffen in the cold, I installed it at minus 3 degrees, and it fits perfectly on all difficult angles and reliefs, and in general there are no problems securing it on straight walls.
That’s basically it, the bathtub is ready))) I didn’t start draining right away, then I’ll cut it in, there’s nothing complicated there, we attach a direct outlet between the membrane and the subfloor and connect a dry siphon to it, then wherever it’s convenient for you, sewerage, ditch, etc. .
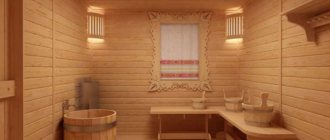
The last stage is finishing the floor, for me it will be a larch deck board. The floor will be made of four panels and will be easily removable, if you are interested I can write later what happened. If you have any questions, ask
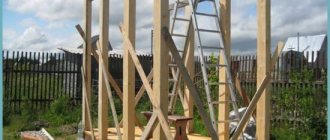
Pie wall frame bath
Baths built using frame technology are not inferior in their characteristics to those built by other methods, but require the investment of smaller amounts. Stages of work:
- The first is timber or edged board.
- Min. cotton wool, placed in the spaces between the wooden parts.
- OSB board with a thickness of 15 millimeters.
- Horizontal sheathing.
- Insulation.
- Vapor barrier.
- Vertical lathing.
- External finishing material.
- Vapor barrier.
- Interior finishing material.
Baths built using frame technology are not inferior in their characteristics to those built by other methods, but require the investment of smaller amounts. You can make the wall pie of a frame house with your own hands, but you need to choose the right materials, and then work step by step, observing all the nuances. As a result, they get a reliable, beautiful home that will delight the owners for a long time.
Base design
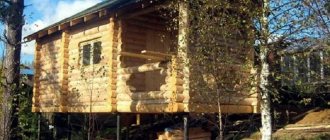
Correct arrangement and insulation of the base along the perimeter of the building allows you to increase the degree of floor insulation with a pile foundation. The purpose of the plinth is that it insulates the space under the bathhouse and does not allow cold air to enter there, and also helps to improve the aesthetics of the appearance of the building.
Cladding with DSP and panels with imitation masonry
The cladding is made using thermal insulation boards and decorative panels that imitate various materials - wood, stone, brick. Slab insulation materials (foam plastic, penoplex) are used as thermal insulation materials.
Base design options
What is unacceptable
When insulating the floor in a bathhouse, it is unacceptable to use materials that, when heated, will release harmful substances . This is often forgotten and people put, for example, linoleum on the floor.
***
There are few areas in Russia where it is cost-effective to build a bathhouse with a floor without insulation. The process itself is not so expensive and complicated as to neglect it, and the end result is an all-weather, year-round bathhouse - a great opportunity to relax and improve your health.
Clients who have not yet decided on the material for construction will find the following publications useful:
- advantages and disadvantages of frame and frame-panel baths;
- features of insulation of walls of brick, wooden and block baths;
- baths made of foam blocks, which have a lot of advantages;
- advantages and disadvantages of internal, which can be done with your own hands, as well as external, in particular inter-crown, insulation;
- the need for roof insulation.
Advantages and disadvantages of different methods of insulating the floor in a bathhouse on stilts
When a bathhouse is built on stilts, how to insulate the floor becomes one of the most important tasks. And the solutions here may be different:
- finishing the basement of the building;
- insulation of the foundation on screw piles;
- the use of an insulating layer when laying floors;
- thermal insulation using lightweight materials under the top layer of floor covering.
Each of these techniques has advantages and disadvantages:
- In the case of finishing the basement of a building, together with providing heat for the floors, the building itself acquires an aesthetically complete appearance. After this, cold air will not circulate under the floor of the building, drawing heat out of it.
- If you insulate the foundation of the structure itself, then you can ensure the longevity of the bathhouse and save yourself from frequent repairs. This insulation is reliable and carried out quickly, without requiring significant costs for materials.
- Insulation of the floor in a bathhouse on screw piles using a layer laid simultaneously with the work on laying the floor covering also turns out to be multifunctional: it not only insulates the floors themselves, but also requires further decoration, which as a result improves the appearance of the bathhouse interior.
- A layer under the final floor covering made of lightweight heat-insulating materials not only makes the rooms warmer, but also practically does not load the foundation of the building. Therefore, this type of insulation is often used for baths, where concrete grillage slabs are laid on screw piles.
Creation of insulating layers during flooring
Once the entire building is completed, interior finishing activities begin. At this time, it is appropriate to create additional floor insulation in all rooms of the bathhouse.
The best material for such work on concrete bases is considered to be polystyrene foam, polystyrene foam or penoplex. Laying such materials is not difficult, and the cost of purchasing insulation is very small.
After a uniform layer of waterproofing, insulation is laid, fastened with foam. After laying out the required layer of insulation, a mandatory reinforcing screed is made on top, on which the outer layer of the flooring is placed.
How to install a floor in a frame house on a pile foundation?
When choosing a material that is best suited for the procedure of arranging floors in a frame house on a pile foundation, it is worth paying attention not only to its strength characteristics, but also to its weight indicator. Experts recommend giving preference to materials that are lightweight
This approach will avoid the occurrence of excess loads on the foundation of the building. One of the good options is to use natural wood, and it is better to choose coniferous species, as well as oak or aspen. The wood must be well-dried and free of visual defects.
The logs are installed on the fixed beams, maintaining a distance between them of 58 centimeters. The cross-section of these elements should be 10 * 25 centimeters, then the thickness of the insulation will be 25 cm. To cover not too large spans (under a corridor or bathroom), you can use beams with a smaller cross-section, for example, 5 * 25 centimeters. To increase the speed of work on installing the logs, the grillage itself must be placed according to the step sizes between the beams. To match their width, it is necessary to equip the strapping elements with places for landing logs. They are placed in pre-made cuts, and they are connected to the base material with self-tapping screws, screws or nails.
How to choose material for insulation?
Different materials for construction can serve as a layer for heat insulation
In a log house, it is important to consider whether the selected type of insulator can be used in high humidity. According to experts, you should choose one of the following insulation materials:
Glass wool or mineral wool
Mineral wool has a significant list of advantages, which include:
- Non-flammability, i.e. fire safety.
- Low thermal conductivity.
- Not damaged by biological organisms (mice, rats, insects).
Based on the type of raw materials used in production, the following types of mineral wool are distinguished:
- glass wool;
- stone wool;
- slag.
Styrofoam
It is characterized by low cost combined with high heat-protective qualities. When laying the material, it is necessary to take into account the fact that the combination of high humidity levels and negative air temperatures can turn the slab material into scattered small balls.
Extruded polystyrene foam (EPS)
Many people are familiar with this insulation under the name “Penoplex”. In appearance, it is very similar to foam plastic, but it does not have its characteristic disadvantages. This material is practically unable to absorb moisture, and also has an increased level of strength. This means that low-temperature exposure is not dangerous for this material. In addition, the composition of polystyrene foam includes special additives that prevent it from burning.
Expanded clay
It is an inexpensive material that can be used for thermal insulation of floors in houses on pile foundations. Its thermal insulation qualities are lower than those of the materials discussed earlier, but its price is very affordable. The insulator is non-flammable, and its installation is extremely simple.
Conditions for determining the type of structure
When you start building your own bathhouse, you should first consider the principle of draining used water and determine the materials that will be used in arranging the floor. Most often it is made of concrete material or wood laid on logs. The first option involves large physical costs and financing, but it can last for a long period. The use of lumber is a more affordable method, simpler to implement, but will be used for no more than ten years. Based on the principle of water drainage, such floors are divided into leaking and non-leaking.
Features of installing wooden floors
When constructing a floor in a steam room using a non-leakage type, the installation of the logs should be perpendicular to the water drainage
One of the main structural elements of a wooden floor is strong logs, which can rest on timber when using the columnar foundation method. But you need to remember that all contact points must be carefully insulated using roofing felt with an intermediate coating of preheated bitumen. If the floor is installed on stilts, then it is advisable to use an insulating material with more effective properties.
After attaching the logs, boards treated with special anti-rotting compounds are laid on them. If a leaky floor is to be installed, a gap of 3-4 mm is required between the boards for ventilation and water drainage. And along the perimeter of the area there is a technological gap of 2 centimeters.
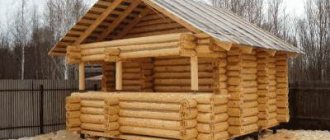
Foundation on screw piles for a 3 by 4 bathhouse
To enlarge the diagram
pile-screw foundation for a 3*4 log bathhouse (up to size 800x600 pixels)
click on the project with the mouse
.
Calculation of the cost of installing piles: 6 metal piles, Ø 108 mm, L 2500, with caps
| № | Names of goods, works, services | Unit change | Qty | Price, rub.) | Amount (rub.) |
| 1 | Metal pile Ø 108 mm, L 2500 mm | PC. | 6 | 1450 | 8700 |
| 2 | Head 200x200 or 250x250 mm | PC. | 6 | 250/350 | 1500 / 2100 |
| 3 | Installation of piles Ø 108 mm, L 2500 mm, with concreting | PC. | 6 | 1550 | 9300 |
| 4 | Channel 160 mm, with installation | linear m | 1050 | ||
| 5 | Delivery to MKAD | PC. | 1 | 2000 | 2000 |
| 6 | Delivery outside the Moscow Ring Road | km | ?? | 40 | ?? |
| Price 1: piles + caps 200x200 mm | 21 500 | ||||
| Price 2: piles + heads 250x250 mm: | 22 100 |
PRICE 1:
The cheapest option for a foundation on screw piles - all piles are mounted with 20x20 cm caps. A beam or log is used to support the floor joists (the price of the support beam is not included in the price of the foundation, since it is supplied with the bathhouse frame)
PRICE 2:
An average-cost foundation - 25x25 cm caps reinforced with stiffening ribs are installed on the piles. To support the floor joists, a beam or log is used (the price of the strapping support beam is not included in the cost of the foundation, since it is supplied with the bathhouse frame).
Notes:
If during installation of the foundation there is NO possibility of connecting to a 220V electrical network (required power 3 kW), the cost of renting a generator will be added to the installation cost (RUB 1,700 per shift).
If water is required during the installation of screw piles (for mixing the solution), the Customer must provide access to water within a radius of 300 m from the installation site. If water delivery beyond 300 m is carried out by a team, 500 rubles are added to the installation cost.
3) INSTALLATION OF PILES IN CRESTY CONDITIONS
When installing screw piles in cramped conditions (LESS than 1.5 m to an obstacle), the price of installing one pile increases by 1000 rubles.
4) DISASSEMBLY WORK
If installation of screw piles is impossible without preliminary dismantling work (dismantling buildings, rubble, removing concrete and gravel areas, dismantling blind areas, cutting trees, etc.), dismantling work is either negotiated and estimated in advance, or estimated based on the time spent on dismantling . The price of one hour of dismantling work by a team of 3 people, without the use of special equipment, is 1000 rubles. To avoid misunderstandings, agree on the scope of dismantling work or clear the site for installation of screw piles in advance. Clearing snow at the installation site (access roads are not an installation site) IS INCLUDED in the cost of installation work.
When installing a screw pile in sandy soil (including if the sand does not start from the surface, but deep into the soil at a depth of 100-200 cm), an additional fee of 500 rubles is charged for each pile.
Features of installing a pile-screw foundation for a 3 by 4 log bathhouse
When installing a 3x4 bathhouse frame on a pile-screw foundation, screw piles with a trunk diameter of 108 mm, a length of 2500 mm and caps of 250x250 mm are usually used. The 3x4 bathhouse frame rests on piles in the corners, and the 4-meter outer wall is split into two parts, usually in the place where the fifth (inner) wall cuts into the bathhouse frame.
When building a 3x4 log bathhouse on screw piles, one additional strapping crown is made from a round log of increased diameter (26-30 cm). The additional crown plays the role of a grillage, which connects the screw piles together and on which the floor joists are laid. At the same time, the crown does not add to the height of the bathhouse frame. Instead of an additional crown made of logs, a beam with a section of 150x200 or 200x200 mm can be used as a grillage under the log house of a 3x4 bathhouse.
If the construction of a log house 4x3 bathhouse is carried out on a significant slope, it is recommended to tie the screw piles with a channel with a flange width of 160 mm. Also, if you wish, the screw piles under the bathhouse frame can be tied with a 20x40 mm profile pipe, which simultaneously strengthens the foundation and is the basis for attaching decorative elements when finishing the basement space. However, we recommend tying the foundation with a profile after assembling the log house of the bathhouse, since during the construction of the log house
Technology of work execution
Fastening the strapping elements
Professionals in the construction field recommend using a combination of two fastening devices when installing a foundation grillage on screw piles - mounting on a threaded connection and clamps. The presented method of fastening all connecting elements of the harness will ensure reliable contact and durability of the structure.
The only nuance when laying wooden beams is their preliminary treatment with antiseptic compounds, which helps prevent premature rotting of the wood and its subsequent destruction. Before carrying out work, it is more advisable to draw up a diagram of the placement of all connecting elements indicating the necessary measurements.
Fitting on a threaded connection
It is more rational to use the presented method in the case of placing U-shaped screw piles. To install the foundation piping with your own hands, you must perform the following steps:
- Install the grillage beam into the opening between the pile posts. Before laying the beam element in the U-shaped flange, we lay an insulating layer of roofing material treated with drying oil.
- We fix the connecting elements. From the sides we fasten the beam to the head using self-tapping screws, and directly to the pile - with anchors or through pins.
We recommend watching a video of how timber is fastened using fasteners.
Fastening with clamps
If it is not possible to secure the beams using self-tapping screws and anchors, it is more advisable to fasten the component elements using clamps.
The installation procedure includes:
Rectangular bars are laid on the heads of the pile elements. When using wood beams, fastening is done using self-tapping screws, and in the case of metal products - by welding
During fastening, it is important to control the verticals of the elements being placed at the building level. After installing the guide beams along the entire perimeter, we lay a U-shaped board (in this case, it plays the role of a “clamp” or a special casing that ultimately secures the guides). The ends of the U-shaped element after placement should be directed downward, while it is advisable to remove excess material protruding beyond the head. fastening the components of the grillage (using a similar method to the presented method, we fix the sides of the head of the pile support and its central part by using screws and anchors, respectively).
Watch the video on how the elements of the strapping structure are fastened together.
Choice of thermal insulation
The construction of a bathhouse on wine piles allows the use of virtually any material for thermal insulation. Some people take expensive products, others use improvised means (for example, plastic bottles). Suitable insulation materials include:
- Expanded clay is inexpensive and environmentally friendly. Among the shortcomings are poor resistance to temperature changes and the need to lay a thick, even layer (at least 20 cm), which is problematic to do;
- polystyrene foam – ergonomic, inexpensive, reliable. Among the shortcomings - it deteriorates when combined with some paints and varnishes;
- mineral wool - comfortable to lay, retains heat well. Among the shortcomings - it accumulates dirt and dust;
- ceramic tiles – convenience, durability. Among the shortcomings is the high cost.
Ceramic tile cladding
In order for the support pillars to have a more presentable appearance, as well as to protect them from dirt and dampness caused by melting snow or flooding with water from a reservoir, they should be additionally finished. Various facing materials will help protect the floor in a bathhouse on screw piles, as well as emphasize the appearance of the building itself.
Since the main damage can be caused by snow and flows of dirty water in the off-season, special attention should be paid to the waterproofing qualities of cladding materials.
A good facing material for decorating the floor in a bathhouse is ceramic or tiled floor tiles. As a rule, they do not put a solid board under it, but prefer chipboards, plywood and other materials that are attached to the bars in the floor.
Bathhouse: floor insulation
Why do you need to insulate floors? Seasonal bathhouses really don’t need this, but if you want to take a steam bath in the cold, you’ll need an insulated bathhouse. Insulation has already been mentioned twice above. But we will consider its options in order.
Insulation of the floor in a bathhouse on screw piles
The building, placed on stilts, does not have a concrete foundation, instead there is an empty space where the wind blows. Insulation of the floor in a bathhouse on screw piles should begin with the creation of a double floor: rough and white with a layer of insulation. To do this, a beam for tying is first placed on the pile heads, and boards soaked in antiseptic are nailed to it. A hydrobarrier film is laid over the entire base area, and then insulation is placed in the space between the boards - mineral wool, penoplex or extruded polystyrene foam. Then again the water barrier and the white floor.
If there is a concrete slab on piles, it is waterproofed by fusing roofing material or covering it with mastics. Insulation is placed on top, for example, extruded polystyrene foam. The next layer is a 5 cm concrete screed with a reinforcing mesh, and then - at the owner’s request: you can put a heating system and tiles, for example.
The floors in the bathhouse are poured, with a layer of insulation
Actually, we have already talked about a concrete field, but this is the same as a poured field. There are two cases of filling: on the ground and on the ceiling.
On the ground
There are many options offered on various resources. You can do this:
- A pit is dug inside a solid strip foundation to a depth of 40-50 cm.
- Gravel is poured and compacted so that its layer is 15 cm.
- A sand cushion is poured and compacted - 30-50 cm.
- Roofing felt is placed on top of it in two layers with sheets overlapping 10 cm and sealed with bitumen mastic. (2nd layer perpendicular to 1st.)
- A layer of insulation - expanded clay or mineral wool, or slag from a boiler room, or felt impregnated with tar. The layer thickness is 30-50 cm, extending onto the walls.
- Only for mineral wool - the second layer of hydrobarrier. This could be plastic film.
- A layer of reinforcing mesh with a rod diameter of 5 mm.
- Beacons and guides for creating the desired slope.
- Pouring concrete screed. Thickness is at least 3 cm.
As an option, two layers of concrete pouring are possible: the first layer immediately over the sand and gravel cushion, and the concrete is mixed with coarse gravel. A hydrobarrier is placed on the first screed, then insulation (for example, perlite with cement). Place a metal mesh and a new layer of concrete screed on the hardened mortar.
Or you can not complicate your life and simply lay the foam on compacted sand (if you have sandy soil) or a sand cushion, waterproofing under it (polyethylene can be used) and pour the slab on top, 10 centimeters thick.
By overlap
This method was described above, where we talked about insulating a concrete floor in a bathhouse, in a concrete floor slab on stilts.
Insulating the floor in a bathhouse with expanded clay
They also insulate concrete floors. It is placed on roofing felt or other waterproofing material placed on top of a sand and gravel cushion. A laser level will help level its layer. To create a slope, expanded clay is moistened with cement mortar.
IMPORTANT! Experienced builders advise that when insulating the floor in a bathhouse with expanded clay, take it from different fractions - the large one is warmer, and the fine one will fill the space between the large particles. In addition, you need to monitor the humidity level of expanded clay - it is hygroscopic, and this has a bad effect on its heat-insulating properties
With foam
Despite the fact that foam plastic is not a very suitable material for floor insulation, it is often used. Although its close relative - extruded polystyrene foam - is much more suitable for this purpose. The advantage of polystyrene foams is that they are not wetted by water. This eliminates the need to isolate their layer with a water barrier. Otherwise, the same methods of application in floor insulation as described above.
With perlite
- Mix 2 parts perlite with 1 part water.
- The mixed perlite is allowed to settle and 1/2 part of cement M300 and above is added.
- During the kneading process, add 1/2 of the water and another 0.5 liter on top.
The result is a dry, crumbly porridge, which is placed on the first concrete screed, and after 6 days it is filled with a second screed.
Insulation of the floor in the dressing room, in a wooden bath
The dressing room should retain the heat of the steam room and washing room, so it should also be insulated. The methods and materials are the same as in other rooms, there is only no need for slopes and drainage. The insulation is placed either between the joists on the subfloor, or on a film-insulated cushion of sand and gravel, or on the first concrete screed.
Thus, various materials are used to insulate the floor, and which one is better depends on the tasks at hand.
Insulated screed floor
It is made in the form of a continuous “pie” of covering from several layers, including insulation. Laying communications below its base can complicate the work and make it difficult to access them during operation. It is necessary to install in advance all elements that allow servicing utility networks, such as ladders, inspections, valves, etc.
The base level is set below the finished floor level to the height of the covering structure. The underlying layer of 0.15 meters is made of well-compacted medium-sized sand or gravel. A waterproofing membrane made of polypropylene film over 0.5 millimeters thick is laid on top of it. The panels are laid with an overlap of 10 centimeters, welded or fastened with adhesive. The edges of the film are placed on the walls of the grillage to a height equal to the thickness of the coating to prevent capillary filtration of moisture.
Ground floor with insulation.
A layer of solution 2-3 centimeters thick is applied to the membrane and insulation is laid. It is recommended to use special boards of extruded polystyrene foam or polyurethane foam. They have sufficient rigidity and low thermal conductivity; their edges have grooves and protrusions that allow the slabs to be joined without the formation of through gaps.
A leveling layer 5 centimeters thick is applied to the insulation, and a clean floor is installed on top of it. The screed is reinforced with a masonry mesh with a diameter of 3-4 millimeters with a cell pitch of 0.1 meters.
Instead of polymer thermal insulation, you can use expanded clay, as was usually practiced before. This solution is more complex and time-consuming, with dubious economic benefits. From 10 to 25 centimeters of expanded clay brand M-500, fraction 10-20, is poured on top of the waterproofing membrane. It needs to be compacted, leveled and poured with cement laitance, which will give structural rigidity to the backfill. After the binder has set, a reinforced cement-sand screed is laid over the insulation layer.
Drain in a bathhouse on screw piles
The floor of the bathhouse, raised on screw supports, can be insulated from the outside by backfilling with perlite or ordinary polystyrene foam. The outlet from the washing compartment and steam room must be connected through a bellows and elbow to a plastic sewer pipe. The sump must have drain and flush taps, otherwise it will be difficult to clean it and drain the water if the bathhouse on stilts spends the winter without load.
If you plan to use the steam room all year round, then the drain ladder or corrugation is installed without a bellows, and the inlet opening must be closed with a removable lid. For winter baths on stilts, the use of a ladder is not recommended, since the water seal inside the body can freeze and break the mounting flange.
Pros and cons of leaking floors
This type of coverage is relatively simple to install and does not require significant financial expenses. It is a simple flooring, between the boards of which there are gaps intended for water drainage. This option does not imply additional sewer communications, except for the drainage well located under the floor.
Insulation is not used, and for this reason this floor is used only in bathhouses located in areas with warm climatic conditions. If you replace damaged elements on such a floor, there are no difficulties, because the boards are not attached to the joists. By the way, they can be periodically removed and taken out into the open air for ventilation and drying.
How to make a drain in a bathhouse on screw piles
Let's consider today how a drain can function in a bathhouse on screw piles, when the bathhouse itself is “suspended” above the ground surface.
Making a drain in a bathhouse on screw piles is not easy, compared to other types of foundations, such as MZFL or USHP. Why? Because with the usual version of the foundation, the lower crown of the frame is connected to the base. This allows you to use both the drain plane of the pouring floor to remove wastewater, and a normal sewer system with drains and drain pipes through which water is sent to a pit or septic tank.
In the case when the pile option is used, there remains an empty space between the lower crown/grillage and the ground surface.
Features of a bathhouse foundation on screw piles
So, we have a bathhouse on screw piles - how to drain wastewater from the washing compartment and the bathhouse?
At the same time, how to make a drain in a bathhouse on stilts in such a way that the sewerage structure does not harm the design of the entire bathhouse complex?
First, let's look at the features of a screw foundation that can help or hinder us during the work. To do this, we will go through the steps, from the very beginning of work on the site to the complete installation of the sauna log on the specified type of base.
A. We begin marking the site for the placement of the bath complex. The bathhouse can be either a small log house 3 by 3 meters, or a really large structure, including not only a steam room and a washing room, but also a relaxation room, a veranda, residential guest quarters, a furnace room and a woodshed.
B. The building site for the construction of a bathhouse is selected based on all the above-mentioned future premises that we would like to see in our recreational building.
B. The installation points for screw piles are marked. To begin with, test drilling is carried out in order to establish the composition of the soil and possible obstacles when using the specified type of foundation. In this case, not only rock fragments or dense layers of soil can become an obstacle, but also quicksand or very weak soils such as peat.
D. Drilling and installation of screw piles is carried out. The number and diameter of piles are selected based on the total weight of the bath complex structure. As you know, the foundation must support the weight of the entire structure with a reserve.
D. A steel grillage is mounted on the installed screw piles, which can later be supplemented with a concrete or wooden grillage.
To make a concrete grillage, formwork is mounted on the top of the piles, and the reinforcement is connected to the steel part of the top frame of the piles. After pouring and strengthening, we obtain a stable and durable foundation for the lower crown of the bath house.
E. The above-ground part of the screw foundation is painted, as well as horizontal waterproofing of the grillage.
Options for draining a bathhouse on a pile foundation
In the case of using a screw foundation, it is best not to make a drain under the bathhouse, but to move it outside the building area.
The most correct option would be to use a sewer pipeline and drain bath wastewater into a pit or septic tank next to the bathhouse, or into a common house septic tank.
In this case, you can use both a pouring floor with a drain plane and concrete floors with drains to collect wastewater. Further, through the pipes, the water can be removed beyond the sauna base.
As you can see, before draining the bathhouse, you should think about how best to implement the bathhouse sewerage project.
How to make a drain under a bathhouse when there is only one room in it, which combines both a steam room and a washing compartment? This can be done using a pouring floor in the steam room, when a galvanized iron trough is installed under it, which collects water. Next, the water is sent through a ladder in the trough to the outside, into a cesspool or septic tank.
How to drain a bathhouse on stilts when you need to combine the drainage from the washing compartment and from the bathroom? All you need to do is link the two drains, with the toilet drain being fitted after the wash compartment drain. In this option, the water from the washing compartment will not only push waste from the bathroom ahead of itself, but will also clean the entire length of the drain pipe.
Basement design options
As you understand, when using screw piles, there is no base under the bathhouse as such, but there is a so-called basement space. This is the distance from the grillage/subfloor to the ground surface.
How to decorate this space so that the overall design of the bath complex looks attractive?
The easiest way is to sew up the basement space with any sheet basement decorative material. This can be all available options for basement siding, profiled sheets, metal siding.
Principles of installation of screw piles
In order for the installation of screw piles for the foundation to be carried out as correctly as possible, a number of basic rules should be followed.
It is necessary to pay attention to the following points:
- The distance between separate piles should not exceed 3 meters, otherwise the floor in the bathhouse will begin to sag due to excessive load.
- If the distance between adjacent joists exceeds 3 meters, additional supports must be installed in the central part of each beam so that the floors do not spring when walking.
- Since a pile-screw foundation requires a sparser placement of supports than, say, a strip foundation, it is advisable to tie the central row of piles with a channel.
- If wooden beams are used for piping, the height of the central piles should be made 15 cm lower than the rest.
- Where the fifth wall adjoins the building, two additional supports should be installed.
The standard height of screw piles for a log bathhouse is 6 m
When installing supports, care should be taken to ensure that there is as little waste as possible.
Let us note that if all building codes and support installation technology are followed, a bathhouse on a pile foundation can last for at least half a century, or even longer.
Insulation of the foundation of a bathhouse on stilts
This method of insulating bathhouse floors on stilts is in demand by many bathhouse owners. In this case, the base itself, resting on screw piles, is insulated. You can begin work after erecting the foundation on piles, using the following order:
- Cover the piles with wooden boards into a single frame, securing them with fasteners.
- Lay out low formwork around the perimeter of the frame, into which a small layer of monolithic base will be poured. The formwork must be made in such a way that it does not interfere with the smooth surface of the poured concrete and its uniform distribution between the piles along the entire perimeter of the bathhouse.
- After the concrete has hardened, it is waterproofed with hot bitumen or roofing felt laid in several layers.
- Then thermal insulation is laid in dense, even rows. A wide variety of materials can be used as insulation: mineral wool, expanded clay, perlite, etc. All these materials weigh little and therefore will not be a noticeable load on the base, which serves as a concrete platform. At the same time, they will have sufficient thermal protection for a bath.
- To protect against moisture, put another layer of waterproofing on top.
- After installing the common base slab of the building on the screw piles, the resulting structure can be faced.
A similar warm floor in a bathhouse on stilts is done quite quickly, but then it is necessary to additionally insulate the floor inside the bathhouse. True, much less materials will be required for internal insulation.
Video about insulating the foundation and base of a bathhouse on stilts:
Spilling or wet floor
This is the most popular design for baths on stilts. It requires high-quality thermal insulation if the bath is to be used in winter. All water that is used in the bathhouse is drained directly onto the floor and removed to the sewer or drainage system through a drain hole (ladder) installed at an angle in the floor structure.
pouring floor
Therefore, it is extremely important to ensure the moisture resistance of such a floor and the rapid, high-quality removal of water from its surface.
There are two types of poured flooring - completely wooden and combined. In the first case, the boards are laid on top of the beams or joists in such a way that gaps 3-7 mm wide are formed between them. Under the flooring there is drainage in the form of crushed stone, laid on a sand cushion to a height that does not reach the bottom of the floor level by 10 cm. During the operation of the bathhouse, the used water goes into the drainage and there is no need to install a sewerage system. But this method of organizing the floor has its own nuances: in winter it will be cold in such a bathhouse, and high-quality removal of moisture from the drainage depends on the presence of sandy soil.
Methods for installing a pouring floor
A more comfortable design is a leaky floor installed above a concrete screed with a drain hole. Crushed stone and reinforcing mesh are laid on top of the soil, laid at an angle to the drainage pit, and a screed is poured. Beams and plank flooring are laid on top.
Sloped floor
If for some reason you are not satisfied with the pouring floor, then you can make a design, the use of which is provided for in all shower cabins. In other words, you can do an ordinary drain. To prevent water from stagnating, thereby accelerating the rotting process, part of the floor should be lower than the base.
The slope is done quite simply. During the installation of the flooring, you can use boards with gradually decreasing thickness. You can place pads between joists and boards. The slope should be slight, literally 1–1.5 centimeters. This is enough for the water to drain.
It is worth noting that sloping floors are mostly intended for rooms with concrete screed. For completely wooden baths with a sink and a steam room, the best solution is a poured floor.
Technology for constructing a pile-screw foundation
The foundation installed on screw piles primarily affects the type of floors in the future bathhouse. In order to correctly calculate the amount of building materials that will be required to build a high-quality and durable foundation, it is advisable to trust the specialists.
When making calculations, the following factors must be taken into account:
- soil composition and quality;
- average level of snow cover in winter;
- soil freezing depth;
- level of melt water flooding;
- Rose of Wind;
- weight of the finished structure with full finishing.
The construction of a frame bathhouse on screw piles begins only after preliminary marking of the placement of supports on the site. Small pegs are driven in at the required points and string is pulled, with the help of which all other measurements are made. The pile can be screwed in either with the help of special equipment or with the joint efforts of several people. It is worth remembering that the position of the pile must be strictly perpendicular to the horizon.
Plank bases - we make and insulate them ourselves
Wet floors are recommended for baths with a base of at least 0.5 m. If we plan to use the steam room exclusively in the summer, there is no need to insulate its wooden base. When using a building year-round, thermal insulation of floors is a mandatory procedure. To install a wooden floor base, we will need boards:
- well sanded (made of oak or larch) - for installing a finished floor;
- lower quality - for the rough part of the structure.
We also purchase beams. It is optimal if they have dimensions of 15x10 cm. But it is also possible to use products with more modest geometric parameters. The main thing is that they are reliable and can withstand the planned loads.
Installation of a poured non-insulated floor is carried out according to a simple algorithm. First, we cut the lumber into the required dimensions. We treat them with an antiseptic brush. Then we install logs (without the slightest slope!) on the foundation grillages (thick beams perform their function). We screw (you will need a screwdriver and self-tapping screws) the edged boards to them, forming a rough covering. After this, we install the finished floor using sanded wooden products. Between the individual elements we leave gaps of about 7–10 mm. These gaps are very important. Through them, water from the steam room will flow out freely. The finished base must be covered with drying oil (preferably two layers).
Insulated floors are a little more complicated. We will have to take care of organizing high-quality drainage, hydro- and thermal protection of the foundation under construction. The procedure will be as follows. We lay the beams on a slope, securely fixing them with dowels of suitable length. Important! For every meter of beam, the slope should be 1 cm. We arrange a rough foundation. We install logs on it. Between the latter we lay insulating material. Experts advise using expanded polystyrene (extruded) slabs as such. It does not get wet and is characterized by excellent heat-protective properties.
We cover the insulation with a vapor-waterproofing membrane. We lay it towards the floor base with an absorbent surface!
We install the membrane with a 15-centimeter overlap on the walls of the bathhouse. We fix the vapor barrier along the edges with aluminum slats.
We are organizing the drainage. We fit the sewer pipe as tightly as possible to the rough base and waterproofing layer. Carefully seal the remaining gaps with sealant. We fill the finished floor. We install the boards very tightly. We knock them out with a mallet. We should not have any gaps between the individual elements of the base. The insulated wooden floor is ready!
Protective and preventive measures
The main danger to the floor in a bathhouse is high levels of humidity, constant fumes, and dampness. Waterproofing is mandatory; all building materials are treated with special compounds. If these requirements are neglected, you are guaranteed the formation of mold and mildew, which can destroy not only wood, but also concrete.
All individual elements of the floor structure must be unambiguously treated with antiseptics, which are offered in large quantities by the building materials market today. It is recommended not to skimp on this activity by treating surfaces several times. If you plan to lay insulating material in the floor, a waterproofing layer must definitely be installed. All these measures taken together will extend the service life of the bathhouse and postpone possible repair work to a later period.
When, for certain reasons, it is not possible to carry out all the recommendations during construction work, it is imperative to carry out certain procedures that can prevent wooden and concrete surfaces from destruction. In such cases. Wooden floors are disassembled, thoroughly weathered and dried, and places where rot has begun to appear are eliminated. Boards and joists are cleaned with sandpaper, soaked in antiseptic solutions, and dried again. Recommended. After completing all of the above measures, coat the wood with a wax or varnish composition on a water-repellent basis.