Today, many people have their own suburban areas. And, of course, everyone strives to arrange their plot so that living outside the city, and just relaxing on weekends, is as comfortable and enjoyable as possible. If you do everything yourself, for example, a bath canopy with your own hands, then that’s absolutely wonderful!
Canopy planning diagram.
Many owners of dachas or country houses dream of building a real Russian bathhouse on their own property. But such a dream can come true even on your own. In fact, it is not as difficult as it might seem at first.
At the very least, you can save a lot of money by doing some of the work yourself. For example, you will make furniture for your future bathhouse.
DIY bath canopy
- 1 Material selection
- 2 Shelf design
- 3 Surface treatment
- 4 Recommendations from experts
- 5 Videos
- 6 Photos
The most important attribute of any steam room is the so-called canopy, the correct arrangement of which largely determines the comfort of bathing procedures (including their safety).
A competent approach to the choice of material and design of the shelves will allow you to turn this functional element into a worthy decoration of the interior of the steam room. Before making a bath canopy, first of all you should familiarize yourself with the existing design options, and also decide on the material from which you will make it.
Rules of care
Over time, the canopy may darken, the protective composition may wear off and wash out. The first problem can be solved with the help of bleaching agents.
Efficiency of wood bleach Source kelohouse.ru
It is important to note that they contain chlorine derivatives or hydrogen peroxide. Bleach lightens wood, helps destroy fungus, mold, and bacteria.
The penetration depth is determined by the percentage of the base component. Since active substances can cause allergies and harm health, the room after their use must be ventilated for 1-2 days.
Before you make the bench in the bathhouse updated, it must be thoroughly washed, wiped and dried. It is better to apply thick protective decorative compositions by rubbing in; liquid ones are processed using a brush or sponge. After 24 hours, excess oil can be easily removed with a cloth.
Material selection
Edged boards
When choosing a material, you should take into account the characteristic features of various wood species, as well as the specific conditions of their practical use. To ensure comfortable operating conditions, the following requirements apply to the wood used to make shelves:
- low level of thermal conductivity;
- strength of the fibrous structure;
- absence of resin secretions;
- resistance to high temperatures and moisture.
Of all the types of wood familiar to us, the specified requirements are fully satisfied by such varieties as cedar, linden, alder and aspen. When choosing a specific material from the specified range, as a rule, preference is given to linden.
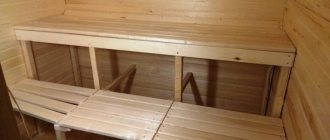
Shelf design
Dimensions of a shelf for a bathhouse
Before making a canopy for a bathhouse with your own hands, you need to decide on the order of arrangement of its individual elements, on which the ease of use of the entire facility as a whole will depend. There are several options for making shelves in a paired room, the choice of which is determined by specific operating conditions. Let's look at each of these structures in more detail:
- The stepped arrangement option involves placing separate shelves in three tiers; Moreover, the canopy is located in this case along the wall furthest from the stove or in the corner. With this design of the shelf, it is possible to obtain two temperature zones in which different conditions for taking bath procedures are created. Within one of them (the top one) the hottest conditions are created, while on the bottom shelf you can relax and catch your breath in the cooler air. One of the indisputable advantages of this design is its cost-effectiveness, which allows you to expand the usable area of the steam room.
- The so-called “L-shaped” version of the shelf arrangement involves installing the upper and lower shelves along one wall, and the middle ones along the other. This design is used, as a rule, in steam rooms of limited size, where there is a need to save every meter of occupied space.
- Well, in very small steam rooms, an arrangement option similar to that used in carriage compartments is often used. In this case, only two shelves are made, placed one above the other. Thanks to specially designed fasteners, they can be folded, freeing up the necessary space (similar to the side shelves in cars).
Floor boards: types of material used as flooring
Several types of wood flooring are used to finish the floor. And each of them has its own characteristics, advantages and disadvantages. Beautiful and high-quality flooring not only determines the appearance of the room, but also withstands heavy loads
This type of material can be used not only as a rough coating, but also as a finishing coating. It is made from solid wood or by gluing several elements together. Visually, this material looks like a milled board. To make a floor from a floorboard, you can use ordinary material or one made according to European standards, the so-called Euroboard. For its production, special technologies and special European equipment are used.
The quality of the second type of floor covering is usually noticeably higher. On the one hand, it has lower humidity, and on the other, high standards do not allow the presence of even small defects, for example, holes, knots, stains, etc. This surface is smoother, ideally polished, but this material is noticeably more expensive.
Obviously, it is better to purchase a Euroboard if you plan to use it for a finished floor. But ordinary material is more often used just as a rough covering, on top of which laminate or linoleum will be laid. Whether it is worth spending money on buying Euroboards is up to each buyer to decide for himself. It is recommended that you familiarize yourself with both material options to choose the most suitable one.
Solid wood floorboards may contain knots, resin, and small bluish spots
This type of floorboard is always fastened into a groove, so the only question is how to make the installation procedure as simple as possible. Rectangular tenons are common, but mating them with grooves is quite difficult, especially if there is even a slight curvature. Laying closely in this case is a complex procedure. Sometimes, in order to make the task easier, the boards are sawn into pieces. But the appearance of the floor covering is greatly deteriorated.
A good option for fixation is quarters. In this case, one of the boards is cut half the width at the top, and the other - in the same way at the bottom. This is a very simple way of fixing, and this floor looks really beautiful.
Glued laminated boards are made from several elements, glued together in such a way as to provide additional strength. In this case, the fibers are arranged so that throughout the entire period of use, each element does not lose its original appearance and characteristics.
Glued-laminated floorboards have a high price due to the complex manufacturing technology
Drying of such boards is almost completely eliminated, which allows the floor to remain level. Laying such a coating is a rather labor-intensive procedure. In addition, laminated wood has a high cost due to complex manufacturing technology.
The main advantage of glued boards is its high resistance to heavy loads. That is, in rooms where there is heavy furniture or high foot traffic, this option will be simply irreplaceable. In addition, this material is often used to decorate children's rooms to provide the floor with an attractive appearance and the necessary durability.
Due to its structure, laminated boards tolerate moisture well. And although it should not be placed in a bathroom or bathhouse, where the humidity is too high and almost constant, it is perfect for ordinary living spaces, even for the kitchen.
The decking board is characterized by a special wavy surface. This is an ideal option for arranging rooms with high humidity, for example, a bathroom, bathhouse. In addition to being highly resistant to moisture, the rough surface reduces the risk of slipping and falling on wet floors.
Among the features of these boards, it is worth noting the presence of special compensation grooves, which are small in size (only a few millimeters), but perfectly relieve excess stress. This is necessary due to exposure to precipitation and sun.
Surface treatment
Wood impregnations
After installation of the canopies, you will need to worry about protecting their surface from destruction, as well as giving the finished structure a more attractive appearance. But before treating the surfaces of the shelves using any of the known methods, you need to carefully sand them using a special grinding tool. When choosing a protective decorative composition, you should take into account the fact that not all known types of wood coatings can be used at elevated temperatures.
Thus, standard paint and varnish impregnations are completely unacceptable for steam rooms, since at high temperatures they form a film on the surface of the wood.
It is for this reason that steam rooms use special compounds and impregnations that are resistant to high temperatures and moisture and do not form a film. As an example of such a coating, we can consider the universal composition of the brand “Supi Saunavaha” (Tikkurila), made on the basis of natural wax.
Device Features
The arrangement of this room should not only be simple, but also at the same time as comfortable and convenient as possible for those who will use it
The most important thing is that it must contain the required number of shelves and racks. It should be said that the stove is the main component of any steam room, because it is responsible for ensuring the correct microclimate, as well as the comfortable required temperature in this room
Today in the steam room it is possible to easily install any type of stove: stone, electric, or made of metal and brick.
If we talk about shelves, they are formed from boards and leave a small space between them, thereby forming a drain. By the way, it is better to use any wood for shelves, except coniferous species. Shelves should be fixed so that there is as much free space as possible and it remains possible to quickly clean after visiting this room. Under them you can place various kinds of bath accessories such as various ladles, buckets, and brooms. In general, the distance between the floor and the shelves should be maximized, because cold air masses accumulate precisely under them.
The steam room must have ideal proportions so that it warms up well to the required temperature level.
Its walls must also be covered with special insulation, which will retain heat inside for a long time and at the same time, under the influence of high temperatures, will not release harmful substances into the environment. If we talk about flooring, it is usually made of either boards or tiles, which are quite easy to care for.
The door should have minimal dimensions, because it can become a source of additional heat loss. It is better if it is located near the stove. It should not be constipated and should be easy to open and close tightly.
The latter is extremely important due to the fact that there are often cases when such doors jam due to swelling of the wood due to high humidity. There cannot be any windows in such a room at all, but if you still want to make them, then they should be very small, blank and located as high as possible to the ceiling
An essential element, without which the effective use of such a room is impossible, is a ventilation system that will remove excess moisture and provide a constant flow of fresh air.
Recommendations from experts
- In certain conditions, the most convenient option for making a shelf is a collapsible design, which allows the elements included in its composition to be dried in the fresh air.
- When attaching shelf elements, you should not place them close to the wall of the steam room, leaving a small gap (about 5–7 cm). For these purposes, you can use special wooden spacers placed between the boards and the wall (watch the video).
- Structural elements in direct contact with the floor must be protected from moisture. Gaskets cut from a piece of rubber can be used as such insulators.
Video
This video describes in detail how to assemble the canopy in the steam room:
Corner canopy in the bathhouse
Canopy in the steam room
Located in the corner
Simple option
Canopy in the bathhouse
Made from logs
The height of the shelves in the steam room (in the bathhouse) from the floor: standard sizes for saunas and steam rooms
The height of the shelves in a bathhouse is an important parameter on which comfort, ease of stay and the benefits received depend. However, there is no special standard for the size of shelves for a bathhouse, fixed in official recommendations. The optimal options are calculated in advance, regardless of who is doing the construction - professional, experienced craftsmen, or the owner who decided to build the structure with his own hands. The determining factors for choosing the height of the shelves can be the size of the bathhouse, the type of stove used, the number of people for which the design is designed and the type of shelves used.
Traditions and recommendations
Despite the lack of a uniform standard, there are traditional ways to determine ceiling height. Typically, a Russian bathhouse was built individually, for the family living in the house. Therefore, to determine the required parameter, the tallest member of the family stood on the floor and raised a broom upward.
The tip of the bunch of branches in the outstretched hand was the boundary on which the ceiling was built. In modern conditions, such a building can be used for commercial purposes or for recreation with friends and colleagues.
The method of determining the height dimension has become less common, so experts prefer to recommend when building a bathhouse a height in the range from 2.1 meters (but not less, otherwise the steamer will be uncomfortable) to 2.40 m.
These are the parameters that are considered optimal:
- the steam room warms up quickly enough, and the consumption of firewood does not exceed the normal amount;
- with a height of up to 2.4 m, even an electric oven does not require a lot of electricity consumption to properly warm up the workspace;
- if there is a tall person in the family, you can use his arm extended upward as a standard - this will ensure that those taking a steam bath will not experience discomfort in any position;
- sometimes you can find advice to add half a meter from the tip of the middle finger of an outstretched hand, but if the height is greater than 5 m, then more fuel will be required and the steam will go to the ceiling;
- 200 cm will already lead to the accumulation of steam almost at the level of the respiratory organs, in such an atmosphere it will be difficult to breathe;
- in a compact structure, a ceiling of 20 m is sufficient, but if a structure is being built for commercial use, with a large number of visitors and steam volumes, the ceiling should be at least 3 m.
Layout and height
The height of the shelf in the bathhouse from the floor depends on the chosen variety. Typically, the shelving is placed along one wall - either the one without windows, or located on the side of the door.
This is necessary so that the cold air from it when leaving and entering does not destroy the atmosphere for those who are in the steam room. The choice of option undoubtedly depends on the owner. But before making a decision, it is better to listen to the authoritative opinion of a specialist in order to make the height of the shelves correctly.
- The linear design is the simplest and is the standard design used most frequently. It is installed under one wall and represents a kind of steps with gradually increasing degrees and consistency of steam. Each shelf is designed for a more resilient visitor. The steam room can have two or three tiers; the height of the bottom shelf is recommended to be at least 50–60 cm.
- In total, the shelves should not be higher than 2 m, but this height can only be made in a high room. It is believed that a seat with a height of less than 60 cm is uncomfortable not only for the person sitting on it, but also for the steamer with a broom. He will not be able to work at full capacity.
- The height of the shelves in the steam room of any Russian bath varies from 30–35 cm to 60. But the lower limit is acceptable only for low buildings. Making them too low means causing inconvenience to both your guests and yourself.
- A completely workable arrangement option is in the form of the letter G. It is arranged in the corner, between adjacent walls - in the form of one shelf, which must be hung on both walls, at a height of no more than 60 cm. It can be two- or three-stage. There is an option for arranging the upper and lower shelves near one wall, and the middle one against the other.
The drawing of such an arrangement of shelves, usually called a compartment by analogy with a train, where the lying places are also located one opposite the other, implies both the usual three steps and one for a full-fledged bath procedure.
In this case, the width and height of the shelves can be variable, although within the recommended standard. Of course, there are also unusual designs, but only a good specialist can use them. Many of them willingly share their experience in arranging shelves in a video, which can be viewed at the end of the article.
Parallel structures are good for a small bathhouse. As you can see in the photo below, this is a convenient option for shelves for a company intent on business or friendly communication.
The dimensions of the shelves in the bathhouse depend not only on the type chosen. Although sometimes they are influenced by certain factors. This is the configuration and shape of the room, its dimensions, the designer’s imagination or the personal preferences of the amateur designer.
The dependence of standard parameters on human size and the conventional concept of normal in various body positions or certain activities is undeniable.
What should a bath shelf be like: design features
Most often in baths you can find two-tier structures. In this case, maximum functionality is achieved with the minimum area required for arranging the shelf. As a rule, the lower tier is used for sitting, and the upper tier is for lying. This design must be done correctly. A slight difficulty is that the width of the second floor must be sufficient to make it comfortable to lie on.
A comfortable stay in the steam room of a bath largely depends not only on the microclimate, but also on the quality and convenience of the shelves located
One of the most important criteria is the thickness of the structural components of the canopy - the log. The cost of the material depends on this indicator. The pattern in this case is as follows: the thicker the logs, the more expensive they are. However, it is not recommended to purchase products that are too thin, as they will sag under human weight.
Helpful information! To save on the construction of a bath shelf, it is recommended to place individual logs at a short distance from each other.
Before assembling bath furniture, you need to decide on its dimensions. The shelves in the steam room can have different sizes and shapes. However, there are traditional, most common dimensions. In accordance with this standard, the total height of the structure should be 70 cm. The distribution of sizes between floors is as follows: for the 1st tier - 40, and for the top - 30 cm.
The distance between the lags is a mandatory rule that should be strictly adhered to. However, you should not make the distance too large. If necessary, these products can be made independently, but to do this you need to have at least minimal wood processing skills.
It is advisable to leave a distance between the shelf and the ceiling of the steam room, in this case you can not only lie on it, but also sit comfortably
Before you begin assembling the bathhouse shelf, you should prepare materials, tools and make a drawing, according to which all subsequent work will be carried out. Its creation must be approached with all seriousness, since inaccuracies in the drawing will lead to installation errors.
You should take into account the number of people for whom the steam room was designed. The size of the room also plays an important role, so you should focus on them as well. As for choosing a location, it is not recommended to place shelves near the window opening. As a rule, this structure is placed along one of the blank walls, complementing the interior with benches.
Determination of optimal parameters
When designing vaping devices, it is necessary to find a consensus between standardized requirements and the presence of individual characteristics of family members or regular visitors.
The comfort of staying in the bathhouse depends on pre-calibrated meters and centimeters. This data is also important when purchasing building materials.
Therefore, it is necessary to decide what the distance of the shelves in the bathhouse should be at the design stage.
To do this, it is recommended to first measure the expected space, and then choose the configuration and depth of the shelves that you like or that is optimal for the room. The parameters should be correlated with the requirements of convenience and comfort of those who will be here for the purpose of washing or healing.
When taking measurements, take into account the following:
- the length of the shelf can vary from 1.8 to 2 m - the latter parameter will allow you to receive guests of almost any height, and saving on length will make the lying position uncomfortable for a tall person;
- you can limit yourself to 1.5 m, but on such a step you can only lie with half-bent legs or in a fetal position, which makes it doubtful to get real pleasure from the steam room;
- the minimum for the bottom shelf is 40 cm, usually it is used as a footrest, but this width allows a beginner or someone who does not perceive heat well to sit with sufficient comfort;
- the middle and top ones are usually made at least 60 cm, in such a space you can sit in different positions for quite a long time.
It is also worth noting:
- if the shelves are 90 cm wide, it is convenient to take a lying position on them both on your back and on your stomach;
- the height calculation begins not from the bottom, but from the top shelf, while the main reference point in a Russian bath is the steam door of the stove, but the bottom bench should not be lower than 30 cm from the floor;
- the fastening of vertical supports should be at least 60 cm so that the structure does not sag even with significant weight of the person lying or sitting, although it may vary slightly depending on the thickness of the wood used;
- the height of the top shelf should be measured from the ceiling above - at least a meter is left from the head of the person sitting on the top bench to the ceiling, so it is important how much the height of the bathhouse is.
Nuances of height
The dimensions of the shelves in the sauna may differ from the parameters recommended for the Russian steam room. It is enough to compare the method of heating air and the conventional vaping method to be convinced of this.
Dimensions of bath shelves
Based on a person of average height and configuration, the following sizes of shelves in the bathhouse have been developed for receiving steam procedures in a sitting or lying position:
- The length of the shelf so that you can lie with your knees bent is 1.5 m.
- To lie on a shelf at full height without bending your legs, the length should be 1.8 m. But in this case, everything is individual, since all people are of different heights and it may be that 2 m is not enough (read: “What is the size of shelves in you need to make a steam room - practical advice”).
- The minimum width of the shelf is 40 cm. Most often this is the bottom shelf, which is used mainly as a stand for the bath attendant’s feet. You can not only stand on such a stand, but also sit if you want to cool down a little.
- The most common bath benches are 60 cm wide. However, they are not very convenient for steaming in a lying position. If you make benches for a bathhouse with your own hands, you need to focus on the people who will use the bathhouse, taking into account their height and physique.
- The width of the shelves is 90 cm, allowing a person of any size to sit crosswise with their legs tucked in and lie down.
Simple and affordable shelf options
Experts give many recommendations on the ratio of useful and auxiliary space, the wood used and the method of installing boards or slats. It must be mentioned that between the rear wall of the structure and the wall there must be a space for ventilation of at least 10 cm.
But you can find little advice on choosing the optimal height, and these are mostly practical recommendations that cannot be found in any book:
- the height of a single-tier in a Russian bath should not be higher than the upper edge of the stove (preferably 10 centimeters lower);
- if it is known who acts as a permanent bathhouse attendant, his height is used as a guide, although this advice is questionable, especially for commercial buildings;
- bottom shelf – from 40 to 65 cm;
- medium - so that it is convenient to work with a broom (although if you are short of height, you can stand on the bottom shelf);
- the topmost tier is at least a meter to the ceiling from the head of the person sitting on the top bench.
The dimensions of the canopy - length, width and height - depend not only on the whim of the builder, who, after completing his important mission, will put on a hat, grab a towel and go off to take a steam bath.
This is the most important part after the heating equipment. How useful and comfortable a stay in a bathhouse will be depends on correctly made calculations and standard recommendations based on many years of experience.
Arrangement of shelves in the steam room for comfortable movement
It is considered standard to install three-tier shelves in a bathhouse. The lower one will be cooler, the upper one will be the hottest.
To do this, it is important to take into account recommendations regarding the main dimensions of the product
Height
There are a number of optimal height indicators:
- 40‒60 cm. Distance between the first and second benches.
- 1.1 – 1.2 m. Height between the lowest step and the second shelf.
- 20 cm. This is the minimum allowable distance from the floor to the first step.
If among the regular vacationers or owners there are people of non-standard height, then the height and distances between the shelves should be selected individually.
Length
The recommended minimum range is from 1.5 to 1.8 m. With a length of 1.5 m, a person will be able to sit on a bench with their legs bent at the knees. On a 1.8 m shelf, most vacationers will be able to lie down at their full height.
Width
For the lower tier, which most often acts as a footrest, 40 cm is enough.
The standard width is 60 cm. With this size of the flooring, it will be comfortable to sit, but not to steam while lying down.
But on a 90 cm shelf it is already comfortable to lie down and sit with your legs bent.
There are benches 150 cm wide. Here the choice is individual. If the area of the room allows, then why not make them wide.
A canopy for a bathhouse is furniture, not furniture, but you can’t live without it
Let’s say right away that the canopy is that large bench that accompanies us, sitting or lying, the entire time we spend in this room. Not a single washing room or steam room is unthinkable without a canopy.
Designing and assembling a canopy for a bathhouse with your own hands is the final stage of all work, then it’s only a rest from the labors of the righteous.
The dimensions of the canopy for a bathhouse with your own hands are determined, in fact, by the dimensions of the room itself - usually the canopy is from wall to wall along the length
In the bathhouse even the bench has its own name
The range of wood on offer is huge, but it is important to choose the species and quality that best suits your conditions and preferences.
The structure will be wooden, so first of all you should think about the type of wood and its quality.
About suitable wood
Let's say right away that coniferous species - larch, pine, spruce - are not suitable here. The fact is that under the influence of temperature, the wood of these species begins to release the resin hidden in them.
Hot resin will cover the entire surface of the canopy on which you are located and, of course, no one needs such an environment. So, only hardwoods.
But here there is plenty to choose from:
- Oak The canopy will experience very significant loads from moisture and temperature, and this is where these two main advantages of this breed will be needed - strength and flexibility. And, in addition, resistance to fungi and insects, and, as a result, a pleasant atmosphere in the bathhouse. Oak will offer you a rich color palette, but there is one drawback as well as offering advantages - ideal sanding of oak wood is very difficult, but if you still set such a goal, you will have to choose a very durable tool.
- Linden . A pleasant smell, low density, healing properties and uniform structure - this is what predetermined the widespread use of linden in baths.
- Aspen. This breed is very resistant to moisture. True, it will quickly lose its original color, but it will not dry out for a very long time.
- Alder. If oak had been easier to process, it most likely would have turned into alder. Otherwise, this species is almost as good as oak in its protective and healing properties.
- Ash. And if the oak had a softer color scheme, along with processing, then it would turn out to be ash.
Classification
When choosing a tree for a canopy, pay attention to its quality, first of all, to the number of knots on the surface - this is the main indicator of the quality of wood, which is divided into 4 classes:
- Extra (example “A”) – maximum quality. The wood sample is uniform in color and does not contain either the core of the original material or knots. This class is also called “Premium” or “Zero”.
Drawings of a canopy for a bathhouse must contain information about the quality of the wood used, of which there are four
- Class “A” (“B”) - here the core is also unacceptable, the color is uniform, but you can find one knot per one and a half linear meters.
- Class “B” (“C”) - already 4 knots for every 1.5 m, through holes and contrasting spots are already allowed.
- Class “C” (“D”) - this quality allows chips and cracks.
Helpful advice! Pay attention to the quality of the wood used, not even because of its appearance. Twigs are an excellent conductor and keeper of moisture. The more knots there are, the more the canopy will be destroyed. And this is the main reason why we advise you to choose only “Extra” or “A” quality wood.
The canopy in the bathhouse must have a folding top or side plane - the instructions for use strongly recommend a thorough periodic inspection of the entire bathhouse
Layout
The area of the bathhouse is an important factor for determining the location of the canopy and the number of its tiers. After all, when they create a canopy in a bathhouse with their own hands, they focus on the longest wall. But with the obligatory consideration of the absence of direct steam from the stove into the steaming space, as well as drafts. Depending on the size, the bath canopy allows you to sit, recline or lie down.
Typically, canopies are made of two or three levels to allow you to choose a more comfortable temperature zone. In the classic three-stage version, the middle tier is made stationary. The collapsible design, where the upper and lower shelves are removable, allows for better drying of the wooden parts of the bathhouse.
Along one wall there can be stepped and compartment options for the arrangement of shelves. The most economical option for arranging the canopy is like in a sleeping car compartment, one shelf above the other. They are attached with the ability to fold, freeing up space in the bathhouse if necessary. With the third L-shaped method, one of the shelves is located on the adjacent wall.
The ideal length for the canopy so that the average person can lie on it freely at full height without bending their legs. Typically the minimum bench length dimensions used are:
- sun lounger – 180–220 cm;
- recliner – 150 cm;
- seat – 40–90 cm.
The most important dimensions for the height of the canopy tiers are the distance from the floor and ceiling of the bathhouse, the optimal location of the upper and lower shelves. The main point of these dimensions is that there is enough space so that an average adult can sit down without hindrance when taking a steam bath. And also so that the steamer or massage therapist does not take uncomfortable, crooked positions during the procedures. Recommended height:
- from the ceiling to the top canopy – 110 cm;
- interlevel height – 60–80 cm.
The standard width of the canopy is considered to be 60 cm, but the upper bed should have a larger transverse dimension - 90 cm. It is quite acceptable to reduce or increase all dimensions to suit the existing standards of the bathhouse room. If the width of the main canopy is designed for two steamers, then this will already be paid. How to make a canopy in a bathhouse to suit the needs of a particular family is up to the owner to decide.
The constituent elements of any standard canopy are:
- frame - support post made of beams;
- the surface of sun loungers, seats made of boards;
- backrest for sitting on the top bunk.
All parts of the canopy must be from the same type of wood.
It is not advisable to use material made from coniferous trees, since with constant heating they begin to release resins that will stick to the bodies of vacationers. The minimum resin content of such popular hardwood species in our country:
- Linden - healing properties, homogeneous structure, darkens over time under the influence of steam and humidity.
- Aspen is relatively inexpensive, has a healing effect, is resistant to moisture, and never rots.
- Alder is a dense wood with healing properties.
- Poplar has a uniform texture; after drying, the wood becomes hard.
The wood of these trees tolerates high humidity, frequent temperature changes, and has a low level of thermal conductivity. Despite all these wonderful properties, they are additionally treated with special natural oils to protect against mold. Under no circumstances should it be impregnated with any chemicals or varnished.
Experienced craftsmen know that wood material is classified by quality. We recommend making your own canopy only from “Extra” or “A” quality wood. In appearance, this smoothly planed wood is distinguished by the absence of knots, chips and cracks. The more knots there are on the material, the more susceptible it will be to rapid destruction under extreme steam room conditions.
In sanded wood, all sharp corners should be smoothed with a chamfer to protect the skin of bathhouse visitors from possible cuts. Boards for flooring sunbeds and seats will last a long time if their width does not exceed four times the thickness. That is, in order for the boards to dry quickly and not crack, they must be thin enough.
To prevent the structure from swaying and creaking, the racks-bars for the canopy frame should have a cross-sectional size of 50×70 mm or 65×15 mm. Fasteners must be made of galvanized iron. When choosing the old fastening method, it will be necessary to drill holes at the joints for oak wedges - tenons. To avoid burns, the heads of metal screws - self-tapping screws or anchor bolts - are buried deep in the wood and protected with special decorative caps.
Work progress
Before you begin making the canopy, you must take into account the following essential conditions.
Manufacturing conditions
Among the conditions that are highly desirable to comply with are the following:
- the entire structure - frame and main elements - must be made of the same type of wood;
- the canopy should be placed along the wall of the bathhouse, which does not have windows or vents;
- recommended height from the floor is at least 110 centimeters;
- It is equally important to maintain the distance from the upper surface of the canopy to the ceiling; let’s not forget, this is where hot air accumulates - the recommended free space at the top is 120-130 cm;
More often, bath canopies are made from such timber with rounded corners and a section size of 65 by 15 cm
- It is necessary to leave a gap of at least one centimeter from the wall for water to drain;
- the design should provide free access to the space under the canopy - drying this space will be the main concern after using the bathhouse;
- The lower supports of the structure must be located at a distance of approximately 60 cm from each other.
conclusions
A canopy for a bathhouse with your own hands is a very simple design, if you approach its creation very disciplinedly and first take care of the drawing, coordinating it with the dimensions of the entire room. Take into account the placement rules, and most importantly, follow the usual principles of convenience regarding the location of the boiler, the entrance to the room and the entrance to the steam room.
These limiting conditions themselves will become a good control of your further actions. Of course, pay unconditional attention to the strength of the structure being created; it is created for a relaxing holiday, in which there is no place for fears that everything might collapse.
Whether the canopy for the bathhouse with your own hands will be one, two or even three-tiered is up to you to decide, depending on the place and the enthusiasm of the master. One thing is clear - the quality of work must meet the highest requirements
The additional information that is offered to you in the video in this article will allow you to feel that, indeed, the work of creating a canopy in a bathhouse is not difficult, but it requires precision and accuracy.
DIY bath canopy drawings
Do-it-yourself bath canopy, drawings, diagrams, description and procedure for assembling a wooden structure.
In this article, we will look at how to make a canopy for a bathhouse with two tiers of shelves and a small step below, which will ensure comfortable bathing procedures in the steam room over a long period of use.
Before starting construction, let's familiarize ourselves with the design requirements:
- shelves are placed on a blank wall (without windows)
- between the shelf and the wall it is necessary to provide a technological gap of 6...10 (mm)
- the distance from the top shelf to the ceiling is 900…1000 (mm)
- the distance between the support bars is no more than 650 (mm)
- the distance between tiers should be 400…450 (mm)
The figure shows a drawing of a canopy frame made of wooden beams.
- Vertical wall beam
- Vertical beam of the top shelf
- Vertical beam of the lower shelf
- Horizontal beam of the lower shelf
- Horizontal step beam
- Horizontal beam of the top shelf
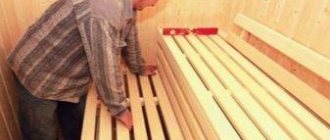
Frame and decking
Support - a canopy frame made of timber for subsequent flooring with boards can be fixed both on the floor and on the wall. The floor frame makes cleaning a little more difficult, and the wall frame may become deformed due to shrinkage of the walls. A reliable frame is assembled from vertical posts, longitudinal and transverse crossbars - jumpers.
To make a safe canopy for a bathhouse with your own hands, experienced craftsmen recommend starting work from the top tier, installing two beams horizontally across the width of the canopy. These beams form a support post, and between them transverse struts are placed every 50 cm, like stiffening ribs. When installing a system of vertical racks, all surfaces of parts in contact with the floor are insulated using specialized rubberized gaskets. In addition, this gives additional stability to the structure.
A deck made of boards is attached to a frame made of beams , where air should circulate freely and water should drain freely. When installing, a gap of 5–20 mm is left between the edges of all boards, the principle of which is also preserved for the floor and walls. The boards are supposed to be slightly tilted so that water does not stagnate and is not absorbed into the wood. The inter-level vertical space is also covered with boards while maintaining gaps, providing access under the canopy for cleaning.
For those owners who are at least a little familiar with carpentry, this bathhouse canopy is a simple structure similar to a bench . How creatively you can approach the process of creating an ordinary canopy can be seen from the many images on the Internet. Warm colors and the smell of natural wood in themselves already create comfort in any room. And the master’s ability to put a piece of his soul into his works will give the steam room an atmosphere of hospitality and care.
Source