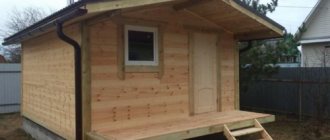
In an effort to save on heating, many home “do-it-yourselfers” make various devices. A DIY boiler, which can often be seen in a private home, is one such useful device.
There are various varieties of it. If you have the skills to work with a welding machine and metal, you can save significantly on heating installations.
Varieties
Before directly manufacturing a boiler for heating a house, you need to decide on its configuration and type. Depending on the type of coolant heating, boilers are:
- Gas;
- Wood-burning;
- Coal;
- Electrical;
- Pyrolysis;
- Oily;
- Pellet
As for the configuration, it can be anything:
- Round;
- Rectangular;
- Trapezoidal;
- Conical
The need for boiler equipment in a heating furnace
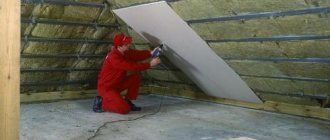
To save fuel and use hot air, you can build a heat exchanger for the stove.
When fuel is burned in the stove, useful heat is directed into the air or flows out through the chimney. In some cases, a low-power heating unit is not enough to effectively warm up the coolant. Furnace boilers are justified for several reasons:
- complete heating of distant rooms - no need to connect additional electrical appliances;
- creating a thermal curtain - windows do not sweat, the house is not subject to rotting processes;
- improved circulation within the heating system - the temperature difference is maintained in different areas of the coolant;
- eliminating corrosion on metal parts of the furnace.
You can combine stove heating with radiator wiring in the house using a boiler built into the heating or hob.
How to make a boiler correctly
During the design process, it is necessary to take into account some design features and the principle of its operation. In particular, you need to decide on the purpose of the boiler and what type it will be. The easiest way is to make a solid fuel boiler with your own hands.
Much more difficult, almost impossible, is gas, since it is subject to increased safety requirements. You need to get permission to use it and check it. And - if all the characteristics of the device do not meet the required ones, then the relevant authorities will simply prohibit such a boiler from use.
The efficiency of the boiler is influenced by both the design (coolant capacity), the rate of fuel combustion, and the constant flow of fresh air (oxygen). It should be taken into account that the fuel burns completely and there is a possible outflow of gas, which carries a lot of heat, which must be prevented.
Rules you need to know when building a chimney
Diagram of a brick chimney.
The structure for solid fuel boilers is made together with the walls of a private house. These elements are constructed according to a single principle, and it does not matter whether the channels will be used as ventilation or smoke. You will definitely need to build a foundation for the chimney. The base structure can be made of brick or concrete.
In all cases, a foundation project is prepared. During the design process, it must be taken into account that its height must be at least 30 cm, and its width must be such that the base structure extends beyond the border of the chimney device by 15 cm or more. If the chimney is made as an element of the external wall, then you need to know that the lower part of the chimney base must be placed at the lower level of the wall base.
During the construction of chimney structures, special attention should be paid to the quality of tightness. To make a durable brick chimney, you will need to follow the rules. The material should be laid so that the seams overlap the elements of the next row
In most cases, the same mixture is used as for the construction of load-bearing walls of the structure
The material should be laid so that the seams overlap the elements of the next row. In most cases, the same mixture is used as for the construction of load-bearing walls of the structure.
In the process of making a chimney for a solid fuel boiler, it must be taken into account that its internal base must be smooth.
Therefore, when performing construction work, you need to use a template. The walls between the elements must be at least half a brick thick. For ventilation elements, the thickness of the partition should be 2 times less.
At the end you will need to make a header. The extreme parts of the element must protrude beyond the structure by 10 cm or more. The outlets of the ventilation ducts must be created under the head; in most cases, 2 walls are used, which are placed opposite each other. This placement method will prevent air from being blown in.
Some features
The boiler configuration, its characteristics, drawings will depend on many factors:
- Material. Regular steel (sheet) will do, but heat-resistant stainless steel or cast iron is best.
- Possibility of good processing of steel, reliable connection of structural parts. Usually, a grinder, a gas cutter and electric welding are used for this.
- Type and characteristics of fuel (liquid or solid). Steel must withstand high temperatures, not deform, and not melt under their influence. Withstand internal pressure of vapors and gases without ruptures or cracks.
- Correct calculation of the coolant circulation method. Will it be natural (due to correct manipulation of pipe diameters, their slope, tank height, etc.) or forced (using a pump in the circuit).
- Taking into account vapor pressure, using valves to discharge excess gases and condensate (installation of return lines).
It is important in the process of designing a boiler and including it in the heating circuit to carefully think through everything. What and how will work after assembly.
Making a heating boiler with your own hands is not that difficult. All problems usually begin later, when something is not taken into account or done clumsily.
Procedure for installing stove heating
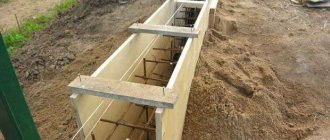
The size of the stove and its location, as a rule, are reflected at the stage of designing a house, according to which the location of partitions between rooms, as well as furniture in the house, is calculated. To equip a full-fledged large furnace, you will need to prepare a concrete base that can support its entire weight. When laying the floor base, you need to provide an indentation, that is, a gap between the floor material and the base of the stove, which further reduces the likelihood of fire.
A waterproofing layer is laid on the base, and the bricks are soaked in water. Afterwards they begin to lay them out in order on the foundation. A row arrangement of bricks is called a row arrangement. If the dimensions of the furnace are known exactly, then you can easily find the order on the Internet, having previously planned the construction stages.
A coil-register is placed in the design, to which pipes are subsequently connected for the output and input of coolant. The stove is assembled using seams measuring a maximum of 4 millimeters; in addition, it is necessary to ensure that there are no sharp corners inside the smoke exhaust ducts and firebox. Rounded corners are required that do not reduce quiet smoke removal, so that less soot will accumulate in the firebox.
There are several important rules when building a furnace:
- A gap is required between the stove and the walls, in addition, it is necessary to lay a metal sheet in front of the firebox. The floor and walls will be protected from fire by simple walls.
- It is necessary to reinforce every 4 rows of masonry to give it maximum strength. Reinforcement is carried out using metal pins.
- The clay mortar should have average plasticity. If you make the solution yourself, then you need to roll up a small ball and throw it on the floor. A solution of normal consistency will not produce large cracks or crumble.
- The chimney must be at least 5 meters high. It is completed by a headband - an element that protects the pipe from debris and rain getting inside, and also allows for increased traction and is an additional element of the building’s decor.
Manufacturing instructions
When you have everything you need (material and tools), all that remains is to assemble the boiler in the following sequence:
- We take 2 barrels with different diameters, wall thickness of at least 4 mm;
- Use a grinder to cut out holes for the ash pan and water container;
- We install one cylinder of smaller diameter inside the other;
- We weld the lid over them, the ash pan, and the firebox;
- Close the door;
- We weld water pipes, a pipe for a check valve (pressure relief);
- We install a grate inside the oven;
- We make a hole for the chimney;
- Install the pipe;
- We check the tightness.
When there are no leaks in the boiler, it is connected to the heating system and water supply network.
If used oil or antifreeze is used as a coolant, they will be filled in manually. Connections to the water supply system and welding of pipes are not required for this.
After installing the boiler into the heating system with your own hands, you need to check that it is working correctly. A properly assembled device will heat the coolant (water or oil) during the combustion process. If he does this poorly, then you should check for air pockets in the heating network and reduce the vapor pressure by releasing them.
In any case, you need to understand the operating principle of this type of boiler so that there are no excesses or problems during its operation.
DIY fan: how to make a homemade powerful fan. Basic parameters and properties of fans (130 photos)- Why do you need a security alarm, what functions does it perform?
How to choose winter workwear and not make a mistake - recommendations from the pros
Expert opinion on a homemade heat exchanger for a heating furnace
A stove with a water circuit is filled with firewood once a day.
Professionals make several comments about installing the boiler in a heating installation:
- The effectiveness of the result of the combined system without overpayments.
- Possibility of using any type of fuel. Sawdust, coal, pallets and firewood stored in a dry place are suitable.
- A stove unit that has a water boiler does not need to be heated constantly. Fuel is added once every 12-24 hours.
- A system that implements a long-term combustion type allows for high-quality heating of the building and provision of hot water.
- If you lack welding skills and understanding of the manufacturing process, you should avoid homemade heating devices. As an exception, installation in a country house or in populated areas with power outages is considered.
- The optimal type of chimney for a stove with a boiler tank is a bell-type chimney. A heat exchanger in the form of a register made of pipes with a large cross-section is placed inside.
- In order not to spend money on copper fittings, you can work with seamless pipes. They do not crack when heated.
A homemade solid fuel unit with a water-type circuit can be used in winter. It will quickly and efficiently heat a large home and ensure uninterrupted supply of hot water. Before starting work, you need to choose a high-quality material for the heat exchanger that will not heat up from the surface of the furnace structure.
What parts does a solid fuel boiler consist of?
Before you start working on the boiler, you need to understand its operating principle. Main elements of the boiler design:
- The combustion chamber is a chamber into which fuel is placed and where the combustion process occurs.
- The heat exchanger is the main structure of the boiler through which the coolant passes and, after heating, enters the heating system.
- The body is a structure that contains all the components of the boiler.
Independent creation of heating boilers for the home is usually limited to a simple design, but nevertheless has two design options: brick and metal.
Let's consider each option in detail.
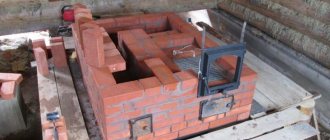
Masonry technology
Before you start laying the stove with your own hands, you need to choose a diagram and draw an order plan with your own hands; it is better to use ready-made, proven diagrams. An example of such a stove is the Kuznetsov stove with a heating register built into the smoke duct on one side of the stove.
Kuznetsov stove, video
To lay such a stove with your own hands in a private house, you will need the following materials:
- concrete for the foundation;
- red solid brick;
- refractory fireclay brick;
- masonry mortar or its components: clay, clean dry sand, clean water;
- metal pipes for making a heat exchanger.
You also need to buy ready-made elements: grate, doors, dampers, dampers, roof penetrations. The price for these elements is usually quite high, so you need to calculate in advance what exactly is needed.
Required tool:
- trowels and trowels;
- rubber hammer;
- grinder with a circle for bricks;
- levels, plumb lines, twine;
- roulette.
Do-it-yourself sequence of operations
- Mark the position of the future furnace and pour a rod-reinforced foundation 5 cm below the finished floor level. It should not come into contact with the foundation of a private house.
- After the foundation has completely dried, two rows of masonry made of red solid bricks are laid out according to the order scheme and drawing on ordinary cement masonry mortar; their purpose is to level out possible unevenness in the foundation and lay the foundation of the furnace.
- The next rows are laid on clay masonry mortar according to the chosen pattern, observing the dressing indicated on it. The solution is made from pre-soaked red clay, quarry sand and clean cold water. The optimal ratio of clay and sand is determined experimentally.
Properly prepared masonry mortar should not be too plastic or crumbly. You can check it this way: roll a ball the size of a tennis ball out of the solution and drop it from a height of 1 m onto a flat surface. It should be slightly deformed, covered with small cracks, but not crumble.
- The thickness of the joints between the rows of bricks is no more than 5 mm. The smaller the seams, the more uniform the structure of the stove and the better the heat transfer. The jointing is carried out immediately as the laying proceeds.
- The doors are installed like this: an asbestos sheet in the form of a strip is placed on the previous row of bricks at the location where the door is installed, and the door is placed on it. Annealed wire, each at least 40 cm long, is pre-inserted into the holes in the corners of the frame. This wire is fixed between the rows of masonry. If this is not done, sooner or later the solution will crumble and the door will fall out. They lay several rows, all the time checking the position of the door according to the level. An asbestos strip is also laid over the door and brick is laid on top.
- The firebox is lined with fireclay bricks. Red ceramic is not suitable for these purposes - it will crack over time, and the vault may collapse. In diagrams, fireclay bricks are usually indicated in yellow.
- Under the hob, grooves are made in the brick to the thickness of the slab. This is done to reduce heat loss and prevent smoke. The plate is placed on the solution.
- A homemade heat exchanger is installed in the smoke channel during the masonry process at the stage of laying the row through which the lower fitting exits. It is installed in the combustion chamber when laying the bottom row of the firebox. There must be a gap of at least 5-7 mm between the heat exchanger and the brick.
- It is imperative to provide cleaning doors in the smoke channel with the heat exchanger, since soot will settle on the register, which will worsen its heating. The number of doors must provide access for cleaning to any part of the heat exchanger.
- The upper part of the smoke channel is equipped with a damper or damper. The chimney itself can be either brick, or you can buy and install a sandwich chimney. In this case, you need to follow the rules for passing pipes through the roof, and make fluff on brick pipes.
The distance from heated metal elements to combustible structures must be at least 25 cm! Passages through the ceilings are insulated with basalt fiber or other non-combustible materials!
- After the oven has dried, it is carefully heated, without overheating, several times. Check the draft, stability of firewood combustion, and absence of smoke leaks. After this, you can install an external heating circuit and fill the system with water. The oven is ready for use.
Step-by-step production of a solid fuel boiler. Subtleties and nuances
You will not be able to make the most economical homemade solid fuel boiler, but you can create a heating apparatus that is quite suitable for heating and hot water supply. The fact is that the assembly of industrial products is carried out on high-precision industrial equipment from specially selected materials in compliance with technological parameters. Each factory boiler model is based on accurate thermal calculations. The possibilities of working at home are incomparably more modest than in industrial conditions, therefore, when choosing a model to be manufactured, one must proceed from existing realities, including one’s personal potential as an installer.
Tools and materials
Having a drawing and specification of the heating unit, you can determine the list of necessary tools. Whether you want to make a large boiler or plan to assemble a small solid fuel heating device for your dacha with your own hands, the list of accessories will be approximately the same.
Tool kit for self-production of a solid fuel heating unit
*
To work you will need the following tools and accessories:
- welding machine;
- small grinder with cutting and grinding discs (safety glasses);
- electric drill with metal drills;
- gas keys No. 1, 2;
- hammer;
- a set of open-end or ring wrenches and screwdrivers;
- pliers;
- 90 degree square
The main material in production is steel, the thickness of which for the boiler must be at least 5 mm, for grates - from 7 mm.
In addition, you will need:
- steel corner 50x50 - for the boiler frame;
- sheet stainless steel - if there is a storage tank in the design;
- thick-walled steel pipes with a diameter of 32-50 mm - for the manufacture of a coil heat exchanger.
A complete list of materials and their consumption is prepared in advance on the basis of technical drawings.
Manufacturing of the housing and heat exchanger
The boiler body, which often acts as a combustion chamber, is the basis of the entire structure. To reduce the deformation of the walls under the influence of high temperature, the enclosing structures of the firebox are made in two layers with a backfill between the layers of dry sifted sand, which plays the role of a geometry fixator. The outer and inner shells of the firebox are made of frames, which also increases the rigidity of the structure. In addition, to increase the strength of the combustion chamber wall, the outside can be sheathed with a steel angle or profile in the form of stiffening ribs.
Manufacturing a solid fuel boiler body by welding sheet steel blanks
On the front wall, using a grinder or a gas cutter, according to the drawing, two openings are cut out - for the hopper door and the ash pit.
Advice! Before cutting sheet steel, it is necessary to make fine markings of future openings with small diameter holes (3-4 mm) in the corners of the holes - this will allow cutting with greater accuracy.
After finishing cutting the sheet steel blanks and the profile for the housing, you can begin to create a heat exchanger. We use cut water pipes, which are connected by welding into a single sealed circuit. The main task is to create a sealed flow fragment of maximum length to increase the heating area of the pipe.
This video shows how to make a heat exchanger, correctly position the pipes and perform welding.
Assembly
Once all structural elements are ready, assembly begins, which is best done at the site where the unit is installed - sometimes the dimensions and weight of the finished device do not allow it to be moved from the assembly site to its final location.
Most often, the boiler is installed on a specially constructed concrete foundation with the unit fastened by welding to embedded parts - anchors. Installation begins with the installation of the frame, after which it is equipped with components and cladding sheets. All welded joints are made with chamfering and weld processing - slag removal and grinding.
Note: After assembling the housing, a thorough visual check of its tightness is performed, based on the results of which additional welding of the seams is performed.
Grate bars (steel grate) and a heat exchanger are installed in the finished housing, which is connected by welding to the heating circuit. During installation of the coil, it is important to fulfill the design angle of its inclination, otherwise obstacles will be created to the natural circulation of the coolant in the circuit.
The body of a solid fuel boiler at the stage of installing external stiffeners
Important! It is better to entrust the manufacture of a storage tank from stainless steel with its insertion into the circuit to professionals, since working with this material requires special equipment and practical skills.
Upon completion of assembly, the boiler is painted with two layers of heat-resistant paint with preliminary surface preparation to protect it from corrosion.
Heat-resistant paint Ecoterra for covering surfaces operating at high temperatures
A self-made heating boiler is durable and easy to maintain, which consists of periodically cleaning the firebox from ash and maintaining the chimney.