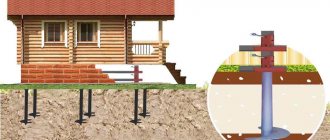
In areas with difficult terrain and unstable soils, the right solution is to build a bathhouse on screw pile foundations. Such a structure can be located on the shore of a reservoir or on a slope, significantly reducing the occupied area of the site. The arrangement of the premises remains practically unchanged, however, the drainage in the bathhouse on screw piles is arranged with some features.
Technology for constructing a pile-screw foundation
The foundation installed on screw piles primarily affects the type of floors in the future bathhouse.
In order to correctly calculate the amount of building materials that will be required to build a high-quality and durable foundation, it is advisable to trust the specialists. When making calculations, the following factors must be taken into account:
- soil composition and quality;
- average level of snow cover in winter;
- soil freezing depth;
- level of melt water flooding;
- Rose of Wind;
- weight of the finished structure with full finishing.
The construction of a frame bathhouse on screw piles begins only after preliminary marking of the placement of supports on the site. Small pegs are driven in at the required points and string is pulled, with the help of which all other measurements are made. The pile can be screwed in either with the help of special equipment or with the joint efforts of several people. It is worth remembering that the position of the pile must be strictly perpendicular to the horizon.
Advantages and disadvantages
The construction of a bathhouse on screw-type supports is deservedly popular. Such bases are much more economical than conventional ones. When building a bathhouse, supports can be installed in 1-2 days.
The supports can be installed by two people; no special equipment is required. Piles can be installed in areas of any complexity.
It is possible to carry out construction in forest clearings, between trees. There is no need to clear the area and remove bushes.
Information. It is not necessary to remove soil and remove construction debris that remains after the construction of a conventional foundation from under the pile foundation. This will save a lot of energy.
A pile-screw foundation is excellent for building a bathhouse on soils whose aquifers are at a high level. You can also install supports on soft soils. Screw piles provide a high degree of stability of the base, because when they go down, they reach hard layers of the soil.
The advantage of such a foundation is that you can always make an extension to a bathhouse on screw piles, which will not “walk” due to the fact that it has a separate base.
Screw-type supports have excellent load-bearing capacity. It is worth noting that when they are installed, the soil does not change its structure, only becomes more dense. The blades with which the piles are equipped distribute the load evenly. Soviet engineers were the first to decide to use them. Such structural elements contribute to resistance to frost heaving.
Attention! The advantage of a screw foundation is the almost complete absence of shrinkage. This means that you can erect a bathhouse or any other building immediately after completing the installation of the supports
Construction can be done at any time of the year. The base is durable, it will last at least 100 years. It is possible to install a turnkey bathhouse on stilts near utilities.
The advantages of this type of foundation are undeniable, but the technology also has a number of disadvantages. The main thing is that the piles are made of metal
This material is susceptible to corrosion, so it is important to choose a manufacturing company that strictly adheres to manufacturing technology when producing supports.
Important! If the site has rocky soil, ordinary piles for soft soil will not be suitable. Installation in rocky areas is only possible using special equipment or special types of piles
But this significantly increases the cost of construction.
By installing screw-type supports, you can only build a building without a basement. Subsequently, it can be completed, but its insulation will require significant financial investments. This will lead to the fact that the cost of a pile foundation will be equal to that of a strip foundation.
Below you can watch a video about the pros and cons of screw piles and the foundation made from them:
Rules for insulation and waterproofing of bathhouse floors
You can begin laying insulation only after thoroughly treating the wooden structure with an antiseptic, which will protect the material from the effects of insect pests and prevent the formation of mold.
The principle of insulation of bathhouse premises depending on their purpose
When choosing a method for insulating the floor in a bathhouse, various nuances are taken into account. To organize a drain in a bathhouse, wooden floors in the form of flooring with slots are more popular. You will also need to take into account the type of material for the finishing floor covering - concrete, tiles and porcelain stoneware take longer to heat up and cool down than wood and composite materials with wood fibers in their composition (decking).
Decking
The principle of floor insulation using joists
Dry water seal for the drainage system in the bathhouse
Roll waterproofing
The durability of the floor structure and the effectiveness of the insulation depend on the quality of waterproofing in the bathhouse. There are several options for waterproofing the floor in a bathhouse: when installing a concrete screed poured over piles, a built-up waterproofing roll or coating in the form of bitumen mastic is used. When installing a wooden floor, a waterproofing membrane is laid on top of the insulation.
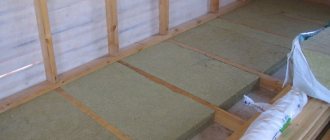
Before laying support boards on the skull beams, they, as well as all wooden elements, should be treated with antiseptics to prevent the appearance of germs and other pests. Next, insulation is laid between the layers of frame boards.
The thickness of the insulation layer will be different, for example, if mineral or basalt wool is used, the layer will reach 25 cm. If foam plastic is used for insulation, a layer of 15 cm is sufficient, especially if the bathhouse does not have a base, but is intended to be used in winter.
Old floor replacement technology
Consists of the following steps:
- Skirting boards are removed. This must be done carefully so as not to damage the boards. Wooden pads will come in handy.
- The screws are gradually removed from the boards.
- The logs and beams are inspected for traces of mold and mildew. Infected, rotten elements are removed.
- The logs are dismantled. Areas with chips are trimmed and sanded.
- The lower part of the walls, which was under the baseboard, is treated with an antiseptic. Logs suitable for reuse are also disinfected.
- Now you can begin laying the new flooring.
Photo: interior of a Russian bathhouse
Insulation of the floor in a bathhouse depending on its type
Let's start with the fact that the baths may not have a rest room, but there will always be a steam room and a washing room, as well as a dressing room. These three rooms have different humidity and temperature conditions. However, this does not prevent you from making the same floor everywhere. The only material you can use for it is concrete or wood.
It’s difficult to make concrete, it requires not only experience, but also assistants, but it will last for half a century without replacement. Wooden is much easier to manufacture, but wood quickly becomes unusable in contact with moisture, which means you will have to replace the entire floor in just a few years.
The general requirements for any of the mentioned types are as follows:
- the surface must be rough enough to prevent slipping;
- cleaning the room and drying it should be easy and simple;
- the presence of a rapid outflow of water, due to which the water will not stagnate and microorganisms will not have time to multiply in it.
Dry wood floor
Non-spill floors are more difficult and more expensive to manufacture than spill-proof floors. To begin with, the soil and foundation are covered with roofing felt, creating a water barrier, then crown beams and floor beams are laid, on which the subfloor is attached with gaps between the boards of 5-7 cm. The next layer is logs with a slope of up to 5 degrees towards the drain.
Next is usually a layer of insulation, but we will talk about it later. The top layer is a good quality tongue and groove board made of larch, pine or oak. For ventilation, it should retreat from the wall by 2 cm. Everything ends with the installation of a plinth.
Why do you need to insulate floors? Seasonal bathhouses really don’t need this, but if you want to take a steam bath in the cold, you’ll need an insulated bathhouse. Insulation has already been mentioned twice above. But we will consider its options in order.
The building, placed on stilts, does not have a concrete foundation, instead there is an empty space where the wind blows. Insulation of the floor in a bathhouse on screw piles should begin with the creation of a double floor: rough and white with a layer of insulation. To do this, a beam for tying is first placed on the pile heads, and boards soaked in antiseptic are nailed to it.
Actually, we have already talked about a concrete field, but this is the same as a poured field. There are two cases of filling: on the ground and on the ceiling.
There are many options offered on various resources. You can do this:
- A pit is dug inside a solid strip foundation to a depth of 40-50 cm.
- Gravel is poured and compacted so that its layer is 15 cm.
- A sand cushion is poured and compacted - 30-50 cm.
- Roofing felt is placed on top of it in two layers with sheets overlapping 10 cm and sealed with bitumen mastic. (2nd layer perpendicular to 1st.)
- A layer of insulation - expanded clay or mineral wool, or slag from a boiler room, or felt impregnated with tar. The layer thickness is 30-50 cm, extending onto the walls.
- Only for mineral wool - the second layer of hydrobarrier. This could be plastic film.
- A layer of reinforcing mesh with a rod diameter of 5 mm.
- Beacons and guides for creating the desired slope.
- Pouring concrete screed. Thickness is at least 3 cm.
As an option, two layers of concrete pouring are possible: the first layer immediately over the sand and gravel cushion, and the concrete is mixed with coarse gravel. A hydrobarrier is placed on the first screed, then insulation (for example, perlite with cement). Place a metal mesh and a new layer of concrete screed on the hardened mortar.
Before laying support boards on the skull beams, they, as well as all wooden elements, should be treated with antiseptics to prevent the appearance of germs and other pests. Next, insulation is laid between the layers of frame boards.
The thickness of the insulation layer will be different, for example, if mineral or basalt wool is used, the layer will reach 25 cm. If foam plastic is used for insulation, a layer of 15 cm is sufficient, especially if the bathhouse does not have a base, but is intended to be used in winter.
If the height of the laid logs is not enough to lay the insulation in a layer of the required height, additional bars are placed on the beams. In this case, one layer of insulation is placed between the beams on a vapor barrier material, and the second layer is laid in the spaces between the beams. Next, the entire floor surface is covered with another layer of waterproofing, and the plank flooring is installed on top of the bars.
Features of installing wooden floors
When constructing a floor in a steam room using a non-leakage type, the installation of the logs should be in a perpendicular direction relative to the water flow. One of the main structural elements of a wooden floor are strong logs, which can rest on a beam when using the columnar method of arranging the foundation. But you need to remember that all contact points must be carefully insulated using roofing felt with an intermediate coating of preheated bitumen. If the floor is installed on stilts, then it is advisable to use an insulating material with more effective properties.
After attaching the logs, boards treated with special anti-rotting compounds are laid on them. If a leaky floor is to be installed, a gap of 3-4 mm is required between the boards for ventilation and water drainage. And along the perimeter of the area there is a technological gap of 2 centimeters.
Floor installation in a bathhouse on screw piles
The floor in the bathhouse on screw piles must have good thermal protection, since there is a lot of free space under the building. If the bathhouse will be used in winter in a region with a cold climate, it is recommended to further protect the underground space by covering it around the perimeter with a plinth. In this enclosing structure, several vents are made, which make it possible to effectively ventilate the underground, and at the same time create additional thermal protection.
Floors in a bathhouse on stilts - Schemes and Projects
The design of the floor in a log bathhouse causes the greatest amount of discussion, since there is a danger of making a structure in which the lower crown will be too intensively moistened. As a result of such constant exposure to moisture, the wood may begin to deteriorate ahead of time and the entire structure will last noticeably less than its allotted life. Therefore, below is a diagram of the optimal arrangement of all the elements necessary for good floors.
Floor logs with a section of 100x150 mm are installed in the lower crown.
Skull boards are sewn under the joists to support the heat-insulating layer.
Next, the insulation boards are laid in two layers, one - 100 mm, and the second - 50 mm. The flooring is done staggered, so that the joints of the lower layer do not coincide with the joints of the upper one.
The next step is the manufacture of sheathing for the subfloor slabs.
A layer of thick polyethylene film is laid on top of the sheathing - this is a waterproofing layer that will protect the wooden structures below from water getting on them.
Durable cement bonded particle boards (CPB) with a thickness of at least 12 mm are installed on the waterproofing. Along the perimeter there is a side made of the same material.
A metal mesh with a rod of at least 10 mm is laid out in the resulting space. After which a concrete screed with a thickness of 10-12 mm is poured.
This design does not indicate an important nuance - there is no drain hole to organize the drainage of water from the washroom and steam room. Its placement plan can be seen in the diagram below.
The finishing layer for the floor covering of the concrete screed in the bathhouse is also indicated - this is, as a rule, porcelain tiles. In addition, you can see here that in the diagram the floors of the steam room or washing room are made with a slope. To organize such an angle, the concrete screed is poured along beacons made of wood at a certain angle from the walls to the drain hole.
A slightly more complicated design with a poured wooden floor and an insulated concrete screed.
A good option for creating a thermal barrier around the perimeter of a building is making a plinth
When creating it, it is important to take into account that the soil next to the bathhouse will move and the enclosing structure with the bathhouse should not have rigid connections
How to make a floor in a bathhouse on stilts with your own hands: Instructions
First of all, make sure that all the necessary trenches have been dug in the ground for laying sewer pipes and water supply channels, if any are planned.
After that, the floor joists from below are lined with subfloor boards.
The next step is to provide wind and moisture protection for the insulation. This role is played by a special vapor-permeable membrane, which will allow the heat-protective layer to effectively evaporate moisture from its surface to the street. A high-quality heat barrier will be created by 150 mm thick mineral wool.
Next, the entire floor surface is covered with dense waterproofing with a slight overlap on the walls.
Having finished with the waterproofing, subfloor boards are installed on top of it.
DSP boards are laid on the subfloor or sheathing.
The slabs are covered with a waterproof film on top, on top of which a lath is placed for pouring a concrete screed.
The floor screed is carried out using beacons. They can be made of wood or metal profiles, as in the photo above. Ceramic tiles are laid on top of the concrete or a wooden floor is installed. If you plan to make poured floors from boards, then it is recommended to organize a ventilation duct in the space between the wooden flooring and the concrete screed.
Such a pipe will ensure good air circulation and not only protect wooden floors from premature rotting, but will also allow you to stay in the steam room longer and with greater comfort thanks to the constant flow of fresh air. If necessary, a control valve, cap or valve can be installed on the pipe externally or internally.
Specificity of non-leakage type
An example of a dry wooden floor frame with a slope for water drainage. This floor system, resting on a foundation or standing on stilts, has its own difficulties. Here you need to install two rows of boards. For the top flooring that goes over the logs, a tongue-and-groove pine or larch board is used, which is installed without gaps. Below there must be subfloors. This is a so-called “dry” floor; it is advisable to install it in a steam room and here it is necessary to insulate the space between the boards. It is advisable to place the floorboards on the finishing floor with a slight slope towards the wastewater collection. At the lowest point you need to make a hole to which a siphon is connected to drain the waste.
Kinds
Two types of coverings can be installed in frame houses - wooden and concrete. Each of them has certain characteristics and is built differently.
Wood
The most popular type of flooring for classic Russian baths. Advantages:
- environmental friendliness of the material;
- low price;
- slow freezing of the material;
- attractive look.
Flaws:
- over time, wood loses its attractiveness;
- wood is destroyed by prolonged exposure to moisture.
To avoid destruction, the wood must be coated with special antiseptics.
Leaking
Leaky structures consist of several levels:
- building foundation;
- beams located on the foundation;
- boards attached to beams at small intervals.
Soapy water flows through holes in the floor onto the ground or into a prepared drain. The washing room is very cold in winter.
Leak-proof
Leak-resistant wooden floors are continuous flooring made of planks that are angled in one direction. At the lowest point there is a drain grate through which waste liquid is removed from the bath. Leak-proof deck design:
- OSB boards up to 6 mm thick;
- windproofing, waterproofing;
- thermal insulation made of mineral wool;
- OSB protective board 18 mm thick;
- two layers of polystyrene foam;
- vapor barrier;
- fiberglass reinforcing mesh;
- concrete screed with reinforcing mesh;
- plank flooring.
It is pleasant to steam in a bathhouse with a leak-proof flooring in winter and summer.
Concrete
These are the most expensive, complex structures in terms of arrangement. Advantages:
- durability, strength, reliability;
- absence of harmful substances during strong heating;
- withstand frequent temperature changes and prolonged exposure to moisture.
Flaws:
- Without additional insulation, concrete freezes quickly.
- It takes a lot of effort and money to build a concrete foundation.
After laying the floor, you need to do decorative cladding of concrete surfaces to improve their appearance.
Preparatory work
So, the foundation is installed and the walls are erected. Now we are making the floor in the bathhouse on screw piles. You need to thoroughly prepare for this work, study the technology, purchase everything you need, and invite assistants.
For work you will need the following materials:
- tongue and groove board;
- beam;
- fastening material - nails, etc.;
- cement;
- coarse sand;
- expanded clay and/or other bulk materials;
- roll waterproofing;
- antiseptic composition;
- mineral wool or other insulation.
Tools and equipment for work will require:
- construction mixer;
- tank for mixing the solution;
- wood hacksaw;
- grinder saw;
- construction knife;
- hammer;
- mittens, work clothes, rags.
The list of necessary tools and materials can be specified after it has been determined from what material and in what way the floor in the bathhouse will be installed on screw piles.
How can you arrange a kitchen sink drain at your dacha?
To organize a drain at your dacha with your own hands, you need to connect a corrugation to the kitchen sink and create a water valve by bending the corrugation in an N-shape so that water always remains in it. Then connect the corrugation to a plastic pipe with a diameter of 50 mm and bring it outside the house. By the way, the kitchen sink should be equipped with a grate to prevent large food waste from falling into the drain pipe. When installing a drain on the main line between the kitchen in the country and the drainage container, it is necessary to install an intermediate siphon so that all foreign particles that are heavier than water settle at the bottom and do not fall into the container. The siphon should be equipped with an inspection window so that you can unscrew the lid and drain the water with solid particles into a bucket. This will reduce the entry of organic matter and sand into the drainage container. In this case, the volume of the barrel will be enough for a longer time, the barrel will last longer, and otherwise the rotting processes will lead to its silting.
When mixing for concreting, you need to add a spoonful of any washing powder to a bucket of water into the solution. This additive will facilitate the mixing process, improve the quality of the solution - increase its moisture resistance, strength, frost resistance, and protect it from cracking.
Then you need to take a metal barrel; if it is closed at both ends, then on one side you need to cut out the bottom using a chisel and hammer. Place the barrel with the open end down in the hole on a pre-filled bed of gravel and small crushed stone. The prepared pit for draining water at the dacha must be larger than the height of the barrel. At the other end of the barrel, you have to make one hole for the pipe, connect the barrel and the pipe taken out of the kitchen with a tee with flanges. All joints: pipes with the barrel, as well as with the outlet pipe from the sink, must be sealed.
Possible options for draining a sink in the countryside, organized by yourself, are shown in these photos:
For better resorption of waste water, you can additionally dig drainage trenches on the sides of the barrel as wide as it is, approximately 1.5-2 m long. The trenches must be filled with crushed stone and large boulders. Cover the top of the trench and barrel with a layer of earth 30 to 100 cm thick, flush with the surface of the site, and cover it with turf. On top you can plant flowers, grass and a couple of birch trees - they love water. As practice shows, if you drain a sink in your dacha in this way, the structure will last about 7-10 years.
Well with a filter at the bottom
The design of a drain pit with a filter bottom is used primarily to purify wastewater from dirt and chemical elements, as well as to retain bacteria. Subsequent filtration of water is carried out directly by the soil layer. But at the bottom of the well, crushed stone, crushed brick or sand are used as a filter.
To ensure the outflow of water from a bathhouse designed for 3-4 people, a well with a diameter of 1.5 m and a depth of 2 m is sufficient. It can be either rectangular or round in shape - the latter option is preferable due to the uniform distribution of pressure on all walls. The cylindrical design will need correction much less often.
Since it is necessary to drain the bathhouse at the dacha without damaging the building itself, it is advisable to retreat from it at a distance of about 3-5 meters. Such a gap will ensure, first of all, the safety of the bathhouse foundation from being washed away, and will also prevent the penetration of unpleasant odors from the well into the bathhouse. But if you locate the drainage hole further, you will inevitably have to purchase additional pipes for water drainage. In addition, it is difficult to ensure the correct angle of inclination over a long distance.
If the soil on your site is dense enough, then simply dig a hole for drainage and lay filter materials at the bottom - sand, crushed stone and broken brick. Additional strengthening of the walls is not required.
According to the drainage diagram in the bathhouse, a trench can be dug from it to the pit, through which water will randomly flow by gravity into the well. However, it is best to equip the drain with pipes made of asbestos, metal, plastic or ceramic, with a diameter of 50-100 mm. In this case, a trench is also necessary, but its depth will depend on the depth of soil freezing, but not less than 50 cm. The pipes are laid at a slope of 20 mm at every meter of distance.
At the design stage, the future design of the drain and the features of the floor organization are thought out in detail. An economical option for draining a bathhouse in a country house is to make the floor sloping towards the drain hole. With this design, wastewater enters the pipes and is discharged directly into the drainage pit.
An alternative to a drainage pit is to use a sealed septic tank, such as one made of plastic. Such a device will be especially relevant in cases where the bathhouse is equipped with a toilet, that is, the nature of the wastewater will require more thorough cleaning.
The nuances of building a foundation for a bathhouse with a drain
When designing bathhouse foundations, the first step is to provide a drainage system. And for this it is necessary to imagine the technology for draining bath wastewater, as well as its composition and method of further purification. Only then will it be possible to figure out what kind of foundation needs to be used for the bathhouse, and what materials it should be made from.
However, given the small mass of the building, you can immediately turn to a screw base. In addition, it is necessary to include high-quality floor insulation in the plan, especially when it comes to cold climate zones.
The drains may be gray or brown. They are sent first, respectively, to the filter or directly to the septic tank.
If there is no toilet in the bathhouse, and the wastewater contains only shampoo and soap, then you can direct the drainage to a graphite filter for simple cleaning.
https://youtube.com/watch?v=aseD3J5tUnQ
Basement design options
As you understand, when using screw piles, there is no base under the bathhouse as such, but there is a so-called basement space. This is the distance from the grillage/subfloor to the ground surface.
How to decorate this space so that the overall design of the bath complex looks attractive?
The easiest way is to sew up the basement space with any sheet basement decorative material. This can be all available options for basement siding, profiled sheets, metal siding.
You should not cover the basement space with regular vinyl siding. It may not be enough even for one season, since it is thin and relatively fragile. Vinyl wall siding will definitely not survive the winter; it will be broken in cold weather, since it becomes extremely brittle at low temperatures.
Choosing a pile foundation for a bathhouse
In the above bathhouse project, 11 screw piles with a diameter of 105 mm and a height of 2.5 m are used. Each support can withstand a load of more than 2 tons, so the stability margin of the structure is more than 2.2 times. 11 screw piles.
The installation plan is determined by the characteristics of the load distribution from the weight of the bathhouse walls. The steam room, washing compartment and living room do not have massive furniture or heavy objects, so the main load falls on the walls of the building.
The log house is not heavy, no more than 3.5 tons, has high rigidity, so for the foundation it will be enough to screw four screw supports under two opposite walls - front and rear. Three more piles are placed along the center line of the internal partition.
Conventional cold-rolled steel pipes with a two-layer epoxy coating are used as screw supports. Upon completion of the construction of the bathhouse, the base part is sewn up with a horizontal lath with a small gap for ventilation of the foundation.
Foundation cladding
In order for the support pillars to have a more presentable appearance, as well as to protect them from dirt and dampness caused by melting snow or flooding with water from a reservoir, they should be additionally finished. Various facing materials will help protect the floor in a bathhouse on screw piles, as well as emphasize the appearance of the building itself.
Since the main damage can be caused by snow and flows of dirty water in the off-season, special attention should be paid to the waterproofing qualities of cladding materials.
Note that natural and artificial stone is very durable and absolutely waterproof.
Drain device
Due to the fact that panel, frame baths or log buildings are mainly built on a pile foundation, the grillage is constructed mainly from timber or rolled metal.
Organization of drainage using tiles at an angle
In this case, draining can be done in several ways at once:
- Pouring the slab grillage;
- By laying an asbestos-cement sheet on the beams with a screed or facing with flat slate tiles on it, and ensuring the required slope due to the difference in the thickness of the glue;
- By securing a galvanized sheet to a grillage with a slope towards the sewer drain (for wooden floors);
- By laying a membrane on the subfloor, attached to both side surfaces of the walls (for wooden floors).
Membrane drainage device
Membrane drain
The most economical option is to perform drainage using EPDM membranes. The design will be like this:
- Subfloor joists secured with metal holders;
- Subfloor, which can be made from tightly laid boards 25-30 cm;
- Insulation, which is used as EPPS with a thickness of 80-100 mm;
- A drain installed in the subfloor and insulating material, and inserted into a drain with a dry water seal;
- Membrane laid over the entire perimeter. It should also be placed on the walls on the sides, taking into account the elevation of the finished floor;
- Finishing flooring logs secured with profile holders;
- The finishing coating is in the form of an edged board, which is not recommended to be firmly fixed, but attached to 10 mm dowels.
This fastening of the finishing coating allows you to remove the boards in any area for garbage collection and sewer drain cleaning. For the water drainage device, the slope is arranged directly in the membrane during installation. The bottom of the EPDM is pressed, then the waterproofing is slightly raised towards the top and secured with slight tension.
Watch the video on how to waterproof a drain using a membrane and install a drain cover.
For frame baths, in order to line the walls from the inside, a vapor barrier device is required, and the scheme will undergo some changes:
- First, the subfloor is laid, and its insulation is carried out in exactly the same way as in the first solution;
- The membrane is fixed to the walls with a slight launch using a stapler; a tension is created for the drainage device;
- The frame of the walls is sheathed with a vapor barrier material, while its lower edge is laid on top of EPDM - when moisture accumulates, it will flow onto the membrane without destroying the wooden elements of the load-bearing frame.
Application of sheet materials
Creating a slope from porcelain stoneware or tiles using sheet materials will cost a little more, but it is quite possible to do it yourself.
Watch the video on how to make a drain slope using tiles.
In this case, it is necessary to observe the following technology:
- The subfloor is made of edged boards on joists;
- Extruded polystyrene foam XP5 is used as insulation;
- Dry screed is made from asbestos-cement sheets or CSP;
- For waterproofing, an EPDM membrane and polymer mastic coating are used;
- The drainage is arranged only in the form of ladders with dry water seals;
- For cladding, tiles or porcelain stoneware are used, laid with an inclination towards the ladder.
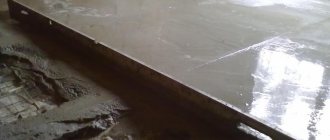
Drainage device when screeding
Dry seal design
Screed without coating is performed in order to save on finishing. In this case, you will need wooden ladders that are laid when using the bathhouse, and removed at the end of the bathing procedures for drying.
In this case, the drainage is arranged after two- or three-layer waterproofing of the screed with mastics, penetrating substances or using hydroglass insulation. Sewage drains are embedded in the foundation, for which it is best to use dry water seals.
Drainage device when pouring the slab
The slab is poured during the construction of the foundation grillage. In this case, the drainage slope is set directly along the slab, and the sewer hole is arranged by installing a pipe of the required diameter into the formwork.
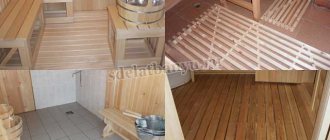
Floor tiling
Ceramic tiles can be laid on top of the wooden floor in the bathhouse. In this case, instead of boards, fibreboard, fiberboard or plywood are used for the rough coating.
In the washing compartment you can lay tiles on the floor in the bathhouse
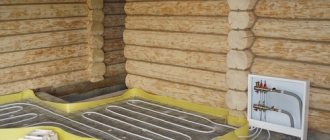
Ceramic tiles are laid on top of the laid sheet covering. This is done in the usual way. Under the tiles, you can lay a system heated floor in a bathhouse on screw piles. You can use a hydraulic or electric infrared option.
In the locker room you can install a heated floor in the bathhouse
Electric heated floor installation
Water heated floor diagram
Installing a sauna on screw piles
When each of the screw piles reaches its stop, you need to cut it with a grinder to the desired level. For frame houses this is a horizontal plane. The log house has a difference between the longitudinal and transverse logs of the crown. It can be selected with pads or different cutting heights for posts (150 mm).
Making a frame
Installing the frame on piles
The base is made of timber with a 150 mm edge. For heavy structures - 200 mm. Assembly order:
- We lay it out on the heads, mark the cutouts in the “floor of the tree” or “in the paw”;
- We fold the frame onto the heads along the cutouts, fasten 1 screw in each corner;
- We achieve a right angle at intersections by measuring the diagonals;
- We fix it with a second screw at each intersection;
- We fasten from below with bolts to the heads;
- We cut the inner beam into the floor of the tree.
The wall posts will be located at a distance of 0.6 m, so the clearance between the piles must be calculated taking this into account. In addition, you should carefully approach the choice of wood material and the installation of vapor barriers in frame buildings intended for bathhouses.
Assembling the log house
For a log house with a small area without loaded internal walls, installation is often performed directly on its crown instead of a grillage. The log of the first row should always be thicker than the next. It is not laid directly on the head, but on a lining made of larch or beech boards, pre-treated with resin (except for the ends). The difference between the longitudinal and transverse logs is compensated by the thickness of the board. The corner is additionally secured with a staple.
Next, the log house is assembled according to serial numbers with gaskets made of hemp, tow, and felt, according to the instructions. The number of walls and the presence of a protruding porch make it clear how many support points are needed.
The frame is also placed on a grillage made of channel bars. Holes are drilled in the crown from below, under which vertical pins are welded to the steel frame. The log is “put on” the rod. Get a tight grip. Watch the video on how to mount a log house on piles.
Tape supports for log houses
The log house of the bathhouse can be installed on strip foundations made of monolithic reinforced concrete, natural stones (cobblestones, rubble). It is allowed to build a bathhouse on prefabricated strip foundations for which reinforced concrete blocks are used. You cannot install prefabricated reinforced concrete with your own hands - you will have to call lifting equipment.
In central Russia, it is enough to equip a shallow foundation for a log house
There are shallow and conventional strip foundations. A shallow-depth tape will require digging trenches with a depth of 0.3 m to 0.7 m. Conventional tape foundations are buried to a distance of up to 1.7 m.
What foundation to choose for a log bath? To answer this question, it is worth determining such site indicators as freezing depth, soil composition and groundwater level.
If the site has weak soils with low bearing capacity, it is best to choose the option of a conventional strip foundation, but it is worth remembering that the work on installing a strip for a log house will require a lot of labor and time. After marking the foundation on the site, you will need to dig a large volume of trenches, install formwork, make a reinforcement cage, after which you can begin pouring the concrete solution.
A finished foundation strip made of monolithic reinforced concrete gains strength in about a month, so you should not plan to start construction in the autumn or early winter, so as not to have to carry out a set of additional work to preserve the foundation for the winter.
Watch the video on how to make a strip base and a concrete subfloor for a bathhouse with your own hands.
Types and features
Specialists involved in the construction of objects distinguish 12 types of piles. Despite the variety of options, only the following 3 types are suitable for the construction of low-rise buildings:
- bored;
- screw, metal;
- driven, reinforced concrete structure.
Reinforced concrete supports for the construction of bathhouses are very rarely used. The whole point is that you need technology to work with them. With its help, the structures will be driven into the ground. The use of driven piles is different in that the result is a very strong foundation.
Bored supports are easy to make on your own. Labor costs are high, but the savings on materials are significant.
All supports should be installed in key locations. These include those places where the walls are connected, as well as at the corners of the base.
At these points it is necessary to place intermediate supports.
The distance between the 2 elements should be chosen taking into account the type of soil at the construction site, as well as depending on the planned loads.
It should be noted that the distance between 2 supports should not exceed 2 m. Piles must be placed along the entire perimeter of the walls, and also installed under the walls.
Attention! Metal screw piles for a bathhouse are good because you can work with them manually. But you need to take into account that steel conducts heat well, so the base of the floor will be cooler.
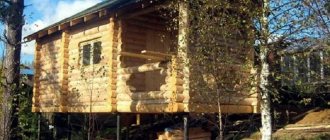
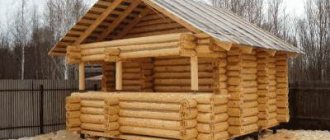
Bathhouse on stilts on the water
Building a sauna on the water is the dream of many owners of summer cottages. The building is positioned in such a way that part of it faces the reservoir, and the other is located on the shore. Piles help keep the bathhouse above the water; they are installed in every corner, as well as under walls and partitions.
The design is not new, such baths have been made before, only in the past centuries, supports made of hard wood were used as piles. Larch was the best option because it does not rot. Therefore, a bathhouse on stilts made of timber or logs served for several decades.
Today, wooden supports are installed very rarely, although this construction option is the cheapest. Installing piles for such a bathhouse does not differ from other cases, except that the piles must be drilled into the bottom of the reservoir at least 1.5-2 meters (accordingly, to this you need to add the depth at the given place and the slope of the bank).
Why choose screw supports for self-assembly?
Constructions of this type are best suited for doing construction work yourself.
Firstly, when using screw piles, the use of expensive special equipment is not required, which for various reasons cannot always be delivered to the site (for example, due to the impossibility of driving to the construction site). Pile supports can be screwed into the ground yourself with the participation of one or two assistants, using lever mechanisms.
Secondly, such designs are initially sold ready-made. Piles can be installed immediately after they are delivered to the site.
Selection of materials
For the drain line, as a rule, a PVC sewer pipe with a standard diameter of 100 mm is used. The mainline is assembled from two-meter or meter sections, which are joined together using the existing sockets at the ends.
To connect a simple drain that does not have a side outlet, you will need to use a standard elbow to the drain pipe.
There should be an O-ring inside the elbow
At the same time, the sewer drain itself has a standard design in various variations. For a bath, you can choose either the simplest or the most complicated, since such products come with various additional functions.
The tightness of the device is of great importance for the operation of the drain system, so before purchasing a drain it is recommended to assemble the device and evaluate the tightness of the parts
Also, to construct a drainage line, you may need a sewer tee with a branch at forty-five or thirty degrees.
You will need a tee if you want to make additional drainage from the sink
In addition to PVC parts, we will need “cold” mastic to seal cracks if the sewer pit is equipped with an iron barrel. This material is sold in metal cans in construction hypermarkets. Before purchasing all the parts and consumables, it is better to make a list.
Mastic can be purchased at any hardware store
Selection of sewer pipes
Choosing a pipe diameter depending on the slope level
A correctly made slope at the base of the ladder does not guarantee the rapid evacuation of water masses from the room. In this matter, the choice of sewer pipes is not the least important. Since the bathhouse uses a non-pressure liquid discharge system, it is advisable to use the following pipes to install the hydraulic apparatus:
- The minimum diameter of the pipe should be 50-60 mm, and the thickness of its walls should be at least 3-4 mm;
- It is advisable to assemble the external pipeline from PVC materials, since they are more frost-resistant;
- During the installation process, pipes are laid in the soil at a level that is below the freezing point.
What is EPDM membrane and where is it used?
Origin and history of development.
EPDM membrane is a new generation roofing waterproofing material created in the 1970s in the USA. At first, she was not very popular. The reason for this was the imperfection of installation methods - for a long time they could not solve the problem of high-quality gluing of canvases. But, with the improvement of technology in 2005, it was possible to develop EPDM membranes with a factory adhesive strip - primer and adhesive tape were applied in advance at production. Modern industrial technology has made it possible to install waterproofing many times faster and, most importantly, has significantly improved the seam. After this, EPDM membrane began to spread widely throughout the world as an excellent and versatile basis for insulating rooms from liquids.
Composition and characteristics of EPDM membrane.
EPDM polymerized ethylene propylene diene monomer membranes are mainly used to create soft roofing. About 30% of the composition is synthetic rubber (EPDM polymer), and 60% is carbon black. This combination gives the material high tensile strength and resistance to ultraviolet rays. In addition, the EPDM membrane contains clay, which creates fire-resistant qualities, and vulcanizers (stearic acid, zinc and sulfur oxide), which are responsible for elasticity and durability. To give it strength, strong reinforcement is made with polyester mesh.
Well-known international manufacturers of EPDM membranes are Carlisle and Firestone.
Areas of application and installation methods of EPDM membranes.
EPDM membranes are used for:
There are several ways to install an EPDM membrane:
Source
How has EPDM membrane conquered the waterproofing market?
EPDM membranes are an effective polymer product made from synthetic rubber. The material has found wide application in waterproofing, roofing and many other types of work of varying complexity.
The chemical composition of roofing waterproofing material includes the following elements:
Soot is the main component, occupying up to 60% of the specific gravity of the product, which gives the membrane the ability to resist mechanical stress.
Various polymers - up to 30% of the composition of the substance.
Mineral fillers help maintain a stable shape.
Vulcanizers (zinc oxides, sulfur, etc.) – provide elasticity and increase the durability of the material.
Technical oils – increase the elasticity of the product.
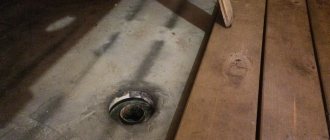
Sloped floor
If for some reason you are not satisfied with the pouring floor, then you can make a design, the use of which is provided for in all shower cabins. In other words, you can do an ordinary drain. To prevent water from stagnating, thereby accelerating the rotting process, part of the floor should be lower than the base.
The slope is done quite simply. During the installation of the flooring, you can use boards with gradually decreasing thickness. You can place pads between joists and boards. The slope should be slight, literally 1–1.5 centimeters. This is enough for the water to drain.
It is worth noting that sloping floors are mostly intended for rooms with concrete screed. For completely wooden baths with a sink and a steam room, the best solution is a poured floor.
Why buy EPDM membranes?
All useful characteristics of the protective fabric are due to the following physical properties:
high strength of the fabric;
ability to work in a wide temperature range from -60 to +100 degrees;
not exposed to moisture;
fire resistance, perfectly protects the roof insulation and the entire system;
environmental friendliness - does not emit harmful substances throughout its entire service life;
durability service life can be measured in several decades.
Despite the rather extensive scope of application, it is customary to distinguish several main areas of use:
waterproofing new and repairing old roofing coverings;
waterproofing of underground structures, tunnels, reservoirs.