Nothing beats the pleasure of taking a steam bath in a Russian bathhouse! The interior decoration of the bathhouse is the final and key point in the construction of this structure. After all, the more comfortable the atmosphere inside the bathhouse, the more enjoyable your time in it will be!
The interior decoration of the bathhouse includes: sealing the cracks of the log house, covering the walls with a waterproofing layer, and covering the walls with wooden clapboard.
General requirements for the characteristics of bathhouses
The interior decoration of the bathhouse assumes that the person is familiar with the safety rules. Materials are designed for high temperatures. It is important to arrange them in such a way that everything complies with GOST. Standards:
- material type;
— removal to the heat source;
- covering for floor and ceiling. The interior decoration of a bathhouse is not necessarily accompanied by inspections from regulatory authorities. At the same time, it is worth selecting only fire-resistant materials.
Questions and answers
Why does cedar turn red during bath use?
Cedar lining turns red during use due to natural oxidation processes. As a result of this, it acquires a more respectable appearance.
What cedars exist in nature?
There are only three types of cedars in nature: Lebanese, Himalayan and Altai. Botanists refer to what we usually call cedar as other plant species. Canadian cedar is a giant thuja, and Siberian and Altai cedars are pine trees.
What can be done to prevent a cedar log house from turning black?
For this purpose, logs can be coated with special compounds. For example, with Neomid.
Why doesn't cedar lining catch fire?
Strong combustion of the material is prevented by the high content of resins in it.
In what cases can cedar lining “leak”?
Cedar material can release a large amount of resin when heated if it was taken for finishing without preliminary drying.
Choosing an antiseptic for wood
If you are evaluating the interior decoration of a bathhouse, a photo of a steam room and a washing room, it is important to pay attention to consumables. When choosing an antiseptic, you should look at the following features:
- scope of use;
— resistance to moisture;
- composition. When finishing the inside of a bathhouse, the antiseptic can be used on different types of wood. Manufacturers indicate surface preparation. The bathhouse inside will be safe if the substance protects it from fungi and mold.
Cold water rinse tub
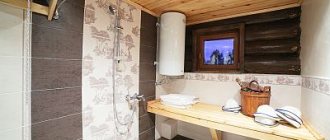
The interior arrangement may also include elements such as a hanging tub for rinsing (photo). It needs to be hung in a washroom higher than a person’s height so that an adult man can use the tub as a shower. It works very simply: you just need to pull the rope attached to the tub, after which the container tips over and water spills onto the person standing under this stylized shower.
Please note that the tub must be secured at a sufficient distance from the wall so that the bucket can completely rotate 180 degrees without the bottom resting against the wall. It also needs to be equipped with a simple device for supplying cold water.
Basic standards and requirements
Do-it-yourself finishing of the bathhouse inside is carried out according to GOST standards. The basic requirements concern walls, ceilings and floors. Materials are assessed for security.
The fire protection indicator must be higher than normal. Plus, the distance between heat sources is maintained. Finishing baths is considered safe if special impregnation is used.
Basic finishing methods
Bathhouse cladding is carried out using different methods:
- frame;
- frameless.
Do-it-yourself frame assumes that the master makes the basis for building materials. It can be made from different materials, the coverage area is taken into account. If you are interested in the inside of the bathhouse, the finishing, in the case of the frame method, you can achieve significant insulation. This means that the choice of style and materials affects thermal performance. At elevated temperatures and humidity, a special coating is required. Different types of wood have completely individual properties. It can accept heat or moisture. Some coatings cannot be used on the floor at all.
The frameless method is considered faster. Not far from the stove , you can make the main coating and forget about additional waste.
How to distinguish cedar from pine
The cost of cedar wood is 2-2.5 times higher than pine. It can be difficult for an ordinary person to distinguish between lumber made from it and finished products. Not everyone understands their properties and differences. The smell of cedar is difficult to confuse with other tree species. It has a pronounced balsamic aroma, including citrus notes. Pine has a less bright and rich aroma.
The core stands out on the cross cut of the cedar. It can be colored from light pink to light chocolate colors. Cedar sapwood is pale yellow. The cross section of pine has a uniform yellowish color. The annual rings of cedar are located much denser than those of pine.
Ceiling protection
The interior decoration of the sauna suggests that the master took care of protecting the ceiling. For this purpose, blanks with ready-made filling are selected. You are also allowed to take care of surface preparation yourself.
In general , the bathhouse interior decoration involves the use of ready-made structures. These may be panel options. Then the bathhouse and interior decoration will look good, but you need to work on the frame.
Design issues are considered after choosing impregnation for the ceiling:
— superficial;
- façade.
The cost of using mixtures is immediately included in the cladding Some people want to build a bathhouse on a varnished surface. Then the room is finished with foam and only then do the finishing touches.
immediately install near the constructed . On the ceiling, the electrics are enclosed in a casing. It is safe for humans, temperature changes are not dangerous.
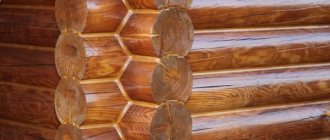
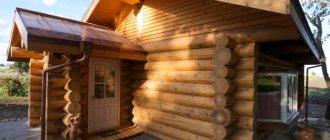
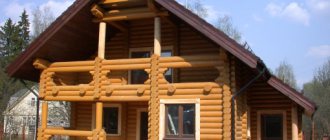
What is a chopped log?
Chopped logs are a wood material for the construction of a bathhouse, which is least subject to mechanical impact during processing. After cutting the log to dry, only the rough layer of bark is removed with an ax, thereby laying down the fibers and leaving a protective thin layer of wood. Such a log usually does not have ready-made cuts, locks and grooves, so during construction all this is done manually, based on the design. Due to such a small impact on the log, it has a natural appearance and a thin surface protective layer. Even after grinding, a chopped log looks natural, which cannot be said about a rounded log, which requires grinding even after machine processing.
Is it rational to use lining or not?
is often discussed online , photo. They use lining every now and then, so users are interested in its advantages:
- low cost;
— simple installation;
- protective properties. The interior lining of the bathhouse on the lining may vary. There is a step-by-step plan about shelves and lighting. However, the log has its own characteristics. It is important not to forget about the integrity and surface treatment. To equip the room, products for washing and steam rooms are processed. The lining is sheathed with cotton wool or foil.
Preparing the walls for finishing
When considering a bathhouse and finishing, beginners are interested in the question of preparing the walls. The main steps include cleaning the surface and priming it. For example, the interior decoration of the bathhouse is evaluated, photo. You can notice on them that the paint and old putty must be removed. On the Internet you can see the finishing of the bathhouse inside, a photo where the old wall is simply covered over. Such mixtures contain sand, so the wall will be ready for insulation and decoration.
A standard sauna can be quickly cleaned using a tool. It is better to do with a scraper or a special disk. If you look at handmade work, it’s an unsightly picture . Some stains simply cannot be removed with a scraper. A power tool in this situation is the right option.
Insulation of wooden baths
Problem areas in a wooden structure are always the same. The problem can be solved either the way it has been done for centuries, or with the help of modern technologies. Below is a list of problems and ways to solve them.
Inter-crown insulation and sealing of cracks
Over time, wooden buildings inevitably shrink, which causes gaps to appear between the crowns. Those, in turn, open the way for drafts, so the first stage of the fight is to seal them.
The initial stage of interventional insulation occurs during construction. Timber (including profiled) and round timber are laid with tow tape or jute. Subsequently, this will be internal interventional insulation.
In addition to the internal, there is also an external one, which has to be periodically updated. The resulting cracks can be filled with tow, jute, natural moss, or you can use modern materials, but only those designed for wood.
IMPORTANT! Plumbing sealants, putty and polyurethane foam are not suitable for sealing cracks in a bathhouse made of logs or timber. They are inelastic, designed for a constant gap size (while wood changes), they have poor adhesion to wood, insufficient heat resistance, harmful emissions, etc.
flaws. Over time, they crumble out of the cracks.
The cracks on the outside of the beams or logs are sealed with wood sealants in such a way that the sealants will dry from 2 to 5 weeks, and the walls must be protected from the sun and rain during this time.
Insulation of window and door openings
Windows in bathhouses are usually made low so that the heat accumulated under the ceiling does not escape. All openings - both window and door - must be carefully sealed with tow or foam. For ordinary windows, the junction of glass and frames is insulated with putty, but it is even better to install special double-glazed windows for baths - made of wood.
High thresholds and low doors
Bathhouse builders have long developed design features that help retain heat. And even in our time there is a reason to take advantage of their findings. However, there are several doors in the bathhouse; should they all be low and the thresholds high?
The principle on which this works is that warm air is light and accumulates at the top, so the higher the doorway, the more heat will escape when the door opens. A high threshold prevents drafts from moving across the floor - it also effectively saves heat.
But today this rule is more often followed for only one room in the bathhouse - the steam room (about insulation for the steam room here). The calculation is simple: you need a pair from the ceiling 60-80 cm down, at this level you can already make a door lintel. Or you can use another rule: from the floor to the ceiling the door is 160 cm in height. From this height you still need to subtract 20 cm per threshold.
By the way, a high threshold is a guarantee that you won’t hit your head, because a person automatically ducks when he steps over it. And if you make the doorway wider, it will become comfortable even at this height.
IMPORTANT! The door to the steam room should open outward, not inward. You never know, maybe you’ll have to knock it out from the inside... It’s better to make the door to the washing room narrow, about 60 centimeters, so that less moisture leaves the room
Another thing: due to the swelling of the wood, the gap between the door and the frame is increased to 5 mm, so that the swollen door can still close. This does not apply to glass and plastic doors.
It is better to make the door to the washing room narrow, about 60 centimeters, so that less moisture leaves the room. Another thing: due to the swelling of the wood, the gap between the door and the frame is increased to 5 mm, so that the swollen door can still close. This does not apply to glass and plastic doors.
The entrance door to the bathhouse can also be ordinary in size, but in terms of material it is better to be metal with wooden lining, so as not to accidentally freeze to the metal in the cold. But the wooden one usually swells and leads.
To do lathing or not to do it
Decorating a bathhouse with your own hands often begins with preparing the sheathing. There are pros and cons here. Craftsmen talk about the need to install it, since it puts a lot of pressure on the wall along with the insulation. If the bathhouse is lined with clapboard from the inside, then there is no need for lathing. The finishing of baths and saunas should be according to the scheme, since the materials are different, as well as the technologies.
Stages of clapboard finishing
Covering the walls in a bathhouse with clapboard goes through the following stages:
— marking;
- decor;
— side racks;
— installation of lining. The interior decoration of a bathhouse made of timber is always in demand. Lining is allowed from different types of wood. To sheathe a bathhouse, just start with simple markings. Decorating a sauna looks simpler when the area of the room does not exceed 5 sq.m. Otherwise, the interior of the bathhouse looks much more diverse. A steam room with clapboard looks interesting; you can include additional shelves and decorative elements the interior The washing corner is decorated with the addition of bath accessories.
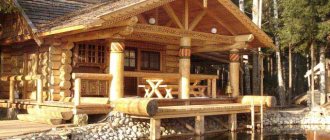
Unique properties and advantages of cedar
Wood is considered an elite building material. It has a pleasant smell, which intensifies when heated. People like the cedar aroma, but it repels insects. This type of wood is not liked by: insects, bacteria, various microorganisms and mold. They are repelled from cedar by the tannins it contains in large quantities.
Cedar wood contains significantly less essential oils than spruce and pine. When heated, it releases cedrin into the atmosphere. This substance relieves fatigue, strengthens the heart muscle and blood vessels. Cedrin vapors treat inflammation of the upper respiratory tract and nasopharynx.
The high thermal insulation coefficient of cedar allows you to create zones with different microclimates in bathhouses. They make it easy to achieve and maintain high temperatures in steam rooms. Bathroom dressing rooms made of cedar are best suited for taking a contrast shower.
In terms of thermal insulation properties, 10 cm of cedar are comparable to 50 cm of brick.
Cedar is easy to process. The wood has a noble color and pleasant texture. It has increased water resistance, is not afraid of temperature changes, is resistant to shrinkage, does not crack or warp over time. These qualities allow it to be used not only for the construction of log bathhouses, but also for their interior decoration.
Making the floor in the steam room
The interior lining of the bathhouse starts from the floor, so the plan is evaluated:
— removal of the old ceiling;
— surface cleaning; — preparation of racks; - surface treatment; — formation of the basis. The inside of the baths is very similar in terms of flooring. The bars are laid around the perimeter and after that the boards can be nailed. The finishing of the steam room in the bathhouse, photos and paintings are often evaluated on the Internet You can see on them that the installation of the material begins either from the far or near wall.
If the floor needs to be tiled, it is important to follow the plan:
— cleaning;
— marking;
— alignment;
- styling.
At the design stage, all corners and tile joints are marked. The material is suitable for various room formats, so it can be changed in the future. In the case of the floor, the surface is prepared according to the standards.
Not only the inclination of the surface is taken into account, but also the degree of curvature. Novice craftsmen believe that they can quickly cope if they immediately lay tiles on the floor. Even manufacturers often indicate on their products that they eliminate floor defects.
For example, there is a concrete floor with bumps. Experts talk about screeding, but there is no desire to raise the level much. Then the craftsmen advise scraping off part of the concrete. Such work is labor-intensive and does not guarantee a good result. In the case of flooring, the following difficulties arise:
- large surface;
— restrictions on materials;
- the need to use powerful power tools.
If you neglect the work, it turns out that you choose not floor tiles, but ordinary tiles. It is not designed for loads; cracks appear immediately. When fixing, specialists also observe deviations from the norm.
For example, humidity restrictions are not taken into account. After the first serious increase in the indicator, the adhesive properties of the product decrease. After this, the row of tiles immediately goes to the side, and it is not realistic to redo such work without complete dismantling. The second point is power tools for flooring. Since the materials are high density, low speed tools generally do not provide adequate performance. It takes a long time to trim the tiles, plus fixing them.
Adhesive mixtures are suitable for different flooring options:
— multicomponent;
- universal.
Multicomponent adhesives are homogeneous. Manufacturers provide their own recommendations for use. For the floor, some advise starting with stirring, and then applying soy mixture to the surface. If the manufacturer writes about multi-layer coating, this means that the adhesive properties leave much to be desired.
In second place are universal goods. For example, the mixture is suitable not only for floors, but also for walls. The composition indicates different materials. Products may contain resins or solvents. Modern products are based on PVA, as well as casein.
Not recently, starch has been on the agenda. Such substances have their pros and cons. The type of surface and material is important.
Cladding technology
You can sheathe walls with clapboard either horizontally or vertically. We will look at the vertical cladding of the walls of a bathhouse - this is how they usually do it.
It is advisable to calculate the width of the racks so that the thermal insulation material is 2-3 centimeters deep relative to the longitudinal end. Thus, we will ensure good ventilation of the space between the sheathing and the insulation.
When finishing the steam room horizontally, you should always start from the bottom so that the groove is at the top. This way, when condensation flows down the walls, it will not collect at the joints.
Installation of the first moisture-proof layer and vertical racks
1 . First, we apply markings for the installation of vertical posts, the installation of which must begin from the corners, in increments of 590 mm. This technique will allow you to tightly lay basalt wool, 100 mm thick.
2. We carefully place the mats in the space between the racks in the same plane with the outer longitudinal ends of the racks in the direction from bottom to top. We press each subsequent upper mat towards the lower one, without creating cracks or gaps.
3. If necessary, we cut the top mats with a mounting cutter.
4 . We install vapor barrier foil in the usual way, as I described here. The only difference is that it will have to be attached to vertical posts, connecting each strip with self-adhesive aluminum tape. The next layer must be glued overlapping with the previous one. We also make allowances of 70-100 mm of foil both at the bottom and at the top of the wall.
5 . We stretch the lace between the outer posts in two places - top and bottom. She will control the internal racks.
6. We install all internal racks around the perimeter.
7. Align and carefully sew on the protective film with a stapler. If necessary, additionally glue with self-adhesive tape. The entire operation must be performed with extreme care. The main thing is to completely eliminate the penetration of air into the area of open logs.
Laying thermal insulation and vapor barrier film
When installing corner posts, it is necessary to simultaneously install basalt wool (stone wool) in the corners. It is less hygroscopic than glass wool. However, there are variations in density; before purchasing, ask the seller which one is more suitable for insulation (rather than sound insulation).
Before installing thermal insulation mats, provide yourself with personal protective equipment - a respirator, goggles, hat, work gloves and appropriate clothing. Getting cotton wool in your eyes or on open areas of your body will not give you pleasure. And inhaling air filled with cotton wool particles will bring a lot of trouble.
Installation of horizontal guide rails
We proceed to the installation of horizontal slats for installing clapboard sheathing on them. We fasten (with nails or self-tapping screws) the slats on top of the vapor barrier, at the top and bottom of the upcoming sheathing. We place the internal slats in increments of 600 mm. Using a level, we give them strict horizontality.
Interior wall decoration with clapboard
1 . Before finishing, you should make sure that the lining is thoroughly dried and rested in conditions similar to the conditions of the installation site for at least a day.
2. We place the initial board strictly vertically with a tenon in the corner of the wall. Paz should be looking at us. How we secure it will affect the quality of the entire cladding. After all, the initial board is an important reference point for all subsequent boards. Using self-tapping screws or nails, carefully attach it along the edge to each horizontal rail. This must be done so that the caps can be completely hidden during subsequent lining with decorative corners. Next, we insert the clamps into the protruding part of the groove of the lining and carefully sew them to the slats.
3. We insert each next board all the way into the groove of the installed lining, lightly tapping it with a mallet through a wooden block - this will protect it from damage. We secure them with clamps to the slats.
4 . The outer paneling often has to be trimmed. We fix it in the same way as the first one. We also finish all the other walls.
We install the baseboards onto the trim and fill the corners with decorative corners using small-headed copper-plated finishing nails. These nails will be almost invisible and will not spoil the appearance of the steam room.
To guarantee unobstructed ventilation under the casing, we install the lower ends of the lining with a small gap - 10-15 mm from the floor. In addition, this will protect the lower ends of the cladding material from exposure to water during operation.
And now the shelves
Arrangement of a bathhouse inside, a photo with your own hands, looks interesting, since shelves are required. You can take structures on one or two tiers. Finishing the inside of a bathhouse with your own hands requires that the master evaluate the free space. The plan and decoration of the bathhouse look good when the ceiling height is calculated. Shelves can take up approximately 20% of the total space. The different options vary in degree of difficulty. The single-tier type for finishing a bath is considered the simplest.
First, it is important to take care of the frame and install the side supports. A bathhouse made of timber will be comfortable for vacationers when the proportions are met. The depth of the shelves is 30-40 cm. finished with varnish for wet rooms.
Setting up a dressing room
The decoration of the shower room in the bathhouse can be in the same style as the dressing room. Craftsmen recommend using similar materials. The finishing inside the bathhouse is used with or without lathing.
It is also recommended to take into account the area and distance to the stove. The design of a bathhouse looks interesting when lockers and benches are provided in the dressing room.
Bathroom and washroom
Finishing the inside of the sauna involves installing a bathroom. The sink can be designed for one or several people. An unusual solution would be to move the washing room to a separate room.
The question remains of how to properly build a bathhouse inside. The style of the bathroom is closer to the classics. Decorating the inside of a bathhouse with your own hands, step-by-step instructions also involves considering postmodern elements. properly decorate the room if you calculate the dimensions. Step-by-step instructions include a plan for laying water supply and sewerage. On plumbing, coordination occurs immediately. Baths and saunas made of logs are safe with elements that do not heat up on their own. Construction includes design stages where the properties of the elements are immediately assessed.
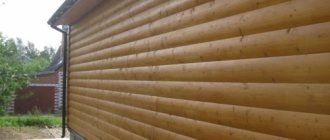
Disadvantages of such wood
Wood tends to darken quickly when exposed to fresh air. In this case, the log houses can be given their original appearance by sanding. It easily removes the darkened top layer from wood.
When building log houses for baths, logs have to be selected not only by size, but also by color, if they are not planned to be painted. There are often specimens that may have pink bark and a yellow core.
Expert opinion
Lovkachev Boris Petrovich
Bath master who knows everything about steaming
Some types of wood of this species are not suitable for finishing steam rooms. These include Siberian cedar. When heated, it releases a large amount of fluid resin. It can cause a burn to a person, and the aggressive aroma released by Siberian cedar when heated can cause allergies. This must be taken into account when choosing the type of wood for a bathhouse.
For cladding steam rooms, it is better to use Canadian cedar. It belongs to the thuja family. There is no resin in its wood. Both Canadian and Siberian cedar are imported into the country from abroad, and therefore have a high cost. Cedar pine is often sold on the construction market under the guise of cedar.
What is better to use to decorate a rest room?
The walls in the bathhouse for the relaxation room may differ. In first place are pine and alder. Hemlock plus linden also works well. Decorating the inside of the bathhouse with your own hands, step-by-step instructions vary depending on the choice.
Finnish spruce or croaker are used much less frequently. Some people are interested in how a bathhouse, decorated inside with their own hands, combines with new tree species. As an option, aspen and even cedar are being considered. Repairing a bathhouse can be easier if the boards are selected from slabs. For a rest room, it is appropriate to take oak or ash. The decoration of the steam room will seem unusual with linden and alder.
to complete the picture . There are not many hardwoods available inside the sauna steam room Decorating a relaxation room is expanding the boundaries as new options emerge with a pleasant aroma.
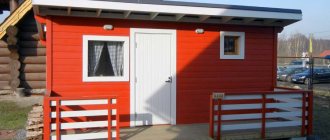
From the reverse
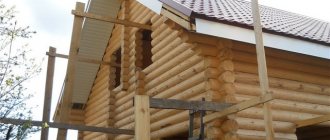
Well, it turns out that the decoration of the bath largely determines the pleasure and benefits of it? Why not, in this case, think of a bathhouse for yourself, following the finishing outwards? That's right, many bathhouse designers do just that. Let’s try to think of a small bathhouse for ourselves that, with a minimum of justifiable costs for it, will be as pleasant and beneficial as possible. The result is:
- The foundation is a flat strip foundation or a columnar foundation with a plinth. With the dimensions of the building in plan up to 6x6 m, the forces of frost heaving on ordinary soils will practically not tilt the structure; the bathhouse will simply rise and fall slightly throughout the year.
- On weak, subsiding and highly heaving soils - a strip foundation of normal depth.
- The structure of the bathhouse is foam blocks made of ordinary masonry cement-sand mortar.
- Exterior finishing and thermal insulation – ventilated facade made of dry-molded facing brick; half-brick masonry, connections to the load-bearing wall - steel anchors with deformation bending seam to seam.
- The floor is made of larch planks with joists on larch beams.
- The runoff from the washing room and steam room disperses through the cracked floor into a concrete catcher.
- The drainage pit is located at a distance from the building.
- Insulation - ecowool.
- Finishing the washing room and steam room is the simplest with standing boards.
- Wood for finishing the steam room - linden, cryptomeria, alder, aspen, poplar.
- Wood for finishing the washing room - larch, cryptomeria, pine, oak, ash, maple.
- Finishing the dressing room and rest room - according to your means and desires.
- The chimney of a sauna stove is a steel pipe in a homemade sleeve.
Steam to your heart's content, and then drink tea from a samovar in such a bathhouse will be no worse, or almost the same, as in a real Russian one. But the whole thing will hardly cost more than just custom-made branded finishing.
***
2012-2020 Question-Remont.ru
Display all materials with the tag:
Go to section:
Do-it-yourself bathhouse finishing
The interior decoration of a log bath follows a similar plan:
— marking;
— materials and tools;
— surface cleaning;
- lathing;
- laying the boards. Decorating the walls in the bathhouse may also involve additional steps. For example, they use frames and panels with insulation. Do-it-yourself bathhouse, the interior decoration looks creative, since the lining and panels fit.
Selection of finishing materials
Arranging a bathhouse will not take much time if you consider the materials: - panels;
- foil;
- foam;
- concrete mixtures. Repairing a bathhouse inside involves dividing the work into basic and additional materials. First, everything is distributed into layers. The decoration of the baths inside should begin with the dressing room, then easily move on to the steam room and relaxation room. Some people fail to decorate the inside of the bathhouse with their own This happens if the materials are not compatible.
Calculation of premises area
The interior lining of the bathhouse begins with a drawing where the areas are marked:
— waiting room 20-30%;
— rest room 50-60%;
— steam room 30-40% Construction and finishing of a bathhouse 15 by 15 meters means that a maximum of 5 square meters can be allocated for the dressing room. More is allocated for the rest room - from 7 square meters. The decoration of the bathhouse, photos on the Internet, indicate that proportions are important for the comfort of vacationers. It is important to place guests not only in the relaxation room, but also directly in the steam room on the shelves.
How to buy quality materials and prepare them for installation
The sauna inside is not ready yet, so it’s worth checking out the offers in the store. Manufacturers may indicate slabs that can withstand high temperatures. The options for finishing the bathhouse inside, photos are sometimes surprising, since the emphasis is on the visual part. In the case of a slab, size and conductivity are assessed. The insulation indicates the heat loss coefficient. A timber bathhouse may include thermoalder inside. This material is only suitable for flooring. If you are wondering how to decorate the inside of a bathhouse with your own hands, it is worth calculating the dimensions and assessing the strength.
Calculation of material requirements
During work, the question always arises of how to arrange a bathhouse inside with your own hands. There are clear rules for calculating material. The problem lies in the fact that finishing a bath requires the use of different tools.
An individual error applies to each material. If the interior decoration of the bathhouse is made from lining, the margin should be more than 10%. Panels are required 5% more than normal. Processing features are also taken into account. Do-it-yourself interior decoration of a bathhouse using cotton wool assumes that the material will shrink. It is possible to take it 20-30% more. The interior decoration of a timber bathhouse may include the construction of additional elements.
For example, supports are often added to shelves. When sheathing is done, common mistakes pop up. Some materials may be defective. If you need to sheathe a bathhouse , it is also important to monitor the quality of the cut.
Consumables are prepared in large quantities for baths Fasteners are provided with a 20% reserve. The arrangement also assumes that electrical needs are taken into account. For wires, the reserve indicator is the smallest - 5%. Finishing the inside of a bathhouse with your own hands is the most demanding insulation. During finishing, materials are assessed based on needs.
Finishing materials for a bath - how not to make a mistake
The interior decoration of different rooms in the bathhouse performs different tasks, and in accordance with them the type of decoration is chosen.
Table: requirements for finishing a bath
| Room | Peculiarities | Type of finish | ||
| Floor | Walls | Ceiling | ||
| Steam room | High temperature - fire protection of wood is required. Humidity - requires impregnation with an antiseptic and fungicide | Ceramic tiles or porcelain tiles with waterproofing, hardwood flooring, drainage | Hardwood cladding, stone or brick cladding at the heater | False ceiling made of hardwood |
| Washing | Humidity - materials are needed that allow surfaces to be washed periodically | Ceramic tiles or porcelain tiles with non-slip surface, drainage | Tiling or finishing with materials that allow wet cleaning | moisture-resistant painting or suspended ceiling |
| Restroom | No requirements | Wood or heated floors with tiles | No requirements | No requirements |
Steam room finishing
To cover the steam room, it is better to use hardwood, which does not release resin when heated. When choosing a material for wall cladding, you must remember that a bathhouse is not only pleasant, but also useful. By inhaling the phytoncides released by heated wood in the steam room, we increase the body’s resistance to colds and heal the respiratory tract.
Table: recommended types of wood for a steam room
| Type of wood | Advantages | Flaws |
| Oak | Strong wood, durable, great appearance | Slips when wet, high price |
| Ash | Durable wood with a beautiful pattern, resistant to rotting | High price |
| Birch | Light pleasant aroma | Prone to rotting, does not hold its shape well at high temperatures |
| Linden | It has a pleasant color, when heated, it emits a delicate aroma, is resistant to rot and high temperatures, and is affordable | No |
| Aspen | Low price, light pleasant aroma | Subject to rotting, over time changes color to dirty gray |
| Alder | Beautiful appearance, affordable price, odorless, does not absorb odors, durable | No |
If you are interested in a budget finishing option, choose alder; if there are no cost restrictions, then the best option is ash.
A bathhouse trimmed with ash clapboard will look prestigious and expensive
For lovers of coniferous scents, a combined finishing option may be offered: where contact with the skin is possible, we make the finishing from deciduous wood, and, for example, we line the space under the shelves with cedar, larch or pine.
To cover a section of the wall near the heater, you must choose a material with high heat capacity and thermal conductivity, ensuring maximum accumulation and uniform heat transfer. The structure of the stone must be uniform so that it does not explode when water gets in. The stones are selected to be round or oval in shape with a smooth surface for free air circulation, the optimal size is from 5 to 21 cm. Another requirement is environmental safety: when heated, they should not emit harmful substances.
Table: properties of bath stones
| Mineral | Properties |
| Gabbro - diabase | Gabbro - diabase is the most affordable and popular option. The stone is dark gray, almost black in color, with low water absorption, excellent heat capacity and very durable. Unfortunately, when heated strongly, it emits an unpleasant odor, and when essential oil gets in, it forms carbon deposits on the surface. |
| Soapstone chlorite | Soapstone is durable, strong, has excellent heat capacity, and comes in colors from light gray to cherry. In order to prevent dusting, the stones are washed and calcined before the first use. It features a pleasant, light steam with a healing effect: reduces blood pressure, heals the respiratory system and skin. Negative characteristic: high price. |
| Basalt | Basalt is the strongest stone of all volcanic rocks. It has only positive characteristics - it is strong, durable, has a high heat capacity, tolerates temperature changes well, and does not emit harmful substances. Even the price is pleasing with its availability. |
| Jade | Jadeite is a semi-precious stone, so you should not be surprised at the high price of this mineral. The color from white through emerald green to black makes it attractive in appearance, and its medicinal properties were appreciated in ancient China. An excellent choice for people who care about their health. |
| Raspberry quartzite | Crimson quartzite, like jadeite, is attractive in appearance with its bright color and has excellent performance qualities - hardness, durability, heat resistance, low water absorption and environmental safety. It tolerates high temperatures well, you can pour water on it without fear of “explosion”. When purchasing, you should avoid split stones, as they will continue to crumble in the future. |
| White quartz | White quartz is not very durable and does not tolerate high temperatures well, but due to its spectacular appearance it is one of the most expensive stones: this translucent mineral consists of silicon and oxygen molecules, and when heated, it releases ozone, which makes a steam bath with it especially useful. |
The ceiling in the steam room above the heater, just like the wall behind it and the floor around it, requires protection with fireproof material. Above the heater, you can make a section of suspended ceiling from a soapstone slab. Soapstone is a universal material for heater stones, cladding walls, floors and ceilings. A more budget-friendly option is a metal sheet over the stove, a foundation and wall cladding made of solid, well-fired brick.
Soapstone can be used not only as a material for stones, but also as a decoration for walls and ceilings behind the heater
The floor in the steam room is made of concrete or ceramic tiles, with waterproofing and a drain for draining water. Walking flooring made of hardwood is laid on top.
Finishing materials for washing
A sink with open shower screens requires the installation of channels, drains and moisture-resistant finishing: facing with ceramic tiles or other durable and moisture-resistant material that can withstand elevated temperatures.
If you plan to install individual shower cabins, such finishing is not required; you can line the walls with clapboard, paint them or plaster them with moisture-resistant decorative plaster.
To prevent water from affecting the sink frame, it is finished with tiles.
It is advisable to have heated floors. The tile must have a rough surface that prevents slipping. It is undesirable to make oak flooring in wet rooms, as it is very slippery when wet. A coating made of coniferous wood, especially larch, is welcome, as it is the most resistant to rotting.
The area of the floor near the font, where significant spills of water are possible, is best made of ceramic tiles with a drain.
The ceiling of the washing room will have to be washed periodically; accordingly, the material must withstand treatment with detergents: larch lining, metal slatted or cassette suspended ceilings.
Restroom
The rest room has no restrictions on decoration, with the exception of warm flooring - it’s always nice to walk on warm wood with bare feet. The rest of the interior design depends on the taste and requirements of the bathhouse owner.
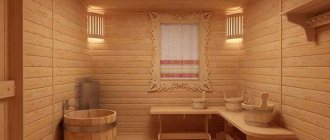
Photo gallery: options for finishing bathhouse premises
In this steam room, the firewood rack serves as an interesting element of the interior.
Soft diffused light and heat from a brick Russian stove will create an unforgettable experience of visiting the bathhouse
Protective lampshades made of slats protect lamps from mechanical influences and create directed streams of light
Taking bath procedures in a small steam room is very comfortable
The interior of the steam room is very decorated with the combined layout of lining made of different types of wood
A steam room for a large company should be heated with a high-power heater
Required Tools
Finishing a shower in a bathhouse assumes that the master has prepared the following tools:
- Bulgarian;
— nail puller;
- drill;
— hammer drill;
- meter.
Insulation on the walls in the bathhouse can be installed using power tools. It's good if you can make cuts quickly. Finishing the walls in the bathhouse is possible using hand tools. You will need a plane, a crowbar, and a scraper. When evaluating the finishing of a bathhouse, photo, it is better to take into account that a high-quality power tool works well.
Important! Even beginners can make precise cuts if they measure everything correctly.
Step-by-step instructions for finishing a bath
To sheathe a bathhouse, it is important to follow the plan:
— marking;
- preparation of walls and floors.
— laying insulation;
— finishing design.
For a bathhouse, finishing can be simplified when materials, plus dimensions, are already marked on the drawings. For a washing room or steam room, the cost of vapor barrier is immediately provided for. Fasteners for products are also important. Bathhouses differ in appearance from the inside. The final design is important. For example, water-based products are not suitable for painting. Acrylic is chosen because it passes temperature and humidity tests.
What not to insulate and sheath a steam room
We think it would be useful to list the materials that are not suitable for the steam room.
All flammable and melting synthetic materials are not suitable for it, especially in the oven area. You should not use polystyrene foam or Penoplex as insulation. Also undesirable are foil materials with polyethylene foam - “Penofol” and the like. Somewhere there was a video of what such materials turn into when exposed to heat for a long time.
Forget about insulation like glass wool - it does much more harm than good.
It is advised not to use ecowool to insulate steam rooms, because it itself is a non-flammable material, but prolonged exposure to high temperatures leads to smoldering even of borax-treated cellulose.
BY THE WAY! Wood in a steam room also becomes more prone to smoldering and fire over time. This is invisible to the eye, but high temperature changes the properties of wood (over several years), and you either need to change the skin regularly or never lose your vigilance.
The external decoration of the walls and ceiling should also not be made of plastic - for the same reasons. But this is understandable. Paint and varnish coatings for walls and ceilings are also undesirable for a steam room. The exceptions are impregnation compositions made from oil, wax or oil wax or acrylic varnishes designed specifically for saunas.
For paints, you can use heat-resistant silicone enamel to paint the stove, and for the floor, use wood compounds that make it waterproof. See Painting section.
PVC profiles in the steam room are also undesirable, because windows and doors made from such profiles can be damaged by temperature. It is better to use combined profiles - the inside is wood, and the outside is plastic or aluminum. Or purely wooden ones.
*** We have written a lot about specific types of insulation and finishing - we advise you to search on the site yourself through the search, site map or through the menu.