OSB for baths
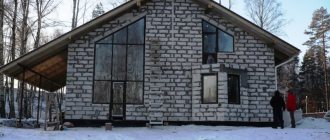
OSB or oriented strand board is a dense sheet building material that is widely used in frame construction, installation of partitions and arches, and for cladding buildings. Most often, frame country houses and bathhouses are built from OSB. This is an inexpensive and quick construction. However, many people still have the question: is it possible to line a bathhouse with OSB from the inside?
To answer this question, you need to study the composition of the material. The panels consist of several perpendicular layers of pressed wood chips with the addition of formaldehyde resins containing paraffin. The binder component gives OSB resistance to moisture up to 60%, as well as to high temperatures - up to +20 degrees. In the bathhouse, these indicators are much higher (up to +80 degrees, humidity - up to 100%). Only natural wood with an integral structure can withstand such changes without deformation. Moreover, at high temperatures, OSB begins to release harmful formaldehydes, which can cause poisoning, headaches and nausea.
Due to these characteristics of the sheets, they are not recommended for use for interior finishing of rooms with high humidity and temperature changes. However, OSB can be used in the rough finishing of baths for further cladding with tiles or clapboard. This will prevent the release of harmful substances and destruction of the panels. For such construction, you need to choose moisture-resistant OSB-3, which can be used in rooms with high humidity, or OSB-4, designed for work in conditions of high humidity. The sheets are additionally protected with a vapor barrier membrane and waterproofing film. OSB cannot be used for installation of subfloors due to flowing water.
It is possible to build a frame bathhouse from OSB boards. The material is suitable for the construction of frames and external cladding of buildings. However, due to the peculiarities of the composition of the slabs, it is not recommended to use them for finishing in damp rooms. It is allowed to use sheets for rough finishing with additional protection with waterproofing materials and further cladding. In this case, being in the bathhouse will be safe, and the panels will not be deformed.
Source
Walling
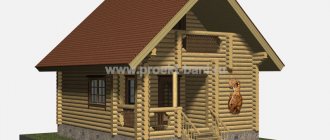
If we are building a frame bathhouse, after the foundation is prepared, we can begin building the walls. Before doing this, make sure that the wood is well dried. The type of wood used is not particularly important, with the exception of birch, since it will quickly rot. The main thing is that the wood has low thermal conductivity.
When choosing materials for external cladding, preference should be given to pine and larch, while aspen is best suited for interior finishing. After completion of construction, the outside of the building is covered with an antiseptic, for example, Texturol.
Inside, a do-it-yourself bathhouse made from boards, when finishing the walls with clapboard, is sanded and coated with furniture varnish in several layers. The wooden lining inside the steam room and washing room is treated with a special impregnation.
Interior decoration of a bathhouse - what is used besides lining?
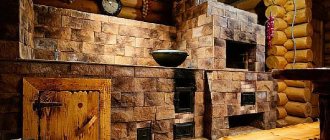
Bath buildings are built from logs, concrete and cinder blocks, bricks and other building materials. The lining of the interior with clapboard remains unchanged. In this article we will tell you what other finishing and decorative products can be used in a bathhouse.
In addition to lining, what can you use to cover bathhouse buildings?
The choice of finish depends on the purpose of the room. Inside the building, in addition to the steam room, there is a relaxation room, an entrance hall (dressing room), a bathroom or a washing room. If desired, the project includes a terrace, a residential attic, or several square meters for a small pool.
Lining is a universal material; with proper processing, it can cover all walls and ceilings, but it will turn out too monotonous. Therefore, diverse interior decoration of the bathhouse is chosen.
Already from the name it is clear that this room is periodically maintained at 100% humidity and high temperature. We need a finishing material that can withstand such changes and also does not emit substances harmful to humans during heating: formaldehyde, ammonia, phenol and others.
4. Rest room.
Lining - pros and cons
Summarizing the above, it is worth noting that a bathhouse cannot do without lining. This is the best finishing material, as it has a unique set of positive properties:
Among the disadvantages, it is worth noting that the lining is susceptible to rotting and woodworms, but the problem can be solved - it is enough to treat the surface with special protective compounds for baths and saunas in order to forget about problems with wood for 3-5 years.
Below, watch a useful video about what materials can be used to cover a bathhouse.
Roof for construction
When the walls of the frame building are formed, you can begin to form the roof frame. Here the greatest attention should be paid to the rafter system. How it will be built depends on several factors - for example, the size of the house, the spacing of the walls and the use of material. The level of roof slope and its type also influence.
The construction of the roof depends on its type.
The roof of a frame building can be single-pitch, flat, gable, gable, etc. The installation of the frame also depends on what kind of roof you choose.
If a residential attic is expected under the roof, the roof is made in almost the same way as the walls - in the sense that layers of insulation, waterproofing and vapor barrier are formed. OSB forms a surface to which shingles can be For other materials, you can use a sheathing made of timber, and attach metal tiles, if you choose one, to the sheathing. From the inside it is also better to use OSB, to which drywall is well fixed.
Roof structure for a frame house - one of the options
Is it possible to sheathe the inside of a bathhouse with an OSB board?
One of the main stages in the construction of a frame bath is its interior decoration , because it is a complex and labor-intensive job.
It must be said that often the bathhouse is not limited to the standard set of four rooms - a dressing room, a relaxation room, a washing department and a steam room .
Everyone’s financial capabilities and desires are different; some will want to have a veranda or attic, a separate room for a swimming pool or gym, which also needs to be equipped and finished (finishing a turnkey bathhouse).
Our company offers its services for interior finishing of wooden baths (frame baths, baths made of timber, logs, etc.), as well as stone ones (brick and block) in the cities of the southwestern Moscow region - Naro-Fominsk, Troitsk, Podolsk, Vnukovo, Odintsovo, Krasnogorsk.
1. Options for choosing materials for finishing 2. Finishing with clapboard 3. Finishing with plasterboard 4. Finishing OSB 5. Finishing the washing room
Options for choosing finishing materials
Having finished building the walls and partitions of the bathhouse, you need to start installing the ceiling, which can be insulated using a layer of sawdust, peat or expanded clay as the cheapest materials. The finished floor is made of floorboards, under which foam plastic or mineral wool is laid. The roof is usually constructed with a pitched roof; this significantly simplifies and reduces the cost of construction.
If we consider options for the interior decoration of a frame bath, we have to choose between: - lining; - plasterboard;
The lining looks most preferable. Finishing a bathhouse with wood material is convenient, environmentally friendly and beautiful. Drywall is the cheapest finishing material. It is easy to install and dismantle. OSB makes the wall frame rigid and durable. Wall-mounted bedside tables can be mounted on walls covered with OSB without fear.
Clapboard finishing
Wooden lining is an ideal finishing material for a frame bath. It creates the effect of a mansion where it is pleasant to relax and steam. Due to its environmental friendliness and affordability, pine lining remains the most popular finishing material for all types of baths. Most often, preference for a bathhouse is given to cedar, aspen, and linden. Larch, oak and ash lining is used less frequently due to its high cost.
When choosing wood, you need to clearly understand which tree species are used and where (the purpose of the room itself). So:
• Both deciduous and coniferous species can be used in finishing the dressing room It serves to protect the bathhouse from cold air in winter and from wind. Fuel and fire-fighting equipment can be stored in its room. There are no high temperatures or humidity here.
• The rest room meets at least two objectives: it should not cause psychological and emotional stress, be functional in terms of the ecology of the room, and be consistent with Russian traditions, just like the interior decoration of the bathhouse.
Any type of wood suitable for finishing work in calm and natural tones and shades can be taken. It can be either coniferous or deciduous wood.
• Steam room . The main rule is no coniferous wood, although Siberian or Canadian cedar may be an exception. Preference is given to deciduous trees. The linden tree is especially worthy of a separate description. It smells amazing when heated and is an energy donor. Linden cladding does not burn or darken over the years, and its finishing is quite decorative.
In addition to linden, what to decorate the inside of a bathhouse with is the more affordable alder or aspen, the tree of which has the ability to absorb negative emotions, energy and “delay” illnesses. The internal finishing of the bathhouse is made of abashi (African oak) and is characterized by high moisture resistance and low resin content. Products made from it are light, plastic, durable with creamy white or pale yellow wood, have no flaws, do not deform and are very beautiful. The material made from this wood can be considered a real find for finishing a steam room.
The main qualities and requirements for wood can be formulated in three words - low heat capacity, thermal conductivity.
Attention: The surface is pre-polished, treated with an antiseptic and coated with a special composition for the bath.
The interior decoration of the walls of a frame bathhouse with clapboard begins with the filling of thin wooden planks with a cross-section of 40x40, 40x50 mm onto racks placed on top of the vapor barrier. By pressing and lowering the screws that secure the wooden planks, you can eliminate all the unevenness of the frame walls. This lathing prepares a perfectly flat surface for the lining.
For a horizontal arrangement of the lining, the lathing is attached along the frame posts, for a vertical arrangement - across the posts (this is called a “counter-lattice”). Lining suppliers usually offer special elements that are used to treat doors, windows, corners, baseboards and other difficult areas.
To come in
Already registered? Sign in here.
Related publications
On a pitched roof, you can use turf as a roofing covering, laid in two layers: the bottom of which is laid with the roots up, and the second with the roots down. Caring for such a roof is similar to caring for a regular lawn. Such “green roofs” are quite popular in Europe, but are not widely used in our country, although they were used everywhere in ancient Rus'. Basically, the roofs of the baths are constructed as gable roofs with an attic. The attic is good for drying bath brooms, storing household equipment, and in rainy weather it is an excellent place for drying clothes. The attic also provides additional thermal insulation for the bathhouse.
Shed roof of a bathhouse When building a bathhouse, many decide to build a shed roof. Unlike other types of roofs, making a shed roof is much easier. So, for its arrangement there is no need to erect a complex rafter system. And if the bathhouse is attached to another building, then such a roof will be a continuation of the existing one. But despite the apparent simplicity in its manufacture, it is important to take into account a number of nuances, for example, the slope of the roof. The pitch of your roof is determined based on several factors, such as how much snow and wind load there is in your area. The selected roofing material also influences the determination of the angle. If there is a large amount of snow in your region, then the angle of inclination should be made steeper from 15°. This will allow the snow to quickly melt off the roof and also make it easier to clean. If strong winds prevail in your region, then the roof, on the contrary, needs to be made more flat. Below is a diagram indicating the permissible roof slope angle for a particular roofing material:
How to calculate the quantity?
To calculate the required number of SIP panels for the construction of a bathhouse, the following indicators are taken into account:
- length and width of walls;
- wall height;
- pediment height;
- number of window and door openings;
- panel dimensions.
Wall panels are sold in sizes 2500x1250 mm , the thickness of the slab itself varies. Slabs of 224 mm are suitable for external walls, and 124-174 mm for internal walls. First, calculate the perimeter of each wall; to do this, the length and height of one wall are added and multiplied by 2.
For example, for a bathhouse 3x3 meters and a height of 2.5 meters, the perimeter of all walls will be equal to (3+2.5)x2=11 meters, multiplying the resulting figure by 4 walls, we get 44 meters. Taking into account the indicators and dimensions of one panel, the construction of such a bathhouse will require 36 panels.
Exterior decoration
Above we learned how to decorate a bathhouse from the inside, now it’s time to take care of its appearance. After all, it is not always possible to build a bathhouse from profiled laminated timber or facing red brick, which do not require any additional finishing.
If you decide to build a building using frame technology using OSB boards, then the bathhouse is finished with siding. Thanks to this material, even the most unprepossessing room acquires an excellent appearance.
Siding will additionally protect the walls from precipitation, increase the service life of the building and reduce the cost of its operation. This type of finishing is now relevant and popular due to its low cost and ease of installation, which can be done with your own hands without inviting professionals.
Facing the sauna with siding
Material characteristics
Siding is made from artificial and natural materials.
Each of them has its fans who focus on consumer qualities; the main thing can be highlighted:
The material is also resistant to:
Siding is made from materials that are completely harmless to health, fireproof and do not contain toxic substances. This makes it possible to use it when decorating the interior of a room.
The decorative properties of siding are also presented on the market, where it can appear in the form of wood, stone or brick. The wide color range of the material makes it possible to provide the building with an excellent appearance.
Wooden siding is made smooth and embossed, in various colors and with imitation of different types of trees. During production, the panels are treated with special compounds and resins, which give the material strength, wear resistance and moisture resistance.
External wall decoration with vinyl siding
Vinyl siding consists of two layers - a top layer that is weather-resistant and a bottom layer with improved mechanical properties. Several types of PVC are used for its manufacture.
Tip: For wooden walls, choose cladding panels made from wood chips.
Features of siding installation
Advice: regardless of the type of finish, fasteners should only be made of stainless steel and aluminum, and the diameter of the caps should be from 8 mm.
Siding installation diagram on OSB
Installation
If necessary, simultaneously with wall cladding, they can be thermally insulated. Its thickness must correspond to the climatic conditions of the area.
Installation technology
To install OSB boards correctly, the process should be divided into stages. This will allow you to carry out all procedures efficiently and avoid problems in the future.
Preparatory work
Preliminary activities include the following:
Before laying the slabs, it is necessary to carry out preliminary measures on the ceiling surface. Correctly carried out preliminary work allows you to avoid problems in the future.
Sheathing device
To ensure that the ceiling made of OSB slabs is extremely smooth and reliable, it is erected using lathing. The creation technology is as follows:
The sheathing is a special frame onto which OSB boards are subsequently attached.
You should know! A significant disadvantage of using plastic dowels when working with concrete structures is their weakening during a fire, which can lead to collapse and blocking the exit.
Fastening the plate
OSB is attached to the ceiling with great care; any inaccuracies will lead to distortions. For ease of fixation, the parts are drilled out in several places, this will allow you to quickly install the self-tapping screw. The material must be hemmed according to a certain pattern:
The fastening should not be done close to the wall; you need to leave a small gap. For a good fit, you can use slabs with a locking connection. They are suitable for situations where it is necessary to obtain a surface that will be decorated with transparent compounds.
Floor covering device
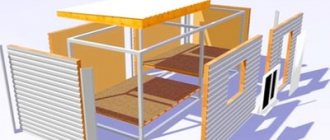
Scheme of the floor “pie” (from bottom to top):
- subfloor rolling – OSB-3 (thickness 6mm);
- waterproofing and wind protection – “Izospan A”
- insulation – ecowool
- OSB-3 shield (thickness 18 mm);
- insulation – EPPS, 5 cm;
- vapor barrier – “Izospan D”;
- reinforcing mesh;
- underfloor heating cables;
- screed;
- tile adhesive;
- tile.
Now let's talk more about each layer.
Step #1 - rolling the subfloor
OSB-3 sheets 6 mm thick were nailed to the bottom side of the joists. They have drainage holes drilled for ventilation. A hole was also cut for the drain outlet.
Installation of a subfloor from OSB-3 sheets
Step #2 - waterproofing the floor
Waterproofing and windproof film “Izospan A” was laid on the roll. All joints were taped with construction tape.
Waterproofing subfloor roll-up with Izospan A film
According to the plan, the supply ventilation hole in the bathhouse will pass under the stove. To organize it, a metal hood box was installed between the joists. A drain tee is also installed.
Installation of the supply ventilation duct
Step #3 - insulation with ecowool
The first layer of insulation is ecowool. But since niches were formed in the ceiling between the joists and the lower frame of the walls (where it is difficult to deliver ecowool), they were filled with Rockwool insulation.
“Rockwool” insulation is laid in niches under the wall trim
I beat the ecowool with an electric drill. During the process, the material increased approximately 2.5-3 times its original volume. The fluffed insulation was laid manually between the joists on the waterproofing. The surface was compacted and leveled with the rule flush with the joists. At this stage, the drainage organization is completed.
Laying ecowool between floor joists
Step #4 - OSB-3 sheathing
Next, the ecowool was covered with another layer of OSB-3. The sheets were cut into pieces so that their edges were located on the joists. Between the logs and the lower frame of the walls, wooden inserts are also fixed, serving as supports for OSB-3.
Embedded timber for OSB-3 support
Taking into account possible expansion (swelling), OSB-3 was laid with a small gap of 2-3 mm. They were secured with self-tapping screws to the joists.
Brief characteristics of OSB
Oriented strand boards are a construction and finishing material, 86-90% consisting of large finely planed wood chips up to 25 cm long and chips no more than 4 mm thick. The remainder of the total mass is thermosetting synthetic resins, special additives and additives.
OSB 3 is the most widely used
Manufacturers offer 4 types of slabs for different purposes:
Basic physical and technical characteristics of OSB are given in the table below:
| Name | Standard | Data |
| Dimensions, in mm: LengthWidthThickness | 2440-2800590-1250from 6 to 38 | |
| Modulus of bending strength, N/mm²: longitudinal axis transverse axis | EN 310 | 18-359-17 |
| Transverse tension, N/mm² | EN 310 | 0,75-0,34 |
| Swelling in 24 hours when completely immersed in water, % | EN 317 | 6-25 |
| Level of formaldehyde release, mg/100 g. | EN 120 | 6.5 and above |
The advantages of OSB are widely known thanks to advertising:
SIP panels are another very common option for using OSB
We also note as a plus the low coefficient of change in geometric dimensions due to changes in temperature and humidity. Thanks to this characteristic, the material can be installed with minimal gaps around the perimeter of the room.
Now let's look at the disadvantages of OSB:
The disadvantages of the material are not limited to this list. According to marketing research, potential buyers consider the harm of these stoves to human health to be the biggest drawback. The main criterion here is the concept of “environmental friendliness”. Let's take a closer look.
How to make an OSB partition inside a house and what screws to use?
OSB is a completely suitable material for the construction of internal room partitions. The strength and light weight of the sheets are clear evidence in favor of this product. OSB boards can be mounted on a metal profile (like gypsum board) or on a wooden frame.
If the second option is used, the wood should be treated with protective materials against mold and mildew, as well as fire retardants.
Now regarding the installation diagram of the partition, which will be considered using the example of a wooden frame:
- Markings are made at the installation site of the structure. A mowing line is passed along the floor and ceiling, which will serve as guides for installing horizontal guides.
- Beams with a cross section of 4x6 cm are attached along the marking lines. If the wall will be subjected to serious loads (for example, you plan to hang furniture on it), it is better to use thicker bars - 5-8 cm. The guides are attached using dowels.
- Vertical posts are installed, which are fixed to horizontal beams using metal corners and self-tapping screws.
The pitch between the racks depends on the width of the slab, which varies. So, if the transverse size of the OSB sheet is 125 cm (the value characteristic of European brands), then the optimal distance between the axes of the vertical beams is 62.5 cm. In this case, it will be possible to screw the edges and the middle of the slab to the frame.
- After installing the racks, OSB panels are installed.
They are attached using self-tapping screws, the length of which depends on the thickness of the sheets and should be 45-50 mm greater than this value. For example, when using material with a thickness of 12 mm, the recommended length of screws will be 60-65 mm.
In the middle of the slab, self-tapping screws are screwed in increments of 30 cm, along the edges - every 15 cm. The distance from the edge is 1 cm. A gap of 1 cm is left between the slabs and the floor. The same gap should remain between the OSB and the ceiling.
Also, the panels should not be installed closely, but at a distance of 3 mm from each other. This will protect the sheets from deformation due to changes in humidity.
Making partitions from bars and OSB - see
Flaws
There aren't many of them. First of all, it is worth noting the low degree of environmental friendliness of slabs from the middle and low price categories. To get building materials that are safe for health and suitable for residential premises, you will have to pay a little more. Better yet, check the quality certificate, which must be attached to each batch of goods. The fact is that during production, resins are used that contribute to the formation of gases hazardous to human health. The most famous of them is phenol. The higher the quality of the product, the less harmful emissions there will be.
OSB is not suitable for use in rooms with high humidity - in a steam room, bathroom or toilet. Heat and steam can cause deformation.
OSB processing leads to abundant dust formation, so it is better to prepare a mask before work.
One way or another, this design has significantly fewer disadvantages than advantages.
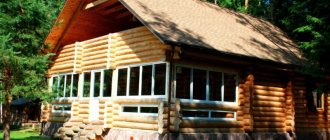
Arrangement of the rest room
The main thing here is not practicality, but comfort, a relaxing atmosphere, and ergonomic design. The most affordable way is to sheathe the room with pine boards. They do not rot, dry quickly, and look beautiful. Based on the durability of the material, it is better to choose boards made from Scandinavian pine. A pleasant light pink shade will eventually become covered with an original patina and will give the room even more coziness.
Budget materials for a relaxation room also include laminated, polyvinyl chloride MDF panels, quartz vinyl tiles, fiberglass wallpaper, decorative plaster, tiles with a stone, brick or wood pattern. In general, everything will depend on the imagination of the owners and the style in which the room is intended to be decorated.
There are also compositions (two-component paints) that completely imitate wood on any surface (mineral, old wood). The inside of a brick or concrete-block bathhouse is finished with OSB or gypsum board panels, primed and puttied. Then paint is applied.
Construction of the truss structure
Typically, boards with a section of 15x5 centimeters are used for floor beams and rafters in frame baths. They are placed on the edge and fastened together. As a result, a distance of 10x12 centimeters is obtained between the rafters. In a vertical position they are fixed with “kerchiefs”, and on top they are combined with a ridge beam of a similar section.
The beams extend outward approximately 40 centimeters. The sheathing is made from boards 25 cm thick, it is laid in the direction from the ridge.
To fasten the rafter forms, special metal plates are used. It is much easier to assemble such a structure on the ground next to the building, and then lift it up and install it there ready-made.
Of the materials for roofing, the best choice would be soft tiles (if a light bathhouse is being built on a conditional foundation) and metal tiles (if a large building is being built). When it is not planned to build an attic, then external roof insulation is required.
Floor tiling
The hardened screed is covered with a concrete primer (I used Knauf “Betonkontakt”). For the floor covering, ceramic tiles with a rough surface and a low level of water absorption (2%) were chosen. This tile is recommended for use in wet areas with high traffic and the likelihood of damage.
The tiles are laid using moisture-resistant glue; in this case, Ceresit CM 11 was used. Using crosses, a 5 mm seam was formed between the tiles. The level of cladding was controlled by the building level.
At the last stage of cladding, the joints were grouted. I decided not to use regular colored grout, due to the fact that it would quickly turn dirty gray on the floor. Therefore, the seams were sealed with the same tile adhesive. It’s a good idea to use regular cement mortar for the same purposes. It turns out neatly, the mixture does not fall out of the seams, and retains its original appearance for a long time. And in terms of strength it is not inferior to the most expensive grouts.
Laying tiles on a screed in a frame bath
This is the floor I got in a frame bath. The main thing is that it is beautiful, warm, moisture does not stagnate on it, and no foreign odors are observed.
Source of the article: https://tvoya-banya.ru/pol/pol-v-karkasnoj-bane.html
Construction of a columnar foundation
This type of foundation for a frame bath is made in the presence of high groundwater. They build a columnar version of the foundation without the involvement of special equipment and a team of workers (for more details: “How to make a columnar foundation for a bathhouse - types of construction options”). You need to have a drill, plastic or asbestos pipes at your disposal and be able to mix cement mortar.
If you are building a frame bathhouse with your own hands, step-by-step instructions for arranging a columnar foundation look like this:
We suggest you read: How to insulate a bathhouse from the inside with your own hands
Dressing room and its proper ventilation
A steam room is never a separate element in a bath system; it is necessarily combined with several functional rooms. Since a dressing room is a mandatory structure for a bath complex, it is also necessary to comply with all comfort conditions. Ventilation in the dressing room is designed to provide this room with an influx of clean, oxygen-enriched air. A constant flow of air in the dressing room is also necessary for effective drying of bath items.
Several systems are suitable for ventilating the dressing room: mechanical (forced), natural and combined. Forced mechanical ventilation consists of installing a fan in the room, which will pump clean air into the room.
The natural way of ventilation is to ventilate the room through open windows. It is advisable to open both windows and doors in the room at the same time.
A combined air ventilation system consists of installing a forced system for injecting clean air and exhausting exhaust air through the toilet or washing room.
How to build a frame bathhouse with your own hands - construction instructions
And so we have already looked at what inexpensive foundations for frame buildings there are. Now we will look at a photo report on how to build a frame bathhouse with your own hands. In our difficult times, not everyone can afford a house with the use of explosion-resistant technologies that can withstand a direct hit from an atomic bomb. And so let's get started.
Constructing a frame bathhouse with your own hands is a completely feasible task. It still needs to be properly insulated and insulated from moisture penetration. It is easier and faster to erect a frame structure than a similar structure made of logs or bricks.
Any home craftsman will be able to cope with such work, since he will not need to order drawings, will not need to equip a serious foundation and will not need to purchase expensive building materials.
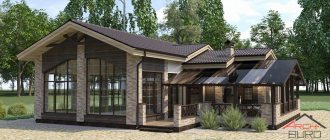
The frame bathhouse in the photo has a significant advantage - the structure is light in weight, which means it will not shrink during operation. Among the disadvantages, it should be noted that during precipitation, moisture penetrates through the cracks of the frame and then accumulates inside it. This problem should be solved in advance.
Creating a wooden base
Self-construction of a small frame bathhouse, as a rule, does not require the construction of a foundation due to its lightness. But to prevent the walls from becoming damp, you need to make a foundation.
In the case where you plan to build a bathhouse no larger than 3x4 meters in size, and the walls and roof are light, then it is enough to create a simple wooden foundation, which is secured along the edges with stakes. Such a foundation is considered a particularly good solution when carrying out construction on clayey, seasonally mobile soils that do not have excessive levels of moisture.
Bathroom trim
What material is suitable for tiling a bathroom or sink - tiles or porcelain stoneware. Unlike wood, ceramics will not require constant treatment with moisture-protective and bactericidal agents.
Glass-magnesite boards are no less popular. This is a durable, moisture-resistant, non-flammable, non-toxic material that is not susceptible to the development of fungus or mold.
You can also use decorative moisture-resistant plaster, plastic panels, plasterboard and glass magnesite for walls and ceilings, followed by the application of waterproof solutions. PVC, slatted pebbles and fiberboard are also allowed. However, it is necessary to take care of complete thermal insulation of the steam room.
In addition to tiles, you can lay moisture-resistant laminate or panels based on composite plastic on the floor. But tiles will be more practical and durable. Wooden shields are placed on top of it to prevent slipping. What interior to create in the washing room in the photo below.
Varnishing
Varnishing or varnishing is a method that allows you to preserve the appearance of the slab and increase its moisture resistance. It is suitable for finishing walls in damp rooms. Before applying varnish, it is recommended to level the surface properly using sandpaper and prime it.
Priming OSB boards. You can use a brush or a paint roller.
How to choose a primer and apply it to the OSB surface can be found in more detail in the article: OSB primer.
Coloring
Painting is the simplest and most affordable option. To do this, use water-based paints (water-based, acrylic or latex paints). They allow steam to pass through perfectly and thus provide a good microclimate in the room. Before proceeding directly to painting the surface, it must be properly prepared. First, two layers of primer are applied and then leveled using wood putty. After this, paint should be applied.
More details about the types of paints used and the technologies for their application are described in a separate article: painting walls made of OSB sheets inside the house.
Wallpapering
Gluing wallpaper is a complex process that requires strictly maintained technology. First, two layers of primer are applied to the OSB board, then putty and only then wallpaper glue with the addition of PVA. This will give the adhesive greater strength and a guaranteed result. More information about gluing wallpaper on OSB boards can be found in the article: how to glue wallpaper on walls made of OSB sheets.
Base trim
A layer of roofing material must be laid on the installed pillars as waterproofing. Next, the base piping is installed. To do this, take a 120x120 mm beam and soak it with an antiseptic. It is better to use softwood such as pine or cedar. The beam is laid around the entire perimeter and fastened using the “half-log” method - half of one beam is sawn off from the top, and from the second from the bottom. When connected, a flat plane is formed. The piping, checked using a level, is attached to the pipes with anchors.