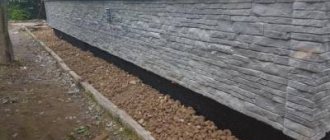
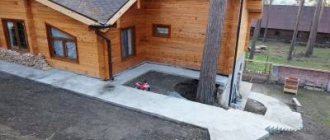
A blind area is a path made of hard or soft materials, the main function of which is to drain water from the base of the building.
It protects the foundation of the building and guarantees a long service life. It can be built from various materials, but, most importantly, you must follow the manufacturing technology, otherwise it will not perform its functions efficiently.
This article provides step-by-step instructions for building a soft blind area around the house with your own hands.
What it is?
A soft, or flexible, blind area is a protective layer located along the perimeter of the structure. The main function of the structure is to drain melt and rainwater from the foundation. It does not have a continuous hard surface; instead, decorative stone, soil with lawn grass or paving slabs are used.
The soft blind area has a longer service life, it is more durable than the hard one.
The structure does not collapse due to soil heaving , since the concrete blind area is susceptible to the formation of cracks and splits. In addition, this is the simplest and most economical finishing method that does not require concreting or asphalting.
Types of blind areas
Despite the existing types of blind areas, their functional purpose is the same. The differences are only in the specifics of installation.
The following types of protective coatings are distinguished:
- Concrete blind area
- Stone and concrete paving stones
- Plates
- Crushed stone blind area
- Soft blind area
At their core, they can be divided into two groups that differ from each other: hard-surfaced blind areas and soft covered blind areas. The first group includes a coating made of concrete, crushed stone, asphalt, sandstone, etc., the second group includes a base with a coating of crushed stone, soil, paving slabs instead of hard. The difference between a soft structure and a hard one is that the drainage function is transferred to the underlying layers, while the inclined surface of a rigid structure removes water from the walls. In addition, it is better suited for use on heaving soil, while a hard blind area is better used for less watered soil.
A concrete blind area has both advantages and disadvantages compared to a soft one: it is a strong coating, durable, and has a simple laying scheme: the trench is filled with sand and crushed stone, then filled with concrete mortar. The disadvantage of this design is the formation of cracks over time and the need to repair them. In addition, water drainage from the path if improperly drained can reduce its protective properties; low decorative value cannot be compared with a soft blind area.
Feasibility of construction
A solid blind area is the most popular option used to remove moisture from the foundation, thereby extending its service life.
But it will not always function correctly, for example, in conditions of heaving soil, a solid structure is rarely used .
In this case, it is advisable to install a soft blind area, which is simpler, cheaper and more repairable. In addition, you can put insulation and waterproofing, as a result of which the structure will perform the same functions as a solid one.
Recommendations from experts
The main advice that professionals give is to use only high-quality materials. Reliable protection will be provided only if each layer properly performs its functions. It is also important to strictly follow the technology for laying a soft blind area so that the result is perfect.
A flexible blind area is an excellent alternative to a concrete path, which, with proper installation and minimal maintenance, will last much longer than its concrete counterpart.
In addition, such a design can add attractiveness to the exterior and become an original flower bed.
Pie diagram
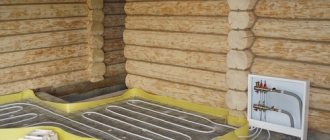
In a soft blind area, elements that perform the function of draining water are located in the lower layers. If the blind area will be installed on permeable soil, it is recommended to make a bedding layer of clay, 15-20 cm thick.
It is better to choose oily clay ; it allows moisture to pass through to a lesser extent. After laying, it is recommended to level it, ensuring a slope of 30-50 mm/m, and compact it thoroughly.
Thus, the first layer in the soft blind area will be clay. Further:
- Waterproofing - it is best to choose a PVC membrane, polyethylene or roofing felt. The width of the material should be 15-20 cm wider than the clay layer. It should be laid overlapping on the wall, attached using a strip or gluing. This is necessary so that when the soil freezes and thaws, the material does not move and empty areas do not form. The opposite layer of waterproofing rises along the ground to the sand level. Waterproofing sheets are laid overlapping each other to ensure sufficient tightness.
- This is followed by a 5-10 cm layer of sand, covered with geotextile on top . This is necessary to protect against chemicals as well as plant roots. Geotextiles are fixed to the wall along with waterproofing.
- 10-15 cm layer of crushed stone , on the outer layer of which a drainage pipe is laid. It is imperative to make drainage grooves along the perimeter of the blind area.
If other material (pebbles, cobblestones, paving slabs, etc.) will be laid on top of the crushed stone, then it should also be covered with a layer of geotextile and covered with sand. Otherwise, the crushed stone layer may be higher than the ground level. To prevent crushed stone from sinking into the ground, curb tiles should be installed.
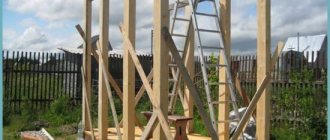
Technology for creating a soft “path”
It is not difficult to make a soft blind area. Don't believe me? However, now you will see this. Shall we start?
Necessary tools and raw materials
To ensure that nothing distracts you from your work, you need to take care in advance about the availability of tools and material for the soft blind area.
- waterproofing - roofing felt, polyethylene, PFC membrane (optional);
- geotextile for blind areas – protects drainage from silting and prevents different soils from mixing;
- clay without any impurities;
- drainage - sand and gravel;
- bayonet shovel;
- cord;
- pegs;
- gloves.
Work order
We follow the step-by-step instructions:
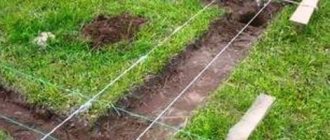
- we mark the site;
- drive in pegs;
- stretch the construction cord;
- we dig a trench 30–40 cm deep and 60–80 cm wide (between the wall of the structure and the cord);
- fill the trench with clay without impurities (at least 10–15 cm) and compact it well. As a result, we get an excellent hydraulic lock, which was used by our grandfathers;
- we put a waterproofing material (the material produces excellent ones), make sure that it extends onto the wall, 10–15 cm is enough;
- cover the waterproofing material with a layer of sand;
- we lay geotextiles, which make an excellent pair with drainage, since it does not allow sand to mix with crushed stone;
- fill the trench with crushed stone (thickness at least 15 cm);
- lay another layer of geotextile;
- fill the material with sand;
- We directly lay the blind area from the raw materials we like (multi-colored granite chips of medium and fine fractions look amazing).
Also, if desired, the blind area can (sometimes should) be insulated. For what? The coating will increase the temperature in the basement, save on fuel, and also prevent the ground from freezing. Most often used:
- extruded polystyrene foam (penoplex) - durable, strong, easy to process (from my point of view, this is the best material for this purpose);
- polystyrene foam - has long been known for its heat and sound insulation properties, reasonable price;
- foamed polyurethane (so-called sprayed thermal insulation) - durable - service life more than 20 years, wear-resistant, does not rot, is not afraid of sudden temperature changes, does not absorb water, however, its price is high, since it requires special equipment.
Of course, you can use other insulating materials, but these are the most relevant.
If everything is done correctly, the work will bring not only excellent results, but also pleasure. The protective “path” will allow you to enjoy the comfort of the family hearth in the arms of your home for decades!
This is what I wanted to tell you about today, but now I’m finishing it and recommend (to anyone interested) to subscribe to our public VK. And if you have friends whose construction of a house, bathhouse, etc. is “at the right stage,” recommend the article to them, it will suddenly benefit them. Good luck to everyone, and a nice warm blind area for the house, bye!
Wisdom Quote: It doesn't matter what you give, it matters how you give (Bruce Lee).
“Scandinavian technologies: insulated Finnish foundation” is the next article in the series. In it I will talk about the type of foundation common among Finns, which we call UFF (Insulated Finnish Foundation). In terms of its operational characteristics, it is very similar to USP, but has wider possibilities for application.
UFF or insulated Finnish foundation is an exclusively popular name for a certain type of foundation, very common in cottage construction in Finland. This name, as in the case of USHP, went to the masses from the construction portal forumhouse.ru. There, a huge database of information was collected on this type of foundation and variations in the execution of individual units. Since my site does not pretend to be a construction-technical resource, but was created solely for general information and understanding of the nuances of organizing country life, I, as always, will not delve into technical aspects. Moreover, everything is beautifully described on the above-mentioned resource. If you read the article about USHP, then, in a nutshell, UFF is USHP with structurally separated stiffeners and floor slabs. In addition, in the case of UFF, these ribs are buried in the ground. In cross-section, the Finnish foundation looks like this:
Pros and cons of flexible design
The main advantages of the design are:
- Resistant to temperature changes.
- The material is not subject to shrinkage, which improves its quality characteristics and does not harm the base of the structure or building.
- The soft blind area does not require periodic repairs.
- If a special membrane is installed during the installation of the structure, its thermal and waterproofing qualities will improve, as well as frost resistance and immunity to seasonal soil heaving will increase.
- You can install the soft blind area yourself.
- The design can serve a decorative function. Depending on personal preferences, you can pour multi-colored stones onto the surface of the blind area, plant grass, or organize a flower bed.
Despite the predominant number of advantages, the design also has disadvantages. For example, the need for constant care, since grass can grow through the stones, plant roots can grow, etc. The surface of the pebbles requires constant cleaning of dirt.
DIY device technology
To understand how to make a beautiful and durable blind area, you need to choose the right type of structure. Concrete is widely used as a reliable, durable and easy-to-use material. It is not difficult to make such protection. The concrete blind area is easy to install with your own hands, and the step-by-step instructions will allow even an inexperienced person to do the job for the first time.
Preparation and marking
The construction of a house concrete blind area begins with the selection of materials and tools. Work is carried out only in the warm season, when the air temperature remains stably above zero. In addition to the required volume of concrete, you will need waterproofing material, metal for reinforcement, a board for formwork and construction tools.
At the next stage, marking is done. The width is noted, which should be 200 mm greater than the roof overhang or drainage elements, if it is planned to install curbs or a drainage system; this is taken into account when marking. To do this, stakes are driven along the outer edge of the future formwork, and a cord is pulled between them. The level of the structure along the base is marked with a spirit level or laser level so that it is horizontal. Its height should be at least 7 cm, taking into account that the structure should be at an angle of 3-10 degrees from the wall of the house. The line connecting to the house can be applied in various ways, the most convenient is using a paint cord.
Next, a 30 cm deepening is dug out for the future structure. Sometimes you have to remove a layer of fertile soil and get to the clay base. In this case, all plant residues are carefully removed. The bottom of the recess should follow the future slope.
Formwork assembly
The formwork is made from edged boards along the width of the blind area being poured. They are secured from the outside with pegs driven into the ground, metal fittings or rods. At the corners, the formwork can be fastened with bolts or ties. The upper edge of the formwork is leveled along the edge of the future structure, which greatly facilitates the work of laying and leveling concrete and creating the desired slope.
Cushion and reinforcement
A concrete blind area begins with the installation of a cushion, which will become a reliable foundation for it. First, the bottom is sprinkled with clean clay, which is carefully compacted, maintaining the slope. Clay allows you to create a reliable water seal, since it practically does not allow water to pass through. It is better to lay it in layers, moistening them for better shrinkage. If the bottom of the trench is clay soil, it is enough to simply compact it.
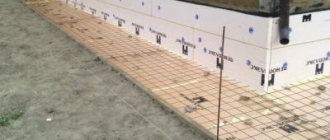
The bottom of the trench is covered with geotextile with a density of 150 g/m³ or other dense waterproofing material with an overlap of 30 cm on the wall and the formwork. The next layer is coarse sand, the thickness of which, after compacting with a vibrating plate or manual device, should be at least 20 cm. Then a layer of crushed stone or gravel up to 10 cm is laid around the house.
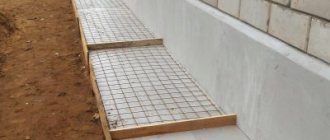
Reinforcement is done with a mesh with a cell of 10x10 cm; options with a larger cell are allowed. The mesh must be deep in the concrete, so it is mounted at a height of 3 cm from the surface. Installed on plastic clamps for fittings or other similar elements. Beacons made of 20 mm thick boards treated with water-repellent compounds are installed on top. Their top edge should coincide with the top edge of the concrete; in the future they will serve as deformation compensators.
Preparation of mortar, concreting
Filling is carried out with concrete grades M200, M250, M300. The mixture is ordered from concrete units or made independently. For example, the proportions of M250 concrete used for blind areas are 1 part cement, 2.1 parts sand, 3.9 parts crushed stone.
Laying is done in parts between previously installed wooden beacons, leveled according to the rule, observing the design angles of the surface. No later than 2 hours after the completion of concrete laying, the surface is ironed by sprinkling it with a 2 mm layer of Portland cement 400.
To improve the properties of any brand of concrete used for the blind area of a private house or other building, it is recommended to add microfiber made from polypropylene or basalt fiber to it.
Care
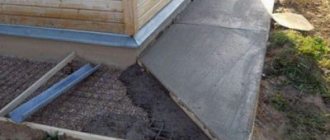
After pouring the blind area of the house, the concrete surface is covered with a film and moistened for several days so that the hydration reaction takes place and the monolith gains strength. The formwork is dismantled after the concrete solution around the house has completely set after 15 days.
To extend its service life and improve its appearance, it is equipped with curbs, storm drains, drainage trays and sand traps.
Tools and building materials for work
Materials for creating a soft blind area should not contain impurities. Consumables for the construction of a soft blind area must be of high quality, otherwise the quality characteristics of the entire structure will deteriorate.
It is recommended to use rolled materials as a waterproofing material; their installation is easier.
A wide range of waterproofing materials are available for sale:
- roofing felt,
- PVC films,
- polyethylene membrane.
For the top, drainage layer, sand or crushed stone is most often used, less often pebbles, gravel, and expanded clay. In the case of a soft blind area, it is necessary to lay geotextiles, which protect the structure and foundation from moisture and also help to evenly distribute the load.
The material is selected depending on the type of soil:
- thermally bonded – for rocky soil;
- needle-punched - for clay;
- woven - rarely used due to low quality characteristics.
It is also recommended to use thermal insulation material, which will help prevent the negative impact of low temperatures on the structure. As insulation, preference should be given to penoplex or expanded polystyrene.
If the soil is loose, it is recommended to lay a layer of rich clay at the bottom of the trench. Sand or crushed stone is placed on it as drainage.
Foundation blind area near the bathhouse - arrangement options
The foundation blind area is a special structure designed to protect the foundation from penetration of precipitation under it, which can lead to its destruction.
There are areas where groundwater can rise so high that it penetrates under the foundation, which is why the building is constantly being washed away, and unevenly, and all this leads to the appearance of cracks in the foundation. A much more terrible situation is when the bathhouse is built on turbulent heaving soils.
If you want your favorite bathhouse to serve you for many years, you need to seriously consider the issue of building a high-quality blind area around the foundation. In our article we want to describe in more detail how to make a blind area yourself without spending much time and money.
Reasons for the need to construct a blind area
The blind area is designed to perform the following functions:
Decorative - it is the logical conclusion of the entire architectural image of the building, and is its integral part. Landscape designers make full use of the blind area to create the desired impression of a bathhouse.
Practical - quite often the blind area serves as a kind of path, and accordingly there are certain requirements for materials and design. It must be abrasion-resistant and hard.
Insulation and waterproofing are the most important functions that a blind area should perform.
If you did not take care of the blind area at the stage of building the foundation, then this must be done before the cladding of the base is completed. Otherwise, the water will begin to erode the nearby soil and undermine the foundation, which will lead to cracks.
Before you start work, you need to decide what materials you will use to make the blind area. Can be used: asphalt, cobblestones, bricks, reinforced concrete slabs, concrete, tiles, wood and even bottles.
Any type of blind area consists of two layers: a covering and a lower layer: sand, sand, clay or small crushed stone. Usually the blind area is done at the same time as the foundation. Well, if you purchased a ready-made bathhouse without it, you will have to equip it.
standard and budget option for constructing a blind area
The main rule that must be followed when constructing a blind area: its width should be 20-25 cm greater than the overhang of the building's eaves. Usually a width of 80-100 cm is sufficient, but the wider the blind area, the better it copes with the function of draining water from the building.
Typically, the blind area is made at an angle of 3-7 degrees. In addition to it, a storm drain (small ditch) will also be installed around the perimeter for drainage.
Blind area - step-by-step instructions for creation
The technology for creating a blind area looks like this:
Step 1. First you need to outline the boundaries and prepare the base. First you need to clear the area of plants and even their roots. Simply remove the top layer of soil with a bayonet shovel so that the plants do not subsequently destroy the blind area.
Treat the soil additionally with herbicide compounds. Then you need to place restriction boards around the perimeter to prevent the solution from leaking out. You need to pour sand into the trench that has formed, compact it and fill it with water. Pour crushed stone or broken brick onto the layer of sand.
If possible, compact everything with a vibrating device.
Step 2. Creation of insulation and waterproofing layers. If there is a cellar or basement in the bathhouse, it is imperative to insulate the blind area.
The insulation material can be foam glass, penoplex, or expanded polystyrene. The insulation of a concrete blind area must be done so that there is an air gap of up to 15 cm underneath it.
To waterproof the foundation, use PVC film, roofing felt or bitumen.
blind area with waterproofing and storm drainage
Step 3. Arrangement of temperature cuts. For these purposes, it will be convenient to use slate and storm drains. It is important to leave an expansion joint at the junction of the blind area and the walls of the building. To create it, you can use sealant, roofing felt or bitumen in two layers.
Step 4. Pouring concrete. Next, you need to prepare a concrete solution and pour it, in parts and according to the rules. It is better to choose cement grade M-300, so the blind area will be stronger and more durable.
You can make concrete yourself, following this recipe: take one part cement to three parts sand, four parts crushed stone and half part water. To do this, mix water and cement in a concrete mixer until the mixture becomes sticky. Add sand and crushed stone piece by piece.
Concrete is considered ready when the mass becomes homogeneous.
Step 5. Ironing. After pouring the concrete, wait 15 minutes and sprinkle the blind area with dry cement and smooth it with a spatula. Ironing will protect the blind area from moisture penetration, and the surface will be smooth and look beautiful. But if you plan to do the finishing with tiles, then you don’t need to do this.
Step 6. Decoration. Then you can proceed to the most interesting and creative part. You can decorate the blind area with stones, tiles, and plant ornamental plants around the perimeter. If you plan to use materials with a porous structure, such as artificial stone, for finishing, then you need to treat them with products with a water-repellent effect.
Step-by-step instructions for the device
When arranging a soft blind area, the following must be taken into account:
- the structure should be 15-20 cm wider than the roof eaves;
- the width must be at least 60 cm, and in case of unstable soil - up to 1 m;
- the depth also depends on the type of soil (usually from 10 to 20 cm).
This type of blind area is usually soft and multi-layered. The first is cheaper and simpler, the second will require more time and money.
In addition, geotextiles are necessarily used in a multi-layer blind area, which protects structures from the negative effects of chemicals, plant roots, etc.
Multilayer blind area is of better quality ; it reduces soil mobility and prevents mixing of layers among themselves. Geotextiles do not allow moisture to pass through and are not clogged with small particles of dust and lime.
The material is laid after leveling and compacting the sand layer, thereby preventing the crushed stone from mixing with the sand.
To make the appearance of the structure attractive, it is recommended to lay a decorative layer . This can be tiles, crushed stone, etc. Before laying it, another layer of geotextile must be laid.
In places with cold climates, it is recommended to lay a layer of insulation. Sheet polystyrene foam is most suitable for this, as it is easy to lay and process. Applying insulation using the spraying method is significantly more expensive, but at the same time much more effective and durable.
Installation technology:
- The top fertile layer is removed to a depth of about 30 cm, width - up to 80 cm (sometimes up to 1 m).
- A 10 cm layer of clay is placed at the bottom of the trench, after which it is compacted. Be sure to make a slight slope from the walls to the site.
- A waterproofing film is covered, one edge is attached to the foundation, and the other to the ground.
- A layer of sand is poured to protect against mechanical damage.
- Geotextiles are laid to prevent sand from mixing with crushed stone.
- A 12 cm layer of granite crushed stone is poured.
- After this, you need to lay another layer of geotextile, and pour a layer of sand on top.
- Next, you can decorate the blind area at your discretion.
If everything is done correctly, the result will be a high-quality blind area that will not be afraid of cold, moisture, etc.
Do-it-yourself insulated soft blind area with a stone border - in the video:
Until recently, creating a blind area was labor-intensive and time-consuming
Traditionally, the blind area is made of concrete. To do this, dig a trench, lay a sand-gravel or just a sand cushion, and pour concrete on top. To make the coating more durable, a layer of polymer film is laid on the sand cushion and metal beacons are installed, and the canvas is reinforced with mesh - it increases the resistance of the blind area to cracking. After pouring, the concrete mixture must be maintained to ensure optimal conditions for hardening and gaining brand strength.
But sometimes homeowners ignore some of the steps in creating a blind area, because following them is quite difficult and expensive. It is much easier to pour the concrete mixture into the formwork and not have to do it anymore.
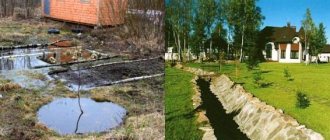
The consequences of such decisions can come back to haunt the homeowner quite quickly - after just a few seasons, the concrete blind area will begin to collapse, losing its protective properties. It should be noted that repairing it is quite problematic.
Possible installation errors
A soft blind area is a good alternative to a concrete path, the cost of which is several times higher. With proper installation and care, it will last for many years.
During the construction of the structure, possible mistakes should be avoided:
- The dimensions and location of the trench are incorrectly selected. The blind area should be located around the entire building, and be 20-30 cm wider than the roof canopy. If the building has a porch with a roof, then the blind area in this place should be wider to prevent moisture from entering the foundation area.
- Water stagnation. Failure to follow installation techniques can result in water pooling near the foundation, resulting in the formation of puddles. Therefore, do not forget about the construction of a transverse slope and drainage trays that will remove water from the structure area.
- Lack of insulation, especially on heaving soils. The fact is that prolonged frosts and thaws lead to oversaturation of the soil with water and its swelling. This leads to the fact that the load on the building elements becomes uneven, which is why cracks appear on the foundation and it collapses.
- Lack of waterproofing of the soft blind area. Gravel is usually poured onto the top layer of such a structure, tiles are laid, or a lawn is planted. They easily let water through, so they need high-quality waterproofing. It will create a sealed layer and prevent precipitation from destroying the foundation. Waterproofing must be laid with an overlap onto the foundation of the building.
How reliable and durable is the soft blind area?
Of course, to answer these questions, you need to try the material yourself.
But none of us wants to experiment in construction. And it is right. Here we can cite one fact that will dispel our doubts. We all know how clearly large developers calculate all the details. We do not take into account those whose goal is to save on everything, and then whatever happens. We are talking about those who are making long-term plans and are not going to spend money on constant repairs. Before using any material, they clearly evaluate its capabilities, effectiveness, reliability and their own benefits. There are no small details here. It is these responsible developers who have been using PLANTER Geo membranes for many years. It would seem that this is a material that can be replaced with any cheap one. But large, responsible businesses know the consequences of such savings and, preferring not to take risks, use our profiled membrane. Soft blind area in modern construction
New technologies may be alarming, but concrete has not existed since time immemorial, but appeared relatively recently. Its use has made it possible to make a huge step forward in construction. So is it worth neglecting the latest technologies that are already being successfully used?
Does it look unreliable? Yes, indeed, the concrete blind area looks much more impressive. This is probably where its main drawback lies - its monumentality does not make it possible to adapt to changes that cannot be avoided. For example, soil mobility. And then it becomes clear that it is the profiled membrane that is much better suited for the blind area. And a well-thought-out elastic drainage system is the ideal solution.
- The membrane does not decompose and is highly resistant to chemical reagents (acids, alkalis, salts) contained in the soil.
- Resists root germination and the effects of waste products of microorganisms.
- Reacts to temperature changes absolutely painlessly.
- Prevents frost heaving, leading to the formation of cracks in concrete structures.
- Made from high-density polyethylene without the addition of chemical elements that negatively affect the environment.
Therefore, the blind area with PLANTER Geo will last more than 60 years.
Now ask your neighbor: how long and how well does the concrete option protect the foundation? With PLANTER Geo you can make an insulated blind area by placing heat-insulating boards under the membrane
The cheapest and easiest option
A soft blind area is considered the most inexpensive and simple way to protect the foundation from moisture. Crushed stone or sand are most often used for the top layer ; they are cheaper and easier to work with.
The most economical and simple option is to plant ornamental grass or form a flower bed on a blind area. This will not only reduce the financial costs of arrangement, but also improve the appearance of the site.
It is better not to skimp on waterproofing and geotextiles, as they play a primary role in structural reliability and durability.
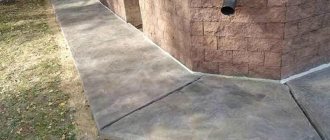
It is worth noting that the soft blind area is highly susceptible to spreading, since bulk materials are most often used for the top layer. To prevent this, a concrete curb is laid around the perimeter of the structure .
To make it cheaper, it can be replaced with wooden formwork, which is mounted in poured clay. Such a barrier is capable of retaining bulk material and also maintaining the integrity of the structure.
Over time, the wooden formwork can be dismantled and a concrete curb installed in its place.
FAQ
With what type of foundation can a non-rigid blind area be made?
Answer
A gravel blind area can be used with any type of foundation (provided that waterproofing material such as Planter GEO is used).
Is it possible to lay tiles or pour concrete on the blind area next year?
Answer
This is possible, but such improvement must be taken into account at the gravel filling stage. In particular, you should not lay a membrane. You can get more detailed advice from our specialists by calling the numbers listed on the website.
Price for turnkey construction services
To calculate the exact cost of the necessary materials and work, you will need the help of a specialist. After all, this is the only way to assess the condition of the soil and select the type of blind area.
It is recommended to carry out work on the installation of a blind area simultaneously with the installation of drainage and storm sewerage.
The final cost of work is influenced by many factors , including:
- material used to construct the structure,
- building area,
- width and depth of the blind area,
- as well as some soil features (flatness, need for dismantling, etc.).
For example, in the Moscow region, the cost of installing a structure using sand, membrane, geotextile and crushed stone will vary from 1300 to 1600 rubles. depending on the width of the blind area. The more materials are used, the higher the final cost of the work will be. In Novosibirsk, the cost of similar work varies from 1000 to 1600 rubles, in St. Petersburg - from 1200 and above.
Requirements
All requirements in accordance with GOST are set out in SNiP and are aimed at protecting the walls and foundations of buildings. They relate to the main parameters of the protective layer:
- The width of the blind area is regulated by the Manual for the design of foundations of buildings and structures (to SNiP 2.02.01-83). The optimal width is considered to be 1 m; this design not only effectively removes moisture, but can also serve as a comfortable path around the house.
- The dimensions of the blind area are equal to the perimeter of the external walls of the house, minus the permanent porch made of concrete - if it breaks, it loses its effectiveness.
- The depth of the structure according to the standards is no more than half the depth of soil freezing in a particular region. Information can be found in building reference books or relevant architectural organizations.
- The thickness of the blind area for concrete structures ranges from 70 to 100 mm, with increased loads 150 mm is allowed.
- The slope of the blind area is indicated in SP 82.13330.2016. It should be directed towards the opposite wall, ranging from 1 to 10%. That is, the height difference per 1 m is from 10 to 100 mm. More often, the slope is 2-3% - this allows you to divert water away from the house and not slip on it when icing occurs.
Photo
Photos of soft blind areas around houses:
“Soft Finnish blind area”, how to lay a geomembrane
IMHODom › Forums › foundations and floors › “Soft Finnish blind area”, how to lay a geomembrane
- This topic has 73 replies, 15 voices, and was last updated 2 months ago by ruslan8.
- Tomsk
We are going to make a “soft insulated blind area”. One question remains unclear: How to lay the geomembrane? “Pimples” down or up? The diagrams on the internet show it down. but we cannot understand the physics of the process of removing water through the membrane in this case. Have any of the forum members used a geomembrane for waterproofing and drainage in a blind area or found an answer to this question?
Share your experience or knowledge
- April
If you lay it with the protrusions down, then there are no advantages compared to ordinary polyethylene. If it is up, then in my opinion the same. The only justification for a geomembrane in the blind area is the geotextile on the protrusions. Then the outflow of water will improve. In this case, of course, the protrusions and geotextiles are up. And there is sand on top. But won’t the geotextiles sag under the weight of the soil? My opinion is that if with geotextiles, then the protrusions are up. If without something down, there will be at least some drainage cavities.
Online store Light. Electrics. newsvett.ru
- Tomsk