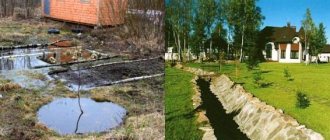
A blind area is a path made of hard or soft materials, the main function of which is to drain water from the base of the building.
It protects the foundation of the building and guarantees a long service life. It can be built from various materials, but, most importantly, you must follow the manufacturing technology, otherwise it will not perform its functions efficiently.
This article provides step-by-step instructions for building a soft blind area around the house with your own hands.
What it is?
A soft, or flexible, blind area is a protective layer located along the perimeter of the structure. The main function of the structure is to drain melt and rainwater from the foundation. It does not have a continuous hard surface; instead, decorative stone, soil with lawn grass or paving slabs are used.
The soft blind area has a longer service life, it is more durable than the hard one.
The structure does not collapse due to soil heaving , since the concrete blind area is susceptible to the formation of cracks and splits. In addition, this is the simplest and most economical finishing method that does not require concreting or asphalting.
Artistic decoration
Despite its purely technical purpose, the blind area also performs a decorative function, visually emphasizing the boundary between the walls of the building and the surface of the ground. And if from afar everyone pays attention to the facade and windows of the building, then upon entering the courtyard and coming closer to the house, it is the basement and the foundation area that are one of the first to catch the eye.
In order to refine its appearance and create a harmonious combination with the overall design style of the site, they resort to various methods of decoration.
For example, finishing a blind area with natural stone will go well with both a strict classical style and country-style buildings. While for a site decorated in Art Nouveau style, finishing the blind area with paving slabs is more suitable, and it can be of different sizes, shapes and colors.
Freshly poured concrete blind area Please note! Artistic finishing performs not only decorative functions. Durable waterproof building materials are used for its manufacture, so it, to some extent, provides additional protection for the foundation and basement of the building.
Feasibility of construction
A solid blind area is the most popular option used to remove moisture from the foundation, thereby extending its service life.
But it will not always function correctly, for example, in conditions of heaving soil, a solid structure is rarely used .
In this case, it is advisable to install a soft blind area, which is simpler, cheaper and more repairable. In addition, you can put insulation and waterproofing, as a result of which the structure will perform the same functions as a solid one.
Insulation thickness
Extruded polystyrene foam is produced in slabs. They have different brands, thicknesses and dimensions.
| Brand | Thickness, mm | Length, m | Width, m |
| PSB S-35, 20 | 20 | 1,24 | 0,64 |
| PSB S-35, 30 | 30 | 1,2 | 0,6 |
| PSB S-35, 40 | 40 | -«- | -«- |
| PSB S-35, 50 | 50 | -«- | -«- |
| PSB S-35, 60 | 60 | -«- | -«- |
| PSB S-35, 70 | 70 | -«- | -«- |
| PSB S-35, 80 | 80 | -«- | -«- |
| PSB S-35, 90 | 90 | -«- | -«- |
| PSB S-35, 100 | 100 | -«- | -«- |
| PSB S-35, 120 | 120 | -«- | -«- |
| PSB S-35, 150 | 150 | -«- | -«- |
Note! For a blind area, the most suitable option is a slab 50 mm thick and 0.6 m wide. A tape emerges from it, insulating the soil around the house to a width of 60 cm
Regulatory requirements for the blind area
It is curious that the blind area is mentioned only in one updated federal standard, namely SP 82.13330 “SNiP III-10-75 Landscaping”. The requirements for this building structure are presented in clause 6.26, the brevity of which allows us to present it here in full:
“6.26 The blind areas around the perimeter of the buildings must be tightly adjacent to the base of the building. The slope of the blind area must be at least 1% and no more than 10%.
In places inaccessible to the operation of mechanisms, the base under the blind area can be compacted manually until the imprints from the impacts of the tamper disappear and the movement of the compacted material stops.
The horizontal and vertical curvature of the outer edge of the blind area within the straight sections should not be more than 10 mm. The concrete blind area must meet the frost resistance requirements for road concrete.”
Such a meager updated regulatory framework for the construction of blind areas forces one to turn to the standards of organizations developed in the development of federal regulations.
PENOPLEX SPb LLC, together with the Federal State Unitary Enterprise Research Center Construction, developed STO 36554501-012-2008 “Use of thermal insulation from polystyrene foam extrusion slabs PENOPLEX in the design and construction of shallow foundations on heaving soils.” The document can be found here.
Pie diagram
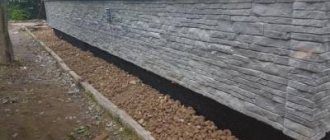
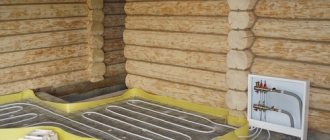
In a soft blind area, elements that perform the function of draining water are located in the lower layers. If the blind area will be installed on permeable soil, it is recommended to make a bedding layer of clay, 15-20 cm thick.
It is better to choose oily clay ; it allows moisture to pass through to a lesser extent. After laying, it is recommended to level it, ensuring a slope of 30-50 mm/m, and compact it thoroughly.
Thus, the first layer in the soft blind area will be clay. Further:
- Waterproofing - it is best to choose a PVC membrane, polyethylene or roofing felt. The width of the material should be 15-20 cm wider than the clay layer. It should be laid overlapping on the wall, attached using a strip or gluing. This is necessary so that when the soil freezes and thaws, the material does not move and empty areas do not form. The opposite layer of waterproofing rises along the ground to the sand level. Waterproofing sheets are laid overlapping each other to ensure sufficient tightness.
- This is followed by a 5-10 cm layer of sand, covered with geotextile on top . This is necessary to protect against chemicals as well as plant roots. Geotextiles are fixed to the wall along with waterproofing.
- 10-15 cm layer of crushed stone , on the outer layer of which a drainage pipe is laid. It is imperative to make drainage grooves along the perimeter of the blind area.
If other material (pebbles, cobblestones, paving slabs, etc.) will be laid on top of the crushed stone, then it should also be covered with a layer of geotextile and covered with sand. Otherwise, the crushed stone layer may be higher than the ground level. To prevent crushed stone from sinking into the ground, curb tiles should be installed.
The PLANTER GEO membrane is responsible for water drainage
This is an elastic fabric made of high density polyethylene (HDPE) with a thickness of 0.6 mm. It does not absorb water and has high tensile strength. The membrane is resistant to soil heaving and prevents plant roots from growing through it.
The membrane has an additional layer of geotextile - it is necessary to filter incoming moisture. Without it, drainage channels can quickly become clogged with sand and soil particles, causing the drainage system to lose its effectiveness. Therefore, the PLANTER GEO membrane uses Typar geotextiles from DuPont with silt resistance and increased service life.
Water calmly passes through the geotextile filter layer, and then is removed down a slope along a plastic sheet and enters the soil or surface drainage system at a safe distance from the house. To do this, the soft blind area is laid at a distance equal to the width of the roof overhang plus 20 cm. The most popular blind area width is 1 m.
Pros and cons of flexible design
The main advantages of the design are:
- Resistant to temperature changes.
- The material is not subject to shrinkage, which improves its quality characteristics and does not harm the base of the structure or building.
- The soft blind area does not require periodic repairs.
- If a special membrane is installed during the installation of the structure, its thermal and waterproofing qualities will improve, as well as frost resistance and immunity to seasonal soil heaving will increase.
- You can install the soft blind area yourself.
- The design can serve a decorative function. Depending on personal preferences, you can pour multi-colored stones onto the surface of the blind area, plant grass, or organize a flower bed.
Despite the predominant number of advantages, the design also has disadvantages. For example, the need for constant care, since grass can grow through the stones, plant roots can grow, etc. The surface of the pebbles requires constant cleaning of dirt.
Asphalt concrete
Asphalt concrete is a material created by the hardening of organic and mineral substances. Often used in road work. Its advantages are:
- moisture resistance;
- reusable;
- easy installation;
- strength;
- affordable price;
- the material is almost not subject to corrosion;
- Grass will not grow through well-laid asphalt.
The downside will be the possibility of melting the asphalt and the emanating unpleasant odor in hot weather.
Tools and building materials for work
Materials for creating a soft blind area should not contain impurities. Consumables for the construction of a soft blind area must be of high quality, otherwise the quality characteristics of the entire structure will deteriorate.
It is recommended to use rolled materials as a waterproofing material; their installation is easier.
A wide range of waterproofing materials are available for sale:
- roofing felt,
- PVC films,
- polyethylene membrane.
For the top, drainage layer, sand or crushed stone is most often used, less often pebbles, gravel, and expanded clay. In the case of a soft blind area, it is necessary to lay geotextiles, which protect the structure and foundation from moisture and also help to evenly distribute the load.
The material is selected depending on the type of soil:
- thermally bonded – for rocky soil;
- needle-punched - for clay;
- woven - rarely used due to low quality characteristics.
It is also recommended to use thermal insulation material, which will help prevent the negative impact of low temperatures on the structure. As insulation, preference should be given to penoplex or expanded polystyrene.
If the soil is loose, it is recommended to lay a layer of rich clay at the bottom of the trench. Sand or crushed stone is placed on it as drainage.
How paths, terraces, stone blind areas are made
The crushed flagstone looks naturalistic and rough. Blind areas and paths near the house, paved with natural stone instead of the usual paving slabs, look great and are very practical. How to make stone paths with your own hands, what to pay attention to first - a description of the technology for creating paths.
Natural crushed stone - classification
Slabs made of natural crushed stone are divided into two categories depending on size - large-format and small-format.
When purchasing slabs of natural stone, you must first of all pay attention to their thickness.
The normal thickness of large-format slabs should be in the range from 3 to 7 cm.
Large-format slabs with a thickness of 1 - 3 cm are considered thin; it is better to refrain from purchasing them for covering a yard, terrace, or paths. The normal thickness of small-format slabs is 2 - 5 cm.
Small-format slabs 1 - 2 cm are considered thin.
The required thickness also depends on the method of future installation. For laying on the mortar, you can use thinner flagstone. When laying on sand, the minimum thickness should be 6 cm.
The thickness of the purchased slabs may vary and this is normal. Fluctuations in thickness are compensated by varying amounts of solution. But the thickness of the slabs purchased for one level of the path should not vary by more than 2 centimeters.
You should refrain from purchasing stone slabs that are too small - with dimensions less than 5 cm.
When choosing, inspect each slab. At least one of the sides should be more or less smooth, without sharp chips or potholes.
Choose only whole slabs. If a rattling sound is heard from a light blow with a metal object, then there are invisible cracks in the slab and it needs to be rejected.
The stone path must be durable
If you want the path to serve for a long time without potholes, cracks, or peeling, you need to properly prepare its base. If it is more or less motionless, shrinkage and frost swelling do not occur, then, most likely, the stone coating will always have an excellent appearance.
Dealing with frost heaving of soils is not easy. Especially when there is an area of soil with varying degrees of susceptibility to frost heaving. One solution is to insulate the soil using extruded polystyrene foam sheets. The width of the insulation is taken to be greater than the width of the object by an amount equal to the freezing depth. Insulation with a thickness of 5 cm is laid on the ground, and the foundation for the object is backfilled on top of the insulation.
If significant soil heaving is observed in the construction area, which can be obtained from local builders, it is recommended to take protective measures in advance.
The second issue is soil shrinkage. It is advisable to compact the bottom of the trench under the path using a mechanical vibrator-compactor. The first layer of crushed stone, 20 cm thick, is also compacted. Crushed stone creates point pressure and its compaction is an effective means of soil compaction.
It is also important to maintain the required layer thicknesses when laying. Reducing the thickness of layers usually leads to premature destruction of coatings.
Ensuring slopes of the local area and paths for normal water flow. The blind area adjacent to the house should have a slope only away from the house. The path can have either one transverse slope in any direction, or slopes from the central axis.
Providing drainage. Along with insulation, it is important to prevent water from stagnating, both on the path itself and near it. When planning the territory, you must not forget that paths, terraces and other paved areas should rise above the surrounding ground. If necessary, gutters are installed along the edges of the paths to drain water.
How to make a path from natural stone
The thickness of the crushed stone layer under the path is usually from 20 to 30 cm. The first layer of crushed stone is compacted into the trench in accordance with the above recommendations. A corresponding trench is first made and formwork is installed for pouring.
It is often recommended to lay natural stone slabs on cement mortar to prevent them from moving and cracking. Therefore, sand bedding on crushed stone is carried out only to fill the voids between the stones to reduce the consumption of the solution.
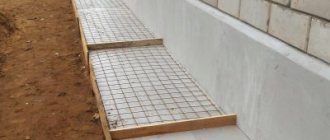
The usual thickness of the concrete base for crushed flagstone for a path is 10 cm. It is recommended to lay this thickness in two layers. First, the first layer forms the required coating profile.
Then a layer of reinforcing mesh with a cell size of 10–20 cm is laid, then the second layer is poured.
On dense, low-shrinkage soils, you can make a stable, long-lasting path without a concrete base, but only on a gravel-sand backfill. But then a natural stone no thinner than 6 centimeters should be used, given its average size, since the load on it will be much greater.
It is not recommended to fill more than 4 meters. It is better to divide a large area with expansion joints 2 cm wide, which are filled with stone chips.
Natural stone cladding is laid on a concrete base using a cement-sand mortar.
Step-by-step instructions for the device
When arranging a soft blind area, the following must be taken into account:
- the structure should be 15-20 cm wider than the roof eaves;
- the width must be at least 60 cm, and in case of unstable soil - up to 1 m;
- the depth also depends on the type of soil (usually from 10 to 20 cm).
This type of blind area is usually soft and multi-layered. The first is cheaper and simpler, the second will require more time and money.
In addition, geotextiles are necessarily used in a multi-layer blind area, which protects structures from the negative effects of chemicals, plant roots, etc.
Multilayer blind area is of better quality ; it reduces soil mobility and prevents mixing of layers among themselves. Geotextiles do not allow moisture to pass through and are not clogged with small particles of dust and lime.
The material is laid after leveling and compacting the sand layer, thereby preventing the crushed stone from mixing with the sand.
To make the appearance of the structure attractive, it is recommended to lay a decorative layer . This can be tiles, crushed stone, etc. Before laying it, another layer of geotextile must be laid.
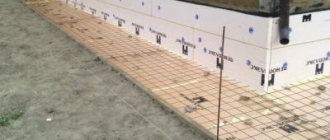
In places with cold climates, it is recommended to lay a layer of insulation. Sheet polystyrene foam is most suitable for this, as it is easy to lay and process. Applying insulation using the spraying method is significantly more expensive, but at the same time much more effective and durable.
Installation technology:
- The top fertile layer is removed to a depth of about 30 cm, width - up to 80 cm (sometimes up to 1 m).
- A 10 cm layer of clay is placed at the bottom of the trench, after which it is compacted. Be sure to make a slight slope from the walls to the site.
- A waterproofing film is covered, one edge is attached to the foundation, and the other to the ground.
- A layer of sand is poured to protect against mechanical damage.
- Geotextiles are laid to prevent sand from mixing with crushed stone.
- A 12 cm layer of granite crushed stone is poured.
- After this, you need to lay another layer of geotextile, and pour a layer of sand on top.
- Next, you can decorate the blind area at your discretion.
If everything is done correctly, the result will be a high-quality blind area that will not be afraid of cold, moisture, etc.
Do-it-yourself insulated soft blind area with a stone border - in the video:
Main types
A huge number of blind areas can be found on the territory of houses in our country. But among all, I would like to highlight three main types:
- Based on concrete. This is a common arrangement model for private homes. Here the foundation is dug deeper, sand is poured in, everything is leveled, a mesh with a cell of 100 by 100 mm is laid, after which the screed is poured. Make sure that its size is at least 10 cm. You should buy high-quality concrete, for example the M200 - M250 brand is quite suitable. Both quartzite, granite and expanded clay can be used as a concrete filler.
- From tiles. This method will be more expensive, but it looks better. In this case, paving tiles are selected to match the overall design of the exterior of your yard, after which a sand cushion is made on which the tiles are placed. The size of the blind area can be the same as for a concrete structure, but often, in order to save money, they make the width 40-60 cm. The cost of this option is more expensive, since in addition to the tiles, curbs also have to be laid around the perimeter of the entire house.
- Soft base. The method is used to decorate the yard. A hydrofilm is installed on the prepared base, which will protect against moisture from underground. It is on top of the film that fertile soil is poured, which is then sown with a lawn. This option is used less frequently, but has a place in modern construction.
Possible installation errors
A soft blind area is a good alternative to a concrete path, the cost of which is several times higher. With proper installation and care, it will last for many years.
During the construction of the structure, possible mistakes should be avoided:
- The dimensions and location of the trench are incorrectly selected. The blind area should be located around the entire building, and be 20-30 cm wider than the roof canopy. If the building has a porch with a roof, then the blind area in this place should be wider to prevent moisture from entering the foundation area.
- Water stagnation. Failure to follow installation techniques can result in water pooling near the foundation, resulting in the formation of puddles. Therefore, do not forget about the construction of a transverse slope and drainage trays that will remove water from the structure area.
- Lack of insulation, especially on heaving soils. The fact is that prolonged frosts and thaws lead to oversaturation of the soil with water and its swelling. This leads to the fact that the load on the building elements becomes uneven, which is why cracks appear on the foundation and it collapses.
- Lack of waterproofing of the soft blind area. Gravel is usually poured onto the top layer of such a structure, tiles are laid, or a lawn is planted. They easily let water through, so they need high-quality waterproofing. It will create a sealed layer and prevent precipitation from destroying the foundation. Waterproofing must be laid with an overlap onto the foundation of the building.
Protection of concrete blind area from destruction
After 20–30 days, the concrete will gain strength and the blind area will be ready for use as a waterproofing tape and path. However, even with the correct installation technology, over time the following may appear:
- cracks;
- zones of subsidence or swelling;
- crumbled edges.
The following measures will help prevent changes in the surface layer.
Ironing
It will protect against cracks, increase hardness and improve waterproofing of the concrete strip.
Ironing can be carried out using two methods:
- dry. The treatment is carried out immediately after pouring, while the concrete still retains its natural moisture and porosity. An even layer of cement 2 mm thick is poured over the blind area and rubbed thoroughly. Cement quickly “eats” - you can walk on concrete (but not use it 100%) after just 2 hours;
- wet. It consists of covering concrete with liquid cement mortar (cement plus sand in equal parts). Additionally, you need to add lime paste to the mixture - 10th part of the total volume of the solution. The concrete is treated with this composition after it has gained strength - 2 weeks after pouring.
Learn more about what it is and how to make iron ironing with your own hands.
Primer coating
Protects concrete from moisture, fungus and mold, increases the strength and wear resistance of the top layer.
If you plan to paint concrete or lay tiles, the following are suitable:
- impregnation primers (impregnate concrete to 50 mm);
- deep penetration primers (strengthen the top layer 5–7 mm thick).
If a topcoat is not provided, you should choose a primer or impregnation with water-repellent properties. The price range of such products is from 200 rub./l for GKZh-11 to 300 rub./l for Aquasol or Eskaro Aquastop Proffessional.
The range of impregnations that compact the concrete layer is wide:
- Protexil - about 50 rubles. per sq. m;
- Monolith 20M – about 70 rubles. per sq. m;
- Monopol 1 – about 100 rubles. per sq. m.
- Concrete contact
Imported compounds such as Ashford Formula increase strength, wear and frost resistance, and eliminate slipping. However, they will cost more and you cannot buy them everywhere.
Liquid glass protection
Liquid glass can not only be added to concrete or cement mortar during mixing, but also used as a protective coating.
The composition of the coating solution is simple - you need to mix equal parts of cement, water and liquid glass. The mixture must be applied quickly, leveling the layer with a trowel or spatula. Read more.
Coating with a layer of enamel
Enamels - polyurethane, acrylic - create a moisture-proof film and increase the strength of the surface layer. It is convenient to work with enamel - it is simply applied with a roller.
With active use, the protective layer wears out quickly - the coating will need to be renewed more often. Here is a selection of paints based on composition and type of work.
Cladding with tiles, stone
Facing with paving slabs, porcelain tiles or clinker must be provided for in advance, planning the depth and design of the concrete blind area as a whole.
The tiles will decorate the concrete blind area and protect it from mechanical wear and moisture.
When installing, the procedure is as follows:
- Arrange concrete waterproofing - roll or impregnation.
- Lay a sand base 3–4 cm thick and level it.
- Lay the tile.
- Grout the seams with cement mortar.
- Install a border taking into account the height of the blind area
- Pour water over the coating to compact the cement-sand mortar and start the hardening process.
You can read more in this material.
The cheapest and easiest option
A soft blind area is considered the most inexpensive and simple way to protect the foundation from moisture. Crushed stone or sand are most often used for the top layer ; they are cheaper and easier to work with.
The most economical and simple option is to plant ornamental grass or form a flower bed on a blind area. This will not only reduce the financial costs of arrangement, but also improve the appearance of the site.
It is better not to skimp on waterproofing and geotextiles, as they play a primary role in structural reliability and durability.
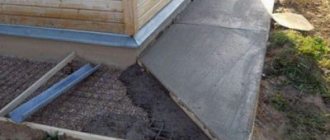
It is worth noting that the soft blind area is highly susceptible to spreading, since bulk materials are most often used for the top layer. To prevent this, a concrete curb is laid around the perimeter of the structure .
To make it cheaper, it can be replaced with wooden formwork, which is mounted in poured clay. Such a barrier is capable of retaining bulk material and also maintaining the integrity of the structure.
Over time, the wooden formwork can be dismantled and a concrete curb installed in its place.
Repair of concrete blind area (sealing cracks)
It is better to carry out all repair work in autumn or spring. Therefore, twice a year, inspect the blind area for cracks, chips, and damage, and make repairs immediately, do not put it off until later.
Most often, repairs have to be made at expansion joints; sealants or foam fillers can help here.
Small cracks in a concrete base can be filled with a special cement-based putty.
Large cracks must be widened in the form of a wedge, treated with a primer, filled with bitumen, and the top layer filled with sand-cement mortar.
If serious damage occurs, such as concrete cracking, the section will have to be dismantled and filled with new concrete. The master talks in more detail about the repair of the blind area in the following video:
To avoid all major damage, follow the recommendations of experienced specialists, do everything carefully, according to all installation standards, and do not skip the process technology. Follow the instructions of the material manufacturers.
Price for turnkey construction services
To calculate the exact cost of the necessary materials and work, you will need the help of a specialist. After all, this is the only way to assess the condition of the soil and select the type of blind area.
It is recommended to carry out work on the installation of a blind area simultaneously with the installation of drainage and storm sewerage.
The final cost of work is influenced by many factors , including:
- material used to construct the structure,
- building area,
- width and depth of the blind area,
- as well as some soil features (flatness, need for dismantling, etc.).
For example, in the Moscow region, the cost of installing a structure using sand, membrane, geotextile and crushed stone will vary from 1300 to 1600 rubles. depending on the width of the blind area. The more materials are used, the higher the final cost of the work will be. In Novosibirsk, the cost of similar work varies from 1000 to 1600 rubles, in St. Petersburg - from 1200 and above.
Expenses
The cost of materials for the construction of an insulated blind area depends on several circumstances:
- material quality;
- manufacturer;
- supplier.
Approximate prices for materials for insulated blind area:
| Material | Measurement value | Amount (rub.) |
| Polyurethane foam | p/m | 380 |
| Expanded clay | cube m | 2000 |
| Expanded polystyrene | sq. m | 280 |
| Styrofoam | sq. m | 150 |
| Sand | cube m | 2000 |
| Crushed stone | cube m | 1350 |
| Concrete | cube m | 3000 |
| Reinforced mesh | sq. m | 130 |
| Drains | PC. | 250 |
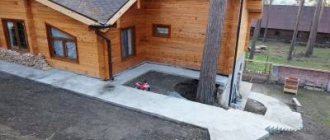
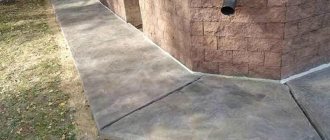
Photo
Photos of soft blind areas around houses:
Is it possible to lay insulation on open ground?
Despite the fairly high strength and elasticity of polystyrene foam, it should only be laid on a leveled and prepared surface. Otherwise, due to soil subsidence, the slabs may bend and even collapse, which will lead to an increase in the thermal conductivity of the entire pie.
In the optimal option, a substrate of 30–50 cm of compacted and leveled sand, thoroughly spilled with water, is prepared under the insulation. To prevent erosion of the bedding, the sand is separated from the soil with one layer of needle-punched geotextile.
Storm water drainage system
Fluid is removed using a drainage system. If there is no such thing nearby, then discharges can be made into the ground at a distance of 8 to 10 m across or down from the level of the system’s slope. For this purpose, special pipes for drainage, as well as steel and HDPE pipes with a diameter of 100 mm or more, can be used. Holes of 16-20 cm are made in the walls of the pipe, after which they are wrapped in needle-punched geotextiles. This is done in case the liquid begins to migrate from the muddy soil.
In corners and where channels intersect, a connection is made using tee channels with an upper outlet. Water must be discharged into a meter-long trench, which is 70% filled with crushed stone and 30% with soil. Distributors are perforated pipes. Important: It is advisable to assemble the channel system in advance before the clay layer dries completely. Layers of the blind area
Crushed stone (10-20 cm) is poured on top of the clay to form a slope. Crushed stone is taken in fractions from 1 to 20 mm. The slope is finally leveled using a sand cushion of 5 to 10 cm with a horizon deviation of 3:100. Important: That part of the embankment that is planned for construction must be raised from fifteen to twenty centimeters from the facade with a slope of 2:10.
In the process of laying the blind area, it must be compacted and spilled with water. The stability of the embankment layer can be improved by adding geotectile layers along the clay-crushed stone boundary, and then crushed stone-sand. The sand surface is leveled and insulating material is placed on it. A geocomposite material with a thickness of 7 to 10 mm is rolled out on top of the insulator, which will help even minor accumulations not to stagnate in the embankment, but to easily exit through the channel.
Next, a sand and gravel layer of 30 to 40 cm in thickness is planned, on top of which geotextiles are placed. All materials poured above this layer are considered a protective and decorative coating for the blind area. Materials such as brick, ceramic elements, loose slabs, etc. can also be used as a finishing layer.
How to do it yourself?
It must be said that to implement the insulation of the blind area, you do not need to have serious construction skills to do it yourself. All you need to do is understand the algorithm, know some rules and have the following tools at hand:
- hammer;
- drill;
- screwdriver;
- shovels (scoop and bayonet);
- cord for marking with a set of pegs;
- electric concrete maker;
- a manual tamping device or a vibrating plate.
The work algorithm itself will look like this.
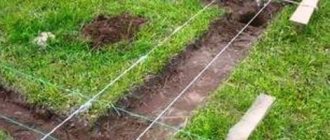
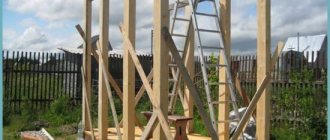
First, you will need to mark the future structure, determining the tape width. This can be done by lowering the perpendicular from the overhanging roof edge to the ground and stepping back outward at least 500-600 millimeters. Then, at the required distance, you will need to drive stakes into the ground and pull a cord between them.
For more information about the insulated blind area, see the video below.