One of the most vital requirements for a roof at all times is fire safety. Of course, straw hats and wooden shingles are long gone, but not all modern roofing materials can boast of good resistance to open flames. Moreover, some of them just need to be heated well so that the wooden sheathing and roofing begin to smolder.
It is precisely for this purpose that a reliable connection of the roof to the chimney pipe of the house is installed - to create the most reliable barrier between the steel that heats up on the coldest winter days and the poorly protected roof. We will show you in detail what this design looks like for different types of coatings.
Carrying out penetration depending on different types of roofing
The roof penetration will vary depending on the shape of the chimney and the material that covers the roof. Thus, to install a sandwich pipe, installation of a heat-insulating box is not required, since the insulation here is laid during manufacture. To penetrate the roof of a brick or ceramic chimney, it is necessary to construct a thermal insulation box to protect the building from fire.
Elastic penetration for round pipe
The simplest but most universal penetration exists for a sandwich pipe. It is a rubber or silicone pyramid that is put on the pipe and fixed to the roof. Moreover, the smoothness of the roof covering in this case does not matter much - the elastic insulating apron is equally hermetically attached to the ribbed surface of the profile, wavy tiles, and soft ondulin. Manufacturers offer ready-made flexible penetrations for sandwich chimneys of any cross-section.
Installation of elastic penetration is carried out as follows:
- A hole is cut in the roof for the pipe outlet so that at least 38 cm remains from the pipe wall to the combustible roofing materials.
- A galvanized metal sheet with a hole for the chimney is fixed to the inside of the roof. The distance from the outer wall of the pipe to the edge of the sheet hole is at least 14 cm.
- Remove the pipe and secure it in the desired position.
- The elastic penetration pyramid is cut to a level corresponding to the diameter of the pipe and put it on the pipe through the top.
- The protective apron of the penetration is applied to the chimney passage, having previously coated the edges with fire-resistant sealant.
- A metal mounting ring (flange) with holes is placed on top and secured with self-tapping screws.
For roofs with a steep slope angle, manufacturers produce special elastic penetrations, where the slope of the pyramid and apron is more pronounced.
Metal penetration for round pipe and smooth roof
A metal feedthrough for a round pipe can also be purchased ready-made. It is a metal cone, the upper hole of which corresponds to the diameter of the chimney pipe. When choosing a metal penetration, you need to know the angle of inclination of your roof.
Installation diagram for metal penetration:
- the hole in the roof and the inside of the protective structure are designed as for elastic penetration;
- a passage pipe is put on the chimney, the edges of the lower part are coated with fire-resistant sealant;
- secure the protection with self-tapping screws with rubber caps to seal the mounting holes.
Penetration for rectangular pipe
Exiting a brick chimney through the roof has its own characteristics. To complete the penetration you will need a grinder, a screwdriver, metal scissors and galvanized iron sheets or stainless steel.
The installation of the brick chimney penetration begins with the construction of a box for thermal insulation. Its size is calculated based on the cross-sectional size of the chimney plus 15 cm on each side. The material for the box must be non-flammable. Sheet iron or asbestos is used.
The space between the pipe and the walls of the box is filled with basalt wool. This material can withstand significant temperatures and has excellent thermal insulation properties. The lower part of the box is decorated with a metal sheet.
Street protection has a complex composite design. The roofing material for a brick pipe is not of great importance, since in any case it has to be removed when removing it. The drainage tie is installed on top of the roofing covering, regardless of its type.
The penetration-casing consists of the following elements:
- four (according to the number of sides) internal protective wall profiles;
- four external decorative elements;
- drainage tie.
If the protection is installed on top of a flat roofing material, then it is glued with a fire-resistant sealant. When installing under a corrugated pipe (profile, slate, tile), a wall profile is installed on the pipe, securing it into a pre-made groove on the pipe. The upper parts of the apron are placed under the roofing material, the lower parts are secured on top.
Video description
Watch the video on how to line a pipe:
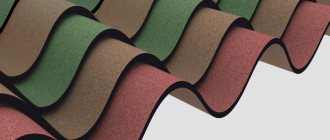
Corrugated sheeting is considered one of the best. Due to its positive qualities, low price and the ability to accept any color from a range of options, it is extremely common. But this material also has a negative side, like any other metal - low sound insulation.
Metal tiles have the same disadvantage. In all other parameters, this material is in no way inferior to corrugated sheeting.
Ceramic tiles are only suitable for cladding inside a building. For this material it is necessary to carry out high-quality preparatory work. Installation must be carried out on a flat surface. But the tiles look great.
Clinker brick is suitable for those who value durability and strength. But not everyone will like its appearance. The main disadvantage is the high cost and weight. Due to the last drawback, reinforcement structures are installed during construction.
Norms and requirements
High-quality installation of the chimney passage through the roof is so important for the safety of the building and residents that the state has officially established the rules and regulations for its arrangement. A document that takes into account sanitary, hygienic, fire, corrosion and other loads on the structure and materials is called SNiP 41-03-2003 “Thermal insulation of equipment and pipelines”.
The pipe installation through the roof is planned during the construction phase. If the stove is reconstructed, replaced or repaired during operation, the chimney is usually left in its old place. The fundamental condition for a high-quality chimney is the location of the pipe relative to the roof ridge.
To ensure optimal traction, the best place to bring the pipe to the roof is its highest point - the ridge. This allows the main part of the pipe to be routed through the attic, which protects it from moisture and cold. The difficulty lies in the fact that it is necessary to violate the integrity of the horizontal beam by installing additional supports on both sides of the chimney. More often, the pipe is installed at a short distance, which makes it possible to limit the street part of the pipe to a minimum of fifty centimeters.
There is the following dependence of the height of the chimney on its distance from the ridge:
- the distance to the ridge does not exceed 1.5 m - the pipe rises 50 cm above it;
- distance from 1.5 to 3 m - it is enough to bring the chimney flush with the ridge;
- when the chimney outlet is more than 3 m away from the ridge, the height of the pipe may be lower than the top point of the roof (the difference should be an angle of 10 degrees).
The optimal pipe height is from 0.5 m to 1.5 m. The outlet is located between the rafters, so as not to violate their integrity and leave a distance of 15-25 cm to them.
If the direct vertical exit of the pipe occurs at such a merger of two roofs, then the roof penetration should be shifted half a meter to the side, adding a horizontal section to the chimney (up to 1 m). Snow and ice accumulate in the recess in winter, which creates an additional threat for leaks.
An unfortunate location for the roof penetration for the chimney is the lower part of the roof. Here the pipe can be damaged when masses of snow and ice melt. In addition, a large section of the pipe has to be taken outside to ensure normal draft, which contributes to its freezing and the formation of condensation on the internal walls.
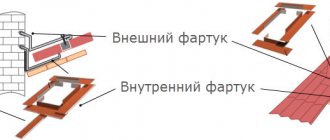
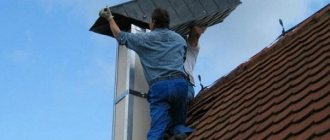
Installation of an external apron at the junction with the pipe
The next step is to install the main cover over the inner apron and tie. A top sheet of metal tile is installed around the chimney. At the same time, it should cover the junction strip and go onto the bottom sheet of the coating, capturing the first wave in the upper part of the chimney. Thus, the mounted lower apron, bypassing the pipe, is clamped between two layers of metal tile sheets and completely prevents water from entering the under-roof space.
Having installed sheets of metal tiles around the chimney, the installation of the outer apron begins. This element has practically no protective function, but is considered a decorative finish for the passage of the pipe through the roof. Its installation is carried out using almost the same technology as the installation of the lower apron.
If a brick or other pipe is located at a distance of 1.5 m, then during installation its height should exceed the height of the ridge by at least 0.5 m. When the distance to the ridge is within 1.5 - 3 m, then the building is placed at the same height as the ridge.
In a situation where the distance from a brick or any other pipe is more than three meters, the height of the building is determined by a conditional line. It passes at an angle of 100 from the ridge shoot to the horizon.
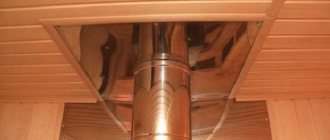
Chimney box
In order to properly remove the chimney through the roofing pie, you should install your own rafter system around the pipe. It must be separated from the chimney at the distance specified in SNiP. The structure consists of side rafter legs and horizontal transverse beams at the bottom and top, which are made of timber of the same section as the rafters.
78f4859b81ff291d5061a723d5a08edf.jpe
To insulate the structure, it is necessary to use non-flammable heat-insulating materials, such as glass wool or stone wool - it is stuffed between the pipe and the wooden structural elements.
When passing a chimney through the roofing pie of a roof in use, the vapor and waterproofing is cut crosswise, like an envelope, the edges should be tucked in and attached with nails or staples to the rafter system.
Waterproofing a chimney on a roof requires special attention. When installing a duct for a pitched roof chimney, the vapor barrier and waterproofing membrane are fastened as follows: the edges of the films are folded up and tightly fixed with brackets to the duct; in addition, the fastening points should be additionally sealed using sealing tape or some other adhesive material. On the outside, protective elements are installed on top of the roofing covering to prevent moisture from entering the joints between the box and the roofing pie.
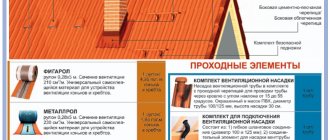
It is important to consider that installing a duct can negatively affect air exchange in the under-roof space. To avoid deterioration of moisture removal, you can install additional ventilation systems, for example, roof tiles, roof aeration grilles, etc.
The slope is a small roof of its own that drains water and snow from the pipe. Its installation is quite complicated, since the slope includes all layers of insulation; in addition, it must be properly combined with the main roof using shaped elements. To avoid installing a bend, it is worth making a smaller pipe.
Using ready-made kits
Standard modular chimneys (“sandwich”) can significantly simplify the process of running a pipe through the roof. A wide range of materials are used for the manufacture of structures, including
:
The choice of a modular chimney depends on the fuel used, since they differ significantly in their technical characteristics. The advantage of such systems is the ability to install the pipe not at a right angle. This is especially true when installing a chimney in a building in use and allows you to choose almost any place to install a fireplace, stove or automatic boiler.
A modular chimney passes directly through the roof, consisting of parts such as
:
- deflector (a device that increases draft in the chimney by using a flow of hot air);
- clamp for guy wires (allows you to additionally secure a tall pipe on the roof);
- skirt (an element protecting the place where the pipe exits through the roof);
- roofing passage (an element with a fixed apron, which is directly mounted into the roofing pie).
Modular chimneys have an attractive appearance.
Steel chimneys can be installed if the temperature of the exhaust gases is no more than 500 °C. Prohibited for installation on coal-fired stoves. For asbestos-cement pipes, this parameter is 300 degrees; such chimneys are also unsuitable for coal stoves.
If the chimney is made of concrete or brick, or a prefabricated passage is installed, the structure should not be rigidly attached to the roofing system. Under the influence of external factors, the roof may be deformed, and these forces will be transferred to the chimney, which may lead to its destruction. When the chimney exits through the roof, all connections between the chimney and the roof are made using flexible elements.
Nuances of laying Wakaflex material
Wakaflex is an adhesive elastic waterproofing strip with internal aluminum reinforcement. Its design allows it to repeat the shape of the roof and at the same time adhere tightly to the pipe surface.
Laying Wakaflex material
Installing Wakaflex is simple, which you can do yourself:
The strip is glued along the lower edge of the chimney. Cut it around
Bend it in half along the tape, release the top protective film and glue it to the chimney, pressing it with a hard roller. Subsequently, the lower protective layer is removed and glued to the roof, scrupulously pressing with a roller to ensure complete adhesion. The corners are carefully trimmed, wrapped onto the pipe walls and glued. The sides of the chimney are treated in a similar way. The corners are carefully placed on the lower/upper area of the pipe, the corners are rounded for the best contact and wind protection. The upper wall of the pipe is processed last, its corners are fixed to the side planes. A Vaka strip is attached to the chimney on top of the waterproofing tape, which prevents water from flowing down the pipe surface.
Waterproofing prevents water damage or destruction in the chimney. If the chimney duct masonry already has gaps, voids, cracks or missing mortar, it should be repaired before waterproofing. Its outer surface must be cleaned before waterproofing, since any particles or dirt will not allow the waterproofing material to create a tight connection.
Carrying out moisture protection is a mandatory operation for every chimney; if this is not done, the damage caused by water to the smoke ventilation system can be significant and lead to its complete destruction. Modern waterproofing materials are well represented in construction stores in all regions of the country, including Moscow.
Roof penetrations and pipes for chimneys with a round cross-section
Metal round systems always require additional fixation. Such elements must be fastened with crimp clamps. For every two meters of such a chimney, a bracket is installed that secures them to the wall, and for the tee - another support bracket. Also, special brackets are used to fasten steel pipes.
The chimney pipe passage itself depends on its cross-section and shape, the slope of the roof, as well as the type of roofing material used:
Here is a very detailed video of a chimney with a circular cross-section being installed on the roof:
It is a little more difficult to get around a round pipe than a square one. But for this purpose, today roof penetrations for chimneys are produced in the form of a universal glass or master flush:
What is such a passage? This is a special chimney nozzle in the form of an elastic material made of silicone or EPDM rubber. Both options tolerate temperatures from -74 to +260°C. The penetration itself rests on a steel sheet, well fixed to the roof.
d643349170cdee6b272b11cacc1e3152.jpePull this collar onto a round pipe using a soap solution, and then coat it under the flange with roofing sealant
This penetration is good because it can take any shape, and therefore it does not matter at what angle of the slope it is mounted. The whole process turns out to be much faster and more accurate than in the case of a brick chimney
So, this elastic apron must be applied directly to the passage and pressed with a metal sheet in the form of a circle or rectangle (make holes in it for self-tapping screws in advance).
Next, a special fire-resistant sealant (not regular roofing sealant) must be applied to the place of contact with the roof and the entire structure must be secured with a screwdriver.
Here's what proper installation of a chimney through a roof looks like in practice:
In the case of installing chimneys on a roof without a relief (not always), instead of flexible passage products, a metal passage pipe is used. These are also finished products, painted or made of galvanized steel:
Such pipes are made mainly from alloy steel of standard sizes and at standard roof angles.
Here the instructions are slightly different:
- Step 1. Make a suitable size hole in the roof. To do this, use a marker and a suitable tool - a grinder, jigsaw or scissors.
- Step 2. Carefully remove the insulation from the hole and saw off the grille that will get in the way.
- Step 3. Attach a sheet of fire-retardant material to the inside of the roof so that there is a margin of 15 cm on each side in a circle.
- Step 4. Route the chimney and secure it with a clamp.
- Step 5. Put on the passage element and secure it to the roof surface with screws and special sealant.
- Step 6. Continue increasing the pipe segments to the desired height - until the pipe itself is at least a meter higher than the ridge.
If you want to insulate the entire structure where the pipe passes, then use only a non-flammable thermal insulator, such as stone wool. It can simply be stuffed between the wooden structural elements and the chimney itself. It is needed to prevent condensation from occurring in this area.
A couple more important points. If the chimney pipe rises higher than 2 meters on the roof, then additional braces need to be installed for it:
Round chimney pipes also tend to complicate the whole process because they have bends in their path and sometimes they even have to be passed through the walls, and only then through the roof:
Sealing
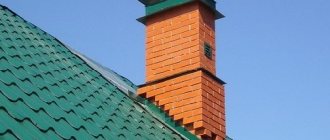
Sealing the joints of a roof with a brick chimney is a responsible and complex process.
As a result of the temperature difference between the working pipe and the air temperature during combustion, condensation forms in it, which causes destruction. Therefore, it is very important to insulate the protruding part of the pipe with finishing materials, taking into account their stability and appearance when choosing.
First, insulation is carried out using clinker bricks. You can cover the pipe with plaster or cover it with cement-fiber boards. Finishing with corrugated sheets the same as the roof is covered will look aesthetically pleasing.
To seal the gaps between the pipe and the roof deck, a cement collar with an increased moisture resistance coefficient is used, followed by the organization of the collar. To cement the crack, a metal profile frame is installed. A decorative collar made of sheet steel is put on and then fastened.
You can put a rubber seal on the round pipe with glue. Cement mortar is poured into the gap and allowed to dry for a day. A metal canopy is arranged to drain water, followed by fastening with self-tapping screws.
There are important nuances here:
- Gaps less than 5 mm wide can be sealed with heat-resistant silicone-based sealant.
- A gap whose width is more than 1 cm is cemented with mortar and covered with an apron.
Flexible passage for round chimney
Usually, in private residential construction, one has to deal with the arrangement of smoke exhaust and ventilation pipes with a round cross-section. How can you install a chimney through the roof elements to also ensure sealing of the passage? For this purpose, a special design is used - an elastic roof passage element. This product is made of special durable silicone or rubber. The shape resembles a funnel with wide round or square margins. These fields are called an apron. The elastic passage element, due to the flexibility of the material, can take any configuration. This allows it to be used on roofs with any slope angle and any final coatings. The material from which it is made must withstand the lowest and highest temperatures possible, and also be resistant to the external environment. Elastic penetrations are available in various colors and configurations.
When choosing which penetration to purchase, you need to focus on the diameter of the chimney and the color of the roofing finish. Universal products are produced, similar to a stepped pyramid, they are suitable for any pipe diameter. The size is adjusted using scissors, which are used to trim the penetration to the required level.
Installing an elastic apron on the roof is quite simple. To do this, you need to attach it to the chimney passage, press it on top with a metal circle in which there are holes for self-tapping screws, apply fire-resistant sealant to the place of contact with the roof and screw it in with a screwdriver or screwdriver.
For roofs with extremely steep angles, it is necessary to use a special type of penetration with a fixed mounting angle of the pressure flange.
What types of sealants are best to use for chimney pipes? characteristics
The chimney is one of the most important communications in residential buildings, the efficiency of which largely determines the ability to live in the house. However, in order for the functioning of smoke structures to be effective and safe, simply installing them is not enough - it is also necessary to ensure the tightness of the structure.
During the operation of the chimney, the very high temperature that occurs inside it (1300 °C) contributes to the formation of various cracks and fistulas in the structure. This significantly reduces draft and allows toxic combustion products to penetrate into the room. Therefore, the need to ensure the tightness of chimneys becomes vital.
The need for repair and sealing sooner or later arises even for expensive and high-quality pipe products, for example, galvanized or made of stainless steel. In order for sealing to be effective and long-term, you should use high-quality and reliable sealant for chimney pipes for this purpose.
Node of passage of a chimney through a flat roof
When installing a chimney on a flat roof, it is important to remember that its height above the roof surface must be 500 mm in accordance with SNiP standards. A round pipe, a rectangular chimney duct, or a brick chimney itself can be discharged through a concrete floor slab. The round pipe passage unit will be considered separately, and for other cases two basic installation principles are used
The round pipe passage unit will be considered separately, and for other cases two basic installation principles are used.
Features of arranging a passage through a pitched roof
How to fix a chimney on the roof? On the chimney pipe on the inside of the roof, it is necessary to mount a flange that is rigid enough to absorb the loads from the sheathing - the chimney outlet forces the dismantling of part of the purlins, and without installing the flange, the structure will remain suspended.
The flange is usually a steel sheet with stiffeners welded to it. The sheet thickness should be at least 2-3 mm. A non-flammable heat insulator – basalt cardboard – should be placed on the flange. This will prevent heat transfer from the chimney to the sheathing. If the chimney structure is not reliable enough to take on part of the load on the roof, a rafter structure or additional racks are installed around the perimeter of the opening so that the load is transferred to the attic floor.
Around the pipe, all layers of the roof must be cut into a gap that complies with the standards specified in SNiP (depending on the type of pipe and the degree of its heating). The resulting gap must be filled with a non-flammable heat insulator - basalt or glass wool, basalt cardboard.
The principle of sealing the junction of the roofing material to the chimney pipe depends on factors such as:
To ensure that the chimney exiting through the pitched roof is not damaged when snow melts, it is recommended to install snow guards higher up the slope. If the width of the chimney (across the slope) is over 800 mm, above it on the slope a special structure should be installed to divert the water flow.
Output through the roof of a pipe with a circular cross-section
It is very difficult to waterproof the junction of the roof to a round pipe without the use of special roofing penetrations. The construction market offers a wide selection of pipe assemblies, differing in diameter and material of manufacture.
A universal option is an aluminum flange equipped with a silicone or rubber corrugation. These elements are available in several standard sizes, so you can choose a penetration for a chimney pipe of any popular diameter. The working surface of the flange is covered with a material similar to the corrugation material and is equipped with grooves for filling with sealant. The top of the corrugation cone is cut to the required diameter, after which the penetration must be pulled onto the chimney. The flange must be coated with sealant and attached to the roof with self-tapping screws, which are included in the kit. If the roof covering is not made of metal, the flange is attached with dowels or long screws directly to the sheathing.
For roofs with different slopes, penetrations are offered in which the corrugation is located at different angles to the flange. You can purchase a detachable design, which is used if it is not possible to stretch the corrugation onto the pipe due to the presence of protruding parts or the large height of the installed chimney. This penetration is equipped with clamps, thanks to which the corrugation is tightly pressed around the pipe.
Fastening the chimney to the roof can be done using penetrations in which a hinged segment is used instead of corrugation. This is a universal option for roofs with any slope angle: the surfaces of the connecting elements are spherical in shape and can be fixed relative to each other at any angle.
Manufacturers of roofing materials often offer ready-made chimney penetrations with a flange pre-formed to match the appropriate roofing covering. This penetration is attached to the roof sheathing with the necessary overlap. To achieve matching diameters, the apron cone is cut off. Penetrations from roofing manufacturers have several standard angles of inclination. To seal the joint, a second conical apron is installed, overlapping with the first.
Fighting joint leaks
To create the maximum possible tightness of the junction of the roofing material and the pipe at the points of contact, an internal apron is made using the lower strips.
Installation of a chimney passage through the roof.
To make an internal apron, you need the following tools:
- marker;
- long metal ruler;
- grinder with a disk 2 mm thick;
- pliers;
- hammer.
In order to do this, the plank is applied to the walls of the chimney pipe, making marks for the top of the plank. The next step is to punch a groove along the previously marked line.
Installation of the inner apron should start from the bottom wall. The edge of the apron is inserted into the groove, after which it is installed on the remaining walls. The overlap should be 15 cm. Then the edge of the film inserted into the groove is sealed. Having trimmed the lower strips, they are installed and then secured with self-tapping screws.
After installing the lower apron, you can begin installing the tie, which is a sheet of waterproofing material placed under the elements of the inner apron from below. The main function of a tie is to drain water.
After completing the installation of the tie and apron that protect the joints, the roofing material is laid. Then the outer apron is installed. To do this, use the upper abutment strips.
The installation of the apron on the outside is similar to the installation of the apron on the inside. The difference is the absence of a groove and the upper edge is fixed directly to the chimney wall.
Important: today the building materials market offers products that are designed specifically for chimneys with a round cross-section. They are roofing passages that consist of a base (flat steel sheet) and an apron cap. A circular chimney is installed inside the passage.
A circular chimney is installed inside the passage.
Installing corrugated sheets
Oddly enough, this is the easiest part when covering a chimney with corrugated sheeting.
- Cut the corrugated sheets to the required length, taking into account the diagonal bevel at the bottom. Use existing guide sizes.
- Secure the corrugated sheet to the guides with self-tapping screws with an EPDM gasket.
- To frame the corners, use a simple outside corner strip. For fasteners, also use self-tapping screws with an EPDM gasket.
- To aesthetically design the top edge, you can use different options: simple outer corner strips or cornice strips. Fasten with the same screws.
If you have a special canopy to protect against snow, just install it on top. It is also called a weather vane or cap.
Ready! You have just learned how to cover a chimney with corrugated sheeting.
Principles of chimney outlet
When installing a chimney, it is important to remember fire safety. To construct the roof of a private house, a large number of materials are used, which may have varying degrees of flammability.
For example, wood used for rafters and sheathing is prone to fires. Also dangerous are the materials used for insulation and waterproofing. Do not forget that the pipe that removes hot smoke gets quite hot. That is why, if possible, all parts of the roof must have a certain level of fire safety and be located at a distance of at least 13 cm from pipes made of brick, concrete, or ceramics. If you use pipes that do not have thermal insulation, the distance will have to be increased to 25 cm.
Thus, in the place where the pipe is laid, it is necessary to create a significant opening through which, willy-nilly, heat loss will occur. And here its own rafter system will be equipped, and a certain type of insulation will be used. As for waterproofing materials, if a chimney is installed in a finished house, these materials are cut out with an envelope, and their edges are then fixed to the rafter system. If we are talking about square pipes, then it is necessary to arrange both internal and external aprons, the purpose of which is to prevent leaks.
520615cb7f2d3fa23af09b27d28c0504.jpe
The shape of the chimney passage will directly depend on the shape of the pipe used. It can be round, square or rectangular in cross-section.
Regarding water, there are two main problems that arise when installing a chimney. This is the need to divert (redirect) water flowing down the roof away from the pipe, and provide the necessary level of protection from liquids trying to get inside the house. That is, moisture flowing down the chimney wall must also be sent to the roof to drain from it. This is why metal aprons are constructed or special factory cutting-throughs are used
Selecting an output location
Choosing a convenient place to make a hole in the roof from corrugated sheets for the chimney pipe is half the success. Naturally, the decisive factor in this matter is the location of the stove. Professional stove makers recommend positioning the chimney strictly vertically, but there are more subtle nuances:
Scheme of the chimney outlet through the corrugated roof
- It is best to place the hole for the chimney outlet at the highest point of the roof, that is, closer to the ridge. The optimal distance from the ridge to the pipe is 50-80 cm.
- It is advisable that the hole in the corrugated roof for the pipe does not fall on the elements of the rafter system. To bypass them, use bends and corner sections of the chimney. Using them, you can set the rotation to 90 or 45 degrees.
- The length of the chimney pipe segments is calculated so that the joints are located above or below the places where the ceilings and corrugated roofing pass. Otherwise, making a quality connection will be problematic.
- To ensure good traction, the system should be 1-1.5 larger than the roof ridge. If the pipe is too high, the flow of smoke will have time to cool while passing through it, which leads to the appearance of condensation.
To check whether you have correctly identified the exit location of the future chimney, draw a mark on the corrugated roof with a marker and check its temperature at the end of the day - the pipe should be located in the “cold zone”, that is, remain in the shade for almost the entire day.
Let's sum it up
Now you know how to simply and correctly connect metal and brick pipes to different types of roofs. If you have any questions about the proposed instructions, ask them in the comments. Do you know other equally interesting ways? Also tell us about them in the comments - everyone will be interested.
Did you like the article? Subscribe to our Yandex.Zen channel
October 10, 2022
Chimneys, Roofing, Roofing installation, Chimney laying
If you want to express gratitude, add a clarification or objection, or ask the author something, add a comment or say thank you!
Preparatory stage of work
To avoid any difficulties during the pipe installation process, you need to prepare the work site and tools in advance. A hole from corrugated sheeting is cut according to the following technology:
- After determining the configuration of the chimney, they plan where the exit to the roof will be located. Let us remind you that it is better to place the pipe vertically.
- The cross-sectional size of the chimney pipes is selected based on the recommendations of the heating device manufacturer. The thicker and higher the pipe, the better the smoke is removed from the stove.
It is important that all segments are of the same cross-section and fit each other, and are inserted without creating a gap.
- On a corrugated roof, mark the outline of the pipe using a permanent marker.
- Using a grinder with a thin metal cutter, cut out a hole, moving a couple of centimeters inward from the intended line. You should work with corrugated sheeting carefully and slowly so that the edge of the cut is smooth, without jagged edges that could cause injury during the pipe removal process.
- You need to make short cuts in the corners of the hole to bend the edges of the corrugated board upward.
- They cut out the same weight in the ceiling.
- A metal box is installed that will connect the pipe to the rafters. The chimney will pass through the hole inside the box; the distance between their walls should be at least 15 cm.
- The insulation, waterproofing film, and vapor barrier membrane are removed from the hole made in the roof. It is necessary that the hole goes through.
Exiting the chimney pipe to the roof
All the preparatory work has been done, all that remains is to correctly connect the pipe and put the chimney into operation. To bring the chimney to the roof you need to:
Diagram of pipe insertion on a corrugated roof
- Insert a chimney pipe through the hole in the box and direct it to the roof. Using adhesive tape, the edges of the waterproofing film and vapor barrier membrane are securely fixed to the surface of the chimney.
- Fill the box tightly with expanded clay or lay mineral wool. These types of insulation are not subject to fire, so they thermally insulate the pipe and protect against sudden ignition of the wooden elements of the rafter system and sheathing.
- Place a rubber or silicone seal on the pipe, which protects against moisture seepage at the outlet. To ensure better waterproofing, the seal is glued to the corrugated sheet with a fire-resistant sealant.
- Install the chimney with new segments to the required height, tightening the joints with galvanized steel clamps.
- After this, all that remains is to make it beautiful - install an outer apron to match the color of the metal tile, which covers the rubber seal and the box.
Installing a decorative external apron
Do not be afraid of overheating of the waterproofing film from the surface of the chimney; it is reliably protected from fire by mineral wool or expanded clay placed in the box.
Even a novice craftsman can carry out the installation of a chimney pipe on the roof; the main thing is not to forget that a negligent attitude to this issue can lead to a fire and loss of your property.
Arrangement of an apron made of aluminum tape
The second method of sealing a pipe is done by installing an apron made of aluminum tape. You should go around two layers of aluminum tape around the perimeter of the pipe, so that part of the tape is buried in the gap between the pipe wall and the roofing. What can I cover it with? It should be covered with bitumen mastic followed by gluing the tape. The lines connecting the apron to the pipe are fixed with a metal profile and covered with a waterproofing film.
Bypassing the pipe on the roof with corrugated sheeting can be done by arranging an apron using adjacent lower sheet strips. The installation principle boils down to organizing the first plank to the side wall of the chimney and fixing the upper level mark. A fine is made at the mark, followed by filling with sealant. The next work process is the organization of a metal tie with the arrangement of sides along the edge to drain water. Then the tie is attached to the top edge.
To ensure high-quality corrugated sheeting around the pipe, it is necessary to make a sheathing. It will ensure reliable fastening of the lower junction strip and the edge of the corrugated sheet along the walls of the chimney.
Fire safety
The wooden rafter system and some layers of the roofing pie (waterproofing, vapor barrier) cannot withstand heat and can ignite or melt. The safety of system elements that are not fire resistant is ensured by installing a special box around the perimeter of the hole in the roof.
Violation of safety rules
The box is mounted from a wooden block; it should be located flush with the sheathing, on the outside of the roof. Along the perimeter of the box, on the outside, the edges of the vapor barrier are fixed - a carpet made of roofing felt or other waterproofing material, as well as the edges of the vapor barrier membrane on the room side, if we are talking about an insulated roof. In both cases, a cross-shaped cut is made in the panel and triangular fragments of material are tucked inside. For fastening, nails with wide heads or staples are used, and sealant or adhesive tape allows you to achieve a tight seal between the materials around the perimeter of the wooden box.
The passage through the roof of the chimney provides for thermal insulation of the chimney with basalt wool or other non-combustible materials. If possible, an air gap of 5–7 cm wide is left between the insulation layer and the chimney itself.
Box insulation with basalt wool
If the installation of a chimney involves the use of a special element - a penetration, when choosing it, first of all, make sure that the element is made of a material that is resistant to temperature changes.
Strengthening the rafter system
Often when installing a chimney, the question arises about strengthening and strengthening the rafter system, because it is necessary to form a hole in the roof pie for the pipe. That is, you will need to install a couple of spacers. When creating a roof made of metal tiles, the pitch between the rafters is rare, and the formed opening or the distance between the rafters may be too large. Therefore, it is necessary to install vertical spacers.
Sometimes you have to break the integrity of the rafter leg, that is, cut it. Then, in certain situations, purlins or crossbars are also sawn. In this case, at the place where the rafter leg was cut, it must be fastened to adjacent, undamaged ones. For this, additional spacers are also used, between which bars are inserted vertically. Their function is to replace the rafter leg at the chimney passage.
Making the sheathing
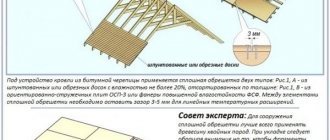
lathing for metal tiles
Sheets of metal tiles are mounted on a lathing, which is assembled from boards with a cross-section of 30x50 millimeters. The initial lathing, located at the very bottom, is made a little thicker - 15 -20 millimeters, since it is used to support overhangs. The first of the battens is aligned with the cornice. The distance between the first sheathing board and the second should be 280 millimeters, and subsequent ones are fastened at intervals of 350 millimeters. Thus, it is necessary that the pitch of the metal tile matches the pitch of the sheathing. When the sheathing is created at the location of the valleys, the location of the chimneys and other elements, additional (reinforcing) strips are installed.
Possible installation errors and how to avoid them
Errors during chimney installation can lead to a fire in the ceiling, roof or wall.
It is important to maintain minimum distances between flammable objects and the chimney
Errors and remedies:
- A common mistake is saving space. Sandwich pipes, as long as they are in good condition, should not heat up. But over time, warm air may pass through the thermal insulation layer. In this case, nearby flammable materials may catch fire. The presence of sufficient space between the chimney and building materials eliminates this possibility.
- Another mistake is neglecting the tightness of the compared parts. It is recommended to cover all joints between the components of the chimney with a layer of sealant, otherwise combustion products may pass from the chimney into the environment. The joints between the pipes can additionally be tightened with special clamps.
- The third common mistake is comparing pipes only by the “smoke” or “condensate” type. Matching “by smoke” means that the socket of the overlying pipe fits onto the underlying pipe. In this case, smoke will not accumulate in the resulting pocket between the pipes, but condensation may drain there. Comparison “by condensate” means that the socket of the underlying pipe fits onto the overlying one. Condensation will not be able to drain into the resulting pocket, but smoke will accumulate there. In the first case, there will be a lot of condensation in the chimney, in the second - soot. In order to take advantage of both options in a sandwich pipe, it is enough to compare the inner cylinders “by condensate”, and the outer ones “by smoke”. Matching both cylinders in the same way can quickly clog the chimney.
- A serious mistake is to use general building insulation instead of thermal insulation. Many insulating materials are used in construction, but when arranging a chimney, it is necessary to choose materials with the best thermal insulation. This material is mineral wool. When installing external insulation, the use of basalt wool is allowed, but if the pipe warms up significantly from the outside, after a few hours the basalt wool will begin to heat up.