Published: 03/17/2013 Heading: Materials and technologies, Repair
Adjustable floor - subfloor in the form of joists or plywood flooring
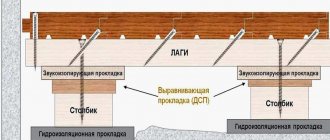
As a rule, flooring in residential premises is laid on a concrete screed and joists. A relatively new option is the construction of a subfloor in the form of logs or plywood flooring , the height of which can be adjusted using special rack blocks. This solution received a completely understandable name - adjustable floor .
The technology of adjustable floors involves the use of wooden logs or slabs (18 mm moisture-resistant plywood sheets), which are supported by stand-up bolts screwed into them, usually made of high-strength plastic. Turning the bolts around an axis changes the height of the joists or sheets, which allows you to accurately level the subfloor. After leveling the structure, the bolt is rigidly fixed to the base with a dowel-nail. In this case, the base can be either concrete (monolithic, hollow, with a screed) or wooden (beam). Sheets of moisture-resistant plywood are usually laid on top of the joists and any type of floor covering is fixed on them - solid boards, parquet, parquet boards, laminate, linoleum, carpet, etc. In order to save money, massive boards are sometimes mounted directly on the joists.
Pros of floors with adjustable feet
Manufacturers produce several versions of so-called “adjustable floors”, depending on the purpose of a particular room, the designed height of the floor covering and the condition of the sub-base.
If it is necessary to raise the floor level to the required height in order to place various communications under its surface, you can mount the DNT structure, which has adjustable supports for the joists. They will not only provide ideal evenness for flooring made of any materials, but will also allow you to build a frame when the floor between floors in the house is made of wooden elements.
The above design is capable of raising the coating to a height of 5 centimeters or more, which depends on the cross-section of the logs and the dimensions of the polymer bolts. The system can be attached to a wooden or cement floor, or to another type of base.
When you need to solve the problem of leveling the rough foundation without losing the height of the room, you can use an adjustable DNT floor construction on slabs. It is used to prepare the base for laying, for example, laminate or parquet boards, provided that the height difference does not exceed 2 millimeters per 2 linear meters. The maximum amount of rise in the floor covering in this case does not exceed 5 centimeters, which corresponds to the thickness of a standard concrete screed.
The parameters of adjustable DNT structures make it possible to create a strong and durable floor in a short time, which is characterized by excellent thermal and sound insulation of the room. In this case, there is no need to deal with dusty and wet processes, as happens when arranging a cement-sand screed. The costs of the DNT system do not exceed the price of traditional leveling options, such as semi-dry or concrete screeds, as well as Knauff floors.
If the floor surface is raised by 5 centimeters or more, you can save a significant amount on preparing the rough base for finishing.
Disadvantages of adjustable floors
As for the disadvantages of such a design, they can be encountered if the requirements regarding the correct execution of the work were not met during the installation process. If installed properly, adjustable DNT floors will become a reliable and durable basis for any finishing flooring material. It will be possible not only to travel on foot, but also to drive a car.
In the event that the assembly technology of the DNT system was violated or the wrong type of fasteners were used for adjustable joists, the floor will become unusable in a short time. Therefore, fasteners for floor joists must be selected carefully for a specific project.
Features of adjustable floors on joists
The structural solution of such floors has the following distinctive characteristics:
- You can construct adjustable floors on joists with your own hands without experienced craftsmen. You just need to purchase quality materials and stock up on some tools.
- The time required to install the floor will not exceed one or two days. In turn, it will take about one month for the concrete screed to dry.
- The adjustable design makes it possible, if necessary, to lay engineering communications in the technological free space. As a result, you can save space and at the same time make imperfections in the floor surface invisible.
- With the help of an adjustable system, it is possible to significantly enhance sound insulation in a room, which is why in recent years such floors have been installed not only in residential buildings, but also in recording studios and concert halls.
- Such structures weigh little, so they are successfully used in rooms where there are weak ceilings, for example, in private households or on balconies.
- In the process of installing adjustable floors, there is almost no work associated with dust and dirt. Therefore, this option is an ideal solution for rooms that need to be kept clean.
- Such as in the photo, an adjustable floor system can withstand a load of about 2.5 tons per “square”, which means that it can be installed in premises for various purposes - office, residential, warehouse, retail.
Usage
This method of leveling floors is, first of all, convenient to use where there are a lot of communications and it is necessary to remove them into the underground space
For example, in server rooms and at transformer stations, and also, if necessary, to hide all pipes and other communications in the house. The adjustable leveling design allows you to quickly achieve a level floor and can be successfully used in both new and old buildings. Unlike a concrete screed, the load on the floor in this case is minimal, which is especially important in old buildings. This floor design is ideal for installing multi-level floors. Today, adjustable floors are successfully used both in the residential sector and in public buildings for various purposes
They are used in television studios, control rooms, classrooms and classrooms, conference rooms, gyms, sports facilities, various warehouses and production facilities.
Today, adjustable floors are successfully used both in the residential sector and in public buildings for various purposes. They are used in television studios, control rooms, training rooms and auditoriums, conference rooms, gyms, sports facilities, various warehouses and production facilities.
The feasibility of choosing adjustable floors
Even though adjustable structures have a lot of advantages, many property owners, when carrying out renovations, doubt the advisability of their installation.
In some cases, it is preferable to install this particular type of coating, namely:
- if the rough foundation is difficult or impossible to level because it has large differences and defects;
- when when leveling the base, for a number of technical reasons, it is impossible to use materials that have a large weight;
- if the floor covering needs to be created with several levels that differ in height;
- when it is necessary to lay utility lines under the floor;
- if there is a need for additional noise and heat insulation.
Where and when can it be used
Considering the design features, advantages and disadvantages, we can conclude that this type of flooring is advisable to use when:
- It is necessary to level the surface and significantly raise its level, and the base does not allow for a thick layer of screed. The height of the level rise can reach 20 cm.
- It is necessary to lay communications, for example, heating pipes, under the raised floor.
- It is necessary to make thermal insulation or sound insulation.
- The design of the room provides areas with different floor levels.
Types of floors with adjustable supports
In the modern market, consumers are offered two varieties of this type of flooring:
- a structure comprising adjustable floor supports;
- slab floor systems with adjustable supports.
The main difference between these varieties is the different lifting heights. When systems are installed on logs, the amount of rise is 5 centimeters or more. As for the adjustable structure on the plates, it can be raised by a maximum of 3 centimeters.
Installation work related to the arrangement of adjustable systems on joists and slabs is carried out using a similar technology, which allows you to do this work yourself.
Construction of floors with adjustable joists
The logs for them are made from planed beams. The size of wooden elements usually does not exceed 50x50 centimeters. First you should prepare tools and building materials.
To install the floor you will need:
- logs made of bars;
- level;
- polymer bolts;
- dowel-nails;
- hammer;
- drill.
At the first stage, preparatory work is carried out:
- Clean the rough base. If necessary, install utility lines.
- Bolts are screwed into the wood joists. If there are threaded holes on the bars, a post bolt for adjustable joists is screwed into them. Otherwise, you need to make them yourself. With a 2-meter long log, at least 5 holes must be made. This simple operation is performed using a drill with an extended tip. To ensure rigidity of adjustment, you need to make the holes slightly smaller than the diameter of the bolt.
- After screwing is completed, you need to tighten the bolts manually using a drill and a special attachment for it.
During the installation phase the following actions are performed:
- Wooden blocks are laid on the floor base. In this case, the gap between them depends on the type of floor surface. When you plan to cover the floor with linoleum or lay tiles, the gap between the beams should be no more than 30 centimeters. A distance of at least one centimeter must be left between the joists and the walls to ensure the required ventilation.
- When the installation of the adjustable joists is completed, proceed to rigidly fixing the bolts to the rough base. Take a strong drill and make holes about 4 centimeters deep through the bolt in the concrete.
- Then a dowel-nail is inserted into it and driven in with a hammer, attaching the bolt to the base of the floor. The nail must be secured as firmly as possible so that the structure does not move.
During the surface leveling process:
- After the adjustable floor joists are installed around the perimeter of the room and securely bolted, they begin to correct them. To do this, use a rule and a key intended for adjustment.
- The level is used to study the height difference, which cannot exceed 1-2 millimeters. Using a wrench and using measurements as a guide, begin raising or lowering the bolts, striving for perfect alignment.
At the final stage, the following work is performed:
- After the adjustable joists are leveled with your own hands, the nails are finally secured using a hammer.
- Use a knife or other cutting tool to cut off unnecessary residues on the stand-up bolts.
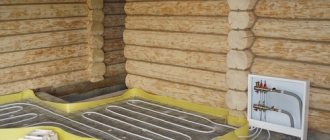
- When required, sound or heat insulating materials are placed between the joists.
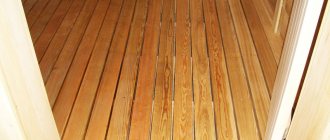
- Flooring is mounted on the logs, or rather on their upper base. The choice of material for it depends on the purchased flooring. Typically, the flooring is made from sheets of plywood, less often they use DSP or GVL slabs, on top of which linoleum or laminate is laid.
- The finishing coating is installed directly on the flooring for the adjustable floor.
Creating a floor on slabs with adjustable supports
This option is used when the height of the floor surface should not be more than 3 centimeters. It is unlikely that it will be possible to hide communications in such a narrow space, but it will be possible to place telephone cables and Internet wiring. The installation technology for this type of structure is similar to the process of installing adjustable floors on joists.
It is necessary to prepare a set of adjustable floors on slabs, which consists of sheets of plywood (other building materials), post bolts, bushings, and self-tapping screws. You will also need: a hammer, a drill, a level (water or laser).
Work begins with the preparatory stage:
- Prepare the work surface by removing debris, dust, and dirt. Then they distribute communications that need to be removed under the floor, not forgetting that the height of the floor surface will be no more than 3 centimeters.
- The sheets are laid out around the perimeter of the room with a distance of 2-3 centimeters on each side.
- Mark the points for the holes that need to be drilled. If the sheet has sides of 1.5x1.5 meters, there should be about 9 of them. One of the holes should be located in the center of the plywood or other material. Another 4 holes are drilled in each corner and 4 in the center of the sheet. Thanks to this, it is possible to ensure reliable fixation of the plywood.
Installation of plates is carried out in the following sequence:
- After marking the holes on the sheets, they begin to drill them. Use a drill with a special attachment that has an extended tip.
- Stand bolts are placed in the already prepared holes, and bushings are fixed to the underside of them using self-tapping screws.
- After the bolts are inserted into each hole and secured, the sheet is turned over and placed on the structure.
- Holes are drilled through the post bolts in the concrete base and dowel nails are inserted into them. They are driven in half their length.
At the adjustment stage, perform the following actions:
- When the installation of adjustable supports is completed, the sheets are leveled. This work is done using a level and a special key.
- Having completed the adjustment, carefully cut off the extra centimeters from the post bolts.
- Dowel nails are driven completely into the base of the floor.
Proceed to the final stage:
- If there is a need to improve the noise and heat insulation of the floor, appropriate materials are laid out on top of the sheets.
- After laying the sheets, the selected floor covering is installed.
Installation technology
Adjustable logs with plastic bolts
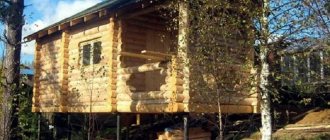
The first step will be measuring the room. This is necessary in order to determine how many joists are needed for a given room. If you are planning to make floors in a bathhouse, then know that they do not have a huge load; the distance between the logs should be up to forty-five centimeters.
The next step is to mark the distance between the lags on the screed. For this moment, a rope with blue is used, with the help of which the beating work will be done with great quality and, most importantly, quickly.
After this, the third step is to cut the joists to the required length. Basically, the length of the logs from the factory is about four hundred centimeters. You should think very carefully about how to mark the logs in order to minimize the amount of waste as much as possible.
The distance from the cutting line to the closest adjustment bolt must be at least one hundred millimeters. If the end is much closer than the above mark, then there is a risk of various cracks forming under load.
Then you need to install the first joist in a vertical position - just screw the threaded hole into simple plastic bolts. After this, you will need to place the ends of the bolts on a line and then drill a hole in the base for the dowel itself.
The depth of such holes (for the dowel itself) should be approximately two by three centimeters, and should exceed its length. This is connected with the hole, since a certain amount of concrete almost always remains in it, but if you do not make a reserve in length in advance, then it will be problematic for you to completely hammer in the dowel.
The next step is to install the dowels, but do not push them all the way. The dowel should not resist the rotation of the bolts. Using a sufficiently long level, establish the correct and at the same time neat position of the lag. If your joist is already installed, and quite firmly, then simply firmly fix the dowel. It is worth continuing to install the logs one by one in places with marks, while monitoring the position of the marks with a level.
This installation algorithm, one might say, is offered to people by the manufacturers themselves, while most builders listen and apply this technology, mainly such builders are those who receive their wages every hour, and not according to output.
Those builders who earn money from production do it a little differently. To your question “How?” we'll tell you. Builders take a simple hydraulic level and hit the so-called zero level log on opposite walls (two).
After this, dowels or nails are driven into those areas, everything will depend on the material from which the wall will be made, after which the ropes are pulled. If the logs need to be connected, then three walls should be taken. The rope will only be tensioned when all the logs have already been placed in their fixation areas.
After that everything goes very quickly and easily. Absolutely every lag is installed along that rope, the main thing is that it should not touch it, it is necessary to constantly check it so that the gap between the lag and the rope is as minimal as possible. That's all, with this method you can achieve a very high speed of installation of an adjustable floor, and you can also increase the quality of this floor.
In general, there is a direct relationship between the number of measured planes and accuracy. Now we will explain to you. There is a fairly high probability that the position of the first log will deviate from the lowest level by about one millimeter.
By real standards, this is quite normal. It was for this purpose that a template was produced - if you need to cut off a fairly large number of identical parts, and at the same time do not take measurements from each ready-made part in turn. In this case, the rope will act as a template.
The seventh step will be cutting, namely, with a wide sharp chisel it will be necessary to cut off the protruding area of the plastic bolt.
Installation of logs on metal plates
The main advantage of these floors is the increased stability of the fastening due to an increase in the area of the lower support. There is also a drawback, namely, the deadlines increase, that is, the inability to continue and generally do the work yourself.
The logs themselves must be fixed to the U-shaped plates using self-tapping screws, while the process of adjusting the height of the logs themselves must be carried out using a series of holes on both sides of the plate, made in a vertical position.
Installation of logs on iron studs
Adjustable floors of this type can be installed independently, and we will tell you specifically about this option. Select the dimensions of the logs taking into account the characteristics of the floor and the greatest loads. Iron studs with zinc coating, optimal caliber 6÷8 mm. To produce the system, studs, nuts and washers are useful.
Step 2 . Make calculations based on the number of joists, washers, nuts and studs. The recommended distance between the studs is 30÷40 cm. Prepare all the materials used, additional components and equipment for performing the work.
Step 3 . Mark the holes in the joists for the studs; all of them must be located on strips of symmetry. In the designated places, first drill a through hole Ø6 mm for the stud (if the caliber of the stud is different, then the corresponding hole must be drilled). On the outside of the joist, use a feather drill to drill a hole for the caliber of the washer. The depth of the hole must exceed the required sum of the height of the nut and the thickness of the washer by a certain number of millimeters.
Everything is done like this: first you need to mark only the last 2 holes in front of the anchor, screw them into the studs, and secure the joist on 2 nuts in a suitable location. Now during the upcoming marking the log will not move anywhere.
In this arrangement, it is possible to immediately drill holes in front of the anchor to the full depth. The work is completed - the joist is removed, all the studs are screwed into the space.
This function will need to be done with each joist, labor productivity is minimized by a factor of 2. You yourself must make the final conclusion on the marking method, taking into account the position of the concrete floor and the experiment of performing a similar family of tasks.
Step 5 . Screw a nut onto any stud and place a washer. It is better to immediately make your choice and place their location according to the height. Screw the studs into the anchors tightly.
Step 6 . Place the logs on the studs one by one, using a wrench of the required volume by turning the bottom nut left/right to straighten the state of the logs. Keep in mind that the thread pitch of iron nuts is much smaller than plastic ones.
Step 7. The logs are set - you are allowed to begin fixing them. Use a washer and nut and insert them into the top hole.
Important! Tighten the top nut with great force, even a slight decrease can be a prerequisite for the appearance of nasty squeaks while walking on the floor covering.
Step 8 . Cut off the protruding ends of the studs with a grinder. Be careful with the lags, do not damage the unity of the lumber with the saw blade.
Tips for installing structures with adjustable legs
To successfully install this type of floor system you must:
- Once the installation of the leveling feet is complete, be sure to clean the subfloor before installing the deck. The fact is that uncollected debris, pieces of plastic, and sawdust after the final finishing of the floor can lead to squeaks and noise.
- All fasteners for the floor structure should be carefully driven in and tightened, because the strength and reliability of the system depends on this.
- Experts recommend using a fastening element such as an anchor for an adjustable floor for installation. This is the same dowel, but more powerful. Anchors provide reliable and durable fixation. They not only hold the beam in place, but also simultaneously attract it to the floor, imparting additional rigidity to the entire structure.
- When installing a high floor, the best solution is to place soundproofing materials between the joists. Thus, no noise will be heard during operation of the coating.
- You should not skimp on the quality of the product to create an adjustable design. It will be more financially profitable to immediately purchase expensive components than to redo all the work later.
If, upon completion of installation, it becomes necessary to move communications, you can dismantle several strips of coating and then put them back.
Anchors, fasteners
To attach the logs to the concrete base, it is the anchors that are needed; plastic dowels are not able to cope with the loads to which the logs are subjected. The so-called plastic bushings, which are screwed into the joist and attached to the concrete, are very inconvenient to install; they can only be purchased from those who professionally install floors. Naturally very expensive. In addition, they have questionable reliability; the bushing is attached to the concrete base with a dowel-nail.
The most reliable fasteners can be assembled yourself, despite the cunning marketing of “wet flooring” and then naturally dried bars; they have a bent shape. You can use them, but you should carefully choose those that are smoother. Let me note that the logs do not have to be planed and smooth, preferably straight and not “screwed”. You should also avoid knots; if the hole with the anchor hits a knot, the joist will significantly lose its strength.
Prepared logs can be treated with an antifungal compound; this will not interfere in potentially damp areas.