Metal tiles are in increasing demand. This material meets almost all consumer needs. It is aesthetic, durable; with its help you can clad the roof in any style - the variety of profiles and shades allows you to implement any design solutions. Metal tiles are resistant to the destructive effects of moisture and ultraviolet radiation; they are used in any climatic conditions. Easy installation is an additional advantage of the material; Installing metal tiles will not take much time. In this article we will look at how to properly lay metal tiles.
Stage 1. Selecting a tool for installing (laying) metal tiles
The first thing you need to know is what tools you will need to properly install metal tiles.
- A screwdriver is useful for screwing in self-tapping screws. Attention: choose a screwdriver with a power of no more than 1800 rpm, otherwise you risk “overtightening” the screws and deforming the metal tiles and EPDM seal.
- Cutting shears - needed for cutting metal. With their help, you can evenly cut sheets of metal tiles. The polymer and zinc layers will not be damaged. Attention: using a grinder for cutting metal is strictly prohibited! It burns out the polymer and zinc coating. A metal base without corrosion protection will quickly rust.
- Special attachment for the drill - “cricket” . It is also useful for cutting roofing material.
- Knife for cutting insulation.
- Staple gun. Needed to fix vapor and waterproofing on rafters.
What you need to know about the material
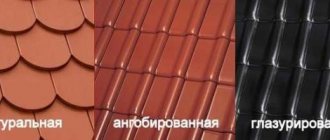
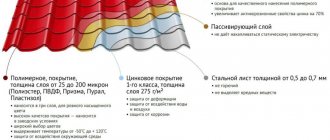
This roofing material is similar in composition to corrugated sheeting - a profiled sheet of steel with a protective polymer coating. But if corrugated sheeting is produced by rolling, then for the production of metal tiles stamping is also used, creating transverse stiffeners in the form of steps. In addition to giving the material greater strength and rigidity, they make the appearance of the sheets more elegant and visually attractive, since their relief resembles real ceramic tiles. Hence the name – metal tiles.
But more complex terrain requires a different approach to how to attach metal tiles to the roof compared to installing corrugated sheets. The latter can be fixed to the sheathing at any point along the wavelength. Whereas on sheets of metal tiles, for this you need to select standard attachment points located just below the stamping line in the deepest place of the wave.
The photo shows the heads of correctly installed roofing screws Source proroofer.ru
Since the sheet must be fixed on the sheathing, it can no longer be attached to the rafters with an arbitrary pitch. It must correspond to the length of the stamping module. This is the main difference in installation between metal tiles and profiled roofing sheets.
Advice! In order not to have to dismantle and reposition the sheathing, the roofing material should be selected in advance, since the distance between the “steps” differs from different manufacturers.
Otherwise, these materials are very similar, and when working with them the following rules must be observed:
- In order not to damage the integrity of the protective polymer coating, which protects the steel base of the material from corrosion, sheets of metal tiles cannot be joined by welding and cut with a grinder with an abrasive wheel, since polymers burn at high temperatures. It is best to use electric scissors for this;
Cutting a sheet with electric metal shears Source i.ytimg.com
- for the same reason, it is recommended to set cutting and drilling power tools to low speeds;
- It is important to know how to properly attach metal tiles to the roof with self-tapping screws: in order not to deform the material profile and ensure sealing of the mounting hole, you need to adjust the degree of pressure when screwing.
Below, all these points will be described in more detail.
Stage 2. Selecting related products for proper installation of metal tiles
Don't forget about related products for installation work.
- Roofing screws are fasteners equipped with a washer with an EPDM gasket and made of zinc-coated steel.
- Sealing materials are needed to isolate the most vulnerable places from moisture - the joints and junctions of roof elements. They can be produced in the form of tapes or in liquid form.
- Repair enamel aerosol. It will be useful if you need to restore the polymer coating (if it was damaged during installation or transportation of the material).
- Double-sided connecting tape. It is used to hermetically seal the joints of steam and waterproofing sheets. Otherwise, the vapor and waterproofing will not be able to perform its functions - it will allow moisture to pass through.
Common fastening errors
- The most common mistake is incorrectly joining the sheets together, creating cracks or gaps into which the wind rushes in . Frequent exposure to gusts of wind over a fairly large area of the sheet will sooner or later tear it off the sheathing. In addition, one often encounters an incorrectly cut edge of a sheet, covered with a corner in such a way that water flows freely under it.
- All places where water can accumulate or penetrate require special attention and local additional waterproofing.
- When installing metal tiles, various situations may arise that require a non-standard solution. It must be taken into account that in any case the general requirements must be met - no cracks, no possibility of water penetration, parts of the sheets must be located in the direction of water flow.
- Common mistakes include the absence of a counter batten when installing the sheathing, which eliminates the possibility of air circulation.
- It is not recommended to use roofing felt or similar materials using bitumen, as in the summer it melts, sag and emits a suffocating odor.
- Under no circumstances should you use self-tapping screws without a sealing washer and gasket.
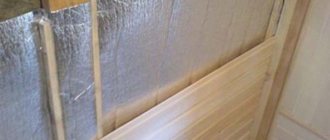
Stage 3. Installation of thermal insulation
The topic of the article is the features of installing metal tiles, so we will not focus on the installation of the rafter system. Let's assume that it is ready and it's time to install the “roofing pie”.
You can start by installing thermal insulation. According to statistics, approximately 25% of heat escapes through the roof. In other words, if the roof is not insulated, you heat the street. To avoid this, install insulation.
The roof can be made “warm” or “cold”. The slopes of a “warm” roof are insulated, and the floor of the attic is insulated for a “cold” roof. We consider the features of installing metal tiles using the example of a “warm” roof - it is more complex.
| "Warm" roof | "Cold" roof |
Thermal insulation slabs or mats are mounted between the rafters.
Recommendations for caring for a tile roof
In order for your roofing to be reliable and serve you for many years, it is not enough just to adhere to the roofing installation technology; you also need to ensure proper care of the structure during operation. To do this you need:
- Inspect the roof periodically.
- Constantly check the roof slopes and all ceilings for defects and leaks.
- Maintain the valley in a timely manner - remove the upper part, which closes, and clean the lower part.
- Eliminate identified defects - if a scratch appears on the sheet, it can be easily eliminated using a special corrector.
Igor Petrov
Blogger, builder with 20 years of experience, family man
Stage 4. Protecting insulation from moisture
In order for thermal insulation to properly perform its functions, it must be dry. Getting wet by just 5% will halve the performance properties of the insulation.
To protect thermal insulation from moisture, vapor and waterproofing films and membranes will be required.
Vapor barrier
Protects thermal insulation from evaporation from the living space.
Laying sequence
The vapor barrier is installed horizontally on the roof slope, starting from the bottom.
Fixation
To fix the vapor barrier, it is attached to the bottom edge of the rafters using a staple gun.
Waterproofing
Provides protection of thermal insulation from condensation. Presented as:
- membranes (they are mounted without sagging, close to the thermal insulation);
- films (during installation, a sag of 20 mm is left).
Laying sequence
Waterproofing is mounted on the outside of the insulation, along the upper edge of the rafters.
Installation of waterproofing begins with the valley (if there is one) - the internal corner that is formed at the junction of the slopes. This roofing element requires careful sealing, since it often comes into contact with precipitation.
A roll of waterproofing is rolled out from the ridge to the eaves. The material should completely cover the valley area.
When the valley is waterproofed, they move on to the slopes. As in the case of vapor barrier, the roll is rolled out horizontally. First - along the cornice, then - higher (and so on - to the ridge).
Fixation
To fix the waterproofing sheets, you should install a counter-lattice made of wooden slats 50x50 or 32x50 mm.
Attention: do not forget about gluing the joints of the hydro- and vapor barrier sheets using double-sided connecting tape!
Preparatory activities
Before laying metal tiles step by step:
- The squareness of the slopes is checked. It is desirable that the difference in lengths between the diagonals does not exceed 2 centimeters. If this value is greater, then there is a skew of the slopes, and this circumstance will significantly complicate installation.
- An antiseptic treatment is performed. The wooden elements that make up the rafter system are coated with special impregnations and fire retardants. Once the roofing material is laid, this will no longer be possible.
Stage 6. Metal roofing: how to install roofing material and additional elements
When the heat, hydro, vapor barrier and sheathing are ready, you can install metal tiles and standard finishing elements. Let's consider which elements are installed before installing the roofing material, and which ones after.
Installation of additional elements (before installing metal tiles)
How to install curtain rods?
Cornice strips perform the following functions:
- Protects eaves overhangs from precipitation.
- Give the roof a finished and aesthetic appearance.
- The eaves strips are installed after the gutter holders and the gutter itself are installed.
- This element is laid on the sheathing; the overlap of one plank over another should be 50–100 mm.
- The laid planks are fixed to the sheathing using self-tapping screws every 300 mm.
Attention : the lower edge of the strip must cover the upper edge of the gutter.
How to install valley strips?
The valley is a structural element of the roof, which consists of lower and upper planks. The lower strip is installed before installing the metal tiles, the upper – after.
Detailed information about installing valley planks is in the article....
How to install junction strips?
The junction strips ensure tightness in the places where the metal tiles adhere to the walls and chimney pipes. Thanks to these elements, dust or precipitation does not enter the under-roof space.
Using the junction strips, the internal and external aprons are mounted. The internal apron is installed before installing the metal tiles, the external apron is installed after.
If you need detailed information about installing these elements, please follow the link....
Installation of metal tiles
The procedure for installing sheets of metal tiles on the sheathing
Depending on the length of the sheets and slopes, the sequence of laying the sheets varies.
Option 1. Sheets correspond to the length of the slopes
We recommend ordering sheets of metal tiles of the same length as the slopes. You don't have to waste time cutting material. There will also be less excess, which means less costs.
In this case, the sheets are laid in the following sequence:
- Installation begins with a sheet, which is indicated in the picture by number 1. It must be aligned along the line of the end and the cornice.
- The lower edge of the sheet should be 50 mm longer than the cornice.
- When the sheet is leveled, it is secured with one screw next to the ridge.
- The remaining sheets are laid in accordance with the numbering in the picture. In this case, they focus on the first sheet.
Attention:
- if metal tiles are mounted from right to left, sheet 2 is laid with an overlap on sheet 1;
- if from left to right, the edge of sheet 2 is placed under sheet 1.
- The laid sheets of roofing material are connected to each other. Please note: different metal tile profiles have different fastening methods.
- TRAMONTANA, MONTERROSA, MONTECRISTO. To connect one sheet to another, self-tapping screws can be screwed into: the end part of the step;
to the top (crest) of the wave where the metal tile sheets overlap.
- LAMONTERRA, LAMONTERRA X, MAXI, CASCADE, MAXICASCADE. Self-tapping screws are screwed only into the ridge of the side overlap.
- The sheets fastened together, which move freely along the sheathing, are aligned - they should be located parallel to the eaves line.
Option 2. Sheets are shorter than slopes
In this case, the sheets are laid in the following order:
- First, install sheets 1–4.
- The sheets are joined together.
- Secure with self-tapping screws.
- The resulting L-shaped fragment of the roof is leveled. The edges of the sheets must be parallel to the end.
Fixing metal tiles to sheathing
When the sheets are laid and leveled, it is necessary to secure the metal tiles with self-tapping screws. But for this you need to know the basic installation rules. Let's look at them below.
Which screws to choose?
Choose roofing screws. They are made of galvanized steel and are corrosion resistant. They have a washer with an EPDM gasket that allows you to distribute pressure and seal the mounting location.
What size should the self-tapping screws be for the main fastening of metal tiles?
The best option is 4.8x28 (35) mm.
| Roofing screw 4.8x28 mm | Roofing screw 4.8x35 mm |
How many screws should I use?
Recommended quantity: from 6 to 8 pcs. per 1 sq. m of metal tiles.
Which part of the metal tile should I screw the screws into?
At the base of the wave. This is the place where the metal tile is as close as possible to the sheathing.
At what angle should you screw in the screws?
Self-tapping screws are screwed in at an angle of 90 degrees.
If a self-tapping screw is screwed in at a different angle, what are the consequences?
The most common options:
- there will be a dent on the metal tile at the attachment point;
- the roof elements will not be firmly fixed.
How do you know until what point to screw in the screws?
The EPDM gasket should flatten approximately halfway and extend 1 mm from under the washer.
Attention : do not overtighten the screws, otherwise you will damage the EPDM gasket. It will not perform its function - to seal the attachment point. Water will be able to get into the threaded part of the connection and penetrate into the under-roof space.
Are the screws screwed in in a chaotic manner?
No. When installing the main fastening, a staggered order should be observed.
Do I need to screw screws into each deflection?
No, you can screw them through the wave. The mount will be quite strong.
How do you fix the bottom row of waves and the horizontal overlap of the LAMONTERRA, LAMONTERRA X, MAXI, CASCADE, MAXICASCADE profiles?
To fix the bottom row of waves and the horizontal overlap, self-tapping screws are screwed perpendicular to the sheathing into the “sole” through the wave.
Installation of additional elements (after installation of metal tiles)
When the roofing material is laid and fixed, it is necessary to install the end and ridge strips.
How to install end strips?
End strips are suitable for any metal tile profiles. Using these elements, you can make the ends of the roof more aesthetically pleasing - the edges of the roofing material will be covered with decorative strips.
What screws will you need:
- 4.8x70 (80) mm - for vertical fixation.
- 4.8x28 (35) mm - for lateral fixation.
Installation sequence:
- Installation begins from the cornice and gradually moves towards the ridge.
- The end strips are mounted one on top of the other. The overlap is 50 mm.
- The lower edge of the planks is aligned along one line.
- The laid planks are attached with self-tapping screws to the sheathing on the side and top sides.
- Self-tapping screws should be located at a distance of 500–600 mm from each other.
How to install segmental end strips?
If you have chosen a new metal tile profile (MONTERROSA, MONTECRISTO, TRAMONTANA), use segmented end strips to decorate the ends of the roof. These additional elements follow the contours of the profile.
They differ from conventional end strips:
- Appearance (they are not flat, but stepped).
- Installation method (they can be fixed from the side and top or from the side and end).
What screws will you need:
- 4.8x70 (80) mm - for fixing from above or at the end.
- 4.8x28 (35) mm - for fixing from the side.
The installation procedure is similar to that of standard end strips.
- Installation direction: bottom to top.
- When laying, make sure that the lower edges of the planks form a straight line.
- The planks are laid overlapping each other.
- The laid and leveled planks must be secured with self-tapping screws on the side, then on top (or in the end part of the profile).
How to install ridge strips?
Ridge strips provide ventilation and at the same time protect the under-roof space from rain, snow, and dust.
These additional elements are divided into two types:
- Round. To install such strips you will need plugs. The type of plugs depends on the type of roof; conical ones are used if the roof is hip or hip;
- simple ones are used for all types of roofs, except the two above.
The plugs are attached to the end of the plank using rivets or self-tapping screws.
| Skate bar round | Conical plug | Simple plug |
- Flat. In this case, plugs are not needed.
Skate bar flat
The installation procedure is the same for both types of planks:
- First, in the place where the slopes adjoin each other, install a seal or ridge ventilation tape.
The seal can be different:
- universal;
- figured (before installation, you need to clear the ventilation holes so that air can circulate freely).
- After this, the ridge strips are installed. Make sure that the overlap between them is 100 mm.
| Flat bar | Round bar |
- The laid planks are screwed with 4.8x70 (80) mm self-tapping screws to the sheathing. As in the case of metal tiles, self-tapping screws are not screwed into each wave, but after one.
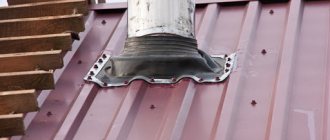
Installing shingles around pipes and obstacles
The scheme for fastening metal tiles around pipes must take into account one important factor - the water flowing from above must be successfully stopped and redirected away from the obstacle. Let's look at how it is necessary to attach the abutment strip and how to properly create external and internal aprons.
It is necessary to install additional sheathing boards around the pipes so that the covering is continuous. At a distance of 15 cm from the top surface of the pipe, it is necessary to cut off the metal tiles adjacent to the pipe. The cut is located 8 cm above the stamping line.
Next, the apron installation procedure begins:
- To begin with, mark the connecting lines of the bottom bar. They are made 15 cm above the surface of the tiles;
- First, the lower elements of the apron are assembled, and only then the side ones;
- the lower apron is covered with sheets of tiles, on top of which the elements of the upper apron are mounted. In order for the top apron to lie flat, you will have to level the metal tiles with a mallet;
- the upper elements of the apron must be moved beyond the cutting line of the sheets that are adjacent to the pipe by at least 20 cm. More is better. The upper part of the apron must have a so-called flange.
Arrangement of sheathing
The workflow involves the following actions:
- The membranes are attached to the edge of the cornice. To do this, 2 boards measuring 50x100 millimeters are nailed one on top of the other along the eaves overhang and the edge of the vapor barrier material is brought to their surface.
- The sheathing is being filled. To ensure equal spacing between the boards, use a hand-made template, for example, from a scrap board. On top of the previously nailed bars, a sheathing is created from boards measuring 32x100 millimeters with a gap of no more than 30 centimeters.
- The laying of the sheathing is completed. On the ridge, one additional sheathing board is nailed on each side of the slope.
Endova
At the point where two slopes converge at an internal angle, steel or aluminum grooves are usually laid on top of the waterproofing, covering them at the edges with an overlap of 8–10 cm with cut ordinary tiles (in the case of “beaver tail” tiles, cut tiles can be laid in the valley - the so-called pigtail) .
The fundamental question is: on what basis should the groove be installed?
The first option is on a solid boardwalk.
According to many experts, for insulated roofs this solution is extremely unsuccessful, since the flooring ends up in the plane of the counter-lattice and prevents the ventilation of the insulation. Among other things, this leads to heating of the groove in winter, causing ice to form on it. is acceptable - installing the groove to the rapid step lathing fixed to the counter-lattice
: then it is in the plane of the lathing and does not impede ventilation. Many customers do not like the groove in the valley, and they require cut tiles from adjacent slopes to be mounted end-to-end here. This is unacceptable: there will still be a gap between the tiles, into which leaves, branches and other debris will fall. As a result, “plugs” will appear, and water will inevitably penetrate under the roof. From an open gutter, on the contrary, all debris is easily washed away by rainwater and blown away by the wind.
For additional protection against leaks along the edge of the gutter, it is recommended to glue special foam rubber strips with water-repellent impregnation
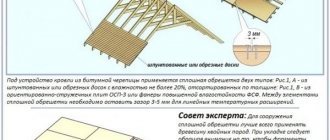
Slopes in the form of a trapezoid or triangle
If the roof slopes have a trapezoidal or triangular shape, then it is necessary to install additional bars.
Step 1. The bars are attached on both sides of the “ridge” along the fold line of the roof.
Step 2. The cornice board is installed and the sheathing is assembled.
Step 3. The cornice system is being constructed.
Installation of metal tiles
DIY metal roof
Step 4. The tiles are laid. This is done along the line of one of the edges or the axis. The first sheet is aligned with the cornice strip.
Important! It is unacceptable that the distance between the cut corner sheets installed near the “ridge” be more than 10 cm.
Step 5. To install the ridge assemblies, perform the following steps. The ridge strips are aligned to the angle of the “ridge”. If a straight ridge is used, then it is cut according to the corners, and if it is semicircular in shape, then the installation of an additional plug (preferably plastic) will be required.
Step 6. The ridge strip lies strictly along the axis of the “ridge”. This is quite simple to do if the angles of the slopes are the same, but if they are different, then it is correspondingly difficult. To control the junction of the slopes, bright-colored mounting tape is used.
Skate knot
After the sealant, a ridge is installed, made to match the color and structure similar to the metal tile. Chimney on metal tiles. Chimney on metal tiles. Chimney on metal tiles.
Advice from an experienced specialist:
- Always follow the metal tile fastening diagram. Installation begins from the left edge of the roof. Subsequent sheets of material are placed under the previous layer.
- After fixing the first sheet of the ridge, the second sheet is laid in a straight line. When joining with an overlap, at the top point the sheets are connected with one screw.
- If the top row of the ridge is not level, the sheets are raised and the slope sides are usually shifted slightly. This way they can be carefully placed in the required position. Then secure firmly.
- If during installation through holes and numerous overlaps are formed, these places must be sealed urgently. For this purpose, special silicone-based compounds are used.
Did you manage to solve your problem using the recommendations from the article?
Yes!
46.83%
No. More answers required. I'll ask in the comments now.
37.24%
Partially. There are still questions. I'll write in the comments now.
15.94%
Voted: 709
Junction points
Junction point
The junction of tiles with walls or chimneys must be sealed in a special way to prevent leaks. To do this, use a special tape (based on aluminum, lead), on the edges of which an adhesive layer is applied on the reverse side. One edge of the tape is glued to the adjacent surface, the other - to the roof. The upper part of the tape is pressed with a metal strip of a curved profile, securing it with heat-resistant dowels. And roofing sealant is applied to the flange of the strip to completely prevent water from penetrating under the strip.
Among the errors when constructing the junction unit is the absence or incorrect use of the strip: flanged down.
The debatable question is how to press the bar? Some roofers suggest recessing it into a groove previously made in the adjacent surface. Others object: due to temperature deformations of the metal strip, its movements during the shrinkage of the roof or the entry of water into the pipe (followed by freezing as the temperature drops and expansion), the latter can gradually collapse, which will lead to leaks.
Important! It is prohibited to cut tiles while on the roof: even if you do this carefully, the dust that appears during cutting fills the micropores of diffusion waterproofing films, as a result of which their vapor permeability decreases. Large fragments can even tear the waterproofing
Often, when laying ceramic or cement-sand tiles, roofing crews, regardless of the slope of the slope, secure each tile with self-tapping screws. Some experts believe that this is wrong: rigid fastening of all roofing elements eliminates play between the tiles when the wooden rafter system and the building as a whole shrink, which is why cracks may appear in the covering into which water can penetrate. It is also possible that tiles may crack. Another disadvantage of continuous rigid fixation: during the process of inspection, repair or reconstruction of the roof (for example, to install a roof window), the tiles are quite difficult to dismantle without damage. Therefore, with a roof slope of up to 60°, it is necessary to fasten with self-tapping screws only tiles that experience special wind loads - along the eaves, ridge and gable, as well as trimmed tiles.
Roof insulation
Before installing thermal insulation, a vapor barrier is first placed on the rafters. The maximum layer of material to retain heat is 25 cm . An antioxidant film is mounted on it, and fastening occurs with wooden blocks to the rafters.
To ensure that precipitation flows into the drain, fix the thermal insulation with a slight allowance (2-3 cm).
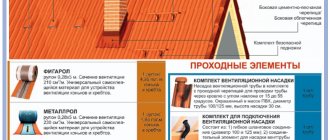
Basic set of additional parts
The step-by-step instructions for installing metal tiles should mention the main elements used in conjunction with the sheets. They are used depending on the roof configuration and operational features.
The main elements of roofing are presented
We suggest taking a look at the list of basic parts:
- a ridge is required to close the upper joint between two slopes;
- the end strip is necessary to decorate the edges on the side of the gable overhangs;
- the valley is installed in the places where the slopes combine;
- the cornice strip is attached to the side of the gutters;
- the junction strip is mounted in the presence of a pipe and other protruding structures;
- A snow retention element is needed to prevent snow from sliding off the roof.
An example of the location of a valley at the intersection of slopes
Ridge, ridge
Ridge tiles are laid on the ridge and ridge, attaching them with special clamps to the ridge beam. As a rule, it is fixed to the counter-lattice using special metal holders, which allow you to vary the height of the beam relative to the plane of each slope. This is necessary to create a ventilation gap in the area of the ridges (ridges), which is required in the case of an insulated roof.
Note:
By using a regular board laid on edge instead of a ridge beam with holders, it is very difficult to achieve full ventilation of the roof in the ridge (ridge) area - for this you will need, in particular, to additionally trim the ordinary tiles to ensure a gap between it and the board. A ridge aero element or a special ventilation tape is installed on top of the ridge beam (under the ridge tiles) - they simultaneously allow air to leave the under-roof space and prevent precipitation from penetrating under the ridge (ridge). The edges of the aero element or tape are pressed against the ordinary tiles.
An important point: in the case of tiles with a high wave, you should carefully select the model of the aero element or tape, since the width of standard products may not be enough to properly cover the tile (its fasteners will remain visible)