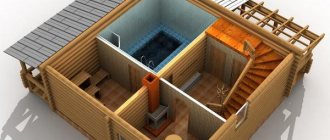
The passion for strong steam is in the blood of the Russian people. Therefore, a sauna or bathhouse is an integral attribute of modern country life. The stove is rightly called the heart of the sauna. This is one of the most important elements of the steam room, which means that the choice of stove should be taken very seriously
Today, the Russian bathhouse and sauna (Finnish bathhouse) are the most popular in our country. The main difference between them is temperature and humidity conditions. In saunas, the air temperature reaches 70–120°C, and the relative humidity is only 4–10%. In Russian baths, the air temperature is lower - 60–70°C, but the humidity is higher - at least 20%.
To warm up a sauna or bathhouse and provide it with steam, wood-burning stoves are most often used. Such stoves usually consist of two sections: the lower one is a fuel combustion chamber (firewood or sawdust briquettes), the upper one is a container for stones. When burning, the fuel heats up, firstly, the body of the stove, thereby heating the steam room, and secondly, the stones (jadeite, diabase, soapstone, etc.), which also begin to give off heat to the room, but most importantly - when water is supplied to them , steam is formed. Wood-burning stoves come in steel (optionally, lined with heat-accumulating material) and brick.
Stones with a minimum size of 3–5 cm that do not crack when heated are suitable for a heater stove: soapstone, soapstone, jadeite, peridotype, diabase, etc.
Design features of a sauna stove
At first glance, a sauna stove differs from a heating stove only in the presence of a backfill of stones - a heater - and the obligatory presence of a water heating tank. But there are also non-obvious differences.
General view of the sauna stove
The primary task of a sauna stove is to warm the walls of the room and only then the air in it. Rapid heating of walls is achieved by using materials that impart 2/3 of the heat produced to the surrounding space in the form of infrared (thermal) radiation and only 1/3 through direct contact of air with the surface (convection heating). A heating stove is designed according to exactly the opposite principle: here 2/3 of the total heat is transferred to the air.
To shift the maximum heat release towards IR radiation, you need a material with high heat capacity but low thermal conductivity. Stone backfill has these properties.
Stone backfill
For brick, and even more so for metal, the ratio of these parameters is insufficient. It should be taken into account that not all stones are suitable for a bath. We'll talk about this below.
Sauna stoves are subject to higher requirements for the tightness of the casing. The fact is that in heated air the harmful effects of carbon monoxide are enhanced, so it is very important to completely prevent its entry into the steam room.
If you want to be able to heat the stove while taking bath procedures, the loading hatch of the firebox, together with the ash pan, must be moved to an adjacent room. If this is not done, then during the heating in the steam room the oxygen concentration will drop and people will begin to suffer from suffocation.
Water tank volume
Before making a stove, you need to decide on the displacement of the tank intended for heating water. There should be one liter of hot liquid per visitor to the steam room.
The best option would be an open container, since it will be convenient to fill and care for the inner surface. To prevent the water in the tank from freezing in winter, it should be completely removed.
Varieties and recommendations for selection
The material of the stove primarily depends on the volume of the bath. Let's consider several options:
- A spacious building with several rooms requires a brick stove that can give off heat for a long time.
- In a modest-sized steam room with a volume of 30 to 35 m3, you can install a stove with a cast iron body.
- For a sauna with the most compact dimensions, a steel stove is also suitable.
The material from which the walls of the bathhouse are made is also important. A frame made of birch or linden is called light, and one made of oak is called heavy. These terms should not be taken literally: the word “heavy” in this case does not mean weight, but the presence of tannins in the wood. People with poor health, as well as women and children, are not recommended to take a steam bath in such baths.
Table: power and weight of stones for linden, birch and oak baths
| Bath type (ceiling height from 2.2 to 2.4 m) | Power (kW/m3) | Weight of stones (kg/m3) |
| Linden | 0,5 | 2,7 |
| Birch | 0,7 | from 3.6 to 4 |
| Oak | 1,2 | 6 |
According to the method of heating the stone backfill, sauna stoves are divided into two types.
Flow-through stoves
In such stoves, the heater is not separated from the firebox by an impenetrable barrier, so the flue gases leak through it before entering the chimney.
Thanks to this solution, the stones warm up extremely quickly, but you also have to put up with some disadvantages:
- The design of the furnace becomes more complicated.
- The stones have to be cleaned of soot at some intervals.
- Adding water (pouring water or kvass on the stones) is possible only after the fuel has completely burned out.
- You can only use fuel that produces a small amount of soot (pellets, aspen, etc.).
With a blind heater
In this option, the stones are fenced off from the firebox and flue with a stove. In terms of advantages and disadvantages, the situation is reversed: the heater takes a long time to heat up, but does not require cleaning and can be used to produce steam at any time.
Stove option with a solid heater
In order for the stones in a blind heater to heat up sufficiently, two conditions must be met:
- the stove must be metal (the thermal conductivity of the brick partition will not be enough);
- have a power of no more than 25 kW (the bathhouse should consist of one room with a volume of up to 45 cubic meters).
As the power of the stove increases, its dimensions increase, and the contact area of the heater with the partition, in accordance with the square-cube law, does not “keep up” with its volume.
It should also be taken into account that the ceiling height in a steam room with a solid heater should not exceed 2.2 m, otherwise instead of light steam you may get heavy steam.
Of all the listed options, only a steel stove is available for self-production at the amateur level. A brick one can also be built at home, but due to the difficult operating conditions, only an experienced stove maker can do this. Cast iron sauna stoves are manufactured only in factory conditions.
comparison table
| Type of oven | Heat | Cooling down | Fuel consumption | Price |
| Cast iron | 30-40 minutes | 30-40 minutes | 4.4 kg/h | from 15 thousand rubles |
| Steel | 15-20 minutes | 10-15 minutes | 6-7 kg/h | from 16 thousand rubles |
| Electric | 10-15 minutes | 15-20 minutes | 3-6 kg/h | from 25 thousand rubles |
| Brick | 2-3 hours | 10-15 hours | 6-9 kg/h | from 15 thousand rubles |
Metal oven
In everyday life, the version of the sauna heater proposed here is called a “fast stove.” This name is well deserved: you can use the steam room within 1.5–2 hours after the start of kindling. This advantage is due to the use of a flow-type heater.
Construction of a metal sauna stove
The stove is designed for a sauna with a steam room volume of up to 25 cubic meters. m - an option for periodic use by a family of 3-4 people. For use in a larger building, lining with fireclay bricks is required.
Required materials and tools
You will need rolled steel. We will use the most affordable steel - structural (it is also commonly called “black”), with a low carbon content (any grade up to Steel 20 will do). High-carbon grades like Steel 35 or Steel 45 are hardened and embrittled by high-temperature exposure.
Here's what kind of rental you should get:
- A piece of pipe with a diameter of 520–700 mm and a length of 1600 mm. Of course, the furnace body can also be made welded, but being made from a single piece of pipe, it will be stronger and more durable. The wall thickness of the workpiece should be 7–10 mm.
- A pipe with a wall thickness of 5 mm and a diameter of 100–120 mm is a blank for a chimney.
- A piece of sheet size 2.2 x 1 m with a thickness of 10 mm.
- A rod with a diameter of about 10 mm.
You will also need a number of products:
- Factory-made grate. The most durable products are those made from cast iron. But in the absence of a purchased option, you can weld such a grate from a steel rod.
- Hinges for doors - 8 pcs. in total.
- Door latches - 3 pcs. in total.
- Valve or ball valve.
Tools used in the work:
- grinder with cutting and cleaning wheels;
- electric welding machine;
- metal scissors.
Step-by-step manufacturing instructions
- The blank for the body (pipe 1600 mm long) should be cut into two parts - with a length of 900 and 700 mm.
- In the lower part of the workpiece, 900 mm long, it is necessary to carefully cut a rectangular hole measuring 200x50 mm, which will serve as a blower. It should be located 70–100 mm from the end. It is important not to damage the cut out part of the wall - the door will be made from it later.
- A little higher, in a similar way, it is necessary to make an opening for loading fuel.
- We turn the cut out rectangular fragments into doors. To do this, it is enough to weld latches and hinge halves to them.
- Having welded the mating parts of the hinges and hooks for fixing the latches to the body, you can install the doors in place.
- Now you need to make a flat ring on which the grate will be placed. It should be cut from a steel sheet 10 mm thick. The width of the ring is selected taking into account the dimensions of the grate, and its diameter should be equal to the internal diameter of the body.
Diagram of a sauna stove made from a pipe
Advice. It is best to order cutting of blanks, especially those with rounded contours, in a specialized workshop or at a metal warehouse where rolled products are purchased. If you take on this matter yourself, you won’t be able to save much, since you’ll have to buy several circles for the grinder. You will have to spend a lot of time “bringing to mind” the rounded edges, because after cutting with a grinder they always turn out angular.
In the left side of the body, at the level of the heater, it is necessary to make an opening through which it will be possible to pour water or kvass onto the stones. The opening must be equipped with a door in the same way as the vent with a firebox.
Next, you should weld a lattice from the rod on which the stones will be laid. The pitch between the rods is selected in accordance with the size of the stones - they should not fall through. Having welded the grate into place, stones are laid on it.
This is how you can build a grid for laying stones in a rectangular heater
It is necessary to cut a round cover for the furnace from the sheet, to which the chimney pipe is welded with some offset from the center. Of course, you first need to cut a hole in the lid to remove the smoke. The lid is welded on top of the heater so that the chimney is closer to the back of the stove.
Another circle of the same diameter must be welded below as a bottom.
Note. You can leave the stove without a bottom, and during the heating process place a wide and shallow container under it - then it will be easier to remove the ash.
We weld a water tank on top of the stove, the role of which will be played by the remaining 700 mm long pipe section. The chimney inside it will serve as a heater.
At the bottom, a fitting with a thread must be welded into the wall of the tank, onto which a tap or valve will subsequently be screwed.
A threaded fitting is welded into the lower part of the water tank
The final stage is the manufacture and installation of a lid for the water tank. It is done in several stages:
- a circle should be cut from the sheet with a diameter corresponding to the diameter of the furnace body;
- the circle must be cut along the chord into two parts, the smaller of which will play the role of a hinged hatch cover;
- a hole for the chimney is cut out in a large piece, after which it is welded to the top of the water tank;
- a small piece, that is, a hatch, is secured to the tank lid using hinges.
At this point, the production of a steel sauna stove can be considered complete. Note that the design proposed here is far from the only possible option. The figure shows several more furnaces made of rolled steel.
Drawings of homemade sauna stoves made of metal
Installation of a smoke exhaust system
First of all, before you start building a chimney, you should decide on its type, which can be external or internal.
There is a significant difference between a heater stove and its analogues: natural stones found in nature are used to accumulate thermal energy in it. The first section of the chimney is laid through an area with stones. Sometimes the pipe is placed inside a tank of water.
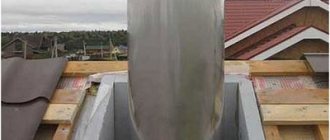
The chimney is assembled using ceramic blocks or sandwich pipes and must be insulated. Its lower part up to the ceiling is made of steel. A gate is installed where the pipe passes through the ceiling.
Sandwich pipes have two walls, between which there is thermal insulation. They are installed between the ceiling and the umbrella located on the roof.
To insulate a chimney made of bricks, basalt mats are used, which are wrapped around the pipes and secured with wire. It is mandatory to install a fungus (umbrella) at the extreme point of the smoke exhaust system. This element protects the pipe from precipitation.
Brick version
Now let’s look at the technology for creating a brick sauna stove.
Types of brick kilns
In order to quickly warm up, it will also have a flow-through heater.
Diagram of a brick stove with flow-through heater
Once again, we draw the reader’s attention to the fact that it is better to entrust the construction of this structure to a master with sufficient experience in the furnace business - this is due to particularly difficult operating conditions and increased safety requirements.
Materials
Significant thermal loads and the need to make the furnace walls absolutely airtight determine the highest demands on the quality of materials.
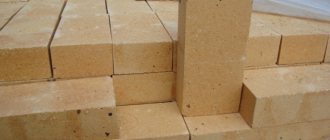
Kiln ceramic brick
The internal walls of the structure, which will have to come into contact with fire and hot combustion products, should be laid out of fireclay bricks. In the order it will be indicated in yellow. You cannot break bricks into pieces or saw them with a grinder - all blocks of ½ or ¾ brick should be purchased ready-made (must have only smooth edges).
Fireclay brick
The clay-sand solution used should have medium fat content. Clay and sand are usually mixed in a 1:1 ratio. Sand should be used without organic impurities - mountain or ravine. It can be recognized by its silvery color and the angularity of the granules. In a solution mixed with river sand with rounded granules, microcracks will quickly appear, as a result of which poisonous carbon monoxide will begin to flow into the steam room. The sand must be sifted through a sieve with a mesh size of 0.15–0.25 mm, washed and calcined.
The fat content of clay can be determined by three conditions
The solution is kneaded to the consistency of sour cream, after which it must be checked for fat content. You should dip a smoothly planed wooden stick into the mixture (usually using the handle of a mop or other equipment) and see how it flows. Normally, a layer 1.5–2 mm thick should remain. If a thinner layer remains, and even with gaps, you need to add a small amount of clay to the solution. If, on the contrary, it is thick and lumpy, add sand.
Advice. If the available clay turns out to be too greasy, dilute it with ground clay bricks.
For cladding, face bricks with smooth edges and rounded edges should be used.
Facing brick with rounded edge
Masonry
Work on the construction of the furnace is carried out sequentially.
Foundation structure
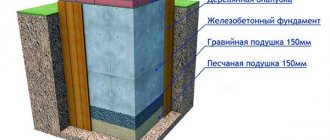
It is necessary to pour a reinforced concrete foundation in the ground on a sandy bedding, the edges of which should protrude beyond the outline of the furnace by at least 50 mm on each side. Sand bedding is a must—without it, the oven will be unstable. The depth of the foundation base depends on the presence of heating in the room: if there is heating (or the bathhouse is heated every day), it is enough to go 400–600 mm deep; in the absence of heating in combination with the rare use of the bathhouse, it is necessary to immerse the foundation to the depth of soil freezing.
Foundation with waterproofing
The presence of any connections between the foundations of the furnace and the building is unacceptable: the shrinkage of both structures will be different, and if there is a mechanical connection, a distortion will occur.
You can leave a cavity in the upper part of the foundation - this is an oven in which equipment is usually stored. The ceiling for it can be reinforced concrete beams, steel sheets or a brick vault laid on top of wooden beams or rolled steel.
Intermediate row
A waterproofing coating consisting of two layers of roofing material is laid on top of the reinforced concrete foundation. Instead, you can lay a steel sheet, and on top of it - basalt cardboard 4–6 mm thick.
Next, an intermediate brick row is laid out. With its help, the unevenness of the foundation is compensated, so that ultimately the surface of the row becomes perfectly flat and strictly horizontal. In addition, in plan this part of the furnace should be a perfect rectangle. This is checked by measuring the length of the diagonals - they must be equal. The mortar is not used when laying the first row.
Another layer of roofing material is laid on top of the bricks.
Fire protection
To prevent the wooden wall of the bathhouse from igniting, a brick wall 5 rows high is erected between it and the stove. Medium quality brick and ordinary building cement-sand mortar are used.
Fire protection
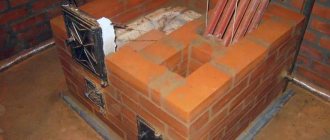
Furnace body
Subsequently, the bricks are laid row by row according to the order.
An example of the order of the Kuznetsov furnace
The thickness of the joints in fireclay masonry should be 3 mm, between facing and fireclay bricks - from 6 to 10 mm. The same wide seams should be left between brick (any) and metal products. It is quite difficult to apply the solution in a thin layer using a trowel, so this is usually done by hand. Bricks must be laid precisely - immediately in their proper place. You cannot straighten or tap the block - if it lies crooked, you need to put it on a new one, reapplying the solution.
Recommendations from an experienced stove maker
It is most convenient to fix the doors using galvanized wire with a diameter of 2 or 3 mm. When installing the blower door (on the 1st row), the wire must be folded in half before twisting. For the fire door you will need a more powerful harness - here they use three pieces of wire folded in half (a thin one will quickly burn out).
Door installation
Advice. To make it easier to bend thick wire, it needs to be lightly burned.
Twisted wires must be placed in specially cut grooves in the bricks.
The frame of each door should be wrapped with asbestos cord in two layers. It plays the role of a seal and at the same time an expansion joint - it allows the cast iron to freely increase in volume when heated.
The height of the door usually does not fit between the brick rows, so the bricks covering it have to be trimmed. It is important not to forget: the thickness of the asbestos cord with which the door frame will be wrapped must be taken into account.
Note. Since the ash door, which provides access to the ash chamber, does not heat up too much, it can be placed on the solution.
The dimensions of the grate must be at least 10 mm smaller than the internal dimensions of the firebox - then there will be a gap of 5 mm between it and the brick. If this rule is not followed, the grating will deform the masonry when heated.
Installation of grate
Note. Sometimes, due to deviations in the size of the bricks, the shelf on which the grate should lie cannot be made strictly horizontal - the edge of one or another brick turns out to be lower than the plane of the entire row. Most often this happens with bricks placed on spoons. The height difference must be compensated using plates cut from brick.
In the 5th and 7th rows, again due to deviations in the size of the bricks, a seam that is too wide may form between two of them located at the back wall. This should not be allowed, since then the clay-sand solution here will quickly crumble. In this case, you should move both bricks towards the ash pit by 3 cm, while reducing the seam between them to the minimum size, and instead of the 3rd brick, lay two bars. Their width is selected in such a way that there is almost no seam between them. The left block moves 1.5 cm towards the front wall.
Securing the fire door
The water tank at the junction with the bricks should be wrapped twice with asbestos cord. On the one hand, this will prevent burning of its walls in the event of lighting the stove without water, on the other hand, it will reduce the rate of heating of the water, without which it would boil even before the steam room is completely warmed up.
The slab is installed on top of the 9th row so that it lies on the bricks with a gap of 2–2.5 cm.
The heater grate can be welded from steel channels. The ideal option is rails that have already been used for their intended purpose (their surface is hardened due to cold hardening).
The stones should be laid after the stove has been dried and heated by the accelerating firebox.
The order of laying stones: left - correct, right - incorrect
Drying the oven takes at least 2 weeks. The optimal temperature is 20–30 degrees, so it is better to build the oven in the summer. When it dries, it is necessary to accelerate the fire 5 times with breaks of 12 hours. The fuel used must be high quality - aspen logs or pellets are best suited. Start with a small portion - up to 5 kg. With each subsequent “acceleration”, the fuel mass is gradually increased, bringing it to the maximum by the last fire.
Chimney
There are two sections in the chimney of a sauna stove. The first section is the part of the pipe that is connected directly to the stove and is located inside the steam room. This element has the following features:
- It is not equipped with insulation, since it requires infrared and convection heat transfer to the steam room.
- It is necessary to provide for the possibility of quickly and easily replacing it, since this section burns out relatively quickly due to the high thermal load.
The second section, starting from the ceiling and facing the street, lasts much longer, so it can be fixed more thoroughly. It must be equipped with a heat-insulating shell. It is installed for several reasons:
- wooden floor and roof elements in contact with the chimney must be protected from overheating (this can cause a fire);
- by preventing the cooling of flue gases, we ensure good draft;
- for the same reason, the amount of condensate formed becomes minimal or even zero.
An adapter is installed between both of these parts. In factory-made sandwich chimney kits, this part is called the “starter sandwich.” If it is not installed, the insulation from the second part of the chimney will gradually spill out.
Sandwich pipe for chimney
Only non-flammable materials that are resistant to high temperatures may be used as insulation. Foam plastics are not one of them.
It is best to use basalt wool in the form of a soft mat with a density of 30–50 kg/m3. This heat insulator loses its performance when moisture gets inside and in bath conditions characterized by high humidity, this drawback must be taken into account. The cotton wool is wrapped in a protective casing made of galvanized steel. The casing is fixed with steel strip clamps, and its edges brought together are fastened with self-tapping screws.
Basalt wool
In places where there is a passage through the ceiling and roof, a fireproof cut is made: an additional heat-insulating layer is laid between the chimney and the wooden elements.
Operation of a brick sauna stove
The temperature in the steam room will reach the required value approximately 3-4 hours after the start of kindling. If between bath procedures the stove has time to cool down significantly (downtime is more than 3 days), it must be started with an accelerating firing (fuel is added to 1/3 of the maximum load), which will dry and warm up the masonry. If this is not done, microcracks may appear in the walls of the structure, which are especially dangerous in a bathhouse - as was said, in conditions of heat and high humidity, the negative effect of carbon monoxide is much stronger.
If it is idle for more than a month, the accelerating fire should be repeated three times, gradually increasing the volume of fuel portions from ¼ to the maximum.
Such a stove can be used both in a Russian bath and in a sauna. In the case of a sauna, the intensity of the firebox is increased slightly, and the heater is not watered with anything.
What to drown with
The sauna stove can only be wood-burning. It is wood that allows you to warm up the steam room according to the correct pattern, that is, first the walls, then the air. Coal burns somewhat differently: first, the light fractions included in its composition quickly burn out, then a phase of prolonged carbon combustion begins with reduced heat transfer. This combustion mode is ideal for a heating stove, but in a steam room it will cause the formation of heavy steam.
Firewood should be stored under cover
The desired effect is achieved not only by real logs, but also by pellets pressed from sawdust or straw. The size of the granules varies widely: the diameter can range from 30 to 70 mm. You can also find pellets on sale that are intended for use specifically in bathhouses, but this fuel is still quite expensive.
Pellets for kindling
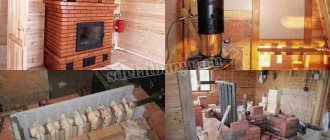
How to finish the stove depending on its type
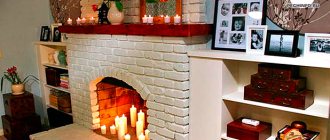
External decoration will help to give the sauna stove individuality. It can be done in various ways - from simple jointing of brickwork to cladding with marble or granite slabs. It all depends on the taste and financial capabilities of the owner.
Photo gallery: examples of finishing stone and iron stoves of different sizes
The stove, lined with glossy slabs, looks like a fireplace
Finishing with natural stone can be very unusual
The firebox in the form of a fireplace portal looks unusual
Granite is ideal for lining a sauna stove
Flat stone can be used to decorate not only the stove itself, but also the adjacent wall
A wooden fence, although not a full-fledged finish, can protect against burns
A large structure can be built from facing bricks and simply unstitched seams
Stones for the heater
As mentioned above, stones with high heat capacity and at the same time low thermal conductivity are suitable for a heater.
Types of stones used for heaters
The use of metamorphic rocks - slate, marble, dolomite or limestone - is contraindicated: they are characterized not only by an incorrect ratio of heat capacity to thermal conductivity, but also by the presence of organic impurities, which, when heated, are released in the form of gases harmful to health. Rocks of volcanic origin with high density are best suited for a heater: soapstone, gabbro, diabase and, of course, basalt. They are characterized by the following signs:
- heavy weight;
- dark color;
- the fracture is smooth or fine-grained.
It is important to choose the right shape of the stones. In order for the share of convection heating to drop to 1/3, their surface area per unit volume must be minimal. This requirement is satisfied by the shape of a ball with as smooth a surface as possible. Accordingly, you need to look for stones that are as round as possible. The largest can have a diameter from 100 to 150 mm (about the size of a fist or a little more), the smallest - from 20 mm.
The method of laying stones depends on the type of heater. If it is flow-through, as in the furnaces described above, then the size of the fraction in the layers should decrease in the direction from bottom to top, that is, at the bottom - the largest stones, at the top - the smallest. When laying a solid heater, the opposite principle is used: here it is important to ensure the fastest possible transfer of heat from the heated slab to the stones, so the smallest of them (they lie in a denser layer) are laid down.