At all times, ceramic tiles have been considered the best roofing material, due to their high consumer characteristics, aesthetic beauty and unsurpassed durability.
However, today, natural tiles, as a roofing material, have lost most of the construction market ( the share of ceramics in the modern market does not exceed 15% ).
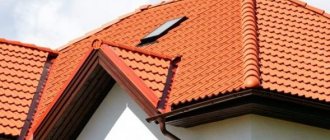
This trend is observed in connection with the constant development and improvement of modern materials for roofing. In modern construction conditions, ceramic coating has occupied its stable niche and is used in accordance with its advantages and disadvantages.
We bring to your attention alternative types of tiles:
- polymer-sand;
- flexible (soft);
- cement-sand;
- metal tiles;
- composite.
Types of ceramic tiles
Today, clay tiles are available not only in their natural color - red-brown. There are two technologies for coloring it, which give it different looks and properties:
Types of coating for ceramic clay tiles
- Glazed ceramic tiles. A tinted glassy coating is applied to the annealed plate, which is also fired in a kiln. As a result, the surface becomes shiny and very smooth. The shades of this type of tile are very bright and rich. With each rain, the roof is literally cleaned to a mirror shine: all dust is washed away from the slippery surface.
- Engobing. Tiles painted using this method have more muted matte shades. After all, engobe is powdered clay mixed with a mineral pigment, diluted with a little water. After annealing in an oven, the applied painted layer has a slightly porous structure, the shades are muted, restrained in tone.
For the conditions of central Russia and the North, engobed tiles are more suitable. After all, its color is the same as ceramics. Therefore, its temperature expansion is the same and its appearance remains stable for many decades. The glassy glaze on the tiles has a different thermal expansion, which causes them to crack and their appearance to be less than ideal.
Part of the assortment of one campaign
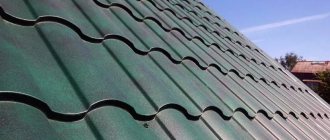
In addition to different colors, clay tiles have different shapes and profiles. They are in form:
- Flat (also called beaver tail).
- Wavy or grooved. Most tiles have this appearance. Waves only come in different types and widths: there may be one or two waves on a tile, the height and their profile may also differ. In order for them to fit together, there are special grooves that do not allow water to pass through from the side.
- Grooved. These are tiles that have a convex and concave shape. It is laid so that the ends of the convex elements rest on the concave ones. This is clearly visible in the photo.
Grooved tiles
Flat and wavy tiles often have grooves, with which they fit together and are also fastened. They are easier and faster to install, and quick installation does not make the coating less reliable.
There are several types of tiles based on their purpose:
- Private. The whole roof is covered with it.
- Skate. It is laid on the ridge of the pitched roof after the installation of the ordinary roof is completed.
- Wind or edge (right and left). Placed on the edge. It differs from the ordinary one in the presence of a wind strip, which protects the edge of the rafters from the effects of rain and wind.
The variety of ceramic tiles is great. It’s not for nothing that this is the most favorite material for roofs among designers.
Comparison: which roof tiles are better?
We've looked at all types of tiles and now let's compare the most popular types of roofing. Namely: metal tiles and flexible tiles. The first thing that influences the choice is the aesthetic component. Because a roof can completely transform or ruin the appearance of a home. After all, there is no point in thinking through the exterior of a new house, the shape of the window frames, down to the last detail, and at the same time, the roof spoils the entire appearance. And here the difference between metal tiles and shingles is huge!
What colors are there for metal roof tiles?
Appearance and configuration
Metal tiles are produced in a large selection of colors according to the RAL catalog, but all of them are monochrome. But in nature there are no such pure shades, so metal tiles look alien against the background of the environment, although stylish. Soft tiles, which are produced today with two main types of top coating - basalt and slate chips, look quite organic and fit perfectly into the surrounding exterior. The colors are very beautiful and varied, making it easy to achieve a unique architectural style. Despite the variety of colors, every year manufacturers release something new. Flexible tiles look equally stylish in urban environments and in rural areas.
Comparison of metal tiles with flexible
The next comparison criterion is the ability to implement complex design projects. Metal tiles are suitable for simpler solutions. Because there is a large waste of material and there is no possibility of high-quality bending. Therefore, metal tiles are only suitable for roofs with two straight slopes without any frills. With this material, hip and hip roofs are considered aerobatics. However, difficulties will arise with the sealing and arrangement of their ridges.
The fact is that metal tiles, with all their relief, are mounted on smooth slopes, and therefore bends or other complex elements result in a number of problems. Often, on unusual architectural objects, the consumption of metal tiles is more than 50%. Whereas on ordinary roofs it does not exceed 15%. And with flexible tiles there are no obstacles other than a flat surface. Thanks to this, it produces beautiful roofs of both simple and complex configurations - even domed and bulbous. This is all thanks to the fact that soft tiles are a piece material, and the integrity of the coating is never compromised due to one difficult place.
Noise
A popular comparison condition is noise insulation. If you want to convert your attic into an attic, they recommend forgetting about metal tiles. But flexible tiles are a completely silent material. But there is a way out in this situation, you just need to choose insulation with high soundproofing properties, and, of course, do not skimp on screws, because metal sheets often make noise from the wind. That is, if you approach the issue wisely, then such an attic will turn out to be quite comfortable for living and the sound of rain will not frighten you at night, but, on the contrary, will bring only positive emotions. For example, for this it is recommended not to purchase screws for metal tiles on the market, where there is a high chance of getting a low-quality product, but it is best to order them from a specialized store, with a rubber gasket based on rubber. Well, if you decide to do without an attic, then you won’t care at all whether it’s noisy under the roof in a rainstorm. Because the sound will not reach living areas.
Advantages of flexible tiles
It is necessary to install snow guards on metal tiles, but not on soft tiles, due to the rough surface of stone chips. The disadvantage for flexible shingles in the context of this comparison is that snow, especially wet and with pieces of ice, will scratch the shingles and thereby tear off the coating from it, which is necessary for protection from the sun.
Installation
Comparing the installation conditions will help you understand which roof tiles are best. You can work with metal tiles in almost any weather conditions, except for rain, of course. But it is recommended to nail bitumen shingles at a temperature not lower than 5° C and not higher than 30° C, and only in dry weather. Because in cold weather, flexible tiles become very fragile and break into pieces during installation. The exception is SBS-modified bitumen, but it also has certain requirements. If you have to work at low temperatures (0°C), then the shingles are prepared and stored in a well-heated room. Then they are served in small batches and fixed very quickly, using a hair dryer to bend the shingles.
It is also difficult to work in extreme heat: because the bitumen softens. And then the granules are easily swept away from it. Minimal consumption when working with shingles. And those sheets that need to be cut can be cut with ordinary scissors, so you don’t need to buy any special tool. But cutting metal tiles exactly to size is very difficult. In addition, when working with an angle grinder and a jigsaw, the coating is scratched, so craftsmen have to tint the cutting line.
Another nuance is the complexity of laying both types of roofing. With metal tiles, everything is simple: sheets of the same size match the color and profile. And if the slopes are even, all that remains is to lift the covering onto the roof and secure it with special roofing screws. With flexible tiles you will have to work hard. Not all series (especially the lower price category) allow you to easily install rows on a slope, and you have to independently develop a diagram and think through a specific pattern. And it turns out that if you didn’t have enough material and bought new ones, then this place will stand out from the general background. Therefore, it is worth thinking about this in advance and unpacking all the packs in order to mix them thoroughly. Each shingle will have to be hammered in by hand, and a nail gun will do the job.
Advantages and disadvantages
The first and undoubted advantage of this type of roofing material is its naturalness and environmental friendliness. After all, this is clay with some additives, fired in an oven at a very high temperature. That's all the technology and composition. But there are other advantages:
- Fire resistance and fire safety. This is very important in such a fire-hazardous facility as a bathhouse, where the temperature of the flue gases often exceeds 200-300°C and sparks often fly out.
Ceramic tiles can have different profiles - Long service life. For some types of ceramic tiles, manufacturers provide a guarantee of 50 years or even more. Some varieties can withstand up to 1000 cycles of freezing and thawing. The figure is simply amazing, so 50 years is clearly not the limit.
- Highly decorative. The roof looks very attractive and can be used for buildings of any style.
- Low thermal conductivity. The ceramic layer is an excellent heat insulator, which means less insulation is required. Due to the high thermal inertia, there are no sudden temperature changes in the under-roof space, and condensation rarely occurs on the inside of the tiles. These properties make tiled roofing the best when installing an attic floor.
- When it rains, falling drops do not produce any significant noise.
- Low hygroscopicity. Only 5-6% of the total mass is absorbed.
It was not for nothing that ancestors laid tiles on the roof. She has a lot of excellent qualities. But there are also disadvantages, and you need to know them:
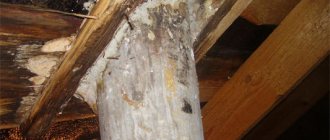
- Heavy weight. This leads to the fact that the rafter system must be made of more powerful timber, and supports must be installed more often. In addition, the significant mass makes transportation more difficult. The mass of the tiles must also be taken into account when designing the foundation.
- Laying is possible only by hand, without the possibility of using machinery. Although new tile models have made the installation itself much easier.
- The slope should be steeper so that the water drains quickly.
- For painted tiles (by any method), the natural color is visible in places where they are chipped.
There aren't many downsides, but there are some. How significant they are, everyone decides for themselves.
Metal tiles
Metal tiles (photo No. 2)
How it is made
Metal tiles are profiled sheets of thin sheet metal. They can be steel, copper or aluminum.
The sheet is covered with a protective coating, most often zinc or aluminum-zinc, but other types of coatings can also be used. This layer protects against corrosion, increases the strength and service life of the material.
The metal tiles are also covered with a protective and decorative polymer coating:
- Polyester
- Acrylate
- Polyurethane
This coating gives the material color and texture, and also protects against external influences: ultraviolet rays and corrosion.
Structure of metal tiles (photo No. 3)
The weight of metal tiles is 4–7 kg/m2.
Advantages of metal tiles
- Large selection of texture, color and profile options
- A light weight. Simplifies the installation of metal tiles; there is no need to strengthen the rafter system
- Reliable corrosion protection. A protective coating made of zinc and aluminum alloys copes well with this task
- Long service life - up to 50 years or more
- Simple installation technology: you can do all the work yourself. A metal roof is also easy to repair.
- You can lay metal tiles even in winter (at sub-zero temperatures)
Disadvantages of metal tiles
- Poor sound insulation. During strong winds, rain or hail, the attic will be noisy
- On complex roofs there may be increased material consumption
- If the protective coating is damaged or insufficiently thick, there is a risk of corrosion.
- High thermal conductivity
!
Note!
When installing metal tiles, it is important to use high-quality seals for self-tapping screws. Poor quality seals deform over time and the roof begins to leak.
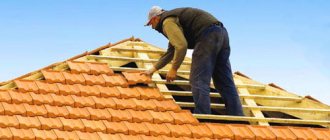
Tiled roof installation
Tile behaves best on fairly steep slopes. The optimal slope is from 22° to 50°. If the slope is less steep, additional waterproofing is required; for larger slopes, additional fasteners are required. Then each tile is “set” on a self-tapping screw, roofing nail or clamp.
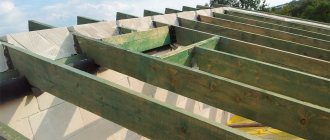
Selection of bars and installation pitch for the rafter system
The bars will require a large cross-section: one tile weighs from 2 kg.
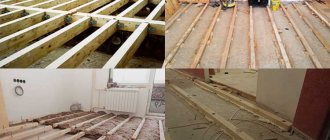
The basis of the structure is the rafter system. This roofing material is heavy - the average weight of one square meter of clay tiles is 40-60 kg. Considerable mass. To this it is necessary to add the thickness of the snow cover that falls in the region. So the rafter system needs a powerful one.
But when constructing a rafter system, it is unprofitable to use very thick bars. It will be much cheaper if you install medium-sized rafters more often. The load-bearing capacity will not be affected, and you will pay less for building materials. So in central Russia, a beam of 75*150 mm is considered an acceptable option (maybe more or less depending on the amount of snow and slope). Installation step 60-90 cm.
Having finished installing the rafters, they are treated with antiseptic and fire-retardant impregnations. A wind barrier film is secured to the rafter system, and then installation of the sheathing begins.
Sheathing device
The distance between the horizontal slats is determined by the size of the selected tile and the angle of the roof. Most often, the installation step is specified by the manufacturer (found in the installation instructions). But you can decide for yourself.
The rafter system and lathing are two key points when laying a ceramic roof with your own hands
The length of the tiles varies, but the most common are 40-42 cm. When calculating the pitch of the sheathing, you need to take into account the useful or effective length. After all, the rows overlap each other. The more one tile overlaps another, the shorter the useful length. And the amount of overlap depends on the angle of inclination of the roof: the smaller it is, the more the rows overlap (so that water does not flow in):
- slope angle 11-25° - overlap 100 mm;
- slope 25-35° - approach 75 mm;
- steeper than 35° - approach 45 mm.
When calculating the pitch, take into account that it is possible to make a larger approach, but less - only to the detriment of the quality of the roof, since water can flow in. Excessively increasing the overlap of one row with another is unprofitable for material reasons (more tiles are required), so you shouldn’t get carried away with this either.
For the sheathing, timber 50*50 mm or 60*40 mm is used. It also needs to be treated with impregnations before installation. The number of crossbars is one less than the number of rows that will be laid on the roof (one is added running along the overhang).
Heat and vapor barrier
The heat insulator is installed from the side of the under-roof space. These are usually mineral wool mats and are rigid enough to fit between joists.
One of the roofing pie options for a tile roof
The heat insulator should fit very tightly and without gaps: the slightest gap is a bridge through which heat will escape. This is an unacceptable luxury for baths. That’s why we insulate it especially carefully. Then a sheathing is laid on top of the insulation, which will hold the insulation, and a vapor barrier membrane is fixed on top. It is secured with a counter-lattice, to which the interior decoration can be attached if the room is inhabited.
Read more about insulating a bath in the article “Vapor barrier for a bath.”
Tools and additional materials used
To install metal tiles you will need:
- Screwdriver + screwdriver attachment 8x45;
- Scissors for cutting metal;
- Roulette;
- Electric nibblers;
- Corrugated pliers;
- Drill attachment for cutting metal;
- Stapler with staples;
- Jigsaw for wood;
- Screws made of hardened steel made of EPDM rubber, average consumption of 7 screws per 1 sq.m;
Calculation of the number of tiles
When determining the number of tiles, useful dimensions are used. How to determine the useful length is described above, and the useful width is indicated by the manufacturer. By multiplying them, you determine the usable area of one element. The total roof area is divided by the found value. Get the number of pieces. But a reserve is needed for fighting and pruning. Approximately 10-15%.
Even a simple gable roof will require a decent amount of money for material
Calculation example. We break tiles, the useful dimensions of which are 345 * 300 mm. The area of the gable roof of the bathhouse is 24 m2.
- We determine the usable area of the tiles: 0.345 x 0.3 = 0.1035 m2.
- We count the number of pieces for the entire roof. 24 / 0.1035 = 232 pcs.
- There will be 255 pcs in stock.
Now a little about the cost. The amount required is considerable: the price of one tile is from 1.6 € per piece (beaver tail) to 4.2 € / piece. It turns out that for this roof you will only need for ordinary tiles from 408 € to 1071 €.
The cost of side and ridge elements will also be added to the costs. Fasteners will also be needed. All this will require about 150-250 €. Not a cheap pleasure. But if you consider that the service life is calculated in decades, then it is not so expensive.
Maintenance of metal tiles and quality assurance
To ensure that your roof lasts as long as possible, we recommend:
- Monthly roof inspection from the ground;
- Annual inspection of each roof slope with a rise to the eaves level;
- If necessary, carrying out roof maintenance work;
- The valleys should be cleared of debris; this requires removing the decorative part;
- If leaks, high humidity, condensation, or uneven temperature of the walls in the attic appear, it is necessary to apply for a comprehensive roof repair.
Scratches must be touched up with a corrector for repair;
Installation of ceramic tiles
Installation begins from the bottom row. First, nail the cornice strip. It can be metal (purchased along with the tiles) or wood. In the first row and the last, we fasten each element with self-tapping screws. All side elements are also secured.
This is how the tiles are secured to the sheathing
All others are fixed with a specially shaped wire, which is supplied with the tiles. It is passed under the sheathing strip and hooked onto special grooves on both sides. Since there are protrusions on the back side with which the tiles rest against the strip, the fastening is flexible and at the same time reliable. Such a roof, when shrinking, will easily adapt to all movements, while maintaining tightness. You just need to make the rafter system correctly: it must also be movable (floating).
For more information about installing clay tiles, watch the video. The first half discusses the advantages and disadvantages of natural tiles, and the second demonstrates the installation of elements in the bottom row, as well as elements of subsequent rows.
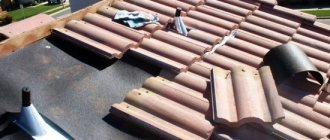
Stage III. Installation of waterproofing and sheathing
Once the base is ready, proceed to the waterproofing device:
- Step 1. Nail the bars on both sides of the valley to the rafter legs.
- Step 2. Place the waterproofing membrane on top of the counter-lattice, always with the inscription and the front surface facing up.
- Step 3. Trim it along the edge of the eaves overhang with a margin of at least 15 cm. Lay it starting from the lower right corner and fix it with a stapler, aligning it with the drip line. Double-sided tape will help you with this.
Here's what it looks like in practice:
Now nail the counter-lattice directly to the rafters, on top of the membrane, at intervals of approximately 30 cm. Cover the ventilation gap under the eaves with perforated ventilation tape.
To find out the optimal position of the bottom support sheathing, you need to try on the shingles from the bottom row and the gutter bracket. The support sheathing beam should be fixed at a distance of 32 to 39 cm from the bottom edge:
At this stage, it is very important to properly waterproof the gable overhangs:
By the way, to make the gable overhangs look beautiful, special side tiles are attached to them.
You can also resort to the traditional method by arranging the pediment with carved boards, which are also called piers. They just need to be treated with an antiseptic and protected with a metal apron.
Cement-sand tiles
Cement-sand tiles are also a natural roofing material.
Natural tiles are another type of roofing material: cement-sand tiles. It is also called concrete, cement or CPU tiles. As the name implies, it consists of cement and quartz sand, to which a coloring pigment is added. That is, these are products made of lightweight concrete. The peculiarity of the technology makes it possible to achieve high density and strength: the service life of a roof with cement-sand tiles is 100 years.
Its technical characteristics and consumer properties are very close to those of ceramic. Even the weight is almost the same: a square meter of cement-sand tiles weighs 42-45 kg.
But there are also differences. Since the pigment is added directly to the solution, there is no difference when chips form: all of it, both outside and inside, is the same color.
There is one not very good point: the edges of the concrete tiles seem to be chopped off. This somewhat worsens the appearance of the roof from above, but when viewed from the side you will not see much of a difference.
The attractiveness of this material is its lower price. For example, products of the German-Russian enterprise Braas start from 36 rubles per tile. Compared to ceramic prices, the difference is noticeable.
The construction of a roof with concrete tiles is no different from ceramic tiles. Everything comes together down to the smallest detail. So there's no news here.
Important factors when choosing roofing tiles
Before choosing tiles for your roof, it is important to consider:
- Material service life and warranty period.
The longer the better. - Installation features.
To install some types of tiles, you will need the help of specialists. And these are additional costs. - The weight of the tiles and the technical characteristics of the building.
It should be remembered that the roofing is an additional load on the floors and foundation. And some types of tiles are quite heavy and the load is significant. Therefore, ceramic tiles, for example, should not be used when arranging the roof of a relatively light wooden house. - Climate.
The shingles must be designed for use in your climate region. - Price.
When calculating the cost of roofing, you need to take into account not only the cost of the tiles, but also the installation devices, as well as the installation work itself.
!
Don't chase too low a price. The quality of the roofing directly determines how long the entire roof will last and the comfort in the house.
Polymer sand tiles
This roofing material can be classified as natural with a very big stretch. However, it is on the market. The material has both pros and cons. The advantages include:
- less weight: the weight is two times less than that of ceramics;
- almost zero hygroscopicity;
- plants and mosses do not take root;
- condensation rarely appears;
- Impact resistance - does not break when dropped;
- lower price - this is a budget option that looks almost the same as expensive ceramics;
- easy installation.
Polymer sand tiles look very good.
Disadvantages require attention - you need to make a decision taking them into account:
- Frost resistance of the material is 200 defrost-freeze cycles. This is five times less than ceramics and cement-sand tiles.
- Under the influence of ultraviolet radiation, a slow process of erosion occurs - the tiles gradually become thinner. It will serve its term, but you shouldn’t hope for a significant excess.
- With temperature changes, the tile deforms - it changes shape. This may cause the roof to leak.
As you can see, polymer-sand tiles have serious disadvantages. But the price is attractive: a square meter of coverage costs from 340 rubles. When choosing, it is worth remembering that if the production technology is violated, problems begin: after a few years it begins to crumble, literally by hand. Therefore, the choice of manufacturer is very important.
If you decide to cover your bathhouse with polymer tiles, you need to know that there are some installation features: each tile is secured with two nails or self-tapping screws. In this case, it is necessary to leave some play: it must be able to move. It is advisable to use stainless steel fasteners: galvanized nails.
Carrying out calculations - how not to make a mistake when ordering a roof
It is better to entrust roof calculations to a professional. Here you need to count not only the number of metal tile sheets (for this you just need to know the length and width of the slope and the width of the metal tile sheet), but also take into account many nuances, such as additional elements, correct lathing, hydro- and vapor barrier, seals, screws and much more .
The roofing calculator presented on our website will help you calculate the required amount of materials. Just enter the type of roof, dimensions, materials used - and you will receive complete information.
Plastic tiles
This type of material is definitely not natural, but it is just as certain that it is much cheaper. The advantages of this type of roofing material are the same as those of polymer-sand material. The appearance is somewhat different from the usual, but not radically.
On the roof this material cannot be distinguished from natural
Available in two formats: in the form of single tiles or sheets of two or three elements. Working with plastic tiles is much easier: they are two times lighter and absolutely not brittle. Each has locks, with the help of which a single roofing sheet is assembled. Attached to the sheathing with nails.
The installation order differs: they start laying from the ridge, placing the bottom row under the one on top. The material is new, so there is little operating experience. But the price is low and installation is simple, which makes you think and hesitate when choosing.
Video description
The video shows the installation process of ceramic tiles:
Installation of tiles on the roof ridge
To do this, use an additional element made using the same technology as the tile itself. It has a peculiar shape that helps to close the ridge hermetically. But since the latter is used in the roofing structure system and as an element of the ventilation system, first a beam is mounted on it on special brackets, and an aeration element in the form of a mesh element is installed on top. It covers the roof ridge, leaving holes for air to escape from under the roof space.
And after that, the ridge additional elements are installed. They are attached to the ridge beam with clamps, because it is this fastener that can ensure the tightness of the ridge assembly. The extensions themselves are assembled using a socket connection type. That is, on one side they have a seat with a larger diameter, on the other - a smaller one.
How to properly assemble a roof ridge from ceramic tiles Source krovsm.ru
Installation of spine tiles
This stage is used if a hip or hip roof is erected over houses. Only in these structures are there ridges - the joints of two slopes that form an outer ledge. It, like other protrusions or concavities, is a place of intense exposure to natural precipitation. Plus, in this area the junction of two slopes is made. Therefore, it is very important to properly seal. We will not describe how to do this correctly. Just watch the video footage.
What you should know about working with metal tiles
When talking about how to cover a roof with metal tiles, first of all it’s worth talking about the necessary tools. You will need:
- Hammer;
- Screwdriver;
- Marker;
- Roulette;
- Rake-rule;
- Metal scissors.
When planning roof construction, do not forget:
- The roof slope angle must be at least 14 degrees;
- You should not cut metal tiles with a grinder, because... high temperatures contribute to the destruction of the protective layer. You also need to know how to cut metal tiles correctly so as not to damage it;
- If you plan to cover a roof with a complex shape, purchase material in large quantities, because... when cutting, there will be a lot of unnecessary trimmings;
- Purchase reliable paint, which must be used to carefully paint the cut areas of the metal tiles in order to protect them from corrosion;
- A roof with metal tiles needs additional sound insulation;
- When laying metal tiles, walk on them in soft shoes, trying to step on the concave part of the wave.
Which hydrobarrier film is better?
It is necessary to immediately decide what is considered a hydrobarrier. There is no uniform terminology here, so some experts use this term for any type of waterproofing, others - only for impermeable sheets.
There are many types of waterproofing film. Among them, reinforced sheets made of cross-linked polyethylene are in particular demand . They are durable, have sufficient mechanical abilities, and are resistant to temperature changes. They do not allow moisture to pass through in any form. Outwardly, they look like a mesh, covered with a layer of polyethylene on top.
If we consider permeable types of waterproofing, then the best option would be a diffusion membrane . It ensures the removal of steam from the roofing pie, while simultaneously cutting off any possibility of moisture getting inside. It has strength, resistance to solar ultraviolet radiation, and durability.
This canvas can be used as a temporary roof (for several days until the tiles are laid).
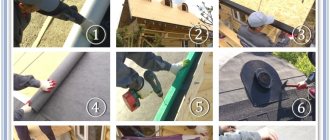
Stage IV. Gutter installation
Now install the gutter on the pre-mounted mount. Attach the drainpipe clamp to the wall of the building and assemble the elbows with connecting elements.
Cover the ends of the gutter on the gables with a universal cap so that the gutter does not interfere with the installation of the lower gable tiles.
And connect the straight elements of the gutter with a joining element and close it from the inside using clamps that are attached to the additional sheathing:
Stage VI. Laying tiles on slopes
So, now that everything is ready, try on the gable tiles on the gable overhang, which should lie with a gap of 1 cm from the front board.
On the sheathing, mark the left edge of the pediment tiles, and to the left of it, mark the position of future columns after 90 cm, at the rate of 30 cm per column.
Using string, apply these markings to the sheathing. Now lay out the lower first row of tiles freely, while carefully checking the position of every third tile using the previously made marks.
The support spike, which will rest on the front board, needs to be knocked down with a hammer, as in this photo master class:
Now fasten each tile of the bottom row with a self-tapping screw through the holes drilled in the ridge, and lay out the first column of gable tiles along the previously marked vertical line. At the same time, fasten each tile at the top with two screws.
After this, lay the tiles on the slope, from bottom to top, along the vertical markings applied to the sheathing:
To walk on a tile roof, all you need is a harness—you can step on it anywhere. Start laying and marking tiles on hip and hip roofs from the middle of the slope. To do this, you will need to find the middle of the triangle: simply lay out a vertical row of tiles from the very top, right in the center, and now lay the bottom row.
After this, mark the vertical rows where you can, and lay the tiles from bottom to top, in rows, starting from the middle of the slope towards the ridges.
Stage VIII. Window bypass and waterproofing of junctions
Where natural shingles go around the skylights, you will most likely need half shingles (unless you timed everything perfectly). Place it next to the others and try to close the joints as much as possible.
We have prepared for you a detailed master class on waterproofing the junctions of natural tiles with windows and chimney pipes, so that you can understand all the intricacies of such work:
Here is another example of how to “fit” a window into a tiled roof:
Stage IX. Trimming tiles for valley joints
To correctly lay the tiles in the valley, use a string on the groove to mark the hanging line so that the overlap of the tiles on the groove is 8-10 cm. After this, cut the tiles at an angle along the marked line. Just don't use small, triangular pieces of shingles that are difficult to secure.
To move the column and ensure quality fastening, you will need half shingles. Approximate consumption – 1 piece for 2 rows:
For convenience, first number the cut tiles and remove them from the sheathing. To cut tiles, we advise you to take a miter saw with a power of 2 kW and a diamond blade with a diameter of 22.23 cm, which is specially designed for dry cutting of heavy concrete. Protect your eyes with goggles or your face with a respirator.
By the way, accuracy will be achieved on a water-cooled machine. Wash the cut tiles with water to remove dust and let them dry. Since you will not cover the cut edges with anything, cover them with cold engobe to match the color of the roof - this is sold immediately with the tiles.
To properly secure the cut tiles to the ridges, use special stainless steel clamps. These clamps come in two types:
- anti-wind, which attract the tiles to the sheathing;
- universal, which support the tiles in weight.
The wire fastener is screwed to a nail, which is driven into the nearest lath. And sometimes the wire is used so thick that it itself is driven directly into the sheathing instead of a nail.