When thinking about building a sauna stove, you need to choose the right type and overall dimensions of the future structure, decide on the design of the chimney, and choose the building material and mixture for masonry. A drawing with marked geometric dimensions and detailed ordering will help to avoid mistakes during the construction process.
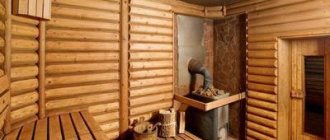
A sauna stove has a number of differences from the traditional ones used for heating a home. They must have a niche for heating stones and a water heating circuit. A simple design is a water tank located in a certain place in the stove.
Advantages and disadvantages of a sauna stove
Sauna stoves are varied. They are made independently or purchased ready-made models in stores. Brick is used as the main material for the construction. This decision is due to a number of advantages.
The advantages of brick kilns include:
- Long-term heat retention;
- High quality steam;
- Great power;
- Fire safety;
- Creating a pleasant microclimate;
- Environmentally friendly.
The peculiarities of the material and original appearance allow you to create a pleasant antique atmosphere in the bathhouse.
Despite their advantages, brick stoves have a number of disadvantages:
- Heavy weight;
- Foundation requirement;
- High manufacturing cost;
- Demanding qualifications of specialists;
- Long fire.
To make a high-quality stove, you must have experience in laying bricks. If the masonry turns out to be uneven, the quality of the room’s heating decreases.
Kinds
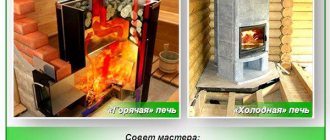
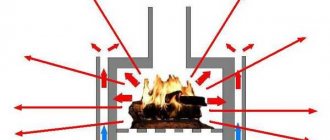
Open heaters
For baths with a small area, it is permissible to use open heaters. These are compartments for stones that are outward and lie in a heap. They are placed above the firebox. Quite often, a special lid is made for the stones, which is lifted only to supply water.
This detail helps retain heat from the stones after the required amount of steam has been generated. The stones are located in an open space, which ensures the fastest possible set of the desired temperature.
Diagram of an open brick stove:
Closed heater
A brick sauna stove with a closed heater is equipped with a window for supplying water to the surface of the stones. To heat the room faster, the door can be opened.
One of the disadvantages of such a device is that it needs to be melted for a long time. But the main advantage follows from this: the heat remains in the oven for a very long time. Therefore, closed-type stoves are very popular among craftsmen and bathhouse owners.
Diagram of a closed brick stove:
Features of modern sauna stoves
When creating a furnace, you must carefully consider the choice of design and development of drawings. The design features of the product will directly depend on the heating option.
The main options are:
- In black - with no chimney;
- In gray - with a chimney, but there is a need to wait for the wood to burn out;
- On white - there are no signs of soot in the room, the stove has a chimney;
- With a stove is the most successful option; it is based on a tank, a stove and sauna stones.
When building a modern stove, special attention should be paid to the choice of a water tank, firebox stones and additional elements. Brick, as the main building material, allows you to retain heat for a long time and maintain the desired temperature in the steam room.
Tank selection
The water tank is selected before construction work begins. Its volume directly depends on the number of people simultaneously in the steam room. The more traffic the room has, the larger the tank should be. In the classic calculation, 1 liter per person is taken.
Experts recommend giving preference to open tanks. Such containers are easier to maintain and fill with water. During periods of prolonged inactivity, it is recommended to empty the water from the tank.
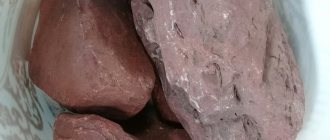
Firebox stones
Stones play an important role in the steam room. Their choice should be approached carefully. Ordinary cobblestones are not suitable for a bathhouse. They have microcracks and additional inclusions, which have a negative effect on the material during sudden temperature changes and can explode.
Stove makers recommend using jadeite, soapstone, or river tracing paper as stones. In case of financial difficulties, the use of basalt or vulcanite is allowed.
Brick selection
For masonry, most builders use ordinary solid red brick.
- It is distinguished by good behavior under temperature changes and a long service life.
- Red brick performed best in the construction of the main structure.
- However, in the firebox, under the influence of temperature and moisture, it quickly collapses.
Fireclay material is used to lay the firebox.
Additional items
Additional elements in the design of a sauna stove are metal inserts: doors, grates, grates and other systems. They are purchased ready-made; it is recommended to buy a full set. It contains everything necessary for the construction of the structure.
- When purchasing metal products, take into account the dimensions.
- It is important that they comply with the parameters specified in the bathhouse design.
- If there are no such items on sale, then they buy those that are as close in value as possible. Dimensions are adjusted using bricks.
Construction technology
Construction of a furnace is not a quick process. The work takes on average at least 1 month. The period directly depends on the qualifications of the specialist and the speed of installation. Most of the time is spent preparing the foundation and hardening it.
The main stages of work are:
- Preparation and pouring of the foundation;
- Preparation of tools and solution;
- Construction of the masonry of the main part of the furnace;
- Construction of a chimney;
- Finishing work.
All stages are carried out sequentially, observing the time limits for hardening of the solution.
Pouring the foundation
The foundation is the basis of the entire building. There are increased demands placed on him. The foundation must be strong and reliable, capable of supporting the heavy weight of the building.
The construction of the foundation is carried out according to the scheme.
- Dimensions are applied to the base. Pegs are driven into the corners, and a thread is pulled over the stakes for ease of orientation. The size of the markings corresponds to the dimensions of the oven.
- Prepare the pit. Depth – 60-70 centimeters, the lower part is additionally expanded by 10 centimeters to the sides. The shape of the pit should be trapezoidal.
- A layer of sand 5-10 centimeters thick is poured onto the bottom. Broken brick or crushed stone is poured on top. Sand is also sprinkled on top. The thickness of the puff pastry is approximately 25-30 centimeters.
- Waterproofing is laid on top of the compacted brick with sand. Traditionally, roofing felt is used.
- Formwork is installed around the perimeter of the pit. A reinforcing mesh is installed in the pit itself.
- The formwork is poured with concrete. In this case, 10-15 centimeters are left to the top. They are necessary for leveling the surface and laying the base layer of bricks.
The foundation is allowed to settle and set. This period takes from 5 to 7 days, after which the formwork is removed. The voids are filled with gravel. Roofing felt is laid on top of the foundation. It is recommended to do waterproofing in two layers for reliable protection against groundwater leakage.
Which material to choose
When building a brick stove for a bathhouse, you should be very careful about the choice of material. Most often, two types of bricks are used for these purposes:
- fireclay. It is used to construct areas that are subject to the strongest heating. Fireclay brick is highly fire resistant. Since this material is quite expensive, there is no need to build an entire furnace from it. But when purchasing material, it is still worth making a small reserve. Since, due to the design features of the furnace, it will have to be cut and stabbed;
- red full-bodied. It is used for all other elements and structures of the stove (walls, chimney, decorative elements).
silicate and hollow bricks are not used for the construction of a sauna stove. Because under the influence of high temperatures, these materials quickly collapse.
When choosing a brick, you need to pay attention to:
- brand (it indicates the density of the material). The higher the density, the better the heat capacity. The best option would be to buy M75 or M150 brick;
- frost resistance. When constructing a structure indoors, this indicator does not matter. But when arranging a chimney, the frost resistance of the material is of great importance;
- color. High-quality brick has a uniform color. If the brick is different in color, this indicates that the production technology was not followed during the firing process. This material is not entirely durable and reliable;
- geometry of the form. If all the bricks are the same, it is more convenient to work with them;
- sizes. The best choice would be material with dimensions: 250×150×65 mm.
When choosing a high-quality brick, you need to hit it with a hammer while holding it. The hammer will simply bounce off high-quality material, and the sound upon impact will be clear and clear. If the hammer hits the brick with a dull sound, it is better to abandon such material.
Preparation of the solution
It is not recommended to use cement mortar for masonry. It is not heat-resistant and does not tolerate temperature changes well. Experts recommend starting a mixture based on clay and sand.
There are no exact proportions for the composition. Focus on consistency.
- Clay is used red or fireclay. No large inclusions.
- The material is filled with water and left for 24 hours. After this, knead until soft. The clay should stick slightly to your hands.
- After this, sand is introduced, previously sifted through a sieve.
- The composition is mixed until homogeneous.
The readiness of the solution is determined by dipping a stick into it and shaking it. If the remaining layer exceeds 3 millimeters, then sand is introduced. If less than 2 – clay. The optimal layer is 2 millimeters.
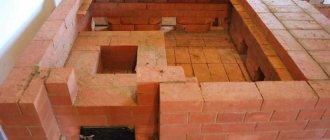
Brickwork
Brick laying is carried out according to a pre-developed plan. During work, it is important to maintain the sequence of rows and the evenness of their construction. The first row should be perfect.
The general scheme for discharging a brick sauna stove with your own hands consists of a number of steps.
- The first row sets the general direction of the walls. Must be perfectly smooth. A plumb line is made from it to check the vertical.
- The next step is to make the ash pan. Its tasks include collecting waste generated during the combustion process.
- The third and fourth rows are responsible for attaching the blower. A metal strip is used to secure it. The blower is responsible for regulating the combustion process. Open position – intense flame, closed – small flame.
- After the fifth row, steel corners for the grate are laid.
- Starting from the 6th row, a firebox is installed. Fireclay bricks are used for it. The height of the firebox is 25 centimeters, the width is just over 30. A grate is placed on top of the firebox.
- In the last rows, the firebox area expands. Refractory bricks are used for external masonry. Openings are created for secondary air supply. They are made of bricks cut with teeth.
- The laying continues with the outer brick. Doors for the firebox and a partition for the chimney are installed.
- A water tank is installed.
- At the height of the 15th row, the firebox is covered with a slab of refractory material, and stones are laid on it.
- The laying of the compartment under the stones begins. Its size depends on the number and size of stones.
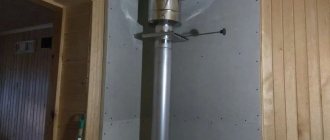
- The chimney is laid out last. Fireclay bricks are used for it. The chimney gradually narrows upward. Exited through a wall or roof. The passage points through the bathhouse partitions are lined with thermal insulation. The last to be installed is a chimney protected from rain and dirt.
During operation, the solution is applied to the previous row. The brick is laid with the smooth side facing the chimney. The vertical and horizontal lines are checked after each row. The remaining solution from the side surface is cleaned every 3-4 rows. After laying out, the oven is left to dry.
Project selection
This stove project is suitable for most types of baths.
The dimensions of the structure will allow you to heat the room (10-15 m2) up to 50 degrees, and when steam is supplied, up to 90 degrees. A tank with a capacity of 180 liters is built into the stove and satisfies all the necessary needs for hot water for a comfortable washing process for all family members. To allow the heater to cool down for a longer period of time after finishing the fire, iron pipes are provided (6 pieces, next to the water tank).
The pipes also support the stones above the firebox. The pipes heat up quickly, and after the heating process is completed, they gradually release heat. There is a hole above the cobblestones through which water will be supplied to generate steam.
Having decided on the project, you need to begin the assembly process itself. Assembling a stove with your own hands is not difficult. Based on the masonry drawings, the process will take a little time.
Finishing
Finishing for brick stoves is not mandatory. Finishing allows you to hide minor imperfections in the masonry and give the stove a complete, stylish look. The most common design option is tile.
There are 3 types of ceramic tiles for finishing the stove in the bathhouse.
- Terracotta. High strength tiles with a porous base. Has excellent adhesion to the surface.
- Majolica. It is distinguished by the presence of a top layer of glaze. It has excellent performance characteristics and an attractive appearance.
- Clinker room. It is made from a mixture of clays with the addition of fireclay powder and pigments. The material is fireproof. Has high strength. It is most suitable for ovens.
You can line the stove in the bathhouse with brick or decorative stone. The design made of porcelain stoneware, marble, granite, and coils looks good.
A brick sauna stove is not only functional, but also a beautiful structure that can create the amazing atmosphere of an old bathhouse. Compliance with installation technology and proper selection of equipment will allow you to create a reliable and functional product that will last a long time.
Conclusion
Do-it-yourself stoves are often used to heat a sauna room. They are reliable, economical and very beautiful. There are two types of heater stoves.
A sauna stove with an open heater heats the room quickly, but a device with a closed heater retains heat much longer. Therefore, if you have a large enough room for a bath, it is better to give preference to the second type. Making such a stove is not very difficult. It is enough to stock up on time, the necessary materials and tools.
In the literature or on the Internet you can find a huge number of row diagrams of a brick sauna stove with a closed heater. They will help you create a beautiful and easy-to-use sauna heating device.