Methods of fastening Penoplex (extruded polystyrene foam)
Extruded polystyrene foam (Penoplex) is a modern insulation material that meets a number of strict requirements.
Today this material is the most popular in comparison with other analogues. Installation of slabs can be done with the assistance of a specialist or on your own. In fact, attaching Penoplex is not complicated. The main thing is to know the basic principles of such work, as well as choose the right fixation method.
Preparatory work
Before proceeding with fastening, it is necessary to prepare the surface. To do this, it is cleaned of dust, dirt, stains of various nature. If the walls are not too smooth, then it is worth leveling them with putty.
Brief characteristics of penoplex
Before insulating the floor, you should find out what kind of material it is.
Oddly enough, this material, like much else, came to us from America. It was created in the 50s of the twentieth century. And now, many years later, we can use this material. Naturally, it first migrated to Europe, where it became very popular for the use of environmentally friendly components in its production.
The material is made from granules that are mixed, heated at high temperatures and compressed under high pressure. This results in a material that is both lightweight and durable.
The material is called extruded polystyrene foam. And this is a very important point. The production technology is such that the entire material consists of small cells containing air. This quality helps retain heat and makes the material completely waterproof.
Penoplex is so durable, frost-resistant, vapor- and moisture-proof that it can be laid directly on a bare floor without a waterproofing layer. Considering that it burns poorly and is also durable, it is essentially indispensable in many building structures.
Methods for attaching Penoplex
So, we come to the most important thing - what is used to attach extruded polystyrene foam? There are several options, and each of them has its own advantages and disadvantages.
First, let's list all the available methods:
Well, now let’s take a closer look at each method.
Mastics made from bitumen and polymers
This substance is widely used for thermal insulation of foundations, basements, and exterior walls. Mastic is a reliable protection against adverse environmental factors, and it is easy and quick to apply.
What is this substance? This is a viscous mixture that comes in a tube and is ready for application. The tube is supplemented with a special gun for convenient and uniform distribution.
Dowels
These elements have a wide cap, which allows you to securely fix the insulation to the wall. The trellis dowels are attached using a hammer drill, which is used to first make holes in the wall up to 6 cm deep. Next, they are filled with foam, after which the dowel is inserted. It is important that the cap does not extend beyond the insulation. One sheet of Penoplex is secured with five dowels, and adjacent sheets are secured with one dowel in the connecting seam.
Dry mixes
The most affordable fastening option is the use of dry cement-based building mixtures. First, you need to dilute it in accordance with the instructions so as to obtain a viscous solution. It is best to stir using the attachment of an electric drill.
The resulting solution is applied to the insulation using a spatula, making sure to distribute it evenly and fill the existing grooves. Then Penoplex is mounted on the surface.
Liquid Nails
This is a universal composition, however, it costs more than many other types of fasteners. Optimal for fixing insulation to metal or wood. This technology is often used in small areas due to its high cost.
Fastening is carried out using a gun. First, the composition is applied in the center, then along the perimeter of the polystyrene foam board. The sheet is fixed by pressing the material firmly onto the surface.
A simple and reliable way to attach polystyrene foam is with an adhesive composition. It has the appearance of foam and has high adhesion. This means that the insulation can be fixed even on smooth stone and concrete walls.
Glue is applied around the entire perimeter using a gun. Next, Penoplex is pressed against the surface with force for 40 seconds, and final fixation will occur in approximately 30 minutes.
After 2 hours, you can begin decorative finishing of the facade.
Polyurethane foam
This method should not be used as the main one. As a rule, polyurethane foam is used in addition to screws and dowels. This combination increases the reliability of fixation and is used primarily when working with plaster or plastic surfaces.
Self-tapping screws
The cheapest and most accessible option is self-tapping screws with a screwdriver. Optimal for insulating a wooden house using a pre-created sheathing.
The simplicity and accessibility of this method does not make it the best. The fact is that self-tapping screws, unlike dowels, have caps that are too small. Accordingly, the consumption is greater, and also the formation of cold bridges and a decrease in the thermal insulation properties of Penoplex.
Positive features of penoplex
This material has plenty of advantages and they were mentioned above. Now all that remains is to highlight the main positive points in the form of a list:
- The material is highly durable. Using it, you don’t have to worry about deformation like wood or plastic.
- Despite its strength, it is easy to process. Everyone probably knows how easy it is to cut polystyrene foam. And although these are different materials, processing is an easy task even for a beginner.
- It is the density that extruded polystyrene foam has that will provide the necessary sound insulation in the house.
- High-quality insulation depends only on the thickness of the material. The cells that make up the penoplex provide the necessary thermal conductivity.
- The degree of water absorption is close to zero, and this makes it possible to use the material in all places exposed to moisture.
- As they say: they don’t live as long as the material can last. It is assumed that the service life of penoplex can be from 50 to 80 years and even higher.
- One of the main qualities of expanded polystyrene is environmental friendliness. This had an impact on increased demand.
All of the listed qualities make the material not so much indispensable, but a universal tool that can be used in a variety of places for a variety of purposes.
How to properly insulate a wooden house?
When insulating stone walls, you can choose any of the above methods and implement it. But you should be especially careful with wooden buildings. The fact is that wood, a breathable material, cannot simply be taken and wrapped in film. As a result, it will simply rot in a few years. Wooden walls urgently need to constantly receive fresh air.
What to do? For such surfaces, creating a ventilated façade is suitable. What does it mean? There must be a ventilation fence between the wall and the insulation. That is, first the sheathing is attached to the walls using bars, and the insulation is already fixed on them. Do not forget to treat all wooden components with an antiseptic that fights mold and fungi.
The availability of the above methods of attaching Penoplex allows everyone to independently choose the most acceptable option. At the same time, the relative simplicity makes it possible, if desired, not to resort to the services of specialists.
You can purchase Penoplex and other types of extruded polystyrene foam for various purposes. Visit our catalog and choose the appropriate option. And in case of difficulty, we are always ready to help!
Source
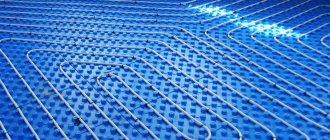
Warm floor - healthy home
Indeed, the rest of the condition of the house depends on proper floor insulation. After all, it is known that if mold comes from the basement, then over time it will spread to the walls. And sick walls mean a sick house as a whole and, as a result, sick residents of such a house.
There are many ways to insulate floors. One of these materials can be called penoplex, the floor insulation with which is loved by many builders and home owners. Judging by the name, you can already guess that this is polystyrene foam, or more precisely, expanded polystyrene. The properties of the material are such that it can be used in places with heavy loads without any consequences for itself. That’s why penoplex is used for floor insulation. The main thing is to follow the installation technology, since despite its simplicity in work, you can easily ruin what you have done. And therefore, before starting work, it is worth considering all the necessary installation rules.
Description of material
Penoplex as insulation can be placed under or on a concrete screed
Penoplex is a slab material based on foamed polystyrene. The products have a closed cellular structure and are distinguished by density, elasticity and slight flexibility. Manufacturers produce slabs with a width of 60 cm, a length of 120, 240 and 360 cm with a thickness of 2-40 cm. Depending on the purpose, the products differ in the degree of rigidity. When choosing foam plastic for floor screed, you should choose grade 35 “Foundation”, which has all the technical characteristics necessary for this.
Thermal insulation is quite versatile. You can lay penoplex on a wooden floor, a concrete slab, and even directly on compacted sand and crushed stone. The tightness of the joints is ensured by the presence of stepped recesses along the edges of the products.
Using penoplex directly on the ground
Firstly, it is necessary to level the ground that will be used as a base, and the distance to the floor should be at least fifty centimeters.
The second step is to fill the space with expanded clay, sand or gravel to a height of up to forty centimeters. In this case, you should make sure that the horizontal position is maintained.
The third step is laying penoplex, but at the beginning, you should check the thermal insulation material for unevenness and chips; if found, they should be removed. The material must be at least five centimeters thick. When laying the sheets, press them tightly against each other, without creating a gap; the joints are glued with special tape so that moisture does not get into them.
The edges of the building are fenced with sheets of roofing material or polyethylene, the top of the foam is also covered with these materials, then a layer of cement and metal mesh is mounted on them to strengthen it, while the thickness of the screed should be five centimeters.
Remember that the screed must be strictly horizontal, otherwise you may encounter serious difficulties when laying the flooring.
What type of floor can be used:
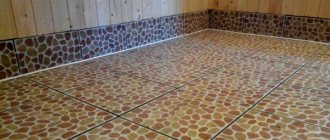
Installing a floor in a bathhouse has its own specific features. So it is necessary to insulate the walls from the side flush with the floor, the concrete screed is installed at a certain angle, this is necessary for the unhindered flow of water, while the drain must also be isolated from air from the outside.
Sanded boards are used as flooring in the baths; they are installed on logs in increments of fifty centimeters. When installing the floor in a bathhouse, the boards are laid with a gap of 5 millimeters to allow water to drain.
Advantages and disadvantages of penoplex
Porous synthetic penoplex does not absorb moisture and insulates the room from sounds
Choosing to lay penoplex on the floor under a screed has a number of significant advantages that have not gone unnoticed by professionals and private developers.
Disadvantages include exposure to ultraviolet radiation, which must be taken into account when organizing the storage of slabs. Some brands do not have fireproof protection and ignite at high temperatures.
Ceiling insulation
When insulating the ceiling in an apartment or on a balcony, penoplex is attached to the surface with a special glue prepared according to the manufacturer’s recommendations. After it dries, which usually takes about a day, the slabs are pulled to the surface with plastic dowels. Then you can lay the reinforcing mesh, plaster and finish it.
Preparing the concrete base
The concrete floor must be leveled and cracks repaired.
Before attaching penoplex to concrete on the floor, a number of activities should be carried out related to the preparation of the base. Ignoring this stage is fraught with rather unpleasant consequences.
Finally, a damper tape is installed around the perimeter of the room. It will provide space for thermal expansion of the insulation when heated. If there is no door, a board, plywood or steel profile is inserted into the opening, the height is designed to raise the floor level after laying the penoplex and pouring the screed.
Questions and answers
Is it possible not to use damper tape when laying?
The absence of this stage of work can cause poor adhesion of the screed and penoplex to the wall, so the use of damper tape is mandatory.
Is it possible to put penoplex under the screed throughout the house?
Can. This will practically eliminate heat loss without affecting the health of the residents in any way. No toxic substances are released during operation.
Before laying penoplex, you should first familiarize yourself with the detailed characteristics of the material and its operating conditions. Only by strictly following the recommendations of specialists will it be possible to obtain not only a perfectly flat, but also a warm floor.
Do-it-yourself styling features
The gaps between the joists and the insulation are sealed with polyurethane foam.
The technology for laying EPS on a concrete floor involves installing slabs followed by pouring a screed up to 5 cm thick. An exception to this rule is made for apartments in multi-storey buildings, where the load-bearing structures are designed for a certain load.
Laying penoplex on a concrete floor is carried out in the following order:
The coating is monolithic and waterproof. If this is provided for in the project, you should proceed to arranging the screed.
If penoplex is laid under a screed, waterproofing is placed on it
This event is carried out in the following sequence:
It takes 3-5 days for a gypsum screed to completely harden, and 14-28 days for a concrete screed, depending on the temperature in the room.
Source
Briefly about the main thing
Having understood the topic - insulating a house with penoplex, it can be noted that the process itself is not so complicated. There are not many nuances and steps in it, because penoplex is a durable material in itself. It does not require frames or complex sheathing designs. It is simply laid on the insulated surface and attached to it with glue and self-tapping screws. If gaps remain between the slabs during the installation process, they are filled with a special foam sealant. This is not polyurethane foam, because the sealant does not expand in volume.
Ratings 0
Types of dowels
There are 3 types of fasteners:
The standard dimensions of such fasteners are 200x10 mm. They are usually used for thermal insulation of ceilings and facade walls, because they are able to withstand a heavy cladding layer. The only disadvantages include the appearance of cracks through which the cold will pass.
Insulation mushrooms with thermal heads are an alternative to metal nails. They consist of a steel rod, the cap of which is coated with a metal with low thermal conductivity. Typically, impact-resistant polyamide is used for this. The nail is completely covered with a polymer composition that protects it from moisture. The thermal conductivity of polyamide is 0.027 W/μ, which is comparable to mineral wool and polystyrene foam. This results in the absence of cold bridges when installing insulation. The only drawback can be considered the high price of the product.
The dowel can be of different lengths. There are 3 sizes on the market:
There are also threaded anchors that need to be driven into the wall. They are made from the following materials:
Metal dowels are used when installing insulation if a heavy facing layer is planned. Plastic fasteners are divided into:
Roofing fungi are used when installing soft tiles, roofing felt, acoustic slabs, thermal insulation for concrete, etc. They consist of:
Calculation of dowel length and fixation pattern
To securely fasten the insulation to the wall, it is necessary to correctly calculate the length of the dowel. For this there is a formula L=H+I+K+W, where:
To understand how long to take fasteners, you need to consider an example. If foam plastic with a thickness of 30-50 mm is used, a layer of glue is 5-10 mm, and the wall is fairly flat, then a dowel 100-110 mm long is sufficient. If the surface distortion reaches 5 cm, then it must be taken into account when choosing the length of the fastener. If you choose insulation up to 10 cm thick, then you need to take a 210 mm dowel.
When the wall is made of hollow materials, the fungal fastener should extend into it by 8-10 cm. Not in all cases, longer means more reliable. The thickness of the walls should also be taken into account. For example, in apartments it is not too large, so an incorrectly chosen dowel can stick out from the back side.
There are several ways to secure insulation. The most reliable method of fixation is considered to be fastening with 5-6 fungi. 4 are hammered in the corners, retreating 5-10 cm from the edge, and 1-2 - in the center. Sometimes an option is used where the dowel is driven at the junction of two slabs. So the cap of one umbrella holds 3 plates at the same time. Additionally, 1 fastener is hammered into the center of each slab.
Sometimes, to save money, the insulation board is fixed with only 1 dowel. This option is only possible for foam plastic if there is no cladding. This method is not suitable for mineral wool, since it tends to gain moisture and, accordingly, increase its weight. It is also worth considering the height of the insulation mounting. If the foam is located at a height of more than 8 m, it is necessary to fix it with 7 dowels per 1 m². When the height exceeds 20 m, 9 fasteners are used for penoplex. This amount is due to the increased wind load on the building and the pressure of the upper rows of thermal insulation on the lower ones.
Typically, to fix insulation that is laid on a blank wall, there are 5-6 dowels per 1 m² in increments of 50 cm. Additional fasteners are installed along the perimeter of the openings at expansion joints, at the parapet, and in the corners of the building. The pitch in this case is 300 mm.
Preparing the wall surface for laying penoplex
Whatever method of fastening the insulation is chosen, the preparation of the wall surface for this process is the same everywhere, and in the total mass of screed production, it takes the greatest amount of time and labor effort.
First, you need to decide on the top point of the finished floor and thus approximately understand how thick the total layer of the future screed should be. Determining the floor height level is influenced by:
- hanging height of heating radiators;
- common floor level with other rooms;
- height of door sills.
After solving these issues, it is necessary to clean the walls of growths and other protruding objects. If there are depressions, they must be repaired until they are smooth. A damper tape will be glued along the perimeter of the future screed, so the walls (to the height of the floor) should be covered with a layer of deep penetration primer intended for the materials from which the partitions are made.
It is desirable that the soil mixture solution has an antibacterial filling.
After the primer has dried, the joints of the walls and floor must be treated with a liquid waterproofing layer. After completing these works, you can begin gluing the tape. If there is no special damper tape, then you can use any roll insulation, the thickness of which does not exceed 20 mm, and even roofing felt - but this is for the most extreme cases.
Stick the damper tape so that the lower edge touches the floor, and the upper edge is at least 20 mm above the level of the intended floor.
Then, on the damper, along all the walls, duplicate the extreme level of the floor screed.
Preparation
First of all, it is necessary to carry out preparatory work. Nothing should stick out from the wall, all sharp protrusions should be sanded or cut off with a grinder, cracks and damage should be repaired with cement mortar, and all irregularities should be eliminated. This is necessary in order to ensure the integrity of the heat-insulating material, then it will lie flat on the surface. If any protrusion cannot be eliminated, you need to cut out part of the insulation to compensate for the unevenness.
Then glue is applied to the surface of the foam or mineral wool and applied to the wall. The glue can be polyurethane foam. To prevent the first row from falling under the weight of the subsequent ones, a so-called starting bar is attached to the bottom, where the sheets will rest. Such a bar can be made from a metal profile. The use of glue will create additional closed air spaces.
There are 2 options for attaching foam boards to walls:
The first method involves sequential fixation of the heat-insulating material row by row. The second option is more complicated, but allows you to move scaffolding or ladders less often. First, the first row is fixed, and then the insulation is fixed at the corners of the building in the shape of a pyramid. Its top should be located at the very top.
The foam sheets must be placed in a checkerboard pattern. This allows you to avoid cold bridges and create a smoother front surface. To eliminate gaps, the sheets are pressed tightly against each other.
All joints must be filled with sealant or foam. Sometimes, due to the skew of the walls, the insulation sheets do not lie flush. In this case, you should use a special grater to level the surface. If foam protrudes in some places, cut it off.
Insulation on the ground base
It is recommended to lay penoplex on a ground base, without main foundation slabs, using the following technology.
The standard insulation scheme assumes the presence of a vapor barrier layer under the foam sheet; in some cases this operation is skipped. The insulation layers are arranged as follows:
- priming;
- crushed stone (or gravel);
- sand;
- foam boards;
- waterproofing;
- reinforcing mesh;
- cement strainer;
- finished floor (laminate, parquet, linoleum, etc.).
The soil base is leveled, compacted and dried. A layer of crushed stone, about 40 cm high, is tightly laid and compacted. Sand is poured onto the crushed stone cushion in a layer of about 10 cm.
Some craftsmen use a modified technology in alternating laying layers:
- priming;
- crushed stone;
- sand.
Granite chips, crushed stone or gravel are poured onto the ground. Then everything is watered generously and compacted. After this, the soil is dried.
It is recommended to use these rules during construction only in the warm season, so that the soil has the opportunity to dry out sufficiently. Then dry sand is poured.
Penoplex is placed on the resulting base; the seams can be glued with tape (or use an adhesive solution). Layers of waterproofing are applied to sheets laid in a checkerboard pattern, onto which a reinforcing mesh is mounted.
Thermal insulation process
For subsequent cement screed, metal cellular reinforcing mesh is used. The height of the mesh should not exceed 25 cm. Fill the floor with cement mortar, checking the level.
If you do the insulation of the floor on the ground floor of a private house yourself, you should pay attention to the fact that it may be necessary to cut holes in the foam slabs for communication pipes. This stage of work should be carried out after laying the sand, during the first measurements.
How to install dowels?
After this, they begin to install the dowels. First, markings are made. Using a hammer drill, holes are drilled in the wall through the insulation into which fasteners will be inserted. Select a drill with a diameter of 10 mm and make a hole of the required depth. It should be 10-15 mm longer than the length of the sleeve of the corresponding brand of dowel.
It is important to control the horizontal position of the tool so that the dowel does not become oblique and one side sticks out above the surface. To ensure that they all have the same depth, a marker is made on the drill using insulating tape. The diameter of the hole should be such that the anchor fits into it without effort. Otherwise it may bend and break. The resulting holes are cleaned with compressed air.
The next step is to directly attach the foam to the wall with dowels. Plastic umbrellas are inserted into the holes. The hat should be slightly recessed in the thermal insulation so that it does not protrude above the surface. Since foam or mineral wool has a low density, this can be done by pressing with your hand or lightly tapping with a hammer.
Then the rod is inserted into the umbrella until it stops. The rest of the part is hammered in so that the head is flush with the foam. If plastic rods are used, do not apply too much force. This may cause the nail to become deformed. If fiberglass dowels are used, then it is inserted into the hole assembled.
The last step is sealing the dowels. Upon completion of the work, you can see quite deep holes in which the caps remain. To prevent voids from appearing in their place during subsequent facing work, the holes must be sealed with an adhesive mixture using a paint spatula. The evenness of the surface is checked with a level or square. After installing the dowels, the surface is plastered or the curtain wall is installed.
Most modern fasteners are made of frost-resistant and impact-resistant polypropylene, so installation is possible at low temperatures. They will not crack or break.
Source
Penoplex floor insulation technology under screed
As mentioned above, the insulation technology will directly depend on the base surface on which the entire floor structure with screed will be laid. Therefore, it is worth considering various options.
Insulated floor on concrete base
If we talk about the insulation of concrete floors in apartments, then there is a difference in the technologies for thermal insulation of the floors of the first floor and all subsequent ones.
In apartments located above the basement, the floors are always colder. In addition, there is a risk of dampness and mold, so it is recommended to carry out thermal insulation work before moving into a new home. In such rooms, more layers of different materials are used, which will prevent the room from cooling down and also protect it from moisture penetration.
The first thing that needs to be done before moving on to the main work is to thoroughly prepare the surface. It is carried out the same way for concrete floors of apartments, regardless of the floor.
You may be interested in information on how to install a heated floor on a balcony with your own hands
Surface preparation
Although this stage of work is not considered the main one, it is extremely important, and the process must be taken seriously.
- The first step is to clean the surface from the old floor covering, the remains of the glue on which it was laid, or “blots” of concrete mortar that have hardened in certain areas of the floor.
Cleaning the floor surface from large irregularities
It is very important to thoroughly clean the entire surface, otherwise concrete build-up will interfere with the installation of insulating material.
- Then, all debris is removed from the floor, and dust from the surface is swept out to clean concrete.
Cleaning the surface from debris and dust
- Next, all holes and recesses are sealed - this work can be done using special repair putties. It will be more profitable to seal deep flaws with polyurethane foam.
Repairing large defects with polyurethane foam
After the foam has hardened, the protruding excess is cut off flush with the floor surface.
As it hardens, excess foam is cut off
- Next, the entire floor surface must be carefully primed with a special deep penetration compound.
It is better to apply the primer in several layers
The primer on the surface should dry well. In the case of obvious rapid absorption of the soil, it is applied in several layers, each time after the previous one has completely dried.
The lower part of the walls around the entire perimeter of the room must also be primed.
The walls also need to be primed to a height of 150 ÷ 200 mm, since a damper tape for screed or waterproofing material will be attached to this part of their surface.
- After the surface has completely dried, it must be leveled with a self-leveling compound. If the surface is mostly flat and only in some places there are depressions and differences, then leveling is carried out precisely in these areas of the floor.
It is advisable to fill large uneven areas with a self-leveling compound.
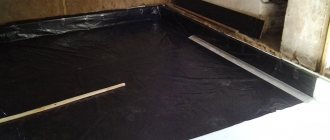
- If insulation will be carried out in a ground floor apartment, it is recommended to waterproof the floor and the lower part of the walls. To do this, it is best to use roofing felt, which is laid on mastic using a hot method or on “cold” bitumen mastic (mastic). The waterproofing material should extend onto the walls by 120 ÷ 150 mm.
Floor surface after high-quality waterproofing
On the ground floor this process is mandatory, but on the upper floors waterproofing can also be carried out - it will reduce the likelihood of possible flooding of the apartment below in the event of a water supply accident.
A damper tape must be glued along the perimeter at the junction of the floor and walls
- Next, a damper tape is glued along the entire perimeter of the room, at the junction of the floor and the wall. You can buy it ready-made or cut it yourself from foamed polyethylene with a thickness of 7 ÷ 80 mm. The glued tape should be 50 ÷ 70 mm higher than the future screed. Damper tape is necessary to compensate for expansion of the screed during temperature changes and prevent deformation of the coating.
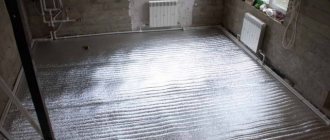
Floor insulation process
Since laying insulation on a waterproofing material differs from installing it on an open, prepared concrete floor, some stages of the work will vary.
Diagram of an insulated floor on a concrete floor slab
This diagram clearly shows what sequence the layers of a concrete floor insulated with Penoplex should have.
1 - flooring - it can be linoleum, parquet boards, laminate or ceramic tiles.
2 – layer of concrete screed.
3 – reinforcing mesh.
4 – waterproofing layer.
5 – insulation layer “Penoplex”
6 – concrete floor slab.
A semi-dry screed can be laid on a base insulated with Penoplex or a regular, “wet” screed can be poured, so the sequence of layers can be slightly changed.
If a waterproofing material is applied or laid on the surface, then “penoplex” is laid on top of it. In the case when installation will be carried out on a leveled concrete surface, the heat-insulating material is laid on a bedding of purified sand.
For example, consider the process of creating an insulated floor with polystyrene foam using semi-dry screed technology:
| Illustration | Brief description of the operation performed |
| In this case, the insulation will be laid on a concrete floor. If any pipe or insulating box with wires passes along its surface, then first insulation is laid on top, and a mark is made in the width and depth at the place where the communication passes. Then, a groove is drawn and cut out in which the pipe will be placed during installation. | |
| But before finally laying the insulation in place, the concrete surface is leveled with clean sand or a sand-cement mixture, the thickness of which should be 1.5 ÷ 2 mm. It is necessary to fill in minor unevenness in the floor. | |
| Sheets of insulation are laid on top of the cement-sand mixture. They are moved lightly with pressure along the poured layer back and forth, thereby leveling the fill underneath and creating adhesion between the surfaces over the entire area of the panel. | |
| This backfill is done sequentially, on floor areas for two or three slabs. Next, heat-insulating boards are laid, and then the same backfill is applied to the next section. Work continues in the same order until the entire floor surface is covered with polystyrene foam boards. | |
| Having finished installing the insulation boards, reinforcing mesh cards with cells of 80 ÷ 100 mm are laid overlapping on top of them. | |
| The reinforcement cards are connected to each other with wire, the ends of which are tucked under the metal bars of the mesh. | |
| Next, you need to make a semi-dry mixture for the screed. It is convenient to mix the solution directly on the insulated floor, after laying sheets of plywood or thick cardboard on it. A certain amount of dry composition is poured out of the bags onto an improvised flooring, and then a depression is made in the center of the slide with a shovel. | |
| Water is poured into the recess according to the proportions indicated on the packaging. | |
| After this, using shovels, mix the solution, which should not be too dry, but also not spread over the surface. While mixing, the dry mixture around is constantly sprinkled with water to reduce the amount of rising dust. | |
| The kneaded mass, when squeezed in a fist, should not crumble, however, and should not be so wet that water oozes out of it. | |
| The next step is to spread the finished solution over the reinforced surface using a shovel. This layer should have a thickness of 10-15 mm. After filling the entire floor area with it, the mixture is trampled down or rolled with a metal roller. | |
| Next, the reinforcing mesh must be raised to the top of the poured mixture. To do this, pick up the mesh with your fingers, lift it a little and release it. Thus, the reinforcing cards on the entire floor surface are on top of the semi-dry cement mixture. | |
| After this, the entire surface is again trampled down or rolled with a roller. | |
| If it was planned to lay a heated floor cable under the main layer of the screed, then the time has come for its installation. The cable must be solid. It is carefully unwound and laid according to a pre-planned pattern with a calculated step between the loops. | |
| The cable is carefully secured to the reinforcing mesh using wire or plastic clamps. The ends of these garters are also hidden in the solution. When installing and securing an electrical cable, it is not advisable to step on it, do not bend it, and turns of the wire must be smooth. It is very important to remember that “warm floors” are not installed in places where heavy furniture will be permanently installed. | |
| In the selected location for installing the thermostat, strictly in the center of the cable loop, a corrugated tube with a temperature sensor is laid. Its second end should be located in the groove on the wall going to the thermostat installation socket | |
| After completing the installation of the cable, the entire floor surface is covered with a semi-dry mixture to the specified thickness of the screed. | |
| After backfilling, the surface must be trampled or rolled using a roller. | |
| Using a laser or regular level, the height of the future screed is marked on the walls. Using these marks on the backfill, level areas are filled using a grater, and then stripes are created that will serve as beacons for leveling the rest of the screed along them. | |
| The strips are leveled and compacted using a rule. Instead of this procedure, you can install metal beacons, but in such a way as not to damage the “warm floor” cable, that is, before the last filling of the mixture. The guides can be secured with wire to the reinforcing mesh. | |
| In this case, the master aligns the main screed with the padded beacons. The leveling process is carried out using a rule that, with slight pressure, is guided along the beacons, collecting excess mixture. If defects form on the surface, the required amount of mixture is poured onto them and they are rubbed. | |
| After leveling as a rule, the master goes over the entire surface with a construction float, lightly moistening the surface as necessary. And in order not to damage the screed, you need to wear special pads on your feet under work shoes, reminiscent of snowshoes. | |
| Next, a trowel is used to bring the surface to perfect smoothness. | |
| The levelness of the screed is checked using the building level. It is considered ideal if there is not even a small gap between the floor surface and the level. | |
| After grouting, the screed is left to dry for a day. Then the excess damper tape is cut off. | |
| After removing the protruding part of the damper tape, it is recommended to thoroughly spray the entire floor surface with water. This procedure is carried out to strengthen the screed. |
After this, the screed should be left to dry and gain strength for two weeks. If it was planned to lay ceramic tiles on top, then you must wait at least 20 days before laying. Coverings such as laminate, linoleum or parquet boards are installed only after laying additional film waterproofing and always after complete drying of not only the screed, but the entire room.
You may be interested in information on how to insulate a wooden floor with your own hands
Penoplex-insulated ground screed
Floors are also insulated with Penoplex in a private house built on a strip foundation - this method is called ground insulation.
Such insulation is possible under the following conditions:
- if the floors of the room do not bear heavy loads;
- absence of a basement or basement under the house;
- if groundwater lies at a depth of at least 4000 ÷ 5000 mm;
— presence of heating in the house, otherwise freezing of the soil can lead to deformation of the screed.
It is better to choose Penoplex slabs for this method of thermal insulation with butt grooves, since there will not be a hard and dense surface underneath them. And the interlocking connections (lamellas) will prevent cold bridges from appearing and will reliably hold the slabs together in a single plane.
For these works, in addition to insulation, it is necessary to prepare additional building materials, the quantity of which will depend on the volume of space to be filled. This is clean sand, gravel-sand mixture, crushed stone, waterproofing material (roofing felt and mastic), cement, self-leveling mixtures, damper tape and reinforcing mesh in cards or rolls.
Insulation schemes
There are several schemes according to which the process of erecting an insulated polystyrene foam floor on the ground can be carried out. First, it’s worth understanding them:
Scheme 1
- In this option, the insulation is laid on a layer of compacted sand, under which a reliable gravel and crushed stone cushion is made.
Scheme 2
- The second insulation option consists of two ties, one of which is placed inside the “pie”, between sand and insulation, and the second covers the heat-insulating material. A “warm floor” system can be installed in the top concrete layer.
Scheme 3
- In the third option, medium-fraction crushed stone is used to backfill directly onto the ground, which is covered on top with a “cushion” of sand, on which Penoplex is then laid. Then the insulation is covered with waterproofing and reinforced screed.
You may be interested in information on how to insulate the floor in a private house
Laying an insulated floor on the ground
Installation of insulated screed on the ground
The most used scheme for laying an insulated floor on the ground is as follows:
- The soil is selected from the space where the backfill will be located, 550 ÷ 600 mm in depth.
- Next, the soil surface is well compacted so that it does not subsequently shrink, which can lead to deformation and cracking of the screed.
- Then, a layer of crushed stone or gravel is poured. Sometimes a mixture of these materials is used, which is also compacted as much as possible. The height of this layer should be at least 250 ÷ 300 mm when compacted.
- To increase the overall efficiency of thermal insulation, crushed stone is sometimes backfilled with middle fraction expanded clay. For the layer to be effective, its thickness must be at least 100 mm, and if the height of the space allows, then the entire 150 mm.
Expanded clay backfill will dramatically increase the degree of insulation of the room
- A cushion of medium-grained sand or granite screenings is placed on top of crushed stone or expanded clay. The layer is well soaked with water and rolled with a roller or compacted with a manual tamper. When compacted, the thickness of the sand layer should be at least 100 ÷ 120 mm. Its surface must be very well leveled and measured to the building level.
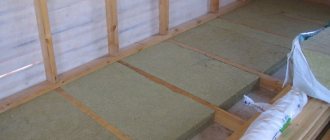
- The next step is to attach foamed polyethylene to the walls of the foundation tape around the entire perimeter, which will act as a damper tape. The material must have a width that will be 120 ÷ 150 mm higher than the intended screed. It should be noted that instead of foamed polyethylene, thin foam, about 15 mm thick, can be used.
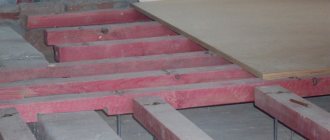
- Next, Penoplex is placed on top of the sand cushion, which should fit tightly to the leveled surface. To do this, each of the plates is moved back and forth across the sand until it takes the desired position. The insulating mats are connected using the tongue-and-groove grooves or lamellas on them. The thickness of the insulation should be 100 mm - this makes the coating more dense and stable.
Laying insulation boards on a sand bed
- The joints of the plates are sometimes taped with waterproof foil tape - this will completely eliminate the appearance of cold bridges.
- Some craftsmen prefer to lay dense polyethylene on top of the insulation, which serves as waterproofing for the screed. In any case, this layer will never be superfluous.
- Next, a reinforcing metal mesh is laid on top of Penoplex or polyethylene. If several cards are stacked, they are tied together with wire.
Reinforcement of the surface before pouring the screed
- Metal guides are leveled on the grid - beacons, which are leveled and fixed with slides of mortar. At the same time, you can install the underfloor heating cable if you plan to lay it. After the beacon system has hardened, you can proceed to pouring the screed itself.
Beacon guides installed, heating cable laid
- A screed is placed on top - for this, the mixed solution is laid out on the surface. It is aligned by the rule according to the installed beacons.
Leveling the screed according to the beacons
As in the previous case, semi-dry or “classic” concrete mixture can be used.
The screed is given the time established by technology for complete maturation. It is advisable to regularly, starting from the second day, moisten the surface that is gaining strength.
- After the screed has hardened and gained its brand strength, if necessary, the floor is filled with a self-leveling mixture. It is advisable to carry out this process if linoleum or laminate will be laid on top.
You can bring the surface to the “ideal” using a self-leveling compound
- When the leveling layer also hardens, the excess damper tape is cut off. Its upper edge should be flush with the surface of the screed.
Now you can install the selected decorative coating on the surface of the floor insulated with polystyrene foam.
During the presentation, it is not for nothing that attention was focused several times on the damper tape. The construction of a floor insulated with Penoplex or other slab heat insulators using such a tape is “floating” and not connected to the walls, so it does not depend in any way on their shrinkage. The main thing is to have a reliable and stable foundation, and this is especially important when installing an insulated floor on the ground.
And in conclusion, a video tutorial from a specialist on the correct installation of insulated floors on the ground. You can find out about the long-burning double-circuit solid fuel boiler at the link.
Mushroom dowel for insulation - types and features of use
Mushroom dowel for rolled thermal insulation materials is a widely used name in everyday life for façade fasteners for thermal insulation, which are used for attaching insulation materials to both the external and internal surfaces of the walls of single-story and multi-story buildings.
Mushroom dowel with thermal head
From this article you will learn what types of mushroom-type dowels exist, how to correctly calculate and select fasteners for thermal insulation, and the technology for fastening slab insulation boards with their help will also be discussed in detail.