Structure and parameters
Structurally, Izospan B is a polypropylene film with one smooth side and the other covered with a thin rough layer of fibers of the same material.
The smooth sealed surface of the film creates an impenetrable barrier to steam and water, and the fibrous coating is an excellent collector of condensation, which will remain on the film and will not get into the insulation of walls and ceilings.
Izospan B has excellent performance characteristics:
- vapor permeability not less than 7 mg/(m•h•Pa);
- water resistance is not less than 1000 mm. aq. pillar;
- tensile strength of at least 25 N/cm;
- operating temperature range from -60 °C to +80 °C.
The film does not lose its properties from exposure to direct solar ultraviolet radiation for 4 months. Izospan B is produced in rolls, strips 1.4 and 1.6 meters wide and with a total area of 35 m2 and 70 m2. What width and area to choose the material depends on the geometric dimensions of the protected surfaces.
Types of vapor barrier Izospan
All modern vapor barriers are universal for use on various surfaces. They differ only in their properties: strength, water resistance, ultraviolet resistance, vapor permeability.
The following types of Izospan are distinguished:
Vapor-permeable membranes for protection from wind and moisture Izospan:
- A;
- AM;
- AS;
- AQ proff;
Density from 110 g/m2 to 120 g/m2.
This type is used for external work (when insulating roofs and walls). It prevents moisture from accumulating under the roof, allowing condensation to evaporate freely. The structure of the material, on the one hand, has a water-repellent effect, and on the other hand, it has a rough surface. This feature can extend the service life of the insulation layer and the structure itself for many years. The Izospan diffusion membrane is made of polypropylene, which does not have a negative effect on humans. Also, the product is not susceptible to mold and any fungi.
Membranes are used in the following cases:
- insulation of attics and roofs;
- covering the walls of low-rise houses with siding;
- construction of frame structures;
- as ventilation of external insulation in high-rise buildings.
It is recommended to lay membranes on the roof at an angle of at least 35 degrees.
Waterproofing and vapor barrier films Izospan:
- IN;
- WITH;
- D;
- DM;
- R.S.
- RM;
Density from 72 g/m2 to 100 g/m2.
The two-layer material is used to protect both wooden and metal structures from the negative effects of water and moisture. Izospan film is treated with a special water-repellent agent, which makes it possible to use it as an additional layer when filling the floor with cement. Izospan is laid on the floor with the soft side on top of the insulation.
Tapes (RM and RS have an additional third layer, which allows them to be used as a water vapor barrier in ceilings between floors).
The purpose of vapor barrier films is as follows:
- arrangement of internal walls;
- protection of the floor from high humidity;
- insulation of roof insulation indoors;
- installation of floor coverings.
Vapor-waterproofing and heat-protective materials with an energy-saving effect: isospan fd, isospan fs, isospan fb and fx with a density from 90 g/m2 to 175 g/m2.
The canvases have high vapor barrier properties, which makes it possible to warm up the room faster and save on heating in winter.
Izospan fb and fd are made of craft material and lavsan, as a result of which they have increased strength and can maintain their characteristics at temperatures up to +140 degrees.
Foil isospan has reflective properties that reduce heat loss. The main thing to remember is how to properly lay the material on the roof: the metalized side should face the inside of the house. Films according to the size of the roll are attached to the ceiling end-to-end and glued together with special tape.
This type of insulation is used in the following cases:
- roof insulation;
- wall cladding at elevated temperatures;
- heated floor laying.
Different types of products are suitable for insulating any surface. Characteristics of Izospan received good reviews from users
Laying the material is not difficult, but it is important to follow the installation rules. The packaging contains information on installing insulation and how to properly lay it on walls, floors and roofs.
Here are some rules to follow:
- the wind and moisture protective membrane should fit snugly to the insulation with a small edge along the edges;
- Izospan AQ AS and AM need to be attached with an overlap (up to 15 cm) with a white surface to the insulation;
- the joints of the vapor-permeable membrane are fixed with adhesive tape and secured at the edges with a stapler;
- When used on roofs and walls, two-layer Izospan is glued with the smooth side to mineral wool or other insulation, and the rough side to the inside of the house. When installing the floor, everything is done the other way around.
Uninsulated pitched roofs
According to the manufacturer's instructions, steam and waterproofing materials Izospan D (DM) are used in non-insulated pitched roofs. If you plan to insulate the roof in the future, then the best solution would be to choose a reinforced superdiffusion membrane from the Izospan AQ series (proff or 150 proff).
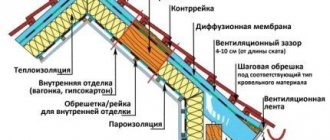
The structure of the roof in section looks like this:
Installation of waterproofing
Laying Izospan begins from the roof eaves, rolling it out on the rafters in horizontal sheets.
This is how the first strip of waterproofing is laid
The lower edge of the first row is lowered onto the drain drip and secured with Izospan KL+ tape.
Important! You need to remember how to lay Izospan on the roof: Izospan D (DM) - smooth side up, Izospan AQ - logo up.
The waterproofing is laid with a slight sag between the rafters - up to 2 cm. The upper panel should overlap relative to the bottom by at least 15 cm. If the length of the panel is not sufficient to cover the entire slope in length, then the extension is carried out along the rafter leg (the overlap size is similar - from 15 cm). All overlaps must be taped with Izospan KL+ tape.
On a ventilated ridge or ridge (when using Izospan D or DM), a gap about 10 cm wide is left in the waterproofing layer.
On a non-ventilated ridge or ridge (when using Izospan AQ proff or 150 proff), the waterproofing is laid with a bend on the opposite side of 15 cm and the joint is glued with Izospan KL+ tape.
The waterproofing of multi-gable roofs is more complicated than that of a gable, hip or half-hip roof. Here it is necessary to waterproof the valleys with a separate sheet.
Valley device
The film is rolled out along the entire length of the valley and fixed to the boards and rafters. The connection with the waterproofing of the slopes goes like this:
The waterproofing is also fixed to the rafters using a stapler. The final fastening is carried out using a batten attached to the rafters. Before installation, sealing tape is glued to the surface of the rail facing the waterproofing.
Advantages and disadvantages
Vapor barrier prevents moisture from reaching the insulation, increasing its service life
Vapor barrier membranes are a more reliable way to protect structures and insulation from moisture. A conventional waterproofing film does not allow air and steam to pass in both directions. If placed outside the insulation, it protects against water entering from the outside. However, it is powerless against condensation from indoor air. At the same time, it is impossible to waterproof the insulation on both sides.
Izospan allows steam to pass through from the heat insulator, but protects against entry from the outside. This protection mechanism provides many advantages:
- Neither steam, nor condensation, nor moisture enters the heat insulator. Dry insulation lasts much longer.
- Walls, roofs, and frame structures protected from steam do not deform, do not rot, or become moldy.
- Izospan serves as a wind barrier - it prevents the penetration of cold or humid air.
- The film is light, elastic, durable. Installing a vapor barrier takes a couple of hours.
- Izospan is made from polypropylene. This is recyclable plastic - more environmentally friendly.
The disadvantages of the product include:
- installation is prohibited in conditions of high humidity, rain or fog;
- before laying, the material must be kept in a warm room for a couple of hours;
- the cost of Izospan is higher than that of conventional film.
Material Specifications
To select the appropriate option, many film parameters are evaluated. The stronger it is, the longer it will last, and the more difficult areas it will protect. The higher the vapor permeability, the faster the moisture trapped in it will be removed from the insulation.
| Material | Density, g/sq. m | Vapor permeability, g/sq. m/day | Water resistance, mm. Water st | Temperature range, C |
| Izospan A | 70 | 22,4 | 330 | -60– 80 |
| Izospan B | 90 | 18,4 | 1000 | -60– 80 |
| Izospan C | 105 | 3,7 | 1000 | -60– 80 |
The vapor barrier material Izospan is a special breathable membrane.
It performs many important functions in the construction of houses:
- serves as protection of thermal insulation from moisture penetration;
- durable membrane prevents heat loss;
- a two-layer structure with a smooth and rough surface retains condensation and prevents it from evaporating and getting on the thermal insulation;
- a thin layer of the composition prevents the development of fungi and corrosion on building parts.
In this video you will learn how to apply the film
Product range overview
Varieties of Izospan A differ in strength and structure.
Each group of materials includes modifications with different structures. The mechanism of action of all membranes of one group is the same, but the structure and properties are different.
The Izospan A line includes:
- A - its vapor permeability is maximum at a higher density - 110 g/sq. m. When laying it, be sure to leave a gap for ventilation.
- AM is a three-layer membrane. It is installed without a ventilation gap: air passes between the layers of the vapor barrier and removes moisture.
- AS - has the same properties as the previous modification, but is denser - 115 g/sq.m. m.
- AQproff is a vapor barrier with a three-layer structure and reinforced reinforcement. Designed for external work. It is also used as temporary protection of a wall or roof while the main finishing is missing.
- A with OZD – fire-resistant vapor barrier. A non-combustible membrane is installed when insulating ventilation facades. Also, A with OZD is used during welding work to protect insulated structures located near the work area.
Izospan B and C are types of vapor barrier with anti-condensation film. Their purpose is the same and they differ only in strength.
Installation features
General requirements
So, the instructions for using this material provide for preparing the base for work. First of all, collect the necessary tools. You will need:
- Izospan V. Calculate the required amount of film.
- Scissors. They are used to cut material.
- Ruler for measuring fabrics.
- Galvanized nails or screws.
- Construction tape for connecting the canvases together.
- A special stapler for attaching material to the base.
- Wooden slats or metal profile (it all depends on the type of subsequent finishing).
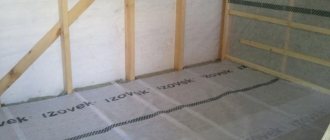
If everything is ready, you can begin installation. Most often, isospan B is laid on a layer of insulation. In this case, installation is carried out on a supporting structure or rough surface.
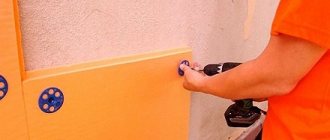
If you need to process the walls, then you need to start from the bottom. In this case, you need to move further upward. The canvases are laid with an overlap of 20 cm in both horizontal and vertical areas. If lining will be used for subsequent cladding, then wooden slats pre-treated with an antiseptic solution will be used to fasten the isospan.
If you use plasterboard for cladding, then galvanized metal profiles will be required to fix the film.
At the same time, keep in mind that the smooth surface of the isospan should adhere very tightly to the insulation.
In addition, according to the instructions, a gap of 4 cm must be provided between the vapor barrier and the finishing material to organize ventilation. The seams between the canvases are connected using special tape.
If the insulation is located on the outside of the room, then the vapor barrier in this case is attached to it from the inside of the room. Wooden strips or profiles are screwed to vertical rafters or beams.
When insulating a floor, the film is laid on a concrete or cement screed. The canvases are mounted with an overlap. In addition, a small approach should be left on the walls. 10-15 cm is enough.
HYDRO-WINDPROOF MEMBRANE
In the design of an insulated pitched roof, a hydro-windproof membrane is used to protect the insulation and load-bearing structural elements from sub-roof condensation, wind and precipitation penetrating under the roof covering. The hydro-windproof membrane does not prevent the escape of water vapor from the insulation into the ventilated gap.
INSTALLATION INSTRUCTIONS FOR HYDRO-WINDPROOF MEMBRANE
Installation begins from the bottom of the roof. The hydro-windproof membrane (Izospan AQ proff, Izospan AQ 150 proff, Izospan AS 130, Izospan AS, Izospan AM) is rolled out on the roof rafters with the logo side facing up. The lower edge of the first row of the hydro-windproof membrane is placed on the drip edge and glued to it using double-sided connecting tape Izospan KL+.
When laying a hydro-windproof membrane in the eaves overhang area, the formation of folds that would prevent the natural drainage of moisture from the surface of the material should be avoided.
The hydro-windproof membrane is laid without tension. Installation is carried out with horizontal sheets, overlapping (the width of horizontal and vertical overlaps is at least 15 cm). The material is fixed to the rafters using a construction stapler.
If the remainder of the roll is not enough to cover the entire width of the roof, then the vertical overlap of the membrane sheets is performed on the rafter leg. Excess laid material is trimmed along the rafter leg.
A vertical overlap of at least 15 cm wide is made on the rafter leg and the membrane is fixed using a construction stapler.
Next, installation of the material continues according to the standard scheme.
In the valley, the sheet of hydro-windproof membrane is rolled out over the valley boards along the entire length of the valley and fixed using a construction stapler along the upper surface of the valley boards, as well as along the rafters (no closer than 30 cm from the axis of the valley). The lower edge of the material is placed on the drip and glued to it using double-sided connecting tape Izospan KL+.
The sheet of hydro-windproof membrane from the left slope is placed onto the valley with an overlap of at least 15 cm from the valley board of the right slope and is fixed using a construction stapler along the upper surface of the valley boards, as well as along the rafters (no closer than 30 cm from the axis of the valley). Excess material is cut off. The lower edge of the hydro-windproof membrane fabric from the left slope is glued to the drip edge and to the material laid in the valley using double-sided connecting tape Izospan KL+.
The sheet of hydro-windproof membrane from the right slope is placed onto the valley with an overlap of at least 15 cm from the valley board of the left slope and is fixed using a construction stapler along the upper surface of the valley boards, as well as along the rafters (no closer than 30 cm from the axis of the valley). Excess material is cut off. The lower edge of the hydro-windproof membrane on the right slope is glued to the drip edge and to the material laid in the valley using double-sided connecting tape Izospan KL+.
In the ridge/ridge area, the hydro-windproof membrane is bent over the ridge/ridge to a distance of at least 15 cm and fixed on the opposite slope using a construction stapler. The overlap is glued with double-sided connecting tape Izospan KL+.
To ensure the tightness of the hydro-windproof layer, it is recommended to glue the overlaps of the laid sheets of the hydro-windproof membrane with double-sided connecting tape Izospan KL+; The junctions of the hydro-windproof membrane sheets with pipes, roof windows and other roof elements must be glued with Izospan ML proff connecting tape.
Finally, the hydro-windproof membrane is secured to the rafters with antiseptic wooden counter-battens. The height of the counter batten is selected depending on the height of the ventilated gap, which is determined in accordance with SP 17.13330.2017 “Roofs”.
To seal the mounting points of the counter rails, a Self-adhesive Sealing Tape is used, which is glued to the counter rails before their installation.
Counter battens are mounted vertically along the rafters (with a sealing tape to the hydro-windproof membrane) and secured with nails or self-tapping screws.
When installing counter-battens in the valley area, it is necessary to leave a gap of at least 5 cm between the counter-battens and the valley boards to remove moisture.
Lathing or continuous plank flooring is mounted along the counter-battens, depending on the type of roofing.
To ensure ventilation of the under-roof space in order to ventilate water vapor and condensate, the following must be provided:
The ventilation system must be designed in such a way as to prevent air stagnation in the under-roof space.
The minimum requirements for ventilation of the under-roof space are specified in SP 17.13330.2017 “Roofs”.
Which side is the material laid on?
So, you have purchased the required amount of film of one type or another, but do not know how to install it correctly? Then you definitely need to know which side the film is laid on. Even if you see Izospan for the first time, determining the correct side for its installation will not be difficult. Distinctive features of the internal and external parts of the material are as follows:
- coloring. As a rule, manufacturers paint different sides of the sheet in different colors. It is recommended to choose just such a material, since you can quickly and easily determine which part of it should be laid. In this case, installation is carried out with the light side facing the insulation;
- Izospan is sold in rolls and is rolled up with the waterproofing part inside. That is, when unwinding, it is the waterproofing that will be on top. It should be on the insulation;
- did you notice that there is lint on one side? This means that the reverse (smooth) side must be mounted on the insulation. Villi are necessary in order to prevent moisture from entering the room.
As you can see, it is not difficult to determine the required side on which Izospan is laid to the insulation. Now you need to properly lay it on the wall
First of all, pay attention to the correctness of the calculations and double-check everything again! If there is not enough material, it is better to buy more immediately so as not to stop the work halfway. Izospan sheets are laid overlapping each other to provide reliable and high-quality vapor barrier
Be sure to read the installation instructions so as not to miss important points during the work.
Izospan is one of the simplest but most reliable vapor barrier materials
There is nothing particularly complicated in its installation; it is important to follow every step of the work. The main thing is just to correctly decide which side it needs to be laid in relation to the insulation in order to get truly reliable protection
Please note that Izospan A, B, C, D and AM are laid out in the same way, and the definition of the parties in this case does not have any special differences. In general, try to purchase film with color differences, then you will not have any problems identifying the correct side
https://youtube.com/watch?v=xTWpLwH8-QI
Izospan D
High-strength, completely moisture-proof waterproofing material. Polypropylene sheet with one-sided laminated polypropylene coating. The versatility of the moisture-vapor-proof material implies widespread use in construction technologies for the construction of any type of structure.
Izospan D successfully withstands moderately strong mechanical loads, is resistant to tearing, withstands strong gusts of wind, and in winter copes with heavy snow loads. In comparison with other similar films, Izospan D has gained fame as the most durable and reliable option.
Izospan D Area of application
In any type of roof, as a barrier preventing the formation of under-roof condensation. Widely used in the installation of hydro- and vapor barriers during the construction of buildings and structures. Protection of wooden structures. The material largely resists negative atmospheric phenomena.
Izospan D is often used on construction sites as a temporary roof covering and installation of a protective wall in objects under construction. Such a roof or wall can last up to four months.
Type D is especially popular when constructing concrete floors that require a waterproofing layer to protect against earth moisture.
Application
- In non-insulated roofs as protection for wooden structures;
- As protection against roof condensation;
- Protection from negative atmospheric phenomena;
- In the arrangement of basement floors;
- Installation of concrete floors.
If there is a task to preserve the internal parts of the home from the influence of vapors generated as a result of life activities, and to extend the service life of the insulation, then the correct solution would be to use the vapor barrier option with the letter “D”.
Insulated pitched roofs
MATERIALS USED
* In the case of insulation of an attic space using a U-shaped pattern or a trapezoidal pattern, it is recommended to use reinforced material Izospan AQ proff as hydro-wind protection.
** The use of reflective vapor barrier makes it possible to reduce heat loss in a room, making it possible to save up to 10% on its heating (according to the results of laboratory tests) due to the ability of the metallized surface to reflect thermal radiation.
Izospan B: description and application
To prevent moisture and water vapor from entering insulating coatings and walls from the internal volumes of the house, Izospan V is used. Its structure allows you to create a kind of barrier for steam: a surface for collecting and ensuring gradual evaporation of condensate. Another property of Izospan B is the protection of the air in the house from the penetration of particles from insulation and wall materials.
Scope of application are:
- internal surfaces of walls and ceilings in attics and attic floors;
- internal surfaces of living room walls made of any material;
- surfaces of interfloor and basement floors.
How to protect your home from excess moisture?
There are several ways to protect your home from the harmful effects of water vapor. Firstly, ensuring good ventilation, in which moist indoor air will be constantly released into the street, and fresh, drier air will begin to replace it.
Secondly, the use of water- and vapor-tight barriers that do not allow moisture to pass through, but allow it to slowly evaporate.
With this method of protection, water does not get into the insulation and onto the walls, and the resulting condensate evaporates directly from the protective coating.
Vapor barrier laying technology
After choosing a vapor barrier, it is also very important to install it correctly. This is not difficult, but requires care when installing, since in most cases the vapor barrier material has an external and internal surface in relation to the insulation
Choosing a side
Among builders, there are two opinions on which side to lay the vapor barrier against the insulation. Some believe that the vapor barrier should be attached only to one “correct” side, while others believe that it does not matter which side the vapor barrier is attached to. All vapor barrier membranes come in two types:
- for one-sided installation, this type of vapor barrier is attached to only one side;
- double-sided, which can be worked with regardless of its side.
Before installing the vapor barrier, you should carefully study the instructions included with the material itself. If there is none, remember these simple rules:
- The outer side of the vapor barrier has a pile in which moisture is retained and then evaporates. The inner one is smoother. It is the smooth side that should come into contact with the insulation.
- If the vapor barrier material has a different color, then the light side will be the inner side and should lie on the insulation.
- Usually the vapor barrier is sold in rolls. When rolling out such material, the side that will be facing the floor will be the inner one.
If you still have doubts, you can do a small experiment. Take a small piece of vapor barrier membrane and cover a mug of hot water with it. Condensation will appear on the side of the film that is waterproof, which means the inside.
Installation of vapor barrier film on the ceiling
After determining the inner and outer sides of the vapor barrier, there are no further questions about how to properly lay the vapor barrier. But still, a few nuances need to be taken into account:
Before laying the vapor barrier, it is necessary to carry out preparatory work
First of all, it is necessary to treat all wooden elements with special agents against insects, fungus, rot and fire. Subsequent work should be carried out only after the impregnation has completely dried. Irregularities on the surface to which the vapor barrier will be attached should not exceed 0.5 cm. If the house is located in a climate zone where there are frosts below -25˚C in winter, then a vapor barrier must be laid on both sides of the insulation. When installing, pay special attention to the corners
It is important that the corners are covered with a solid film. It must be well stretched. At the joints of the canvases, the vapor barrier must be laid with an overlap of at least 10-15 cm. With less overlap, moisture can penetrate inside
With less overlap, moisture can penetrate inside
It is important that the corners are covered with a solid film. It must be well stretched. At the joints of the canvases, the vapor barrier must be laid with an overlap of at least 10-15 cm. With less overlap, moisture can penetrate inside
Seal the joints with tape
You need to use special tape, preferably the same brand as the vapor barrier. The film is attached to the beams using a stapler. If installation is carried out between beams, you can use slats and screws with a wide head.
Laying vapor barrier on walls and ceilings
After installing the insulation on the walls, a vapor barrier film is laid. Which side to lay towards the insulation was discussed above. You just need to consider the following:
- The vapor barrier must be well tensioned so that it does not sag, there are no unevenness and so-called waves.
- The joint should overlap 5-10 cm and be securely taped with wide tape.
- The film should fit tightly to the insulation.
- Near window and door openings, it is necessary to leave 2-4 cm of vapor barrier film “in reserve”, since shrinkage or deformation of the material may occur during operation.
- There should be a small gap between the vapor barrier and the facing material for ventilation and condensate removal.
- After laying the vapor barrier, it is necessary to cover it with finishing material as soon as possible, since this material is “not friendly” to sunlight. If you leave the vapor barrier uncovered for just one season, ultraviolet radiation will do its dirty work and all your work will go down the drain, and the vapor barrier membrane will have to be replaced.
When laying a vapor barrier film there is nothing complicated and no special skills are needed. The main thing, as with any other work, is to be careful, take your time and read the instructions of the manufacturers of the material you are working with. Then there will be fewer mistakes, the house will be warmer, the mood will be excellent and you will be proud of your creation.
Types of Izospan
There are several types of such material:
- Class A insulator.
- Class B insulator.
- Class C insulator.
- Class Isolator
Izospan A
This material is used as wind protection, as well as protection against condensation on the inside of the roof and walls. It is attached to the outside of the insulation for the roof or under the facing material for the facade. This wind-moisture-proof single-layer membrane improves the properties of insulation and extends the service life of the entire structure.
Izospan A is absolutely harmless. It is easy to use and has good mechanical strength.
The design of the roofing pie, starting from the inside, implies the following sequence:
- interior decoration,
- Izospan B,
- rafters,
- insulation (placed between the rafters),
- Izospan A,
- counter rack,
- roofing covering.
There is also Izospan AM. This three-layer membrane is designed for installation directly on top of the insulation. Which side should I lay Izospan AM on? It spreads with the red porous side inward.
Izospan B
This insulator already belongs to the category of hydro- and vapor barrier films. It is made of polypropylene.
Its outer side has a smooth laminated surface, while the other side has a porous or rough surface. Thanks to this surface, condensation can accumulate and then evaporate without penetrating into the insulation.
It is used to protect walls, partitions, roofs and interfloor and basement floors.
Izospan S
Instructions for use for floors, roofs and other areas show that it has hydro- and vapor barrier properties, but in this aspect it surpasses the performance of Izospan B. One side is smooth, and the other, with the help of a rough surface, retains drops of condensate, which subsequently evaporate.
To provide a vapor barrier for the floor in a wooden house, Izospan S plays an important role. For example, it is necessary when installing parquet or laminate flooring. If a concrete screed is poured onto the floor of a wooden house, hydro- and vapor barrier is provided by Izospan S. This insulator is also used for waterproofing roofs under metal tiles.
Izospan D
This is a universal polypropylene material that has very high strength. This vapor barrier floor membrane is used for concrete or earthen foundations where there is high humidity.
A special feature of the insulator is its resistance to ultraviolet radiation, which allows it to be used for covering temporary structures. Another plus is the ability to withstand snow loads.
Insulated pitched roofs
The roofing pie of an insulated pitched roof looks like this:
If additional insulation of the slopes is necessary from the inside, a counter-lattice is installed along the rafters for another layer of insulation.
Waterproofing
Izospan AQ (proff or 150 proff), AS 130, AS, AM, A membranes are used as waterproofing. The choice of a specific material depends on the type of roofing and the attic insulation contour.
So, for combined roofs with a U-shaped (or trapezoidal) insulation scheme, the roof of which has a relatively small insulation area, it is recommended to choose reinforced membranes with high vapor permeability (water vapor flow density) - Izospan AQ or AS. And, for example, Izospan AM, according to the instructions for use, has almost 2 times less tensile strength and 12% lower maximum water vapor flux density.
Features of waterproofing installation
How to properly lay waterproofing is described in the previous chapter. The only difference between the waterproofing of an insulated roof is that there is no gap left for superdiffusion membranes in the ridge area - the vapor-permeable properties of the materials are sufficient to ventilate moisture from the roofing pie.
Scheme of waterproofing with superdiffusion membrane
In an insulated roof with a slope angle of more than 35°, you can use the Izospan A diffusion membrane. It is mounted on the rafters with a slight sag, but so that it does not touch the inside of the insulation. As a result, there should be two air gaps under the roof measuring 3-5 cm:
The peculiarity of this material is that on one side it has a rough surface that can hold condensate until conditions are created for its weathering. And this side is placed inside the roof.
Such a device (with two ventilated gaps) is recommended if a large amount of condensation forms on the inside of the coating:
In this case, a gap is left near the waterproofing in the area of the ridge to allow condensation to erode.
Important! If Izospan A lies on the insulation, it will lose part of its waterproofing properties.
On roofs with a slope angle of less than 35°, Izospan superdiffusion membranes of AM, AS or AQ brands are used. They can also be laid on slopes with any slope angle. These materials are laid directly on the thermal insulation. They are suitable for all types of roofing, including profiled metal coverings: corrugated roofing sheets and metal tiles.
Vapor barrier
Izospan grades RS, B, DM or C are used as a vapor barrier for insulation. These are materials with a rough surface that can retain moisture vapor until conditions for its weathering appear.
This is what the side with the anti-condensation function looks like
Important! You need to remember which side the vapor barrier is laid on - the rough side facing the attic room (used attic).
The rules for laying Izospan RS (B, DM, C) in the roof are as follows:
You can use reflective vapor barrier Izospan RF (FS, FD, FX). It is laid with a metallized surface facing the room. The installation rules are the same as for anti-condensation vapor barrier.
Installation of reflective vapor barrier
A strip is stuffed on top of the film, to which the sheathing is attached. The gap is necessary to create good conditions for both types of vapor barriers to work effectively.
“Izospan B” - which side to lay towards the insulation, frame, floor
Although it is not a monopolist in the building materials market, it occupies the entire niche of vapor barrier films and membranes. Their products are a windproof, vapor-permeable, waterproofing membrane under the Izospan brand. Depending on the structure, density and scope of application, series A, B, C, D, E, F, K, etc. are produced. Basically, these are two-layer nonwoven materials, where one side is smooth, the other is fleecy and/or rough.
Using Izospan B film as an example, we will tell you which side to lay towards the insulation, how to lay it correctly and what they are generally intended for.
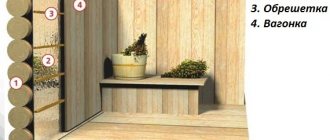
Use for walls on the room side
Most often, this vapor barrier is used to insulate vertical walls and enclosing structures from the inside. Next, we will discuss in detail how “Izospan V” is installed in this case. Instructions for use for walls are as follows:
- First, a beam is attached to the surface, the width of which is equal (or slightly greater) to the thickness of the insulation. When used for finishing drywall sheathing, a metal profile can be used.
- Next, slabs of mineral wool or expanded polystyrene are installed.
- On top of them - on bars, slats or staplers - the vapor barrier "Izospan V" is fixed.
- Next, the finishing is installed.
Structure and parameters
Structurally, Izospan B is a polypropylene film with one smooth side and the other covered with a thin rough layer of fibers of the same material.
The smooth sealed surface of the film creates an impenetrable barrier to steam and water, and the fibrous coating is an excellent collector of condensation, which will remain on the film and will not get into the insulation of walls and ceilings.
Izospan B has excellent performance characteristics:
- vapor permeability not less than 7 mg/(m•h•Pa);
- water resistance is not less than 1000 mm. aq. pillar;
- tensile strength of at least 25 N/cm;
- operating temperature range from -60 °C to +80 °C.
The film does not lose its properties from exposure to direct solar ultraviolet radiation for 4 months. Izospan B is produced in rolls, strips 1.4 and 1.6 meters wide and with a total area of 35 m2 and 70 m2. What width and area to choose the material depends on the geometric dimensions of the protected surfaces.