A brick stove is the main functional element of any Russian steam room, which is traditionally made of heat-resistant red brick. The construction market offers a wide range of ready-made stove designs, but bathhouse owners decide to build a Russian stove with their own hands.
A classic brick stove for a bathhouse with a heater, built with one’s own hands, makes it possible to safely heat the room, maintain optimal temperature conditions, produce clean and thick steam, and is a decorative interior element.
Selecting material for constructing a furnace
Currently, there are many available schemes for constructing a furnace, but a novice master is recommended to choose the simplest drawing.
What kind of brick should a stove be built from? Choosing the right building material is not easy. If you have limited financial resources, you can choose red brick of dubious quality.
However, the dimensions of such material rarely correspond to accepted standards; for this reason, quite wide seams can be obtained - up to 11 mm, which is absolutely unacceptable when constructing a stove.
Often, a sauna stove is built from fireclay brick, which consists of 75% heat-resistant clay. This material is resistant to overheating and high humidity, cracking and deformation. In terms of technical and operational characteristics, fireclay bricks are superior to all existing analogues, but the price is much higher.
The firebox is built from fireclay bricks, and it is better to build a chimney from fire-resistant red bricks.
For construction work you will need clay, which you can get yourself or purchase at a specialized point along with bricks.
To build a brick stove, you need to prepare the following materials:
- fireclay;
- heat-resistant brick;
- coarse clay and sand;
- a grate, a door for the ash pit and combustion chamber, cleaning wells, a cast-iron stove and a grate;
- asbestos cord;
- heating tank;
- zinc wire;
- corner;
- roofing felt
These materials are enough to build a simple brick oven with your own hands.
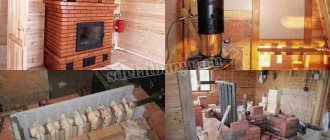
Furnace appliances
We must not forget that cast iron and brick have different coefficients of thermal expansion. Cast iron expands when heated more than brick, so if cast iron stove appliances are tightly seated in brickwork, the cast iron will expand and tear the brick . Therefore, all devices: grates, fire doors and water tanks must be installed with clearances.
Grate
We lay the grate freely without mortar with gaps on all sides of at least 5 millimeters. The grate must be able to be easily replaced in case of burnout.
Blower, cleaning and combustion doors
Important! Doors are still checked in the store to see if the door leaf fits tightly to the frame. It is necessary to identify possible distortions, how the door closes and opens on hinges, how the latch works, and whether there are mounting holes.
Insert soft knitting wire into the mounting holes on the door frame and twist the wire into a bundle. We lay mortar on the brick where the door is installed. We install the door, check the vertical and horizontal levels and temporarily fix it with bricks placed like braces. Then we put the ends of the wire into the masonry seams.
Fixing the door with bricks
We temporarily fix the door with bricks. We twist the knitting wire into a bundle. Then we continue laying around the doors. We cover the door from above or with two whole bricks, half the length of the brick on each side. Or a whole brick into a “castle”. The combustion chamber door must be additionally wrapped with asbestos cloth . It’s a good idea to secure it on top with a metal strip with a cross-section of 25×2 millimeters, and seal the ends of this strip into the masonry.
Covering the stove door from above with two bricks
Closing the stove door into a “lock”
Chimney
We all love to heat up the sauna stove very much.
- Therefore, the temperature of the flue gases at the outlet of the furnace reaches 750 degrees . Moreover, this can last for several hours.
- And the normal operating temperature of factory-made stainless steel metal chimneys is only 450 degrees. True, metal chimneys allow a short-term increase in temperature up to 900 degrees, but for 15–30 minutes, and not for several hours.
- In addition, the binder of most basalt insulation inside the sandwich pipe begins to break down at temperatures above 400 degrees.
Our advice! The way out of this contradiction is as follows: make the first element of the chimney after the stove from a thick-walled steel or cast iron pipe. This segment will take the main temperature “blow”.
Double-wall insulated sandwich pipe
The first element of the chimney is single-walled. And after it comes a double-walled sandwich pipe insulated with a basalt slab.
Preparing construction tools
To build a brick sauna stove with your own hands, it is recommended to prepare working tools:
- grinder with a circle;
- electric drill with a special attachment;
- wide plastic container for solution;
- Master OK;
- level;
- tape measure and pencil;
- metal strips.
This is a basic list of tools, but if desired, it can be expanded with additional equipment.
At the stage of choosing a place where a small brick oven will be located, as well as preparing a construction project, it is important to take into account the basic requirements for the future design:
- Firebox safety doors should face the door.
- The base for the stove device must be at least 75 × 75 cm in size and up to 22 cm in height.
- The shelves should be located along the wall near which the stove is installed.
- Heating stoves made of bricks are built in compliance with the technological gaps between the walls of the structures and the walls of the steam room.
What types of wood-burning stoves for baths are there: comparison
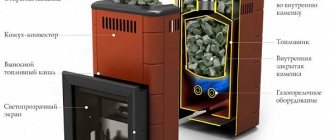
Wood heating appliances do an excellent job of heating large and small rooms. You can make such a stove from refractory bricks or thick-walled metal sheets and cast iron. Brick kilns are capital structures with heavy weight that require a solid foundation. Metal models are more compact and do not take up much space. Let's compare these two types.
| Brick oven | Metal oven |
| pros | |
| Retains heat for a long time thanks to the large number of heated stones. | It will cost less than brick. |
| Creates a gentle heat that does not burn the skin and mucous membranes, and deeply warms the body. | Can be mounted in any corner of the steam room and does not require much space. |
| When using high-quality bricks, it will last for more than one generation of house residents. | Heats up the steam room quickly – in a couple of hours. |
| Simple and safe to use. | Saves fuel. |
| Minuses | |
| Long kindling – up to 5 hours. | Cools down quickly without adding fuel. |
| Takes up quite a lot of space in the steam room. | The cabinet becomes very hot and may cause burns or thermal shock. |
| In terms of the cost of the material and the cost of laying it from a professional craftsman, it is more expensive than its metal counterpart. | It may burst due to a sudden change in temperature (do not splash cold water). |
| Needs a reinforced foundation. | Over time it burns out and requires replacement. |
Owners of home baths are increasingly choosing a combined version of the stove: the inside is welded from metal, the outside is lined with refractory bricks. This tandem allows you to use all the strengths of stone and metal without the risk of burns and with significant fuel savings.
Homemade stoves made of metal and brick are not as expensive as purely brick ones and are quite easy to install
Arrangement of the foundation
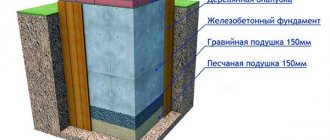
Laying brick stoves begins with laying out the foundation, which is the basis for any heating structure, ensuring its strength, reliability and durability.
According to the finished bathhouse design, markings are made at the construction site and a foundation pit up to 65 cm deep is dug. Its width should exceed the dimensions of the stove by 10 cm.
A layer of sand 18 cm thick is laid on the bottom of the pit and moistened with water, then covered with crushed stone, stones and broken bricks. All layers are thoroughly wetted and compacted. The pillow is kept for some time to shrink.
After complete shrinkage of the sand layer, removable formwork is installed, reinforced with an armored belt made of thin reinforcement.
Important! A technological gap of 12 cm must be left between the walls of the formwork and the earthen edges of the pit.
The formwork is filled with concrete mixture to the boundary level, which is 17 cm below the soil surface. The mixture is prepared in proportions - 1: 3 (three parts sand to one part cement) with the addition of the required amount of water.
After the concrete has completely hardened, the formwork is removed, and the existing voids are filled with fine gravel.
Folded roofing felt is used as a waterproofing layer for the foundation. The material is laid on a concrete base layer strictly according to the size of the site.
Types of stones
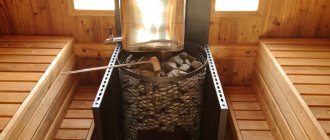
The distribution of warm air and steam inside the steam room occurs due to the stove heater. As a rule, from 1 to 5 kg of stones per 1 m3 are laid inside a brick sauna heater.
Important criteria that determine the choice of stones are:
- heat capacity, that is, the ability to accumulate and release heat into the air;
- melting point - or the threshold to which stones can heat up - it is desirable that this indicator be as high as possible;
- weight – it is preferable that it be high;
- strength - it is important that when heated, the stones do not become brittle and do not crumble or crack.
Basically, the types of stones chosen for the heater are basalt, quartzite, granite, diabase or jadeite (more details: “How to lay stones in a sauna stove correctly, which stones are best to use”). Each of them meets the requirements to a greater or lesser extent.
Materials that should never be used for the heater:
- marble;
- shell rock and dolomite due to the presence of magnesium and calcium carbonates;
- limestone - when sharply cooled with water, it can release gas;
- silicon rocks - tend to crumble and there is a risk of getting burned;
- ores containing asbestos, sodium or sulfur;
- sedimentary rocks.
A number of professionals use cast iron for laying the heater, which meets all the criteria for the operation of the stove.
Mixing connecting masonry mortar
To ensure a reliable and durable brick stove for a bath, it is important to properly mix the masonry mortar. The accuracy of the proportions depends on the quality of the clay - its fat content.
To mix the solution, clay and sand are used in a ratio of 1: 2 (for one clay part, 2 sand parts). The clay is pre-soaked in a small amount of water.
To do this, the material is placed in a container, filled with water and mixed thoroughly. To simplify the kneading process, you can use a drill with an attachment. The clay is kneaded until it becomes sufficiently plastic.
Only after this is slightly damp sand introduced into it in parts and stirred. A well-prepared stove solution should be viscous.
One batch of mortar should not be too much or too little; it should be prepared just enough to be enough to complete 2-3 full brick rows.
Preliminary work
Choosing a brick
High quality oven material
Before putting the stove in the bathhouse, you need to choose a brick, and it must be of high quality. Otherwise, certain problems may arise, for example, if the dimensions do not correspond to the standard, it will be difficult to maintain the dimensions of the stove when laying. In addition, the seams will either be too large or simply different.
Preparing clay
The clay must be well soaked
We prepare the clay in advance; the most suitable material is the one mined at a depth of about a meter. It is first purified from impurities that may be present in it.
The clay is soaked in a container of sufficient volume for several days. After soaking it is much easier to work with. Dry clay is difficult to process and therefore requires the use of additional tools.
Preparing sand
The sand must be sifted thoroughly
The sand is also pre-cleaned of debris; this is easier to do by sifting. It is especially necessary to ensure that pebble crumbs do not get into narrow stove seams.
Mix the solution
Thorough kneading is the key to high-quality masonry
In order to prepare a high-quality solution, the clay is kneaded well. Experienced stove makers use a special tool called an oar. But it can also be replaced with any other solid and convenient object.
After the clay is kneaded, water is added to it and, using a puncher with a mixer, the mixture is brought to the state of thick sour cream.
Then prepared sand is added to this mixture, which should be wet. If the clay is too oily, then the sand and clay in the solution should be in a two to one ratio.
Testing the solution is as follows: a clean stick is dipped into the solution, which is considered ready. If a layer of approximately two millimeters remains on the stick, then this is a good mixture. With a smaller layer, clay is added, with a larger layer, sand.
Checking the quality of the solution is very important
Advice: the solution does not need to be prepared in large volumes; it is best to prepare it in one bucket in one batch. Otherwise, over time, its quality will be worse, and it will be more difficult to lay the brick, and the quality of the masonry itself will be worse.
After the solution is ready, you can begin a process such as laying a sauna stove.
Step-by-step execution of brickwork of the furnace
The procedure for erecting brick walls for a bathhouse is determined by the construction scheme - the order. The proposed step-by-step instructions consider alternate brick laying.
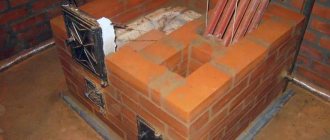
Bricklaying from 1st to 7th row
Beginning craftsmen have a completely logical question: how to build a stove from the foundation (the first 7 rows)?
- The first row is laid out directly on the waterproofing layer of the foundation. The bricks are pre-wetted with water. Corner elements are made at a right angle, which is checked with a corner. The edges require careful measurement, which will prevent the appearance of unwanted gaps in the stove structure. In this case, the thickness of the finished joints between the bricks should not exceed 6 mm. To better stack the bricks, you need to properly mix the mortar.
- The second row of bricks is laid out in a similar way, with each subsequent element being located at the joints of bricks from the bottom row. Bricks for the third row should be laid according to the same pattern. A blower door should be installed here. It is fixed with thin wire and steel strips.
- Before proceeding with laying the next row, it is recommended to check the evenness of the walls being erected vertically and horizontally, as well as the accuracy of the angles. In this row, wells for ash and gratings for air ducts are installed. To do this, small holes of 1 cm are made in the elements with gaps for mounting the grate. Under the installed grille, the rear wall is made slightly rounded.
- In the sixth row, the installed blower door is fixed, and in the seventh row, the installation of the grate and firebox door is completed. To ensure safe heating of the steam room, the stove door must be made of cast iron. At the moment this is the most durable and heat-resistant material.
Bricklaying from the 8th to the 23rd row
- How to fold the stove from the 8th row until installing the chimney? When forming the eighth row, a partition is installed, which serves as the basis for arranging the chimney. Using a similar principle, brickwork is carried out up to the 14th row inclusive, on which metal channels will be installed. In this case, it is necessary to create a small opening in the front wall of the furnace for the vertical installation of the water tank so that it is in full contact with the channels.
- To lay out the fifteenth row, ½ bricks are used, which are placed at a slight angle among themselves. This will serve as the basis for the dividing partition. Up to the 18th row, the laying of bricks is carried out by analogy with the first rows of the structure.
- When laying the nineteenth row, a door is installed to allow steam to escape. Next, metal strips are installed, with further laying of the remaining rows. This is necessary for securely fixing the door frame for steam exhaust and installing a hot water tank, which is lined with bricks.
- From the 23rd row, a chimney pipe is installed, which determines the final height of the structure.
Kinds
There are 4 main variations of sauna stoves:
- "in white";
- "in black";
- "in gray";
- with a stove.
Black stoves do not have a chimney and have been used in villages across the country for many decades. All fumes and smoke escape through the steam room itself - naturally through the cracks and gaps of the roof. Of course, this creates the best steam and aroma in them, and it becomes very pleasant to wash, but at the same time you have to wait until all the wood burns out. When choosing black stoves, it is recommended to treat the internal walls of the bathhouse with a special solution that can prevent the formation of soot residues. Black baths have a very high efficiency, and therefore, when using them, you can save on fuel.
Next in complexity are stoves that are heated “gray-style.” They have a chimney, and therefore the bathhouse warms up much faster. However, you still have to wait until all the fuel burns, as soot is deposited on the stones. The walls are not stained with soot, but when liquid is applied to the stones, a small amount of soot microparticles appears along with the steam from the furnace. This design can be direct-flow or with channels. In the first case, the stones placed above the firebox end up on fire, and the gases escape into the air through a pipe, and in the second, through two valves.
White stoves heat the room for up to 12 hours, but do not pollute the stones, therefore they are considered the most environmentally friendly. The process occurs as follows: the fuel heats the overlying metal plate, and from it the stones, which will store heat for several hours. This heating method appears to be the most expensive - a large amount of firewood and other materials are consumed. Previously, the box in which the stones were placed was made of ordinary black iron, but now it is made of heat-resistant stainless steel. Traditionally, in white baths there are two separate spaces: a dressing room and the steam room itself. To warm both rooms, one side of the stove opens into the dressing room.
In the fourth case - with a stove - the stones and a tank of water, the placement of which can be changed, are heated by two cast-iron stoves. One of them is placed above the firebox, and the second - above the chimney. The slabs should be fenced on three sides with a brick screen, which will ensure high water temperatures. Such furnaces are usually built independently.
According to the type of fuel used, furnaces are distinguished:
- wood;
- heated by coal;
- natural gas;
- diesel fuel;
- wood chip briquettes;
- electricity.
Based on the type of construction, they are divided into furnaces:
- with an open heater (typical for a Finnish sauna);
- with closed heater;
- combined.
Intermittent heater stoves are usually chosen by large families, when many people go to wash, but the duration of the steaming process is short. They have thick walls that retain heat for a long time and provide the necessary service life of the bathhouse. The smoke passes through the stones before entering the chimney. The volume of stone backfill in such a heater is much larger than in continuous heaters.
Continuous sauna stoves have minimal wall thickness and the volume of stones located in an insulated metal box above the firebox. Their main advantage is the ability to use the steam room during the heating process. Stoves with a closed heater are also safer. Heating is carried out inside the housing through the wall, which is common to the heater and firebox. The stones retain heat much longer, and the air in the steam room has a stable optimal temperature. It will take about 4-5 hours to warm up the air in such a bath.
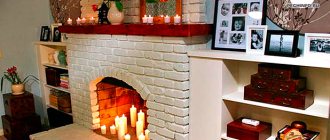
Separately, it is worth highlighting such a variety as a stone stove-fireplace for a bath. This design has an attractive design, but has low efficiency. If you install a fireproof glass valve, you can protect yourself from flames and enjoy relaxing in a warm room. This is why fireplaces are often installed in dressing rooms. Modern technologies make it possible to design mini-heaters. This design quickly warms the bathhouse, but even after the fuel has completely burned, the room remains heated. Its length and width are usually 2 bricks.
Installation of a chimney pipe
How to fold a stove with a chimney after completing the construction of brick walls? The furnace construction manual provides for the preliminary selection of a pipe, which in type and functional features must correspond to the design of the future furnace. For a lightweight design, it is recommended to choose a small pipe made of lightweight and heat-resistant material.
When choosing, you should take into account the appropriate wall thickness of the chimney pipe, which cannot be less than ½ the thickness of the brick. The diameter of the passages for the chimney pipe should be of a similar size.
The length of the upper part of the pipe, located above the roof, should not be less than 55 cm. To equip the smoke exhaust duct, a connecting mortar based on cement or lime is used. The clay-sand mixture is not suitable for such work, since under the influence of precipitation it will quickly wash out and form condensation on the inner walls of the pipe.
The chimney pipe with a minimum number of bends must have a total length of at least 5 meters. The finished design can be equipped with a special gate valve.
How to make a stove for a bathhouse with a water tank
It is convenient if the design of the sauna stove includes a built-in tank for heating water. It can be mounted or attached. Let's look at the features of both options.
Hanging tank for a bath
A separately located tank has its advantages - it does not evaporate moisture in the steam room and at the same time warms the adjacent room. It is better to take tanks from stainless steel; they can withstand even hot boiling water.
The connection between the stove and the tank occurs through pipes and hoses
Use pipes that can withstand high temperatures. Water is poured into such a system before the fire starts. If you pour water into a hot stove, it may burst due to the temperature difference. Water can circulate in the heating device by gravity - for this, the distance from the stove to the tank should be no more than 1.5 m, and the lower edge of the tank should be placed half a meter above the register. You can simplify your task by installing a small pump.
Sauna stove with built-in water tank
The second option for placing the tank is directly above the stove. It is a simple design, easy to implement and does not require any pumps or complex inclination systems. Water is drained from the tank through a built-in tap.
Such tanks are made from high-quality stainless steel with a wall thickness of 1.5 mm
Important! Built-in tanks must be kept filled at all times.
Built-in tanks help create a humid atmosphere in the steam room. Not everyone will like this, so think about it: maybe it would be better to take the tank outside the steam room.
Related article:
This article will discuss types of stoves for a wood-burning sauna with a water tank , popular models from manufacturers and the stages of DIY construction.