Installation details
Gaps are left between the brick and the slab so that the expansion of the metal does not destroy the masonry.
During installation, the thermal expansion of various materials must be taken into account. For example, brick and cast iron are affected completely differently by high temperatures. If, during installation, the cooking floor is tightly walled into the masonry, soon such a stove will simply fall apart as a result of the expansion of the metal.
Installing tiles on a brick stove:
- A horizontal 5 mm gap is left between the heating structure and the panel. Thanks to it, thermal expansion between objects will be compensated and the service life will increase.
- The hob is installed in a strictly horizontal position on a flat base - the tiles should not play. To determine whether there are any deviations along the horizon, use a building level. The largest of the cast iron circles for the stove is located above the combustion compartment.
- The panel is mounted on a clay-asbestos composition. These materials are resistant to high temperatures. You can make the solution yourself by grinding and mixing the ingredients with water, or dilute a ready-made store-bought solution. The consistency should be similar to liquid sour cream. When installing, make sure that the horizontal gaps remain empty, otherwise the stove will quickly collapse.
- An asbestos cord or sheet is laid under the base of the panel.
- The top row of bricks, on which the cast iron sheet is placed, is “ringed” with a metal corner - this will give the structure strength.
Due to gradual heating, the internal stress of the cast iron is relieved, and the stove plate acquires greater strength. The procedure has a positive effect on the further operation of the stove and tiles, preventing bending and cracking.
Installation on a metal stove follows the same principles. But it is necessary to take into account that cast iron is a heavy material, so a brick structure can deform under its weight. Additional reinforcement of the stove with a cast iron corner is required. You can use a “support” from another resistant material.
Oven
The oven, installed in the oven body, is wrapped with asbestos around its entire perimeter. The wall adjacent to the oven is laid out on edge, and the top is covered with a solution two and a half to three centimeters thick. This will prevent the oven walls from burning out quickly.
The oven is usually made of strong steel. Gaps are determined using a level, the frame is wrapped around
sheet asbestos, half a brick wide. The plane of the frame at the top must coincide with the masonry surface of the last row of bricks, therefore, if necessary, the asbestos layer must be increased.
The grate must be installed 25-30 cm below the combustion opening with a slope towards the combustion door. The bottom of the firebox is shaped like a trough, and the slots located between the grates should be along the firebox.
The blower door and, together with it, the cleaning door are installed in the same way as the firebox door. The blower door is practically not exposed to high temperatures, so it must be tightly and firmly walled into the stove masonry, treating the seams with clay mortar. The horizontal of the frame is also determined using a level.
Installation and use rules
To install a cast iron cooktop for a wood stove, observe the following points:
- Lay it on top of a thin, liquid layer of cement mortar, the distance between the stove and the upper edge of the oven should be 50-60 mm.
- Before installation, ensure that there are thermal gaps in the stove (at least 5 millimeters). This will help the masonry not crack as the oven heats up. Otherwise, you will have to seal the cracks with clay mortar.
- To strengthen the structure, secure the top of the brickwork using angle steel.
- The largest burner should be located above the firebox.
- After installing the stove, heat it for 8 hours until the temperature reaches 640 degrees (for every hour the temperature should increase by 70-80 degrees). Follow the following algorithm:
- first heat with shavings and wood chips;
- then start tossing larger logs;
- After eight hours, leave the stove to cool until all the wood has gone out.
- Make sure that moisture does not get on the heated flooring.
- Mechanical damage and shock loads during transportation or use are dangerous.
If you follow all the installation and use rules, you will extend the life of your cast iron stove and stove and ensure the safety of yourself and your loved ones. Cooking decks made of cast iron can also be used in solid fuel boilers, double-circuit stoves, as well as stoves with a water circuit.
We recommend that you watch the video on how to properly install a stove hob
Work process
Installation of a high-quality combustion door. This process must be approached with full responsibility and
seriousness. It is most exposed to thermal and thermal expansion. Therefore, it should be installed so that the space in the stove is overlapped as tightly as possible and the door is securely fastened to the masonry. This oven door is secured with clamps, which are made of steel.
Clamps are made of steel. All ears should protrude 10-12 cm beyond the door frame, and they are fastened with special rivets. The lower part of the door can be secured with a wire about 60 cm long. Before installing the door, you need to wrap the frame with asbestos. The material can be used in the form of cord, crumbs or sheets, moistening with water before use.
In the exact location of the door installation, it is necessary to apply a layer of clay composition to the masonry. When using wire, the ends are hidden in the seams. Be sure to check the horizontal position of the installation with a level and fix it using a wooden strip. One end of this strip is placed on the door frame, and the other on three bricks of the masonry, a brick is placed on top of it. Next, bricks are laid on the mortar, gradually laying the door in the stove mass. Each row starts from the door.
The nuances of choosing and installing a cast iron stove for a stove
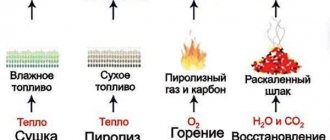
The stove runs on solid fuel (coal or charcoal, peat), which is burned directly in the firebox and thereby heats the heat-releasing surfaces. The cast iron stove plate is one such heat dissipation element, it not only helps distribute heat in the room, but is also used for cooking.
Purpose and technical characteristics of the product
Cast iron stove plates, also called cooking floors, are mounted directly on the upper horizontal plane of the stove. They are used for cooking and heating the room. This element has inertial heat transfer: the hot cast-iron surface cools down for a long time, while evenly heating the room and at the same time performing the function of a hob.
The product is produced by casting. The material used is gray cast iron grade SCh 15-20. This metal is a compound of iron and carbon (more than 2%) and is characterized by high strength and fire-resistant properties. Gray cast iron also contains silicon, phosphorus, manganese and sulfur. The presence of such impurities significantly improves the physical and chemical characteristics of the metal.
The cast iron stove plate is resistant to temperature changes, does not deform during operation and maintains its integrity throughout its entire service life.
Cast iron hob on a modern fireplace stove
For your information! Any products made of gray cast iron are immune to corrosion, since their surface is covered with a layer of rust immediately after casting. It is this “protective” layer that prevents corrosion from penetrating deep into the metal.
Types of cast iron stoves
The cast iron stove installed on the stove can be prefabricated or solid. In both cases, it simultaneously acts as a heat conductor and a cooking burner. The difference lies in the presence or absence of thermal gaps, which compensate for the expansion that occurs when the metal is heated.
Let's take a closer look at each type of product and get acquainted with their advantages and disadvantages.
Subtleties of installing the stove on the stove
First of all, it is necessary to take into account the characteristics of thermal expansion of various materials. For example, brick and cast iron behave completely differently under the influence of high temperatures, and if you wall the hob end-to-end in the masonry, then such a stove will not last long. It will simply collapse due to the expansion of the metal.
Correct installation of the stove requires a 5 mm gap around the entire perimeter, without coating. Thus, when heated, the stove element will have sufficient free space for expansion, and the brickwork will maintain its integrity.
The top row is laid out “dry” (without mortar) in order to correctly lay the future expansion gap
During installation, a clay-asbestos solution of liquid consistency is used. It is used to fix the cast iron stove on the stove. The solution is prepared as follows: crushed asbestos is added to clay diluted with water, and then, gradually adding liquid, the compound is brought to the state of “liquid sour cream.”
The stove plate is always laid level. And the burner with the largest diameter is located directly above the firebox.
The top row of the stove masonry is secured with a steel angle along the entire perimeter of the stove, thus increasing the strength of the entire structure.
For your information! After installing a new cast iron cooking floor, the first firebox is carried out according to a special scheme. Slowly, over 8 hours, heat the oven to a temperature of about 600°C. This means that every hour the temperature of the heat-releasing surfaces should increase by 75-85°C. This gradual annealing eliminates the internal stress of cast iron, which significantly enhances its strength characteristics.
Installing a cast iron stove on a stove is no joke. The length of operation of the product directly depends on the accuracy of installation, so such important work should be entrusted to professionals.
Chimney installation
Due to the strong heating of the furnace, the temperature in the chimney area can reach 300 °C. If there is a large accumulation of soot in it and it ignites, this figure rises even higher. When installing steel chimney pipes with your own hands, you need to take into account a number of points regarding the order of their installation.
Firstly, the chimney can be laid not only inside the building, but also along the outer surface of the wall (in the attic). Secondly, in the internal spaces of the house it will be necessary to reliably insulate the pipe in the areas where it passes through the ceiling and roof. Finally, the outside of the chimney should be carefully secured to the wall of the building.
In the process of arranging a diversion channel, it is necessary to be guided by the following requirements of the PPB:
- near the walls, the drain pipe should be laid at a distance of approximately 25 cm;
- the surfaces of the walls are first lined with basalt cardboard, and then sheathed with galvanized or stainless steel sheets;
- the holes in the ceiling must be large enough to maintain 25 cm gaps on the sides (they are subsequently filled with basalt insulation).
To install a chimney, it is preferable to use a sandwich pipe made of ceramic and stainless steel, protected by a layer of thermal insulation. If you have available funds, you can install a branded ceiling trim.
Features of cooking ovens
Depending on the model, cooking stoves combine a real oven, stove and oven, differing in fairly compact dimensions. Most cooking stoves are no larger than a standard gas stove. In addition, manufacturers of cooking stoves place great emphasis on the design of this equipment, which makes them a real decoration of the interior. Installing the stove is quite simple and does not take much time, but it should be entrusted to professionals, this will guarantee long and correct operation of the equipment. A modern cooking and heating unit is mobile and, if necessary, transporting it to another place will not be difficult.
Preparation for welding
Preparatory operations must be carried out carefully and carefully, as this is one of the fundamental principles of obtaining a high-quality connection:
- the structure is cleaned of dirt, debris and dust;
- then you should degrease the parts with a solvent, for example, acetone;
- when working with thin cast iron, you need to use pads to remove heat;
- edge cutting should be done before welding thick-walled products; for this, a file or grinder is used;
- cracks must be drilled along the edges and cut to their entire length; an alternative method is to cut out the cracks and round the ends;
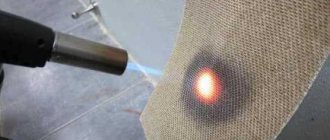
- depending on the chosen welding method (hot or cold), the product is heated or not. The part can be heated using various equipment: ovens, gas burners, or using improvised means: a blowtorch.
Purpose and technical characteristics of the product
Cast iron stove plates, also called cooking floors, are mounted directly on the upper horizontal plane of the stove. They are used for cooking and heating the room. This element has inertial heat transfer: the hot cast-iron surface cools down for a long time, while evenly heating the room and at the same time performing the function of a hob.
The product is produced by casting. The material used is gray cast iron grade SCh 15-20. This metal is a compound of iron and carbon (more than 2%) and is characterized by high strength and fire-resistant properties. Gray cast iron also contains silicon, phosphorus, manganese and sulfur. The presence of such impurities significantly improves the physical and chemical characteristics of the metal.
The cast iron stove plate is resistant to temperature changes, does not deform during operation and maintains its integrity throughout its entire service life.
For your information! Any products made of gray cast iron are immune to corrosion, since their surface is covered with a layer of rust immediately after casting. It is this “protective” layer that prevents corrosion from penetrating deep into the metal.
The cast iron stove installed on the stove can be prefabricated or solid. In both cases, it simultaneously acts as a heat conductor and a cooking burner. The difference lies in the presence or absence of thermal gaps, which compensate for the expansion that occurs when the metal is heated.
Let's take a closer look at each type of product and get acquainted with their advantages and disadvantages.
Prefabricated slabs
Prefabricated stove plates consist of several cast iron rings of different diameters, which are folded into a single surface like a puzzle.
A significant advantage of prefabricated flooring is the vertical thermal gaps located between the cooking rings. The presence of these small distances makes it possible to compensate for the expansion of the metal when heated. Thanks to this, the stove plate does not warp or deform during operation.
Particularly strong cast iron plates are cast with stiffening ribs located at the bottom. This addition increases the heating temperature of the hob, thereby increasing the efficiency of the entire oven.
Solid slabs
A solid cast iron stove is a flat sheet of metal on which one or two burners of a stationary diameter are placed. In addition, there are solid stove floors; there are no burners on their surface at all.
A small number or complete absence of thermal gaps makes a solid slab less practical and reliable. When highly heated, cast iron expands and, without sufficient free space, can become deformed.
But a solid stove slab also has its advantages: it is easy to install and is more affordable in comparison with prefabricated slabs.
For your information! To increase heat transfer rates, a cast iron plate can be cast with a notch or three-dimensional ornament.
Correct installation of the stove requires a 5 mm gap around the entire perimeter, without coating. Thus, when heated, the stove element will have sufficient free space for expansion, and the brickwork will maintain its integrity.
The top row is laid out “dry” (without mortar) in order to correctly lay the future expansion gap.
During installation, a clay-asbestos solution of liquid consistency is used.
It is used to fix the cast iron stove on the stove.
note
The solution is prepared as follows: crushed asbestos is added to clay diluted with water, and then, gradually adding liquid, the compound is brought to the state of “liquid sour cream.”
The stove plate is always laid level. And the burner with the largest diameter is located directly above the firebox.
For your information! After installing a new cast iron cooking floor, the first firebox is carried out according to a special scheme. Slowly, over 8 hours, heat the oven to a temperature of about 600°C.
This means that every hour the temperature of the heat-releasing surfaces should increase by 75-85°C.
Installing a cast iron stove on a stove is no joke. The length of operation of the product directly depends on the accuracy of installation, so such important work should be entrusted to professionals.
What should it be
It would seem that there is nothing easier than replacing the suitable surface of a brick oven with a metal insert with your own hands, getting a stove for cooking. In reality, everything is much more complicated. A stove is a complex device, and the thermophysical processes occurring in it depend on the correct arrangement of its elements.
There are special requirements for furnaces of this type. On the one hand, it must effectively accumulate heat in the thickness of the brickwork, on the other hand, it must take a significant part of the heat to heat the hob . In the summer, when heating the house is not required, the hob should warm up quickly with economical fuel consumption.
Requirements
Theoretically, the hob can be made from any material that can heat up to high temperatures when the stove is fired. In practice, they use cast iron plates with holes covered with a removable lid.
This design allows you to create zones with different temperatures on the stove. The thermal conductivity of cast iron, unlike steel, is not very high, so you can heat food on the plane of the stove, as well as cook or stew it over low heat. And by opening the lid, you can achieve direct heating of the cookware with an open flame, which allows you to quickly boil water or fry food in a frying pan.
The most practical are burners . shown in the photo, consisting of concentric rings of different diameters - they can be selected to fit the size of the bottom of the dish. In addition, the gaps between the rings compensate for the thermal expansion of cast iron that occurs when overheated, and the plate can withstand multiple heating and cooling cycles without damage. Solid cast iron stoves are less reliable and require more careful firing.
Advantages of an army stove
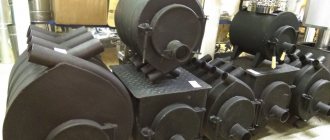
The POV-57 cast iron stove is very economical in fuel consumption.
One load of the unit can heat it for 6-10 hours. Historically, this type of stove was used about fifty years ago to heat barracks and army tents. This is where the name came from. The ease of operation and maintenance of a cast iron stove, as well as safety and low fuel consumption, have significantly increased its popularity and made it possible to use the stove in our time, in conditions where heating with central heating is impossible.
Today, an almost original version of the potbelly stove design is used, which has not been modernized. The reliability of the unit ensures a long service life. Another advantage of a cast iron stove is that you can use not only firewood as fuel, but also construction and wood waste and even household waste.
Video description
Another option for creating a stove is shown in the video:
- Further, in the twelfth row, exactly 18 bricks are used.
With their help, the door of the cleaning compartment is closed and the formation of the rear wall of the fireplace chamber continues.
- At the next stage - for the thirteenth row, 19 bricks are used.
When using blocks in a fireplace compartment, they are pulled out and cut away. The same row allows you to raise the walls of the open hob.
- Also 19 bricks are used in the next, twentieth row.
They begin to form a shelf above the fireplace insert. To do this, each brick is pushed 3 cm not only forward, but also to the side. The result is an overhanging row over the firebox.
- Further, in the twenty-first row, 20.5 bricks are used.
With their help, the walls of the cooking compartment are completed and the construction of the fireplace mantel continues.
- Then, in the twenty-second row, 15.5 bricks are laid.
They are reinforced with a steel angle above the cooking chamber. Metal strips are also used above this compartment. They are installed in the middle and rear part, the so-called ceiling of the cooking chamber. The elements are needed to subsequently cover the entire tier.
Types of heating cables for water supply
There are two types of heating cables - resistive and self-regulating. Resistive ones use the property of metals to heat up when passing an electric current. In this type of heating cables, a metal conductor is heated. Their characteristic feature is that they always emit the same amount of heat
It doesn’t matter whether it’s +3°C or -20°C outside, they will heat up the same way - at full power, therefore, they will consume the same amount of electricity. To reduce costs in relatively warm times, temperature sensors and a thermostat are installed in the system (the same as those used for electric heated floors)
Structure of a resistive cable
When laid, resistive heating wires should not intersect or be located next to each other (close to each other). In this case, they overheat and quickly fail. Pay close attention to this point during the installation process.
It is also worth saying that resistive heating cables for water supply (and not only) can be single-core or double-core. Two-core ones are more often used, although they are more expensive. The difference is in the connection: for single-core ones, both ends must be connected to the mains, which is not always convenient. The two-core ones have a plug at one end, and at the other end there is a fixed ordinary electrical cord with a plug, which is connected to a 220 V network. What else do you need to know? Resistive conductors cannot be cut - they will not work. If you bought a coil with a section longer than necessary, lay it in its entirety.
This is approximately how heating cables for plumbing are sold.
Self-regulating cables are made of a metal-polymer matrix. In this system, the wires only conduct current, and the polymer, which is located between the two conductors, heats up. This polymer has an interesting property - the higher its temperature, the less heat it releases, and vice versa, as it cools down, it begins to release more heat. These changes occur regardless of the condition of adjacent sections of the cable. So it turns out that it regulates its own temperature, which is why it is called self-regulating.
Structure of a self-regulating cable
Self-regulating (self-heating) cables have many advantages:
- they can intersect and will not burn out;
- they can be cut (there are markings with cutting lines), but then you need to make an end coupling.
They have one drawback - the high price, but the service life (subject to the operating rules) is about 10 years. So these expenses are reasonable.
When using a heating cable for any type of water supply system, it is advisable to insulate the pipeline. Otherwise, heating will require too much power, which means high costs, and it’s not a fact that heating will cope with particularly severe frosts.
Additionally: wood treatment with impregnations
Fire regulations require that wood be treated with special impregnations that reduce its flammability.
However, we know very well that impregnation in a bathhouse is not particularly desirable, because at a high temperature inside the steam room, all the chemicals begin to be released into the air and poison a person. That's not why we go to the bathhouse. And yet, not all rooms experience such a temperature load as a steam room, so it would be reasonable to treat at least them with fire retardants, as well as the attic, especially since a considerable proportion of fires occur due to sparks flying from the chimney (here Also install a spark arrester or a deflector with it).
The composition should be applied in two or three layers, waiting for at least 6 hours to dry between stages.
Yes, and pay attention to the presence of pigments to indicate impregnation if you do not want the wood to become, for example, a bright pink color. (That is, the color is not from chemicals, it is added specifically to distinguish treated wood from untreated wood.)
***
So, now that you have an idea of how to install a stove correctly, it’s time to put your acquired knowledge into practice. Write comments, we are interested in your opinion about what you read.
If you have not yet decided on the type of stove you need, then you should familiarize yourself with the characteristics and models of different types: gas, wood, electric. The variety of types of designs, sizes and prices provides the widest selection of stoves for baths and saunas. And which one is better, everyone has the opportunity to decide for themselves.
Characteristics of cast iron stove
The hob is installed horizontally on the stove
The cooking floor is installed on top of the horizontal plane of the stove. It is made by casting from gray cast iron grade SCh 15-20. This durable and fire-resistant metal is an iron-carbon alloy, which also includes silicon, phosphorus, manganese and sulfur. These impurities significantly increase the physical and chemical properties of the metal.
The cast iron hob for the stove has the following qualities:
- Resistance to temperature changes. The product does not deform if you follow the instructions for use.
- Anti-corrosion characteristics. Immediately after casting, the panels are coated with a layer of rust, making them resistant to corrosion.
- Heavy weight. Cast iron slabs are heavy, which gives them stability.
The quality of the product is subject to such requirements as evenness of the surface, absence of scratches, chips and other damage.
Characteristics of modern cast iron stoves
Cast iron plates, also known as cooking floors, are mounted directly on the upper horizontal surface of the stove. The cast iron stove has inertial heat transfer.
When fuel (wood, coal, peat) is burned in the stove, the cast-iron stove heats up well and then remains hot for a long time, giving off heat. Once the cast iron is hot, it can be used as a cooktop.
Modern cast iron stoves for installation on a stove have a number of characteristics that distinguish them from other similar options.
- The cast iron used to cast the slab has increased strength.
- Due to the fact that the material also includes a number of chemicals, the physical characteristics of the product are improved.
- Throughout its service life, cast iron does not deform, does not crack and withstands high temperatures well.
- The cast iron stove is resistant to temperature changes, maintaining its appearance and original performance properties.
- Plates for installation on the stove are not subject to corrosion.
In general, all cast iron stove stoves are divided into two groups: prefabricated and solid. In both cases, the product can serve as a heat conductor, uniformly heating the air in the room, and as a burner for cooking.
A prefabricated cast iron slab is a panel with rings installed on it that fit into each other. By adjusting the number of rings and their diameter, you can choose the best option, depending on what kind of cookware you use.
This option has one important advantage - thermal gaps, which allow the plate to heat up evenly without deforming under the influence of high temperatures. Solid plate due to the absence of thermal gaps is less reliable during use
Cast iron can expand when exposed to too much heat and warp. However, cast solid cast iron plates are much cheaper and easier to install on the stove yourself
A solid plate, due to the absence of thermal gaps, is less reliable in use. Cast iron can expand when exposed to too much heat and warp. However, solid cast iron stoves are much cheaper and easier to install on the stove yourself.
If, when choosing a stove for the stove, you caught your eye on a model with a cast ornament or pattern, take a closer look at this option. Due to the patterns, the heat transfer of the plate increases, which has a positive effect on its functionality.
Features of installing a cast iron stove in a stove
Installing a cast iron stove on a stove is a serious matter. Violation of technology and incorrect selection of materials can lead to the fact that during the first fire the slab becomes deformed or cracks due to expansion.
Yes, cast iron stove plates have increased durability, but do not forget that when heated they expand, which must be taken into account by the technician during installation.
You cannot install the stove next to the material from which the stove itself is made. As a rule, this is brick. But brick expands differently when exposed to high temperatures. If you do not leave a gap between the masonry and the slab, either bricks or cast iron will not last long, since the metal simply will have nowhere to expand.
- The slab cannot be tightly walled into the masonry.
- There should be a gap of approximately 5mm around the perimeter between the brickwork and the slab.
- There is no need to coat the gap with mortar - it is necessary so that the slab has room to expand. This will keep both the cast iron stove and the stove masonry intact.
- When installing a cast iron slab, a special liquid clay-asbestos solution is used. It makes the fixation of the stove on the stove stronger.
Remember that it is necessary to install a cast iron hob level, otherwise cooking on it will become difficult. The smaller the stove burner, the closer it should be directly to the firebox. This is explained by the fact that a small burner heats up faster, but also cools down faster. This rule is for your convenience.
The first firebox is produced according to a special scheme. Don't expect to be able to cook on your new stove right after installation. To relieve the internal stress of cast iron, it is heated slowly and thoroughly for the first time.
If you are not sure that you can install the stove according to all the rules, it is better to trust professionals in this matter.
On the website https://svt-ukraine.com.ua/lyuki-dlya-zoly you will find even more useful products for building a functional stove in the house.
Current repairs: prevention of serious damage
Troubleshooting minor problems
Any owner can carry out minor repairs to a stove in a country house or in a residential building, even if he does not have construction skills.
- Scuffs that appear on the pre-furnace sheet make cleaning difficult and can cause a fire. The leaky metal must be removed, the flooring must be protected with a sheet of asbestos and roofing steel of the required size must be nailed on top.
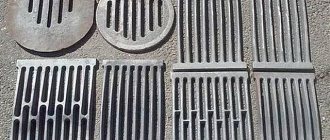
- To replace the grate, you need to remove the old part from the furnace and clean the area of soot. The new grille should be exactly the same size as the failed one. It is laid in place without mortar in the same way as the old grate bars.
- Twice a year it is necessary to inspect the chimney for foreign objects and debris. To clean soot from channels, it is recommended to use special chemicals.
Renewing masonry joints
Leaky seams spoil the appearance of the brickwork and allow harmful gases into the room. To detect weak areas, it is recommended to heat the stove - this will make large cracks visible. To eliminate the problem, it is necessary to clear the seams by 2-3 cm, after soaking them with water. Next, the walls are washed well with clean water using a brush.
Deepening the seams of brickwork
The resulting depressions are filled with new clay mortar, carefully compacting the mixture and wiping out the voids. To increase the resistance of the solution to cracking, you can add a little table salt to the clay - 300–350 grams per bucket of solution. It is recommended to seal wide cracks with fire-resistant cord. If necessary, the walls are plastered and whitewashed or tiled.
Sealing of the combustion door and hob
The gaps that form between the doors and the masonry due to mechanical loads and thermal expansion also begin to let dangerous gases into the room. Do-it-yourself oven repair in this case begins with cleaning the surface and removing the old mortar. The cleaned area is washed and primed with heat-resistant glue diluted in the same volume of water.
Ceramic cord for sealing
A sealing asbestos or ceramic cord is attached around the perimeter of the door - it protects the clay from cracking, compensating for differences in the thermal expansion of materials. To avoid buying a fake instead of a fire-resistant cord, experienced stove makers recommend setting fire to your purchase without leaving the cash register. Next, the area around the door is rubbed with a repair solution and left to dry for at least a day.
Grouting the seams above the door
Similarly, the gaps that appear between the hob and the walls are eliminated. To remove the stove, the stove should be heated a little, and then pry off the cast iron with a hard metal object, such as an ax. Instead of a cord in this case, you can use basalt wool or felt. If possible, the old stove can be replaced with a more modern one.
Fastening the cord under the stove
How to use a home wood stove correctly and safely
The stove must not be left unattended. When opening the door, embers and sparks should not fall outside the pre-furnace area.
If the sandwich pipe has a damper, it is not closed until the fuel is completely burned. For combustion, use the fuel specified by the stove manufacturer.
You should not leave hot ash removed from the ash pan at home, as it emits deadly carbon monoxide.
The cast iron body and parts of the device do not like sudden temperature changes. Do not allow cold water to come into contact with cast iron surfaces, as this can lead to cracks. It is forbidden to move an already installed stove, this will cause depressurization of the chimney.
Types of cast iron stove surfaces
Regardless of the configuration, all cast iron surfaces perform heat transfer functions well and are suitable for cooking. The difference between a solid and prefabricated slab is the presence of thermal gaps between the elements, which compensate for the expansion of the metal when heated. You can understand the structure of hob surfaces in more detail by reading about each of them separately.
Prefabricated slabs
The prefabricated cooking deck is a structure made of a cast iron surface and several rings that differ in diameter. They are inserted into each other and assembled into a single plane like a puzzle.
All prefabricated stoves can include from one to several burners, and thanks to the ability to remove and put on rings, you can choose the most suitable burner size for each specific cookware.
This type of flooring is more durable and resistant to temperature changes. Due to the presence of gaps between the rings, the metal can expand during heating without deformation or other damage. To provide extra strength, some slabs are produced with additional stiffening ribs on the inside. A significant advantage of this addition is an increase in the temperature of the hob, and thus an increase in the efficiency of the oven in cooking.
Solid slabs
A solid cooktop comes in the form of a single sheet of metal, usually with
one or two burners with a constant diameter. There are also blind stoves that do not have burners.
This design of the stove plate has virtually no thermal gaps, which makes it not as reliable and practical as the previous model. Due to the lack of free space, deformation of the cast iron may occur during heating.
However, an important advantage of solid slabs is ease of installation and reasonable cost compared to prefabricated ones.
The main nuances when installing a cast iron stove:
- When making a furnace, it will be appropriate to compare the difference in the behavior of different materials under the influence of temperature. Metal and brick have different expansions, and during the heating process the oven may collapse. To prevent this from happening, it is necessary to provide gaps between the cast iron slab and the brick surface of up to 5 mm around the entire perimeter. This way you can significantly increase the service life of the furnace.
- The metal plate on the surface of the furnace is fixed with a liquid clay-asbestos solution. To prepare it, clay is mixed with crushed asbestos and by adding water the solution is brought to the correct consistency (liquid sour cream).
- When installing a cast iron stove, be sure to control the process using a level. The largest burner is always located above the firebox.
- To strengthen the structure of the stove, the top row of brickwork should be fixed with a steel angle around the perimeter.
Types of foundations
Among the known types of foundations for arranging furnaces, the following are suitable:
- concrete pillars;
- strip foundation;
- monolithic slab.
Each type has its own characteristics. Concrete pillars are suitable for both a heavy metal stove and a massive brick fireplace. The number of supports is selected based on the total weight of the structure and the condition of the soil at the installation site. To install them, holes of the required size are made in the floor, and after installing the posts, a frame of welded metal channels is laid on them.
Strip foundations are erected according to the classical scheme. According to the method, when constructing them, formwork is first made around the perimeter of the supporting structure, into which liquid concrete is then poured. All other operations are performed in exactly the same way as described in the previous case.
The monolith is mainly used when installing fireplace-type stoves in dachas. Its thickness can reach 15–20 cm, which is quite enough to withstand the design pressure on the foundation.
Any of the types of foundation discussed above must sit for some time after pouring. You can begin installing the stove on it in about 28–30 days.
Advantages of cast iron
Cast iron provides the product with inertial heat transfer, which means that slow cooling of the surface contributes to uniform heating of the room. Cooking decks are cast from SCh 15-20 cast iron (carbon combined with iron), which is famous for its strength and fire resistance.
Phosphorus, sulfur, silicon and manganese added to the composition enhance the chemical and physical properties. That is why cast iron structures are not subject to temperature changes and remain intact for quite a long time of operation. In addition, any cast iron structures will not be subject to corrosion due to the rusty layer covering them.
How to make a choice
You can buy an imported cast iron hob, for example, Finnish Pisla and HTT. Among domestic brands, products from NMK, SibStalShar, Litkom, and Balezinsky LMZ are in greatest demand.
All of them have a beautiful appearance, heat resistance up to 1000°C and are environmentally friendly, without emitting harmful substances when heated.
For stove slabs, standard dimensions for laying are accepted: 710x410 mm, 340x410 mm, 660x410 mm, 585x340 mm and others. The number of burners in a typical section is one or two.
The thickness of cast iron in expensive slabs reaches 12 mm, and the structure itself has stiffening ribs on the reverse side. Weight is about 20 - 25 kg.
Main manufacturers
If you decide to buy a cast iron hob, contact a specialized salon or use an online store. The minimum price for a product is 500 rubles. It depends on the size, material and manufacturer. The most common sizes are slabs of 34*41 cm, 71*41 cm, 58.5*34 cm, 66*41 cm, 51*34 cm.
The most popular and sought-after foreign manufacturers include the Finnish brands
Pilsa and HTT. But domestic manufacturers also produce products that are worthy competitors to foreign ones. These are the trademarks NMK, Litkom and SibStalShar, which create durable, high-quality models with an attractive design.
Caring for a cast iron cooktop
Cast iron is an unpretentious material, but even it has its weak points. First of all, it is natural fragility. Careless handling of the slab or impacts lead to the appearance of cracks and chips on the surface. It is impossible to weld defects, so such a slab will have to be thrown away.
The hot plane is sensitive to liquid contact. A sudden cooling of the slab is fraught with the appearance of cracks and a violation of the tightness of the seal.
The surface of the slab does not require additional treatment with any compounds. It is enough to regularly wipe the cold stove with a damp cloth, and remove burnt food residues with a stiff brush. Rust deposits due to long periods of inactivity will disappear immediately after heating the stove.
Traditional methods for cleaning surfaces are popular: baking soda, soda with vinegar, ammonia and hydrogen peroxide, mustard powder. Do not use flammable liquids (solvents, acetone) or strong detergents containing acids. It is best to use mechanical cleaning methods using various abrasive materials.
Security measures
When working with welding equipment, you must follow the safety rules:
- Do not work with faulty devices.
- When working with welding equipment, stand on a rubber mat.
- If there are cracks or pores in the workpiece, do not secure it above you.
- The welding process is harmful to health. The welder needs to use a special mask, gloves and protective clothing.
Do not touch the seam you have just made.
It is more difficult to connect parts made of cast iron using welding equipment than those made of other materials. For this reason, it is necessary to know the technology of creating seams and to use suitable equipment and consumables.