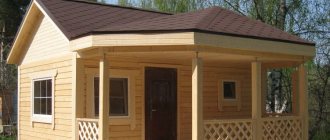
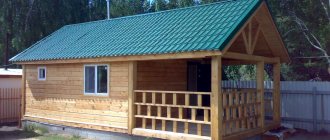
A summer cottage for seasonal living does not require capital structures. Therefore, a small bathhouse in the country may be the best solution. Along with the availability of the material and its low cost, a do-it-yourself bathhouse made from cinder blocks significantly reduces the costs of its construction. The properties of such a structure are not inferior to similar buildings made of wood.
Greetings, dear reader! Thank you for showing interest in my diary...
The bathhouse has been known in Rus' since time immemorial. Our ancestors always treated the Russian bathhouse with dignity. It was believed that she embodied such natural elements as water, fire, air and earth.
When visiting a bathhouse, a person absorbs the power of these elements, becoming stronger in body and soul. It cleansed and relaxed, helped to isolate oneself from the bustle of the world, free oneself from negative energy, and receive a charge of freshness and vigor.
On the eve of significant events in life, such as a wedding, it was customary to visit the bathhouse. Also, visiting a freshly heated bathhouse over time became a hallmark of Russian hospitality.
Today, it has also not lost its popularity, and your own bathhouse at the dacha with a steam room and a birch broom allows you to relax, gain strength and wash away the work dirt accumulated during the day.
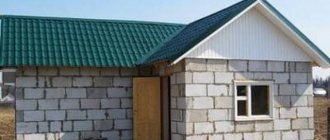
From time immemorial, Russian baths were built from wood, but nowadays not every dacha owner will allow himself such luxury, and the work of creating a log house requires professional skills and abilities.
A more affordable and inexpensive option is to build a bathhouse with your own hands from a cinder block. There is an abundance of different cinder blocks on the market today, and the availability of the source material creates the opportunity to make them yourself.
CLASS BLOCK MATERIAL
The components of cinder blocks are sand, cement and filler, the type of which gives the material certain properties. The most durable products use pebbles or crushed stone, but they are also the “coldest”, since they have high thermal conductivity.
The ability of cinder blocks to retain heat increases when expanded clay or sawdust is added, but the strength barrier and resistance to moisture decreases. When making cinder blocks yourself, seeded slag is used and they are about 15% cheaper than expanded clay concrete, but inferior to industrial designs.
Building a bathhouse from cinder blocks with your own hands is one of the inexpensive and accessible methods, but preference is still given to industrially manufactured samples. Compared to self-made products, they have increased strength and you will not need so many of them - for a small structure you can get by with 500 - 1 thousand pieces.
The standard size of industrial samples is 390x190 mm, the height of which is 188 mm, and the weight of one cinder block varies in a wide range and reaches about 23 kg. A reduction in the thermal conductivity of the blocks is additionally achieved by their hollowness.
This material is best suited for the construction of bathhouse walls, because it retains heat for a long time. According to Russian standards, blocks are manufactured with a hollowness of 28%, 30%, 40% and solid, containing no voids.
When choosing cinder blocks, you should first check the quality of the material: a fall onto a concrete surface from a meter high should not cause chips and cracks, and an attempt to hammer a long nail should not be successful.
It is equally important that the blocks have a relatively smooth masonry and front surface, and their dimensions do not differ by more than 1 mm from the norm. To create the walls of a bathhouse, several types of blocks are usually used, ranging from monolithic ones, and ending with lightweight products.
In addition, it doesn’t hurt to know that a cinder block reaches full strength no earlier than a year after its manufacture, and several months are not enough for the lion’s share of unwanted impurities to disappear from the product.
Hence, when buying a batch of cinder blocks, you need to know the date of their manufacture and it is unjustifiable to purchase recently produced cinder blocks, because they begin to crumble even with the load of the first four rows.
However, if you still purchase them to create a bathhouse at your dacha, then it is recommended to put them under film for the period of preparatory work. It is not good to overdry the products, so they should be periodically sprayed with water, but you should not overdo it, since moisture evaporates quite slowly from the porous structure of the blocks, which must always be remembered.
The main advantages of a cinder block bath:
- easy accessibility and low cost if you build a bathhouse with your own hands;
- high speed of construction, since the block is of impressive size;
- relatively light weight of the structure and ease of processing;
- consistent sizes of products that you can make yourself;
- high fire safety due to the fire resistance of the product;
- low heat transfer, since the blocks are superior to brick, but slightly inferior to wood;
- high hygiene, as they do not create an environment for insects, rodents, mold and fungi;
- long service life, because a bathhouse made of cinder blocks has been in use for a century.
Main negative aspects:
- the walls are porous and rough, they should be carefully insulated from moisture penetration;
- the gray color of the cinder block requires external processing to give the structure a presentable appearance;
- plaster does not adhere well to the walls, so you will need panels for finishing the outside and inside;
- often there are blocks with low quality aggregate and containing toxic substances;
- Depending on the type of cinder blocks, ordinary dowels are not always suitable for fastening.
So, such materials have significantly fewer disadvantages, and they do not play such an important role, so summer residents often stop not only at building a bathhouse from cinder blocks, but also create other ancillary buildings from them.
Finish options
A cinder block bathhouse without additional finishing looks unaesthetic. To improve the thermal insulation and decorative qualities of the structure, it needs to be sheathed. When carrying out facing work, various finishing materials are used.
Internal
To finish the walls and ceiling inside a steam room or relaxation room, lining is most often used. This is an environmentally friendly building material that does not emit harmful substances when heated. It has excellent performance properties: it is resistant to humid environments, mechanical stress, and easily tolerates sudden temperature changes without deformation. The lining is reliable and durable. For bath conditions, it is best to use finishing materials made of aspen or alder.
To finish the recreation area, you can use a tongue and groove board. When covering the floor, both natural wood and ceramic non-glossy anti-slip tiles are used. By the way, tiles can often be found in baths, where the exit from the steam room leads directly to the relaxation room.
To decorate a bathroom or washroom, use ceramic tiles, mosaics or plastic panels. For tiling the floor surface, it is best to purchase ribbed materials whose surface is slip-resistant.
External
Exterior finishing is an important and mandatory stage in the construction of a cinder block bathhouse. External facing work is necessary to add aesthetics to the structure, as well as to protect cinder blocks from various adverse external factors. If external finishing is neglected, the mineral blocks may soon collapse.
Manufacturers offer a wide variety of materials for finishing work. Baths are often lined with siding. There is a wide range of colors for this type of finish on the market, so the buyer should not have any problems choosing the optimal palette. Due to the huge selection of colors, you can easily make your bath room interesting and original.
Decorative plaster for facade work, brick, artificial stone or tiles for building facades are also suitable for finishing. You should choose finishing materials in accordance with your taste preferences and financial capabilities.
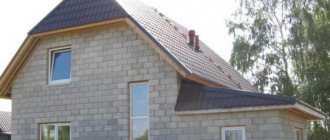
BATH PROJECT AT THE DACHA
Building a bathhouse is the dream of almost every country property owner. When the design is simple, you can sketch out its design yourself. As a rule, the basis for building a bathhouse in the countryside with your own hands is taken to be small in size.
For example, a building 6x4 m and 2.5-3 m high is quite enough for 3-4 people to visit the bathhouse at the same time. A sauna made of cinder blocks with impressive dimensions always requires long-term heating and its construction is associated with additional costs.
The given dimensions of the bathhouse allow us to divide its internal space into primary sections: a dressing room, a rest room, a washing room and a steam room. To prevent drafts and store household supplies, a vestibule or hallway would not hurt.
Creating a veranda or terrace is a big advantage of a bathhouse, which can be attached to one of the side walls of the bathhouse. As an alternative, three garage walls can be added using the same cinder blocks.
Ultimately, it is rational to bring such an almost square structure of the building and the extension under a single roof, then it becomes possible to use the space directly under the roof as an attic.
The project should take into account all similar nuances, including the type of foundation of the structure, sewerage features and type of roof. At the same stage, it is appropriate to provide for the introduction of other communications, for example, water supply and electricity.
Drawing up a bathhouse project does not pose any particular difficulties, since the Internet is full of special programs that are easy to use and will instantly create any project based on the initial data.
As an example, below is a sketch of a design option for a bathhouse made of cinder blocks, available for manual conversion. In a real project, taking into account the taste of the owner, of course, the dimensions may differ, but the essence of the approach remains the same.
Purpose of bath rooms
Locker room. The room where you will undress or change clothes must be made warm enough. Usually, cabinets for clothes and shoes are installed in the locker room, and several hangers can be attached. There must be a couple of benches. If you wish, you can hang a mirror.
Waiting room. Plays a protective role. With its help, cold air does not enter the bathhouse. Bathroom equipment and firewood are usually stored in the dressing room. Also, if the space allows, a recreation area is also made there.
Washing room. A must have in every bathhouse. Anti-slip coatings are selected for the floor. The temperature in the washing room should be room temperature, slightly higher than the dressing room and rest room.
Steam room. In this part of the bathhouse there is a stove and shelves for lying on. Their number is individual. Usually taken based on the number of vacationers. A chimney and ventilation must be installed.
Your vision of the bathhouse project may be different. You can expand the room and make it a bathroom and a swimming pool. In the recreation room, for example, install a billiard table. In general, there are many options, the main thing is that they are combined with your capabilities.
CALCULATION OF THE NUMBER OF BLOCKS
Building a bathhouse in a country house from cinder blocks with your own hands will require purchasing the necessary materials in sufficient quantities.
First of all, you need to calculate the required number of blocks. In this procedure, greater clarity is given by a table containing all the main and auxiliary parameters of the structure.
The table shows that the dimensions of the block are larger than its actual dimensions - the difference of 10 mm takes into account the thickness of the seam between the blocks. According to the table, it is not difficult to calculate the number of products that will be required to build the walls of a bathhouse in one block according to the above sketch of the project option.
The procedure for calculating the number of blocks:
- First you need to determine the number of rows of blocks - 12 (2.4/0.2).
- Calculate the total number of blocks - 600 pcs. (48/0.08).
- Determine the total number of blocks, excluding door and window openings - 51 (4.08/0.08).
- Adjust the total volume of blocks – 549 (600-59).
- Taking into account the 10% reserve, you need to purchase 560 blocks.
- Determine the cost of a batch of products, depending on their type (monolithic, hollow).
Price
Table. Cost of cinder blocks
| Cinder block material | Number of voids | Size, mm | Price in rubles for 1 piece | Photo |
| Sand cement | 2 square, open bottom | 390x190x188 | 37 | Sand-cement wall block |
| Sand cement | 2 square, bottom closed | 390x190x188 | 39 | Sand-cement wall block |
| Sand cement | 3 square non-through | 390x190x188 | 37 | Sand-cement wall block |
| Sand cement | 7 slot voids | 390x190x188 | 41 | Sand-cement wall block |
| Expanded clay concrete | 8 slot voids | 390x190x188 | 44 | Expanded clay concrete wall block |
| Sand cement | Monolith, partition | 390x90x188 | 27 | Sand-cement partition block |
| Expanded clay concrete | 2 through slots, septal | 390x90x188 | 26 | Expanded clay concrete partition block |
| Sand cement | Full-bodied | 390x190x188 | 60 | Solid cinder block |
| Expanded clay concrete | Full-bodied | 390x190x188 | 50 | Expanded clay concrete wall block |
| Expanded clay concrete | Full-bodied | 390x120x188 | 35 | Expanded clay concrete wall block |
The price of solid building bricks of standard size M100 and M150 for 1 piece is 10-13 rubles. And if the estimate includes work on insulation, waterproofing, and finishing, then the benefit of building a cinder block bathhouse turns out to be very small.
However, savings can be achieved by making the required number of cinder blocks yourself.
Table. Brief step-by-step instructions for making cinder blocks yourself for building a bathhouse
| №№ | Process description | Photo |
| Step 1 | We make a metal/wooden mold or purchase a vibrating machine for the production of wall blocks. | Form-stretcher Metal mold |
| Step 2 | Prepare a sufficiently liquid solution for pouring into the mold. The approximate composition is as follows: - cement M400 or M500 - 1 part; — blast furnace slag 9-10 parts; - water. The compositions of slag concrete are presented in the following table. When making blocks with voids, you can use bottles, inserting them into the poured mixture with the neck up. The blocks can be tinted by adding crushed red brick to the mortar. | Form filled with solution |
| Step 3 | 24 hours after pouring, we take out (shake out) the blocks and store them for final air drying (takes from 10 to 20 days). Before each subsequent pouring of the mixture, rinse the inside of the mold with water, dry it, and wipe it with diesel fuel. | Making cinder blocks |
The compositions of slag concrete are presented in the following table.
Table. Slag concrete - number of components for different grades of block strength
| Brand of cinder concrete | Cement M400 (material per 1 m3 of slag concrete, kg/l) | Lime or clay (material per 1 m3 of slag concrete, kg/l) | Sand (material per 1 m3 of slag concrete, kg/l) | Slag (material per 1 m3 of slag concrete, kg/l) | Volumetric mass of slag concrete, kg/m3 |
| M10 | 50/45 | 50/35 | 100/60 | 700/1000 | 900 |
| M25 | 100/90 | 50/35 | 200/125 | 700/900 | 1050 |
| M35 | 150/135 | 50/35 | 300/190 | 700/800 | 1200 |
| M50 | 200/180 | 50/35 | 400/250 | 700/700 | 1350 |
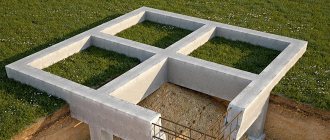
FOUNDATION AND WATER DRAIN IN THE BATH
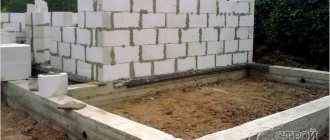
Building a bathhouse from cinder blocks with your own hands begins with laying the foundation. Despite the fact that a cinder block structure is lighter than a brick one, it still has a decent weight, so the base must be reliable and durable.
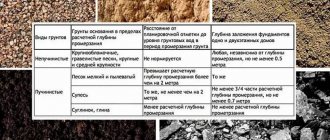
The choice of foundation depends on both the condition of the soil and the type of blocks used. For similar buildings, the most practical is a strip foundation, but its construction requires a lot of money and effort.
A cheaper and more optimal option may be a grillage foundation, which is not inferior in strength to a strip foundation, but it should be borne in mind that cinder block amazingly absorbs moisture, so the base should rise 30-40 cm above ground level and have waterproofing.
An accessible method of waterproofing is bitumen resin and roofing felt. Laying the foundation for the stove is no different from the foundation of the bathhouse, but it should not come into contact with it.
In the process of creating the foundation, the drainage of water in the bathhouse is simultaneously arranged, but the decision on the type of drainage of water in the bathhouse is made during its design.
Water drainage is possible in different ways depending on the type of floors in the washing area. If you plan to use a leaking wooden floor, then a special concrete tank is created under the entire surface of the floor, from where it will flow into the sewer. When installing a concrete floor, it is tilted towards the drain pipe.
For example, a siphon from a bathtub or one made by yourself is suitable for the drain hole, and the hole for draining the water can be located anywhere in the washing compartment.
The best option is to place it near the wall of the bathhouse, but if it is installed near the stove, then through it fresh air will flow directly into the stove. A slight slope of the floor in the steam room from the stove to the far corner with a gutter and hole will help remove water from it into the washing room.
For a small bathhouse at a seasonal dacha, complex sewerage will be unnecessary, so some craftsmen do not bother themselves and resort to ground filtration, preparing the soil under the bathhouse for draining the water.
In the simplest case, the water is drained into a drainage hole or pit, equipped directly under the floor of the washing compartment, but one must keep in mind, for example, with clay soil or close groundwater, the creation of such a drainage system is associated with certain difficulties.
In addition, implementing a similar solution causes unwanted problems:
- due to the destruction of the top layer of soil, the structure is prone to shrinkage;
- conditions are created under the floor for the growth of fungus and mold;
- The air in the bathhouse is filled with a musty, disgusting smell.
From here it is obvious that the drainage pit must still be taken outside the building and for this purpose, a plastic pipe with a diameter of 100-150 mm is most often installed in the foundation or under it, which should protrude from both sides by at least half a meter. The drainage pit is equipped under the outer end of the pipe at a distance of 1.5-2 m from the foundation of the bathhouse.
In the simplest case, heavy truck tires or metal containers without a bottom and with holes on the sides are used for this. The drainage pit made from tires does not freeze and does not collapse for a long time.
A more competent version of a drainage pit is obtained when it is lined with bricks with gaps, then in such a pit a cushion of expanded clay, gravel or broken brick 10-15 cm high is created.
A layer of sand of the same height is placed on top of it and a drain pipe is laid, then the pit is covered with a metal removable lid, plastic wrap and covered with earth.
Floor installation instructions
The main components of the structure are logs and boards. Before starting work, you need to select the most suitable sizes of the mentioned elements and high-quality manufacturing materials. It is recommended to use high-quality boards that are three or four centimeters thick, and it is recommended to make the finished flooring logs from timber measuring 10x15 cm.
It is necessary to take a responsible approach to the choice of material for making logs and boards. Preference should be given to hard coniferous and deciduous species. They are durable and moisture resistant. The lumber must be well dried. Otherwise, all installed elements will become deformed over time. All joists and boards must be smooth without defects in the form of cracks. This will save you hassle in the future.
If the length of the laid logs is more than two meters, then the logs must be additionally secured to the supports. This design will be more stable and reliable. After this, the subfloor is laid. The boards must be laid perpendicular to the joists. When installing a poured floor, a gap of several millimeters should be left between the boards.
Solid floor in a frame bath
After this, the finished floor logs are installed in the form of timber with a section of 5x10 cm. A water vapor barrier material is laid on top. Next, a layer of thermal insulation is laid. The insulation is covered with another layer of water vapor barrier material. Only after this the board is laid. The process uses edged or tongue-and-groove boards. The finishing floor (if it is not a leaking floor) should be installed with a slight slope in the direction of the drain.
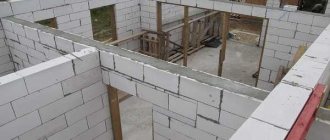
LAYING CLASS BLOCKS
Building a bathhouse from cinder blocks is no different from creating buildings from ordinary brick, and their installation does not require any special techniques. The main difference is the hygroscopicity of the block, and it also predominates in volume, is harder, more fragile and has voids.
The main thing in laying blocks is to regularly have a plumb level “at hand” and not allow the walls to bend, but to increase the rigidity of the structure, a metal masonry mesh should be laid every 2 rows, and in critical places it is better to fill the voids in the sides with concrete.
At the beginning of the process of laying cinder blocks, so that the masonry of the lower rows does not collapse prematurely, it is necessary to reliably isolate the walls from the foundation. For this purpose, bitumen mastic is usually used, and on top there are 2-3 layers of roofing material laid on a heated base.
Preparation of masonry mortar
The key to the strength of creating cinder block walls is the preparation of good masonry mortar and ease of handling. Particular attention is paid to its viscosity, strength after hardening, spreadability over the surface, absence of lumps and solid inclusions.
A sand-cement mixture in a ratio of 3:1 is considered optimal, but with an increase in the proportion of cement, the strength of the solution increases.
The masonry mortar is prepared from Portland cement, no lower than grade M400, and sifted sand, and clay inclusions improve its plasticity. You must add water to the mixture carefully, since a liquid solution only creates difficulties in work.
The mass of the solution must be plastic and not spread over the surface. To increase plasticity, plasticizers are added to it, which are supplied by the retail chain and are easy to use.
Along with natural plasticizers, there is another way to increase the plasticity of a solution, which is cheaper. Plasticizers can be clay or detergents, for example, for dishes or surfaces, but they must not contain chlorine or its components.
For 50 kg of cement or one bag, you will need only 10 ml of concentrated substance, but pre-diluted with water before use. This proportion of it does not have a significant impact on the reliability of the masonry.
The consumption of masonry mortar is approximately 30-40 kg per cubic meter of masonry, which needs to be prepared in small volumes, as it quickly sets and loses its plasticity.
Wall masonry
The most common methods in the construction of walls are the spoon and butt masonry methods, as well as their combinations. In the first case, cinder blocks are placed parallel along the direction of the wall.
In the bathhouse project under consideration, this is exactly the type of block laying that is assumed. If a thicker wall is needed, then the indicated masonry techniques alternate, but the consumption of blocks also doubles.
It is important to adhere to the “checkerboard” order of the seams so that they have a shift of more than 1/3 of the size of the block, and if the cinder blocks are not intended to be filled with expanded clay, then they should be laid with voids down.
The sequence of laying the walls is as follows.
- After waterproofing the foundation, the locations of door and window openings, internal walls, partitions and holes for floor beams are marked.
- The laying of walls begins with monolithic cinder blocks, which are first placed in the corners of the structure. In the initial row of each corner, two blocks are laid, and on top they are overlapped “in a dressing” with another block of the second row.
- The building level controls the equal height of the stacked blocks in the corners, and the tape measure controls the correctness of the rectangle of the building by the equality of its diagonals.
- After carefully checking the orientation to align the blocks, a cord is stretched between the corners of the structure, along which the blocks are laid out using mortar.
- The solution is applied with a trowel to the surface of the foundation for the bottom row or to the previous row in a layer of 20-25 mm, as well as to the end parts of the cinder blocks. If there are no monolithic cinder blocks, then their voids in the masonry of the initial rows are also filled with mortar.
- Each cinder block is installed at an angle of 90 degrees and pressed into the mortar mixture so that the entire mass sits at once, then the block is leveled by tapping it with a rubber mallet or the handle of a trowel. Some of the mortar will protrude from the seams, so it must be removed immediately and ensure that the seam thickness does not exceed 10-15 mm.
- Subsequent rows of blocks are also laid out from the corner and aligned horizontally. If large distortions of the blocks are observed, then their bottoms should be filed a little.
- For the strength of the structure, reinforcement or masonry mesh is laid every 2-3 rows, and reinforcement of some shafts is often used, in particular, the side shafts of door and window openings and corners and filled with concrete.
- One row before the window opening, a masonry mesh is placed on the wall, and the voids in the blocks above it are also filled with mortar.
- The ceilings of door and window openings are equipped with steel angles, welded reinforcement rods and masonry mesh, then the lintels are enclosed in formwork and filled with concrete.
- On top of the walls, so as not to damage the surface of the upper blocks and strengthen the upper trim, a light belt of concrete with reinforcement 100-150 mm high is usually mounted, which is also a Mauerlat and provides for fastening the roof.
Features of laying hollow cinder blocks
Voids in cinder blocks, on the one hand, reduce their thermal conductivity, but, on the other hand, the area of their adhesion to each other is reduced, so some of their features should be taken into account when laying walls, which boil down to the following.
- In the process of laying walls, the need to cut cinder blocks inevitably arises. Such an operation is usually carried out with the sharp side of a construction hammer or a trowel, but unlike brick, a cinder block is characterized by increased hardness and crumbles easily, so it is more practical to use a “grinder” with a special cutter for working on stone.
- The type of block determines the technology for its installation. So, when laying hollow blocks, the mortar is applied along the edges, and excess masonry mortar is not allowed because, falling into the shaft under its own weight, it disrupts the valuable air gap and increases the thermal conductivity of the walls.
- The formation of cracks in masonry joints should not be allowed, and each time after laying a cinder block, the mortar on the outside and inside is leveled flush with the block.
- Unlike monolithic blocks, reinforcement of hollow cinder blocks is mandatory, since the small area of their contact does not provide sufficient strength to the walls.
- Reinforcement is required for blocks located in the first row, in every 2-3 rows, under window openings, in the area of lintel support and near the insulation. To place the reinforcing rod in the cinder blocks, special recesses are provided, but instead of reinforcement, the use of metal masonry mesh is allowed.
- If you install lintels only made of metal over door and window openings, then there is no need for formwork and a pause when the concrete gains sufficient strength.
- On top of the walls, a concrete belt can be created from hollow cinder blocks, having previously laid a masonry mesh underneath them so that the concrete does not fall through when filling the voids.
- Due to the hygroscopicity of the material, it is not recommended to erect walls in inclement weather, and also during long breaks in work, the building box should be protected from adverse weather conditions.
Geometry
Geometry
Wall blocks are produced in the form of rectangular parallelepipeds with 90-degree or rounded edges. Special blocks are produced for the corners of the building. In addition, stones of special non-standard shapes are made to order. Thus, one can note the good geometry of the individual products and the constructed building as a whole. And even if individual blocks have deviations in size, a one and a half centimeter layer of mortar connecting the rows will level out small (up to 3 mm) errors.
In terms of geometricity, cinder block is not inferior to brick and other stone building blocks.
Video - Geometry of cinder block
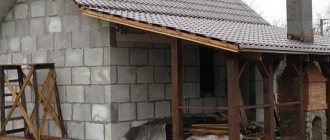
CONSTRUCTION OF THE ROOF
When the box for the structure is erected, all that remains is to put it under the roof, but it would hardly be appropriate to invent a complex roof for a bathhouse in the country. The harmonious completion of the building can easily be achieved with a simple gable roof.
Its construction with your own hands does not cause additional complex problems, and it allows you to equip both a mini-loft and an attic, but before the actual construction of the roof, the bathhouse box made of cinder blocks is allowed to settle for at least half a month.
The roof for a bathhouse made of cinder blocks does not differ significantly from the roofs of other structures. If the Mauerlat is a concrete belt, then it is enough to lay waterproofing and floor beams on it, which will become a good support for the rafters and then the bathhouse ceiling can be easily attached to them.
Roofing felt, metal tiles, corrugated sheets, etc. are suitable as roofing materials. Due to insufficient environmental friendliness, one should refrain from using slate or ondulin as a roof.
Features of ceiling insulation
Bathroom ceiling insulation
When installing a ceiling in a bathhouse, it is necessary to take into account not only the fact that it accounts for up to a third of heat loss, but also the fact that the accumulation of condensate on the surface reduces any insulation measures to nothing. Therefore, vapor barrier from the inside is required here much more than for walls, actually coming to the fore. This type of work in this case requires much more effort than a similar one in a sauna.
Initially, it is recommended to cover the ceiling with hewn and dried boards 40 mm thick
The wider the boards you can find, the more beautiful they will look, no matter what type they are. Even with knots, it will be even more beautiful. It is not advisable to use lining; it may lead
Large thickness of boards is not desirable due to the accumulation of a large amount of cold during periods of absence of heat. This leads to the appearance of condensation on the ceiling while heating the steam room. A layer of waterproofing must be placed on them; this can be a regular greenhouse film or other vapor barrier material. Everything can be covered with a 15 cm layer of dry sawdust or put mineral wool and covered with ordinary clay on top. This is a very good method that our grandfathers used. If it is glass wool, then an additional fiberboard plate is placed on it
It is not advisable to use clapboard; it may move. Large thickness of boards is not desirable due to the accumulation of a large amount of cold during periods of absence of heat. This leads to the appearance of condensation on the ceiling while heating the steam room. A layer of waterproofing must be placed on them; this can be a regular greenhouse film or other vapor barrier material. Everything can be covered with a 15 cm layer of dry sawdust or put mineral wool and covered with ordinary clay on top. This is a very good method that our grandfathers used. If it is glass wool, then an additional fiberboard plate is placed on it.
Purpose of bath rooms
Locker room. The room where you will undress or change clothes must be made warm enough. Usually, cabinets for clothes and shoes are installed in the locker room, and several hangers can be attached. There must be a couple of benches. If you wish, you can hang a mirror.
Waiting room. Plays a protective role. With its help, cold air does not enter the bathhouse. Bathroom equipment and firewood are usually stored in the dressing room. Also, if the space allows, a recreation area is also made there.
Washing room. A must have in every bathhouse. Anti-slip coatings are selected for the floor. The temperature in the washing room should be room temperature, slightly higher than the dressing room and rest room.
Steam room. In this part of the bathhouse there is a stove and shelves for lying on. Their number is individual. Usually taken based on the number of vacationers. A chimney and ventilation must be installed.
Your vision of the bathhouse project may be different. You can expand the room and make it a bathroom and a swimming pool. In the recreation room, for example, install a billiard table. In general, there are many options, the main thing is that they are combined with your capabilities.
How to do it well
You need to carefully select the material for construction, paying attention to the following points:
- Manufacturer. Well-known companies care about their reputation. They have all the necessary certificates confirming the high performance properties of their products. Research aimed at quality control is regularly carried out;
- Price. If the price is lower than that of competitors, then this fact should raise suspicions about the quality of the building material. Typically, a discount is provided due to either proximity of production, or bulk order quantity, or low grade of material;
- Warehouse conditions. The blocks should be stored in a dry place where moisture cannot penetrate;
- Package. Must not be damaged.
Information. The unsuitability of building materials can also be detected through a simple inspection. The way they look can tell a lot about their quality.
When inspecting the blocks, you can glean the necessary information from the following signs.
- On the inner surface. It can be studied by breaking the block into parts. The building material from the inside must be the same as the outside. The pores should not be connected, otherwise the blocks will absorb moisture;
- Pore size. The larger they are, the lower the strength of the building material;
- Color. Since cement is the predominant component of the blocks, their surface should be painted a monotonous gray shade. Too light building material was produced in violation of standards, since it does not contain enough cement;
- Form. If, when you put two blocks together, gaps are found between them, then when building a bathhouse you will need too much mixture or glue;
- Weight. This indicator should also remain within normal limits.
To test a block for strength, you need to try to break off part of its edge by pressing with your hand. If a piece falls off, this indicates poor quality of the material.
Information. Another way to test the block is to pierce it by hand with a large nail. If the nail enters without strong pressure, then it is not recommended to use this building material for a bathhouse.
Building walls
The process of constructing them from the material we have chosen is similar to brickwork: the initial row is made of bonded ones, and the next three are made of spoons. The first row is placed so that they lie across the wall, one after another. The spoon principle is based on the arrangement of blocks along the direction of the wall parallel to it. The division of this building material is carried out with a trowel or the pointed part of a hammer. Laying must be done in such a way that the seams on adjacent rows do not overlap, as this may lead to cracks in the future. The bonded rows are reinforced with a reinforcing mesh placed on them.
Internal insulation
The structure of cinder blocks is porous, which allows for excellent heat retention, but the same porous surface absorbs moisture. Therefore, maximum protection of the walls eliminates the accumulation of moisture inside the blocks.
Before insulation, the internal walls of the bathhouse are lathed with wooden slats at least 50 mm thick, on which a layer of mineral wool, basalt insulation, polystyrene foam or any other material is laid. The thermal insulation layer is covered with foil film or aluminum foil, which performs the function of waterproofing
Particular attention should be paid to the tightness of the joints of all layers
Aluminum foil is used as a material for insulating seams. If such insulation is insufficient, it is possible to lay one layer of non-combustible mineral wool between the wall and the vapor barrier layer.
Flooring
At the beginning of laying the walls, it is necessary to leave pockets for installing floor joists if the project plans to have a wooden covering. Provided that a concrete floor will be poured, this is not necessary. The logs, before being installed in the pockets, are treated with fire retardants and waterproofing impregnation. Additional fastening is made with metal corners. During further construction, a rough coating is laid on the logs to make it more convenient to carry out the remaining work. Upon completion of finishing, the floor is constructed according to the technology chosen for these purposes.
Engineering ways to eliminate deficiencies
If we take into account the fact that blocks made on the basis of foam concrete have significantly more “pluses” than “minuses”, then it is simply impossible to refuse the use of such materials. As a result, builders have to look for solutions to eliminate all the shortcomings of the building material.
First of all, the problem with the fragility of building blocks can be solved by strengthening the foundation. For the construction of buildings made of foam blocks, a special slab base is often used, but it is also possible to use a strip foundation (profiles “T”, “G” and “L”, which do not shrink).
As for the increased hygroscopicity and the negative impact of moisture on foam concrete, these disadvantages of the material can be eliminated by additional finishing of surfaces and their insulation.
Thanks to such simple and affordable processes, it is possible to increase the reliability and durability of any structure almost significantly, and eliminate premature wear and destruction.