Choosing ondulin as a roofing material is a good solution if you have a limited financial budget. But in order for the coating to turn out beautiful and reliable, it is important to correctly install ondulin in compliance with all stages and technology. You can do this on your own. The main thing is a responsible approach and attention to detail.
Recommended Material:
- How to make a roof
- Correct installation of the drainage system
What is the material
Initially, before proceeding with installation, you need to study the properties of the material. Ondulin is similar to slate, however, it has a flexible base. This roof consists of the following layers:
- main board - cellulose-fibre board;
- mineral additives and filler, which are responsible for strength;
- bitumen resin, which guarantees resistance to moisture;
- pigment is responsible for the aesthetics of slate.
The price of 1 m2 of ondulin starts at 200 rubles, so the cost of a sheet with a width of 0.95 m, a length of 2 m, a thickness of 3 mm, a wave width of 9.5 m and a weight of 6.3 kg is 395 rubles. You can buy the material at any hardware store; many also provide home delivery.
Roofing pie
Depending on the purpose and the presence of an insulating layer, the following are distinguished:
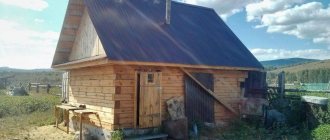
- Cold attic roofs without waterproofing film (lathing + ondulin). The lack of tendency to accumulate condensate allows for such a design in outbuildings and summer cottages with seasonal residence.
- Cold roofs with waterproofing , which have excellent airtightness in comparison with the first group, but do not retain heat. The pie design includes a waterproofing film attached to the rafters, a counter-lattice, lathing and Euro-slate.
- Insulated roofs with one or two ventilated gaps , ideal for residential buildings with permanent residence.
In the first version, the cake consists of a vapor barrier film, insulation in the space between the rafters, an adjacent superdiffusion membrane, counter battens, sheathing and ondulin. In the second, the diffusion membrane is replaced by a film with increased moisture resistance (if necessary, used as a temporary roof), a 2 cm ventilation gap is left between it and the insulation.
Advantages of ondulin
Modern onduline material is produced on the basis of bitumen. The advantages include the following:
- lightness - because of this, there is no need to construct a reinforced rafter system before laying the roof;
- budget cost is ensured due to the manufacturing method and available component materials;
- Elementary care - just spray it with a hose or wait for the rain;
- the material is resistant to acidic and alkaline irritants;
- there is no risk of mold on the surface and inside the layers;
- roofing made of ondulin is environmentally friendly due to the characteristics of the components;
- resistant to precipitation in the form of snow and rain;
- the manufacturer determines the service life of 15-20 years;
- installation of ondulin is possible on top of the old roof, which will save on dismantling.
Common mistakes
Onduline provides a 15-year warranty on the material. On YouTube you can find a large number of videos showing the depressing state of ondulin 10-20 years after installation. It's not the material that's to blame. There may be several reasons:
- Purchasing cheap analogues. The savings will be small, but problems may begin after several years. To avoid this, it is better to take the material from official representatives of the manufacturer. Their consultants always help with calculations and tell you what additional elements are required.
- Poor installation, incorrectly installed rafters, sheathing. Although it is often written that ondulin is easy to install without experience, this should not be done. It is much better if the installation is carried out by a team of professionals. Installation costs will be repaid by the long service life of the roof without the need for repairs or alterations.
- Carelessly made connections to pipes, poor-quality installation of ridges, valleys, gable elements, lack of filler in cracks. Such work requires qualifications, care and experience. It is better if it is done by a specialist. This especially applies to connections to chimneys and ventilation.
An example of careless laying of sheets: crumpled waves, lack of filler, incompletely driven nailsSource ytimg.com
Disadvantages of operation
It is necessary to note the disadvantages of the material in order to ensure the possibility of an objective choice of roofing:
- sun and rain can cause the roof to burn out, which will negatively affect the appearance of the coating;
- resistance to water is ensured only for the service life specified by the manufacturer;
- if you intend to purchase a large volume of slate, then it may turn out that some sheets differ in shade;
- fragility - the surface should not be walked on, as most likely dents or other damage will remain on it; the same criterion should be taken into account during transportation;
- As you can see in the photo, the limited color range currently includes only 4 colors: brown, green, red and black.
The technology for laying ondulin is similar to fastening slate, but before starting work you should do a little preparation.
Laying rules
In order for the roof to be warm, protected from moisture, and for the coating to look great for many seasons in a row, it is necessary to correctly install ondulin sheets. Work is carried out at temperatures not exceeding 30 degrees. Otherwise, the material softens, deforms, and becomes sticky. But it cannot be installed in the cold either, since ondulin tends to crack at subzero temperatures. In general, like any other roofing work, this must be carried out under comfortable weather conditions.
In its structure, ondulin is very similar to slate, only it has many more useful properties and advantages. The wavy structure promotes the most efficient drainage of moisture and also increases the rigidity of the sheet. Sheets can only be installed on a pitched roof; the material is not suitable for flat roofs. Most often, such coating is used for summer cottages and private houses.
The installation of lathing when covering with ondulin is considered mandatory. It helps to avoid unnecessary deformation of the sheets and allows for additional insulation of the roof. To save material, you should not attach stretched sheets, since they will be deformed due to temperature changes and, most likely, it will be necessary to cover the entire surface.
Wooden sheathing is easy to install. In addition, it is an environmentally friendly and well-insulated material. Most owners use wooden sheathing when laying ondulin. The metal profile frame is lighter, but no less durable. It is also able to prevent ondulin sheets from deformation. For such a sheathing you will need a grinder and metal screws with a plastic head.
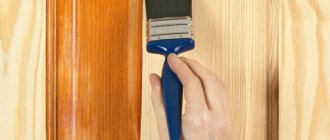
You should not walk a lot on the installed areas: ondulin is quite soft, but if you have to do this, then when installing sheets on already attached ones, you should step on the upper crests of the wave. To cut sheets across the waves, it is better not to use a ruler - this is quite inconvenient, but to cut yourself a pattern from another fragment of the sheet, preferably of a different color. This way the waves fit together and it’s easier to mark them. The material is cut very easily both lengthwise and crosswise, however, for safety it is better to mark all the necessary fragments in advance and cut them off after going down to the ground.
For special nails or screws with colored plastic heads, just use a regular hammer. The material itself, due to its softness, is very easy to pierce, so a lot of diligence is not required, you need to work carefully. The nail must be driven into the crest of the wave perpendicularly to the end, slightly pressing the head. The correct way would be to secure the two outer waves first, then in the middle, then the rest. It is wrong to nail each wave one by one.
Features of working with ondulin
To correctly attach ondulin to the roof, you should learn some of the intricacies of working with this fashionable material. After studying them, you will be able to lay sheets on the roof of any structure yourself.
- If you still need to go through the required material, then it is better to step on the crest of the wave.
- To renew the roof for a long time, it is better to carry out all installation work at an ambient temperature in the range from -5C to +30C. If the temperature is above normal or, conversely, below -5C, reschedule the work to another time.
- Approximately 20 nails are used to fasten one sheet. This is exactly how many nails the sheet can hold in case of gusts of wind.
- Due to the nature of the composition, the coating may stretch. This leads to the appearance of waves over the entire roof area, which will only have to be removed by dismantling. To prevent stretching, the ondulin fastening scheme involves the use of sheets that are perfectly even in shape.
- Check that the overhang is long enough. Too long will look unsightly, and too short will lead to the collection of debris and dust under the roof. The most dangerous thing is that precipitation will constantly fall under the short overhang.
How to avoid mistakes
Understanding the method of producing ondulin should suggest that the material is quite soft, so there are no particular difficulties in dividing or cutting the sheet to the required size. This is also a disadvantage, because if the fixing force is exceeded, the sheet can be damaged to such an extent that it will be impossible to use it. The blows should not be strong or intense. As a result, distortions and gaps may occur through which rain or melt water can enter. The nail is driven only into the upper part of the wave. At the same time, it is easy to bend or simply break through if the lower wave does not fit tightly to the sheathing.
In most cases, the best solution for ondulin sheets will be nails. They make it possible to ensure high quality finishing flooring. Using a nail to fix the ondulin sheet makes it easier to control the applied force. If you screw in a self-tapping screw with a screwdriver, it is not always easy to calculate the required degree of immersion. The total cost of nails per project is lower than the same number of screws.
Note! It is worth choosing nails for ondulin with a length of 70 mm. The diameter of each element must be 3.5 mm
As an alternative, the most common nails will do, but they will require the use of plastic caps
The diameter of each element should be 3.5 mm. As an alternative, the most common nails will do, but they will require the use of plastic caps.
If, nevertheless, it was decided to use self-tapping screws, then the same elements that are used for corrugated sheeting are suitable for ondulin. They are elements with a hexagonal head. Moreover, each self-tapping screw has a rubber seal, which improves the pressure and also seals the hole. You should be careful when choosing material for the sheathing. If oak, pine or acacia is used, which has a lot of knots, then there will be problems with how the nails will fit into the material. To make your task easier, you can dip the nails in solar oil. This is necessary to prevent cracks from appearing in the timber and to prevent corrosion in the fastening material. The process of correct installation of ondulin sheets is shown in the video below.
Advice! It is important to ensure that the oil used does not get on the ondulin, because
It is impossible to wash off the stain.
What you need to prepare initially
Note that the competent selection of the necessary tools and materials is much more important than the installation itself.
Make an accurate calculation of the required amount of coverage. The dimensions of a standard onduline sheet are 200 x 95 cm. Be sure to take into account overlap allowances in your calculations. For overlap you will need to leave 9.5 cm in width and 10-15 cm in length. It turns out that the useful area from one sheet will be 1.6 m2. If you know the total roof area, you can simply divide it by 1.6. This way you will get an almost exact number of sheets needed. Please be aware that results may vary depending on the roof angle and roof shape.
Preparation requires the availability of the following tools:
- hand saw for wood;
- hammer;
- nail puller;
- ladder;
- roof ladder.
In addition, you should purchase auxiliary parts, without which the work will not be of high quality:
- tong elements (protective shields) for the edge;
- cornice filler (foamed polyethylene, which prevents debris from getting between the sheets and the sheathing);
- skate (flexible);
- rubber drip aprons;
- specialist. nail fasteners with a rubber cap.
Additional covering elements
In addition to the ondulin itself as a roof covering, manufacturers also offer a lot of additional elements provided for it, which are made of the same material.
These include the following:
- ridge element;
- endova for ondulin;
- tong parts;
- nails;
- self-adhesive sealant tape;
- cornice filler;
- ventilation tube;
- apron covering.
In order for the roofing covering to look attractive and harmonious, as well as to achieve its greatest efficiency, all accessories used during installation must be original, that is, they must be supplied together with the covering material.
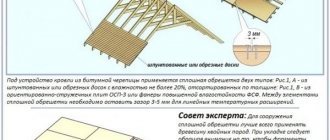
Making lathing and its features
- Laying ondulin on the roof involves arranging a continuous sheathing. It is extremely necessary so that the material does not sag later. For installation, waterproof plywood or OSB boards are used, and the pitch should be 40-45 cm.
- If the roof slope is more than 15 percent, then the sheathing pitch can be increased to 60 cm. And for areas with a lot of snow in winter, the sheathing pitch should be minimal. To build the frame, bars with dimensions of 4 x 5 cm, 5 x 6 cm or 5 x 5 cm are used.
- Install additional sheathing under the gable and ridge. The sheathing under the ridge is installed at a distance of 5-10 cm from its axis. This distance varies depending on the degree of slope of the roof slopes.
- The cornice is formed using a rubber apron, which can bend, enveloping the sheathing of the cornice at any angle. The apron is attached to the sheathing with ordinary self-tapping screws, and the overlap between the elements is 5 cm.
Important! Immediately before the construction of the sheathing, it is necessary to carry out waterproofing work.
- The last thing to install is the wind board, which should protrude 3 cm from the sheathing frame.
- After the frame is erected, be sure to check the entire structure for compliance with the geometry. To do this, measure the diagonal of each roof slope. If the values differ, all errors should be eliminated.
A little history
Ondulin, also known as Euroslate, got its name from the name of the company that began producing it. This happened in 1944 in France, when after the war there was a shortage of building materials. The demand for them was high, but inexpensive products were required. Therefore, she began to produce slate, which contained cellulose instead of asbestos. And the binding component was bitumen.
The roofing material was therefore environmentally friendly and its cost was low. The French company, in addition to ondulin, produced its subtype under the name “ondura”. In principle, this is the same corrugated roofing material, only its dimensions are larger than ondulin. Therefore, its main use is on roofs with large slope areas.
It should be noted that one of the American companies also produced cellulose-bitumen sheets with corrugated molding. They called their products “Nulin”. Since she tried to keep the global ondulin consumption market in her hands, in 2010 she simply bought an American company.
In France, a large number of house roofs are covered with ondulin Source nicefon.ru
Let us add that the French did not transport products to all countries. They preferred to penetrate into them, organizing production. So in 1994 a plant was built in Nizhny Novgorod. Therefore, ondulin is represented on the Russian market by products of this plant. Although it should be noted that small-scale industries are also present. But the quality of their material leaves much to be desired.
Ondulin installation instructions
To properly cover a roof with ondulin, you must adhere to a certain algorithm.
Important! Initially, you should take care of your own safety.
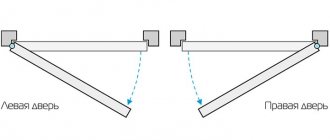
Here are the instructions for laying ondulin with your own hands:
- Attaching the first sheet should begin on the side farthest from the wind, and always from the bottom of the slope. To align the sheets, pull the cord along the bottom edge, taking into account that the sheet overhang should end at a distance of about 5 cm from the drip apron. The extreme wave of the sheet should go onto the wind board. Place the filler in the space of the waves between the sheet and the sheathing, using a screwdriver to free the ventilation holes in it. If this is not done, birds may fly into the holes under the waves, and even hornets may take up residence.
- Special nails are equipped with special heads, so fastening is carried out like this: with a hammer you punch a nail with an open head at an angle of 90 degrees, and after driving it in, put on a decorative cap.
- Remember that you will have three lines of fasteners on each sheet. To get a nail into the sheathing, either mark the sheet or stretch a rope along the sheathing line. It is important to remember that the indentation of the lines along which the nails are driven in will depend on the pitch of your sheathing, however, there cannot be less than 3 lines of nails on the sheet. Next, carry out the fastening according to the diagram below.
- Lay the second sheet overlapping 1 wave, and you will nail its first wave together with the overlap, that is, immediately into the sheathing through two sheets. During the process, make sure that the second sheet does not protrude beyond the boundaries of the lace that regulates the horizontalness of the bottom of the roof. In any other situation, the sheets will lie askew. If you need to cut off the tip of the sheet, you can use a hacksaw.
- The second row, the next row relative to the first, is laid out in checkerboard order. To do this, take and cut the sheet lengthwise in the middle. Install an overlap between the rows of 10-15 cm. If the roof slope allows, then the overlap can be reduced, thereby achieving savings in material consumption.
- After completing the installation of the last segment, you can proceed to attaching roofing accessories that perform the functions of protection and decoration.
- The gable elements are installed on the wind board, which is pressed closely to the ondulin. The overlap of the pliers is about 15 cm. It is nailed to the end with the same nails.
- The ridge for ondulin is attached to the edge of the roof opposite the predominant wind direction, just like the sheets. The ridge is nailed into each underlying wave, on both sides alternately. The overlap of the ridge elements is also 15 cm.
Important! Pay extreme attention to the quality of nail fastening. Their caps will be very visible on the surface, so initially take care of their correct geometry.
Now that you know the step-by-step instructions for installing ondulin, here is a video instruction for a more detailed introduction to the installation process.
Now you can easily cover your roof using ondulin. Perhaps you already have experience working with this material? Share your impressions with the readers below.
Stage I. Roof design
In fact, the roofing covering, which today is called ondulin, is corrugated bitumen sheets. These are organic or inorganic fibers impregnated with bitumen, which are formed into a ten-wave sheet with a compressed multilayer structure.
And some manufacturers cover corrugated bitumen sheets with high-density acrylic, which provides excellent protection from wind, rain and ultraviolet radiation. The surface structure becomes so smooth that dirt that settles on the roof is easily removed by rain and leaves no trace.
That is why the whole peculiarity of ondulin lies in its composition. It is based on natural cellulose (popularly called cardboard), with the addition of mineral granules for rigidity, resin, bitumen impurities and natural dyes.
In factory conditions, cellulose is impregnated with bitumen with additives at high temperature, after which the entire mass is put into a special unit, where it is given a neat wavy shape by mechanical pressure. That's all! The finished roofing material is light, convenient and easy to cut with a regular hacksaw (unlike metal tiles, which require a circular saw).
Ondulin is completely unlike any other roofing covering. That is why, despite the apparent simplicity of installation, it is so easy to make mistakes and ruin this beautiful material. And in order to avoid them, let's first study the features of Euro slate and what exactly can be done with it.
Regardless of the manufacturer, such a roof looks like this:
Here, even at the design stage, decide on the roofing pie. Under ondulin you can make both a cold roof with an attic and a warm one for a future attic. The fact that ondulin supposedly melts and spreads an unpleasant bitumen odor in the heat is not true if we are talking about a proprietary material.
Of course, handicraft products without identification marks can do no such thing. And when Euro slate is simply not intended for a hot sunny climate, like Gutta, in which bitumen spots even appear under the rays of the sun. Therefore, think about the safety of the roof of your home.
Also during the installation process it will be necessary to properly organize the ventilation of such a roof. We have prepared an illustration for you so that you can easily understand these concepts:
It is not difficult to calculate the number of ondulin sheets for roof slopes, the main thing is to know their usable area. So, as we have already said, Ondulin is presented in three versions, and each of them has its own design, dimensions and usable area. for example, Ondulin DIY has fewer waves, while Smart has an additional “smart” lock Smart Lock, and Ondulin Compact sheets are small in size.
Specifically, the usable area is the sheet area without taking into account the end and side overlaps. You just need to divide the area of the slopes by this, and you will get the exact number of sheets. But remember that the overlap directly depends on the angle of the roof, and the greater it is, the less the overlap, and vice versa.
So, at large angles of inclination, it is customary to install ondulin with a side overlap in a wave, and at a small angle, the overlap is made in two waves. On the other hand, the greater the roof slope, the greater the end overlap, because this is necessary to prevent leaks during heavy rain, slanting rain, strong winds and puddles of melt water.
CONCLUSIONS:
- Ondulin is a sheet material for roofing with a base made of organic mass impregnated with bitumen.
- The components of ondulin are a cellulose-fiber base, a mineral filler, resins, and coloring pigments of mineral origin.
- The sheets have standard sizes and weigh only 6 kg.
- The popularity of ondulin is due to its quality characteristics and a number of advantages: water resistance, resistance to temperature fluctuations, etc.
- The material has a number of disadvantages, the main one of which is a low level of fire safety.
- The appearance of analogues on the market requires knowledge of the criteria for selecting a quality product.
- Ondulin is produced in the form of slate and tiles: slate is suitable for simple roofs, tiles are suitable for arranging roofs of complex configurations.
- Before starting installation work, you should make calculations of the required number of sheets of material.
- The work is carried out at temperatures above zero.
- To attach ondulin sheets to the sheathing, nails with specially shaped heads are used.
- It is recommended to lay layers of vapor and waterproofing materials on top of the sheathing.
- The sheets are laid staggered.
- The amount of overlap is determined by the slope angle of the slope.
- Installation of the material is carried out in a zigzag manner.
- The final touch is the installation of cornice strips and ridge.