This supply of water will last for several days.
It is not always possible to provide a country house or cottage with an uninterrupted supply of drinking water. The reasons may be different, but the best solution in such cases would be a water supply system for a private house with a storage tank.
Such a tank itself is a simple design. But installing it and connecting it to the system can raise questions and difficulties. To avoid them, read this article.
Connection diagram and installation of a pumping station for a home
Today, for a comfortable stay in a country house, it is necessary to organize an uninterrupted water supply, because in addition to ordinary water taps, cottages use household appliances that require automatic water supply. To ensure autonomous, uninterrupted water supply to a private home, it is not enough to dig a well or install a borehole. To pump water from the depths of a hydraulic structure and supply it to the house, you need to buy and install a pumping unit. It is better to use a fully automated pumping station. If you install such equipment yourself, then you will need a connection diagram for the pumping station. And the video offered at the end of the article will help you correctly assemble and install such an installation.
Recommendations
When planning to purchase a storage tank and organize its operation in the house, it is worth enlisting the advice of experienced specialists:
- Combine the purchase of a water storage device with the purchase of a filtration device. This way you can get crystal clear drinking liquid. When considering offers on the market, you should pay attention to products. We manufacture and sell water treatment equipment and are ready to help you choose the option that suits you.
- When choosing a water storage tank, do not skimp on quality. If you buy a cheap product, you will probably spend more money on troubleshooting various problems.
- When doing the installation yourself, consider the possibility of dismantling the system for repairs or replacement.
- Be sure to consider grounding to prevent corrosion.
How to flush a reverse osmosis tank
Disinfection of the storage tank
The storage tank must be washed regularly, not only in case of breakdown. It is not possible to wash the inside of the tank mechanically, so it is necessary to use special chemical disinfectants.
There are cases when users become alarmed by the unpleasant taste or smell of the purified liquid
It is important to correctly determine the cause of this phenomenon. Most often this occurs due to a malfunction of the membrane or breakdown of the membrane holder
Another possible option is that a tank filled with water has not been used for 2-3 weeks or more.
To disinfect the internal cavity, it is best to use hydrogen peroxide, chlorine or iodine. The most effective are drugs that contain chloride compounds.
After such disinfection, it is important to carry out high-quality washing with complete filling and emptying of the container, repeating the procedure at least twice. To achieve an effective result, rinsing should be done only with purified water, and not from a water tap.
How it works
Basically, storage water heaters have the following principle of operation, which is based on heating the liquid to a certain temperature, set at the required level in automatic mode. In this case, cold water enters the boiler under pressure, and hot water leaves it under the same pressure.
Basically, electric storage units have an advantageous operating mode - a temperature of 60 to 65°C, which creates comfort for the user. At the same time, heat losses are lower than when the boiler is operating at full power.
The factors on which the heating rate of the liquid depends are as follows:
- unit volume;
- heating element power.
In the first option, the larger the storage boiler capacity, the longer the water takes to heat up. For example, if the electric heater is 100 l, and the heater (heater) with a power of 1.5 kW, then the water will warm up to the maximum in 205 minutes. And if small-volume electric heating units, for example, 22 liters, are installed at home, then the water in it will warm up in just 22 minutes.
Basically, if electric storage units have a large volume, then they require a powerful heating element. If their capacity is up to 150 liters, then they have 1.2 - 2 kW heating elements installed. And if we consider the operating principle of such a heater, we can note that all electric storage units operate the same way, and their operation is based on the so-called indirect heating of water coming from the water supply system into the tank.
In fact, the heater is constantly filled and under pressure. After the heat source is turned on, heated coolant begins to flow into the heat exchanger (it has the shape of a spiral), it cools down and begins to heat the liquid that fills the tank. Circulation is created due to rising heated water from the bottom of the tank. In fact, the effect of such natural circulation allows for uniform heating of the liquid in the boiler. But in order for the water to reach the set temperature, some time must pass, and the entire capacity of the storage water heater will be filled with hot water.
If it is necessary for the water to quickly heat up to a certain temperature, then for your home you should choose electric storage units with layer-by-layer heating. In such an aggregate there is no natural circulation, and the boundary between the layers is lowered.
In the upper part, almost immediately after connecting the water heater to the electrical network, warm water is formed, which is suitable for consumption. When empty, such storage electric units are again filled with cold water, which enters the lower part of the device, and hot water, passing through a pipe located at the top of the storage unit, exits the boiler. This occurs due to the resulting different densities of the liquids, since in this case their intensive mixing does not occur.
Methods for installing a storage tank
The storage tank can be installed underground, openly and inside the house. With the open method, the tank is installed on a hill, thanks to which it will act as a water tower and make the use of a pump unnecessary.
Only a small container is installed inside the house, which does not require much space.
You can hide an arbitrarily large tank underground, and place, for example, garden beds above it. But underground installation will require additional work.
In addition, the container must have a certain configuration. The plastic tank should be round or ribbed, with technological holes for inspection and cleaning. If a “Eurocube” is used, then it will require a concrete shell, since a mesh fence will not save you from soil pressure.
Water supply scheme with storage tank:
Capacity volume and material
When choosing a drive, in addition to other technical nuances, you first need to determine what material its body should be made of and what its usable volume should be for everyday needs.
A plastic container can be installed outdoors without additional protection Source sovet-ingenera.com
Material
Most often, the materials used in the manufacture of the tank body are:
- Polyvinyl chloride.
- Polypropylene.
- Cross-linked polyethylene.
- Stainless steel.
- Steel coated with a layer of waterproof coating - varnish, ceramics.
- Galvanization.
To equip drinking water supply and related household needs (washing dishes, showering, etc.) for a private home, food-grade plastic containers are most often chosen. Its main advantages over metal analogues are inertness, safety (does not emit harmful components), corrosion resistance, durability, light weight - which is convenient for transportation, installation and maintenance.
Buffer tank storage battery for heating
A heating battery installed in the buffer tank circuit can provide fuel savings for heating the coolant in modern systems. It is used both in solid fuel systems and when heating with gas or electric heating.
The storage tank for heating is capable of generating the resulting thermal energy, which is subsequently returned for use in heating water or using it again for heating the room. In the internal cavity there are special reservoir tanks, the dimensions of which depend on the specific model of the product.
Electrical part
The station motor is powered directly from the electric meter through a circuit breaker.
To protect the pump, quickly de-energize the engine in cases of unstable power supply or rotor overload, it is advisable to select a machine 10% more than the rated power. For the station motor used in the example, the rated power is 0.77 kW, taking into account the requirements, you need to use a 3.85 A circuit breaker ((770 W + 77 W) / 220 V), but the closest parameter is 5 A. You can use a circuit breaker with differential control.
As practice shows, conventional circuit breakers with similar current parameters cope with their functions quite well.
Advantages and disadvantages of TA
The dimensions of the TA are impressive
Let's start with the advantages that using a battery tank for hot water and heating gives:
- temperature stability in the circuit;
- fuel economy;
- reducing the number of fuel loads into the boiler;
- the heater fully realizes its power potential;
- the possibility of saving if an electric boiler acts as a heater;
- simultaneous heating of the coolant in the heating circuit and hot water.
There is nothing that does not have its shortcomings. Same with heat accumulators:
- take up a lot of space;
- are expensive;
- need a more powerful boiler.
Everyone understands that every task must be done well and efficiently, preferably adhering to all the rules. In practice, unfortunately, this is not always possible. Here you need to count money, because everything always depends on it. The use of buffer tanks really helps to reduce fuel costs and stabilize the temperature in the circuit. In this case, initially you will need to buy a boiler twice as powerful, which is naturally more expensive, and buy a heat accumulator itself, which is also not cheap. You can make purchases gradually, first make a circuit without a storage tank, and then buy it over time if the desire continues. In this case, you will need to slightly adjust the heating pipe layout.
Interesting on the topic:
- Is there any harm to health from heated floors?
- How to choose heating pipes
- How to connect an electric boiler
- Polyethylene, polyurethane, polymer, etc.
Safety precautions when operating a water heater
All electrical devices require careful handling and compliance with safety measures. Since the device is connected to an electrical power supply, it represents a special hazard class in which injury from electric current is possible.
Therefore, you should always comply with the following requirements to avoid injury and damage to the device:
- It is forbidden to remove the heater body with the plug plugged into the socket.
- The outlet to which the heater will be connected must be grounded.
- You cannot plug in the tank if there is no water in it. You can check its presence by opening the hot water tap. If it runs, it means the tank is full.
- It is necessary to carry out timely maintenance of the tank: cleaning of scale and other impurities. This will protect it from damage.
Cleaning the water heating device from scale and other impurities
It should be remembered that the most vulnerable elements of heaters are the heating element and the storage tank. They are the ones who are exposed to the greatest loads of aggressive environments.
Methods for connecting storage tanks
The tank can be connected to the system in two different ways: by placing it at a high elevation or at or below ground level.
Top position
This scheme of supplying water to a house from a storage tank is practiced mainly in cases where there are no appliances in the house that require good pressure, and the residents’ need for water is minimal - to wash, wash dishes, etc.
And also with frequent power outages. Because water from a tank installed on the roof, attic or overpass flows to consumers by gravity, and such a system does not depend on the presence of voltage in the network.
Such pressure in the system will be insufficient to operate the washing machine, and even taking a shower will be problematic. You can increase it by connecting a booster pump at the outlet of the tank. The advantage of this installation is its simplicity and ease of maintenance of the tank.
However, do not forget about the disadvantages:
- The storage tank takes up a lot of space, taking away useful space from the house;
- If you install it in the attic or outside on a special overpass, then you can use water only in the warm season. Or you need to properly insulate and heat both the tank itself and the pipes going to and from it;
- If the installation instructions were not followed or the system itself has worn out over time, leaks are possible, which can cause a lot of trouble.
As you can see, each homeowner solves these problems differently depending on the needs of the family.
- To prevent the water from freezing, the tank is installed on a heated second floor or attic, sacrificing space.
- Or they use electric heating of a container in the attic. And they pay extra for electricity.
- Or they simply place it on the cabinet, being content with the minimum pressure in the system.
Bottom position
This is a more common and effective method of placement for houses with permanent residence and all the amenities familiar to a city dweller. Such a water supply system with a storage tank must be equipped with an additional pump or pumping station. Without them, the water itself will not flow to consumers, but with it you can get any necessary pressure.
There are also several options for lower placement:
- Ground - when the container is used only in the summer and does not need insulation;
- Underground - the tank is buried in the ground, and only the neck is brought to the surface, providing access to it for repair and maintenance;
House water supply - storage tank underground
Basement - when the house has a heated basement or technical room.
The last option is the most convenient, since the container does not need to be insulated, it is always accessible and does not take up useful space.
The second most popular is the underground option. It also allows you not to use the space of the house, but in this case cleaning and repairs will be fraught with certain difficulties. And the upper part, located above the freezing level, will also have to be insulated.
In addition, not every container can be buried in the ground. It must be durable, with thick walls, stiffeners or metal formwork. Otherwise, you need to build a hard shell for it.
Installation of the tank in a caisson made of waterproof slabs
Design features
The design of the storage tank does not depend on the installation location. There are only a few nuances.
The container is equipped with the following structural elements:
Float valve. It prevents it from overflowing and turns on the pump when the water level reaches the minimum level.
Float switch
- Overflow pipe in case of failure of the float switch. It is located at the top of the tank and connects to the sewer.
- Drainage pipe at the bottom. Designed to remove sediment. They are equipped with storage tanks for water supply located at the top or in the basement of the house. Underground tanks are cleaned through the top hatch.
This photo shows both pipes connected to the sewer system
- The filter located at the inlet will retain some of the suspended particles. It can also be installed at the exit, equipped with a finer mesh.
- Ventilation pipe or breathing valve. If you do not install them in the tank lid, when draining the water, its walls may collapse under the influence of atmospheric pressure.
Cover with breather valve
Possible pipe routing options
The house's water supply scheme is designed with two central pipelines. Usually they are installed at a distant distance from each other. In this case, one pipe is mounted close to the system, and the second is installed in the corner between the wall and the ceiling, or in the floor screed. When choosing option 1, communications can be covered with a decorative box made of gypsum plasterboard (plasterboard sheet). In the second case, a groove is made in the screed, preferably near the wall, a pipe is laid out with permanent fittings, a protective casing is installed on it and the entire line is hidden under a cement-sand mortar.
Water supply system for a private house with a storage tank - diagram
There are two methods of connecting a storage tank to a water supply system - with an upper and lower position.
Top mounted
The tank is installed on the second floor of the house or in the attic. Water towers in villages and small towns operate on the same principle. This option has the following advantages:
- Water flows to water collection points by gravity without the use of a pump, while the water supply system is energy-independent (can operate without electricity)
- The container is easy to install and maintain.
A caveat should be made: although the water flows by gravity, one should not expect strong pressure. As you know, a height difference of 10 m creates a pressure of 1 atm. Thus, if you place a storage tank in the attic of a two-story house with ceilings 3 m high, then the water pressure in the tap on the first floor will be approximately 0.6 atm, and this is without correction for the hydraulic resistance of the pipeline. On the second floor the pressure will be half as much.
Cumulative water supply scheme with two tanks
It makes no sense to install a Charcot shower with such a water supply system, but for a country house it is quite suitable.
A significant drawback of this scheme is that the storage capacity takes up useful space. After all, the attic could be turned into an attic or used to store some things or seasonal equipment. As an alternative solution, you can suggest installing the tank on a special overpass outside the house, but this is purely a summer option.
To use water in winter, you will have to install electric heating and insulation not only of the tank itself, but also of the pipelines leading to and from it.
Bottom mounted
With this scheme, the storage tank is buried in the ground. On the half-meter layer of soil with which the container is sprinkled, you can grow flowers or vegetables, so not a single square meter will be wasted.
In this case, the dimensions of the tank are not limited in any way.
Obviously, this option is also not perfect. First of all, a pumping station will have to be introduced into the water supply scheme, without which water will not get into the tap or washing machine.
The second point: a container located underground is difficult to repair and clean. And lastly: in order to minimize the impact of frost heaving forces, the soil above the tank will have to be insulated.
Storage tank dug into the ground
Features of underground installation:
- The plastic tank must have a round shape or stiffeners, otherwise a concrete shell will need to be built around it.
- It is necessary to provide holes in the upper part for inspection and cleaning.
The tank should be installed with a slope of up to 15 degrees, so that sediment accumulates on one side just under the hatch.
Kinds
Hot water tanks are available in various models. The most common types of structures include a built-in tank, a remote tank and a tank on a pipe. Each of the presented models has both its positive and negative sides.
Built-in
Previously, built-in structures were made in bathhouses immediately during their construction. The lower part of the water tank was connected to the firebox, and then the liquid was heated by the fire in the stove. This is a familiar and standard design that has been used for a long time. Its big advantage is that the water in the tank heats up quite quickly and there is no big hassle with the option of heating the water. Liquid is taken from such a reservoir using a ladle, lifting the lid or installing a tap in the barrel. However, such a tank may have a small capacity. The volume in this case directly depends on the dimensions of the heater or boiler. And also, most of the heat from the stove goes precisely to heating the container with liquid, which reduces the level of heat transfer in the steam room.
Remote
The main convenience of this type of design is that the tank can be installed anywhere, depending on convenience. Such a container is most often placed in washrooms or in the shower near the steam room. The heating device used here is a heat exchanger located in the stove, which is connected to the reservoir using pipes made of copper and brass. The principle of operation is that cold water flows through the heat exchanger, and hot water rises back.
On the pipe
These models are advisable to use when the steam room is used for quite a long time. In this case, the container with water is located above the pipe. Installation of this design is more difficult than others, but has more advantages. The water tank is usually installed in the attic. The heated water retains its high temperature for a long time even after the furnace has stopped firing. The structure itself does not clutter up the space in the bathhouse, as it is located in the attic. This design is good to use in a bathhouse with a large number of people, because the tank holds a large volume of water, and it is heated in an extremely short time.
It is also common to call a hot water tank on a pipe a samovar because of its operating principle. Typically, stainless steel is used for the production of samovar systems. Thanks to this material, the water in the container warms up very quickly.
But it is extremely important to prevent the liquid from boiling in the tank. This rule applies to all types of systems
Also quite a popular model are mounted tanks. This is a very convenient design that is installed directly above the stove, which allows you to heat the water. Such a tank is very convenient to use in a small bathhouse, since the water container takes up little space. But their most typical drawback is that people in the steam room can accidentally touch the hot walls of the tank and receive serious burns. In addition, the volume of such tanks is not always large and the water in them can boil quickly. To do this, it is recommended to periodically drain the water and fill it with cold water. Moreover, such tanks are equipped with taps for draining water.
A corner water tank is installed in the corner of the steam room. This is a plus, since this design does not clutter up the space in the bathhouse.
Horizontal water tanks are oval in shape and more like a barrel.
There are also tanks with the so-called heating element. Heating elements are heating elements that heat water using electricity. Heating elements have also gained particular popularity recently. Even many sauna stoves now operate not with wood, but with the help of these devices. Their leading manufacturers are Helo, and among domestic manufacturers, the Ermak campaign is popular. In addition, there are complex devices in which water can be heated both from the electrical network and from the heat of the stove.
It is also worth mentioning such a model as expansion tanks. The main function of such a device is to compensate for excess pressure in the heating system. This always happens when the water temperature increases. That is, the point is that such a storage tank helps maintain optimal pressure in the system. Expansion tanks are often used for large heating systems, for example, for public baths.
An attached hot water tank is also considered one of the most popular. To heat water, the tank is simply placed against the partition of the furnace, and the water in it is heated.
Preparatory work
A polymer mesh and a check valve are attached to the end of the pipe
Before implementing one of the connection schemes, appropriate preparation of the area is necessary. To achieve this, the following work is carried out:
- Digging trenches to lay a pipeline below the freezing point of the soil. Typically a slight slope is made towards the source to allow the equipment to operate more efficiently.
- After the preparation of the trench is completed, a polyethylene pipe with a diameter of 3.2 cm is laid from the well or well and connected to the pumping equipment. A polymer mesh and a check valve are attached to the end of the pipe. If you do the installation yourself, then in order to do everything correctly, it is better to buy a pipe with a valve and filter mesh already installed.
Advice: if the pipeline is installed above the freezing point, then it is necessary to insulate it. An electric heating cable laid nearby will help to additionally heat the pipes.
What to look for when choosing?
Experts advise installing an expansion tank with a volume of 10% of the volume of the hot water boiler: a 100-liter boiler requires a 10-liter tank, a 200-liter boiler requires a 20-liter tank.
It is important to consider that a smaller capacity means the possibility of more frequent pressure surges. Do not forget that water is stored in the tank
This reserve may come in handy under certain circumstances.
You need to select a special hot water supply tank, for which such a possibility is provided structurally, indicated in the instructions. For example, heating system tanks require higher operating temperatures, but lower pressures. They provide the transfer of coolant at a “hotter” temperature, but the pressure there is relatively low. In such containers, little attention is paid to the hygienic characteristics of the materials. To help the consumer, tanks are made in different colors: blue, blue, white for water supply, red for heating. But it’s better to carefully read the product data sheet to avoid mistakes, since you can’t always trust the labeling.
The safety of using an expansion tank for water is determined by the material of the membrane and tank:
- rubber of natural origin - harmless in cold water, but you should not heat it above 50 degrees - negative reactions are possible;
- artificial rubber is suitable for water of various temperatures - up to boiling - without any consequences;
- rubber (ethylene-propylene) is similar in properties to artificial rubber - it has high performance properties;
- The tanks themselves are most often made of steel.
Another factor in choosing a tank is the manufacturer. A low price can often mean low quality of the product and, as a result, subsequent expensive repairs. A manufacturer with a name and reputation is not ready to sacrifice them, chasing fleeting benefits. They offer tanks and good quality components at reasonable prices.
First of all, pay attention to the membrane material (see above), since the service life of the tank, the quality and safety of the water depend on this
The price of the membrane is not an empty question if we are talking about a tank with a replaceable rubber band.
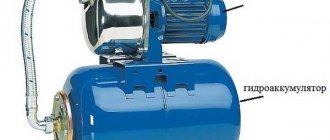
Design and principle of operation of the hydraulic accumulator
Hydraulic accumulators are metal tanks, usually with a volume of 20 to 100 liters. They have an inlet and an outlet. These devices are designed to maintain operating pressure in the water supply network when the pump is turned off.
To do this, there is a rubber membrane inside the metal tank, which stretches when the container is filled with water. When the pump turns off, the membrane, due to the compression force, pushes the water contained in the tank into the network. Thus, the pressure necessary for the operation of plumbing fixtures is maintained in the plumbing system.
Setting up the automation unit
The automation unit consists of a membrane with a working element, a contact group, a housing, and adjusting screws.
Under the influence of pressure, the rubber membrane expands or contracts, while its working element switches the contacts from the “On” position. to the "Off" position At the factory, the pressure switch is set to maintain a pressure of 1.8 - 2.8 bar, that is, when 1.8 bar is reached, the pump turns on, and when 2.8 bar it turns off. A timely inspection of the automation, which consists of cleaning the inlet (connecting port) and the contact surface, allows it to operate smoothly without adjustment. But since the relay contains adjusting devices, let’s consider how the unit can be switched to a different operating range.
Pressure switch.
If you turn the No. 1 stud nut clockwise, the upper response range will increase; if you turn it counterclockwise, this range will decrease. Nut No. 2 adjusts the lower response limit. To quickly achieve the best results, after small changes you should check the results of the adjustment. The device is very sensitive and every setting, even one that is not significant at first glance, leads to a change in the response limit of the device.
Schemes of water supply systems with a storage tank
The water supply scheme for a private house with a storage tank depends primarily on its location and type of source, as well as on the need to increase the pressure in the system and prepare hot water. And the choice of the pump itself, which supplies water to the storage tank, and the accompanying equipment is also not done just like that.
For example:
- If water is taken from a well up to 7-8 meters deep, it is enough to buy a surface pump. A check valve must be installed on the suction pipeline to prevent the flow of water back to the source;
- If the well is drilled into sand with a depth of no more than 15-18 meters, the surface pump must already be equipped with a remote ejector;
- If it is from a deep artesian well, it can only be extracted using a deep submersible pump. In this case, the check valve is placed on the pipe leading from the pump to the house.
Water supply storage tanks - connection diagrams can be as follows:
As you can see, an additional pump on the supply pipeline from the storage tank to the system allows you not only to increase the pressure in it, regardless of the position of the tank, but also to install a boiler for preparing hot water.
If your electricity is often cut off, both this pump and the boiler will be useless. All that remains is the supply of cold and hot water according to the last scheme, with a second tank. Its volume is selected according to your needs, but the larger it is, the longer the water will cool in it.
This can be used to heat the first tank in winter. For example, a storage tank for hot water supply of 1000 liters, installed next to a cold water tank, will not allow it to freeze during the day, even if the water in it is not heated during this time.
There are several ways to heat water for this scheme:
| Scheme | Description |
| Direct heating | Using a gas or electric heating boiler. |
Heating with bottom tank | Using a stationary wood stove. |
| Heating by heating element | Using a tubular electric heater - heating element. |
Storage water heater
The design of a storage water heater is quite simple.
The main element of the device is a water container made of stainless steel or aluminum. If the tank is made of simple steel, then its inner surface of the tank is covered with special materials that improve its performance characteristics and corrosion resistance. A heating module consisting of one or several heating elements is installed in the storage tank. Heating elements can be “wet” or “dry”. In the first case, the heating element is in direct contact with the water, and in the second, it is placed in a tube, which heats the water.
This entire structure is placed in an outer casing and insulated from it with a special thermal insulation material. A thermostat and other necessary sensors connected to the automation system and information modules are installed in the tank. A control system, mechanical or electronic, is mounted on the outer shell of the device. Below is a classic diagram of a storage water heater in section with the minimum required set of elements.
The principle of operation of the boiler is based on the properties of water at different temperatures.
Warm liquid tends to rise, and cold liquid flows down. It is on this physical phenomenon that the work of all storage water heaters is based. Cold water is supplied from the bottom of the device and heated by a heating element. As it rises, it is removed from the tank through a high hot water intake pipe. The process itself is simple, but for reliable operation of the entire system, the installation of additional elements and systems is required both inside the tank and on the protective casing.
A magnesium anode is installed inside the storage tank, which is necessary to reduce the amount of free ions in the water. This element can significantly reduce corrosion of the internal parts of the boiler. A thermostat is also installed in the tank, allowing you to regulate the water temperature and turn off the heating elements when the required temperature is reached. The entire process of heating and extracting hot water from the boiler is shown in the following figure.
Most electric storage water heaters are equipped with temperature sensors, with readings displayed on an electronic display or mechanical thermometer.
Cold water is supplied through a tap with a non-return safety valve.
The boiler operating modes are controlled both by electronic modules and by mechanical regulators in simpler models.
The advantages of storage electric water heaters include the ability to heat large masses of water and low energy consumption, and the disadvantages are high cost.
Single-pipe connection diagram
Installation of input and output lines
The distant connection of the pumping station is carried out in the following sequence:
The second end of the pipeline with a mesh and a check valve is attached to the inlet pipe of the pump unit. The pipe section is selected according to the diameter of the pipe. To avoid leaks and air leaks, all connections are carefully sealed. Otherwise, interruptions in the operation of the pumping equipment may occur or the water will flow in jerks. The photo below shows a diagram of connecting pumping equipment. To connect, we use a combined coupling made at an angle of 90 degrees and an American tap.
When the installation of the input main for the water supply of a country house is completed, we similarly connect the output main
- When the installation of the input main for the water supply of a country house is completed, we connect the output main in the same way.
- Before starting the installation for the first time with your own hands, you need to pour water into the pumping equipment through a special hole.
Connection to water supply
To correctly connect the water supply unit to the water supply with your own hands, you must use special connecting elements called fittings. To securely fasten the pipeline to the inlet and outlet openings, a special connecting piece is attached. The pumping station is connected to the water supply system using a special insert or tee.
For high-quality water purification, in addition to the coarse filter, which is mounted at the entrance of the pipeline to the pumping station, a deep purification filter is installed at the entrance to the internal water supply system of the house. Only after this can a test run of the equipment be performed.
Emergency overflow and drain
To protect against flooding of the room in cases of overfilling of the container, an emergency overflow is installed in its upper part, consisting of:
- transition with a diameter of 1 inch;
- corrugated hose with a cross section of 32 mm;
- siphon for washing;
- fastenings for sewer pipe 50 mm.
A tee with a 45-degree outlet was installed into the existing sewer system. The outlet pipe of the siphon is connected to the tee through a rubber transition from a diameter of 32 mm to a cross-section of 50 mm. For reliability, these components are treated with silicone sealant.
When it is not possible to supply liquid by the pump (breakdown, no electrical power), the water is drained through an emergency drain located in front of the suction line check valve.
In this case, the drain valve 26 is placed as close to the bottom as possible.
Installation process
The most affordable option for organizing an autonomous water supply system in a house or bathhouse is to install a container in the attic.
To do this, you need to make or purchase a bath tank of the required volume and configuration.
The container is installed on the top beam or in any convenient location in the attic.
Installation work is carried out in stages:
- The base under the water tank is being strengthened. The floor beams are covered with wide boards.
- The drive is installed on the prepared base.
- A float type valve is being installed. Step back 7.5 cm from the top edge, make a mark and cut out a hole of the required diameter. The tail part of the valve with a plastic sealing washer is threaded into the hole. A special stiffening plate is installed on the opposite wall of the container, another sealing washer is installed, and a nut is screwed on. All fasteners are securely fixed, a connector is screwed to the tail part, with which the water pipe is connected.
- Holes are made for outlet pipes of the required size. A connector with a washer is screwed into the finished holes on the inside of the container. The thread is strengthened with a special tape. Next, put on the washer and tighten the nut.
- Shut-off valves are inserted into the outlet pipes.
- Overflow is in progress. To do this, set a mark 2.5 cm below the location of the float-type valve and make a hole. The overflow pipe is led into the sewer system and secured to the walls of the tank using connectors using a similar principle. Next, the pipes are connected with compression fixation. The finished sections of the pipeline system are mounted to the walls of the tank and a wooden base.
- The connected tank is filled with water to check the tightness of the system, as well as to regulate the float valve.
- The container is insulated using polystyrene sheets or rolled mineral wool.
In this simple and reliable way, you can set up an autonomous water supply system, the main element of which is a storage tank for a bathhouse or home.
Functions, purpose, types
Installation location - in a pit or in a house
In the water supply system of a private house without a hydraulic accumulator, the pump turns on whenever water flows somewhere. These frequent starts lead to wear and tear on the equipment. And not only the pump, but the entire system as a whole. After all, every time there is an abrupt increase in pressure, and this is a water hammer. To reduce the number of pump starts and smooth out water hammer, a hydraulic accumulator is used. The same device is called an expansion or membrane tank, a hydraulic tank.
Purpose
We found out one of the functions of hydraulic accumulators - to smooth out water hammer. But there are others:
- Reducing the number of pump starts. There is some water in the tank. With a small flow rate - wash your hands, wash yourself - water flows from the tank, the pump does not turn on. It will turn on only when there is very little left.
- Maintaining stable pressure. This function requires one more element - a water pressure switch, but they maintain the pressure within the required limits.
- Create a small supply of water in case of power outage.
Installing a hydraulic accumulator in a pit
It is not surprising that most private water supply systems have this device - there are many advantages from its use.
Kinds
The hydraulic accumulator is a tank made of sheet metal divided into two parts by an elastic membrane. There are two types of membrane - diaphragm and balloon (bulb). The diaphragm is attached across the tank, a pear-shaped cylinder is secured at the inlet around the inlet pipe.
According to their purpose, they are of three types:
- for cold water;
- for hot water;
- for heating systems.
Hydraulic tanks for heating are painted red, tanks for water supply are painted blue. Expansion tanks for heating are usually smaller in size and lower in price. This is due to the membrane material - for water supply it must be neutral, because the water in the pipeline is potable.
Two types of hydraulic accumulators
Depending on the type of arrangement, hydraulic accumulators can be horizontal or vertical. Vertical ones are equipped with legs; some models have plates for hanging on the wall. It is the elongated upward models that are most often used when independently creating water supply systems for a private home - they take up less space. The connection of a hydraulic accumulator of this type is standard - through a 1-inch outlet.
Horizontal models are usually equipped with pumping stations with surface-type pumps. Then the pump is placed on top of the tank. It turns out compact.
Principle of operation
Radial membranes (in the form of a plate) are used mainly in gyroaccumulators for heating systems. For water supply, a rubber bulb is usually installed inside. How does such a system work? As long as there is only air inside, the pressure inside is standard - the one that was set at the factory (1.5 atm) or that you set yourself. The pump turns on, begins to pump water into the tank, and the pear begins to increase in size. Water gradually fills an increasingly larger volume, increasingly compressing the air that is located between the wall of the tank and the membrane. When a certain pressure is reached (usually for one-story houses it is 2.8 - 3 atm), the pump is turned off, and the pressure in the system stabilizes. When you open a tap or other water flow, it comes from the accumulator. It flows until the pressure in the tank drops below a certain level (usually about 1.6-1.8 atm). After which the pump turns on, the cycle repeats again.
The operating principle of a gyroaccumulator with a pear-shaped membrane
If the flow rate is large and constant - you are filling a bathtub, for example - the pump pumps water in transit, without pumping it into the tank. The tank begins to fill after all the taps are closed.
A water pressure switch is responsible for turning the pump on and off at a certain pressure. In most hydraulic accumulator piping schemes, this device is present - such a system operates in optimal mode. We’ll look at connecting the hydraulic accumulator a little lower, but for now let’s talk about the tank itself and its parameters.
Large tanks
The internal structure of hydraulic accumulators with a volume of 100 liters and above is slightly different. The pear is different - it is attached to the body both at the top and bottom. With this structure, it becomes possible to fight the air that is present in the water. To do this, there is an outlet in the upper part into which you can connect a valve for automatic air release.
The structure of a large hydraulic accumulator
Popular models
It's time to understand the most popular models of heat accumulators for heating systems. We will consider products from domestic and foreign manufacturers.
Heat accumulator for heating boilers made in Russia Prometheus
The manufacturer of Prometheus heat accumulators is Novosibirsk. It produces models with volumes of 230, 300, 500, 750 and 1000 liters. The equipment warranty is 5 years. The heat accumulators are equipped with four outlets for connection to heating and heat sources. A layer of thermal insulation made of mineral wool is responsible for preserving the accumulated energy. The working pressure is 2 atm. maximum – 6 atm. When purchasing equipment, take into account its dimensions - for example, the diameter of a 1000-liter model is 900 mm, which is why its body may not fit into standard doorways 80 cm wide.
The price of the presented heat accumulator for heating systems varies in the range from 65 to 70 thousand rubles.
SPSX-2G 1000
Another capacious heat accumulator for 1000 liters of water. It is equipped with one or two smooth-tube heat exchangers, but lacks thermal insulation, which must be taken into account when installing it - it will have to be purchased separately. The diameter of the case is 790 mm, but if thermal insulation is added to it, the diameter increases to 990 mm. The maximum temperature in the heating system is +110 degrees, in the DHW circuit – up to +95 degrees.
Buderus Logalux P 500-1000/5
These heat accumulators are available in modifications with six or ten connections. Temperature sensor terminals are also provided on board. The tank capacity is 960 liters, operating pressure is up to 3 bar. The thickness of the thermal insulation layer is 80 mm. The use of liquids other than water as a coolant is not allowed - this applies to both circuits, and not just the heating circuit. If necessary, it is possible to connect several heat accumulators in series into a single cascade.
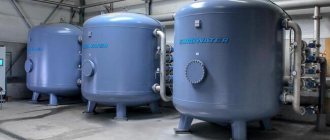
Types of reserve tanks (water storage tanks) for cold water
In accordance with the technical characteristics and configuration features, water storage tanks are divided into several classes according to:
- Form. They are produced in round, rectangular, cylindrical, and in the form of non-standard models.
- Design differences: closed or open.
- The material from which the tanks are made. The most common are metal, polypropylene, stainless steel, and plastic.
- Volume. Water storage tanks have a capacity from 7 to 500 liters.
- Purpose: for hot water supply, hot water supply, heating systems and irrigation.
- Installation method. Possible vertical or horizontal placement, underground or wall mounting.
Automation and tank cleaning
These aspects must be taken into account when installing the tank. If water is supplied with normal pressure and a certain frequency, then the issue can be solved quite simply by installing a float valve for the toilet on the supply fitting. When filling the container, it will shut off the supply and the water will not overflow.
If water is taken from a shallow well or poorly filled well, then to supply it you need to use a drainage pump equipped with a float switch. When the water level in the well drops to a critical level, the pump will automatically turn off.
If the water supply storage tank releases water through a pump, then a float or other switch will be required inside the tank itself. When the water level drops to a minimum, the pump will turn off. You can duplicate it with a water level, which is useful when using a washing machine to make sure there is enough water for the wash.
Volume of the tank
In the event of problems with the city water line and a water outage, repair work is usually completed within a day or two. However, accidents also happen on holidays, and in places where quick repairs are simply impossible, then you will have to wait much longer. The optimal supply of water for 2-3 days will be for using the toilet, maintaining personal hygiene and cooking.
For a family of three people, 100 liters per day is enough when using water in economy mode. One wash requires approximately 80 liters of water, more precisely you can find out in the passport for the washing machine. Same for the dishwasher.
It turns out that for 2-3 days when using household appliances, you need to look for a storage container with a volume of at least 500 liters, half a cubic meter.
However, there are a number of restrictions:
- The larger the volume of water and an open storage tank, the faster it will begin to become overgrown with sediment. It is not recommended to use containers larger than 200-250 liters in everyday life for long-term storage of water.
- The safety margin of the floor and load-bearing walls should be taken into account. The installation of the tank must be planned at the design stage of the house.
- When using an autonomous water supply, the volume of the storage tank, especially the membrane type, should not exceed the flow rate of the well. If this rule cannot be observed, then the pump must be protected from idle running.
Membrane-type storage tanks are limited in volume and are not able to release the entire supply of stored liquid. To form a reserve of over 300 liters, you will have to connect several tanks of smaller capacity in parallel to each other.
Choosing a location for installation
The pumping station must be installed in a heated room or caisson, since the unit cannot operate at sub-zero temperatures
The pumping station must be installed in a heated room or caisson, since the unit cannot operate at sub-zero temperatures. To choose the right installation location, you should adhere to the following recommendations:
- It is better to choose a place to which the heating system can later be installed.
- There should be no other energy sources present in this room.
- To facilitate maintenance and repair, free access to the pumping station must be provided.
- The closer the station is to the source, the better.
Taking these recommendations into account, the following location options are suitable for installing a pumping station:
In a residential building or country house, you can allocate a separate room for these purposes, for example, in the basement
At the same time, it is important to perform sound and heat insulation. As a result, no noise will be heard in the house when the unit is operating, and in winter the optimal temperature will be ensured.
This method is the most suitable from the point of view of ease of equipment maintenance. If there is no free space in the building where you can install equipment, try to build a heated extension to the cottage or build a separate structure, which requires careful insulation. The arrangement of a separate structure is unprofitable in terms of additional costs, but it allows the noise during operation of the unit not to disturb the residents of the house. Installation in a caisson. This is a special sealed insulated chamber, which is installed on the site (not far from the water intake) below the soil freezing mark.
Nuances of choosing a storage tank
When choosing a suitable water storage tank, focus on the needs of future consumers of the water resource. Determine how many people will use it. Also count the number of water intake facilities in the house or apartment. These include: kitchen taps, showers, various household appliances that consume H2O during operation. Plus, consider the possibility of use by several people at once. So that it doesn’t happen when one family member is washing, and the second cannot wash the dishes at that time.
Purpose
Tanks are used for collecting and storing drinking liquids and other non-aggressive substances that meet the food category. A variety of sizes of water supply storage tanks with and without a pump for water in an apartment allow you to save a sufficient amount of resource. A certain amount of reserves is especially relevant during systematic supply cuts. And also in cases where there is no source on the plot.
Shape and volume
Many who in practice have encountered the purchase of reserve capacity believe that the optimal displacement should be 250 liters. This is exactly the amount of liquid that will be sufficient for mass flow. For example, it will be spent cleaning the house, washing the car, filling the bath. The aqueous solution will constantly move without stagnating. 150 or 200 liters is not enough for this.
However, it is impossible to confidently recommend any specific parameters. The most common but valuable substance - H2O - is consumed differently by everyone. Therefore, when purchasing a storage tank, focus on the needs of your household.
Materials
Manufacturers produce devices of two types: metal and plastic.
The first option is products made of stainless steel, which is impervious to mechanical damage and rust. In this regard, metal models are quite expensive and are often made to order. To avoid the negative effects of corrosion when collecting and storing hot liquid, the tanks are coated on the inside with heat-resistant enamel.
Storage tanks made of plastic are the most practical and common. They are easy to manufacture, light weight and low cost.
Features of design choice
When constructing a water supply system for a private home, each owner strives to obtain stable water pressure, regardless of the number of water consumption points
When constructing a water supply system for a private home, each owner strives to obtain stable water pressure, regardless of the number of water consumption points. An automatic pumping unit is needed to lift liquid from the depths of a hydraulic structure and supply it to the house. Today you can find a wide range of pumping devices on sale, differing in power, performance, principle of operation and location. Thus, surface models are designed for installation in a house, caisson or special building. They are easier to repair and maintain, but noisier. The motor of a submersible unit is installed deep in a well or borehole, and the rest of the equipment is installed on the surface. The operation of such a device is quieter, but its maintenance is more difficult.
If you use a conventional deep-well pump to provide water supply to your home, it will very quickly fail due to the fact that it will work very hard. In this case, installing a pumping station is more preferable, since each opening of the tap in order to fill the kettle with water or wash your hands will not cause the pump to start. Since each device is designed for a certain number of on and off cycles, this will extend the service life of the installation.
A pumping station for water supply to a country house or cottage consists of the following components:
- pumping device (surface or submersible);
- filter device (purchased separately);
- a hydraulic accumulator with a rubber membrane that allows you to maintain pressure in the system, or a storage tank;
- control unit allows you to monitor the pressure in the hydraulic tank and start and shut down the unit (a float switch can be used instead).
Important: to provide water to a private home, it is better to install a pumping station with a hydraulic accumulator and control sensors. The thing is that a system with a storage tank is more difficult to install; it needs to be installed only in the attic of the house, since the liquid flows to the consumer by gravity
In addition, units using a storage tank do not create a certain pressure in the system
The thing is that a system with a storage tank is more difficult to install; it needs to be installed only in the attic of the house, since the liquid flows to the consumer by gravity. In addition, units using a storage tank do not create a certain pressure in the system.
Unlike a storage tank, pressure is created in the hydraulic tank, which ensures a constant pressure supply even to several consumers. In addition, the installation of such a device can be carried out in the basement of the house. You can learn how to install and connect such a product from the video provided at the end of the article.
How to choose a drive
When choosing a tank, you need to pay attention to two main parameters: volume and material of manufacture.
Volume
The storage tank should not be confused with a hydraulic accumulator. And it’s not even that the second one is a pressure tank that regulates the pressure in the network thanks to the pressure of compressed air on the rubber membrane.
The maximum volume of the hydraulic accumulator is only 100 liters, the standard is 24-50 liters. This is very little to supply water as usual in the situations described above.
The hydraulic accumulator is not able to compensate for a long absence of water in the system
To understand how much capacity you need, you need to analyze the following factors:
- Required water flow per unit time. It can be calculated approximately by adding up the nominal consumption of all appliances in the house - faucets, toilets, washing machine and dishwasher. Another calculation method suggests multiplying the daily water requirement of one person by the number of family members. But this need is different for everyone and also depends on the availability of amenities in the house. It can be 60 or 200 liters per day. Therefore, be guided by your habits and conditions.
Average water consumption per person for different needs
- Performance of an autonomous source or schedule of a centralized system. For example, if water or electricity is turned off for a maximum of a couple of hours, a 100-liter barrel may be enough for you, but it’s a completely different matter if this happens often and for a long time. There is also no point in installing a five-cubic-meter tank if your well can pump no more than 500 liters into it per day.
Material
If you are planning a drinking water supply for your dacha, the storage tank must be made of materials that do not react with water and do not affect its taste, smell and quality. And this is either stainless steel or food-grade plastic.
Increasingly, preference is given to plastic, as it is much cheaper and more durable, especially when it comes to underground containers. In addition, it is lightweight: even a tank of impressive size can be installed with your own hands without the involvement of a bunch of assistants or special equipment.
To get a rough idea of prices, look at the options presented in the gallery:
200 liters 3200 rubles
500 liters 7900 rubles
750 liters 10,500 rubles
Eurocube 1000 liters 14800 rubles
Capacity for underground installation for 5000 liters 24400 rubles
Metal tank for 1000 liters 41,000 rubles
As you can see, stainless steel tanks are several times more expensive. It is more profitable to buy plastic ones, but you need to make sure of the quality of the material and its purpose - for storing drinking water.
Automation and tank cleaning
These aspects must be taken into account when installing the tank. If water is supplied with normal pressure and a certain frequency, then the issue can be solved quite simply by installing a float valve for the toilet on the supply fitting. When filling the container, it will shut off the supply and the water will not overflow.
If water is taken from a shallow well or poorly filled well, then to supply it you need to use a drainage pump equipped with a float switch. When the water level in the well drops to a critical level, the pump will automatically turn off.
If the water supply storage tank releases water through a pump, then a float or other switch will be required inside the tank itself. When the water level drops to a minimum, the pump will turn off. You can duplicate it with a water level, which is useful when using a washing machine to make sure there is enough water for the wash.
Briefly about the main thing
The storage tank ensures constant water supply in a private home in the event of a planned or sudden shutdown of the central water supply or breakdown of the autonomous system. It eliminates the problems of water supply failure associated with a number of the following reasons - low well productivity, equipment breakdown, siltation of the source, power outage, etc. In addition, it reduces the load on equipment and pipes and extends their service life.
A standard water tank consists of the following elements:
- Cases.
- Inlet, outlet and drain tubes.
- Float mechanism.
- Filter.
- Luke.
- Drainage pipe.
- Diffuser.
- Ventilation.
The tank is classified according to several criteria - shape, design, material, volume, purpose, installation method. When choosing it, volume and material are first taken into account. Installation is possible both in an autonomous system and in conjunction with a centralized water supply. In each case there are several installation methods.
Ratings 0
The need for water storage
In an apartment in a multi-storey building, you can connect a small reserve tank.
Intermittent water supply creates problems and inconveniences. This happens if water is supplied to the tap for several hours a day. Another example is a well; the well does not have time to fill due to intensive water extraction.
In order not to depend on these conditions and to use water constantly, a storage tank is included in the water supply system of the house. It accumulates a supply of moisture and ensures its uninterrupted supply to the pipes.
With a minimum flow of water into the system, it will gradually accumulate and then, if necessary, fully meet consumption. The hot water system also requires a thermal tank.
Why is it needed and how to use it
If for some reason the pump in the autonomous water supply system does not work, or there is no pressure in the centralized city water supply, then it can be supplied to the sink or toilet cistern from a pre-filled reserve container. Simply put, it is better to always have a supply of drinking water in the house and use it in emergency situations.
For the convenience of using a reserve supply of water, the storage tank must be integrated into the water supply so that it is either automatically used in the absence of external pressure, or it can be activated by simply turning the valve.
There are many variations on how to install and connect a storage tank, depending on the type of water source, the possible location of the tank and even the layout of the house. It is enough to choose the appropriate option and decide on the type of storage tank itself.
Basic operating rules
After putting the station into operation, it is necessary to carry out regular preventive inspections. If necessary, wash the filters and tighten the threaded joints. If the filters become clogged, water begins to flow into the network in pulsating jerks, and sometimes stops flowing altogether. The frequency of filter washing depends on the quality of the water in the well.
The hydraulic accumulator should also be inspected approximately once a month. If the pressure reading in its air chamber is below the required level, then it should be raised using a car pump through the nipple. For proper operation and maintenance of the device, you need to carefully read the diagram of the pumping station and the manufacturer’s recommendations, usually indicated in the technical instructions.
Types
The storage tank can be a container with sufficient internal volume, made of a material that is resistant to corrosion and safe for storing drinking water. The following materials are used:
- polyvinyl chloride;
- cross-linked high or low pressure polyethylene;
- polypropylene;
- stainless steel;
- steel coated with waterproof varnishes and ceramic coatings.
Plastic Tanks
Although galvanized steel is corrosion-resistant and waterproof, over time the protective layer of zinc can wear thin, especially at joints and welds.
By design there are:
- open containers that have a neck with or without a lid, but with sealed walls and bottom;
- closed, completely sealed membrane-type containers.
In the first case, everything is simple: the entire internal volume is filled with water and, if necessary, drained through a pipe fixed at the lowest point.
In the case of membrane storage tanks, the useful volume is at least a third less than the volume of the entire structure. Part of the volume is allocated under the air chamber, separated from the water using a durable elastic membrane. As the container fills with water, the membrane presses on the air chamber, creating excess pressure. When it is necessary to get water back, the valve opens and it enters the water supply system under the influence of accumulated pressure.
Rules for starting and setting up equipment
Before starting the pumping equipment for the first time, it is first necessary to prepare the hydraulic accumulator, since the stability of the entire water supply system depends on the correctly selected pressure in it. A high pressure in the tank will provoke frequent switching on and off of the unit, which will not have the best effect on its durability. If there is low pressure in the air chamber of the tank, this will lead to excessive stretching of the rubber bulb with water, and it will fail.
The hydraulic tank is prepared as follows. Before pumping air into the tank, make sure that the bulb inside it is empty. Next, check the pressure in the tank with a car pressure gauge. Typically, new tanks are filled with air at the factory. Hydraulic tanks up to 25 l should have a pressure in the range of 1.4-1.7 bar. In containers of 50-100 liters, the air pressure should be in the range from 1.7 to 1.9 bar.
Advice! If the pressure gauge readings are lower than recommended, then you should pump air into the tank using a car pump and adjust it, referring to the pressure gauge readings.
First launch of the station
To correctly start the pumping station for the first time, perform the following steps step by step.
- Unscrew the plug that closes the water hole located on the unit body. Some devices may have a valve instead of a plug. It should be opened.
- Next, fill the suction pipe and pump with water. Stop pouring liquid when it begins to flow out of the fill hole.
- When the suction pipe is full, close the hole with a plug (close the valve)
- Connect the station to the power supply and turn it on.
- To remove remaining air from the equipment, open the tap at the water intake point closest to the pump.
- Let the unit run for 2-3 minutes. During this time, water should flow from the tap. If this does not happen, then turn off the pump and refill the water, and then start the pumping station.
Setting up automation
After a successful launch, you need to check and configure the operation of the automation. The new pressure switch has factory settings for the upper and lower pressure thresholds, upon reaching which it turns the pump on or off. Sometimes it becomes necessary to change these values by setting them to the desired on-off pressure.
Automatic adjustment occurs as follows.
- Turn off the unit and drain the water from the accumulator.
- Remove the cover from the pressure switch.
- Next, you should start the pump so that water begins to flow into the hydraulic tank.
- When turning off the device, write down the pressure gauge readings - this will be the value of the upper shutdown threshold.
- After this, open the tap at the most distant or highest point of water intake. As water flows out of it, the pressure in the system will begin to decrease, and the relay will turn on the pump. The pressure gauge readings at this moment will indicate the lower switching threshold. Record this value and find the difference between the upper and lower threshold.
Normally, the switching pressure should be 2.7 bar, and the switching pressure should be 1.3 bar. Accordingly, the pressure difference is 1.4 bar. If the resulting figure is 1.4 bar, then nothing needs to be changed. If the pressure is too low, the unit will turn on frequently, which will cause premature wear of its components. If it is too high, the pump will operate in a more gentle mode, but the difference in pressure will be obvious: it will be unstable.
Advice! To increase the pressure difference, tighten the nut on the small spring. To reduce the difference, the nut is loosened.
When checking the operation of the relay, pay attention to the pressure with which water flows from the tap. If the pressure is weak, then pressure adjustment will be required. In this case, the pressure in the system should be higher. To raise it, turn off the device and slightly tighten the nut that presses the large spring of the pressure switch. To reduce the pressure, the nut must be loosened.