Only high-quality fittings (hinges, handles and locks) should be used for arranging baths and saunas
Buy sauna doors produced by the AKMA plant. Equip with additional fittings and buy fittings for sauna doors.
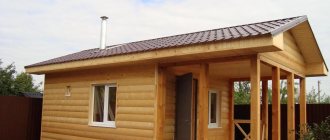
During the construction of a bathhouse, it is necessary to take into account many functional aspects, which will subsequently shape the efficiency, reliability and durability of the entire structure. In the article we will consider in detail such a stage as installing a door in a bathhouse, since this element is designed to reduce heat loss and increase the comfort of the room.
Hinges for bath doors, handles on bath doors - all about the main fittings
Published by: admin in Doors 02/10/2019 0
The fittings that are used in the bathhouse are practically no different from those that we could use in any other room, but still it has its own specifics. Because the bathhouse is characterized by high humidity and temperature. Both impose restrictions on the materials used. In particular, metals should be stainless, and objects with which a person comes into contact should not heat up too much. But first things first.
On sale you will find several classes of door hinges, here they are:
All of them are suitable for use in a bathhouse, you just need to choose something that organically combines with the chosen style. In other words, wall-mounted ones are good in a traditional bathhouse, while screw-in ones are good in a modern sauna with an electric heater and a glass door.
External ones are located entirely outside the door. The fastening is not hidden; on the contrary, it is made a decorative element.
Once upon a time, long overhead hinges were also intended to protect the door leaf from deformation. Now the same can be achieved in other ways, so the length is not important.
As mentioned above, this type of hinge is good in a traditional bathhouse - a log house, for example.
Their design is interesting: there should be a pin inside that acts as an axis of rotation. But with this design, an ordinary cylindrical pin would fall out of the loop. Therefore, it is riveted on one or two rotating parts.
These were external invoices. And then there are internal ones, and their structure is completely different. This is a type of card loop that does not require insertion due to its reduced thickness. You will understand everything if you look at the photograph demonstrating the structure of the butterfly loop. Due to its design, it is twice as thin as a simple card loop, which is of the mortise type (see below).
When, in order to connect the door to the frame, you first need to work a little with a chisel, choosing a layer to match the thickness of the fittings, then such hinges or canopies will be called mortise.
They are durable and have proven themselves in use. Another name is card games.
There is a slight difference between card awnings and hinges. It lies in the length and fixation of the axial pin.
The canopy has a short axial pin; it is fixed in the bottom card, which is screwed to the door frame. And for hinges it is end-to-end, unsecured, passing through the rotating parts of both cards. The pin has a thickening on top that prevents it from falling, and a decorative plug is placed at the bottom. (During installation, the plug must not be on top!)
Card hinge with bearings
In modern card hinges, bearings can also be added, which are located between the rotating parts of the cards.
The main advantage of canopies is the ability to quite easily remove the door if necessary. But this is only if the platband does not interfere with this.
However, card hinges also have the advantage of being neither right nor left, because the position of the axial pin can be freely changed.
Here, too, there is a choice between canopies and hinges, with the same difference in the fixity of the axial rod. The main difference from card ones is the absence of flat parts: the fastening is welded directly to the rotating parts.
Their device can be seen in the following figure.
It is already clear from it that the structure of the door leaf must be different from the usual one in order to install such hinges or canopies. And indeed, the door for such fittings (the leaf itself) should have a so-called false quarter, that is, protrude somewhat above the frame.
A type of screw-in hinges are those that are used to fasten glass door panels. In this case, half of the loop will be screwed in, and the second (the one that holds the glass) either fixes it with a clamp - these are clamping loops, or by fastening it into a hole made in the glass.
Unlike conventional screw-in fittings, glass fittings have two welded screws, between which there is a part for fixing the glass.
Advantages of glass doors in a steam room
By and large, these shortcomings cannot be taken too seriously, because most of them are easy to fix. But the advantages of these products should be discussed separately.
As for the material, it is better to choose stainless steel hinges, which do not rust or wear out too quickly.
The fittings also include door latches. In inexpensive models of glass doors, ball latches are often installed, however, they are short-lived, wear out quite quickly and can jam at any time. It is unlikely that anyone will object that it is not particularly pleasant to be locked inside a steam room when you urgently want to get out and cool off. But magnetic latches are the best option for a sauna. They are very durable and never jam.
- glass sheet;
- hardwood timber measuring 4x80 mm;
- door hinges;
- fittings (wooden or metal);
- closer;
- soft silicone seals;
- platbands;
- fastening elements (anchors);
- polyurethane foam;
- means for impregnation of wooden structural elements.
Door installation tools:
- electric screwdriver;
- hammer;
- hacksaw;
- building level;
- construction pencil;
- tape measure, square.
Installing a steam room door with your own hands
Therefore, if maintaining high humidity is not critical for you, feel free to install glass; it will not sweat. However, it must be said here that the atmosphere in a steam room with high convection is not compatible with the regime of a Russian bath. This microclimate is already closer to a Finnish sauna.
Another important disadvantage of glass structures is that they have a minimum height of 1.8 meters. When arranging a steam room for use in Russian bath mode, this can become a big problem. To get a good steam cake, there must be at least 40-50 cm from the top edge of the door to the ceiling, which leads to the need to design a steam room with ceilings of at least 2.3-2.4 meters.
In a Russian bathhouse, where high humidity is of particular importance, only glass doors should be installed in wooden frames with a threshold and a seal around the entire perimeter. Often when purchasing glass doors, they are taken without a threshold or without a seal, which leads to excessive ventilation of the steam room and disruption of the necessary microclimate.
Glass has a feature that can be a significant drawback in wooden baths. This feature lies in the impossibility of changing the dimensions of the canvas. If a wooden bathhouse changes the geometry of the internal walls during the shrinkage process, then you can always trim the wooden door a little and continue to use it.
Since there are some details you may or may not like:
- This material is environmentally friendly and will not harm a person even in a wet environment;
- Glass doors to the bathhouse perfectly tolerate high humidity and temperature and therefore will last for quite a long time, and under the action of the listed loads will not change their structure;
- The disadvantage can be considered the possibility of damage to the canvas by mechanical means. But this issue is being resolved and it is possible to apply an armored film to the surface;
- Glass doors to the bathhouse are sufficient (see Installation of glass doors in residential and public buildings) and this is completely possible to do with your own hands and without resorting to outside help;
- This design visually enlarges the room and therefore for small rooms it is simply a godsend;
- A glass door for a sauna will not require a lot of maintenance, unlike a wooden structure;
- Glass bath doors are transparent and this confuses some. But this issue is easily resolved and the glass can be tinted, we will talk about this below;
- The price of the material is not high and is significantly lower than some types of wood.
If you take them into account when purchasing, then you will not be disappointed at the end of the installation:
Glass doors for baths should be selected according to glass thickness, this indicator should not be less than 7 mm
- The glass door for a bathhouse must fit well enough to the jamb, otherwise there will be a draft and if you installed such a door in a steam room, then heat will escape;
- The fittings for glass doors to the sauna should not be heated, otherwise you may damage the skin.
Hinges for heavy bath doors
The weight of the door is another important factor that determines both the quality and quantity of hinges and hinges used.
You have two options: either look for especially strong hinges for heavy bath doors, or simply increase the number of regular hinges, which also increases the strength and durability of the fastening.
In general, when purchasing, you should ask what maximum weight this or that model is designed for. Because there are also plastic fittings on sale that are suitable only for the lightest door panels.
On the other hand, there are companies that produce models specifically designed for heavy or frequently used doors. Let's take ASSA ABLOY Group Company as an example.
You should also know the principle of calculating the number of fittings:
| Door weight (kg) | Number of hinges or canopies |
| up to 25 | 2 |
| 25-40 | 2-3 |
| 40-60 | 3 |
| >60 | 4 |
ADVICE! When installing 3 loops, the middle one should not be located exactly in the middle, its place is 20-30 cm from the top one, and the top one should be installed 20 cm from the top edge of the fabric.
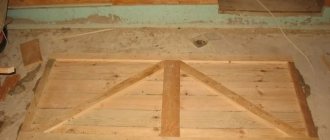
How to make and why you need a pigtail
The edge is made so that during the use of the bathhouse, as well as during shrinkage, there is no distortion of the doors.
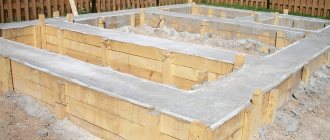
When building a bathhouse from a log house, a gap of 10 cm remains between the lintel and the opening, and 6 cm on the sides.
To create a frame, you need to make holes for self-tapping screws. Two on the ceiling and on the threshold, 3 on the sides. Use timber. Holes are made in it for the same screws. The beam should be adjacent to the walls and ceiling. There should be a gap of 10 and, accordingly, 6 cm between the timber and the frame.
After fixing the timber to the walls, the remaining gaps are covered with tow. It will last at least three years. After this, it is removed and the places are filled with foam.
Dimensions and assembly technology of a bath door
Typically, the dimensions of a door to a bathhouse with a frame, or more precisely, the future opening in the wall for installing a trap, are determined by the number of whole boards laid in the door leaf. To do this, take the width of the processed board, multiply it by five, and adjust it to more or less acceptable dimensions of the bath door. Next, 2x35 mm is added to the required width - the thickness of the two sides of the door opening plus an installation gap of 10 mm. The height of the door for a bathhouse is calculated in the same way, and for the bottom edge you will need to add another 5 mm for shrinkage.
In addition, you need to take into account the peculiarities of the technology for assembling entrance doors for a bathhouse. The door leaf for the entrance to the bathhouse can be assembled in two ways:
- Cut a tenon and groove at the ends of a standard forty, as is done for a tongue and groove board. In this case, the total width of the canvas will decrease by 10x5=50 mm;
- Mill a groove 15 mm deep at the ends of the prepared and cleaned wooden workpiece; the joining of two boards is carried out on an inset dowel. In this case, the width of the doors and the dimensions of the opening in the wall of the bathhouse do not need to be adjusted.
You can make doors for a bathhouse using both methods, there is not much difference, although doors with dowels are more flexible and durable. The question of technology, how to make a door to a bathhouse, depends on the wishes of the customer and the availability of woodworking equipment.
For your information! For a novice carpenter, it is easier to make a door to a bathhouse step by step with your own hands using a doweled connection of the canvas.
Firstly, keyed doors for a bathhouse are considered a classic manufacturing option, and secondly, in the event of an accidental defect, you can always replace the key and redo the joint.
Making a door
From the array
It is difficult to make doors to a bathhouse using this method without experience in carpentry. This is due, first of all, to the figured selection of wood and the accuracy of marking the canvas. The procedure is clearly illustrated by the diagram below.
- The sash elements cut from the board are laid out on a flat “hard” base and adjusted to each other.
- Places for installing dowels are marked to connect parts and strengthen the bath door.
- Arrangement of grooves.
- Manufacturing of crossbars and jib (if provided).
- Assembly of the canvas.
On a note! Such a door for a bathhouse is significant in weight, so the frame must be installed quite massive. Accordingly, select powerful canopies.
Frame structure
- Before you put it together, you need to check the dimensions. In a bathhouse, even the densest and best-dried wood will gradually begin to absorb moisture. Therefore, it will swell over time. Therefore, the dimensions of the frame are chosen to be slightly smaller than the opening with a jamb. The recommended gap between them around the perimeter is 5 mm.
- Since the door to the steam room will have to be insulated, it is made prefabricated; You will need 2 frames with identical parameters.
- It is easier to make all connections “overlapping” with additional reinforcement of the door with wooden spikes. As an option - metal corners.
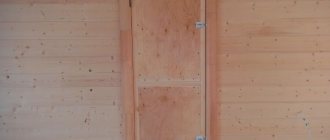
Sheathing
The frame structure consists of two parts. The one that will face the inside of the steam room is finished with a tongue and groove board. But for the second, the cladding material can be chosen from several options: MDF, OSV, chipboard.
Door insulation
The timber used to make frames has a certain thickness; The recommended value is indicated above. All that remains is to lay insulation in one half of the frame. Which? Despite all the advantages of mineral wool, it is hygroscopic, and a steam room in a bathhouse is a room with excess humidity. Therefore, not an option. It is advisable to use sheet polystyrene foam. Cutting and laying it is easy, as is sealing the gaps between it and the frame.
Door assembly
- The second half is placed on the insulated frame and leveled.
- Both parts of the bath door are rigidly fastened (with self-tapping screws).
- The gap around the perimeter of the canvas is carefully sealed. To do this, it is advisable to use a jute cord, on top of which a sealant (heat-resistant category) is applied.
All that remains is to fasten the hinges, decorate the outer part, and the bath door is ready for installation on site.
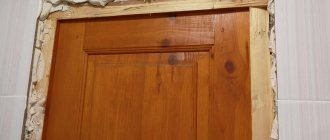
Hinges on the door to the bathhouse: hinge material and door leaf material
When purchasing hinges for bathhouse doors, you should pay special attention to the material from which they are made. It could be:
As you can see, the screws have already begun to rust
They differ significantly in cost, strength, and resistance to oxidation in the hot and humid bath environment. You know that magnetic stainless steel rusts at high temperatures? Therefore, stainless steels have a limit of heat resistance. On a door this is, of course, not as significant as on a chimney.
For the purpose of protection and to make the fittings more attractive, they are usually anodized with chrome or nickel.
Glass doors use special plugs, which can be made of metal or plastic. Both are anodized.
We have already mentioned above that the material of the door leaf determines the type of hinges. Now let's break it down into pieces.
Internal doors in the bathhouse can be either made of wood or glass. The entrance can be made of metal, but they come with their own box and metal fittings.
Any hinges and canopies are suitable for wood, except those made under glass. With known restrictions - you remember that screw-in ones need a false quarter.
Only special fittings are suitable for glass - the already mentioned clamping or ordinary hinges, which are a specific type of screw-in hinges.
The weight of the door is another important factor that determines both the quality and quantity of hinges and hinges used.
You have two options: either look for especially strong hinges for heavy bath doors, or simply increase the number of regular hinges, which also increases the strength and durability of the fastening.
In general, when purchasing, you should ask what maximum weight this or that model is designed for. Because there are also plastic fittings on sale that are suitable only for the lightest door panels.
On the other hand, there are companies that produce models specifically designed for heavy or frequently used doors. Let's take ASSA ABLOY Group Company as an example.
You should also know the principle of calculating the number of fittings:
What kind of doors are there?
Before tackling the question of how to install a door in a bathhouse, you need to understand what we are installing. We have already talked about bath doors, let’s briefly go through the essence of the issue. The main materials for their manufacture are:
- Wood. This material is the most popular and most widespread. It is accessible, well processed, and has good environmental performance. With a certain approach, from wood of various species it is possible to obtain, if not a unique, then at least a product that is far from ordinary. Wooden doors come in a wide range of ready-made industrial options, to suit every taste, color and budget. Amateur craftsmen are given a great opportunity to show themselves in all their glory by making a door with their own hands;
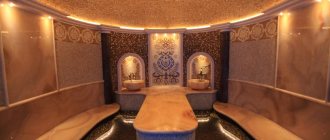
- Glass. Glass sheets appeared in bathhouse use relatively recently. The point here is the peculiarities of industrial technology. Just some three decades ago, in domestic realities, not only a glass door leaf, but a normal window was a rarity. Today's industry's ability to produce thick, hardened material of increased strength, while being injury-resistant, is incomparable to what it was decades ago. Technologies for decorating glass sheets have radically improved. We admit that the home craftsman’s arsenal has also been replenished with tools, primarily made from super-hard materials, which greatly simplify glass processing, although this material remains very difficult to work with and requires accuracy, skill, prudence and technical savvy. Glass has almost zero water absorption, so they are widely used in oriental baths - hammams, which are characterized by an extremely high absolute humidity, and as a result - the danger of swelling of hygroscopic materials, which, of course, includes wood. Glass also offers interesting design solutions when arranging modern steam rooms, in fashionable innovative keys. In the end, glass, when used carefully, is very durable and does not require special measures to protect it from pathogenic microflora - a real scourge of wood;
- Combined designs are primarily a combination of glass and wood. They embody the positive qualities of both materials. Among other things, this option is somewhat cheaper than a canvas made only of glass, and it is also somewhat more convenient and easier to install the accompanying fittings.
Application of Thermal Insulation Curtain
And, probably, the easiest way to insulate a bath door is a thermal curtain attached to the frame. Typically, this method is used as an additional method, after first insulating the door structure itself.
Material cutting
A canvas is made from dermantin or tarpaulin that will serve as a heat-insulating screen. The dimensions are calculated as follows: the length and width of the door plus 20 centimeters for fixation.
The screen should completely cover the door and be securely attached to the walls above and on the sides of it. Several eyelet rings are sewn onto the top edge of the curtain.
Screw-in hinges for doors: how to choose, install and adjust?
- Where is it used?
- Device
- Kinds
- Where to install
- Installation
- Adjustment
Screw-in or screw-in hinges for doors have several differences from other types of hinges: ease of installation, low price, strength. But it is the quick and easy installation of hinges that makes them increasingly popular. Installation does not require precise marking, centering holes for self-tapping screws or cutting out fit grooves, so even a non-professional can handle the installation.
General requirements for canopies
The main difference and advantage of glass models is their transparency. Such structures are installed at the entrance to country houses, shopping and office centers. Glass systems are popular in apartments; they are suitable for bathrooms, baths and saunas. The products are also in demand in furniture production. Loops are the main element that holds the transparent fabric. Of course they must be strong.
But besides this, they are subject to the following requirements:
- External attractiveness. Since glass doors come without a frame, if the door is completely transparent, the hinges must not be too large and look nice from any side. The fittings should not visually weigh down the canvas, otherwise the whole meaning of the design will be lost.
- Protection. Metal elements should not scratch the sash. To do this, pads made of polymer materials are usually installed under the canopies. Also, additional glue can be used for maximum fixation.
- Possibility of mounting without holes. If the door leaf has a frame made of plastic, wood or metal, then there are no problems with fixing the fittings. In the case of frameless models, awnings are sometimes secured using clamps. In this case, no holes are drilled.
For the manufacture of doors, the most durable types of glass are used, such as triplex or tempered material, but they also do not like drilling after processing. All technological holes for canopies are made in the doors at the stage of their production, in the conditions of the enterprise. This reduces the risk of material cracking. To make holes, special drills are used that are coated with diamond dust, as well as cooling lubricant.
Hinges
Another very popular type of canopy. There are many varieties of them, but the principle of operation is the same. The hinge is similar to two doors that are connected to each other by a hinge. The products are durable and wear-resistant. Each canopy can withstand a weight of 20-25 kg. Another advantage is their wide opening angle: the door on such canopies opens 165 degrees.
Hinges for glass doors are used when installing swing-type systems. They can be hidden, practically unnoticeable and quite difficult to hack, as well as semi-hidden. Their variety is four-ball canopies, which are fixed in three planes. They are in demand for interior and furniture doors. There can be hinges for glass doors without drilling, hidden or semi-overlay.
Canopies for sliding models
Glass doors, both interior and entrance, are often made in the form of sliding systems consisting of two leaves. They do not require free space to open; they simply roll away to the side. This is an ideal option for small rooms, rooms loaded with furniture. The doors move on rails, which are located at the top and bottom or in only one place.
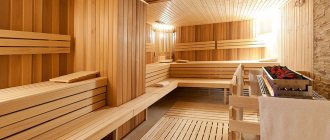
Glass doors
Specialists, offering such a procedure as installing doors in a log bathhouse with glass elements in the structure, introduce modern trends in the arrangement of the premises. The maximum efficiency of glass doors is observed when they are installed between the steam room and other rooms of the bathhouse (more details: “How to choose glass doors for a sauna and bathhouse - tips on selection and installation”).
The production uses high-strength tempered glass, processed through repeated heating and cooling. This material is absolutely safe for humans to use. There is no need to be afraid of getting injured if the glass is accidentally broken, because the resulting fragments do not have sharp edges.
It is worth noting the high thermal conductivity of glass doors, but at the same time the material is absolutely inert to high humidity and temperature fluctuations, which makes it universal. The cost of glass doors is high and varies due to the prestige of the brand of the manufacturing company.
A separate material is thermoplastic, which also has excellent characteristics:
- inertness to high humidity and temperature;
- maintaining shape;
- the presence of a transparent structure similar to thermal glass.
Combinations of different materials
Before installing a door to a log bathhouse, you should consider the harmonious combination of the interior of the room with the door itself. It is worth noting that the combination of wood and glass looks very harmonious against any background.
Accordingly, designers have many options for decorating the premises in the bathhouse and designing doorways. Glass allows you to improve natural light, and natural wood creates an atmosphere of comfort, provides a lasting aroma and releases substances beneficial to the human body.
Also, a two-frame structure can be inserted into the doorway in the log house of the bathhouse, protecting the room from heat loss several times more effectively. Wooden frames are knocked together using two sheets of wood fiber fabric, separated by thermal insulation material: mineral wool, polystyrene foam or felt.
The surface of such a structure is sheathed with the thinnest board. If such insulation is not enough, then the surface can be upholstered with felt. Maximum connection between the door leaf and the frame is ensured by a double lock: a latch at the top, a hook at the bottom.
Hinges for heavy bath doors
The weight of the door is another important factor that determines both the quality and quantity of hinges and hinges used.
You have two options: either look for especially strong hinges for heavy bath doors, or simply increase the number of regular hinges, which also increases the strength and durability of the fastening.
In general, when purchasing, you should ask what maximum weight this or that model is designed for. Because there are also plastic fittings on sale that are suitable only for the lightest door panels.
On the other hand, there are companies that produce models specifically designed for heavy or frequently used doors. Let's take ASSA ABLOY Group Company as an example.
You should also know the principle of calculating the number of fittings:
How to change the canvas?
Often during repairs, only replacement of the door leaf is required. The procedure is much simpler than installing an interior door from scratch.
- The old fabric is removed from the hinges. Awnings usually consist of two detachable halves. To remove the interior sash, it is enough to pry it open from below with a pry bar. If the axial rod is inserted from above in the hinges, the canvas will not be removed. First, a screwdriver is inserted under the head of the rod, then it is knocked out of the socket with hammer blows. Dismantling begins from the bottom loop. After removing the rods, the sash can be easily removed.
- Two canvases are compared in size, laid on top of each other. If the new fold is larger than the old one, mark the boundaries with a pencil. Excess sections are cut off with a hand-held circular saw. The cuts are adjusted with a plane and processed with a grinder.
- The door leaf, adjusted to size, is equipped with hinges, a lock, and a handle.
- Hanging on the hinges occurs in the reverse order.
If the new canvas has been adjusted, the cut points need to be masked. The paint material is selected to be similar in color or the entire canvas is completely repainted.
How to install a plastic door
Installation of a plastic door is carried out according to the same scheme as similar structures made of any other material. Decide right away which door you need - interior or entrance. They have different designs and purposes. The material must be of high quality and certified.
The most rational option is to choose a door frame made of a metal frame. Experts recommend using a five-chamber profile. It is desirable that longitudinal or transverse stiffeners be present. It is recommended to take into account the following design features when choosing:
- When installing plastic doors with your own hands, it is advisable to use hinges that have a multi-layer structure.
- Degree of tightness.
- Availability of insulation.
- Quality of the glass unit - it is recommended to use armored or triplex.
- Quality lock and handle.
Before you begin installing a plastic door, read the instructions. If the installation quality is high, there will be no need to adjust the door. You can start using it immediately.
Preliminary preparation of wooden and conventional openings
When installing a plastic door in a wooden house, it is necessary to carefully treat all surfaces. First you need to completely clean the opening. Dismantling the old structure involves removing the fabric from the hinges. Then, using a crowbar and a grinder, you need to disassemble the box and completely dismantle it.
You need to get rid of the plaster, remove all dust with a brush, and apply primer to the slopes. If the structure is made according to your design, it will fully correspond to the size of the opening. After this, you need to install the fasteners yourself. The installation process is carried out in two ways:
- Using anchors. If you choose this option, you will need to drill holes.
- Using special brackets. They must be installed on the back of the box in a special groove.
If you decide to install using anchors, the appearance of the block will suffer. But this method is used in practice more often. If you decide to use brackets, then the appearance will not deteriorate, since all fastenings will be masked by slopes. Both methods are not difficult to implement.
Some important points
When installing plastic entrance or interior doors, you must adhere to the following recommendations:
Do not make a door threshold yourself - the best option would be to purchase a finished product. To secure the box on both sides, install wedges. It is not recommended to use nails, as they can deform the wall. After fixing, it is necessary to make holes for attaching the door frame. It is advisable that the holes are made at the production stage. You need to drill three holes on the left and right: in the center and along the edges at a distance of 20-30 cm. Two holes are made in the upper and lower crossbars at the same distance from the edges. Dowels must be installed in all holes. Screw the bolts into the dowels. You need to start from the side on which the hinges are installed. Screw in the bolts 2/3 of the way, then carefully check the position of the box relative to the vertical and horizontal with a level. Once the box is level, you can tighten all the bolts all the way. It is impossible to install a plastic door in a wooden house using anchors, so it is necessary to use other fasteners. The door frame must be in the opening and secured with nails or self-tapping screws. After putting the fabric on the hinges of the box, it should be pressed evenly to the base
A few hours after the foam has hardened, the wedges are removed and the doors are closed for a day.
Features of correct installation
Before inserting the plastic structure, it is necessary to measure the opening. Only in this case will you achieve a quality installation. In order for all the work to be done correctly, you need to know three parameters:
- The thickness of the opening.
- Height.
- Width.
Attaching the box to the doorway
Having made the markings, you remove the canvas and insert only the box into the opening. According to the rules, the dimensions of the opening should at least 1 cm larger on each side than the box. However, in practice the gap between them may be larger. The main thing is that it is not wider than the platbands with which it will be closed later.
Your main tool at this stage of installing a bath door with your own hands will be a level and/or plumb line . To make your work easier, you should first align the geometry of the opening itself.
Then you need to cut small wedges . When choosing a size, keep in mind that they are driven flush with the wall, because many people prefer not to pull them out after installation is complete. But this is a matter of taste. Although... it is cost-effective to leave the wedges when the door is supported solely by polyurethane foam. But we will not recommend this method.
So, we have three reliable methods of fastening at our disposal when installing a bath door with our own hands:
For suspensions
Hangers are freely bending carved metal plates that are attached to the side of the box facing the wall, and then placed on the wall on both sides, fixed with screws and cut so that they can be hidden with platbands.
Useful video
A video that very clearly shows how the box is secured in the opening using hangers:
Hidden three point mount
Its principle is simple. You can use long screws, dowels , or even anchor bolts to firmly connect the box to the wall. But not everyone likes it when the jambs are perforated with fasteners. Therefore, it was decided to make holes where they would be least noticeable - for example, under the hinges or in the area of the lock on the other side of the door.
Six point mount
It can be called the most reliable and least aesthetically pleasing, although plastic plugs , the color of which is close to the color of the jamb, are usually used to disguise the screws.
The same screws, dowels or anchor bolts can be used as fasteners.
Useful video
There is nothing complicated in this method, but it is better to make sure by seeing how the installation of a bath door is done in the video with your own eyes:
Installation of a two-chamber door
Installing a two-chamber type of door in a bathhouse also does not require special knowledge and skills. It is installed using the generally accepted method - using a socket and combs on logs. For installation using this method, grooves are cut with a milling cutter along the ends of the logs, the size of a doorway 50*50 mm. Carriages are made according to the height of the door, while the upper crossbar of the frame is made of a 50*150 mm board.
The cracks formed after installation are filled with polyurethane foam, and after it dries, hinges are attached, on which the door can soon be hung.
In this article, we reviewed the most effective and cost-effective methods of thermal insulation, as well as insulating the door in the bathhouse. They include not only the production of the thermal curtain itself, but also the use of basic insulation methods. More global work that can be performed in this case is replacing the door frame and installing a two-chamber door, nothing more.
All presented options have been tested in practice, so you are provided with material for your own analysis and choice. Whichever insulation method you use in your bathhouse, you are guaranteed good thermal insulation and protection from dampness and fungus.
Installation of door leaf
First of all, it is necessary to prepare the areas where the hinges for the bath door will be located, in the form of small cuts in the thickness of the wood. Their size should match the size of the loops used. Taking into account the weight of the door itself, it is necessary to use one or two pairs of hinges.
The door structure must be installed clearly perpendicular to the floor. The hinges at the ends of the doorway are secured with self-tapping screws and only after that the door leaf is hung on them.
Materials recommended for thermal insulation
Having determined the basic criteria of insulation, you can select a material that meets all safety requirements.
Foamed polyethylene with a layer of foil does not burn, allows steam to pass through and retains moisture. The aluminum layer of the material repels heat waves back into the room, which allows you to maintain a high temperature inside the bath. Polyethylene foam is safe, durable, and easy to nail or staple.
Felt is a proven wool insulation material; it does not lose its heat insulating properties even when wet. Natural material does not burn, is resistant to high and low temperatures. Felt is used for the outer door and for the entrance to the steam room.
Ecowool is a cellulose-based material; antiseptic and antipyrine are added to its composition to increase resistance to rot and fire. Natural insulation dries easily from moisture and has natural vapor permeability.
Door materials
Each owner of the plot can independently decide which design and style of the bathhouse to choose. Manufacturers made sure that everyone could choose the most suitable material for the job.
Design option for a wooden door with forged elements
Most often, the choice is made on the following raw materials for making doors:
- Wood.
- Glass.
- Plastic.
- Metal.
Each of these materials has its own advantages, disadvantages and features. Therefore, before placing a bet on any of them, you need to familiarize yourself with the nuances.
Wood
There are different materials for making doors leading to the bathhouse. People choose to finish the structure using eurolining prepared for the process, while other owners prefer to buy a solid frame and carry out the construction on their own.
Homemade wooden door for a bathhouse
In any case, wood is at the top of the list of materials for bathhouse doors.
Material advantages
- Resistance to moisture.
- Adaptation to temperature changes.
- Wood itself is a heat insulator, so the owner of the site will not have to spend a lot of money on additional materials to insulate the canvas.
- And of course, aesthetic characteristics. Wood fits perfectly into the overall interior of the bathhouse. A wooden door will look harmonious and create a pleasant atmosphere in the room where you can steam.
Flaws
The material requires additional processing and not all types of wood are suitable for bathhouse door construction.
Important nuances
Also, due attention should be paid to the question of what material to make the door handle from. It makes the most sense to also use wood for this purpose, because metal, plastic and similar materials under the influence of high temperatures can become deformed and also heat up, which reduces the level of safety in the bathhouse;
Therefore, when the question comes about what material the entrance door to the bathhouse should be made of, it is worth paying attention to wood
Therefore, when the question comes about what material the entrance door to the bathhouse should be made of, it is worth paying attention to wood
It is best to give preference to aspen or linden wood. Internal doors leading to the steam room can be achieved by installing a glass door.
Glass
To enter the steam room, as well as the shower room located inside the steam room, glass doors are often installed.
Advantages
- This design looks harmonious in the opening.
- The glass door is easy to clean.
- The material tolerates high temperatures well, which are not uncommon in a steam room.
- There are many designs of glass doors, so everyone will choose the best option for themselves.
Flaws
- the cost of such a design is quite high, because the glass must be durable and quite thick if the question is about a door;
- You won’t be able to make such a door yourself, unless the owner of the site with the bathhouse has his own workshop for the production of glass products.
In any case, the glass in the doorway of a steam room or shower looks elegant and harmonious.
Plastic
If you prefer plastic, you need to choose a heat-resistant one; other options are not suitable for installation in a bathhouse.
The process of installing a plastic door to a bathhouse
Advantages
- Heat-resistant plastic is a fairly durable material.
- This door raw material is durable.
- Withstands changes in air temperature.
- Able to tolerate high levels of indoor humidity.
Flaws
The material is not natural, which means it will not release aromas into the air that one would like to hear in a steam room or dressing room.
Design options for plastic doors for baths
Metal
If you wish, you can create an armored metal door with your own hands, however, this will require additional materials and tools.
Advantages
- Such a canvas will certainly protect the dressing room from drafts.
- This design looks harmonious.
- A large selection of designs of such canvases will help satisfy the needs of even the most demanding apartment owners.
Flaws
- high price;
- such a canvas is not suitable for installation at the entrance to the steam room.
The choice of material depends solely on the preferences of the owner of the land plot. Any raw material will fit perfectly into the space of the bathhouse, the main thing is to do the work with soul.
Production of bath doors
Oversized doors with a height of 1.5-1.7 meters and a width of about 0.7 meters can reduce heat loss as much as possible. Naturally, before properly installing the doors in the bathhouse, it is necessary to make an opening of the appropriate size.
The cutting process is performed using a hacksaw, and pieces of wood are removed with a regular chisel. A 5-centimeter key is inserted into the formed groove and secured by driving it in with a handy tool. The ends of the keys are cut to a cone shape.
It is worth mentioning coniferous wood, which is not recommended for use as a material for the production of doors to paired compartments. The reason for this was the peculiarity of coniferous species to release resin when heated. First of all, such secretions will be unsafe for visitors, since they have excessive temperature and can cause painful burns.
If the walls are made of logs or timber
A wooden bathhouse made from a log or timber is quite common, and the installation of doors in such a bathhouse differs in technology from a similar installation in a room with walls made of a different material. The fact is that wood constantly changes its overall dimensions , and this has to be taken into account in buildings made from it.
In particular, the installation of doors and windows is usually accompanied by the creation of a specific frame . This is a well-known tongue-and-groove connection, which creates the possibility of the box sliding during the period of continued shrinkage of the wooden frame.
Pit under the door in a chopped bathhouse
The “tenon and groove” can be done in any way you like - cut a groove in the logs or, conversely, cut a tenon in the wall and a groove in the post . Both options are viable. The tools usually used are a hand-held power saw and chisels. However, it is worth warning in advance that the work is not the easiest and will take quite a lot of time.
Useful video
See how the professionals do it:
Yes, and if you want to get even more practical advice on how to install doors in a bathhouse with your own hands, we recommend reading this article on our website.
How to insulate the door leading to the steam room
A common question when building or renovating a bathhouse is whether it is necessary to insulate the door in the bathhouse leading to the steam room. The main argument of insulation supporters is the fact that it is necessary to reduce heat loss by all possible means. One cannot but agree with this if the power of the stove is barely enough to warm the volume of the steam room.
In this case, you should approach it rationally and insulate the walls, doors and ceiling in the steam room.
Doors to the steam room come in different sizes: size, material. Glass can only be insulated if the seals around the edges are leaky. The presence of a gap between the floor and the canvas below is acceptable only for doors in saunas, regardless of the type: wooden, glass. In a Russian bath you need to make a threshold that will close this gap. Or reduce the size of the box.
Wooden ones are different. If solid wood is used, then the source of cold may be dried wood. However, this only happens if it is not dried properly. Check the ventilation, let the stove work for some time after completing the bath procedures (a brick stove will cope without this, but an iron stove cools down too quickly). As for the door itself, you can put clapboard on it on both sides, then the cracks will close.
If the door is framed, that is, has a void inside, then you can use foil to reflect heat back into the steam room
It is important that there is a little void in front of the foil, otherwise it will not work, giving off heat through the contact. The foil is installed between the frame and the shield
ATTENTION! A lot of controversy arises about the use of mineral wool to insulate the frame of the door to the steam room. Most people are inclined to believe that there is no need to use it here - it will release harmful organic matter from the impregnation
There should be enough foil. But, in principle, if you really want to, you can use insulation designed specifically for baths - Rockwall, for example.
Another type of insulation of a bathhouse door is felt padding. This can be used for the outside of the door to the steam room, and for other doors, for example, the entrance. However, in conditions of high humidity, the felt will definitely get wet, so we recommend using this method only in bathhouses with good drying - well-designed ventilation and for those who have a brick oven.
Useful tips
The dimensions of glass doors for a Russian bath must be selected so that there is no distance between the panel and the floor. When installing glass door structures in a hammam or Finnish sauna, it is necessary to leave a gap at the bottom for ventilation, so such doors are made slightly smaller in height.
A few simple and useful recommendations for installing and maintaining glass door systems:
- It is necessary to periodically inspect the hinges and monitor their condition, because due to the heavy weight, the fittings become loose and the fabric sags. If necessary, tighten the screws.
- You should not install a glass door in a newly built room. You need to wait several months for the structure to completely shrink.
- Do not use abrasive products to care for the canvas, as scratches may remain.
- The door to the sauna or bathhouse should open exclusively outward. This ensures a quick safe exit from the steam room and saves usable space.
- It is recommended to use doors made of frosted or tinted glass, as well as with a printed pattern or design. Transparent glass may be accidentally overlooked.
With the correct installation of a glass door system in a steam room, the necessary conditions are created for taking bath procedures. This design will last for many years if you follow a number of simple tips for hygienic care of glass sheets.
Rules for installing doors in a bathhouse
To prevent your steam room from becoming a hot trap for visitors, you need to take the installation of doors to the bathhouse responsibly, carrying out the installation in full compliance with the rules for installing doors in the bathhouse. Simple rules for installing doors in a bathhouse:
- All doors installed in the bathhouse open outward! — it will be easier for visitors to knock them out if they jam
- As for the door locks, neither the outside nor the inside of the bathhouse door should be fitted with latches or locks whose locking mechanism can operate without a key - otherwise you can accidentally lock yourself and your friends in the bathhouse
- traditionally, builders make the door to the steam room smaller than standard entrance doors, and always install a threshold 14 - 16 centimeters high
- the hinges in the sauna door cut in from the outside - if the metal hinges on which the door is hung are located inside the steam room, condensation will accumulate on them, as a result of which they quickly rust
- The hinges in the installed sauna door must be lubricated in any case!
- the door leaf should be noticeably narrower than the door frame so that it does not jam when it swells
- the door handle on the inside should be wooden, metal will burn
- just in case, it is worth making a small window in the bath door, which will be closed with a flap from the inside
- the bath door must have heat-insulating properties, which can be provided by mineral wool or felt
- the door to the bathhouse should be treated with an antiseptic and also impregnated with a waterproof substance
- Installation of windows in the bathhouse
- Grinding tool
- reference Information
How to hang a bath door correctly
To hang the bath door correctly, you need to mark it with a pencil.
- put the door in the box
- 15-20 centimeters from the top and bottom of the bath door, select the location for installing the hinges, preferably without knots
- the place for the hinges (the recess for the hinges) is prepared using a chisel or an electric cutter
- depth equal to loop thickness
When the recesses are ready, loops are placed in them and recesses for self-tapping screws are made using a drill. Drilling is necessary when the diameter of the screws is large and in places where there are still knots, so that the wood does not crack. In other cases, you can do without drilling. The diameter of the recesses should be slightly smaller than the diameter of the screws themselves, with the help of which the hinges are attached to the door leaf.
The recess for the valve is made using a drill and a large-diameter drill. It must be deep enough so that the body of the valve intended for it does not extend beyond the boundaries of the door leaf body. The latch is attached to the door in the same way as the hinges, using the same screws (or dowels).
To install a finished door in the door space, you will need wooden wedges - a full description and sequence of work with illustrations can be found in specialized literature.
Features of choosing a door
Wooden doors to a sauna must meet some parameters that are worth knowing before making a purchase. There are certain requirements that are worth listening to.
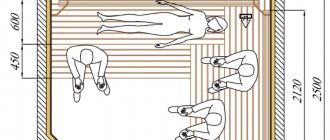
For example, standard sizes are used for the rest room and the front door, but they should be different for the washing room and steam room.
Door size
A wooden door for a sauna is made according to slightly different parameters. Everything here leads to saving terla.
And first of all, this concerns the dimensions:
Doors should be smaller and they usually correspond to a height of up to 180 cm. Sometimes a size of 150 cm is even used
The width ranges from 55 cm to 70 cm; Here you also need to pay attention to the manufacture of the threshold. It is not recommended to make it less than 15 cm
These dimensions are used only for steam rooms and washing rooms.
Selecting the material
As we said earlier, wood can be considered the best option.
But you can also use combinations, for example using glass:
Handles for bath doors: shape and material
Handles for bath doors should be chosen according to the following principle: where it is hot it is better to use wood, otherwise the choice is determined by the taste of the owner and the style of the interior.
Even for the doors to the steam room, wood can be placed only on the inside, and on the outside - what you like best. Glass doors to the steam room with wooden handles are a classic option. A separate article is devoted to the dimensions of the doors to the steam room. The material from which handles can be made can be the following:
- metal;
- tree;
- glass;
- plastic.
All of them have the right to be used in the bathhouse.
As for the shape, specifically wooden bath handles are:
- arc and its variations;
- U-shaped brackets;
- round knobs;
- artistic - carvings, asymmetrical branches, etc.
Glass handles are either a variation on the U-shaped bracket or a knob.
Others can be of any shape, applicable for interior and entrance doors.
Useful video
We invite you to watch a short video about how you can make wooden handles with your own hands.
***
So, to summarize: bath fittings should not be afraid of moisture and heat, should be suitable for the material of the door panels - that’s all the requirements, the rest will be at your discretion. The criteria for choosing the best door for a bathhouse are presented and analyzed in the corresponding article.
Material
Having understood what dimensions of the entrance door to the bathhouse are suitable, you need to choose the material from which they will be made. For this, the following can be used: wood, durable glass, plastic.
Solid wood
Our ancestors used wood for this purpose. And today, despite the development of technologies for the production of various materials, wood remains quite in demand.
One of the most popular types of wood is linden. It is affordable, durable, and has good aesthetic characteristics. Products made from ash are often found. Manufacturers of wooden structures value this wood for its excellent performance qualities.
Wooden door to the steam roomSource remont.castorama.ru
Some manufacturers offer bath doors made of oak in different sizes. This option is considered one of the most durable and reliable, but at the same time expensive. In addition, a feature of oak is its significant weight, which also scares off potential buyers.
Glass
For the production of doors for baths and steam rooms, special heavy-duty tempered glass is used.
When choosing a product from this material, you need to pay attention not only to the size of the bath doors, but also to the thickness of the glass itself, the degree of its heat resistance, the model and the absence of any mechanical damage on the surface.. Usually the height of such a door is 1.6-1.7 meters
Width - within 60-80 cm. The thickness of the glass should be no less than 8 cm. If it is thinner, it may deform or burst over time.
Typically the height of such a door is 1.6-1.7 meters. Width - within 60-80 cm. The thickness of the glass should be no less than 8 cm. If it is thinner, it may deform or burst over time.
The following types of glass doors are usually offered for steam rooms:
- completely transparent or slightly tinted designs;
- frosted glass products;
- options with a thematic image or engraved design.
Door to the steam room made of tempered glassSource derdomus.ru
In order for the material to withstand mechanical loads and overheating up to 300 degrees, it is subjected to a fire polishing process.
The advantages of a glass door include:
- ease of care;
- ease of opening;
- resistance to high temperature and high humidity;
- safety in use;
- large selection (shape, shade, texture);
- the ability to apply a drawing;
- ability to retain heat due to high-quality joining and the use of silicone seal;
- the ability to choose the optimal size of the door for the bathhouse;
- affordable price.
When choosing a glass door, you need to consider some points:
- In the sauna, a tempered glass door is attached to a frame made of wood (aspen, linden). To protect the wood surface, veneering or lamination can be additionally used.
- For a Turkish steam room, you can choose a door made of frosted glass mounted on an aluminum frame. This metal is not afraid of interaction with water and condensate.
Hinged glass door to the steam roomSource podmoskovie.info
Plastic
This material is not very common in baths. Based on the characteristics of plastic, it can be used in some bathhouses:
- Tambour. This room is not heated, so the temperature inside is practically no different from the temperature outside. At the same time, a plastic door can become a good barrier to the penetration of wind and frost. Therefore, a door made of this material is well suited for an entrance vestibule.
- Waiting room. Even if the bathhouse is heated, the air temperature in the dressing room is usually 25-30 degrees. Plastic will easily withstand such values. It also responds well to high humidity. If a room is not heated for a long time in winter, the air temperature in it can drop significantly. Due to such changes, natural wood can become unusable over time, which cannot be said about plastic. Such a door can serve in the dressing room for a very long time, performing its functions efficiently. The only thing a plastic door needs is periodic lubrication of the seal and adjustment of the fittings.
- Shower or washroom. There will always be high humidity in this room. And water negatively affects the condition of the wood. But plastic will feel great in such conditions.
- Steam room. This room is characterized by high air temperature and humidity. From such exposure, a PVC door will quickly become unusable. Therefore, here you need to choose a door made of glass or wood.
PVC bath doorSource birzhaplus.ru
Installation instructions
Installation of the product requires a clear sequence of actions. Step-by-step instructions will allow you to get an overall picture of the entire scope of work and not lose your way. Installing a metal door consists of four stages.
Preparing the opening
The locations of openings in the building are provided for by the design. They are made at the construction stage or cut out with a chainsaw after the house is built.
The width of the opening should be 150 mm larger than required by the door structure. This is necessary to install a casing box with a width of 65 mm. It is also necessary to leave a gap of 15 cm at the top, which will be closed over time by the settled crowns.
When replacing an old frame door, preparation of the opening begins with its dismantling. Disassembling the structure will not be difficult. To do this you need:
- Remove the canvas. If it was held on collapsible hinges, then open the door and lift it with a crowbar. If the hinges were not removable, use a screwdriver to unscrew the screws holding the sash in the frame.
Clean the opening from worn-out insulation, remaining fasteners, and pieces of plaster.
Assembly and installation of casing
The frame or casing is the name given to the bars around the perimeter of the opening, which form a rigid base for fastening the door. It does not prevent the shrinkage of the wooden structure, but at the same time protects the openings from distortions that appear under the influence of settling crowns. When installing the casing, a groove is made at the ends of the opening using a router.
Then a beam is inserted into it. It is also called a sliding bar, along which the entire house settles. The contours of the opening remain unchanged.
It is also possible to use other casing structures that perform exactly the same function. The choice of connection type is a matter of taste.
Casing options
A cross-bar is installed at the top, and soft insulation is placed in the gap. The beams are extended on the sides with boards, the width of which is equal to the width of the end. As a result of these actions, a rough frame is obtained to which the iron door will be attached.
Installation of box and canvas
For buildings made of wood, frames with a high degree of rigidity are usually chosen. As a rule, this is a welded mechanism made of sheet material with a thickness of at least 2 mm.
Before inserting the front door frame into the opening, it should be insulated with mineral wool and thereby seal the joints. Often there are products with an insulated box. In this case, no additional manipulations are required before installation.
The gap between the door frame and the casing should be in the range from 1.5 to 3 cm. It is filled with polyurethane foam.
Once you have managed to place the iron box in the opening, align it and secure it. To ensure that the load is evenly distributed over the entire wall, it is recommended to increase the number of fastening points.
The next step is hanging the sash. There are 2 fastening methods used in iron doors:
- Welded external hinges. To put the fabric on, you need to lift it and place the top of the loop on the pin. This fastening is considered unreliable, since the loops are easily cut off.
- Hidden loops. They are inserted into the sash or hatch and are considered burglar-proof. To carry out installation, you will need a hex key, which is used to tighten the fittings.
The correctness of the door hinge is checked by opening and closing it.
Filling cracks with foam
After installation is complete, it is necessary to foam the cracks around the iron box. If you don't want traces of foam to remain on the frame, cover its edges with masking tape.
How to Install Butterfly Hinges
Fittings are an integral part of the door. Without it, normal functioning, opening and closing of the door leaf is impossible. Technical advances make it possible to produce hinges of different designs, including butterfly hinges.
Features of hinges
Butterfly loops consist of two parts. During their folding, the smaller part is inserted into the larger one. Therefore, the installation of butterfly hinges on interior doors does not require a groove. The canopies are attached using hardware and this does not require the use of any professional tools.
Advantages of hinged hinges
Typically, butterfly hinges are used as fittings for the first attempt at installing an interior door. They are characterized by the following advantages:
- Relative strength and wear resistance. Typically, this fittings are made of stainless steel or brass and coated with a galvanic layer, which provides additional resistance to mechanical wear.
- Easy installation. The hinges do not require insertion, so inserting them does not require the help of a specialist.
- Comfort of use. The design of the fittings includes bearings that ensure smooth operation and no squeaking.
- Versatility. Suitable for left and right door mounting.
- Aesthetic appearance. The stylish and modern shape of the hinges goes well with many interior styles. A wide range of colors allows you to choose fittings in accordance with the shade of the door.
To hang a standard size canvas, it is enough to purchase two loops designed for loads from 40 to 100 kg.
Disadvantages of butterfly loops
The disadvantages of card loops include:
- Their lack of reliability. Due to the fact that the fittings are located on the outside of the canvas, it is easy to dismantle for the purpose of hacking.
- Inability to screw door hinges onto a door equipped with a hinged strip around the entire perimeter.
- Not suitable for hanging techno-style doors with the illusion of no fastening.
Experts identify several features of butterfly awnings that must be taken into account before installing hinges on an interior door:
- the need to accurately screw the hinges to perfectly fold the sides of the canopy to avoid unevenness of the door and problems during operation;
- frequent appearance of a small gap, which is a side effect of loop cards;
- impossibility of removing the door leaf without unscrewing the hardware.
Butterfly hinges are best suited for lightweight interior doors. To hang heavy interior or entrance structures, it is better to give preference to other more reliable fittings.
When analyzing the advantages and disadvantages of these products, you need to decide whether you will install a butterfly hinge or give preference to other, more suitable fittings.
How to install butterfly hinges on doors yourself
For those who do not know how to embed hinges into an interior door, let us explain that this process consists of the following steps:
- applying special markings for hinges to the surface of the door leaf, as well as to the surface of the door frame;
- using a drill to drill holes for hinges in pre-marked places;
- checking the tightness of the door connection;
- checking the functionality of the door.
How to secure the door frame and install butterfly hinges on the interior door will directly determine their service life. The color range is not that wide. Most often there are imitations of various metals. In particular, copper, gold, bronze, or nickel. Butterfly door hinges can be either matte or glossy.
For those who do not know how to install hinges on an interior door, we provide detailed instructions.
Apply markings to the surface of the door leaf and the surface of the door frame;
- Install the rotary axis, which is the main structural element and which ensures the functioning of the entire mechanism.
- Measure 20 cm from the top and bottom edges of the door.
- Place the loop at the mark.
- Attach the plates using self-tapping screws.
We attach the hinge to the box:
- insert the canvas into the box, in the same way mark with a marker the location of the other part of the loop on the outer border;
- place one part of the butterfly in place, circle the points for the holes with a marker;
- carefully drill holes, place the product in place and fasten it with screws;
- unscrew the loop from the end, then attach it to the outer area, use an awl to mark the locations for the holes;
- make holes and secure the hinges with self-tapping screws, first attaching the inner part of the hinge, and then attaching the outer side to the box.
This design is suitable for almost any type of door leaf, with the possible exception of heavy solid oak doors. Hinges for heavy doors are slightly different from ordinary ones; they have a thicker flange and have built-in bronze bushings.
For greater clarity, we recommend watching a selection of videos on installing butterfly hinges.
Solving possible installation problems
Since the ideal installation of this type of fastener is possible only with a perfectly flat door leaf (which is rare), some shortcomings may arise during the work: non-critical, but nevertheless requiring correction. We'll tell you how you can correct possible defects that appeared during the installation process.
The most common problem when installing butterfly hinges is the gap between the hinge plate and the door frame. If there is such a defect, this means that the door will not be able to close tightly, which over time will lead to loosening of the structure and rubbing of the threshold. A small spacer made of cardboard, wood chips, or rubber band (even a match can do) solves this problem. The presence of such a gasket will slightly worsen the quality of installation, however, it will successfully solve the gap problem. If you are not satisfied with the fact that the butterfly hinge plates close too tightly, you can “drown” one part of the hinge a little into the thickness of the door frame.
Common Mistakes
The most harmless thing is that it may be an incorrect indentation from the edge of the canvas. If the hinges are installed correctly, but too close to the edges, then you will simply ruin the appearance.
The next and most common mistake is when people confuse the installation locations: the small inner part of the hinge is attached to the box, and the large outer part is attached to the canvas. This setup is dangerous for several reasons.
If the outer part of the loop runs along the edge of the canvas, then the holes will be at a distance of a couple of millimeters from the edge, respectively, if you slightly skew the screw and it will come out from the side, or you may get caught in a knot and then the outer edge will break off altogether.
If installed correctly, the holes in the small part of the butterfly will be located almost in the center of the door leaf, which means there is no need to worry about any cracks or distortions.
Things are no better with the box. The photo shows that the holes are too close, and the thickness of the lightweight box is small, so it can burst under load.
In addition, the box is usually attached to the wall with anchors in 3 places - these are two points under the hinges and one in the lock area. If we do everything as expected, then we will have 2 places left where we can drive the anchor and cover it with a loop, otherwise the anchor will be visible, which is also not very good.
There is one more nuance: during installation, all hinges must be strictly parallel to each other. The slightest distortion vertically or horizontally will lead to the door starting to “play” and eventually the hinge will burst or the screws will break out.
Video description
This video shows how to properly install butterfly hinges
To install hinges on interior doors, you do not need to make cutouts in the panels and doors, which greatly simplifies the task and saves time:
- The first step is to attach a loop to the side of the canvas at a distance of 200-250 mm from the edge to mark the holes for fastening.
- Afterwards, indentations are made on the marks with a drill. If you start screwing in the screws right away, the material may crack. This will also create the correct direction for screwing. The inner part is attached to the canvas, because it is problematic to mark the location of the inner side on the box.
- Next, the distance is measured with a ruler and marks are placed for the screws.
Since the hinges have a non-separable design, you must first drill holes everywhere, and then immediately install the entire finished structure. It is advisable to install the mechanism first on the door, and then on the frame.
During the installation process, sometimes there is a snag: the strip does not fully contact the door. If the situation is not changed, the hinges will not fully connect when the door is closed or will “play.” You can eliminate this problem by placing a strip of paper or elastic under the bar, on the side where it fits tightly.
How to lubricate butterfly hinges
There is no need to lubricate anything right away, since they already have factory lubricant. But with daily use it becomes less and an unpleasant sound appears. To get rid of it, you need to pour a little lubricant into the moving mechanism.
There are four options for lubricating the butterfly hinges of interior doors:
- The easiest and most effective method is the use of sewing machine oil. But not everyone has such liquid.
- The modern way is to use WD-40, but not everyone has lubricant either. It is without a greasy base and one or two injections are enough for the loop to stop being smeared.
- The third method is vegetable oil, but this method does not last long.
- And the last option, which also won’t last long, is a pencil. It is inserted into the mechanism and needs to be moved. The stylus will crumble and treat the inner surface.
Mortise hinges
Drilled or mortise hinges are a more reliable installation method and should be chosen when it comes to massive panels. For them, at the stage of cutting glass before it is tempered, all the necessary holes are made. Making them yourself in canvas is quite problematic: at the slightest stress, the material can burst. If the awnings are fixed in this way, then the rest of the fittings (lock, handle) will have a similar fastening. This is the best option for doors that have a frame and glass inserts, entrance products, and panels with a thickness of more than 10 mm.
The main advantages of this fastening method:
- the mounting location is clearly defined;
- fixation is the most durable and reliable;
- the load is distributed evenly across the canopies;
- there cannot be any displacement of the loops.
The disadvantages of mortise fittings include the fact that it is difficult to install it yourself; you cannot make a hole without a special tool. If the holes need to be large, then they can be made on a machine. In the case when the blade cracks during the drilling process, but there is no way to fix it. Therefore, all holes for installing mortise fittings must be provided by the seller (manufacturer) of the door.
Main parameters for selection
It just seems that buying hinges for glass doors is not a problem. The selection of these parts in stores is truly huge, but it’s easy to get lost in this variety. It is necessary to take into account some features that affect the performance and attractiveness of the design.
First of all, it is worth highlighting the following characteristics:
- Sash weight. This is the main parameter that you need to know before purchasing awnings. Each of them is able to withstand a certain number of kilograms. The thicker, taller and wider the sash, the heavier it will be and the greater the number of hinges will have to be used. In addition to the glass itself, the weight of the door is affected by the frame, if provided, and the rest of the fittings.
- The angle at which the door opens. It’s good when the sash can be opened 90 degrees or more. In this case, not only will people be able to move freely, but furniture can also be carried through the opening. If necessary, install a special limiter so that when opening the canvas does not hit the wall or interior items.
- Door control. If the hinges are adjustable, then this is a good option. If necessary, you can independently correct their work and fix them in a certain position.
- Design. This is also a significant characteristic, because elements of a transparent design should not only work well, but also create a pleasant impression and harmoniously combine with the glass, taking into account its texture, shade, and patterns.
When choosing hinges, it is not superfluous to check their completeness for the presence of gaskets and fixings. They will help you install the fittings correctly.
As for the weight of the sash, if it is from 25 to 40 kg, then 2 or 3 canopies are enough. If the weight of the door leaf is at least 60 kg, then at least 4 hinges must be installed, and for a door weighing 80 kg or more, 4 fastening elements must be provided. In addition to the weight of the structure, the geometric size of the product and its length also matter. If the partition is interior and not too large, then fasteners up to 7.5 mm in size will be useful. In the case where the structure is heavier and weighty, then you need to choose canopies with a length of 10-12.5 mm. You cannot save too much on purchasing accessories.