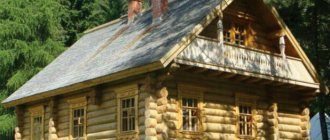
The floors in the bathhouse are formed for a specific purpose - in this case, special attention is paid to interaction with high humidity and heat preservation. Accordingly, “simply” creating this structure, without taking into account its specifics, will not be the most rational solution and will inevitably lead to serious problems in the future.
A special approach to floors is explained by the fact that most of the moisture will accumulate in this part of the room. If when decorating walls it is quite possible to get by with traditional plaster, then with the material for forming the floor the situation is somewhat more complicated - here it is important not only to correctly install them, but also to make the right choice from the very beginning.
Floors in the bathhouse
This article will discuss in detail the question of what kind of floor should be in the bathhouse? With its help, you can choose the most optimal solution for your circumstances. It also contains instructions that describe all the most important points of the process and how to install them yourself.
Bath floors
Tile covering for a bath
There are several technologies for creating a floor for a bathhouse, while the answer to the question “how to cover the floor in a bathhouse?” is rhetorical - no other material other than ceramic tiles is provided for this purpose (with the exception of natural wood in a Russian bath).
- Most often, concrete mortar is used to form bathhouse floors, through which a cement screed and CBPB sheets are created.
- You can rarely find wooden analogues.
- Cement-containing materials are used only as a basis for future finishing with ceramic tiles, since their surface cannot be used as a finishing coating.
- While a poured floor in a bathhouse made of natural wood is created as an original covering that does not require further manipulation.
Let's look at these three main analogues in more detail.
Protecting the walls of the bathhouse from the heat of the stove: installing protective sheathing and screens
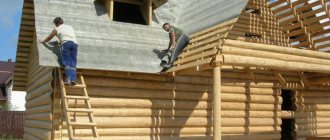
During the heating of the bath, the surface of the stove heats up to 300-400°C. At the same time, it begins to emit infrared rays and itself becomes a source of heating. The coming heat is distributed throughout the steam room, but first of all it hits the walls adjacent to the stove. If the walls are wooden, then under the influence of high temperatures their charring begins. And there it’s already a stone’s throw away! The only truly effective way to insulate wooden walls from heat is to create protective screens and cladding from non-combustible materials in the bathhouse.
When is protection needed at all?
The need to install protective casings and screens does not always arise. If a fire-safe distance is maintained between the stove and the nearest flammable surface, additional protection is not needed. At this distance, the IR rays are scattered, weakened, and the amount of them that the wooden wall receives can no longer lead to damage.
It is believed that the safe distance from the wall to the brick stove (quarter-brick laying) is at least 0.32 m, from the wall to the metal stove (not lined) - at least 1 m. For a metal stove lined from the inside with brick or fireclay, the distance decreases to 0.7 m.
Thus, maintaining fire safety distances is more possible in large baths, where the issue of saving space is not relevant. In family steam rooms, where every centimeter of space counts, installing a stove 0.3-1 m from the nearest walls is impractical. In this case, the safety distances established by the standards must be reduced using screens and casings.
And the article https://stroy-banya.com/delaem_pech/kak-sdelat-fundament-pod-pech.html will tell you how to make a foundation for a stove
Protective screens near (around) the stove
Protective screens are insulation panels that cover the side surfaces of the furnace and reduce the intensity of thermal radiation. Screens can be metal or brick. As a rule, they are used for metal furnaces.
Method #1 - metal screens
The most common protective screens are factory-made steel or cast iron sheets. They are installed around the stove, at a distance of 1-5 cm from the walls of the firebox. Depending on the need to insulate one side or another of the furnace, you can purchase side or front (front) screens. Many metal furnaces are initially manufactured with protective screens in the form of a protective casing.
Concrete floors
Concrete floor
Concrete floors in a bathhouse are not the most traditional, but at the same time one of the most popular design methods. The material for their formation is a mixture of cement, sand and filler (crushed stone, gravel), through which a monolithic screed is poured onto a solid base .
The main advantage of concrete floors is the low price of the starting material, which allows you to save a lot on their creation.
Its disadvantages include its heavy weight - a monolithic concrete floor in a bathhouse on stilts would not be entirely appropriate. Only hard soil can be used as the basis for its creation.
It is also worth mentioning the resource intensity of installation - without partial mechanization of the process, you will have to attract a large amount of labor to implement even a not very large project.
Note! There are technologies such as creating a cement screed on top of floating floors made of gypsum fiber boards, but in this case it loses some of its positive properties.
Installation technology
Laying the floor in the bathhouse - filling with expanded clay
Filling with expanded clay:
- Before installing concrete floors, it is necessary to level the base - it is not necessary to do this particularly carefully, it is enough to plan and create a relatively flat surface. It is necessary to fill the holes and cut off the mounds so that the overall plane is level relative to the ground;
- To create a heat-insulating layer, expanded clay is poured into a layer of at least 10 cm - this will not make the floors warm to the touch, but they will not “suck” heat from the room so intensely;
- Using a laser level or hydraulic level, the perimeter is marked and a surface level relative to the ground is visually drawn, which will serve as a guide for further work;
How to build a floor in a bathhouse - leveling the screed
- Metal reinforcement is laid, which most often takes the form of a welded lattice of reinforcement - in the future it will prevent subsidence of individual sections of the coating;
Note! The reinforcement should not lie directly on the insulating backfill - it must be positioned so that it is approximately in the middle of the future screed. To do this, it is enough to raise it using stones or blocks to the required height.
- Based on the markings made, beacons are installed - metal profiles that will serve as a guide for pouring. It is necessary to take into account that the floor is poured for a bathhouse and it is necessary to ensure the drainage of water - for this it is enough to make a gradual slope of the surface equal to 1 cm for each linear meter of the floor;
- Then the area is filled with concrete mortar, which is leveled according to the existing beacons;
Disadvantages of the material
Disadvantages of the product:
- Weight. Due to the presence of some components, the elements have a high density and significant mass, so assistance will be required when transporting and carrying the slabs to their destination. Due to the large load on the surface, when laying on joists, it is necessary to take into account the ratio of thickness and distance between the supporting elements.
Due to the serious weight of the material, powerful freight transport is required to transport cement bonded particle boards - Difficulty of processing. The cutting must be carried out with a suitable tool, otherwise the work may be significantly delayed.
- Dust formation. When cutting, a large amount of suspension appears, which has a detrimental effect on the respiratory system, so work should be performed in a respirator.
When purchasing material, you must check for safety certificates.
DSP floors
DSP floor
DSP is a composite material based on wood chips, a chemical component and Portland cement, which has increased strength and moisture resistance, which is especially important if you want to create a leak-proof floor in a bathhouse. The main advantage of this material is its low weight, which allows it to be used to create a floor on a pile foundation.
Installation technology
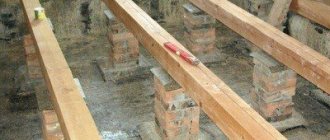
- First of all, as in the previous case, the perimeter is marked, after which load-bearing logs are placed, which will serve as the basis for the future floor. The distance between them should not exceed 80 cm;
- According to the set level, the lathing is assembled from wooden beams - the distance between the load-bearing elements should not be more than 50 cm;
- Then the intermediate parts are inserted, and it is necessary to position them in such a way that the edges of the joints of the two sheets fall exactly in the middle of the beam. In this case, it is also necessary to create a gradual slope of the common plane for water drainage, as in the previous case;
DSP boards photo
- DSP sheets are spaced apart to prevent the appearance of cross seams that will weaken the surface structure. When joining, a gap of 4–5 mm must be left between the edges of the sheets, since this material is subject to shrinkage deformation. It is also necessary to have an expansion joint 5 cm wide near the walls along the entire perimeter of the room;
Advantages of using cement bonded particle boards for flooring
This material is becoming more and more in demand, which is explained by its excellent parameters.
The main advantages of the product include:
- Strength. This quality ensures the product’s resistance even to severe mechanical stress. Point loads do not weaken the structure of the part.
- Environmentally friendly. The base, consisting of cement and a wood component, to which special modifiers are mixed, does not pose a threat to human health.
- Fire safety. The resulting coatings are highly fire resistant. Exposure to severe temperatures does not result in deformation or release of harmful substances.
- Resistant to mold and mildew. The presence of alkali in the composition prevents the development of microorganisms on the surface.
The tandem of liquid glass and Portland cement determines the unique water-repellent and antiseptic characteristics of cement-bonded particle boards - Moisture resistance. The product has low hygroscopicity, which allows finishing work not only inside the house, but also outside. For example, during frame construction, the floor can be laid long before the walls and roof are erected.
- Additional sound and heat insulation of the room. The parts absorb noise well and improve the energy efficiency of the building, reducing costs and ensuring comfortable living.
- Availability. The price corresponds to the quality of the product. The popularity of DSP is gradually expanding its distribution and increasing production volumes, which affects the price reduction.
- Frost resistance. The slabs do not deform in unheated rooms.
You can install the parts yourself without involving specialists, but the work has certain nuances.
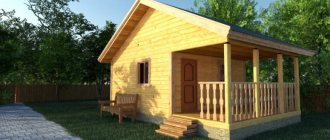
Spilling floors
Shower floors consist of plank flooring, and the floorboards are not fitted closely to each other - equal gaps are left between them, through which water flows away. This is the most common floor in a Russian bathhouse, as it is assembled entirely from natural wood. Their use is also relevant when constructing a lightweight structure - pourable floors in a frame bathhouse are one of the lightest and most economical analogues.
Shower floor in the bathhouse
Installation technology
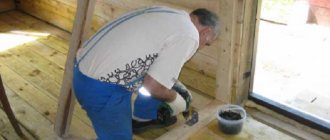
- The main condition for this technology is to ensure rapid drainage of water and good ventilation to avoid rotting of the structure. Water should not be absorbed into the soil - it is necessary to create a waterproofing subfloor. For this purpose, you can use ordinary roofing material, with which the subfloor is glued. The joints are treated with bitumen. If the foundation is strip, it is necessary to consider ventilation holes;
- Load-bearing logs are installed on concrete or brick pillars about 30 cm high, at a distance of up to 1 m from each other. Then the sheathing is assembled onto the logs, as in the previous case;
Spilling floors
- The assembled structure must be coated with a special compound, of which there are several varieties - it’s up to you to decide how to treat it in your specific case. The best option is internal moisture-resistant impregnation + bitumen coating;
- The frame is covered with boards, which must be planed on both sides so that water does not absorb into the fibers. The gap between them should be at least 4 -5 mm. Several boards above the drain and on the opposite wall must be made removable so that you can dry and clean the subfloor from debris;
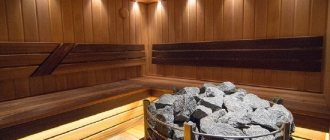
Protecting the walls of the bathhouse from the heat of the stove: thermal screen and lining
A feature of modern sauna stoves is their heating temperature, which can reach 400 degrees. An important indicator of the efficiency of the furnace is instant heating of the body and maximum heat transfer.
The entire heating process is accompanied by the release of infrared radiation, which is distributed on surfaces adjacent to the furnace. Under the influence of high temperatures, the wooden structure of the bathhouse can char or ignite.
This is why it is so important to ensure that wooden surfaces are reliably insulated from the heat of the stove. A protective screen and casing made of fire-resistant materials are suitable for this.
When is thermal protection required?
An urgent need to install additional protective elements arises in cases of non-compliance with the fire-safe distance between the stove and the surfaces adjacent to it.
At an unsafe distance, the infrared radiation released when heating sauna stoves hits the walls and is not scattered. This leads to damage to wooden surfaces or a fire hazard in general.
The safe distance between the wall and the heating structure depends on the material from which it is made:
So the distance from the wall to the stove:
- made of brick - 35 cm;
- made of metal (without interior decoration) – 100 cm;
- made of metal (with interior decoration made of brick or fireclay tiles) - up to 70 cm.
In small rooms where it is not possible to maintain a safe distance from the wall to the stove, it is more rational to install a protective screen or casing.
Protective thermal screens
As the main protection of the walls of the bathhouse, heat-resistant screens are used - special insulation shields to cover the side surfaces of the stove and reduce the intensity of the spread of IR radiation in the room.
Screens are divided into two categories: metal and brick.
Metal
Protective screen made of sheets of steel or cast iron. It is mounted around the perimeter of the sauna stove, while maintaining small technological gaps (3-5 cm) between the screen and the outer walls of the heating structure to ensure additional air convection.
Depending on the characteristics of the walls of the bathhouse and the type of stove, metal screens can be front and side. Some models of metal stoves are produced with an additional protective casing, which is installed when installing the firebox.
Installation of metal screens is carried out using adjustable legs and secured to the floor with bolts. In addition, the legs allow for clearance at the bottom of the structure for additional ventilation. To increase service life, the screens are coated with a fire-resistant paint layer.
How to make a porcelain tile floor in a gazebo
This is one of the most practical 'set and forget' flooring options for a gazebo. The most important thing is to choose tiles with a neutral pattern that you won’t get tired of by the third day, and always with corrugation so that it’s not slippery to walk on in wet weather.
To install a porcelain stoneware floor, you need to prepare a base - a concrete screed. To do this, remove the top layer of soil, fill it with a sand or gravel cushion, onto which a layer of concrete mixture 4-5 centimeters thick is poured. After the concrete surface has completely hardened and dried, we begin laying porcelain tiles on the screed.
Pros and cons of dry prefabricated floor screed
The use of dry prefabricated screed when installing floors has the following advantages:
- Prefabricated screeds reduce work time, as they do not require time to harden and dry.
- They do not add moisture to the rooms or underlying floor layers, which speeds up finishing and occupancy.
- They have a low specific gravity. Lightly loaded floors. Suitable for installing floors on floors with wooden beams.
- They provide, in comparison with monolithic screeds, better floor thermal comfort and thermal insulation properties, as well as a higher degree of sound insulation from impact and airborne noise.
- They create a solid and durable base suitable for laying any floor covering without additional work.
The disadvantages of prefabricated screeds, compared to a monolith, include:
- Greater sensitivity to flooding. It is not recommended to make floors in rooms where there is a risk of large amounts of water getting onto the floor.
- Withstands less loads. Prefabricated screeds are used for moderate and low intensity mechanical impacts on the floor, in dry rooms and with moderate humidity.
- A warm water floor with a dry screed will have less thermal power per 1 m2 than with a monolithic concrete screed.
Floor on the ground on the ground floor with dry prefabricated screed
What is a floor on the ground and what types of floors are there on the ground? You can find out about this on the previous page: “What are the types of floors on the ground - design options.”
A concrete floor on the ground lies directly on the wet and cold ground. The floor structure should serve as a barrier that protects rooms in the house from cold and soil moisture.
For residential premises on the first floor of a house, an inexpensive option would be to install a floor on the ground with a dry prefabricated floor screed, Fig. 4.
A floor with a prefabricated screed is afraid of flooding. Therefore, it should not be done in the basement, as well as in wet rooms - bathroom, boiler room.
| Fig.4. Floor on the ground in a private house. |
The design of the connection between the floor and the outer wall is shown in Fig. 5.
| Fig.5. Connection to the outer wall of the floor along the ground. |
1-2. Varnished parquet, parquet, or laminate or linoleum.
3-4. Parquet adhesive and primer, or standard underlay.
5. Prefabricated dry screed from ready-made factory-made elements with a “groove-tongue” connection of sheets.
6. Water-dispersed adhesive for screed assembly.
7. Moisture insulation - polyethylene film.
8. Quartz sand.
9. Concrete base - concrete screed class B22.5.
10. Separating gasket made of waterproofing roll material.
11. Thermal insulation made of polystyrene foam PSB 35 or extruded polystyrene foam, thickness as calculated.
12. Foundation soil.
13. Plinth.
14. Self-tapping screw.
15. External wall.
The layout of the floor on the ground, waterproofing of the base and walls, in a building with residential premises, is shown in Fig. 6.
| Fig.6. Layout of the floor on the ground and waterproofing in a private house. The arrows indicate the cold bridge. |
Here, in Fig. 6, the positions are as follows:
- Cellular concrete blocks.
- Waterproofing.
- The foundation is combined with the plinth.
- Plaster on mesh.
- Net.
- Blind area.
- Glue, solution.
- Interior decoration.
- Floor on the ground.
Why is there a prefabricated screed made of sheets, and not a monolithic one?
For floors, there are thermal technical standards for floor heat absorption.
Thermal absorption of a floor is the ability of the floor covering surface to perceive heat to a greater or lesser extent during periodic fluctuations in heat flow or air temperature.
The heat absorption rate for residential premises is 12 W/m2*deg.S. - no more. Depends on the thermal inertia of the materials in the floor layer. Simply put, standing barefoot with one foot on a wooden floor and the other on a concrete floor, you will feel the difference in the heat absorption of the floors.
In order to ensure the standard heat absorption of the floor without additional layers of insulation, this design uses a screed made of relatively “warm” slabs in combination with sand backfill.
The prefabricated screed has other advantages. The prefabricated screed is laid on a layer of dry quartz sand (washed construction sand). This layer also affects the heat absorption of the floor. The thickness of the sand layer in the proposed floor structure must be at least 40 mm. and no more than 100mm.
In this layer of sand you can place pipe distribution with various communications. Then the height of the sand layer should be 15 mm higher than the pipes. (Fig.4). Instead of quartz sand, you can use perlite or expanded clay sand of a fraction of 1.5-5 mm, in a layer up to 100 mm thick.
A sufficiently thick layer of light sand will improve heat absorption and sound insulation of the floor.
Fig.7. A layer of insulation is placed under the prefabricated screed. 1 and 2 - finished floor; 3 - substrate; 4 - self-tapping screw; 5 - sheets of prefabricated screed; 6 - glue; 7 — edge tape; 8 — thermal insulation slabs; 9 - interlayer; 10 - dry leveling backfill; 11 — moisture insulation; 12 - floor with uneven surface; 13 - plinth; 14 - glue; 15 - wall.
The presence of insulation boards under the prefabricated screed will provide better heat absorption rates for the floor and make the floor energy-saving. Heat leakage into the underlying layers of the floor will be significantly reduced.
Extruded polystyrene foam (EPS) boards or rigid mineral wool boards with a density of at least 125 kg/m3 are used as thermal insulation.
The layer (item 9) serves to uniformly distribute concentrated point loads in the soft layers of the floor. As a layer, moisture-resistant gypsum fiber - GVLV, or glass-magnesite - SML sheets with a thickness of at least 10 mm are used, laid on a backfill layer with a gap at the joints of no more than 1 mm. The joints of the sheets are taped with construction tape. The joints of the interlayer sheets (item 9) should not coincide with the joints of the thermal insulation slabs (item 8).
If you use EPS boards with tongue-and-groove joints for thermal insulation, then you don’t need to make a layer.
Choosing cement sheets for the floor
The choice of DSP boards is carried out in accordance with the conditions in which the material will be used, as well as the technology by which its installation will be carried out. For laying on logs, slabs with a thickness of 20-26 mm are used - they will perfectly cope with their function as a rough base. If installation is carried out directly on the ground, then 24-26 mm slabs are used. In general, almost any DSP board can be used to level floors.
Average market prices for material
Requirements for CBPB slabs used for floor installation:
- humidity – from 6 to 12%;
- density – more than 1300 kg/m3;
- tensile strength – 0.4 MPa;
- surface roughness – 80 microns;
- moisture absorption level – 16%.
For the floor, DSP boards must be used that meet a number of requirements
If the bathhouse is not heated
Gypsum is not afraid of low temperatures. The Knauf company indicates in the description of the plasterboard the only limitation on the lower temperature - minus 10°C. But this applies to the process of installing building slabs.
If in doubt, you can use façade plasterboard from Knauf. It differs from moisture-resistant only in the processing of cardboard on one side with a special polymer impregnation (on the other side - ordinary, non-moisture-resistant cardboard).
Doubts about the possibility of using moisture-resistant gypsum board in finishing a bathhouse (except for a steam room) are groundless. It is specially designed for operating conditions in damp and wet conditions. And additional waterproofing of areas with direct water contact allows it to be used for arranging shower cabins in washrooms.