Home » Decor » DIY
Design with your own hands
Tatiana Grigorieva
44812 Views
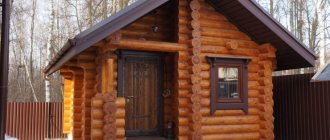
The Russian bathhouse has three main goals - to heal the body, relax the soul, and plunge into an atmosphere of friendly communication. Not every building will be able to meet the necessary criteria, but it’s worth talking about a comfortable and practical bathhouse interior. Of course, the room should be comfortable, functional and at the same time stylish.
What material is suitable for a steam room?
There are a lot of finishing materials for interior work. To make it easier for you to choose what kind of finishing will be done for the steam room in the bathhouse, each designer has photos and pictures of ready-made solutions. It is worth remembering that even if you made your own choice, it is better to coordinate it with a specialist, because not all materials are suitable for installation inside the hottest room.
Taking into account the specific operating conditions, the following requirements are imposed on the finishing:
- moisture resistance;
- heat resistance;
- durability;
- hygiene;
- environmental friendliness.
Important! For the interior decoration of the bathhouse, you should choose natural materials.
When the temperature rises, plastic becomes deformed and begins to emit an unpleasant odor, and ordinary tiles crack after heating. Therefore, the use of such finishing is unacceptable in the steam room.
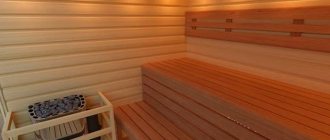
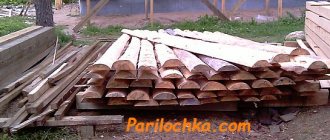
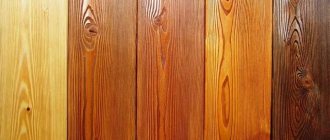
The best option is wood. The finishing structure depends on financial capabilities. For example, lining is cheaper than timber; it is chosen if it is necessary to meet a certain budget. Basically, bathhouse owners prefer deciduous wood. Below is an example of what the interior decoration of a bathhouse might look like, a photo of the classic version.
High-quality wood for interior decoration of a bath Source stroy-block.com.ua
There is an opinion that you should not sheathe the inside with steamed coniferous wood, since it releases resin when the temperature rises. But this statement is controversial, because resin has a beneficial effect on health, cleanses the respiratory tract, and strengthens the heart.
Whether or not to sheathe the interior with coniferous wood is up to you - maybe someone in your household doesn’t like the smell of pine needles or vice versa...
If lining was chosen for cladding the bathhouse, then it must be of high quality. Particular attention must be paid to the external processing of the material - there should be no chips, knots, or cracks on its surface. The lining should not deform: swell when heated or dry out at normal temperatures.
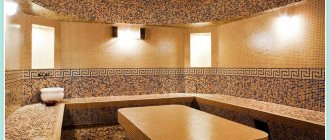
If wood is not suitable for you as a material for interior decoration of a steam room for some reason, you can give preference to heat-resistant tiles; they have proven themselves well under significant temperature changes.
Experts recommend laying the walls of the steam room with terracotta flagstone - this material is resistant to high temperatures and humidity.
Characteristics of wood species for a bath
For the interior decoration of the bathhouse, you can use coniferous and deciduous wood. A significant difference between the species is the amount of phytoncides released, which can kill some microorganisms and slow down their growth. Coniferous species contain much more of these substances.
However, choosing wood for a bathhouse based only on the usefulness of the material is wrong.
Other criteria should be taken into account:
- density;
- durability;
- percentage of resin content;
- affordability.
Bath traditions go deep into the past, so our ancestors accumulated enough knowledge about the properties of different types of wood. After studying them, you can choose the most suitable material for finishing the bath.
Larch
This is a beautiful resinous tree with a reddish tint.
The mechanical properties of this species are identical to oak. In addition, larch contains an impressive amount of highly active substances useful to humans.
The main advantages of larch:
- Durability. Even in conditions of high humidity and high temperature, wood is resistant to rot and fungus.
- Over time, wood does not change its color.
- With excellent mechanical properties, it is cheaper than oak.
- The disadvantages include the complexity of wood processing and low thermal insulation properties.
Linden
This is one of the most popular and affordable materials. When heated, linden releases substances that are beneficial to health. In interior decoration, this wood shows its best side.
Even at the highest temperatures, the walls and ceiling will be pleasant to the touch.
Advantages of linden for interior decoration:
- The wood is light and soft. Thanks to these qualities, finishing is time-consuming and easy.
- Linden has low thermal conductivity. Buildings made from this type of wood warm up quickly and require less fuel. In addition, the steam room does not cool down for a long time.
- Well-dried lining does not shrink, and the bathhouse can be heated immediately after finishing is completed.
Linden also has significant disadvantages:
- Low fiber density and resistance to rotting. As a result, insects quickly appear in the material and fungus spreads. For this reason, linden-lined baths must be thoroughly dried after use.
- High price. Linden is more expensive than pine and spruce, but at the same time cheaper than oak, larch and especially cedar. However, given the advantages of this material, the price is quite justified.
Oak
The most durable and moisture-resistant material. But it is used less often in bath decoration due to its high price.
If you want to have a rich environment, oak is the best choice. In order to save money, lining or boards made of this wood are used as additional finishing in order to emphasize some details.
For example, the shelves are lined with linden lining, and the headrest and back are made of oak.
Birch
Wood that has long been valued by bathhouse fans. It is beautiful, fragrant, healing and durable. Birch is soft, tough, and elastic.
It demonstrates anti-inflammatory, bactericidal, antifungal, strengthening, wound-healing, antiviral and antiseptic properties. But birch is afraid of moisture, so it is ideal for finishing the ceiling, walls and floors of recreation rooms.
Aspen
Deciduous species, widely distributed in Europe and Asia.
It has a recognizable light shade and a smooth, pleasant texture.
Choosing aspen for finishing is a good idea due to its advantages:
- does not overheat;
- due to the specific structure of the fibers, it will not cause splinters;
- does not release resin;
- has an acceptable cost.
- The disadvantages include susceptibility to rotting in high humidity and darkening over time.
Cedar
Decorating the bathhouse with cedar looks very beautiful and noble. This wood is easy to process, is highly resistant to temperature changes and moisture, and is not afraid of insects and fungi.
Cedar is rich in healing essential oils, thanks to which a unique aroma will reign in the room.
However, the persistence of the aroma is considered not only among the advantages, but also among the disadvantages of cedar.
- Some owners of cedar steam rooms note with annoyance that the pleasure lasted a little more than six months and soon the smell began to irritate. And the material was very expensive.
Ash
Boards and lining made from this species look very presentable. The color of the wood is dark, the structure is dense. Ash is especially recommended for making shelves. Dense, non-porous wood does not allow dirt to penetrate inside. Ash has a high heat capacity.
At the same time, the surface does not overheat and does not burn the skin. Lying on the wide and warm ash loungers is very comfortable. A solid ash shelf is the best solution for a steam room with a temperature/humidity mode of 60/60.
- The disadvantages of ash include its relatively high cost. It is also worth considering the material’s susceptibility to temperature changes: such lining in a steam room will require careful and regular maintenance.
Abash
The exotic tree is an analogue of the oak familiar to Russians. It has no less impressive properties than its domestic counterpart. This is one of the best materials for finishing a bath.
Abashi wood is lightweight and amazingly durable. The material has no knots and does not emit resin.
The advantages of this type of wood:
- the amazing ability to adapt to the temperature of the human body;
- low thermal conductivity: wood does not overheat even at extreme temperatures;
- does not deform or shrink even with changes in humidity;
- resistant to rotting.
- This material has only one drawback. Since it is exported from African countries, its cost is much higher than the usual local materials. Therefore, such a finish is not affordable for everyone.
Expert opinion
Lovkachev Boris Petrovich
Bath master who knows everything about steaming
It is not recommended to use maple and beech for construction or interior decoration of bathhouses. They have a loose structure and even at low humidity begin to rot.
Ceiling protection
Before finishing, you should protect the ceiling from hot steam. To do this, use aluminum foil or a construction membrane.
Important ! Do not use foil with mineral wool or polypropylene foam glued on it. When heated, these materials release toxic substances.
Protecting the ceiling in a bathhouse using aluminum foil Source ko.aviarydecor.com
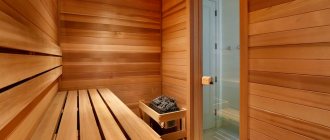
Using lining - rational or not
Definitely yes! Lining made from linden, aspen, cedar, and abashi has become popular due to its properties. It tolerates temperature changes well, high humidity, is aesthetically pleasing, and does not absorb moisture. Cladding made of clapboard has low thermal conductivity - it does not heat up, but transfers heat to the air.
Bath lining is not covered with varnish, antiseptic, or paint; it is used in its natural form.
See also: Catalog of companies that specialize in finishing materials.
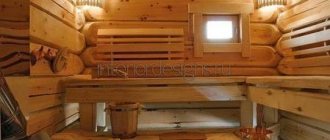
Covering the walls of the steam room with clapboard
Choosing a cladding method
There are two types of lining arrangement - vertical and horizontal. In our example, the lining is positioned vertically. If desired, you can also orient it horizontally. In this case, there is no need to install horizontal slats (planks) on top of the vertical posts. In this case, the width of the racks must be taken in such a way that the thermal insulation wool is recessed by 20-30 mm relative to their longitudinal end. This will ensure ventilation of the air space between the insulation and the inner surface of the wall sheathing.
It is important to know that when viewed horizontally, the sheathing must be done from the bottom up, placing the tenon at the top. This will subsequently prevent water from getting inside the joint grooves when it flows down the walls of the steam room.
Return to content
Laying the first moisture-proof layer and vertical posts
- First, we make markings for installing vertical posts, starting from the corners of the steam room with a step of 590 mm between their inner edges. These dimensions will allow you to tightly lay basalt wool with a thickness of 100 mm.
- The decoration of the walls of a bathhouse built from logs has its own characteristics. The fact is that fixing the sheathing slats strictly vertically is not so easy. To achieve this, it is necessary to process the vertical posts from the side where they contact the logs. For this purpose, a special copier is made, which is a thin ruler pointed on one side and holes drilled along it for a pencil. Having attached the stand to the log wall, the copier is passed along it and lines are drawn that repeat the profile of the log house. Further actions boil down to processing the racks along the drawn lines. It is enough to ensure a tight fit of the rack to the logs in several places with a step of 600 mm, maintaining a strictly vertical level. The length of the contact surface of 20-30 mm is quite sufficient. Don't forget to treat with an antiseptic.
- We lay the protective membrane from bottom to top. The top film is overlapped with the bottom film by 20-30 cm. We level and fasten the top edge to the protruding parts of the logs with staples using a stapler. We glue the overlap areas with self-adhesive Isofix tape.
- We align the protective film under the posts, which we install in the corners according to the previously made markings. Using a level or plumb line, set them strictly vertically. Fastening to logs is done with galvanized nails or screws. In order not to use long screws, we drill a blind hole in the rack 2-3 mm larger than the diameter of the screw head.
- We stretch the rope between the outer posts in two places: below and above. It will serve to base the internal racks.
- We install all internal racks according to the example in step 4.
- Align and carefully staple the protective film. Where necessary, additionally glue with self-adhesive Isofix tape. This operation should be performed with particular care. It is important to completely eliminate the possibility of air entering the area of open logs.
- Note: during the installation of corner posts, it is necessary to simultaneously lay thermal insulation wool in the corners.
Return to content
Installation of thermal insulation and vapor barrier film
- Before laying thermal insulation mats, you should provide yourself with personal protective equipment: work gloves, goggles, a respirator, a hat and appropriate clothing. Getting cotton wool on parts of the body or in the eyes will cause a lot of trouble. Inhaling air filled with volatile cotton wool particles will not improve your health.
- We carefully place the mats in the spaces between the racks in the direction from bottom to top and in the same plane with the outer longitudinal ends of the racks. We carefully press each upper mat to the lower one, avoiding gaps and cracks.
- We cut the top mats with a mounting knife
- We lay the vapor barrier foil in the same way as indicated in paragraph 3 of the above section. The only difference is that it is attached to vertical posts. Each strip should be connected with self-adhesive aluminum tape LAS. The new layer of tape must be glued overlapping with the previous one. You should also make releases of 70-100 mm foil both at the top and bottom of the wall.
Return to content
Fastening horizontal slats (planks)
At this stage, we fasten the horizontal slats for mounting the clapboard sheathing on them. We nail or screw the slats over the vapor barrier at the bottom and top of the future sheathing. The internal slats are spaced at 600 mm intervals. We use a level to give them a horizontal position.
Return to content
Cladding walls with clapboard
- Before covering, you should make sure that the lining is dried and has lain in conditions close to the place of work for at least one day.
- We place the first board strictly vertically with its tenon in the very corner of the wall. At the same time, its groove should look at us. The quality of the entire cladding depends on how you secure it. After all, the first board is the main reference point for all the boards in the row. Using nails or screws from the edge, carefully secure it to each horizontal rail. It is important to ensure that the fastener caps are completely closed during subsequent lining with decorative corners. We place the clamps (clamps) into the protruding edge of the lining groove and carefully nail them to the slats.
- We carefully insert each subsequent board all the way into the groove of the fixed lining, tapping it with a mallet through a wooden block, which will protect it from unnecessary damage. We also secure it to the slats with clamps.
- The last piece may need to be trimmed and secured like the first board. We sheath all the remaining walls, attach the baseboards to the sheathing, and caulk all corners with decorative corners using copper-plated small-head finishing nails. Such nails are practically invisible and will not spoil the appearance of the steam room.
- Important: to ensure unobstructed ventilation in the space under the cladding, the lower end of the lining is installed with a gap of 10-15 mm from the floor. This scheme will also protect the lower ends of the lining from exposure to water during the operation of the steam room.
Return to article content
Preparing the walls for finishing
When starting to finish the walls, they solve the issue of insulation and waterproofing. Without such measures, the bathhouse will not last long, and healing procedures will be reduced to simple hygienic ones. For insulation, the walls are covered with mineral or basalt wool. The second one is more resistant to high temperatures, so it lasts longer.
Insulation of walls in a steam room with mineral wool Source hvylya.net
Experts consider cork to be the best thermal insulator for bathhouse walls. This agglomerate does not burn, does not rot, and is resistant to fungi and mold.
How to line walls, floors and ceilings
Before you start finishing the walls, you need to choose waterproofing and insulating materials. It’s impossible without them. Cotton wool - basalt or mineral - is perfect as insulation. The first one will last longer than the second one, because it resists heat more easily. When it comes to cladding, professionals recommend balsa wood. Among the advantages is resistance to mold and fungal bacteria. Also, it does not burn and does not rot.
Choosing the right floor and ceiling coverings is also important. Not only wood is suitable here, but also corrugated tiles. If the choice falls on it, it is better to take the smooth glazed one. It tolerates temperature fluctuations well.
For flooring, experts recommend taking a closer look at larch. It may not be cheap, but, like cork, it does not rot and boasts an excellent level of strength. Floor finishing should be done only after completion of insulation work. Even if the floor is concrete, it needs to be insulated - with crushed stone or expanded clay.
When it comes to finishing the ceiling, the best choice would be a type of wood with a low resin content.
The hottest air in the steam room is concentrated near the ceiling. Therefore, you should not take pine needles - hot resin, among other things, can burn the skin.
Lathing - to do or not to do
Craftsmen prefer to install the sheathing and attach the interior trim to it. The popular base size is 50x50, less often they make 70x70. The pitch is not standard and varies depending on the size of the blocks being strengthened.
The sheathing is made of wood, less often of metal. Considering the operating conditions, the metal must be treated with moisture-resistant compounds. The lining or logs are secured with self-tapping screws and nails. They must be copper or brass. The installation of the base is done perpendicular to the sheathing.
Lathing walls in a steam room under clapboard Source seattlehelpers.org
Stages of clapboard finishing
- A beam is fixed along the perimeter of the wall and ceiling . Fastenings should be every 80–100 cm.
- Cut pieces of insulating wool are placed between the wood without compacting.
- The top is covered with a waterproofing agent . The joints are sealed with aluminum tape, paying special attention to the corners.
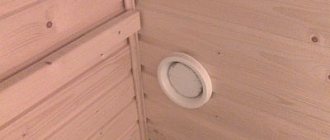
- Provide ventilation . To do this, fill the distance rail. It will provide a small gap (2–3 cm) through which air will be vented.
- They make separate upholstery for doors and windows.
- They fasten the lining . You need to start from the corner, fixing each part vertically. This position will ensure free flow of water. If a horizontal arrangement of blocks is planned, make sure that the spikes are at the top. This will protect the lock from moisture.
- The lining located in the corners or near the walls is cut to the required size . It is especially important to cut the corner block correctly. It is necessary to accurately calculate the angle of inclination so that the adjacent block is correctly fixed.
Insulating the furnace using a metal sheet Source interistroy.ru
Next, install insulation from the furnace. For this use:
- metal - stainless steel or profiled iron is mounted on the wall behind the stove;
- red brick - placed between the wall and the fire;
- tiles resistant to high temperatures (kaolin);
- mineralite is a heat-resistant board made of cement and special components.
Alternative finishing materials
If wooden cladding is chosen for the walls in the steam room, then the floor and walls in the remaining rooms can be made of other materials.
Steam room
The interior of the bathhouse does not have to be completely “wooden”. The floor and wall behind the stove can be tiled. You can choose natural or artificial heat-resistant stone as the material for the area near the stove. For the floor, heat-resistant clinker tiles with a matte rough surface are used. You can slip on glossy tiles, which is especially dangerous in a room with a stove. To create a comfortable floor temperature, plank flooring is laid on top of the tiles or a “warm floor” system is installed. It can work from the stove.
Tiled floor in the steam room
Expert opinion: Afanasyev E.V.
Chief editor of the Stroyday.ru project. Engineer.
I recommend that you read the material about the most serious mistakes when installing a stove in a bathhouse!
Washing
To finish surfaces in the washing room, it is better to use moisture-resistant materials that are not afraid of high humidity: ceramic tiles, porcelain tiles, mosaics. This material will forever eliminate the need for caring for wooden surfaces and treating them with antiseptics. One of the advantages of tiles is durability. Disadvantage: cold surface. For the floor, choose a material with a rough, non-slip surface; for the walls, you can choose glossy tiles or mosaics. Ceramic tiles come in a variety of colors, patterns and shapes, so the interior of a sink can be not only practical, but also stylish. Tiles go well with natural wood, so you shouldn’t completely abandon them in your washroom interior.
Ceramics diversify the interior
Restroom
Since the humidity in the rest room is not increased and there are no thermal effects on the surface, it is quite possible to use materials familiar in residential interiors: laminate on the floor and walls, MDF panels and boards with a laminated surface, glass wallpaper, decorative plaster, tiles, artificial and a natural stone.
Waiting room
If the bathhouse is built not from wood, but from concrete blocks, then the inside wall before finishing is lined with OSB or gypsum board sheets with insulation. You can install any finishing material on top, even moisture-resistant wallpaper for painting.
Making the floor in the steam room
Not only comfort, but also safety depends on the choice of raw materials for the floor. Moisture on smooth tiles or linoleum leads to falls and injuries. Installation of such materials will turn the floor into a skating rink. In addition, when heated, linoleum emits an unpleasant odor containing substances harmful to health.
The optimal choice of floor for a steam room is wood. It does not require a special coating, and with this design the room will be designed in the same style. It is worth noting that the wooden floor in the bathhouse is not made of oak. This wood becomes stronger when wet, but at the same time its surface begins to slip.
Concrete works well. A floor made of such material will be strong and durable. Tiles are laid on top of it, but the structure of the surface of such a coating is important. It should not be glossy; a pronounced relief is necessary. The floor is laid at a slight slope towards the water drainage.
Laying tiles on the floor in a bath Source seattlehelpers.org
The tiles are laid from the corner, placing crosses between the blocks, tapping with a mounting hammer. After 2-3 days, the seams between the tiles are rubbed down. Wooden grates are placed on top to prevent you from stepping on the cold floor and provide additional safety in case of possible slipping.
Necessary tools and accessories
- Electric drill with a set of wood drills.
- Electric jigsaw.
- Wood saw.
- Set of wood rasps.
- Hammer.
- Hatchet.
- Mallet.
- Furniture stapler with a set of staples.
- A device for sawing bars at an angle.
- Level.
- Roulette.
- Yardstick.
- Carpenter's square.
- A ruler for drawing the outline of a log house.
- Plumb.
- Rope.
- Metal clamps for lining.
- Pencil.
Additional materials on the tool can be found here and here.
Return to content
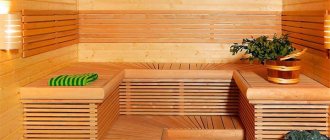
And now the shelves
A very important point is the shelves in the bathhouse. Since constant tactile contact is assumed with them, increased requirements are put forward for these elements:
- they should not get very hot ;
- it is better if they cool slowly ;
- must be environmentally friendly ;
- do not slip or be very rough;
- have no external damage ;
- easy to wash.
Again, wood is most suitable for this purpose. Carefully cleaned, without knots or nicks, it has served people in bathhouses and steam rooms for centuries. Shelves should not have sharp corners that could cause injury. They are not made solid, leaving a small distance between the wooden boards.
Setting up a dressing room
The main function of the dressing room is to preserve heat. The temperature in the room is not high, so it is good to use coniferous trees to decorate walls in a traditional style.
Design of the waiting room and rest room “under the tree” Source koon.ru
The interior decoration of the bathhouse made of logs creates an atmosphere of antiquity and ancient fairy tales. A light aroma created by pine, fir, and spruce is appropriate here. The wood of these species resists fungus and mold well. It does not crack after drying and is durable. When heated, fir releases almost no resin.
If hardwood is preferred, experts advise finishing the room with birch. The lining can be laid out not only in even rows, but also in a pattern. It is important that the walls in the room are covered with the same type of wood.
What is a bathhouse
Let me give you a short excursion into history. The Russian bathhouse was originally a free-standing low building with only one room. Inside everything was poor and austere. In the dressing room there are only benches and hooks for clothes, bands, and brooms. The building was used only as a steam room, and then you could take a dip and cool down in a river, an ice hole or a snowdrift. How do you like this prospect?
Interior of a Russian bathhouse
Modern baths are a structure consisting of several rooms, each with its own functionality. There are various layouts, some offering large-scale construction, sometimes even in the perspective of two floors.
Building with several rooms
But more often, more familiar, medium-sized one-story buildings with three rooms are built:
1Steam room.
2 Shower room (sometimes also a laundry room).
3 Dressing room or, as it is also called, rest room.
Recreation room or dressing room
Inside each of the rooms you can create your own, exclusive style, although it is important to maintain a harmonious combination in the interior of the entire bath.
Bathroom and washroom
These rooms do not have very high temperatures, although the humidity is as high as in a steam room. The choice of finishes in the bathroom and washroom is more extensive. Fans of bath procedures recommend using natural raw materials for such rooms - wood or stone. Among wood, pine is the leader - it is an affordable material, however, it darkens with prolonged use.
An example of a washing station design Source profstroiplotnik.ru
Plastic is acceptable since there is no high temperature, and it tolerates humid air well. You can use regular tiles for the shower.
Types of interior design of baths
The classic layout of a bathhouse includes 3 rooms: a dressing room (dressing room), a washing room (shower room) and a steam room. Although in traditional Russian baths the steam room and shower can be combined. All additional premises - a font (swimming pool), a games room (billiards), a kitchen, a recreation area, a toilet, a smoking room - are a matter of financial capabilities and personal preferences of the owners.
However, the most popular decoration is in the usual Russian style - restrained, laconic, with a massive table, benches and couches. Billiards or TV will add a touch of modernity.
The interior of an old-style bathhouse can be complemented with forged elements, wooden household items and utensils decorated with carvings. Walls decorated with oak, birch brooms or bundles of fragrant herbs will also look colorful.
Video description
For interesting ideas for interior decoration of a bathhouse, watch the video:
Decorating a relaxation room in a bathhouse, in addition to traditional wood, can be done:
- glass wallpaper;
- porcelain stoneware;
- natural stone;
- decorative plaster.
Important! The tree is not installed immediately after delivery to the construction site. It is brought into the room and allowed to stand for a couple of days so that it “gets comfortable” in the bathhouse. After this procedure, the wood is not subject to deformation when heated and high humidity.
How is insulation done?
For example, the question of what is the best way to cover a bathhouse has already been resolved, so it’s worth moving on to the plan. Insulation instructions:
- Preparation;
- lathing;
— vapor barrier;
- waterproofing.
Next, plaster for the bathhouse can be applied inside. We'll have to decide on natural and non-natural options. The current topic is how to replace the lining in a bathhouse. This is where tiles and plankers come to the rescue.