Sauna in the basement of a private house
Construction of a sauna in the basement of a house is becoming increasingly popular among their owners. What could be better than soaking in a sauna on a frosty winter day? And if you don’t need to go far to see it, you just need to go down to the room located under your own house.
This is possible subject to the availability or irrational use of the basement and funds for the implementation of the project. You can learn how to build a sauna in the basement of a house from the article.
Pros and cons of placing a steam room in the basement of a house
The biggest disadvantage of this arrangement, of course, is the increased fire hazard of the facility.
The main fire hazard occurs when firing a sauna stove. If you take all precautions and fire the stove in compliance with fire safety regulations, then the risk will be minimal. Well, if you install an electric heater in the bathhouse, then there will be no danger of a fire in the steam room due to an open fire.
The second disadvantage of the bathhouse project in the basement is the increased humidity from the bathhouse, which will spread throughout the house. Fortunately, modern manufacturers have taken into account all the critical moments and offer ready-made high-quality solutions for providing air ventilation. The same applies to other equipment.
Project development
Where should you start building a bathhouse? The answer is quite simple - from project development. If the construction of structures is not carried out according to plan, then it is almost impossible to avoid most problems.
A real estate construction project is presented by a document that should answer the following questions:
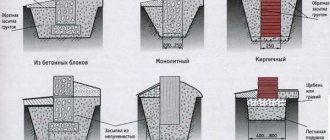
- What should be the foundation? It is selected depending on the load size, soil type and other criteria.
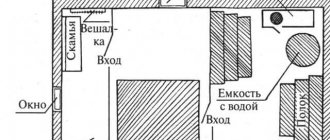
- Layout diagram indicating the location of all the main elements, in the case of a bathhouse, stove, windows and sunbeds.
- The type of material used in the construction of walls, ceilings and roofs. Quite a lot of attention should be paid to this point.
- Features of connecting various communications. The bathhouse needs light, and an electric heater can be installed to maintain the required temperature.
The more information the developed project contains, the fewer problems will arise during installation work.
When developing a bathhouse project, the following recommendations should be taken into account:
The concept of a bathhouse and a sauna are significantly different. A classic Russian bathhouse consists of only three rooms: a steam room, a vestibule, and a dressing room. Other premises can also be built, for example, a recreation room or a swimming pool. In order for the bathhouse to be as comfortable as possible, one important recommendation should be taken into account - the steam room area should provide at least 4 square meters for each person. Otherwise there won't be enough space. When developing a project, the location of the furnace is also taken into account. During its construction, using bricks will put quite a lot of pressure on the base. That is why a solid foundation is being created. At the time of the preparatory stage, the material is selected. The difference between timber and logs was given above
As for other materials, you should pay attention to red brick or silicate blocks. They can also be used to create a sauna, but such a structure cannot be called a traditional Russian bath
When using non-solid wood, a variety of finishing materials are used.
When creating a project, an estimate is calculated, which allows you to determine upcoming costs. Today, when most building materials are purchased via the Internet, creating an estimate is quite simple. To do this, you only need to calculate the volume of materials used during construction.
Safety precautions when building a steam room in the basement
In order for a basement sauna to have the right conditions, it is necessary to maintain the appropriate relationship between temperature and humidity. This relationship describes the "right to the sum of 110". According to this formula, the sum of the temperature (in degrees C) and humidity (in percent) in the steam room should be 110 (for example, 70 degrees C and 40%).
Otherwise, placing a bathhouse in the basement is a complete plus. You can start heating a sauna without leaving your home. Residents can take a steam bath and go out to drink kvass right in the kitchen. You will save on building a free-standing bathhouse - after all, you no longer need a log house, say, somewhere on the outskirts of a summer cottage.
Beautiful examples
- An excellent bathhouse made of natural wood, which is made in a minimalist style.
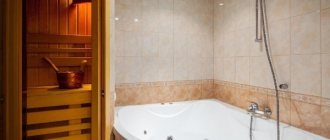
- A luxurious bathhouse in a large basement, which includes a relaxation area.
- Bathhouse with a separate shower room and shower stall. The lighting inside creates a unique microclimate and allows you to relax.
- Sources used in the article:
https://stroy-banya.com/karkas/banya-pod-domom-v-podvale.html - https://stroyday.ru/stroitelstvo-doma/pridomovye-postrojki/sauna-svoimi-rukami-v-podvale.html
- https://stroypomochnik.ru/banya-v-podvale-01/
- https://o-vannoy.ru/banya/vse-o-saunah-v-podvale/
- https://PlanVsem.ru/banya/banya-v-cokolnom-etazhe.htm
- https://poparimsya.online/stroitelstvo/banya-dom/podvale-sauna.html
- https://bouw.ru/article/banya-v-podvale-chastnogo-doma
Ventilation of sauna and steam bath
The most common mistakes in the design of bath complexes in the basement are violations in the installation of ventilation ducts. In addition to inconvenience of use, this can lead to the room becoming damp and, in extreme cases, lead to overheating of the elements inside the sauna or even a fire.
Air should circulate freely in the room. There should be at least a few centimeters between the walls of the room and the walls of the bathhouse itself, if there is one.
Drafting
Ceilings should be between 1.85 m and 2.05 meters high. This indicator is limited by the foundation and walls of the building’s basement. Too high ceilings are not very good for a steam room, since you will need to do excessive heating, and if you make small ones, it will be inconvenient for anyone who is tall to use the steam room.
In addition, a low ceiling is dangerous from a fire safety point of view. All materials must be treated against moisture and fire-resistant impregnation.
For a company of 4 people, the steam room made should be approximately 3 square meters. The shelves are made in 2 rows, each 0.5 m wide. The first row is placed 0.5 m from the floor, after 40 cm another shelf is made, and the third row is placed very rarely, with high ceilings.
The width of the shelves greatly affects the air circulation inside the steam room.
The sauna structure is installed so that the following requirements are met:
- 2 sides must be adjacent to the walls of the house;
- Proper supply of electricity, water supply and sewage drains is necessary;
- Ventilation must provide sufficient air exchange.
It is necessary to equip a separate exit to the outside in case of an emergency.
Installation Requirements
In traditional saunas, the only requirement is a suitable electrical connection. Basement steam rooms will also need the following.
- Water – all you need to do is run cold water to power the steam generator. If possible, install a sprayer, which will allow you to cool a heated room without leaving it.
- Discharge into the sewer system where the condensed water vapor will be discharged into the sewer system. It must be located in the geometric center of the bath and have a diameter of at least 50 mm (for example, in a shower tray). The floor should slope slightly towards it.
- Sufficient electrical power of the steam generator.
- Connection to the ventilation duct.
If you doubt your knowledge, it is better to entrust all communications to professionals.
Sewage disposal system
Removing dirty water at the end of bath procedures is not as simple as it might seem at first glance. The reason is obvious - the basement itself is located below the level of the sewer pipes and drains of the house.
Therefore, all wastewater in the basement is collected in a sealed tank or cistern connected to the sewer riser of the house at the level of the first floor. An air compressor is connected to the container with waste water; after turning it on, excess air pressure forces the collected liquids into the general sewer system of the house.
Sometimes bathhouse owners take a more expensive and reliable route; instead of a compressor, a submersible fecal pump is installed in a collection tank in the basement subfloor, capable of pumping the contents directly into a septic tank or cesspool.
Walls and ceiling
The internal parts must be made of panels of suitable wood, at least 12 mm thick. To build a bathhouse in the basement, the following are most often used:
- Scandinavian spruce;
- Canadian spruce;
- cedar, which is an ideal material for a sauna.
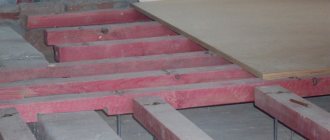
It is important that the wood has as few marks of knots as possible and a minimum amount of resin (to ensure maximum comfort). Underneath the wood paneling in the basement there should be insulation, preferably mineral wool. The thickness of the layer can range from 45 to 100 mm. Expanded polystyrene is not resistant to high temperatures, so insulation should not be made from polystyrene boards. Proper thermal insulation is a very important element of the sauna cabin. This reduces heating time to minimal operating costs.
Baths in the basement can also be made from solid wooden logs - then the use of mineral wool will not be necessary. The room does not require additional protection from moisture. Contrary to popular belief, this is the driest room in the entire house. In principle, the walls can be finished with any material: wood, fiberboard or plaster. To protect the wooden wall elements from absorbing water collected on the sauna floor, they must be installed on aluminum profiles.
Electric heating or wood?
It is not easy to answer the question: what type of stove to choose for a home bath in the basement. First of all, because it is very difficult to define specific criteria that would allow such an unambiguous assessment. Even if we take into account energy efficiency, cost or ease of use, this comparison can only be made on individual models representing a given type of heating.
What to consider when choosing stove types
| Varieties | Peculiarities |
| Single-component electric furnaces. | Dry sauna stoves, in which we pour water (usually with the addition of essential oils) onto heated stones to obtain higher humidity. |
| Electric dual-function ovens. | This is a stove with an evaporator (for example, from the Bi-O series), which will fill the bath with dry, humid air or steam. |
What to choose? The answer usually lies in the preferences of the person planning their own home bath in the basement. In technical questions regarding the possibility of using specific stove models in rooms intended for bathhouse needs, it is worth consulting with production and assembly specialists.
How to make a floor correctly
Scheme of the floor arrangement in the bathhouse
It is made of material that is resistant to moisture and high temperature. This can be terracotta or synthetic lining. To prevent its surface from being slippery, it can be additionally covered with wooden gratings. Basement floors should not be insulated.
Wooden elements such as floor grilles, door thresholds or door handles must be protected with a special varnish. This is used, for example, to impregnate a boat. Drainage in the floor is recommended in any bathhouse, because then it is easier to maintain cleanliness.
Drain grates should not be placed directly under the stove, as this may cause unpleasant odors to escape from the sewer system.
Creation of ventilation and supply of communications
When deciding to build a sauna complex in the basement of your own home, remember to carefully design the ventilation. When using the bathhouse, a constant supply of fresh air must be provided, as well as drainage of used air - warm and humid. Lack of ventilation (or improper implementation) will not only worsen the bathing conditions, but can also lead to excess moisture in the room, overheating of its internal components and even a fire.
To ensure free circulation of air in the basement, place the supply system under the furnace, and place the outlet in the ceiling on the opposite side above the entrance (if there is free space above it) or high in the wall. At the same time, it is important that the distance between the air inlet and outlet be as large as possible. The air intake and air outlet must have the same dimensions.
Regulations
There are quite a lot of regulations regulating the activities of bath and sauna organizations. The main ones are:
- ZPPP No. 2300-1.
- SanPiN 1.2. 3150-13 (a document regulating both the design and operation of saunas).
- SNiP 31-05-2003 (rules for the construction of housing and communal services).
- SP 118.13330.2012/SNiP 31-06-2009 (requirements for public buildings).
- Federal Law No. 123, pay attention to table 11. This law is a technical regulation of fire safety (fire safety).
- NPB 110-03 (list defining the types of knowledge to be protected by automatic fire extinguishing systems and automatic fire extinguishing systems).
Before starting work, make sure that local authorities have not provided you with a SNiP specially developed for the city or region.
Don't forget about lighting
In baths, special lamps are used, where the lamp is completely covered with a tight lid. There should not be direct access to it. Lighting panels can be additionally covered with special lampshades.
Do not achieve too much light intensity; lighting should promote relaxation.
Lamps are usually installed on walls at a safe distance from the ceiling: at least 30 cm. They can also be located under benches. This type of lighting creates a pleasant mood. Lamps should not be installed directly on or near the floor.
Work progress
When a place has been chosen, the future premises are marked, the turf is removed and after that you can start digging a pit. This may take several hours or several days - the volume is about 30 cubic meters.
Next, drainage is performed, where the water will flow, and roll waterproofing is installed.
Then we begin to build a “shed” inside the pit. You can use dead wood and dead wood for it. First, corner pillars and load-bearing pillars are installed under the roof, then logs are laid around the perimeter. The waterproofing is fixed, and the void between the logs is filled with earth. External walls can be treated with clay.
Next, the rafter structure is assembled, the ceiling and roof are installed.
The top is covered with waterproofing material, the chimney is removed and the surface is covered with turf - the underground bathhouse is almost ready!
A window is very desirable, even necessary, for fire safety and natural light. Diesel lamps are often used as light bulbs in such a bathhouse.
Next, internal partitions and structures are erected to the owner’s taste, and a stove is installed. This could be a stove or another option.
Any design is possible inside, but wood looks best.
Outside, it is recommended to organize a ladder from boards.
You can build doors between rooms with your own hands, or you can buy them to better retain steam.
This is what a real forest bathhouse that has been in use for many years might look like inside and out:
How to fold a stove-stove:
Choosing a stove for a bathhouse and sauna in the basement
An important argument in discussing the preference for the type of stove is, of course, the type of bath. It's not just about whether we want infrared, Finnish or steam. A wood stove works well with traditional decor, especially when finished with wood logs. However, it is difficult to imagine this type of heating in the current bathhouse filled with electronics.
On the other hand, there are modern wood stoves that have virtually nothing in common with their “ancestors”. They have built-in water tanks and rock containers, but they look modern and stylish. However, this does not change the fact that design often involves convenient and easy solutions. And in this category, the electric stove will always be the easiest to use.
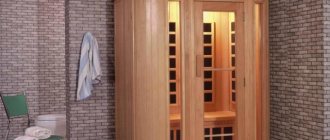
Electric ovens
Currently, bathhouses in the basement are increasingly equipped with modern electric heaters, which are effective and very easy to simulate and control the temperature. For those who value cleanliness and convenience, and do not want to worry about buying and storing fuel in an apartment building: a device that connects to a power outlet and is started by a button is the ideal solution.
In the case of an electric furnace, a certain disadvantage (significant, especially at current energy prices) is the cost of operation.
Of course, the heater does not work all the time, but only when necessary. Additionally, when properly designed, air hoods can also be used to maintain temperature throughout the entire home. It is impossible to send warm air directly into the living spaces, but at the stage of designing a bathhouse in the basement, you can prepare a drainage system so that the resulting heat does not escape from the house.
Features of the arrangement
Building a bathhouse is a very complex and difficult process. No matter who says it, but here you need to have certain knowledge, as well as skills, in order to erect the building correctly and quickly. If we are talking about the basement or basement of a garage, then the cost and price of the project is significantly reduced. It will also be much faster and easier to build all this, which makes such projects very attractive for people who want to save money or have insufficient experience in construction.
If you want to build such a building in an apartment building, then this is also legal, but before construction you need to obtain permission from other residents, as well as fill out certain documents.
A project for building a steam room in a residential building should look something like this:
- steam room parameters;
- functional plan for the placement of premises;
- diagram of the main communications;
- calculation of materials that will need to be spent.
When arranging a steam room in the basement of a garage or residential building, you need to pay attention to the following factors:
- If you didn’t have time to add a bathhouse to the project, you definitely need to do this.
- If the basement was previously used for economic purposes, this change must be made to the documentation.
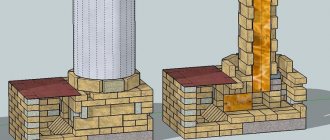
- To safely operate the building, it is necessary to correctly install the chimney so that it has minimal contact with the walls.
Wood stoves
Many enthusiasts do not accept modern solutions. They claim that the heat from a wood stove is more “mild” and “friendly.” Both of these adjectives may seem strange. But since they are in the realm of the senses, it is most likely that proponents of wood-burning stoves are simply appreciating the natural ambiance of a sauna made of wood.
The only real difference is that a traditional wood stove creates a distinctive smell around it. However, this is not a scent that would be associated with aromatherapy. In addition, it should be remembered that a wood-burning stove, like all others, needs gas removal, in this case - in the chimney. It must be constructed in accordance with applicable building codes. Of course, manufacturers have already solved this problem, and you can order ready-made chimney elements for almost any type of stove.
How to make a sauna in the basement - a few familiar steps
When building a house, it is necessary to carefully think through its design for the years of use in advance - of course. It is useful to have a basement in the house, just in case, for starters - very useful. And from here, when there is already a basement, over time there will definitely be a desire to make a sauna in it.
This is when our desires meet our capabilities. And all thanks to the fact that during construction everything was thought out in advance.
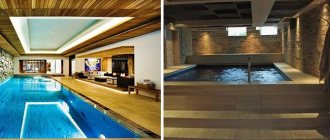
A sauna in the basement of a private house is an ideal, but very responsible option
Some technical details
Of course, the simplest and most convenient option is to put an electric stove in such a bathhouse. But, if for you the only option for a steam room is thick, rich “Russian” steam, then get ready to seriously deal with the chimney and issues with the hood. These are: smoke sensors, a separate exhaust for the steam room, controlled inflow and outlet of smoke. All this can be implemented if desired, just be sure to invite a specialist to check everything thoroughly later.
If your sauna stove is smoking, we recommend reading the article
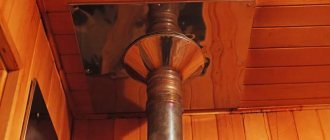
As for installing the stove , the chimney can be led directly through the base to the street or installed through the ceiling into an existing one. Like in this project:
And now about hot water. If the house has a boiler, you can use pipes to organize a closed circuit with a circular pump - it’s quite simple.
You can see how to properly organize ventilation in a basement bathhouse in the following illustrations:
You can read about how to properly ventilate a bathhouse here:
General concepts
In the photo - the dream of many owners of country houses that are equipped with basements of sufficient capacity
Including, from the “past life before the sauna” we will take with us:
- a reliable and proven foundation of the house - and if the soil turned out to be heaving, it was necessarily replaced with a carefully compacted sand and gravel mixture;
- the house's sewerage system was laid through the basement, and a supply to this pipe was provided at the level of the basement floor - if this was not done or access to the sewerage is difficult, you will have to build your own drainage system in the sauna, which will force you to make important design decisions;
- an ideal basement drainage system, when it is always perfectly dry - otherwise you will have to find out the reason for the presence of moisture, eliminate it and thoroughly dry everything until the rough room of the future sauna.
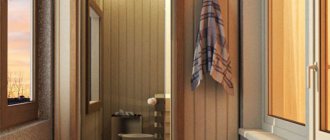
The new life that comes with the sauna will force you to first select the necessary lining material with which the sauna will be lined.
When choosing wood for lining, pay attention to:
- Species - here we select only deciduous species, from the most durable and parasite-resistant oak to the healing linden and alder. If we were talking about construction “upstairs”, then we could safely recommend the linden tree as the “highlight of the program” under the name “sauna”. But since the sauna is in the basement, we advise you to still choose oak and not stand by the price. As a last resort, replace oak with ash, which also has good strength and protection, but also a softer palette.
Helpful advice! It is always very tempting to use coniferous species in a bathhouse - pine, spruce, larch, cedar. The smell and healthy atmosphere will, of course, be indescribable. But conifers retain resin for a very long time, which is released under the influence of high temperatures. Not only is there a great danger of simply getting burned, but the resin also slips, and this is unacceptable for saunas, and disaster is not far away.
Without lining, building a sauna in the basement would be much more difficult:
- Quality - only “Extra” is suitable - not a single thorn and ideal color along the entire length, or “A” - no more than one thorn per one and a half meters of length with ideal color. Under no circumstances use quality “B” - 4 spines or “C” - even cracks are possible here.
- The type of profile - it will determine the reliability of the interlocking of the lining strips. Choose one of the five most common, which are equally reliable if the supplier is reliable:
- Euro (in the figure - “A”) - European standard with a special groove for water drainage and increased depth of connections;
- Soft light (“B”);
- Calm (“C”);
- Tenon – groove and chamfer along the entire length (“D”);
- Tenon and groove along the length (“E”) – no chamfer.
The progress of the construction of a sauna in the basement is not a big problem; all the tasks at hand are very clearly readable.
The first task is the foundation, tiles, drainage
First he deals with the foundation.
The tiles will be laid here, so all the steps are already familiar:
- the surface is carefully leveled and polished;
- waterproofing is installed;
- Next comes the tiles.
There is only one caveat - at this stage you need to take care of drainage from the floor.
- we no longer make the floor perfectly horizontal, but, on the contrary, barely noticeably converging towards the drainage hole;
- if a home sewerage system is available, then everything is great, the pipe is connected to it;
- if the drainage system is autonomous, then most likely we will lead the pipe through the side wall of the house to the outside:
- here, careful insulation of all joints and inputs and outputs is required;
- In order not to raise the tiles high, you will have to make a ditch for the pipe in the rough foundation.
Helpful advice!
When constructing a drainage system, there is always a temptation to run it directly under the foundation; this is usually easier.
But we strongly advise against doing this. Over time, the whole house will definitely feel all the “delights” of excess moisture in the foundation.
Second task - walls and ceiling
When the tiles are laid, we proceed to decorating the walls and ceiling of the Finnish bath - as very often during such work, we are saved by the lathing installed according to the diagram:
- A – places to attach the canopy, we are already thinking through future actions in advance;
- B – ventilation hole at the inlet;
- C – stove installation location;
This drawing is practically an instruction on how to make a sauna in the basement with your own hands (see description in the text)
- D – exhaust vent;
- E – lining – will cover a layer of foil;
- F – steam and waterproofing – the diagram shows one of the options, but we recommend laying the waterproofing on the concrete surface of the wall, lathing and insulation on it;
- G – insulation – a layer of foil should be placed on the insulation, as an indispensable attribute of any sauna where temperature and dry steam reign.
Here it is, the secret of any sauna - a foil layer under the lathing, providing maximum heat conservation
Helpful advice ! When working on the walls, don’t forget about the electrical wiring for the stove and lighting. Firstly, it must be reliably insulated, and secondly, it must have sufficient power to work with an electric heater, the power of which, depending on the model, is from 4 to 15 kW.
The third task is ventilation
When a sauna is built “upstairs”, ventilation is also not forgotten, it is necessary. But it is fundamentally important to take care not just about ventilation, but about reliable ventilation if the sauna is in the basement.
Here we follow the diagram:
- A – there must be a rodent mesh at the entrance;
- B – supply air vent;
- C - this distance must be strictly maintained - less than 20 cm (usually you should not make it more than 50 cm;
Ensuring reliable basement ventilation is an indispensable condition for the success of the entire undertaking - saunas in the basement
- D – air flow;
- E – condensate drain valve – a very useful precaution;
- F – exhaust air vent;
- G – insulation of the air exhaust pipe;
- H – be sure to install the pipe 40-50 cm above the ridge.
The price of insufficient basement ventilation is mold and mildew, which will gradually penetrate upstairs
Steam room assembly
After determining the location of the sauna and making an individual project, they begin to assemble the steam room. According to sizes:
- vertical and horizontal bars are installed;
- all corners of the structure are checked;
- outside the frame, the walls are sheathed with sandwich panels, clapboard or plywood;
- Insulation is laid on the inside, and a vapor barrier layer is placed on it;
- all joints are carefully covered with foil tape;
- internal walls are sheathed with longitudinal or transverse slats made of non-coniferous wood;
- similar actions are performed with the ceiling;
- the floor inside is covered with ceramic tiles, on top of which a grating is installed so as not to burn your feet;
- build two shelves for a comfortable position while sitting or lying down;
- a stove (floor or wall) is installed with an enclosing structure.
When assembling the steam room, do not forget to follow the instructions