The sawn parts are assembled together using fasteners - often screws, nails, nuts or bolts are used, so the tools you will need are a jigsaw or hacksaw, a screwdriver, a hammer, a wrench and a drill. A square will also come in handy so that the frame comes out perfectly straight.
To make a wooden sun lounger with your own hands, you need to purchase edged boards by ordering them on the website of a hardware store. Materials for sun loungers can be not only carved wood, but also plywood boards or even logs. The most widespread use in the creation of this piece of furniture was found:
- beech;
- larch (its distinctive feature is that if, for example, such a longchair stands for a long time in heavy rain, it hardens and becomes stronger under the influence of water);
- oak (its wood is considered the hardest in the world);
- ash.
Some craftsmen do not use wood at all, because it is not always at hand and is not cheap. Showing their imagination, they build sun loungers from plastic - they can be placed near the pool at home - or even folded cardboard! Tubes cast from PVC (polyvinyl chloride) are also suitable for longchairs. Suitable for a garden lounger are sheet aluminum or rattan - a material obtained by drying the stems of one of the types of palm trees.
When work on the lounger is completed, the product can be varnished or painted. In this case, it is necessary to use not ordinary, but construction paint designed specifically for processing wood material. If you want to assemble a “Kentucky” chair, you will need staples and wire - they are used to connect the upper parts of the boards for the back, thereby giving it a trapezoid shape. When creating a chaise lounge from wood, the craftsman must have previously prepared drawings and preferably a photo of such a product. First you need to mark the parts with exact dimensions on the materials with a simple pencil. You won’t be able to do this without a measuring device: you can take a long ruler, but a tape measure will cope with this task better. After cutting, all that remains is to fasten the resulting elements together. You can cover the lounge chair with fabric to make it more comfortable to lie on.
Construction from timber
This is another option for a budget bathhouse, which is built as quickly as a frame bathhouse. Construction is carried out in 9 steps:
- Preparing the construction site, performing preliminary work for the foundation: constructing “formwork”, resolving the issue regarding drainage of water, namely, where and how to place the opening. Keep in mind that even a small sauna made of timber will weigh 4-5 tons, and therefore, a minimal foundation is highly desirable for it;
- Installation of the reinforcement cage into the formwork and pouring the foundation with concrete;
- Laying the finished log house, the first beams of which are placed on boards pre-treated with an antiseptic. You can also put moss between the boards and the first crown. It can also perform antiseptic functions;
- Assembling the walls, after which they must be left for some time to shrink;
- Fastening rafters and erecting a roof;
- Installation of a frame partition between the components of the future bathhouse. This partition will need to be insulated with mineral wool and sheathed on both sides;
- Laying the floor under the stove and final finishing of the walls;
- Exiting the chimney through the roof to the street;
- Fastening shelves in the steam room, supplying water and electricity.
How useful are contrast procedures?
After high temperatures, the epidermis needs cooling. A Russian person who practices hardening can allow himself to dive into an ice hole and rub himself with snow. If you do not have such experience, it is recommended to simply stand under a cool shower or swim in the pool.
After multiple visits to the bathhouse, you can try going outside and drying yourself with snow. After some time, dipping into the ice hole is allowed.
Stages of constructing a roof for a bathhouse
The roof is erected after the walls of the bathhouse are completely built. The principles of constructing a bathhouse roof are the same as for conventional buildings: first the mauerlat is laid, then the rafter system is installed, then the sheathing is attached, and at the final stage of the work the structure is covered with roofing material.
Mauerlat and rafter system
At the first stage of work, the protruding ends of the mauerlat should be leveled, because it is these logs that will serve as support for the rafter legs. The more carefully the measurements are taken and the smoother the logs are cut, the faster and easier the rafter system will be erected.
It is necessary to measure all the protruding parts of the Mauerlat and determine the smallest value. On the logs located along the edges of the structure, make a mark of the lowest value and drive nails there. Stretch the cord between two logs at opposite ends, make marks on all other parts and saw off the excess logs. After which you can safely begin installing the rafter system.
Before installing the rafter system on the mauerlat, you should lay a rough flooring on which you can walk. Flooring can be made from any boards.
The rafter system is made according to the roof parameters indicated in the bathhouse design. Those parts of the rafters that rest on the Mauerlat beams are impregnated with a special waterproofing agent, then wrapped in roofing felt, inserted into pre-prepared grooves and securely attached to the walls using metal brackets or studs.
Roof structure
An under-roof structure is mounted on the finished rafter system - it helps to securely attach the roof directly, transfers external load to the rafters and ensures good ventilation in the space under the roof.
The roof structure consists of the following elements:
— rough flooring;
— waterproofing;
- counter battens;
- laths.
The rough flooring carries a huge functional load. Waterproofing material is applied to the flooring and a counter-lattice is attached. In addition, together with the sheathing, the flooring forms gable overhangs with a length of 60 cm.
The rough flooring is made from plywood, boards, OSB or unedged boards. The gaps between the boards should not exceed 2 cm, so when laying the flooring it is necessary to adjust the protruding areas and minimize the possibility of gaps.
Waterproofing is laid on the rough flooring. Any rolled waterproofing material that is sufficiently resistant to moisture is suitable for an attic roof. Strips of waterproofing material are laid horizontally on the flooring with an overlap of 15-20 cm. For insulated attics, it is recommended to choose a material that allows steam to pass through.
A counter-lattice is placed on the waterproofing layer. For this, bars with a length of 70 cm and a cross section of about 30 mm by 70 mm are used. Starting from the very bottom, the counter-lattice is filled with lathing - bars with a cross-section of 50x50 mm or 40x60 mm. The sheathing pattern for all types of roofing material is the same, the main difference between the structures is the distance between the individual bars. So, for example, under slate the bars are placed at a distance of 50 cm from each other, under ondulin - up to 60 cm, under corrugated sheets or metal tiles - 35 cm.
The final stage of installing a bathhouse roof is the installation of roofing material. When choosing a roofing covering, you should consider the following factors:
— strength and reliability: the material must have sufficient resistance to wind and precipitation;
— functionality and durability: a good coating protects the structure from snow and rain, extends the life of the building walls; the longer the service life of the material, the longer the roof will last, requiring only ongoing maintenance and intermediate repairs;
— basic roofing tool;
— good thermal insulation: well-chosen hydro- and thermal insulation materials, as well as their correct installation, retain heat inside the building in winter and prevent walls from getting wet and rotting.
Competent roofing work means a reliable roof for a bathhouse for many years. If all important points were taken into account during construction, then further operation will not require significant material costs; it is enough to periodically clean the roof of overgrown plants and small debris.
Choosing material for the lounger
In this bath case, hardwoods become the favorite. The advantage is that at high temperatures they do not release resins that can cause skin burns. There are other requirements for the wood used to make benches, as well as shelves for the steam room.
Strict requirements for a steam room
The material must withstand high temperatures and high humidity with honor, otherwise the furniture will not be in danger of a long service life. Low thermal conductivity is also necessary for a comfortable rest, since there will be no need to spread a sheet on the sunbed. The list of suitable breeds includes:
- Aspen. The tree is distinguished not only by its light weight and low price: it is believed that it is endowed with healing properties and is capable of absorbing negative energy (the “saving” aspen stake immediately comes to mind). The material is practical: the manufactured sunbeds will serve their owners faithfully for a long time. However, when choosing wood, you need to make sure that there are no signs of rot, especially internal rot.
- Linden. This tree is a leader if you evaluate the material in terms of quality-price ratio. It is quite light, easy to process, beautiful, and at elevated temperatures it begins to exude a subtle, pleasant aroma. Another advantage of linden is its durability: the wood is resistant to rotting, and cracks do not appear on it either. A relative disadvantage of wood is the appearance over time in some places of small defects - darkened areas.
- Regular and black alder. The main advantage of these rocks is their very low thermal conductivity, so steaming on such loungers will be very comfortable. Alder is not affected by either high humidity or high temperature, so cracking is not typical for the material. During use, alder almost does not change color: for those who want sunbeds of a darker color, it is better to choose black species. The disadvantages of the material are poor flexibility, tendency to rot.
Other breeds have more weak points. Birch and oak are difficult to process due to the fact that their wood has a high density. Beech, maple, ash are materials that are not indifferent to moisture, so they begin to rot relatively quickly. African oak, mahogany, and Canadian cedar look great, but few owners of a “wet place”—a bathhouse—are willing to pay such a large sum for beauty. Especially for the latter coniferous (and therefore resinous) plant, which requires special treatment. Regardless of the choice of wood species, when purchasing material, you must make sure that it does not contain knots, as well as other defects - cracks, nicks, signs of rotting.
Washing room, dressing room, rest room
In this case, there is no direct threat to the wood from high temperatures, so the range of candidates expands slightly. In the washing department, which is characterized by a constant and large abundance of water, the only suitable option is coniferous wood, since it is the resins that are able to protect the wood from moisture and not give it a chance to rot.
The cheapest material is pine, but not only it can withstand humidity: deciduous trees are also suitable, but they definitely need high-quality water-repellent impregnation. There are absolutely no restrictions on materials in the waiting room and rest room. Any wood can be used for furniture here. To protect it from moisture, all kinds of impregnations and varnishes are allowed.
Prepared boards designed specifically for shelves can be purchased at the store. This option will greatly simplify the work, since these materials are already completely ready for installation: they are sanded and the corners of the boards are rounded. If you plan to cut boards with your own hands, then you need to take into account their careful processing. There is one more point: to prevent the wood from cracking or warping in the near future, it is necessary to “notch it at the nose”: the width of the board cannot exceed four times the width.
Design features and differences from a standard steam room
People have learned to make bathhouses from car booths, sea and railway containers, and refrigerated trailers. A cabin is a small container that is loaded onto a trailer for transportation. Such designs are manufactured at industrial enterprises and have certain features:
- Standard sizes are 2.3x6 meters, 2.45x5.8 m, 3x6 m, 2.8x6 m. The standard ceiling height in cabins is up to 2.3 m.
- The box is a metal frame, which is sheathed with sheets of galvanized steel or aluminum.
- The inside walls are lined with sandwich panels.
- The floors are reinforced with metal profiles and covered with liquid waterproofing. They can be supplemented with a layer of foam plastic, which acts as insulation.
- More often the entrance is located on the wide side of the structure. In large trailers, a door divides the interior space into two rooms.
Containers with pine timber floors are not mounted on trailers. Cranes and trucks are used to move them.
Peculiarities
It is impossible to imagine a traditional village bathhouse without shelves: often multi-tiered, reminiscent of a wide-step staircase. In another way, such shelves are called canopies. They are an integral part of any steam room.
A shelf, or canopy , is a wooden flooring - a kind of elongated multi-tiered bench located along one or more walls of the room. So that you can relax in the steam room, such shelves are made in such a way that even a large, tall person can calmly lie on them. In addition, multi-tiered shelves allow vacationers to independently choose the most comfortable temperature for them.
Bath shelves can be divided into three types. The most common option is shelves used as benches; They are suitable for both small steam rooms and spacious large rooms. Loungers are not as popular as benches, but they are also found in a variety of bathhouses. And finally, the third type of bath shelves - sun loungers. They are practically no different from beach loungers, and they can be used with equal success both as a bed and as a chair, which makes them very functional, although far from the traditional design of a bathhouse.
The design of the shelf is extremely simple. Decorative elements are not welcome, as they can cause injuries, and they simply stand out from the traditional external design of the steam room. The simplicity and small selection of shelf shapes is easily explained: it is customary to set aside a small room for a bathhouse, which can be easily, quickly and quite economically warmed up without spending extra resources. That is why the most beloved by craftsmen is the ordinary rectangular shape of the shelves.
Special stoves for camp baths
If you most often travel by car, a smart decision would be to purchase a ready-made mobile sauna stove. It is quite compact and light weight. It requires much fewer stones to work (many people carry them with them so as not to waste time searching).
Such stoves are equipped with a spark arrester, which is very important when used in tents made of flammable material. They have a fairly attractive appearance
Pipes for the chimney are included; most often, tents have special holes for their installation.
Compact camp stove for sauna
Watch this video on YouTube
Stove "Bereg"
Stainless steel is used to manufacture such a device. Metal with a thickness of 1 mm is used for the front and rear walls of the structure, and 0.8 mm for the side walls. The convection casing, which encircles the stove body and protrudes several centimeters above it, performs the functions of a heater. You can place stones here with a total weight of no more than 25 kg.
This design is good because the hot air rising up along the walls transfers some of the heat to the stones. The result is quite thick steam. The ability to regulate the supply of heated air and the temperature in the bath is achieved by equipping the oven door with a special glass. The device is equipped with a chimney with a total length of 50 cm and a diameter of 80 mm. Both small and larger firewood are used to light the stove. The instructions for the stove contain information from the manufacturer about the presence of a flame arrester in the design, which prevents the stove from overheating and the formation of sparks.
Poshekhonka stove
The device, made of stainless steel, is a compact oven model with body dimensions of 300x300x500 mm. On the sides of this design there is a removable screen. The kit includes chimney elements with a total length of 1.5 m. For the convenience of connecting them and the ability to rotate the chimney in the desired direction, two elbows are offered. When removing the legs, doors and screens, the structure is disassembled, which is very convenient during transportation.
Just a few minutes and the stove for the mobile sauna will be assembled again. The absence of a heater may not be so noticeable if stones are placed on the surface of the stove. However, this option will not provide a lot of steam.
How to make shelves in a steam room. Installation Guide
Based not only on practicality, but also on considerations of universal installation of shelves, for the installation example we will use as few parts as possible of different sizes and types, i.e. so that their size is universal. Therefore, we will focus on a design in which the maximum number of meter-long bar blanks is possible. Universal size. The height of the top shelf (from the floor level) is 1 meter, the total width of all shelves including the top 60 cm and the bottom 40 cm is also 1 meter. The height of the first, low shelf is 50 cm, which is half a meter block. Almost all parts can be made from meter-long pieces. To construct the shelves we will use a 50mm*70mm block. With such dimensions, the distance to the ceiling from the top shelf is 125 cm, which is even very good for a steam room - there is room to wave a broom over your head.
In order to more clearly visualize the structure of the shelves in the figure, similar parts of the same type are depicted below in the same color: • green - length 60 cm; • blue – length 100 cm; • yellow – length 100 cm; • red - length 50 cm, 16 pieces of meter bars, 4 pieces of bars 50 cm long, 6 pieces of bars 60 cm long. In total, 22 meters of bars are needed for the frame.
The method of cutting the connections between the frame bars of the shelves is also of the same type and makes it possible to mass-produce these parts. For ease of perception of the picture, the parts that play the role of backs are not shown.
For installation, an ordinary planed spruce block is used. Before installation, it is recommended to lower the lower ends of the bars that will stand on the floor into a container with an antiseptic no deeper than 1 cm for 1 minute. This is the most vulnerable point of the shelf frame. This is especially important in the case of leaky wet floors.
The shelves themselves are usually made of low-density hardwood. The most affordable wood is linden. But in comparison with traditional building materials, the price of high-quality raw materials is much higher.
Those who like to have a good steam bath believe that the size of the shelf should be such that you can lie down with your arm extended forward and the width should be 80-90 cm. This size can be achieved in small steam rooms only if you do not use the bottom shelf for the seat, but only as a step. Or is it better then not to make a step at all, but to make the height of the top shelf such that it would be convenient for the one who carries out the procedures with a broom. This applies more to the professional use of steam rooms.
If you noticed, the frame is made in such a way that it is in no way attached to the frame. This is due to the fact that the log house shrinks and the structure may become deformed or prevent normal shrinkage. The greatest danger is the through fastening of the frame to the crowns through a layer of lining and foil wool for decorative cladding of the steam room. They are most easily destroyed when the log house moves.
Kentucky chair
Let's consider the original version - the Kentucky chair, which is assembled entirely from bars. If necessary, the chair can be folded at any time and put away where it is needed for storage.
Kentucky chair
In order to make a chair you will need the following material:
- Galvanized wire with a diameter of 4 mm and 16 galvanized staples to secure the wire.
- Hammer and wire cutters.
- Fine grit sandpaper.
- You also need to take 50x33 mm bars, which are obtained if you cut a 50x100 mm board into three equal parts. If all the bars are put together, you should get 13 meters.
Build process
When the bars are ready for assembly, they need to be processed for strength (and protection from ultraviolet radiation, moisture, weathering) and to give them additional beauty.
Size and quantity table
To do this, the tree is treated with a stain called Beitz. To treat a sun lounger, you need to buy an external stain, the best of which are based on oils and wax). Among other things, you can use parquet oils, which are ideal for all wooden products.
Assembly diagram
You can apply a protective coating to the bars either with a brush or with a spray gun (the best option).
Assembling the chair
The diameter of the holes should be made one and a half to two millimeters larger than the thickness of the wire used.
We thread the wire into the bars
After preparing the required number of bars, it is necessary that the edges be carefully processed with fine-grain sandpaper. We begin to assemble the structure.
Raise the chair
You can also use galvanized studs (the edges are secured with eight nuts and washers) instead of staples and galvanized wire.
Grinding
After assembly, carefully lift the chair
Materials Dimensions Specification:
- lying board – 50 x 100 x 2000 (mm), 5 pcs.
- connecting bars – 50 x 100 x 440 (mm), 2 pcs.
- lounger legs – 50 x 100 x 400 (mm), 4 pcs.
- front crossbar – 25 x 150 x 490 (mm), 2 pcs.
- side crossbar – 25 x 150 x 490 (mm), 2 pcs.
The main stages of making a sunbed for a bath:
1.
We will produce wooden assembly parts according to specifications.
2.
Lay the lying boards (1) on a flat surface. We align the ends of the boards on one plane. We set the same distance between the boards, equal to one centimeter.
3.
We fasten the lying boards (1) with connecting bars (2). The grooves in the bars are directed from the center of the boards to the edge.
Reference:
To fasten the parts we use self-tapping screws or wood screws. For one joint of parts, we use two units of fasteners.
4.
We insert the legs of the lounger (3) into the grooves of the connecting bars (2) and fasten them together.
5.
We attach the front (4) and side (5) crossbars to the legs of the lounger (3).
6.
We will install the assembled product on the legs, additionally process the front surfaces with fine sandpaper, smooth out sharp edges and remove burrs.
We made the bath bench with our own hands; in the next article we will look at the drawings of the bath bench.
Share with your friends!
Finishing touches
To give the bathhouse a finished look, we equipped the porch with a canopy and a homemade staircase. The height of the steps on the stairs is 18 cm, the parts were assembled using mounting angles and self-tapping screws.
A path leads to the bathhouse
brooms
Relaxation corner
I made a path from the gate to the entrance, and near the bathhouse I managed to collect a compost box and a decent firewood rack. We brought furniture inside the bathhouse, hung shelves, curtains, and hung brooms. In the future, I plan to arrange a front garden near the bathhouse and build an outdoor barbecue.
8 cubes of firewood
- https://derevyannie-doma.com/materialy/karkasnaya-banya-proekty-i-chertezhi.html
- https://dekoriko.ru/banya/proekty/karkasnaya/
- https://obustroen.ru/banya-i-sauna/karkasnaya-banya.html
- https://svoimi-rykami.ru/stroitelstvo-doma/banya/karkasnye-bani-proekty-svoimi-rukami.html
- https://okarkase.ru/drugie-postrojki/banya/karkasnaya-banya-4×4-svoimi-rukami-poshagovaya-instrukciya.html
- https://tolkostroyka.ru/banya/karkasnye-bani-proekty-svoimi-rukami/
- https://bouw.ru/article/proekt-karkasnoy-bani-5h5
- https://2proraba.com/malye-postrojki/xozpostrojki/karkasnaya-banya-5×5-proekty-i-chertezhi.html
- https://stroyday.ru/istorii-polzovateley/kak-ya-stroil-karkasnuyu-banyu.html
Folding the oven
For a mobile bathhouse, you can make a stove directly at your resting place.
If you have a car, you can make a more advanced version from a pipe and a potbelly stove. Where can you get stones? It is better to purchase them in advance in the store, and find a few more cobblestones of not very large size on the spot. Stones bought in a store heat up instantly, but also quickly give off heat. Therefore, the stones you find will help retain heat longer.
There are three masonry options:
- Solid.
- Vaulted.
- With jumper.
It is worst to use the “solid” option, since the fire does not reach the top stones. The easiest way is to fold the stove with a jumper.
You can heat hot water for the bath on the stove using a metal bucket. It will boil within 3 hours. All that remains is to take a broom and pour water over the stones. Enjoy Your Bath!
Important Tips and Recommendations
Important recommendations on how to take a steam bath.
- After leaving the steam room, it is not recommended to immediately take a vertical position on the bench or even lie down. You need to walk around a bit for your body to come to its senses. You can't move fast. Walking slowly for 5 minutes will help the body adapt to new conditions. After this you can sit down and relax.
- You cannot use cosmetics before visiting the steam room. They clog pores. This worsens the quality of your stay in the steam room. Cosmetics also prevent the epidermis from absorbing the beneficial substances contained in broom leaves.
- If you feel worse, you must immediately stop the procedure and leave the steam room. In the dressing room the body will cool down and the condition will return to normal. On this day, it is recommended to refuse subsequent steam rooms. If the situation repeats when you go to the bathhouse again, such manipulations should be abandoned.
Treatment
The final stage will be treating the resulting shelf with special compounds that will make its use more comfortable and also provide it with a longer service life. It is generally accepted that in a traditional steam room the wood should not be processed in principle; it is enough to sand it thoroughly. Indeed, with good ventilation, there may be no need for additional reinforcement of wood fiber, but extra insurance will never hurt, but can guarantee long and high-quality service for the furniture.
The benches, first of all (in fact, many craftsmen recommend doing this procedure with boards at the very first stages of preparing the frame in order to saturate the wood from all sides) must be soaked with powerful antiseptics. After all, constant contact with humid and very hot air will inevitably contribute to the destruction of the tree. In addition to rotting, mold can form on the tree and develop fungi and many harmful organisms.
One of the impregnation options can be natural impregnations; for example, the most budget-friendly and affordable option is simple linseed oil.
Often, antiseptic agents are used as impregnations, which make the wood moisture-resistant and permeate it through and through. An unexpected solution at first glance may be the use of bleaches: these special compounds not only protect the wood, but also, in case of darkening, return it to its original color. In addition, there are special compositions intended for direct use in the sauna.
However, under no circumstances should you use chemicals or varnishes as impregnation, and you should also not paint the wooden flooring. In conditions of high humidity and constant temperature changes, such substances will inevitably begin to decompose and release a variety of toxic substances. In addition to the unpleasant odor, which can turn the steam room from a place of relaxation into real torture, these substances can cause headaches and allergic reactions.
Preparation of materials and tools
Materials
Wood is a capricious material, or rather, sensitive to how it was prepared and dried. Therefore, you need to not just take the first board of a suitable species that comes across, but take a closer look at it, and, if possible, measure the humidity.
IMPORTANT! Because a tree that is improperly dried after cutting and cutting will definitely warp - it will “lead”, that is, it will either change its geometry or twist it.
When inspecting boards for carpentry, of course, first of all look at the number of knots. They are known to cause a lot of problems for woodworkers.
Also pay attention to the dimensions. Boards can be very uneven - both due to uneven shrinkage and due to cutting too quickly. The reasons may be different, but you will have to adjust it to the desired size later.
And since we are telling you about benches for a bath, we need to clarify in a separate paragraph which types of wood are best suited for such purposes.
Steam room
Resin leaks
If the bench will be in a steam room, then immediately discard coniferous wood. They begin to secrete resin at temperatures above 40 degrees.
Deciduous ones are fine. For example, you can take aspen, linden, poplar, ash.
Washing
There are no high temperatures in the washing room, but the water flows generously. This is where you can use coniferous species - it is the resins that make them more resistant to high humidity and prevent them from rotting.
Take the same pine - it is the cheapest. All others are also suitable - deciduous ones are also possible if you use water-repellent impregnations.
Rest room and dressing room
There are no restrictions on wood - make it from what you feel like. Humidity will be high here too, but you can freely use both impregnations and varnishes. So the choice is yours.
Required Tools
When making a bench for a bathhouse, you will need the following equipment:
- a miter saw or wort with a reward to cut boards straight or at different angles;
- hammer and construction mallet for assembling parts on dowels;
- a screwdriver or drill with an attachment for drilling slots;
- sandpaper or sanding machine for processing boards;
- measuring tape and square;
- self-tapping screws for fixing the benches to the wall; in the steam room it is better to use stainless steel or at least galvanized fasteners.
Depending on the chosen complexity and qualifications of the master, additional devices may be required.
Means of protection
Of the popular wood species, the most resistant to the effects of water and steam are larch and aspen. This wood does not require any protective agents. Other materials should be treated to prevent damage from rot and mold.
Important! Different impregnations are used to protect benches in saunas and Russian baths. In the first case, the air can heat up to 100–110 degrees, but against the background of low humidity
In the second, the heating temperature does not exceed 60 degrees, but the humidity reaches 50% and higher.
For Russian steam rooms, preference is given to waterproof and water-repellent materials. These include:
- oils – for steam rooms, compositions are produced that are absorbed into the wood and do not form a film;
- oil wax - most often it is a mixture of linseed or hemp oil with wax;
- bleaching - such products contain strong oxidizing agents; such treatment not only protects the wood in the bath, but also prevents darkening.
Some allow the use of special varnish that is resistant to high temperatures. But in practice, experts do not recommend using varnish in a steam room, especially for benches.
Features of using a sauna on wheels
A sauna on a trailer can be heated during transportation, i.e. when you arrive at the place, the steam room will already be ready for you to visit. Upon arrival, you need to secure the supports and move the car to the side. Lower the folding side, and the sauna is ready for use. Its preparation takes only 15-20 minutes.
After you have steamed, you need to dry the room. To do this, just leave the oven in working condition and open the door.
Before leaving, you need to raise the side, remove the supports, attach the trailer sauna to the car, and you are ready to go.
Every person who loves steam treatments would not want to deny themselves such pleasure while being far from home or cottage. Now you have a unique opportunity to take your sauna with you, just buy or make a sauna on a trailer with your own hands!
597
Necessary accessories for the procedure
In addition to a broom, to visit the bathhouse you will need:
- bathrobe;
- large towel;
- rubber slates;
- sheet;
- felt or wool hat;
- clean linen;
- hard mitten;
- washcloth;
- shampoo;
- soap or shower gel;
- drinks: tea, juice, decoction based on medicinal herbs, pure water without gas.
Representatives of the fair sex are recommended to take with them anti-cellulite products (if they have the problem of “orange peel”) and creams for the face and body.
It is not recommended to take alcoholic drinks with you to the bathhouse, as they create an increased load on the heart, which can cause a heart attack and other pathologies.
Stages of work carried out during the construction of a camp bathhouse with your own hands
Doing a camp sauna with your own hands is not a very simple task without preliminary home preparation. But our people are “cunning”; they can create a small bathhouse for 2 people and one where several people can sit.
To build a mobile sauna, you need to choose a place near a river or other body of water. After all, water will be needed for washing and watering stones.
Stage 1: heater installation
The most important point in building an improvised sauna is the installation of a fireplace.
The entire soaring effect will depend on how the pebbles heat up. Large stones need to be prepared for the stove. They take longer to warm up, but also “exude” more heat. They are folded in such a way that there is space inside for stacking firewood 50-60 cm deep for long logs. An entrance hole with a width of 40-45 cm and a height of 40-45 cm will be convenient for adding firewood and maintaining a fire. Specialists, who are constructing a fireplace for a sauna not for the first time, choose for this purpose stones of a certain shape, which are stacked together securely, but not too tightly. In order for firewood to burn well, it needs access to oxygen. Properly placed cobblestones provide access to air that supports combustion. Granite and stones with a heterogeneous or layered structure should not be used for saunas. Round or oblong cobblestones are most suitable for a sauna.
Handy workpiece
Some travelers bring with them a rectangular piece of steel rods that will serve as a stove when setting up a sauna, and in other cases it will become an impromptu table or chair.
Stage 2: making the frame
While the stove is heating, you can mount the frame. It can be made in any convenient way. In some cases, they even use the trunks of growing trees. The easiest and safest way to build a camp bathhouse is not thick round timber.
The frame can be mounted in a square, rectangular shape or in the form of a hut. The round timber is dug into the ground and secured in different ways.
Some “experienced” travelers use tent tubes, boards, and metal pipes, prepared in advance and brought by car, for the frame. This option will significantly reduce your work, but again, it requires the use of vehicles.
The floor inside the steam room can be covered with branches, moss, and benches can be installed for sitting. For a low bench, round timber (for several people) or hemp is suitable for one seat.
Board fastening options
It must be reliable, but safe, therefore, when creating bath structures, several methods of fixing elements are often used.
- Fastening with self-tapping screws. The simplest method is to embed them in wood (5-6 mm). An alternative is to screw in the fasteners from the rear side of the structure.
- Oak dowels that are driven into pre-made holes. This method is completely safe, but quite labor-intensive.
The first method of fixation is the most popular, as it does not involve unusual actions. Connecting elements with dowels is recommended by experts, but this technology requires precise calculations and also leads to a greater loss of time, which is now worth its weight in gold.
Notes
During operation, some shortcomings were revealed, mainly related to the stove.
First.
Initially, it was planned to install an ordinary cast iron stove door, but we liked the fireplace door with glass. And it is much larger in size, one and a half times. After installing it, the upper arch of the stove was at a short distance from the top of the door, 6-7 cm, with the recommended 15-20 cm. And therefore, when opening the door, especially when the stove is not yet heated, smoke jumps out and smokes the masonry (seen in the photo) . It’s good, of course, when the bathhouse smells of smoke, but it’s not very aesthetically pleasing.
Second
Since the door is large and expands greatly when heated, causing cracking of the masonry around it, it had to be lined with asbestos cord around the entire perimeter, and I laid asbestos only at the fastening points. By the way, all the supporting edges of the metal corners and plates used for masonry must be laid on asbestos and laid on top asbestos as well (sheets are sold in specialty stores). This can significantly reduce cracking of the stove masonry. Cracking of a brick stove due to uneven heating of the brick in the body of the stove cannot be avoided, and cracks still have to be greased once or twice a year.
The expansion coefficients of refractory (fireclay) and oven bricks are also slightly different. This is also one of the reasons for cracking of the masonry; it is recommended to make gaps between them, but then the heating of the furnace is much slower. I made a small gap just at the long ends where the various bricks meet and filled it with fine sand.
Recognizing the scale and location of regiments
Based on the above, it is worth noting that the height of the working shelf itself must be such that the person lying on it would be comfortable, and the steamer would be able to manage the broom without any special difficulties. Move closer to your personal kitchen table and you will notice that it is the same height as the top shelf. Oddly enough, but it should be comfortable to act on it without sitting down, without straining your back at all.
In a proper way, its height is chosen independently, taking as a basis the height of the steamer himself. In particular, the interval from the shelf to the very surface on which the person who will be steaming will stand (grid, also step and floor) should be about 75-90 cm. With all this, no less than 20 cm should be maintained above the head of the person sitting on the rack. -25 cm of unobstructed space, otherwise it will be damn difficult to sit on, as your ears will get fried, according to certain experts in the field. The racks of the lower tier (in a Russian bath they are made folding or sliding, with the intention of not interfering in any way with the crown massage) or the steps are placed approximately 40 cm from the “working” shelf itself.
It should be immediately noted that after lengthy considerations, it is better to decide to build spacious shelves in your own steam room with a length of 280 centimeters from 8 planks 13.5 cm wide. It should be mentioned that the width of the shelf in my case was: 8 x 13.5 + 7 centimeters (the gaps themselves are 1 cm each) - the total is 115 cm. Likewise, on the outside of the surface, 1 more board is placed on the side at an angle of 45°. By the way, the absolute width of the shelf in this way increased by another 13 cm + 1 cm (gap), for a total of 129 cm.
For your information, the ceiling height in the above-mentioned steam room is 205 cm, a special wooden grid with a thickness of approximately 5 cm is taken into account on the floor. The shelves must be planned and assigned at a level of 105 centimeters from the floor (or 100 cm from the ceiling). In a word, it is too elevated, as a result of which there is no way to avoid the lack of steps in this place - I had to make 2 of them. The first - on the opposite side of the entrance in order to jump onto this shelf (here at a height of 45 centimeters), the other - a bit long , for the steamer himself (already at a height of 25 centimeters).
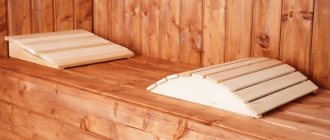
Sun beds in the bathhouse and sauna
The sunbeds themselves are what we sit and lie on in the steam room ( Designing a steam room in a bathhouse ). The quality of their processing must be very high to avoid splinters and skin irritation. This applies to abashi, linden, and any other material. It is best to make them in the form of prefabricated panels that can be removed from the frame at any time. This is necessary for inspecting baseboards, floors, and simply for cleaning the steam room after bath procedures. If necessary, such panels can be taken out for drying and restoration: sanding, washing and bleaching with approved means.
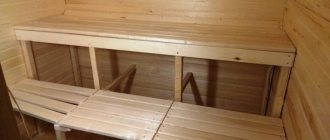
Rounded (rounded)shelves | Open shelves without racks | Pull-out shelves in the steam room | Closed (wired) shelves |
Installation of shelves in the steam room
A standard shelf in a steam room consists of 2 elements, a support post made of thick bars and a seat. The support post is made of two beams that are installed across the width of the bench and connected by jumpers every half meter. It is customary to stuff thin boards onto the frame in such a way that there is always a gap of 1-2 centimeters. The seat is tilted to create better water flow. In order for the boards to dry faster, the correct ratio between their width and thickness should be maintained: the width of the shelf in the bathhouse is ≤ 4 * thickness.
The manufacture of shelves in a steam room is complicated by the fact that it is recommended to pay special attention to the fastening of the elements. It is better to carry out installation without screws and nails, because the visitor may get burned if he comes into contact with hot metal.
Dimensions of shelves in the steam room (sauna)
The minimum length of a steam room bench should be 1.5 meters. All dimensions of the shelf in the bathhouse depend on the dimensions of the room itself, but the top step should still remain the most spacious - about 90 centimeters. The remaining shelves should have a standard size - 60 centimeters, but not less than 40 centimeters.
The length that is comfortable for sitting is 90 centimeters, to lie with your legs bent is at least 150 centimeters, to lie with your legs stretched out is more than 180 centimeters. You can sit on a bench that is 95 centimeters long with your legs extended and slightly raised.
The height of the shelves in the bathhouse can be determined according to this principle: a person on a bench can be located in a lying or sitting position. Thus, the distance between the top step and the ceiling should reach 1.2 meters, and the difference between levels can vary within 60 centimeters.
The distance to the top shelf from the ceiling should be such that it is possible to enjoy hot air. Therefore, install the highest shelf at the same level as the heater door. The shapes of benches in the steam room come in different shapes: with a back, flat, in the form of couches with a head rest.
Disposition of regiments. Steam room and sauna layout
Benches and loungers in the bathhouse are placed along walls that have no windows, and shelves are installed two or three tiers from the floor. Most often, benches in steam rooms are made in the form of steps: the air temperature increases as the shelves rise, and this is designed for visitors with different temperature preferences (read more - Steam room layout, optimal sizes).
Since ancient times, the arrangement of shelves in a bathhouse has been stepped , L-shaped and “compartment” . So, with the first method, shelves are built in two or three steps along one wall. The bottom shelf is the coolest and the top shelf is the hottest. This bathhouse shelf design is ideal for spacious rooms. In the g-shaped solution of shelves, the upper and lower shelves are located against one wall, and the middle one is placed opposite them.
In the “coupe” there are only two shelves, which make up the lower and upper tier . They are adjacent to one wall. Like on a train, the top seat is raised and fixed against the wall for convenience. This design is called the ideal option if you need to strictly save space in the steam room. However, the most profitable solution today is the arrangement of a prefabricated structure of benches . They can be quickly disassembled and dried outside if necessary.
Such a structure should be installed only along walls that do not have windows or other glazed ventilation outlets. You can arrange the shelves in several ways: 1. Along one wall in several rows (one shelf above the other). 2. In the shape of the letter “G”, where construction options with different numbers of steps are provided. 3. Two parallel installations, located one opposite the other (like a railway compartment). 4. Different number of shelves along each wall. For example, install the highest and lowest benches on one side, and place the middle one along the adjacent wall.
Rules for the construction of bath shelves
The ideal option would be to purchase a ready-made structure, but, unfortunately, not all structures sold are suitable in size. When making bath shelves with your own hands, remember the following points: 1. The size and shape of the boards should be as comfortable as possible for people of different sizes. 2. Choose your material carefully. It should be of high quality, smooth to the touch, without any roughness. 3. The structure must be stable and reliable. Pay special attention to the fastenings. 4. Metal elements of the structure must be hidden. Otherwise there is a risk of getting burned.
Choosing material for shelves in the bathhouse
Shelves and benches are an important part of the washing compartment and the steam room itself, because they come into direct contact with human skin. And therefore, there is no doubt that when drawing up a drawing of a shelf for a bathhouse, it is very important to choose a type of wood that is characterized by high fiber density, low thermal conductivity, low content of resin substances and significant resistance to moisture and extreme heat.
Linden shelf for bath
Linden is famous for its beneficial properties, which is ideal for arranging shelves in a bathhouse, because the boards, when heated, emit a delicate, unobtrusive aroma that is endowed with healing powers. This wood is easy to process, has no various flaws or knots, dries quickly, heats up slowly, and does not crack. In addition, sweat does not leave any stains on its surface.
Linden is known for its role; it improves well-being and gives bathhouse guests a charge of positive energy, moral and physical strength. The list of benefits is completed by economic benefits - this building material is sold in stores at an affordable price. The only drawback is that under the influence of heat and steam, linden boards lose their primary color over time and darken.
Aspen shelf for a bath
Aspen is also endowed with medicinal properties. It is believed that it absorbs all the negativity that accumulates in a person. After visiting a Russian bathhouse with an aspen shelf, you can feel satisfaction and relief; you are getting rid of the “burden” on your soul.
This is a cheap and accessible material, so it is as popular among builders as linden. The main disadvantage of aspen boards is the “invisible” defect; they often rot from the inside, so it is difficult to distinguish high-quality lumber from a tired sample.
Abashi shelf for bath
The African abashi tree is called a record holder for a set of various useful characteristics. A guest from abroad is not afraid of moisture and heat; the wood heats up slowly, even at fairly high temperatures, so it is impossible to get burned on a shelf made of this wood. The African tree is distinguished by its endurance.
The color of abashi varies from pale yellow to delicate cream; in the process of making a shelf in a bathhouse from it with your own hands and during the use of benches, it does not change at all, maintaining its original fresh appearance. But the main drawback that forces many developers to abandon the use of African wood in construction is the cost, which not every developer can afford.
Alder shelf for a bath
Due to alder’s resistance to moisture and high temperatures, it has been used for the construction of shelves in bathhouses for a very long time. An alder shelf will never become covered with mold, much less fungus, and considerable variations in its shades allow you to choose the right one. The shelves have a smooth structure, because there are almost no knots or uneven areas in the alder.
The price of material for alder shelves can fluctuate and depends on the processing method, the size of the beams, the width of the material and the quality of the wood itself.
Determining the size and location of the shelves
The height of the working shelf should be such that the person lying on it is comfortable, and the steamer can wield a broom without strain. Go to your kitchen table - its height corresponds to the level of the top shelf. It should be comfortable to work on while standing, without straining your back. Accordingly, its height is selected individually, based on the height of the bather. On average, the distance from the shelf to the surface on which the steamer will stand (grid, step, floor) is 75-90 cm. Moreover, there must be at least 20-25 cm of free space above the head of the person sitting on the shelf, otherwise he will sit on it impossible - “your ears will fry,” as one of my friends says. The shelves of the lower tier (in a Russian bath they are folding or sliding so as not to interfere with the broom massage) or steps are located approximately 40 cm from the “working” shelf.
After much thought, I decided to build one wide shelf 280 cm long from 8 boards 13.5 cm wide in my bathhouse. The width of the shelf turned out to be: 8 x 13.5 + 7 cm (1 cm gaps) = 115 cm. Also on the front side Another board is placed on the side of the surface at an angle of 45°. The total width of the shelf thus increased by another 13 cm + 1 cm (gap), for a total of 129 cm.
The ceiling height in my steam room is 205 cm, the floor has a wooden grid about 5 cm thick. I planned to install the shelves at a level of 105 cm from the floor (or 100 cm from the ceiling). It’s quite high, so you can’t do without steps here – we had to make two of them. One is opposite the entrance for jumping onto the shelves (at a height of 45 cm), the second is long, for the steamer (at a height of 25 cm from the floor).
The procedure for assembling sun loungers
First you need to prepare the boards by sanding all the corners with a sander. Instead of hardware, it is better to use oak wedges so that visitors to the steam room do not get burned on the metal elements of the shelves. If you make the structure of the sunbeds collapsible, the boards can be taken outside for regular drying. This will extend their service life.
Lounger with frame
Shelves without frame
The standard dimensions of shelves for a steam room are 180x90 cm. There should be a distance of at least 1.25 m between the ceiling and the top shelf, and it should retreat from the wall by about 10 cm to create a ventilation duct. If 2-3 tiers of sun loungers are installed in the steam room, they should have a distance between them of 40 to 60 cm so that people can sit on them without bending their back.
Mobile sun loungers and removable benches must be installed on rubber pads, which will ensure their stability on the floor surface. The bottom boards of the shelves should be at a distance of 10-15 cm from the floor. This will ensure good ventilation and the ability to clean.
If the bathhouse has windows, the sun loungers should be located at some distance from them so that accidentally cracked glass does not fall on people. This may happen due to high room temperature. Therefore, windows cannot be installed in the steam room, but only in the relaxation room or in other rooms of the bathhouse, where the temperature does not rise above +25...+30˚C.
Source
What is the key trick to setting up regiments?
It is no accident that I focus on the fact that my bathhouse is Russian. The present is by no means a dry-air steam room where people come solely to sit and warm up. In the Russian sauna, the fundamental event was and remains broom massaging on the shelves. As a result, their mechanism must guarantee a comfortable approach for the steamer to the body of the person steaming. The most fundamental axiom: comfort in a Russian bath should be exclusively in its original place, and elegance and design are all secondary. The scale and length of the regiments should allow a person to stretch out on them to his full height, and the height should allow him to independently enter and exit them.
The overwhelming number of multi-stage static devices that we see on marketing brochures or on the Internet are shelves for saunas. These sun loungers are in no way suitable for a Russian steam room and for this reason:
It is impossible to get close to the working shelf (it is located in the middle or at the top of the “pyramid”) - the lower shelves are in the way. The steamer himself will need to bend over and stretch forward, and this means certain torment and an unhealthy lower back.
The shelves in saunas are traditionally narrow, therefore, a person will, in turn, lie on them like a “soldier”. And there can simply be no talk of any kind of convenience here.
Often, such designer sun loungers for saunas are covered with wooden slats at the bottom, either completely or with minor openings. The steam room does not imply the use of a broom, from which we can conclude that there should not be any flying leaves there. And in the steam room they are present, and in huge quantities. In a proper manner, after the crown massage, a large number of them are concentrated under the shelves. A covered “drawer” will in no way make it possible to carry out high-quality cleaning and tons of garbage will accumulate under the sunbeds.
To our great regret, numerous new bathhouse owners, far from fully understanding the concept of the Russian steam room, are already following the “glamorous” design delights that the manufacturers of various saunas respectfully provide them with. They purchase expensive shelves made from prestigious “Abashi” wood (there is an established opinion that this material is gaining more and more popularity, but in reality it is somehow unnatural, simply put, identical to plastic, not at all alive), with special figured cutouts and also backlighting . And after that, having suffered with them for a certain time, they reconstruct everything that has already been done to suit themselves.
Types of bath brooms and their effects on the body
A broom is an indispensable attribute of a Russian bath. Professionals know that each attribute affects the body in its own way and has its own distinct effect. There are several types of bath brooms.
- Birch. It is in greatest demand among lovers of the Russian steam room. Birch leaves contain tannins, vitamins and essential oils. This composition determines the anti-inflammatory, disinfecting and antimicrobial properties of the broom. It is recommended for use in a steam room by heavy smokers and people with lung pathologies. Birch broom also improves the condition of the epidermis: promotes rejuvenation and cleanses the skin.
- Oak. This is the second most popular attribute of the Russian bath. It is recommended for use by people with inflamed and oily epidermis. Broom is useful for hypertensive patients because it stabilizes high blood pressure, but not during an exacerbation. Broom leaves contain tannins, so they relieve a person from excessive sweating.
- Lime. Linden leaves have anti-cold and anti-inflammatory properties. The substances they contain improve the quality and duration of sleep, and also relieve migraines, headaches and improve the condition of the epidermis.
- Cheremukhovy. The leaves contain substances that promote the healing of small wounds on the epidermis. The broom has a pleasant aroma, making a visit to the steam room an aromatherapy session. The bird cherry broom is very soft, so it is in demand among girls and women.
- Juniper. It has a positive effect on the state of the nervous system and normalizes unstable emotional background.
- Walnut. Experts recommend using it for people suffering from diabetes. The broom also improves the condition of varicose veins and ulcerative pathologies.
- Fir. Helps remove excess fluid from the body. Due to this, swelling from the face and limbs disappears. Fir broom has sedative and anti-inflammatory properties. It relieves insomnia and radiculitis.
- Alder. Alder leaves contain adhesive substances, due to which during the procedure they stick to the epidermis and free it from waste and toxins. Broom has a positive effect on the respiratory system.
- Nettle. Helps cure radiculitis and arthritis. Stabilizes high blood pressure and normalizes unstable emotional background.
- Eucalyptus. Helps get rid of colds. A broom also helps eliminate allergies.
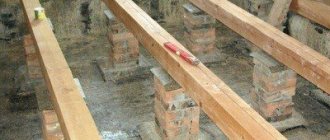
Construction process of pouring floors
Organization of underground space
This is the most important thing in poured floors, take my word for it. It is imperative to ensure a quick outflow of used water into the sewer system so that the subfloor dries quickly, if possible. Otherwise you will get rot, mold, fungi and other “delights” that have no place in the bathhouse. I did this: I removed the fertile layer inside the log house, poured clay into it, and then a gravel-sand cushion, spilled it with water, and trampled it down. At the same time, the surface sloped towards the wall with a drain below. Then it was time for waterproofing. I used roofing felt - I laid it in one layer on the surface of the subfloor, and I tarred the seams with hot bitumen. In theory, the subfloor has already been waterproofed. The water will go down the drain without being absorbed into the soil, but the surface of the subfloor will remain wet. And this, again, will lead to dampness and fungal growth.
The subfloor must dry completely, and this requires ventilation, that is, a constant flow of fresh air to the space under the bathhouse. My log house stands on a strip foundation, so I initially provided for the presence of holes in it - vents. Through them, air penetrates perfectly into the “basement”. The vents should almost always be kept open, closed only when heating and steaming in the bathhouse. Otherwise, all the hot air will safely go outside.
Installation of posts to secure the joists
The height of the underground space, from the ground (covered with roofing felt) to the wooden planks of the pouring floor, should ideally be 200-300 mm. Thus, the logs of the wooden floor should not lie directly on the roofing material, but should be raised. This is done by laying them on posts. I installed columns with a height of 270 - 300 mm from brick, placing them in increments of 80 - 100 cm. After this, the bricks were completely plastered with ordinary cement mortar.
Waterproofing
I covered all surfaces of the underground space (columns, surface of the subfloor) with hot bitumen. The result is a smooth surface to which leaves, soap flakes and other bath waste do not cling. The purpose of this action was to provide additional waterproofing and ensure the rapid flushing of all kinds of bath waste into the sewer system, so that nothing remained under the floor.
Attaching joists to posts
I used metal channels as joists and covered them with bitumen - it seems to me that they will not be demolished. In general, beams made of hard wood, for example, larch, are traditionally used for lags. They must also be covered with bitumen, otherwise they will rot after a couple of weeks of use.
Metal logs will last longer than wooden ones
Creating a boardwalk
For the boardwalk, I used 40 mm thick larch boards. They were previously planed on both sides so that drops of water would not stagnate on the fibers.
Plank flooring pouring floor
I laid the boards on the joists with the convex side up (they were slightly warped when drying) with gaps of 5-6 mm. Several floorboards above the drain and near the opposite wall are removable. This solution allows me to lift the boards after washing and clear the subfloor and drain of debris. Additionally, dry the space under the floor so that the floor can last longer.
The boards closest to the wall are removable; they can be placed on edge while drying and cleaning the subfloor.
Frame and decking
Support - a canopy frame made of timber for subsequent flooring with boards can be fixed both on the floor and on the wall.
The floor frame makes cleaning a little more difficult, and the wall frame may become deformed due to shrinkage of the walls. A reliable frame is assembled from vertical posts, longitudinal and transverse crossbars - jumpers. To make a safe canopy for a bathhouse with your own hands, experienced craftsmen recommend starting work from the top tier, installing two beams horizontally across the width of the canopy. These beams form a support post, and between them transverse struts are placed every 50 cm, like stiffening ribs. When installing a system of vertical racks, all surfaces of parts in contact with the floor are insulated using specialized rubberized gaskets. In addition, this gives additional stability to the structure.
A deck made of boards is attached to a frame made of beams, where air should circulate freely and water should drain freely. When installing, a gap of 5–20 mm is left between the edges of all boards, the principle of which is also preserved for the floor and walls. The boards are supposed to be slightly tilted so that water does not stagnate and is not absorbed into the wood. The inter-level vertical space is also covered with boards while maintaining gaps, providing access under the canopy for cleaning.
For those owners who are at least a little familiar with carpentry, this bath canopy is a simple structure similar to a bench. How creatively you can approach the process of creating an ordinary canopy can be seen from the many images on the Internet. Warm colors and the smell of natural wood in themselves already create comfort in any room. And the master’s ability to put a piece of his soul into his works will give the steam room an atmosphere of hospitality and care.
Stage 6. Construction of a log bathhouse
Comparison of Canadian and Russian logging
There are several assembly technologies:
- Russian assembly;
- Canadian;
- Norwegian
The first option - Russian felling - is the easiest to perform; even an inexperienced carpenter can handle it. Therefore, we will consider this technology.
Sauna cutting
Step 1. The construction of the log house should be carried out in stages and begin with the frame crown (in other words, from the first). The logs that will serve as the frame crown should be edged to ensure a tight fit to the foundation.
To begin with, we lay the so-called “backing” linden board on the foundation. This can be a beam about 50 - 100 mm thick and at least 150 mm wide. Then we begin to assemble the log house. Laying the first crown on the foundation.
Step 2. Lay the first pair of logs on top of the waterproofing layer. Place the next pair at an angle of 90ᵒ relative to the first and connect everything into a “cup”.
Chopping into a bowl
You can use a chainsaw - this will save a lot of time. Although the final finishing of the “cups” will still have to be done with an ax.
How to properly cut a corner in a log house Joining logs
Step 3. Next, lay the second crown using the thickest logs possible. This is explained by the fact that in the future you will cut sex joists into them. To ensure a tight fit, make a longitudinal groove in the top log, which would be equal to a third of the diameter of the previous log. To draw the boundaries of the groove, place the upper log on the lower one and mark using the “line”.
Obviously, the best option is a semicircular groove. Do it with a chainsaw and use a chisel to remove any residue.
Walling
Step 4. Insulate the joints of the logs, preferably using flax-jute fabric. Place one piece of fabric on the lower crown, and seal the longitudinal groove with the second (especially if the latter has a triangular shape).
We fill the entire groove and recess of the bowl with caulking material
Step 5. Connect the crowns together. Here you can use:
- square dowels;
- round dowels made of wood.
The second method is preferable, because dowels can be purchased ready-made and holes can be made using an electric drill.
Make holes in increments of 1-1.5 m, parallel stitching the top pair of crowns completely and not completely the third one (from the bottom). To avoid distortion, after shrinkage is completed, recess the dowels into the upper crown by at least 6-7 cm.
Joining logs
Step 6. After raising the walls to the desired height, lay the ceiling beams and rafters on top of them. If damp wood was used, then lay slate sheets instead of rafters and wait until the structure shrinks. Usually, it is enough to overwinter once, but ideally, shrinkage should last a year and a half.
Flooring made of massive solid logs
In the spring, when the shrinkage is complete, start caulking.