A stove or fireplace in a home becomes a key decorative element and helps create a feeling of warmth and comfort in the home. Stove facing tiles allow you to create different finishing options and organically fit the stove into an interior made in any style, from classic to high-tech.
But in order for the created beauty not to be destroyed for as long as possible, it is important to choose the right facing material and solution for the stove tiles.
When choosing a mixture, you should take into account the special operating conditions of the stove or fireplace (the surface gets very hot). This means that not only the tile, but also the glue that fixes it must have special fixing properties.
What solution do you use to lay the tiles on the stove? This is the question that will primarily interest the owner who has decided to make the lining of the stove with his own hands.
Solutions and mixtures for tiling stoves
The construction market offers many compositions for lining heated surfaces. But, we can distinguish three fundamental approaches to obtaining a solution, which have additional options.
Calculation of the number of tiles
To do this you need to know a few things:
- the total area of all oven surfaces on which the tiles will be laid;
- the dimensions of possible areas with a narrow decorative layer of ceramics;
- dimensions of ceramic tiles.
To calculate the area, you will need to subtract the dimensions of the blower doors, combustion chamber, and gaps between finishing parts. For furnace cladding, it is recommended to make gaps of up to 10 mm.
If you plan to make a narrow finishing belt, make barriers and other decorations, the area of such a layer is taken into account in the calculation. Now knowing the dimensions of the tiles, we can easily calculate the number of tiles of the main layer and decorative belt.
We divide the total surface area by the area of 1 tile and get the number of parts required to complete the work. If the doors on the firebox and ash pan are small, they can not be subtracted from the total area. For reserve, it is recommended to increase the number of tiles by 20% of the calculated value.
Selection of adhesive composition
Finishing the stove with tiles requires the correct choice of adhesive. A large part of success depends on this. The wrong approach will lead to dire consequences. Namely, the tiles will begin to fall off, because the applied solution, which is not heat-resistant, will not be able to withstand the temperature and will collapse.
According to the method of use they are distinguished:
- Adhesive for continuous application. This composition is used to glue the main types of ceramic tiles. This is done with your own hands in this way: a layer of no more than one centimeter is applied to the surface, on which the material is laid.
- Spot solution. It is also used to cover a heat source with a decorative layer. But it is better to use it for finishing adjacent surfaces.
When choosing an adhesive for tiles, you need to take into account the heating temperature of the oven.
The adhesive for oven work must have - heat resistance. This is the primary condition.
You can make this composition yourself. The main thing is to follow the technology correctly. Take:
- four parts sand;
- two parts clay;
- two parts of cement (M400-500);
- one part of liquid glass;
- fiberglass can be added.
Additionally, after kneading, add 1 kg of salt for every 10 kg of solution. Used within one hour. This creates an excellent tile adhesive that can easily be used to tile any surface.
Tile requirements
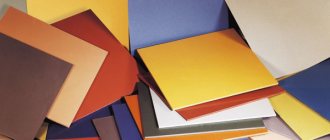
To get acquainted, we will analyze the main types of tiles and the criteria for their selection. It is recommended to use several types of finishing materials for lining heating units and fireplaces:
- "Majolica". Such tiles can be found on old stoves. Ceramics covered with a layer of special heat-resistant enamel - the high price does not make it popular among the population;
- Terracotta tiles are a simple version of majolica. It is made from clay, due to its properties it is not subject to deformation from high temperatures, and is resistant to cracking and mechanical damage. It is successfully used as a finishing for stoves in garden houses with seasonal heating and long breaks in work. This finish will protect the stove from dampness and cracking.
- Clinker tiles are an alternative to refractory bricks. The composition includes several types of clay with the addition of fireclay and various dyes. The finished mixture is pressed under high pressure, then fired;
- The use of porcelain stoneware increases the service life of the stove finish. It is made from different types of clay with the addition of granite, marble and binding additives. The thermal properties of the material make it possible to reliably protect the stove surfaces and give them a beautiful appearance.
Any tile must meet several requirements, which we must pay attention to when choosing finishing materials:
- Surfaces must be smooth, without cracks or chips.
- Individual parts of the series must be painted the same color. If even the color tone is different, it is not recommended to buy such products. It could be a defect or a fake.
- Each part must be geometrically smooth, maintaining right angles. To check, place several tiles on the surface and join them together. If there are the slightest gaps or the slab does not adhere to the surface, it may be a mismatch or a fake.
- We make sure to check the seller’s quality certificate for the product, which should indicate the environmental safety class and other performance characteristics.
Features of the distribution of furnaces
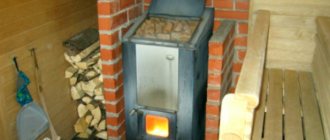
It doesn’t matter that we are now in the twenty-first century and progress has reached unprecedented heights, stoves and fireplaces still have the same relevance today and are experiencing a new surge in popularity. But now stoves perform a more decorative function, but it is difficult to replace the warmth from a home fire with current heating devices. Quite often it is possible to meet them not only in a bathhouse, a private house, a country cottage, but even in a city apartment.
Covering a fireplace with ceramic tiles is also an art; not every designer can do it beautifully.
Before you start installing a stove in your apartment, you should think about covering the fireplace with ceramic tiles as early as possible, and also think about the installation process.
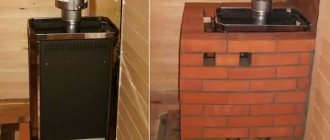
| The photo shows the interior of a home with a stove lined with real tiles. Today, what type of country house is not only outdated, but also very expensive |
|
| Covering the stove with ceramic tiles (tiles) in the room |
As an option, decorating the stove with ceramic tiles.
Installation of the stove consists of:
- choosing ceramic tiles for finishing the fireplace;
- technologies for finishing the stove with ceramic tiles;
- surface preparation;
- installation of metal mesh;
- preparing glue for laying ceramic tiles for the stove;
- laying ceramic tiles for the fireplace.
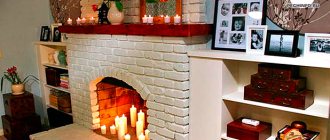
A simple and laconic design of the fireplace is allowed and recommended for any home that loves a laconic interior design
More lively design of the fireplace using decors and special elements
What glue should I use to glue tiles to the stove?
Having chosen a tile, you need to select a composition to securely fix it on the walls. To answer the question: how to glue tiles to the stove, we follow several recommendations:
- it is better to purchase a ready-made composition so as not to perform complex calculations on the amount of materials;
- we select glue produced for lining fireplaces or stoves;
- It is recommended to use heat-resistant mastic “Standard” with a heating temperature level of 10,000. We take into account the material consumption of 1.5 kg per 1 m2;
- glue “Plitonit – SupenrKamin” is produced using a dry mixture, which we dilute before work;
- Atlas-Plus hardens within a few hours. Consumption rate 2 kg per 1 m2;
- “Fixator” adhesive is recommended for use when lining garden house stoves. It can withstand high temperatures during furnace operation and cold during long breaks.
Adhesive fireproof mastics
They are made on the basis of phosphate and silicate compounds with the addition of additives and fillers of mineral origin. Their consistency is a viscous mass. They are characterized by high heat resistance and moisture resistance. Withstands heating within 1250-1400 °C.
The industry produces a wide range of fire-resistant mastics:
- Kaowool mastic – the main substance is ceramic fiber (ceramic wool). The mastic has high thermal resistance when heated to 1000°C and good adhesive characteristics (does not crack, does not peel off). Can be used for lining with tiles and heat-resistant ceramics, both the internal walls of the stove and its front side. Sold in ready-to-use form.
- ZVMKV is a fire-resistant mastic, can be used when heated to 1800°C. It is made from fire-resistant filler with the addition of ceramic wool and solvent. Has high elasticity and low linear shrinkage. It is used for laying heat-resistant ceramics on metal surfaces both inside and outside stoves, fireplaces, and barbecues.
- KOM – fire-resistant adhesive mastic. It is a dry mixture made from heat-resistant oxide with chemical additives. Designed for gluing ceramics to metal surfaces of ovens. Retains its performance properties when heated to 1800°C. Before use, it must be diluted with water until creamy.
Materials and tools
In order to glue tiles to the stove, we will prepare the required materials and tools according to the list:
- tiles or other type of material with a reserve;
- mounting mesh or just chain-link;
- hammers with rubber and metal strikers;
- hammer drill with chisel;
- ready-made glue that can withstand high temperatures;
- device for cutting tiles;
- spatulas;
- building level;
- devices for protecting the corners of the furnace;
- special primer;
- ready-made or home-made parts for setting equal gaps between the cladding;
- heat-resistant grouting.
Tiles
This material is specially designed for lining stoves. It features excellent performance and stunning appearance. But this is not only a stylish decor, but also a way to retain heat for as long as possible. It has a box-like structure with a recess on the reverse side - the so-called rump.
Related article: DIY children's sofa at home
Tile cladding will provide visual appeal and effective functionality.
How to lay tiles on the stove:
- A serpyanka mesh is fixed to the surface and plastered with a thin layer.
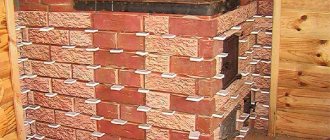
- Self-tapping screws are screwed into the seams between the bricks.
- Glue is applied to the stove and to the back of the tiller, along its contour.
- The tile is fixed to the surface, then screwed to a self-tapping screw using wire. All tiles are laid in this way.
- The distance between elements reaches 1 cm.
- Fire-resistant chamotte is poured inside the pump; it retains heat and increases the useful effect with less consumption of heating materials.
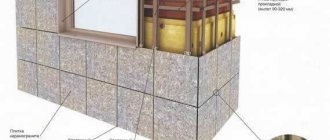
Preparing the furnace for cladding
At this stage, you will need to perform a number of auxiliary works:
- We clean the surfaces of the oven from the mortar and layer of plaster. We cut the seams between the bricks to a depth of 10 mm, for better fixation of the tiles on the surfaces. If you used a solution of clay and sand, you can put a metal brush on the grinder, but there will be a lot of dust;
- Removing traces of paint. If the surface is completely painted, you can make shallow cuts with a chisel or grinder;
- We attach the mounting grid to all planes.
Installation process: step-by-step instructions
Let's consider the technology of laying ceramic tiles step by step.
1. Prepare the work surface for laying new material. If the oven is covered with a layer of paint, remove it with a wire brush along with dust and dirt. If the stove is covered with tiles, remove them using a chisel, moving from top to bottom.
It is not advisable to break old tiles, as this may damage the brick from which the stove is built. After cleaning the stove from the old coating, it is necessary to deepen the masonry joints by 0.5-1 cm (to improve the adhesion of the mortar).
2. To ensure that the new tile holds firmly and does not peel off over time, we level the walls of the oven using a metal mesh with cells no larger than 15x15 cm. We fix the mesh on the work surface with tension - a ceiling dowel is quite suitable for these purposes. After this, we treat the stove surface with plaster - we use a solution based on sand, clay and cement in a ratio of 0.2: 3: 1. The final preparatory step is primer. It is advisable to use a heat-resistant, high-quality mixture.
Methods for cutting tiles
In order to cover the stove, the tiles have to be adjusted to size. There are several tools you can use for this job:
- To cut simple, thin tiles, you will need a simple glass cutter. We trim the layer of glaze and then break the tile, laying it on a flat surface;
- electric jigsaw. This tool can cut any types of materials and shapes of parts. But the file leaves chips, even gluing tape to the front surface does not help;
- grinder with diamond blade. This tool can make smooth, straight cuts on any type of tile. To do this, mark the cutting line and lay the part on a flat surface. First, we do not deepen the disk, remove the layer of glaze along the entire line and only then cut off the part;
- tile cutter It is used by professional tilers; if it is possible to rent it, this will be the best tool option. The cuts are smooth, the front part does not crumble. Simply lay the tiles along the line, run the cutting tool and you can lay the tiles in place;
- for larger cutting sizes, after cutting with a glass cutter, you can gradually chip off pieces of tile using sharp tongs or wire cutters.
Cladding a brick oven with tiles using a special adhesive composition
Before moving on to the description of the process of installing tiles on the walls of the furnace, a few minutes of attention should be paid to adhesive compositions suitable for this purpose. In addition, the rather complex process of cutting ceramic tiles requires lighting, since incorrect actions are quite capable of ruining the entire work.
What kind of glue is needed for tiling the stove?
The adhesive composition used for laying tiles on the walls of a brick kiln must have special characteristics, as it will be exposed to high temperatures.
As an example: packaging of a special dry construction mixture - heat-resistant adhesive for lining stoves
Some tilers prefer to make up the adhesive solution according to their own recipes. For example, one of them is quite simple. The mixture is made up of Portland cement, PVA glue and a small amount of salt. However, the difficulty in creating such glue options lies precisely in the correct selection of proportions. Therefore, if there is no accumulated experience in this matter, then it is best to use a ready-made dry composition, sold in hardware stores in paper packaging. All the necessary ingredients have already been added to this glue, and all that remains is to add the required amount of water and mix until it becomes a homogeneous plastic mass.
Experienced tilers also add a little salt to the finished adhesive composition, as it accumulates moisture, not allowing it to completely evaporate quickly from the solution, maintaining the plasticity of the mixture.
Ceramic tile cutting
Ceramic tiles have a very high hardness, so they are not easy to cut, especially in cases where it is necessary to cut out complex shapes. In order not to spoil the material already during cladding, it is recommended to study in advance information about the technology of correct cutting so that you get a smooth edge without protrusions and burrs. Better yet, practice on some unnecessary fragments to get better at it.
The simplest and most convenient option for cutting in a straight line is to use a special tile cutter
It is recommended to cut ceramic tiles using a special manual machine called a tile cutter. A glass cutter for thick glass may work, and often the optimal solution for this process is a grinder with a stone disc mounted on it.
The grinder allows you to cut out corner pieces of tiles if necessary.
Terracotta tiles, which are often used for lining stoves, are usually cut only with a grinding machine.
If the work will be done with a tile cutter, then it needs to be prepared:
- First, the reliability of the roller cutter is checked. It should rotate well around the axis, but not move from side to side. If such a problem is identified, the wheel must be firmly secured with a bolt.
- A few drops of machine oil are dripped onto the guide frame and cutting roller.
- It is imperative to check how sharp the cutting edge of the roller is - perhaps the cutter needs to be replaced. This becomes necessary from time to time, especially if the tile cutter has previously been used intensively.
- A properly adjusted tile cutter can cut tiles 4÷8 mm thick.
The cutting procedure itself is carried out in the following order:
- The first step is to take measurements from the area where the tiles are to be installed.
- Then, the tiles themselves are marked taking into account the width of the seams. The lines on the tile are drawn using a marker.
- Before cutting, the tile must be securely fixed in the tile cutter, so that the cut line marked on it is under the cutting edge of the cutter roller, along the line of its translational movement
- The next step is to apply pressure with a roller along the marking line. The marked groove will determine the fault line, cutting the front surface of the tile.
- Then a special lever with claws is lowered, which will divide the tile in two.
When using a grinding machine for cutting, for the safety of the master and the formation of a neat cut edge, it is recommended to firmly hold or secure the tile on a flat horizontal surface with an overhang of the part to be cut.
In addition to the above tools, a manual tile cutter is also used for cutting tiles, which also has the function of nippers. The principle of operation is similar: a groove is drawn with a roller, and then, when the handles are compressed, the paws break the tile in two. However, you need to remember that thick, for example, floor tiles, cannot be cut with this tool. In addition, the likelihood of possible failures is much higher than when working with a desktop tile cutter.
Prices for tile adhesive
tile adhesive
The simplest manual tile cutter, which, however, may not cope with high-quality cutting of thick ceramic tiles
When using a regular glass cutter to cut ceramic tiles, you will have to make additional efforts to deepen the fault line and separate the tiles into two parts.
Therefore, for quick and accurate work, it is recommended to use a tile cutter, which is safe and easy to use. If the farm doesn’t have one, then you should try to rent it - many hardware stores offer a similar service.
Covering the stove with tiles fixed with glue
Now that the preparatory work has been done, and you know which glue is best to use, as well as how to cut the tiles to the desired size, you can proceed directly to the finishing work.
According to the master’s plan, the stove is finished using a combined technology - plastering and cladding with terracotta tiles are used
In this case, a combined finishing option is presented, when terracotta ceramic tiles are combined with a plastered and painted surface.
| Illustration | Brief description of the operation performed |
| In order for the tile laying to go smoothly, it is necessary to perfectly align the horizontal of its first row. This cannot be done by eye, since even small deviations in the lower part of the cladding will turn into significant visible distortions of the masonry located above. Therefore, you first need to determine the bottom line along which the alignment will be carried out. In any case, the building level will come to the rescue. If a line needs to be marked on the long side of a structure, the easiest way to do this is with a paint cord. On the narrow side of the oven, a ruler or rule may be sufficient. Typically, such a line is marked along the upper edge of the bottom row of tiles. | |
| It would be safer to attach a special perforated aluminum L-shaped profile along the bottom edge of the first row, which will serve as a stand for the tiles and will definitely prevent them from deviating from the markings or sliding down. The corner is fixed to the furnace wall with dowels installed in increments of 200÷250 mm. The size of the corner depends on the thickness of the tile - it should not protrude above the finished surface. If the tiles are laid from the floor, and the corner is fixed at the junction of two surfaces, then its size will not matter - the main thing is that it is level. Instead of an aluminum corner, a flat wooden strip can be used, which can be simply dismantled after the glue has dried in the masonry. | |
| Next, you can start laying. Cladding is usually done from the corner of the building. If the tile set includes corner elements, then there will be no problems with placing the corners, since they will be completely protected from damage, and possible irregularities will be hidden. First, corner elements are laid at both corners of the structure, and only after they are secured, tiles are installed to fill the space between them. If necessary, one or two of them are trimmed. Each row laid horizontally must be checked with a building level. | |
| If the kit does not include corner tiles, then in order for the corner of the stove to be neat, another perforated corner profile with a rounded protruding edge is attached to it. This element is also secured to the corner of the stove with dowels, which are installed at a distance of 250÷350 mm from each other. They often do without them, so as not to damage the corners of the brick - the perforated “wings” of the profile are simply recessed into the applied mortar. One of the options for such a profile is shown in the illustration. | |
| To ensure that the horizontal and vertical seams between the rows of tiles are the same, various devices are used. You can use special crosses or, as in this case, pieces of broken unnecessary tiles installed between the masonry elements. The main thing is that they are all the same thickness. | |
| The adhesive, mixed using a mixer, can be applied to the surface of the stove using a notched trowel, or to the tile itself. When installing the tiles on the wall, press them well and immediately insert plastic crosses or other calibration devices into the seams. Do not forget that the glued tiles can be leveled and adjusted only within 10-12 minutes, while the mixture has not yet set. The adhesive mortar that has protruded into the masonry joints must be removed immediately, without waiting for it to dry, since these gaps between the tiles must be filled with a more plastic grout mortar. The calibration elements are removed only after the glue has set and the tile can no longer be accidentally moved. | |
| If you plan to clad the walls with solid masonry, then after installing 5-6 rows, it is recommended to take a break for several hours so that the glue sets well and the lower rows become a reliable support for the upper ones. After maintaining such a technological pause, you can complete the lining of the furnace with tiles. But they start filling the seams only a day after laying the last row. | |
| If a combined design option is chosen for the furnace walls, then after gluing the tiles, after just one or two hours you can start transforming the plastered surface. | |
| The first step is to cover all non-tiled surfaces with putty. This process is carried out using spatulas - narrow and wide. The putty is applied in a thin layer, and its function is to make the surfaces smooth, thereby preparing them for painting. | |
| For this stage of work, heat-resistant putty for stoves and fireplaces is used, which is most often sold ready-made in plastic buckets. | |
| Having covered all plastered surfaces with putty, you need to leave the oven for one or two days for all layers of preliminary finishing to dry completely. | |
| Further, if terracotta tiles were used for finishing, it is recommended to varnish them, giving them a brighter color. | |
| A clear stone varnish is used for this process. | |
| The next step is to paint the rest of the surface, covered with putty. For this purpose, brushes of different widths are used. Painting must be done carefully, without touching the plane of the tile. It may be worth considering temporary protection of ceramic tiles from accidental contamination - using masking tape, old newspapers, etc. | |
| Radiator enamel, designed for increased heating and temperature changes, is suitable for painting. If desired, you can add color to the white paint and varnish composition, giving a shade that will harmonize well with the glued tiles. | |
| Next, move on to filling the seams. The grout composition is matched to the color of the tiles or painted surfaces. The joints can be filled with grout using a construction syringe, or it can be pushed into the cavities between the tiles using a rubber spatula. The first option will allow this process to be completed faster, and the filling will be neat and will not touch the tile surfaces. You can make something like a syringe yourself - put the grouting compound in a thick plastic bag, then carefully trim one corner. If small mistakes cannot be completely avoided, then it will be easier to remove the solution from the previously varnished surface of the tile. Any mixture that gets on the tiles is wiped off with a damp, but not wet, sponge. | |
| To fill the joints, a heat-resistant wide-joint mixture for fireplaces and stoves is used, which is mixed immediately before starting work. The final evenness of the seams is given with a special tool - narrow jointing. | |
| After completing this stage of work, the finishing of the stove can be considered complete. |
Another example of covering a stove with terracotta tiles is in the video below:
Video - Cladding stoves with ceramic tiles "Terracotta"
How to cover a stove with tiles?
Do-it-yourself tiling of the stove is carried out according to a certain scheme in several stages:
- We begin to lay the rows from the bottom. To prevent slipping and provide protection during operation, we attach a special perforated corner to the bottom along the markings. We fasten the corners to dowels with self-tapping screws. The pitch between the mounting holes is 200-250 mm. We cover all corners of the oven with the same parts. This will level all surfaces, protect corners from chipping and securely fasten the tiles.
- Prepare the glue. We dilute the dry mixtures and be sure to let the solution sit for 10-15 minutes.
- We apply the finished glue to the wall, filling the surface for laying a maximum of 7-8 tiles in a row. The thickness of the layer depends on the consumption rate indicated on the packaging. From the corner we begin laying out the ceramic parts. The first row is the basis for the entire finishing structure, so we lay out each tile level, bringing its position to the ideal. We insert special crosses into the gaps. Their thickness may vary depending on the type of ceramic. For simple tiles, it is enough to lay crosses up to 5 mm thick. We remove the protruding glue, the seam should not be filled, we will fill it with a special grout.
- If an incorrect position of a part is detected, it can be repositioned within 15-20 minutes. Place crosses on the bottom row on 2 sides and begin to make the 2nd and next rows. We check the installation of each part using a level. All seams must be even. After laying 4-5 rows, we take a break for 2-3 hours for the glue to harden and fix the lower rows.
- We bring the rows to the top row and determine the size of the tiles to be cut to size. Now we apply the solution to the wall for each part separately. To cover all the irregularities, we fix the corner with self-tapping screws. Having laid the top row on all sides of the stove, we check that there is no adhesive on the front surfaces and in the seams. Leave the oven for 3 days until the glue completely hardens.
Stages of work
Porcelain tiles
This material is increasingly used in oven linings. It has excellent heat resistance and unique characteristics. Porcelain tiles are used to decorate not only the outer surface, but also the interior of the oven. In addition, he is not afraid of temperature changes, evaporation, cold and shock.
Porcelain tiles are wear-resistant, so they practically do not wear out over time.
How to cover a stove with porcelain tiles:
- Apply glue to the surface with a notched trowel.
- The fragment is installed and compacted with a mallet.
- Several rows are laid in this way and allowed to dry.
- Work continues. At the end, the cut tiles are glued.
Final works
At this stage of work:
- We remove all the crosses from the grooves;
- We put 2-3 kg of firewood into the firebox and dry the surfaces before completing the work. We carry out this operation at least 3 times, allowing the oven to cool completely after each stage;
- Prepare a solution of heat-resistant grout or use mastic. If necessary, you can add a color pigment to the composition to shade or highlight the main color of the tile. We fill the seams using a small rubber spatula. Immediately remove excess solution using a dampened cloth. If a heat-resistant sealant is used, fill the seams using a mounting gun;
- We treat the seams with a special water-repellent composition based on silicon;
- Let the grout harden a little, and after 2-3 hours we finally clean the front surfaces of the oven.
By carefully and slowly doing the work, you can improve your old brick oven or metal unit screens during the day. The work is not difficult, but responsible. The main thing is not to be afraid and do it. By redoing defective areas, we gain invaluable experience.
Factors affecting the quality of the solution
The stage of preparing the solution is very important, on which the quality and durability of the entire structure depends. The quality of the resulting solution is affected by several factors that can be corrected:
- Fat content of clay
. Clay can be thin or oily; if the ratio of components is incorrect, the solution may crumble or crack during the drying process. To avoid this, it is necessary to conduct a little testing to determine the type of clay and the quantitative ratio of the components. Testing can be done in several ways:
- From clay samples, after pre-soaking them in water, small bundles with a diameter of 10 mm and a length of 10–15 cm are rolled up, which are wound on a mold with a diameter of 5–10 cm. When using fatty clay, the bundle will gradually stretch without cracks appearing on it. In the case of thin clay, the rope will also stretch, but when the reduced thickness parameters are reached, it will quickly break.
- Having made a clay batch of creamy consistency, a flat wooden bar is immersed in it for 2 minutes. If, when removing the plank, more than 3 mm of knead remains on it, then the clay is considered too plastic and requires a large amount of sand. If the thickness of the clay layer is less than 2 mm, then this type of material is not recommended. The best option is a layer of 2–3 mm.
- Contamination of clay and sand
. To mix a high-quality solution, it is recommended to use only purified sand and clay.
Sand cleaning is done as follows:
- first of all, the sand is sifted through a sieve to remove large fractions of debris;
- next, a kind of jug for catching fish is made using a metal circle and burlap;
- Having secured the product on a strong stand, sand is poured inside;
- Using a hose and high water pressure, the sand is washed;
- This is done until the water coming out of the net becomes clear.
Clay, like sand, must be washed; for this, the following manipulations are carried out:
- the required amount of clay is crushed into small fractions;
- the prepared material is poured into a trough placed at an angle of 5–8 degrees relative to the floor. Clay is poured onto its elevated part;
- in the lower part of the trough, water is poured to the level of the clay;
- using a scoop or shovel, the clay is washed;
- when a paste-like substance is formed, it is transferred to any previously prepared container;
- The washing process must be carried out until the required amount of clay is obtained.
- Correct proportion of solution components
. To obtain a high-quality solution, it is necessary to correctly select the proportion of incoming materials. The selection is carried out in the following ways:
- Clay and sand are mixed with water in four containers. The first container contains clay and sand components in a ratio of 4:1, in the subsequent ones 2:1, 1:1 and 1:1.5. All mixtures are diluted to the same consistency, 4 balls are made and flat cakes are rolled out of them. After which they are laid out in one place and kept until completely dry. The sample that has not undergone cracking and has a homogeneous composition has the most ideal ratio of components.
- The next way to determine the required proportion of components is to squeeze the clay balls to 1/3 of them. If cracks appear, the sample is immediately removed. What remains is the sample that withstood the pressure as much as possible without the appearance of large cracks.
- And the last test is a test of the strength of the dried solution. To do this, balls are formed from four samples of mixtures with different proportions of components. The average diameter of these balls is 5–10 mm. Next, they are dried for 10–12 days and after complete hardening they are thrown from a height of one meter. Those samples that did not collapse when dropped will be an indicator for the optimal proportion of sand and clay in the solution.
It all starts with calculations
A little preface. Ceramic tiles include just a few of the most common types, which have significant differences. Its history goes back hundreds of years, which suggests that it is an indispensable material for lining stoves.
So, before proceeding with the direct selection of materials necessary for work, the area of the furnace is measured. And also do not forget that adjacent surfaces (walls, floors and ceilings) that will be exposed to temperature must first of all be finished with fire-resistant elements.
Tile adhesive is calculated separately. To do this, you can read the instructions that each manufacturer places on the packaging. You can also use free calculators found on sellers’ websites.
Additionally you will need:
- rags;
- roller and brush;
- mallet;
- tile cutter;
- screwdriver;
- level and rule;
- fine mesh;
- trowel and spatula.
I would like to immediately give some advice:
- Tiling a stove does not take place without damaging the material, especially when you work with your own hands. Even experienced craftsmen take into account the required margin of ten percent, which is due to damage or other defects.
- Before covering the heat source with a decorative layer, it needs to be strengthened. To do this, a wire is often used, which is stretched to form a cellular structure. But you can use a ready-made mesh.
- You can make your own mortar for laying tiles. It should be borne in mind that it is better to cook it in small portions.