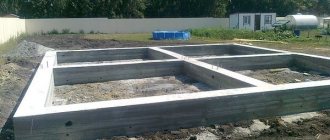
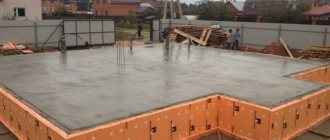
Creating a foundation for a bathhouse is not an easy process; it requires careful attention and study of all the details. Any novice builder has a general understanding of creating a foundation and knows about the stages of work, but in this article we would like to dwell in detail on such a point as the choice of materials.
If concrete mortar or bulk materials can simply be ordered and they will be delivered to you at home or even placed in a pit, then you will have to choose the reinforcement yourself and knit it together is also your task.
Therefore, we decided to talk in detail and fully about how to choose the right reinforcement for the foundation of a bathhouse and what methods of knitting metal rods exist. There are many types of this material on the modern market, so an inexperienced builder may get confused and purchase an expensive, but completely unnecessary product. After studying the material we offer, you will be ready to go to the store, and you will also know exactly how to work with reinforcement and how to create a high-quality and correct frame for the foundation.
It is worth noting here that reinforcement of the foundation is mandatory, and it cannot be neglected. The fact is that only proper reinforcement allows the foundation to become a real support for any structure without a metal frame; a concrete structure will incredibly quickly become unusable and lose its performance qualities. At first glance, and even during the first year, a foundation without reinforcement does not show any differences from its reinforced counterpart. But after the second autumn and winter, problems will begin that will lead not only to deformation of the foundation, but also to the destruction of the entire structure. Therefore, even if you are planning to build a very small bathhouse with a shallow foundation, you will still have to reinforce it in one way or another.
Installation of high-quality reinforcement frame is the key to the success of the entire construction
What types of fittings are there?
To begin with, it must be said that modern technologies have also affected such an area as construction, and new materials have long appeared here. Reinforcement today is not only metal rods; the modern market offers the builder plastic reinforcement, fiberglass and composite parts. The variety of offers gives the average person the opportunity to choose the best option for his work, which will suit him in all respects:
- By price.
- In terms of performance.
- In terms of reliability.
- For ease of operation.
Today, every bathhouse owner can choose whether he wants to tinker with heavy metal fittings and prefer a light and simple composite alternative. The question of choice in these cases mainly depends on the price range; everyone chooses what they can afford. But to simplify your task, you need to say a few words about each type of modern fittings:
Fiberglass reinforcement - this type of material is nine times lighter than its metal alternative and twice as strong. This type of reinforcement does not corrode at all and can remain in its original form for up to seventy years. In addition, fiberglass is about twenty percent cheaper than its steel counterpart. Fiberglass is used for any foundation work, from small domestic construction to large residential and industrial buildings.
Today everyone has the opportunity to choose the right material
Steel reinforcement is a material tested by many generations of builders, which shows reliable and high-quality results. If you work with steel rods according to technology and follow all the requirements, then the foundation reinforced with them will serve with a guarantee of fifty years or more. Features of the material are: susceptibility to corrosion, heavy weight, difficulties in working with it. In addition, the price of such reinforcement, despite its popularity, is rather high, and such rods also require additional wires for knitting, which also cost money. To work with such parts, a special tool is required, which not everyone has.
Ready-made reinforcing mesh - it can be made of either steel or composite materials, your choice. This type of mesh is used mainly in monolithic foundations, and its main advantage is that the rods are already securely fastened together at the factory and all you have to do is lay it in two parallel layers. If you compare it with a homemade frame, it shows more reliable strength and quality for many years.
The further result will depend on the chosen reinforcement
The choice is always yours; we only offer food for thought. In addition, it often happens that the owners have some materials left over from building a house and, of course, it is more advisable to use them than to purchase new ones, even of better quality. Therefore, think and decide, and we will continue.
Results
The diameters of the required reinforcement and its quantity depend on the type of foundation and its dimensions. The type of soil and the weight and number of floors of the building also influence. Having this data, you can calculate the cost of reinforcing any foundation.
The strip foundation has a non-standard geometry: its length is tens of times greater than its depth and width. Due to this design, almost all loads are distributed along the belt. A concrete stone cannot compensate for these loads on its own: its bending strength is not enough. To give a structure increased strength, not just concrete is used, but reinforced concrete - this is a concrete stone with steel elements located inside - steel reinforcement. The process of laying metal is called strip foundation reinforcement. It’s not difficult to do it with your own hands, the calculations are elementary, the diagrams are known.
The quantity, location, diameters and type of reinforcement - all this must be specified in the project. These parameters depend on many factors: both on the geological situation on the site and on the mass of the building being constructed. If you want to have a guaranteed strong foundation, you need a project. On the other hand, if you are building a small building, you can try, based on general recommendations, to do everything yourself, including designing a reinforcement scheme.
How much reinforcement is needed for a foundation?
Since it is not easy to deliver the fittings in your own passenger car, you will most likely have to hire special transport. And so in order not to travel for material several times and spend money on it, it is necessary to accurately calculate the required amount of material accordingly and go shopping with these figures.
Calculating reinforcement at first glance seems to be an incredibly complicated undertaking, so many builders don’t even try to do it and buy parts “by eye,” but this is not correct. Yes, the calculation will take you some time, but it will significantly optimize your money and save valuable time, and in business affairs these indicators are very important. Therefore, arm yourself with paper and pencil, as well as a calculator, and let’s start doing the calculations. To begin with, here are the main indicators that we will focus on:
- For the foundation of the bathhouse, it is necessary to use only reinforcement with a cross-section of 10 mm, that is, A3.
- If, which happens extremely rarely, the soils are very unstable or there are other problems, then you can use material with a cross-section of 14 mm or 12 mm.
- When creating a cellular frame, the cell dimensions are usually 20 cm by 15 cm.
- To create a monolithic foundation, two parallel frames are used, so you will need twice as much material.
- For a strip foundation, you can use reinforcement with a cross section of both 10 mm and 12 mm.
- A strip foundation is always reinforced in two belts, that is, the frame will consist of two levels.
- The cell of the tape version can be up to 50-60 cm by 20-30 cm in size.
- For columnar (pile) foundations, reinforcement with a cross-section of 10 mm is more often used.
- In the columnar method, the rods are installed in increments of ten centimeters.
- Horizontal intersections in the pillar method are installed every 50-60 cm.
Paradoxically, reinforcement is calculated not in meters, but in tons, and it is sold in precisely these measurements. Therefore, to calculate, we need to recalculate the length of all parts of our foundation, taking into account the strapping and use of belts, and convert the result from meters to tons. To do this, you can use the following table:
DIY block laying
Scheme of a columnar foundation made of blocks for a bathhouse.
The foundation in this case consists of expanded clay concrete blocks standing on concrete pillars. To begin with, we mark the directions for the blocks by driving 4 pegs along the outer perimeter of the future bathhouse. Pull and level the cord to the height of approximately the first block. If you made basement formwork when pouring concrete, the masonry is carried out according to its dimensions, placing the blocks on concrete pads.
Lay two blocks at a time, filling the seam with mortar. Lay the next row perpendicularly, the edge of the expanded clay block or foam block should touch the cord. Blocks are mainly used to raise the height of concrete foundations above the ground or when the site has a large slope. Lay the required height and leave it to dry. During laying, place studs between the blocks to secure the frame.
Meters, per ton of reinforcement
- 8
- 10
- 12
- 14
- 16
- 18
- 20
After you calculate the number of tons you need and decide on the type of material, you can go shopping. When purchasing parts for foundation work, do not forget about the strapping; it can be metal or plastic, depending on your choice. You will need a lot of strapping; you must buy it with a reserve, as it can deteriorate and become unusable during operation. It is quite cheap, so it is not practical to carry out calculations separately; it is enough to simply buy it in large quantities.
How to properly pour a foundation for a bathhouse: what needs to be done before pouring
Before pouring the foundation, it is necessary to carry out a number of works that will ensure high-quality preparation and facilitate the pouring process in the future.
Preparatory work
You need to choose wisely and taking into account the requirements of urban planning standards: taking into account the necessary setbacks from the boundaries of the site, ditches and other buildings.
If the site has vegetation, then it must be cleared of all plantings at the proposed site of construction of the foundation and the surrounding area.
Marking for the foundation
In the selected and cleared area using available materials:
- pieces of reinforcement, wooden stakes and other means that can act as support points;
- twine, nylon cord, signal (fencing) tape, etc.
Key points are determined, marked with stakes, which are connected along the perimeter with a rope, thus marking the foundation. External boundaries are marked corresponding to the expected dimensions of the bathhouse, or exceeding them. Internal boundaries are marked for strip, columnar and other types of foundation, with the exception of monolithic.
Excavation
It is necessary to remove the entire fertile layer of soil, or carry out peat removal. This stage involves excavating soft layers of soil that may be mobile. Such excavation is usually carried out to hard layers of soil. Additionally, this guarantees the removal of most organic elements and substances under the bath.
Pillow
After removing the soft layers of soil, a significant depression appears at the site of the foundation, which in some cases will be filled with water. Therefore, it is necessary to place a pillow under the foundation. Most often, the pillow is filled with sand or gravel, or in layers (first sand, then gravel). It is recommended to spill the sand cushion with water or process it using a vibration plate to increase the density of the created cushion. The pillow must be level.
REFERENCE. It would not be amiss to lay a layer of geofabric before filling the cushion; this will provide additional fixation of the soil, and also ensure that the filling will not “go” underground or be washed out by rain.
Installation of formwork
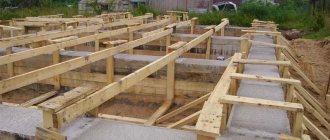
The formwork is a frame (most often made of boards, the use of slate and plywood is allowed) for casting the foundation, to create the external boundaries of the foundation according to pre-prepared markings. It guarantees the correct shape of the foundation for the bathhouse, and will also prevent concrete from overflowing to the outside of the structure. The height of the formwork should not be lower than the level of the intended concrete pouring.
ADVICE. It is recommended that after installing the formwork, lay a layer of polyethylene or other dense material on the bottom, or make formwork with a bottom.
Reinforcement
The reinforcing frame is made of metal reinforcement through the initial installation of vertical posts into the ground and further laying of horizontal reinforcement (laid in 2 or more layers, depending on the thickness of the foundation). The rods are subsequently fastened perpendicularly and knitted using wire.
Welding of reinforcement, as a rule, is not used, since the structure must be sufficiently ductile.
Video
Watch a short video on how the formwork for a pile-grillage foundation is made. At the same time, you can see how well the reinforcement cage is connected:
https://youtube.com/watch?v=pd_sVv39BEU
IMPORTANT! It is not allowed to install horizontal lower reinforcements directly on the cushion; all reinforcing structures must be immersed in concrete on all sides.
How to knit reinforcement
After you have purchased a sufficient amount of the reinforcement you have chosen and determined the day for work, you will need to carefully tie it into a certain frame and only then lay it in the formwork. There are several types of knitting and each type of foundation has its own, so in this article we will talk about all the methods and describe the progress of the work. It must be said right away that the frame is tied outside the trench - on the ground and only its finished parts or it is entirely laid in the formwork.
Sometimes you can use reinforcement mesh
So, let's talk about how the reinforcement bars are connected to each other:
- For work, you can use steel wire with a cross-section of 1.2 - 1.4 cm; you should not use a larger cross-section, as it is difficult to work with. (if the wire bends poorly, then it can be heated over a fire, then it will become much more flexible)
- The easiest to work with is a plastic clamp with a loop; it is knitted without additional tools, which greatly speeds up the process. (this method cannot be used in winter - plastic immediately becomes unusable due to frost)
- You can use metal cord; to do this, you need to burn the old tires and what will remain are thin metal pieces of wire. This method allows you to save a lot, since tires can be obtained for free. (tires must be domestically produced - imported ones often use plastic)
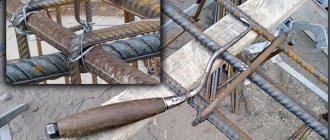
In addition to wire or clamps, you may need a special metal hook for the job, which you can buy on the market or make yourself. Some craftsmen make an attachment in the form of a hook and install it on a screwdriver - thus, the work speed becomes twice as fast. But all these methods require at least a little experience and a certain skill. If you have familiar builders who will show you all the nuances in practice, then you will quickly learn.
If you have experience, you can use a hook to knit reinforcement
But if things are not very good with dexterity, then you should not waste time reinventing the wheel, it is better to turn to a simpler method. Today, stores sell special guns for tying reinforcement - they can be used. The process will go faster, and the result will be neat.
There are many ways to knit reinforcement
For ease of work, you need to make a special wooden frame, that is, knock two boards together perpendicular to each other. And when laying reinforcement bars on them, also perpendicularly - tie them at the intersection. To do this, fold the wire in half - into a loop and tie it at the intersection of the rods:
- You can insert the two ends of the wire into the loop and bend them over the rod.
- Or you can use a hook to tie both ends together.
If you use plastic clamps, then everything is even simpler, you just need to tighten the locking mechanism on the clamp and that’s it. In conclusion, it must be said that when tying, you should not have too long tails of wire, as they can subsequently stick out from the structure and violate its integrity.
Tips and tricks
- Before laying the reinforcement in the formwork, it should be cleared of dirt, debris and unnecessary objects.
- Reinforcing bars are cleaned of rust, scale and dirt. It should be stored on wooden stands under a canopy, excluding exposure to precipitation.
- The blanks are marked with chalk, along which they are cut or bent.
- It is advisable to photograph the results of the work. These pictures may be useful in the future.
- It must be borne in mind that when purchasing fittings, the presence of rust on it is not a defect.
- The permissible deviation in curvature when purchasing reinforcement should be within ±6 mm per linear meter.
- The standard consumption of reinforcement in individual construction is 50-80 kg per cubic meter of concrete.
So, we have reinforced the foundation
under a log bathhouse. In the following articles from the series on how to build a bathhouse with your own hands, we will consider questions about pouring the foundation with concrete and waterproofing it.
To the begining
Go to the main article-contents How to build a bathhouse from a log house.
PS You can bend the reinforcement this way...
Dear friends! If it’s not difficult, share it on these social networks with your friends. Thank you!
Calculation of the required quantity
Correct calculation of quantity saves money, time and nerves. This truth is clear to everyone. First, let's estimate the ribbed reinforcement. If you're not interested, scroll down. The equation would be something like this:
(The perimeter of the bathhouse) + (the total length of the internal walls under which the foundation will be) x (the number of rods in the planned scheme). Example: We take a structure with a foundation length of 5 m on one side and 7 m on the other. With an internal wall, 7 m long. Let’s say the diagram includes 5 longitudinal rods ø 10 mm. We count:
It's not me
(5+7) x 2 = 24 m. This is the outer perimeter of the foundation.
24 + 7 (internal wall) = 31 m. We obtained the total length of the foundation in meters.
31 x 5 (number of rods in the structure) = 155 m. This is the total number of reinforcement.
If you can’t find a rod of the required length, you will have to connect it in segments. This should be done with an overlap of at least 1 meter. Let's take this moment into account.
We assume that the longitudinal reinforcement bars in the frame will have one connection.
5 (number of rods in the structure) x 5 (total number of external and internal walls resting on the foundation) = 25.
This means we will have 20 connections, which will require 20 additional meters. Let's take it into account. 155 + 25 = 180 m. That's it. We are done with the horizontal rod.
We calculate the vertical transverse jumpers. Take, for example, ø 6 mm, and cell pitch = 0.4 m.
Dividing the length of the foundation (total) by the cell pitch, we get the number of so-called “rings”.
31 m: 0.4 m = 77.5 (78). All. We know how many rings there are.
Let's assume that the height of the reinforced structure = 0.4 m and the distance between the rods = 0.25 m. We count. (0.4 + 0.25) x 2 = 1.3 m. This is the perimeter of one ring.
We calculate the total quantity: 78 x 1.3 = 101.4 (rounded to 102) m.
“Usually, reinforcing bars are sold by weight (not by meter). To determine the mass, consult a reference book (Google can help). The main point is compliance with GOST 5781-82. It accurately indicates the mass of 1 meter. Also GOST 2590-88. In it you will find the parameters of the circle.”
Rebar frame
Classic example:
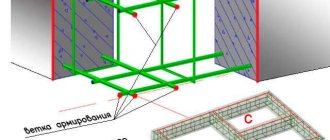
- Long segments of the reinforcement frame receive the greatest loads. Based on the characteristics of the soil, ribbed reinforcement from 10 to 14 mm in diameter is usually used for them (more differences around the perimeter of the future foundation - larger cross-section).
- The reinforcement laid along the trench must have a distance from the side walls, bottom and the level of the upper boundary of concrete pouring, within 50 - 80 mm. By the way, this is exactly what many people ask about.
- For example, for a foundation with a pour width of 40 cm, the optimal distance between the longitudinal rods in one horizontal plane is 30 cm, and in a vertical plane - from 10 to 30 cm. The pitch depends on the nature of the soil and the expected load on the foundation.
- For vertical and transverse elements, use a smooth rod ø 6-8 mm. This diameter is sufficient since they bear less load.
- The pitch between the vertical transverse ribs is from 10 to 30 cm (maximum up to 50 cm).
