A heat exchanger is a device designed to efficiently transfer heat from one coolant to another.
Such a process can be carried out several times in one system, because a special case of a heat exchanger is a heating radiator and a gas or electric boiler.
The most common model of heat exchanger used in a heating system consists of 2 metal containers, which, like a nesting doll, are located one inside the other, and transfer heat through the metal wall.
The advantages of this mechanism are that, due to the hermetic design, mutual mixing of homogeneous media does not occur, and when using coolants with different physical properties, mixing does not occur.
Principle of operation
Not a single heating boiler system can operate without a copper heat exchanger. The operating principle is simple. Water begins to circulate through the coils in the pipes, heats up, flows into the system pipeline, into the radiators, from which it returns back, already cooled.
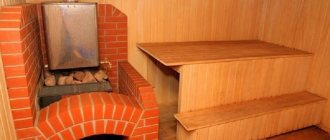
In private homes, a heat exchanger is installed to convert the stove into a water heating boiler. When making a homemade device, it is important to consider the size and shape so that the exchanger matches the dimensions of the stove chamber.
Radiators, a pipeline are connected to the exchanger, the pipes are heated evenly, and the heat is distributed throughout the house.
Pipeline installation
We have already mentioned that for pipelines it is better to use pipes with a diameter of 3/4″; this diameter is most often used in all heating systems and is suitable in all respects for a bathhouse heat exchanger.
Pipe diameter 3/4″
Pipes can be metal or plastic. You can also use flexible corrugated hoses, but you need to keep in mind that they have a significantly smaller nominal diameter, and this negatively affects the speed of water flow.
Let's give some tips on installing pipelines.
- Try to reduce the length of the pipelines as much as possible; do not make many turns or bends in the pipe. Your task is to create the most favorable conditions for water circulation.
- When using plastic pipes, do not allow them to overheat at the junction with the heat exchangers. The presence of water inside will prevent their complete breakthrough due to loss of strength caused by heating, but deformation is possible.
- Don't forget to place the drain valve in the lowest place. If the bathhouse is not used for a long time, then in winter you need to drain all the water from the system.
- When connecting pipelines, provide for the possibility of dismantling them to perform repair or routine maintenance work.
- Try to keep the length of horizontal sections of the pipeline to a minimum. Install all such sections at an angle of at least 10°. Such measures have a positive effect on the speed of water flow.
Advantages and disadvantages
The obvious advantages of the heat exchanger include:
- simplicity of its manufacture and installation;
- heating can be combined; in addition to heating, a water heating system can be installed;
- fuel for the device can be varied: solid, gas - liquid;
- The devices are beautiful in appearance; you can give the interior a national style.
The heat exchanger has two disadvantages:
- there is no automatic control over media heating;
- The efficiency is not too high.
Heat exchanger using tube sheet
What it is?
A heat exchanger is a device designed to exchange heat between two or more heat carriers not directly connected to each other. Most often used to heat water directly from the heating system.
This allows you to significantly save on heating and electricity, as it allows you to avoid spending additional energy on heating water, as is the case with an electric or gas water heater.
Theoretically, you can consider using water directly from the heating system, since its quality is not much different from water sold in supermarkets. However, in practice, it cannot be used for domestic purposes.
This is due to the following reasons:
- Replacing water in heating pipes is a costly process and requires money.
- The injection of new water has a negative effect on boilers and contributes to rapid wear of the system.
- Heating systems often use chemical additives to soften the water.
- The pipes in these systems themselves have a lot of deposits inside them; the standards for their use are designed for process water, and not for human consumption.
For the above reasons, it is not possible to use water directly from heating pipes for household and food purposes, and to heat water from a heating system, it is necessary to use a heat exchanger.
Necessary materials, tools, drawings
For the heat exchanger it is worth choosing:
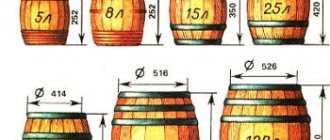
- Capacity 90 -110 liters.
- Anode.
- Copper tube up to 400 cm long for a thermal heater. If there is no copper pipe, you can use aluminum or plastic, as long as it bends well.
- Power regulator for regulating heat supply.
There is no need to make a coil from steel, the material is bad for heat transfer, it doesn’t matter how it bends, the air heats up thanks to copper many times faster. When using steel, you will additionally need a pipe bender.
Step by step guide
Manufacturing of a ductless heat exchanger
- Prepare a container, preferably metal, plastic will take longer to heat up.
- Place the tank at the beginning of the heating system.
- Make 2 holes in the container for exits. One is at the top, through which hot water will be discharged. The second is at the bottom, cold liquid will flow from the system pipes.
- Place the outlets correctly; the rate of heat transfer will depend on this.
- Seal the holes hermetically so that the air temperature is not wasted on the battery, and the room is evenly heated.
- Use copper for the tube; it should bend well and transfer maximum heat into the room.
- Bend the tube into a spiral shape to create a coil.
- Place the spiral in the tank, the ends of the tube need to be brought out, and secure them well.
- Connect a threaded fitting to the ends of the parts.
- Connect a power regulator to the pipe; you can buy it in a store, it’s inexpensive, so you shouldn’t get hung up on making it yourself.
- The system will work properly without a regulator, but it is needed to regulate power and save energy. The power can be set at your discretion.
- Connect the terminals to the thermostat, and then the power wires.
- To prevent the tank from wearing out due to temperature changes, install an anode.
- Close all elements hermetically.
- Fill the tank with water, the heat exchanger is ready.
Types of maintenance
Diagram and operating principle of a recuperative heat exchanger
Based on the operating principle, the equipment is divided into recuperative and regenerative. In the first, moving coolants are separated by a wall. This is the most common type and can come in various shapes and designs. In the second case, hot and cold coolants alternately contact the same surface. High temperature heats the wall of the equipment during contact with a hot medium, then the temperature is transferred to the cold liquid upon contact with it.
According to their purpose, heat exchangers are divided into two types: cooling - they work with cold liquid or gas, while cooling the hot coolant; and heating ones - interact with the heated environment, giving energy to cold flows.
There are several types of heat exchangers by design.
Collapsible
They consist of a frame, two end chambers, separate plates separated by heat-resistant gaskets and mounting bolts. Such equipment is easy to clean and can increase efficiency by adding plates. But collapsible maintenance units are sensitive to water quality. To extend their service life, additional filters must be installed, which increases the cost of the project.
Lamellar
A plate heat exchanger requires the installation of additional filters on the coolant.
They differ in the method of connecting the internal plates:
- In brazed TOs, corrugated stainless steel plates 0.5 mm thick are made by cold stamping. A gasket made of special heat-resistant rubber is installed between them.
- In welded plates, plates are welded together to form cassettes, which are then arranged inside steel plates.
- In semi-welded maintenance, cassettes are fastened together using paronite joints in a structure consisting of a small number of welded modules. These modules are sealed with rubber gaskets and connected by laser welding. Then they are assembled between two plates using bolts.
Plate heat exchangers are used in high pressure and extreme temperature environments. Such devices require minimal maintenance, are economical and are highly efficient. In addition, the efficiency of the equipment can be increased or decreased as needed by increasing or decreasing the number of steel plates.
The only drawback of a corrugated stainless steel heat exchanger is its sensitivity to the quality of the coolant; it requires the installation of additional filters.
Shell and tube
They consist of a cylindrical body in which bundles of tubes arranged in grids are placed. The ends of the pipes are secured by flaring, welding or soldering. The advantage of such equipment is that it is undemanding to the quality of the coolant and can be used in technical processes where aggressive environments and high pressure are present (in the oil, gas, chemical industries). The disadvantages of shell-and-tube maintenance are relatively low heat transfer, large dimensions, high cost and difficulty in repair.
Spark extinguishing
Any tent has a hole for a hot smoke pipe (chimney). In addition, the area around the stove is always protected with a fireproof mat in case of hot coals flying out. Some tent manufacturers recommend rolling back the tent base and placing the product directly on the ground.
Not only hot carbon dioxide, but also sparks rise from the stove through the chimney pipe. If the pipe is short, they can get onto the roof of the tent and cause a fire. To prevent this from happening, the chimney pipe is made long so that it is at least 2–2.5 m long. While the spark flies along this path, it will have time to go out. Consequently, the chimney acts as a spark arrestor.
Safety precautions also mean that all objects that can catch fire should be kept away from the operating stove. Another danger is carbon monoxide. It must go strictly into the chimney. And the tent itself should be designed so that clean air regularly enters it.
Do it yourself
Before starting to manufacture a heat exchanger, it is necessary to decide what principle of heat transfer will be implemented in such a device.
Manufacturing of plate heat exchanger
To make such a device, you need to prepare the following materials and tools:
- welding machine;
- Bulgarian;
- 2 sheets of stainless corrugated steel 4 mm thick;
- flat sheet of stainless steel 4 mm thick;
- electrodes;
Build process:
- from stainless, corrugated steel , in the amount of 31 pieces.
- Then , a tape with a width of 10 mm and a total length of 18 meters is cut from a flat stainless steel. This tape is cut into pieces 300 mm long.
- The corrugated squares are welded to each other , with a 10 mm strip on two opposite sides, so that each subsequent section is perpendicular to the previous one.
- As a result , you get 15 sections facing one way and 15 facing the other in one cubic body. The corrugated surface of such sections allows you to effectively transfer heat from one coolant to another, while there is no mutual movement of different or homogeneous media.
- In the case when not an air mass, but a liquid is used to transfer heat, a stainless steel manifold is welded to those sections in which water will circulate. The collector is made of flat stainless steel. For this purpose, rectangles are cut out with a grinder: 300 * 300 mm – 2 pcs; 300 *30 mm – 8 pcs. Thus, you get a kit from which 2 collectors are welded, which resemble in shape a square box lid.
- A hole is made in each of the collectors , to which a pipe is welded for subsequent connection to the pipes of the heating system or to provide hot water supply.
- Holes on the collectors are made at one of the corners a, and when installing them on a heat exchanger, the inlet pipe should be located in the lower part of such a structure, and the outlet pipe in the upper part.
The heat exchanger discussed above is installed with the open side into the hot gas circulation system.
Thus, the hot gaseous coolant will transfer heat to the corrugated walls of the stainless steel plates, which, in turn, will heat the liquid.
A heat exchanger of this design can be used to transfer heat from one liquid to another. To do this, a steel jacket with a pipe of the above-described design is welded onto the open parts of the plates on both sides.
Drawing:
Manufacturing a water heat exchanger for a furnace
A conventional wood stove can not only heat a room in the traditional way, but can also be used to heat water for heating rooms in which this heating device is not installed.
To make such a device you will need the following materials and tools:
- steel pipe with a diameter of 325 mm, a length of 1 meter;
- steel pipe with a diameter of 57 mm, a length of 6 meters;
- steel sheet 4 mm thick;
- welding machine;
- electrodes;
- cutting torch;
- white marker;
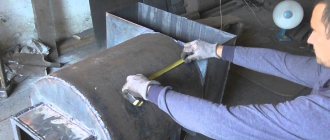
Manufacturing process:
- A cylinder made of a pipe with a diameter of 325 mm is installed vertically on a steel sheet and outlined with a marker or chalk.
- The outlined circle is cut out with a gas cutter. Then, using the resulting metal pancake, another circle of the same diameter is made.
- In each of these pancakes, 5 holes with a diameter of 57 mm are cut. Such holes should be equidistant from each other, as well as from the middle of the pancake and its edge. The pancakes are welded to the cylinder so that their holes are located opposite each other.
- A 57 mm pipe is cut with a grinder into sections 101 cm long. It is necessary to prepare 5 such sections.
- Each piece of pipe is installed in the holes so that the edges of this pipe protrude 1 mm from the holes of the upper and lower “pancakes”. Pipe sections are welded using electric welding. The result is a metal cylinder, inside of which there are pipes of smaller diameter. Hot air and flue gases will pass through these pipes, as a result of which the pipe will heat up and transfer heat through its walls to the liquid that will be located inside the cylinder.
- To circulate liquid inside the metal cylinder, pipes are welded in its lower and upper parts. Cold water will be supplied from the bottom of this design, and the liquid heated in this way will be taken from the top.
Thermal generator stove - heating, hot water and electricity from wood
Hello everyone, I propose for consideration an interesting design of a wood-burning stove that you can make with your own hands.
The design feature is that the oven is capable of generating electric current to charge a mobile phone and other devices; Peltier elements are responsible for this. Water serves as the coolant in the furnace, although it can easily be replaced with oil or other liquid. This means that you can connect batteries to such a stove and heat the room, as an example. With the help of such a stove you can easily and simply get hot water. The maximum power produced by Peltier elements is 10 Watts, and the maximum voltage is around 15 V. If you need higher power and voltage, you can install more Peltier elements. Let's take a closer look at how such a stove works and how to make it. List of materials:
— ready-made housing for the furnace (or sheet steel, corner and other materials); - steel pipes; - chimney; — car radiator (from Volga or another, preferably larger volume); — Peltier elements (the author has 14 pieces); - thermal paste; — sheet aluminum: — fum tape; — square steel pipes (for heat exchangers); - water hose; — hydraulic valve (to relieve excess pressure); — tees for water supply; — battery, electronics for voltage control (and the like if desired).
List of tools:
- Bulgarian; - welding machine; - lathe; - drill; — broken keys.
Furnace manufacturing process:
Step one. Manufacturing of the furnace body
The oven body is made of metal; the author used an old container for such purposes. You can make a similar stove from sheet steel, old gas cylinders, and so on; you can simply upgrade the potbelly stove you already have.
We install the door, as well as the chimney. We make sure to make a valve in the chimney, and we make the oven door so that it closes hermetically. This is necessary in order to quickly extinguish the stove if necessary. If the Peltier elements overheat, they may fail.
The author's oven is small in size, but to get more heat, you can make a larger oven.
Step two. Manufacturing of heat exchangers
Step three. Heating circuit
A heating circuit is installed inside the furnace; our water will circulate in it, heated by coals and flames. To make this circuit, you will need steel pipes; we weld them into a structure like the author’s; everything must be sealed and must withstand high pressure. Of course, the design of the circuit may be different; the larger the heated area, the more efficiently the stove will heat the water.
Step four. Furnace assembly
Everything is almost ready, you can assemble the oven. We install the door, and install the heating circuit inside the oven. We weld the heating circuit to the furnace body so that it does not move. We also weld the legs to the stove; the author made them from round pipes, welding the ends with sheet steel.
Step five. Assembling the “sandwich”
We connect Peltier elements in series or parallel, depending on the current and voltage you want to receive.
Step six. Final assembly and testing
If the system is equipped with good batteries and smart electronics, quite good reserves of electricity can be stored from firing the furnace. Good luck and creative inspiration if you decide to repeat something similar! Don't forget to share your DIYs with us!
Source
Become the author of the site, publish your own articles, descriptions of homemade products and pay for the text. Read more here.
How to make a booster for flushing a heat exchanger
The booster consists of a reservoir, a pump for water circulation and an electric heating element. There is no need to disassemble the heating boiler for flushing, just disconnect the pipes, connect a hose to one of them and pump a chemical solution through it into the unit. The solution will pour out through the other pipe, but you also need to connect a hose to it.
Of the chemical reagents, hydrochloric and sulfuric acid are mainly used; phosphoric and nitric acid can also be used.
Cleaning the heat exchanger is not difficult, but it is necessary to follow safety precautions, that is, first disconnect the device from the power source, be it gas, water, or electricity. Dismantling must be done carefully; a damaged seal can lead to leakage of the structure, and the equipment will quickly fail.
Gas equipment
A good alternative would be gas heating. Main gas is used here. Such boilers are efficient and reliable. The efficiency is 87% for the simplest modification. For expensive condensing modifications, this figure is close to 97%.
The heating device is compact, safe and automated. It requires maintenance no more than once a year. In this case, you have to go to the boiler room solely to change the settings and monitor their normal functioning. Compared to solid fuel, this is a fairly budget unit.
Gas equipment has its own nuances
Tips and tricks
- It is important to design a heat exchanger correctly , calculate economic efficiency, the percentage of hydraulics, indicate heat losses, calculate the design according to the geometric parameters of the unit and its components, and calculate the thermal insulation of the device.
- simpler design for making it yourself
- You can connect the heat exchanger to the system using fittings , place one at the bottom for cold water inlet, the second at the top for hot water inlet.
- When installing the exchanger, install the pipes at a slope according to the diagram.
- When installing the unit to a furnace and using coal for combustion as a material for the exchanger, it is better to choose cast iron; it is durable and fireproof.
- To make an exchanger with your own hands, take any model as an example and follow its parameters.
- When using the stove for heating and water supply purposes, the exchanger should absorb no more than a tenth of the heat generated.
- Pellets are good fuel and cheap in price, they do not emit soot, which is very important for cleanliness.
- Check the seams at the exchanger , you must not allow them to leak; under pressure or high temperatures, the entire structure can become unusable.
- Make the calculations correctly , otherwise your work will cost you dearly.
- A heat exchanger of the pipe-in-pipe type is easy to clean , lasts a long time, is simple to manufacture, and can operate under pressure. It is considered the most acceptable option for making it yourself.
As you can see, making a heat exchanger yourself is not difficult. For a simple design, a tank, two copper tubes of different diameters, a coil and a fan are enough. Thanks to the device, you can not only heat the room, but also cool it.
A thing like an exchanger in one form or another is found in almost every home. Approach the work constructively and thoroughly, prepare drawings, decide on the choice of material, follow the instructions described above for the manufacture, assembly and connection of the device.
If you wish and follow consistent steps, you will assemble a design no worse than a store-bought one, the house will be warm and cozy, and the device will work flawlessly for a long time.
Negative points
Along with the benefits of a heat exchanger on a chimney, it is worth noting a number of negative factors. Firstly, due to this design, the temperature of the exhaust gases is significantly reduced. This can provoke excessive soot accumulation, condensation formation and poor traction.
An important point in arranging such a heating system is to calculate how much water is needed for its full functioning. If there is not enough of it, the system may overheat, the water in it will boil, and the pipes may burst
In addition, it is important to ensure the tightness of the seams.
In any case, installing a heat exchanger allows you to increase the efficiency of any furnace. For safety reasons, at least twice a year, visual diagnostics of the system and its maintenance should be carried out - cleaning soot, replacing defective elements, and so on. Then it will be possible to confidently use the heat exchanger for heating the house and heating water in the bathhouse.
Specifications
Plates and gaskets can be made of various materials; their choice depends on the purpose of the unit, because the scope of application of such heat exchangers is very wide. We are considering heating and hot water systems, where they act as thermal power equipment. For this area, the plates are made of stainless steel and the gaskets are made of NBR or EPDM rubber. In the first case, a stainless steel heat exchanger can operate with water heated to a maximum temperature of 110 ºC, in the second - up to 170 ºC.
For reference. These heat exchangers are also used for various technological processes when acids, alkalis, oils and other media flow through them. Then the plates are made from titanium, nickel and various alloys, and the gaskets are made from fluorine rubber, asbestos and other materials.
Calculation and selection of a heat exchanger is carried out using specialized software according to the following parameters:
- required liquid heating temperature;
- initial coolant temperature;
- required flow rate of the heated medium;
- coolant consumption.
Note. The heating medium flowing through a plate heat exchanger for hot water supply can be water at a temperature of 95 or 115 ºС, or steam heated to 180 ºС. This depends on the type of boiler equipment. The number and size of the plates are selected in such a way as to obtain water at the outlet with a maximum temperature of no more than 70 ºС.
It must be said that the advantages of plate heat exchangers lie not only in their modest size and ability to provide high flow rates. The fact is that the range of selected exchange areas and costs for the units under consideration is extremely wide. The smallest of them have a surface area of less than 1 m2 and are designed to flow 0.2 m3 of liquid in 1 hour, and the largest - 2000 m2 with a flow rate of over 3600 m3/h. The table below presents the technical characteristics shown by the operation of plate heat exchangers of the famous ALFA LAVAL brand:
According to their design, heat exchange units are of the following types:
- collapsible: the most common option, allowing for quick and high-quality repair and maintenance of a high-speed heat exchanger;
- soldered or welded: such devices do not have rubber gaskets; the plates are rigidly connected to each other and placed in a solid body.
Note. It is brazed heat exchangers that many craftsmen use for private homes, adapting them for heating or cooling water.
Peculiarities
This device makes it possible to significantly expand the functionality of equipment whose main purpose is to heat rooms. Since the supply of cold and hot water is a factor indicating the livability of a residential building, having efficient equipment for this purpose is a must.
With cold water supply in private homes, the situation is somewhat simpler than with hot water supply. Hot water supply is a more complex system, where productivity directly depends on the heating mechanism. The role of such an element is often played by a domestic heating boiler.
There are a huge number of similar units on sale, which differ in their design features. Based on this, the liquid will be heated in different ways. One of the options that has recently become widespread is a heat exchanger for hot water supply.
The device has this name due to its main function - temperature exchange processes occur in heat exchangers. And since it concerns hot water, it becomes clear that thermal energy from hot water from heating is transferred to cold water so that it reaches the desired temperature. Some enterprises use air heat exchangers with fans, in addition, there are chimney heat exchangers that save thermal energy.
The peculiarity of the process is that hot water from the heating system circulates through a heat exchanger, while giving off a certain part of the heat to the cold liquid located in a container. Usually a boiler acts as a reservoir. And the whole process is called indirect heating technology, since in the process of providing the required temperature to the water, there is no direct contact of the energy carrier with the heating structure of the water supply system.
The operation of the heat exchanger is influenced by the following factors:
- contact area between two media and the unit itself;
- thermal conductivity indicators of materials used in the manufacture of the structure;
- difference in temperature between cold water and water from the heating system. The higher this value, the less efficient the device will be.
Some craftsmen use homemade products for home use as such a device, which will transfer heat between liquid media.
Power calculation
It is very difficult to make an ideal heating system without knowing the power of the heat exchanger. When calculating this indicator, the following parameters should be taken into account:
- pipe diameter;
- length of the heating device;
- thermal conductivity of the metal used;
- maximum fuel combustion temperature;
- fluid circulation speed.
If it is problematic to establish these initial values, you can use an average calculation, based on the fact that to obtain a power of 1 kW, you will need a meter of pipe with a radius of at least 2.5 centimeters.
How to calculate a model for a specific building?
When selecting a specific device model, the following parameters must be taken into account:
- number of residents in the room;
- the volume of water required by one resident per day, the standard consumption rate is 120 liters per person per day;
- degree of heating of the coolant - in centralized heating systems the standard is heating equal to 60 degrees;
- whether the device will work around the clock, or whether it is planned to be turned off periodically;
- water temperature in pipes in winter;
- number of appliances consuming hot water;
- permissible percentage of water loss.
The performance of the device must be calculated for the winter season, when the most active use of hot water is implied. For accurate calculations and selection of equipment, you can contact supplier companies.
System design
So, the purpose of the device is to transfer temperature from one environment to another. Heat sources and coolants can be various liquids, gases and steam. Unstable media are separated by a material that has a suitable thermal conductivity for this purpose. The simplest example of a heat exchanger is an ordinary room radiator. The heat source is heating water. The heated medium is the air in the room. And the separating material is the metal from which the radiator is made.
A big role in which intermediate material to use is its degree of thermal conductivity. The leaders in this indicator are silver and copper. But for obvious reasons, copper is most often used.
Heat exchanger device
Copper is 7.5 times better at transferring heat than steel, and plastic is 200 times worse than steel. It turns out that, other things being equal, 1.7 meters of copper, 12 meters of steel and 2000 meters of plastic pipe will transfer the same amount of heat.
About the cost of ready-made models for heating with solid fuel
If it is not possible to make a long-burning boiler or there is simply no desire, then you can purchase a ready-made design. It must be recognized that models for heating large rooms will not be cheap. In the table you can see the prices for Stropuva boilers.
You can appreciate the stylish design of the Stropuva boiler
Table 1. Prices for Stropuva boilers
| Model | Power in kilowatts | Cost in rubles |
| S-8U | 8 | 70 000 |
| Stropuva S-8U | ||
| S-15U | 15 | 116 000 |
| Stropuva S-15U | ||
| S-20U | 20 | 123 000 |
| Stropuva S-20U | ||
| S-40U | 40 | 142 000 |
| Stropuva S-40U | ||
Stropuva S-40U
Related article:
Long-burning wood-fired boilers for the home. From this publication you will learn everything about wood-burning boilers, their types and nuances of use.
Although the price of the structures is quite high, with long-term use they are justified. The presented models have a fairly stylish design, so there are no problems with their integration into the overall design of the room.
The main advantages of Stropuva products
Operating principle of a long-burning boiler
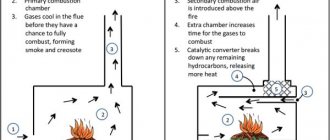
The basic principle of operation of long-lasting boilers is based not on the combustion of fuel, but on its smoldering inside the combustion chamber. At this moment, the wood fires emit more heat. It is impossible to achieve such a result in classic brick kilns, since they cannot create active draft.
The design features of the long-burning furnace make it possible to achieve maximum efficiency of heat release during the long, slow smoldering of wood. In homemade installations, one bookmark can last more than 6-8 hours.
Click on the picture to enlarge
The boiler is equipped with a special valve - regulator. After the logs begin to burn profusely, it is necessary to shut it off and minimize the flow of oxygen with air inside. Gradually, as the firewood smolders, it releases the so-called “flue gas”, consisting of methane, carbon monoxide and hydrogen.
The main source of heat is precisely the “flue gas”. When it gets into the ignition chamber, it ignites, burns very quickly and releases a large amount of energy.
See also instructions on how to make a sauna boiler yourself
Connection diagrams
The heat exchanger can be connected to heating and water supply systems using three different schemes: parallel, two-stage mixed and two-stage sequential.
Parallel
The most simple to implement and economical scheme . A prerequisite is the installation of a temperature regulator. The disadvantages are not the most economical consumption of carrier heat, as well as the need for an enlarged pipeline.
Two-stage mixed
Also requires a temperature controller. Significantly more economical than a parallel circuit in terms of heat consumption. However, the design itself is more expensive, since it requires two heat exchangers at once. Equipment must be selected very precisely in accordance with specific conditions.
Two-stage sequential
With this connection, the incoming flow is divided into two, one passes through the regulator, and the second through the heater. The heat carrier is consumed more efficiently compared to the mixed one. The load on the network is also distributed more efficiently.
The disadvantage of the scheme is the impossibility of full automation . Despite all the advantages, in practice the scheme is rarely used due to the strong influence of the heating and plumbing systems on each other and the possibility of overheating of the heating network.