To fully enjoy your relaxation in the steam room, experts recommend performing wellness procedures in a lying position.
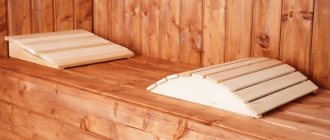
A comfortable stay on wooden shelves will be provided by such an indispensable attribute as a headrest for a bath. You can make a functional bath accessory from natural wood at home, following simple step-by-step instructions.
Materials for making bath accessories. Creating a rounded headrest on your own
Let's move on to the section: materials for making a bath accessory
.
To make a headrest for a steam room on your own, use the following types of wood:
- Linden. Its wood is elastic and has good heat capacity. The material absorbs moisture poorly and does not heat up to high temperatures. Having an attractive appearance, it does not lose it over time. In the future, after completing the procedure, the accessory should be dried. During the heating process, linden begins to release phytohormones, which have a relaxing and pronounced therapeutic effect.
- Aspen. Aspen products serve for a long time, at the same time, without cracking or deforming. It heats up insignificantly and does not absorb moisture; the material is not affected by changes in temperature and degree of humidity.
- Exotic trees. Products made from it do not change shape under the influence of moisture and high temperature. Except for the high cost of such products, rare wood, for example, abasha and ofram, has no disadvantages.
- Cedar. The tree releases special volatile substances that have a beneficial effect on the immune system and respiratory system. It is resistant to mold, and when heated, it emits a pleasant odor.
- Pine. Mostly affordable wood. It may happen that when heated, the wood begins to release resin, so when choosing such a material, it is necessary to purchase high-quality products. In the future, after use, the headrest in a pine bath must be dried. Parts made from it may become deformed over time.
- Birch. It is not afraid of frequent changes in temperature and air humidity. Since it has a dense structure, it has a low degree of moisture absorption. Providing a warming effect on the area of the upper neck and spine when applied, the material is characterized by increased thermal conductivity.
_
Detail
- a product or its component, which is a single whole, which cannot be disassembled into simpler components (reinforcing rod, washer, spring, window sill board, etc.) without destruction.
Material
- any ingredients, raw materials, components, parts, etc. used to manufacture the product.
Now let's take a closer look at creating a rounded headrest on our own
.
Before you make a rounded headrest for a bathhouse on your own: drawings for the product should be prepared. You also need to purchase:
- pencil and tape measure;
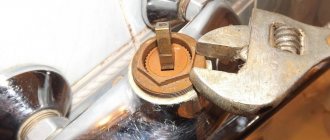
- drill plus drill;
- wooden slats 40x20 millimeters;
- wood for the sides;
- screwdriver;
- screws.
- sanding machine or sandpaper;
- jigsaw (wood saw);
<-
A step-by-step process on how to make a headrest for a bathhouse on your own:
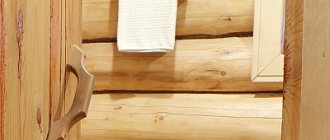
First stage. To do this, two rectangles with a length of 400 and a height of 100 millimeters are cut out of a wooden blank 25-28 millimeters thick. First, the sides are given a rounded shape, so that later the slats that serve to support the head are attached to them. Marks are applied to them with a pencil.
The maximum height of the first edge of the sidewall must be 100 millimeters, and the second – 20 millimeters. In accordance with the markings, two parts are cut out. The marks are connected to each other with a rounded smooth line. All existing roughness and irregularities are carefully rubbed down, the edges of the sidewalls are processed with a grinder.
Second phase. Since the width of the headrest must be 450 millimeters, they are made of the same parameter. You should cut the slats into elements of the required length. Using a jigsaw or hacksaw, you need to cut 8-9 pieces. The resulting surface is made absolutely smooth. The edges of the slats are treated with sandpaper.
<-
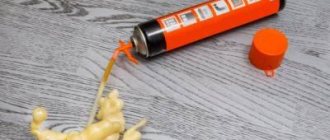
The final stage. Holes are drilled at the ends of the sidewalls, and a rail is screwed to each of them using screws. The structure is assembled. Since they heat up at high temperatures and can leave a burn on human skin, metal fasteners should be buried in wood.
10mm gaps are left between the slats, which are necessary to ensure moisture drainage and air circulation
This is important when wood tends to heat up.
What is it made from?
Obviously, it is worth noting that this accessory has the form of a soft pillow or a hard support for the head, maintaining it in comfortable conditions while reclining on the bath shelf of a steam room. Accordingly, natural fabrics and wood should be recognized as the main materials for manufacturing.
Soft headrest
In general, it has the appearance and shape of an ordinary pillow. Naturally, the filler is not down, feathers and padding polyester, but a mixture of sawdust, medicinal herbs and pine needles. At the turn of the 18th - 19th centuries, the following composition of stuffing for a linen headrest was in use in the landed estates of central Russia:
- 1 part dry birch leaf;
- 1 part juniper needles;
- 1 part dry linden blossom, harvested from the current year;
- 3 parts oak sawdust or fine shavings;
- 0.5 parts of thyme herb or, as it was also called, virgin herb;
- 0.5 parts of watermint herb, in modern realities, it can be successfully replaced with peppermint or garden mint;
- 0.5 parts of St. John's wort herb;
- 0.5 parts oat or rye straw.
For lovers of bright decor, such a headrest can be decorated with embroidery or choose a material with bright, eye-catching colors. For admirers of the classics, it is better to use fabric of natural color.
The pattern of such a product is simple, if not primitive, and even a student of initial labor training classes, as part of the general education school program, can cope with its production. Even if you don’t have a sewing machine lying around, the work of stitching the material can be completely and successfully done by hand.
Hard headrest
Wood should be considered the ideal material for such a product, but we must not forget that not every tree provides first-class raw materials suitable for such crafts. The best should be considered:
Oak is a strong, durable raw material with a spicy aroma, excellent texture and beautiful color. Resistant to mechanical and thermal stress, tolerates soaking well, including hot water. Prone to chipping edges during machining, especially if the optimal cutting conditions are not selected and a blunt or improperly sharpened tool is used. Cracks may occur when fastening elements using self-tapping screws; Birch has a completely satisfactory set of consumer qualities. Provides sufficiently dense and durable raw materials. Tolerates temperature fluctuations and soaking well
With proper care, birch products are quite durable; Alder - it is worth paying attention to this tree for a number of reasons. Products made from it are attractive without additional processing, quite strong and durable. A good feature is the fairly low heat capacity of solid alder, which will allow you to avoid burns upon contact with a heated surface in high-temperature dry steam baths; Linden is, along with oak, one of the classic types of wood for bath use.
Particularly noteworthy is the pleasant aroma and pliability of linden raw materials to mechanical processing. However, it should be remembered that wood of this species is certainly inferior to oak in strength and durability of products.
Sizes that are comfortable for a person
There is no way to get around this point: there is a certain relationship between the size of the table and how many people can comfortably (or not) fit behind it. Therefore, each bathhouse owner should estimate in advance how many people will most likely gather at the table in the recreation room or on the veranda at the same time.
The second important factor in choosing the size (and, possibly, shape) will be the area of the room. After all, you need not just to place a table, but to make sure that a person can sit down and get up from the table freely, that there is room for passage, etc. To do this, you need to add a few more parameters to the table dimensions - the width and depth of the seat, the width of the seat for one person at the table, and also the minimum width of the passage.
For our part, we will present the standards of ergonomics, which is the science of how to adapt things to human anatomy.
REMEMBER! To sit comfortably at the table, a person needs 70 cm of space. This is called the seat depth (see picture). Add these 70 cm to the dimensions of the table on all sides - you will get a spot that you allocate for this area. The minimum passage behind the seated person, if necessary, must be at least half a meter.
Now the dimensions of the countertops themselves (according to the estimated capacity):
A person is comfortable at a table if he is provided with at least 60 cm of table space in width. It's minimum.
A two-seater table of square or round shape should be 60 cm on the side or in diameter. However, the “spot” of the zone together with the chairs is calculated as 120 by 210 for a square and 120 by 200 for a circle.
A three-seater table is only possible for a round shape, but the dimensions increase: the table diameter is 80 cm, the spots are 220 cm.
The four-seater can be either cross-shaped or parallel. The side of the square is 85 cm, the side of the spot is 225 cm. The diameter of the circle is 90, the spot is 230 cm. The rectangle is 85 by 125 cm, the spot is 185x225 cm.
Five-seater – circle 100 cm, spot 240; rectangle, size 135 by 85 cm, spot – 235 by 225 cm.
Six-seater – three types. Circle: diameter 120, spot 260, rectangle parallel seating – 85x175, spot – 235x225 cm, perimeter – 85x145 cm, spot – 285x225 cm.
We'll probably stick with eight-seaters. The circle is 140 cm in diameter, the spot is 2.8 meters. Rectangle: parallel seating – 80 by 250 cm, spot 220x285 cm around the perimeter – 85 by 195 cm, spot 225x285 cm.
Also worth mentioning is a design called a “corner”. It looks cozy and fills the space well. The module of the proposed scheme is a seat measuring 55x55 cm. A corner measuring 220 by 165 cm is folded out of them. The table is also square in shape with a square side of 85 cm. Single seats in front of the table are the same dimensions as the module.
DIY headrest for the bathhouse. Bath accessories
- 04 January 2015 21:36:10
Bath accessories are among the devices without which the steam room can be considered completely unfurnished. Today they can be purchased in stores, but most bathhouse owners make them themselves. A do-it-yourself headrest for a bathhouse is an important accessory, the production of which takes a little time.
Headrest design
A headrest in a bathhouse is a convenient device that is necessary for complete relaxation during a visit to the steam room. The main criterion by which the comfort of these accessories is assessed is ease of use. You can make your own long or short, straight or curved headrest. Everything will depend on your own preferences and wishes.
The design of the headrest consists of slats, small in width, which are connected on parallel bases.
Selection and preparation of material
In the modern world, you can find linen headrests, cotton accessories, and many others on sale. But the most popular material for the manufacture of such devices remains wood.
For independent production, it is recommended to focus on loose rocks. This is due to their low thermal conductivity
It follows from this that such wood will not heat up quickly in a steam room.
Other advantages in favor of this material are the rapid absorption of moisture and the ability to dry completely.
In accordance with these indicators, it is recommended to pay the greatest attention to:
- Aspen is a material that is often found in baths or saunas. It tolerates high temperatures and humidity well, so it will last a long time. Unlike most other breeds, this one will not swell over time and mold will not begin to form on it.
- Linden is another type of wood that can be used to make headrests. It does not absorb moisture at all and has an attractive appearance and color.
During production, some craftsmen combine several types of wood at once. However, to do this you need to have certain skills and knowledge.
Manufacturing
DIY headrest for a bath:
The upper part of the structure is made in the form of a lattice. To make it, you need to use round sticks, which must first be sanded; The advantages of the lattice shape are obvious. Firstly, excess moisture will not stagnate for hours, days or weeks. Secondly, it provides the opportunity for ventilation. Thirdly, this arrangement has a massage effect on the head. This is especially useful as it allows you to relieve stress and achieve complete relaxation; After making the grating, you need to sand the surfaces. There should be no sharp corners or edges, since a person’s head and face are placed on this accessory. Be sure to hide the heads of nails or screws with special wood plugs. Otherwise, burns may occur; So, the manufactured grille needs to be fixed on two supports. The supports must be absolutely identical. The ideal design is one in which the lower part is narrower, after which it gradually expands. It's convenient for the location; And the last step is to coat the structure with a protective varnish.
When purchasing varnish, it is recommended to pay attention to its properties. It must protect the surface of the product from mold, mildew and cracks.
The varnish coating must not fail or become ineffective due to exposure to high temperatures or large amounts of moisture. You can coat the product for the first time after it has been manufactured; you can repeat the procedure after a few days.
Decor
The wooden headrest looks beautiful without any additional finishing. The reason for this is the attractive appearance of the wood, which does not require painting. However, if your bathhouse is decorated in a certain theme, then the accessories must correspond to it.
Do-it-yourself bathhouse accessories, including the headrest, can be painted with enamel paint. Today it is presented in variety, in different colors and shades. She is not afraid of temperature changes or moisture. However, it is still recommended to apply a protective varnish on top of the paint.
In addition to paint, you can make carvings on wood. If you or someone you know has experience in this area or certain skills, then you can try.
A beautiful pattern on wood always impresses and attracts attention. There are practically no places on the headrest where you can do it.
What types of wood are they made from?
The most commonly used types of wood are:
- cedar;
- Linden;
- pine;
- birch;
- aspen.
Each material has its own properties and advantages. Pine headrests will be the cheapest option. When heated, the wood emits a pleasant pine aroma, and the phytoncides released into the air have a beneficial effect on the body. It is important to choose an accessory without resin stains, knots or other defects. In our store, choosing quality products will not be difficult.
A linden headrest has many advantages:
- have a beautiful appearance;
- heats up slowly (no risk of burns);
- has a texture that is pleasant to the touch;
- does not absorb moisture;
- When the temperature rises, it releases phytoncides.
The birch headrest is characterized by good resistance to moisture. This accessory is well suited for people who want to get rid of the feeling of congestion in the neck. Birch heats up quickly. An important advantage is good resistance to deformation. The material tolerates even sudden temperature changes well.
A cedar headrest is more expensive, but also has excellent performance characteristics. Wood contains substances that prevent the formation of mold and have a beneficial effect on human well-being.
The main advantages of aspen include the following:
- high density;
- resistance to deformation, delamination, cracking;
- resistance to high humidity;
- resistance to temperature changes.
Brief description of the design of a headrest for a bath
The future headrest for the bath should be a glued wooden structure of two vertical sidewalls connected to each other by thirteen transverse strips. The ends of the oval-section planks are inserted into the corresponding grooves of the sidewalls and glued with heat-resistant wood glue.
As for thermoaspen slats, difficulties may arise in purchasing them. If you still manage to get thermal aspen, the headrest will look really cool!
How to make a rounded headrest for a bathhouse
This type of headrest provides comfortable placement of the head and upper body due to its anatomical shape. It is believed that the ideal width of such a product is 45 cm, length - 40 cm, height - 10 cm. Let's consider the order of work:
- We give a rounded shape to the sidewalls on which we will attach the slats. To do this, cut out a couple of rectangles measuring 40x10 cm. The ideal thickness of the wood is 25 mm.
- We put marks on the blanks with a pencil. The maximum height on one edge is 10 cm, the second edge should have a height of 2 cm. We connect the marks with a smooth rounded line using a pencil.
- We cut out a couple of parts along the marked lines. Sand all edges and surfaces with sanding paper.
- We prepare slats of the required length - 45 cm. In total, you will need 8-9 slats. We cut them out using a hacksaw or jigsaw, and clean the edges with a grinder and sandpaper.
- At the ends of the side panels we drill holes where the slats will be attached using self-tapping screws. We “recess” the screws into the wood so that they do not burn the skin when heated.
- Leave a gap between the slats of about 1 cm. This is necessary for draining water and air circulation.
If you have certain skills, the finished product can be decorated with wood carvings.
Video - Rounded headrest for steam room
Headrest massager for a bath
This accessory has a curved shape, due to which the cervical vertebrae and the back of the head are massaged. To make it you will need:
- polished round sticks with a diameter of 25–30 mm;
- wooden panels measuring 120x450 mm.
Stages of work:
- To give the shape to the sidewalls, using prepared patterns, a wavy line smoothly descending down is drawn on the wooden panels.
- The sides are cut out.
- Crossbars of the required length are prepared from 10 or 12 round polished sticks. Their number depends on the width of the gap between them.
- Holes are drilled at both ends of each crossbar.
- The sides are connected using round crossbars, which are installed along a wavy contour. The sides and crossbars can be fastened together using wooden dowels or long self-tapping screws. To drain water and ventilate air, there must be a gap between the crossbars.
- The finished product is processed again with sanding paper. It is necessary to achieve ideal smoothness of the structure.
Experts recommend giving the headrest massager an anatomical design.
Straight headrest for a bath - drawings
A straight headrest is a simple design that even a beginner can build. The product for the bath should fit without problems on the shelves in the steam room, so before making it yourself, you should make calculations.
Stages of work:
- Wood blocks 5–7 cm wide and long in accordance with the width of the shelves are prepared. They need to be sanded thoroughly using sanding paper. There should not be a single nick left.
- The sidewalls are made according to the template prepared in advance. They should be triangular in shape and the same size. To place your head comfortably, the tilt angle should be 30 degrees. The finished triangles are polished.
- On the sidewalls parallel bars are placed in 10 mm increments. They are fastened with self-tapping screws, which should be sunk into the wood. Otherwise, at high temperatures they will heat up and burn the skin.
- To prevent the product from cracking over time, it is varnished.
Headrest Features
The headrest in the bathhouse is a removable glued structure made of vertical side parts that are connected to each other by horizontal strips. The ends of the connecting strips are inserted into special grooves in the sidewalls and additionally glued with wood glue.
Thanks to the presence of horizontal slats, the headrest allows you to comfortably enjoy bath procedures while lying down. This provides rapid relaxation of the spine and muscle corset.
The headrest can have different shapes: round, curved, straight, triangular. Various natural materials are used to make the structure - linen, cotton, calico and satin. But the most popular are wood products. They are resistant to high temperatures and high humidity, are easy to clean, dry quickly, and retain an attractive appearance.
Homemade straight headrest for bath procedures
To make a straight headrest with your own hands, you need to correctly calculate the dimensions of the product. The straight design of the headrest has no bulges or bends, but should still be comfortable and functional.
The headrest assembly technology consists of the following steps:
- Preparation of the required number of slats from the selected wood. Blanks up to 5 cm wide and up to 50 cm long (taking into account the width of the bath shelves). The slats are sanded with sandpaper to eliminate all minor defects.
- Preparing the side parts. Triangular blanks of the same size are cut out using patterns. At the same time, the angle of inclination of the sides is maintained for a comfortable position of the head. The optimal value is 32 degrees. Surfaces are cleaned with sandpaper or a grinding machine.
- Assembly of the structure. The prepared slats are placed one at a time in a horizontal position on the sidewalls and mounted with self-tapping screws. When fixing, it is necessary to maintain a technological gap of 1 cm between the individual elements.
- The finished headrest is treated with flax seed oil to protect it from cracking and drying out.
Sources
- https://SdelatBanyu.ru/aksessuary/podgolovnik.html
- https://banyaspec.com/poleznoe-o-bane/kak-sdelat-podgolovnik-v-banyu-proverennye-sposoby.html
- https://bane.guru/aksessuary/podgolovniki-dlya-bani-svoimi-rukami-etapy-rabot-chertezhi.html
The main stages of creating a wooden headrest
The creation of a wooden headrest can be divided into the following stages:
- Selection and purchase of lumber;
- Cutting lumber to size;
- Treatment of workpieces with water-repellent and antifungal agents;
- Headrest assembly;
By completing these simple procedures, you will receive a headrest that will exactly match the drawing and all your expectations.
DIY headrest for a bathhouse drawings
DIY headrest for a bath, drawings of a convenient and practical device that is used during bath procedures. The design is designed to minimize the material used for manufacturing.
Judge for yourself. To manufacture the product offered for consideration, only two types of materials are used:
- wooden plank measuring 15 x 40 (mm) in cross section
- wooden dowel with a diameter of 16 (mm)
To make parts, you simply need to cut the material used to the desired length.
Material for making the product:
linden, aspen, oak or larch.
The distinctive features of the presented design from its analogues are that the flooring under the head can change the angle of inclination in three positions, in steps of eight degrees:
first position
– tilt angle 32°
second position
– tilt angle 24°
third position
– tilt angle 16°
How to reduce the negative properties of wood
When purchasing lumber for the manufacture of bath equipment, especially when purchasing lumber from pine, you should pay attention to the following signs, or rather, their absence:
- Knotiness;
- Presence of resin pockets;
- Characteristic significant cross-layer;
- Characteristic resin stains;
For example, products made from birch have completely different characteristics than products from pine. This happens, to a greater extent, because birch wood has a significantly higher density compared to pine wood.
Because of this, its heat capacity and other characteristics are different. Of course, this significantly affects the properties of the finished products. For example, a birch headrest (as well as a birch lounger) are much less prone to absorbing water than similar pine products.
Accordingly, such products are much less prone to change in geometric dimensions due to warping of the material during swelling and subsequent drying of the products.
Waiting room
Dressing room furniture
Bench in the bathhouse The dressing room is a rather cool place.
In all places of the bath where there is no high humidity and high temperatures, other materials can be used. For example, you can place expensive furniture here. However, you should protect it from accidental exposure to steam and moisture.
The relaxation room often features gorgeous summer oak furniture. She is so beautiful that she can create a special atmosphere. Relaxing at a table made of such material after a steam room is a dream.
Plastic furniture is also appropriate here.
Plastic is not used in the steam room due to the high temperature there. But in other places it can be an ideal solution. In the saunas in the relaxation rooms you can find chairs with soft leather upholstery.
Aged furniture
Pine wood, which is prohibited in the steam room, is well suited for cool rooms.
Moreover, it will spread a special aroma thanks to the resins. Resins that are not exposed to high temperatures are very useful. They calm and give harmony.
In addition to pine, you can use aspen and alder. Birch and beech are also appropriate. A universal material for any part of the bathhouse is larch.
To make the bathhouse truly convenient and comfortable, it is advisable to place a mirror there. Having enough light will also create a good atmosphere.
If in a steam room the issue with lighting is sometimes difficult, then in the relaxation room you can create high-quality light. As for materials for lamps, it is better to choose wood from moisture-resistant and heat-resistant species.
Terms of use
This headrest must be used correctly.
- Do not leave the stand in a steamy room. Constant overheating will reduce the life of the product.
- Always dry the headrest thoroughly. Do not leave it in direct sunlight or close to heat sources such as radiators or heat registers. The best drying is natural.
- If you use a pillow with sawdust-herbal filling, you will need to change it to a new one after each visit to the bathhouse. Of course, the textile cover itself must be washed thoroughly and then dried as usual.
Under no circumstances should you use wood that is damaged by insect pests, borers or mold.
Homemade furniture for the heart of the bath - steam room
In a good, proper steam room, apart from places to lie down and a few handy accessories (rest for head and feet, basin, ladle), there should be nothing superfluous
It is important that hot air circulates freely in the steam room, so you should not clutter the steam room. You can make shelves for your bath or sauna yourself
Before you start making sun loungers for the steam room, you need to decide what you need. What shape, width or size should the shelves be, how will it be located: in the form of steps or along the perimeter of the steam room; what it is intended for: for sitting or lying - all this depends on the desires and imagination of the owner, as well as on the characteristics of the room.
Before you start making furniture, prepare drawings
The first stage of making a shelf for a bathhouse is measuring the room and sketching the future lounger. It is necessary to measure the steam room as accurately as possible and draw a schematic drawing of it, where you must indicate the location of the boiler and door. Then draw the future shelves on the drawing, indicating its dimensions and attachment points.
- After all measurements have been taken, boards and timber have been purchased, you can begin to work. We assemble a frame from timber (section 100 x 50). The racks can be fastened together with metal screws, so they will not be on the surface. The distance between the posts is no more than 45-50 cm.
- Next we make seats for the shelves. They can be made from well-sanded boards or from lining. The boards must be fastened at a distance of 1-1.5 cm from each other. This will allow water to flow down smoothly and also allow the seats to dry out faster. It is better to fasten the boards for the seat with wooden dowels, since you can subsequently get burned on the metal heads of nails or screws.
Advice! Do not treat wooden products in the steam room with anything: varnish, paint, chemical impregnations. At high temperatures this is fraught with toxic fumes and poisoning.
Bath chair
In order to make a chair for a bath yourself, you will need 5 seat boards 50x100x500 mm, 2 bars for fastening 50x100x490 mm, two longitudinal (25x100x475 mm) and transverse (25x100x540 mm) crossbars. Two backrests measuring 50x50x580 mm, 3 backboards 50x100x540 mm, 2 armrests 25x70x467 mm, two rear legs 50x50x610 mm and two front legs 50x50x600 mm.
Bath chair drawing
Manufacturing:
- We trim seat boards, fastening bars, uprights and boards of the backrest, front legs, and armrest at an angle of 90 degrees. We end the transverse and longitudinal crossbars at 45 degrees, the rear legs at an angle of 11 degrees. On one side of the top of the backrest we make a 200 mm long cut at an angle of 5 degrees. The sharp edges of the chair elements need to be rounded. We lay out the seat planks on a flat surface at a distance of 1 cm from each other. We fix the planks with transverse bars. We attach longitudinal and transverse crossbars along the edges. There are two backrest posts to the transverse ones. We fix three backrest boards on the uprights. We attach the legs to the longitudinal ones. We put armrest boards on the top of the legs. We thoroughly clean the assembled chair with sandpaper and cover it with a protective compound.
All elements of the chair are connected using screws, special confirmat screws, wood dowels with glue or self-tapping screws.
So, for today these are all the drawings of bath furniture that we have prepared for you. Good luck with your work and good mood!
https://youtube.com/watch?v=IO5SuHpyESURel%3D0%26amp%3Bcontrols%3D0%26amp%3Bshowinfo%3D0
- stroysvoimirukami.ru
- kakpravilnosdelat.ru
- dachadizain.ru
- baniaisauna.ru
DIY rounded headrest
Making this accessory with your own hands is not difficult. The main thing is to have the right materials and the right tools available.
- Jigsaw.
- Screwdriver.
- Drill.
- Drill.
- Wood saw.
- Screws.
- Wooden slats (40 mm by 20 mm).
- Wood for the sides.
- Sandpaper or sander.
- Roulette.
- Pencil.
Headrest device
The first stage is to give a rounded shape to the sides, on which the slats will be attached to support the head. For the sides of the structure, two rectangles are cut out of wood - length 400 mm, height - 100 mm. It is advisable to take wood with a thickness of 25 -28 mm. Then, using a pencil, marks are placed on the wooden blanks: the maximum height of one side edge is 100 mm, the other is 20 mm. Using a pencil, the marks are connected with a smooth, rounded line. Two parts are cut along this line. The result is rounded sides. It is advisable to sand the edges with sandpaper or a sander and smooth out all the unevenness and roughness.
Headrest for bath drawings
The next step is to cut the slats to the desired length. Since the recommended width of the headrest is 450 mm, the slats need to be cut to this size. Requires 8-9 pieces. After they are cut using a wood hacksaw or jigsaw, you need to carefully clean the edges with sandpaper. The surface must be absolutely smooth, without unevenness or roughness.
The last stage is assembling the entire structure. Holes are drilled at the ends of the side panels, to which each rail will be attached with a screw. It is recommended that metal fittings be slightly recessed into the surface of the wood so that the metal does not leave a burn on the neck or scalp when heated.
Headrest for bath semicircle
There should be a gap of 10 mm between each rail
These gaps are needed for water drainage and air circulation, this is especially important if the wood tends to heat up
How to choose?
You can choose a good accessory for a bath and sauna by paying attention to the following criteria.
- The product must have suitable dimensions. The stand must match the size of the shelves or benches in the steam room.
- It is important to make sure that the headrest fits you in both width and height. The design should be as comfortable as possible for you. If possible, check this in the store. The design should not cause pain or noticeable discomfort.
- Choose designs made only from natural wood. Choose a model made from practical and high-quality material that has undergone careful processing. There should be no nicks, protruding parts, or loose slats on the surface of the product.
- Buy similar items in specialized stores or order from official online stores of well-known manufacturers of bath accessories.
Selecting material for making a headrest in a bathhouse
Making a headrest for a bathhouse with your own hands is a great opportunity to save money and create a device that is optimal for your bathhouse in size and design.
Most often wood is used for this purpose. The requirements for the wood from which it will be made are the same as for all finishing materials in the steam room. The most important thing is that it must be well dried. This way the finished product will retain its shape and will not deform. The most popular types of wood when making this bath accessory are:
- Linden
. This wood is elastic and has good heat capacity. This prevents the linden from absorbing too much moisture and from heating up to very high temperatures. In addition, linden has a beautiful color and texture. When exposed to high temperatures, linden releases special phytohormones that have a therapeutic effect on the body. - Pine
. The most inexpensive wood material. Its pleasant feature is the ability to release a pleasant pine scent when heated. But at the same time, pine can release resins from the fibers when heated. Therefore, if you have chosen pine as the material for the headrest, choose only high-quality lumber - without resin stains, knots, “pockets”, or cross-layers. - Birch
. Dense wood that has low moisture absorption. Birch can heat up quickly, having a warming effect on the neck and upper spine, and also cool down quickly. Moreover, frequent changes in temperature and humidity conditions are not scary for it. - Cedar
. A relatively expensive material that smells great when heated and is highly resistant to mold. Contains some resins in the fibers, so it will not release them when temperatures rise. But the special volatile substances released by cedar have a beneficial effect on the body. - Aspen
. This is a dense tree that is resistant to temperature and humidity changes. It retains its original appearance for a long time and does not crack. - Exotic wood species
. These include ofram, meranti, abash, and bamboo. These types of wood have virtually no disadvantages, except for the high price. But headrests made of such materials will retain their original appearance for many decades.
Sometimes professional carpenters combine several types of wood at once in their work. However, beginners are advised to choose one type of wood. In addition to wood, we will need self-tapping screws and special carpentry tools.
Tips for caring for headrests
- After bath procedures, leaving the product in a heated steam room is not recommended. It is best to bring them in immediately before visiting the steam room. In this case, the headrest will not overheat, and the procedure will be comfortable.
- The accessory must be stored in a well-ventilated area.
- Headrests for a bath should be made from well-dried wood. Then the product will retain its original shape and last a long time.
- All metal fittings must be placed on the internal surfaces of the accessory or recessed deep into the wood.
- Every detail of the structure must be carefully polished.
- Do not use paints that release toxic substances when heated.
Handmade wooden headrests look very beautiful . If desired, they can be carved or painted with enamel paint, which is not afraid of temperature changes.
Selecting material for making a headrest in a bathhouse
Making a headrest for a bathhouse with your own hands is a great opportunity to save money and create a device that is optimal for your bathhouse in size and design. Most often wood is used for this purpose.
The requirements for the wood from which it will be made are the same as for all finishing materials in the steam room. The most important thing is that it must be well dried. This way the finished product will retain its shape and will not deform.
The most popular types of wood when making this bath accessory are:
- Linden. This wood is elastic and has good heat capacity. This prevents the linden from absorbing too much moisture and from heating up to very high temperatures. In addition, linden has a beautiful color and texture. When exposed to high temperatures, linden releases special phytohormones that have a therapeutic effect on the body.
- Pine. The most inexpensive wood material. Its pleasant feature is the ability to release a pleasant pine scent when heated. But at the same time, pine can release resins from the fibers when heated. Therefore, if you have chosen pine as the material for the headrest, choose only high-quality lumber - without resin stains, knots, “pockets”, or cross-layers.
- Birch. Dense wood that has low moisture absorption. Birch can heat up quickly, having a warming effect on the neck and upper spine, and also cool down quickly. Moreover, frequent changes in temperature and humidity conditions are not scary for it.
- Cedar. A relatively expensive material that smells great when heated and is highly resistant to mold. Contains some resins in the fibers, so it will not release them when temperatures rise. But the special volatile substances released by cedar have a beneficial effect on the body.
- Aspen. This is a dense tree that is resistant to temperature and humidity changes. It retains its original appearance for a long time and does not crack.
- Exotic wood species. These include ofram, meranti, abash, and bamboo. These types of wood have virtually no disadvantages, except for the high price. But headrests made of such materials will retain their original appearance for many decades.
In addition to wood, we will need self-tapping screws and special carpentry tools.
Before you start work, you need to correctly calculate the dimensions of the headrest for the bath. Be sure to check the width of the shelves and benches in the steam room, as the device should fit there without any problems. But in any case it should not be too high or low.
A straight-shaped headrest, without bulges or bends, is considered the simplest design that even a beginner can make.
To make a simple headrest for a bathhouse with your own hands, we perform the work in this order:
- We prepare wooden blocks that will serve as slats. Their optimal width is 5-7 cm. Length depends on the width of the shelves (on average about 45 cm). We carefully sand the boards so that not even the smallest nicks remain. To do this we use sanding paper.
- Preparing the sides. We cut out triangles of the same shape and size. Use patterns for this. Make sure that the tilt angle is about 30 degrees - this is the optimal angle for comfortable placement of the head. We also process all surfaces with a grinder or sandpaper.
- We place each rail on parallel side panels and attach them using self-tapping screws. The gap between the slats should be approximately 10 mm.
- We coat the finished product with linseed oil to prevent cracking in the future.
Purpose
Many people have a headrest in their baths and saunas. But what is this thing for? With the help of a convenient removable accessory - a wooden headrest, the most comfortable conditions are created for both the neck and the head of the user relaxing in the bathhouse. This is a kind of substitute for a comfortable pillow. As a rule, a bath stand is made from natural wood of the best species. Such natural materials are characterized by many useful properties, for example:
- always retain their initially correct shape, are not subject to deformation, do not wrinkle, do not break;
- under the influence of hot steam in a steam room, such structures do not heat up, so lying on them is not painful or too hot;
- the wooden headrest dries very quickly, and no cracks form on its surface;
- Easy and hassle-free to clean and can be treated with hygiene products.