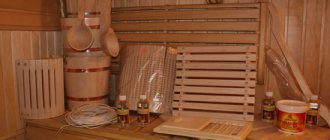
Many owners of land plots dream of setting up a bathhouse on it, but often there is simply not enough space. In this case, a barrel-shaped bathhouse will come to the rescue. It comes in different sizes, which is very convenient. Wooden barrels for baths can be ordered in specialized online stores. And after delivery, you can decorate it based on your own taste, so each bath will be different.
The love for a bathhouse is in the Russian blood and has even turned into a national feature, which is why many people dream of having their own bathhouse in their summer cottage. But the high cost and duration of construction often scares away lovers of bath rituals, and there is not enough space on any site. But don’t rush to despair, because you can buy a barrel sauna, a mobile, inexpensive design that is in no way inferior to a traditional sauna. This ingenious Finnish invention has conquered the whole world and gained wide popularity in our country.
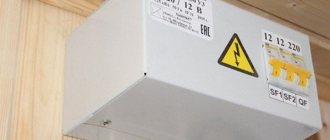
Choosing a stove for a barrel sauna
The choice of a stove for a sauna is very important, because a heater stove is the main equipment of a barrel sauna. When making a decision, we are based on data:
- Steam room volume,
- Wall material (or quality of thermal insulation),
- The volume of additional adjacent compartments requiring heating,
- Required temperature and humidity in the steam room,
- Heating time
Particular attention should be paid to the power of the heater. If you install a stove with a small heating capacity in a steam room with a large volume, you will need to heat it for a long time and more intensely, which will undoubtedly shorten the service life of the stove.
It has been experimentally determined that, in terms of technical characteristics, the following stove models are best suited for barrel saunas ranging in size from 2 to 6 meters: Rus 9, HARVIA M2, Termofor OSA and GRILL'D Aurora 160.
For a more complete and detailed overview of the technical characteristics of each model, look at the Operating Manual for the stove you are interested in (can be downloaded or viewed online):
- Rus 9 — manual_rus.pdf
- HARVIA M2 - harvia.pdf
- Termofor OSA – manual_osa.pdf
- GRILL'D Aurora 160 — grill_aurora_160.pdf
Two options for wood-burning stoves
Wood stoves come in two versions:
- With a firebox inside,
- With the firebox facing out.
Which option to install is up to you to decide. The only thing you must understand is that stoves with a firebox inside the bathhouse will create additional difficulties associated with cleaning the ash pan from ash. This process requires precision and patience. To install a stove with an external firebox in a barrel bath, additional work is required. This leads to a slight increase in the total price of the bathhouse (we have + 5000 rubles to the cost of the bathhouse).
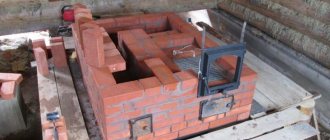
Design features of the heater stove
General diagram of the furnace:
Parts of the stove, such as the firebox and heater, bear the greatest thermal, corrosive and mechanical load, so they are made of high-alloy stainless steel with a thickness of at least 2-4 mm. The chromium content in such steel is at least 13-17%, which ensures a longer period of operation in oxygen-containing environments at high temperatures.
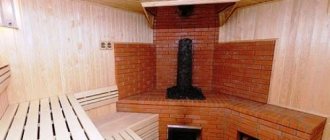
The ovens are equipped with a multi-section steam generator and a convector made of mirror stainless steel. The convector covers most of the heat-releasing surface of the stove. Due to the powerful circular convection flow it creates, the heating of the air in the steam room and adjacent rooms is significantly accelerated. The hard infrared radiation emanating from the hot walls of the firebox is shielded by the casing circuit, which creates “soft” heat in the steam room.
The ventilated heater also plays the role of a powerful steam generator. High-quality heated stones ensure an even temperature in the steam room. One of the interesting details of the Harvia M2 is that the standard door can be replaced with a SCHOTT ROBAX® heat-resistant glass door. This will allow you to steam and admire the fire at the same time.
The stove-heater is equipped with a box with an ash pan, thanks to which you can regulate the intensity of combustion. The grate, made of cast iron, ensures uniform, stable combustion along the entire length of the firebox.
The outer surfaces of the furnace are covered with a double layer of silicone enamel. It is heat-resistant and retains its properties at temperatures of 600°C.
On the chimneys of stoves of all models, you can install a tank for heating water of the “samovar” type or install a universal register-heat exchanger for remote heating of water. They are made of stainless steel.
They are not included with the stove and must be purchased separately.
Diagram of functional holes in the heater stove
- A - Upper connection hole
- B - Rear connection hole
- C - Soot removal hole
- D - Firebox door
- E - Ash pan
Assembling a heater with a chimney
The figure below shows how to connect the chimney to the stove point by point:
- Open the rear connection hole flap. Use a screwdriver to bend the holder
- Move the plug from the top to the rear connection hole,
- Use a screwdriver to bend the holder. Bend the flap and secure it with a screw,
- Attach the chimney pipe to the top hole in the heater.
When using protective flashing around the heater, the chimney insulation should start below or at the level of the top edge of the flashing.
Step-by-step instructions for assembling a chimney with photos:
- Install a tank on the stove on the pipe
- Install an adapter on the pipe after the tank
- After the adapter, a start sandwich is installed
- Next comes a sandwich pipe that passes through the roof, and the master flush and cap are placed on top of it. The sandwich pipe has no insulation on one side from the inside along the edge - this side is placed on the start sandwich.
Types of designs
Many designs of potbelly stoves for the garage have been invented, so choosing the appropriate option based on the available material is not difficult.
The drawing is drawn up independently, taking into account the characteristics of the room, or taken ready-made from the Internet. The structure, depending on the size of the garage, is made horizontal or vertical. A classic potbelly stove is made from sheet iron. The easiest way to make a stove is from an iron barrel, but the service life of the structure is short, since the thin walls quickly burn out. The option made from a gas cylinder or pipe will last much longer due to the greater thickness of the metal. Simple structures for garages are made from old rims and iron cans.
Preparing the oven for operation
Before heating the stove for the first time, remove the protective films from the decorative panels on the stove body. Please read the description and instruction manual carefully.
When the furnace is heated for the first time, smoke and odor will be released from the combustion of industrial oil applied to the metal and volatile components of the paint. In the future it will disappear and will not bother you.
The first heating of the stove should be carried out with the doors and windows open or not indoors. The first heating time is at least 1 hour. The firebox must be fully loaded, the heater empty and the tank filled with water
If you are heating the first time outdoors, install a chimney on the stove to provide draft, which will ensure that odors are removed from it as well.
The heat-resistant paint used to paint the outer casing of the heaters dries completely and reaches maximum strength during the first heating. It is not recommended to wipe the painted surfaces of the heater before this. After the first heating, ventilate the room and drain the water from the tank.
If you pour water on your stove the first time you fire it, it can damage the paint and shorten the life of your stove.
During long-term operation of the stove, deformation of the internal walls of the firebox may occur. In places of greatest temperature influence - in the firebox, smoke collector and heater, burnout and peeling of the silicone coating may occur. This does not affect the service life of the oven in any way.
Chimney construction process
The complexity of the process of constructing a chimney for a potbelly stove in a country house directly depends on the location of the stove in the room. For example, bringing a pipe out through a window is much easier than making a hole for a chimney in the roof. In this regard, before installing a potbelly stove, you should take into account the design features of the building.
Safety rules and structural measurements
If you plan to install the stove outdoors, then installing a chimney will not cause much difficulty, the main thing is to choose a suitable location
It is important to remember that the stove structure should be located away from flammable objects and active recreation areas
Constructing a chimney indoors will require knowledge of safety rules that will help avoid fire. The material from which the pipe is made must have increased heat resistance and can easily withstand temperatures above 1 thousand degrees. If you plan to install a potbelly stove near walls lined with clapboard or plastic, then the part of the wall located in close proximity to the stove is sheathed with fireproof material.
Don't forget to decide on the pipe size
The hole through which the chimney will enter the ceiling must also be decorated with non-combustible materials, since the entire structure becomes very hot when the stove is operating. For these purposes, a special glass is used to prevent contact of the hot pipe with the edges of the hole. If there is more than one potbelly stove installed in a building, then a separate smoke exhaust system is made for each of them.
After calculating the diameter of the pipe for the potbelly stove, you will need to calculate the total length of the pipeline, but first you need to accurately determine the location of the stove in the room. Then determine the specific location where the chimney will be vented outside. When measuring the length of the pipeline outdoors, you need to take into account that the height of the pipe above the ridge should be 1.3-1.7 meters.
It is more difficult to carry out installation work indoors
Installation of all system elements
Installing a stove installed outdoors is not difficult. To assemble the system, you will need a pipe of the required diameter, which is placed on the pipe extending from the potbelly stove. The pipe must be put on the pipe, and not inserted into it. Otherwise, smoke will leak out at the junction of the nodes. The procedure for installing a smoke exhaust system in a room is much more complicated and consists of several stages:
- the pipe section is securely attached to the furnace pipe;
- the pipeline is extended using connecting elbows;
- the smoke exhaust is passed through a passage glass and discharged onto the roof or behind the wall;
- all connecting nodes are securely fixed.
A section of pipeline located outdoors must be insulated with heat-resistant material. During operation of the potbelly stove, condensation inevitably accumulates on it. To get rid of the condensate accumulated in the system, a tee is installed on the outer section of the pipeline, equipped with a faucet for discharging liquid. In the place where the horizontal and vertical pipelines connect, an inspection window is made to make cleaning the chimney easier.
The final stage is checking the functionality of the smoke exhaust system. If you managed to properly make a chimney for a potbelly stove, then after igniting the stove the necessary draft will be created and the smoke will quickly be discharged outside. During the combustion process, you need to ensure that smoke does not leak into the joints of the nodes. If a smoke leak is detected, the connections must be sealed using heat-resistant sealant.
What to use as fuel material
Dry wood is the best material for heating a heater. True, different types of wood have different calorific values. Thus, beech wood needs to be burned approximately 15% less than birch wood to produce the same amount of heat.
What should not be burned in a stove:
- Plastic, coal, briquettes, granules,
- Construction waste, wood with paint, sleepers,
- Rags, leather, rubber, diapers,
- Garden waste.
Some customers install a special gas-wood-burning stove in a barrel sauna. In this case, gas can be used as fuel.
Difference in fuel
Wood burning
A traditional option that has been used in baths and saunas for several centuries. The advantage of this stove is the indescribable atmosphere from the crackling firewood, which creates a special comfort and makes it possible to tune in to bath procedures.
There is even a peculiar ritual associated with preparing firewood and heating the stove. Typically, waste from coniferous and deciduous trees is used for fuel.
Wood burning heater
Stones for the heater
It is advisable to buy stones for the heater in specialized stores. Stones of unknown origin, picked up from various types of industries and roads, may contain harmful chemical compounds. For example, on railway embankments, stones are treated with creosote. Their use will be dangerous to your health. You can use sea and river pebbles, it is better to take flattened stones, more of them will go into the heater, the laying will be denser and water will not get on the metal of the stove. You cannot take soft stones such as limestone. See the picture below for how to properly place stones in the heater.
To begin with, the stones should be washed in running water with a stiff brush. Large stones are placed on the bottom of the heater so that they are adjacent to the metal surface with the side with a larger area. This increases the contact area. Small stones are placed tightly between large stones.
There is no need to stack stones above the top level of the heater. They will not warm up to the temperature required for high-quality vaporization.
It is recommended to use a protective net for the heater basket. It protects the heater from overfilling, and can also be used to steam a broom and protect stones from getting leaves on them.
Correct placement of stones in a stove:
- The diameter of the stones should not be more than 15 cm,
- The best types of stones are: olivine, olivine-dolerite and peridotite. The popular gabbro-diabase is cheaper, but not the best option. It takes a long time to gain heat and cools down quickly. In addition, it can collapse and clog the furnace grates, i.e. it must be sorted regularly, throwing out collapsing stones,
- When laying, make sure that air circulates between the stones,
- Do not pile stones on or on top of the grate around the stone area.
- Do not place stones between the grate and the heater body.
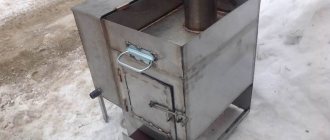
Potbelly stove with smoke circulation
This is a rectangular stove with minimal fuel consumption and the ability to regulate combustion intensity. The structure (furnace body) is assembled from metal sheets by welding.
Required materials and tools:
- welding machine complete with electrodes;
- grinder and circles for cutting metal;
- roulette;
- metal corners;
- metal rods for the grate;
- pipeline;
- sheet metal.
The furnace consists of the following sections: firebox, smoke circulation, ash pan, exhaust pipe. Additional elements: doors with canopies and latches, grate, metal legs, valve on the pipeline to reduce heat loss.
Assembling a potbelly stove with smoke circuits
- We make a drawing of the future furnace.
- According to the dimensions indicated in the drawing, we make markings on the sheet metal and use a grinder to cut out blanks for the future firebox.
- We join the sheets of metal to form a rectangle. We weld metal corners inside (on the side walls of the oven) on which the grate will be placed.
- The grate is made from a set of longitudinal and transverse metal rods of the same length, connected by welding. The cells must be of sufficient size to retain fuel on them and free passage of combustion products through the grate. There is no need to weld the grate itself to the body of the firebox, then it can be pulled out while cleaning the stove from ash and ash.
- At the next stage of work, it is necessary to weld a sheet of metal inside the firebox, which forms a smoke circulation. The size of this sheet of metal should match the bottom of the furnace in width and be slightly shorter in length.
- After the interior of the stove is ready, it is necessary to make a ash door and a door for putting fuel into the stove. We make the doors in such a way that it is convenient to clean the oven and remove the grate. To make canopies, we use a metal rod and a tube of suitable size. We cut them with a grinder and weld them to the walls of the firebox and to the doors, respectively, then insert the free section of the rod into the tube. For ease of use of the doors, we make handles from thin strips of metal and attach them by welding. We make the valves in the form of a long curved strip of metal and, accordingly, a hook to which it will cling.
- The legs of the stove can be made entirely from metal corners or adjustable. To be able to adjust the length of the legs, you will need nuts and threaded metal rods of appropriate thickness. Thanks to this technique, the potbelly stove will stand steadily even on an uneven surface. And also, with the help of such legs, it is convenient to disconnect the stove from the pipe and carry out maintenance or replacement of any parts.
- Outlet pipeline with damper. For the damper itself you will need a metal rod of small diameter and a sheet of round metal with a diameter slightly smaller than the diameter of the pipe. We drill two holes in the pipe, insert a rod into them, bend its outer part for convenience, and install and weld a metal circle inside the pipe. Thus, when the rod turns, the circle will turn accordingly, changing the gap and reducing heat loss from the furnace to the atmosphere.
- In the upper part of the furnace we cut a hole corresponding to the diameter of the outlet pipe and weld it hermetically.
There can be two or three smoke circuits in a potbelly stove. And in order to reduce heat loss from the metal walls into the atmosphere, the outside of the furnace is lined with refractory bricks or a reflective metal screen is installed with a layer of heat-insulating material, for example, an asbestos sheet.
To light a fire in the stove, newspapers, sawdust are placed on the grate, small dry logs are placed on top and the newspapers are set on fire with matches. Once the logs are hot, larger pieces of wood are added to the stove. Do not open the firebox and ash door at the same time. Regulation of draft and combustion intensity occurs by changing the gap in the pipe (valve) and through the blower.
Warming up the heater
It is better to heat the stove using wood chips and finely chopped dry firewood. The firebox should be filled to 2/3 of its volume. Do not place firewood in the remote fuel channel. It is also prohibited to use waste containing flammable components as fuel.
When the draft becomes stable and half of the loaded firewood burns out, you need to add firewood to 2/3 of the full load of the firebox and open the ash pan.
After the optimal temperature has been established in the steam room, you need to cover the ash pan and maintain a stable temperature with coarsely chopped firewood. The optimal number of logs is 3-4 pcs.
When loading the next batch of firewood, you need to completely close the ash pan and only after loading smoothly open the door
5 steps for proper kindling:
- Empty the ash pan
- Place wood in the firebox. Air should flow freely between the logs in the firebox. Small firewood is placed on top of large firewood. Choose logs no larger than 12 cm,
- Place kindling chips on top of the firewood. This type of wood burning reduces emissions,
- Light the wood chips and close the door. By opening the ash pan, you regulate the draft in the firebox. Never light the stove with the door open,
- Add more wood to the firebox as the embers begin to die out.
Prolonged and strong heating entails a risk of fire!
Remember:
- Several full loads in a row can create excessive heat and cause the heater and chimney to overheat. This will shorten the life of the equipment and may also cause a fire.
- Based on experience, it can be argued that temperatures over 100 °C are too high for a bath,
- Use the amount of wood specified in the heating instructions. Be sure to let the heater, chimney and sauna room cool down.
Types of stoves depending on location: vertical model
Depending on the plane in which the metal tank will be located, there are two types of homemade potbelly stoves: vertical and horizontal. Each of these types of heating devices has its own advantages and disadvantages.
A vertical barrel stove is installed not on the floor, but on legs. To make the door, you will need to cut out the side of the tank and provide it with hinges
It is important to remember that the hinges must be fixed to the barrel and the door not from the inside, but from the outside.
A mandatory element of this design is a perforated metal plate, which is called a grate. To fix such a grille, you can use ordinary corners. In order to make a blower, you will need to prepare a metal pipe with a gate valve. The thickness of the metal walls must be sufficient, otherwise the structure will quickly burn out.
A vertical barrel stove is always installed not on the floor, but on legs
The damper for a long-burning wood stove, located in a vertical plane, is fixed with special bolts. When igniting fuel inside the tank, open the blower as far as possible.
A hole in the shape of a circle must be made in the upper part of the canister. It will be needed to connect a chimney structure to a homemade stove. The pipe is joined to a metal surface using welding equipment.
The function of the grate is to protect the bottom of the canister from burning out, as well as to retain thermal energy. Thus, this element is necessary when installing a homemade long-burning stove.
Before starting assembly, it is recommended to draw up an individual drawing of the device. It should be as detailed as possible, contain a drawing of the future unit and its individual components, and also indicate their dimensions.
To make the door, you will need to cut out the side of the tank and provide it with hinges
Design features are determined depending on the purpose of the device and the place where it will be located. If you wish, you can download a ready-made drawing of a potbelly stove on the Internet. However, in this case it is necessary not to make a mistake with its volume.
The vertical version of a homemade heating device is easy to assemble. You can find application for such a unit both in a private home and in the country. The firewood used to light a heating device of this type is selected depending on the dimensions of the firebox.
Barrel stove: features of the horizontal model
From a barrel with a volume of 200 liters, you can also make a heating device located in a horizontal plane. In this case, it is also necessary to prepare a supporting structure. Its height is calculated taking into account individual operational characteristics. When choosing this indicator, first of all you need to focus on the dimensions of the room in which the homemade heating device will be installed.
In the drawing of the furnace, you need to take into account the features of its location. The assembly of such a structure occurs in almost the same way as in the case of a vertical heating device. Let's take a closer look at the process of making a potbelly stove from a metal canister yourself.
From a 200 liter barrel, you can make a heating device located in a horizontal plane
A hole must be made in the bottom of the tank, which will be used to remove ash. At the same time, you need to understand that its parameters should not be too large. Next you will need to make an ash pan. The material used for this element is a regular metal sheet of appropriate thickness. Then it should be docked with the bottom of the heating device. For this purpose it is customary to use welding equipment.
When arranging the ash pan, it is necessary to provide an inspection window through which this compartment will be cleaned. Next, the chimney structure is installed. In this case, there are two common options for locating the pipe - on the back wall or in the upper part.
A long-burning potbelly stove, located in a horizontal plane, can be used not only for heating garages, basements and outbuildings, but also for cooking. For this purpose it is equipped with a special hob. This device is mobile, so it can be taken out into nature.
A 200 liter barrel is installed horizontally on the surface, in a lying position
Water for the stove
The water you apply to the stones should be clean tap water. If it contains a high content of salt, iron, lime or humus, this can lead to rapid corrosion of the heater.
Using sea water guarantees the fastest corrosion of your heater
Requirements for tap water quality:
- Humus content less than 12 mg/liter,
- Iron content no more than 0.2 mg/liter,
- Calcium content below 100 mg/liter,
- Manganese content up to 0.05 mg/liter.
Water is poured only on stones, since if you splash water on very hot metal surfaces, the paint can swell due to a large temperature difference.
Installation Rules
Like all heating appliances, during their operation, potbelly stoves must be treated with full responsibility and strictly follow the safety rules:
- do not leave the stove unattended, on children or people who have no experience in using such devices;
- place the stoves at a safe distance from furniture and interior items, at least 1 meter;
- do not overload the stove while firing the stove;
- for the firebox, use only oil that has been free of water impurities;
- do not block the chimney during combustion;
- Do not leave any objects on the surface of the stove to dry, even after it has gone out.
Selecting a water tank
When choosing the volume of a hot water tank, you can use the rule: 10 liters per person and 10 liters for steaming a broom.
It is calculated that the optimal tank volume for hot water in a barrel bath is 50-55 liters. This is enough to wash all family members or a small group of friends.
In the tank on the chimney, the water is heated to 70-75°C by the time the air in the steam room is heated to a temperature of 90°C. For stoves equipped with a steam generator, we recommend installing a stainless steel tank with two fittings. The tank is installed on the stove so that the fittings are above the funnels of the steam generator.
How a stove can be used in a garden plot made from a barrel with your own hands
The furnace is fired up as follows:
- Dry solid fuel is tightly packed into an empty cylinder to such a height that the upper plane of the piston is below the lower boundary of the chimney opening. Do not add wet wood, which can slow down the movement of the piston during the combustion process.
- Place wood chips, a rag or paper sprinkled with diesel fuel or kerosene on top, close the lid with the piston.
- Open the valve completely, set fire to the rolled paper and throw it into the pipe. When the wood burns well, close the damper, setting the minimum gap for air flow.
Cooking shish kebab on a homemade stove
On a homestead, a stove made from a 200-liter barrel can be used to heat greenhouses, light a bathhouse, or burn garbage.
Stove maintenance
Their service life depends on a serious attitude to compliance with the operating rules of the stove and barrel bath. Follow simple steps and regularly monitor the condition of the equipment so that it serves you for a long time.
Kamenka
- Clean out the ash pan. The air passing through it should cool the grate well. This increases its service life. Collect the ash in a metal container,
- Soot and ash, which accumulate over time in the smoke ducts of the heater, must be removed through the round holes on the sides of the stone space,
- The stones must be repositioned at least once a year, since due to high temperatures they are destroyed during prolonged use. The remaining stones are removed, the destroyed ones are replaced with new ones. It is recommended to check gabbro-diabase stones more often, approximately once every six months,
- Use a damp cloth to remove dust and dirt from the heater.
Chimney
- The chimney and connecting pipes must be cleaned periodically, because Due to incomplete combustion of fuel, soot accumulated in the chimney may ignite.
What to do in case of a chimney fire
If the operating conditions of the furnace are met, this situation will not arise, but you should know what to do in this case. It's just like you should be able to do artificial respiration in the hope that this skill will not be useful to you.
- Close the ash pan, firebox door and damper, if installed,
- Call the fire department
- Don't put out fire with water
Can stove
A can or barrel is often used as a furnace container. The idea is quite popular because it requires almost no work to make the case. You can cut and weld the remaining structural elements (door, legs, chimney) in a few hours.
Assembly steps
- For the blower, make a hole under the neck.
- You need to make a hole in the bottom of the can for the chimney pipe.
- The design of the grate should be either serpentine or in the form of a grid of reinforcement so that it easily fits into the container of the can without using unnecessary fasteners.
- All dimensions of the structure can be seen in the drawing. The finished stove is installed on bricks, or metal legs are welded.
Due to its compactness, such a stove can be installed in a small room. Consuming a lot of fuel, heating a room with it for a long time is not rational. You also need to ensure that burning coals do not fall out of the stove during the combustion process.
Conclusion
It is quite possible to make a brick potbelly stove from bricks yourself. Such a furnace increases efficiency from 50-60% to 70-75%. However, it is still not cost-effective enough to fully replace stove heating. Although it retains heat more efficiently than iron, it requires the connection of a heating panel for constant use.
As a temporary source of heat, a brick potbelly stove, made with your own hands in a garage or greenhouse, is fully justified.
The design can be further improved by clad in metal. This will increase the service life and protect the stove from damage.