Most owners of steam rooms do not think much about how the drain in a bathhouse with a water seal is designed and works. In the process of arranging the sewer route and water drainage, the first option that comes to hand is selected, more or less suitable in size. The locking system somehow serves in the bathhouse until it stops completely and fails. Then it’s time to figure out the problem and make a normal water seal for the bathhouse with your own hands.
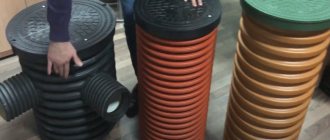
Models of drainage systems for wooden baths
To be precise, the safety of the floors in the steam room and washing department depends on the correct choice of the design of the bath drain. In addition to the joists and floorboards of the rough floor padding, the corners and some of the wall insulation begin to dampen.
You can stop using the drain altogether. For example, in small log cabins with a steam room for a couple of people, the washing floor is laid with a slight five-degree slope. A layer of film is laid on top of it just to protect the thermal insulation and rough padding boards. Wooden bath ladders are installed on top of the film. The drain is installed along the edge of the wall, usually it is a standard gutter through which water goes into the sewer pipe and into the ditch.
Installation
Shower drain Viega Advantix 452452 100×100 mm dry shutter. Photo by Leroy Merlin
A dry shutter can be part of various designs; if you follow the instructions and carry out the work carefully, their installation will not cause difficulties . Instructions are supplied with the plumbing kits. The biggest problems when doing DIY installation are caused by high-quality sealing . Therefore, if the performer is not confident in his own abilities, then it is recommended to turn to specialists. But installation is quite simple, the main steps are:
* you need to check the device ; the sealing elements must be exactly in place;
* between the siphon and the plumbing fixture it is necessary to place an o-ring , which seals the joint;
* installation of a siphon and application of sealant to the joints.
Options for drain drain systems
As a rule, experts recommend three types of drains for use in bathhouse conditions:
- Classic ring drain path;
- Linear drain with grating;
- Dry or float drain with mechanical bellows blocking.
The principle of operation of all devices is approximately the same; differences may be in the method of blocking the flow area and the design of the ladder itself. This is convenient; you can always choose one or even two different devices that are best suited for the specific configuration of the steam room or washing compartment of the bathhouse.
Ring and linear version of the drain ladder
This type of drainage device is used for small spaces; it is convenient to equip, for example, a shower stall. The cylindrical body and the annular slot for receiving water cope well with the load in conditions where the water flow approaches the drain from all sides in a relatively small area.
The installation of a ring-type drain is much simpler than linear or combined designs. A ring drain is recommended for rooms with a small amount of water to be removed.
The structure, 70-90 mm high, is designed in the form of two coaxial annular cavities installed in one housing. The gap between the walls is filled with water with a column height of 50-55 mm, which is quite enough to reliably block the inlet section of the sewer pipe.
The classic linear drain is a long receiving chute with a barred window. Structurally, the linear drain differs from the standard ring design only in the shape of the water intake and the rectangular body of the water seal.
Floor and drainage
Laying a sewer line is much more hassle than directly draining a bathhouse, but it is better to do it, the more carefully, the better.
Even if the floor in the bathhouse is covered with wooden gratings, it is still better to make a screed along the beacons with a slight uniform slope towards the ladder , and lay tiles on it. The final cutting of the drain extension can be done when it is known exactly at what height the tiles will approach the drain point. If the work is done very carefully, then even with a minimal slope there will be no puddles.
Providing access, with the ability to replace all elements, is too much of a luxury for an ordinary bathhouse. Therefore, you should not avoid work that may seem unnecessary, for example, the depth of laying the sewer system should not be less than the freezing depth . Insulating the floor under the screed with a 20 cm layer of expanded clay with a rich cement mortar is by no means an excess. A dry ladder is also not a panacea - dirt that gets into the shutter can prevent it from closing tightly. At the end of the season, it doesn’t hurt to wash the removable elements. Buying a dry water seal in a store or making it yourself - this question is not necessarily related to financial difficulties.
Source
Adapted versions of the sauna drain
The so-called dry type drain looks more attractive. In such a drain there is a minimum amount of water in the water seal. For comparison, the height of the water column in a dry case is 30-35 mm, while in the classic version it is 50-55 mm. This is more than enough for a wooden bath.
Dry water seals are produced in two types - float and pendulum.
In the first case, the exit to the sewer drain pipe is blocked by a heavy float. The weight of the ring element is large enough that, in the absence of water in the bellows, it reliably sinks to the bottom and blocks the exit to the drain line. In this position, the drain system can close the bath drain pipe for an unlimited time, and with the first liters of water filling the bellows, the drain will go into working condition.
The design of the ladder with valves of the pendulum system is shown in the diagram. The bellows blades or flaps are in a vertical, closed position. When the system is filled with water, the valve opens under pressure and releases some of the water.
Typically, the drain plane is tilted and planned so that the water flows to the point where the receiving window is installed. If the floors “play” slightly, the slope under the load from the weight of people in the room may change.
Therefore, before installing a drain in the floor of the bathhouse, they do a small check:
- Place an insulating film on the floor;
- Install wooden ladder gratings;
- Pour a small amount of water onto the waterproofing of the bath.
Moving along wooden ladders, they monitor the place on the floor where spilled water mainly flows and collects. This will help determine the optimal location for installing the drain system.
Tips for using drainage systems
After the concrete floor has dried, the drainage system can be tested. To get started, just pour a small bucket of water directly into the drain. In this case, you need to ask an assistant to see if water is leaking on the street at the joints of the main line. Once the tightness of the line is established, you can bury a trench with pipes.
During further operation, you need to remember only one thing: about once a month, the sewer drain needs preventative cleaning. This operation is not difficult to perform. First, remove the grill, then easily take out all the insides of the product and clean it.
Many ladders have such a part as a float. When the water drains, it rises. In its normal, dry state, it is lowered and prevents the penetration of unpleasant odors. The float is also cleaned and must be installed back.
The bath drain system has a simple design that is almost universal for all types of floors. Making it yourself is not so difficult if you take into account all the recommendations given. The main thing is to approach the matter with soul, to carry out the main operations diligently and carefully. And then the result will exceed all expectations!
Installing a drain ladder in a bathhouse
After the thermal insulation has been laid, it is time to install the drain floor. You can do it in two ways. In the first case, it is formed directly on foam boards laid on the subfloor. The surface of the insulation is simply sealed with a waterproofing membrane, and at a selected point a hole is cut in the foam and membrane for installing the casing and the drain system of the drain.
In this embodiment, washing floors are made in the form of wooden gratings, supported on bars nailed to the level of the baseboard of the bathhouse walls.
The second option for installing the drain involves covering the surface of the insulation with an intermediate floor, which simultaneously serves as the basis for the drainage system and PVC waterproofing. In this case, the floors are a little thicker, but the entire drain system of sewer pipes is sealed into the insulation of the bathhouse floors.
Of course, in both cases, drain gratings will be required to house the steam room and washing compartment. Before making ladders into the bathhouse, it is necessary to mark the number and location of support bars on the drain floor, so that the dimensions of one wooden grate do not exceed 70x150 cm.
Selection of materials
For the drain line, as a rule, a PVC sewer pipe with a standard diameter of 100 mm is used. The mainline is assembled from two-meter or meter sections, which are joined together using the existing sockets at the ends.
To connect a simple drain that does not have a side outlet, you will need to use a standard elbow to the drain pipe.
There should be an O-ring inside the elbow
At the same time, the sewer drain itself has a standard design in various variations. For a bath, you can choose either the simplest or the most complicated, since such products come with various additional functions.
The tightness of the device is of great importance for the operation of the drain system, so before purchasing a drain it is recommended to assemble the device and evaluate the tightness of the parts
Also, to construct a drainage line, you may need a sewer tee with a branch at forty-five or thirty degrees.
You will need a tee if you want to make additional drainage from the sink
In addition to PVC parts, we will need “cold” mastic to seal cracks if the sewer pit is equipped with an iron barrel. This material is sold in metal cans in construction hypermarkets. Before purchasing all the parts and consumables, it is better to make a list.
Mastic can be purchased at any hardware store
Selection of sewer pipes
A correctly made slope at the base of the ladder does not guarantee the rapid evacuation of water masses from the room. In this matter, the choice of sewer pipes is not the least important. Since the bathhouse uses a non-pressure liquid discharge system, it is advisable to use the following pipes to install the hydraulic apparatus:
- The minimum diameter of the pipe should be 50-60 mm, and the thickness of its walls should be at least 3-4 mm;
- It is advisable to assemble the external pipeline from PVC materials, since they are more frost-resistant;
- During the installation process, pipes are laid in the soil at a level that is below the freezing point.
Installation of a drain drain
The drain installation process begins with marking the hole on the floor. This is quite simple to do if you know exactly the location of the axis of the sewer pipe located in the underground. Usually the point - the center of the circle is marked when laying the drain floor in the bathhouse.
Using a jigsaw, a hole equal to the outer diameter of the body is cut according to the markings. The ladder should fit into the cutout with a small gap.
Next, using a chisel and a light hammer, or maybe a mallet, cut out a square for the mounting flange of the ladder. If the floorboards are thin, then it is better to do the work using a hand router, and only trim the corners with your hands.
Next, a waterproofing membrane is laid on the floor of the bathhouse; the size of the canvas should be chosen with a small margin, so that there is an overlap of 30-35 mm on the walls of the bathhouse.
Before laying the ladder, the canvas will need to be tensioned and secured with aluminum thresholds. Next, at the installation site, a hole with a diameter of 15 mm smaller than the cylindrical body of the ladder is cut out in the PVC film. The edges of the film are cut with straight cuts, treated with sealant and glued to the walls of the seat.
All that remains is to insert the outlet pipe into the sewer connecting flange, treat the edges of the drain system with sealant and install the housing in place.
Scheme
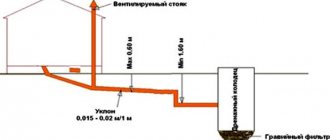
The system diagram is not difficult. In fact, it consists of an inclined pipe connecting the floor in the bathhouse with a storage tank. As a rule, a plastic (PVC) sewer pipe with a diameter of 110 mm is used for this (for a small bathhouse, a thinner pipe with a diameter of 50 mm can be installed).
It is necessary to purchase a red-colored pipe - it is intended for use outside the home, unlike gray, indoor pipes.
The outlet of the pipe from the room is usually connected to the drain point - a drain or drainage tray. Then they dig a trench where the pipe is laid. Its slope should not be too great - about 2 cm per 1 m of length. This is an important point, since if the slope is too large, layers of fat and mucus will begin to accumulate on the inner walls of the pipe, which sooner or later will lead to a complete blockage of its section.
The lower end of the pipe can be connected to the release point in different ways:
- to the sewer main;
- placed in a sealed storage container;
- discharged into a filtration well;
- connected to drainage pipes laid on the filtration field.
Drainage directly into the ground is rarely used, since suitable soil conditions are not available everywhere. Most often, drainage is organized in this way only from the steam room, where the volume of wastewater is relatively small.
The design option for the drainage system largely depends on the type of floor in the bathhouse.
There are three varieties in total:
wooden pouring floor
Water goes into the cracks between the flooring boards, where it falls on the loose soil and is absorbed into it, or it passes down a slope into the drain ladder and flows through a pipe to the discharge point;
wooden non-spill (solid) floor
This is a flooring without gaps, laid at a slight slope to the drain. Through it, water enters the drain pipe and passes to the discharge point;
concrete floor
This is a layer of screed with a slope towards the drain, which is connected to the outlet pipe.
There is no fundamental difference in the organization of drainage for all design options; only the method of discharge differs - directly into the ground, into the sewer system, or into a container. All options have their own characteristics, so they should be considered more carefully.
Pit
A small depression (about 60 cm) is made under the washing compartment or steam room, which is filled with a layer of filter backfill.
These can be materials of different types:
sand;
PGS;
broken brick;
crushed stone;
stone chips, etc.
The water is drained directly onto the floor, from where it falls onto the filter layer. Passing through it, the wastewater releases suspended particles and is then absorbed into the soil.
This method of drainage has a significant drawback - the bottom and walls of the pit quickly silt up and stop absorbing wastewater.
Therefore, many owners use a modified version - a pipe is removed from the pit, through which the waste flows into a container or other discharge point.
If necessary, this method can be used to reconstruct a flooded pit and restore an effective drainage system.
Drain tank
This is a method of drainage in which wastewater is drained into a sealed container. As it fills, a sewer truck is called and the waste water is pumped out. The type of floor is not of fundamental importance - it can be any version of a wooden or concrete floor with water discharge into a drain pipe.
The main condition is to make a nest in the ground and install a sealed tank in it. It must be at such a depth that the pipe is located at a given slope and enters the container at the highest point.
To do this, you will have to perform a geometric calculation and determine the depth of the nest.
Many users neglect this requirement, and as a result, they get a mismatch between the location of the container neck and the end of the pipe. When choosing a place to install a tank, it is necessary to provide for the possibility of access by sewage disposal equipment. This is an important point, since pumping will have to be done regularly. If you can’t fit the car, you will have to scoop out the overflowing container manually, which is time-consuming, difficult and very unpleasant.
Drainage well
This is a container without a bottom, in the lower part of which there is a layer of filter backfill (sand, expanded clay, crushed stone, stone or brick chips). Wastewater enters the well through a pipe, passes through the filter layer, leaving suspended particles of fat and detergents in it. After this, the water is absorbed into the soil.
Expert opinion
Lovkachev Boris Petrovich
Bath master who knows everything about steaming
An important condition is the composition of the soil layers. If there are clay layers on the site, the expected result will not be achieved. Clay is a good natural waterproofer and will not allow liquid to be absorbed. Therefore, when choosing this method of organizing drainage, you must first find out the composition of the soil.
In addition, it is necessary to find out at what depth the aquifer is located and whether it changes seasonally. If they occur regularly, you will have to choose a different type of drain system design.
From a design point of view, the drainage well and storage tank are almost identical. The whole difference is the absence of a bottom and the presence of a filter bed at the well. It is better to choose a place to install a well at the lowest point of the site (if possible), so that you do not have to dig a too deep nest.
Ground filtration
The filtration field is a layer of filter backfill about 0.5 m thick, into which drainage pipes are immersed. They are connected to a drain pipe and are needed to discharge wastewater over a large area - the field can be very spacious, up to 15-25 m2 or more. The larger the size, the easier it is for waste to be absorbed, since there is a small volume of water per unit area.
A special feature of this method is the small volume of excavation work. The pit for the filtration field, although large in area, is shallow and can be dug manually.
Drainage pipes are plastic pipelines perforated along the entire length, through which wastewater is discharged into the backfill layer. Next comes the initial cleaning of suspended matter and mucus, after which the water is absorbed into the soil for final purification.
A filtration field can only be created over a large area. This circumstance significantly limits the use of this method, leaving it for owners of large estates. However, they do not actively choose such methods, preferring septic tanks or local treatment plants.
Water seal for sauna sewer
There can be a lot of problems with the water drainage system. Most often it is necessary to redo or modify the existing drain for two reasons:
- The smell of sewage regularly appears in the bathhouse, which cannot be eliminated by ventilation and sanitary treatment;
- The bellows or drain does not have sufficient capacity, so the water in the bathhouse drains very slowly, which annoys both guests and especially the owners. Instead of relaxing after the steam room, you have to waste time and wait for the water to completely drain through the drainage system.
Sometimes attempts to speed up the flow of water using brushes or cable brushes lead to depressurization of the drain and even breakage of the bellows seal. Even if the water has gone, you still need to inspect the drain, otherwise the plug will occur with enviable frequency.
The main purpose of the water seal
The system for locking the outlet into the sewer is used primarily to reliably cut off the internal space of the outlet pipes from the bathhouse atmosphere. Otherwise, odors and gases released from the drains will easily break through into the washing and steam room of the bathhouse.
The second purpose of the drain valve is to block wastewater discharged into the sewer. A bellows or any other type of valve locks dirty water and prevents it from rising into the bathhouse through the drain hole in the floor.
How to equip a good water source?
An important question is where to get water for the bath. Of course, the ideal source for it is a limestone well, called an artesian well. But the price that workers charge for drilling it discourages many bathhouse attendants from even going into the steamy water at all.
There are also sand wells - but they are often too sandy and require serious filters. This point is also alarming - if the territory itself is radon-bearing, which cannot be checked by eye, then the water from it will contain a large amount of radioactive soil gas radon. That is why the best option is an ordinary well, for which you can find water using a frame.
Once water is found, you can do test drilling and dig a well.
It is only important to purchase the “correct” rings - with a tongue-and-groove system that are attached to each other. This will prevent possible horizontal displacement of the rings
It would be good if the rings were additionally tied together with special metal brackets. And so that the upstream veins cannot get inside, when laying between the rings, it is advisable to make a seam from a special rubber tape such as RubberElast. In extreme cases, a cable - foam, jute or linen - is suitable. But you can’t lubricate it with bitumen - it’s harmful, liquid glass is a waste, and only the quick-hardening mixture Plitonit Aquabarrier is suitable.
At the bottom of such a well you need to make a bottom filter - from crushed stone, stones and geotextiles.
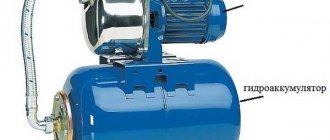
The resulting space around the well should be filled not with earth, but with sand - it will drain water from the walls and thereby reduce frost heaving. It wouldn't hurt to insulate the well - at least with the same extruded foam, which doesn't produce crumbs. And the top of the well must be covered - with a steel or plastic lid - so that leaves do not fall into it and then the entire water supply system of the bathhouse does not become clogged, and there is no need to replace a burnt-out pumping station.
The water itself will be taken from the well by the outlet pipe - it is important to make its entrance completely sealed. But not with bitumen mastic - it will pollute the water and cause a tarnished color to appear on it.
Waterproofing needs to be done in multiple layers - with silicone, cement mortar, liquid glass and Kiilto fiber rubber.
Here's how it's done: a layer of silicone is placed on the hole in the ring and plastered with a mixture of waterproof and frost-resistant tile adhesive. When it dries, a layer of fiber rubber is applied - it is usually used for waterproofing showers. Once it dries, apply another, thicker layer. And after that, plastering again with a mixture of tile adhesive and liquid glass. The next day, all this is coated with blue clay and polystyrene foam is laid, followed by loam. And all these manipulations are carried out both from the inside and from the outside.
Water seal for a bath: types
Unlike conventional bathrooms and showers, baths use drains with increased capacity. That is, the size of the drain receiving grid is usually 100x100 m or even more, instead of the standard 60x60 mm. In this way, it is possible to ensure normal operation of the drain even with a large amount of soap and dirt residues.
In addition, you have to take into account the size of the bathhouse, the design of its floors and the frequency of use. Therefore, several water seal schemes are used for the drainage device:
- Classic bellows with U-shaped elbow;
- Pendulum or dry shutter;
- Float type of shutter;
- Controlled or transom drain option.
The first and third types of water seals are classified as “wet” types of devices; for their normal operation, the presence of a sufficient amount of water in the system is extremely important. The second and fourth are classified as “dry” devices; they work equally well in baths, both under normal conditions and when there is a lack of water in the drain chamber.
Water supply for winter and summer baths
Winter and summer water supply for a bathhouse have their differences. Providing water in the summer does not require deep burying of pipes. 80-160 cm is enough. When laying pipes, it is necessary to ensure that there is a mandatory slope towards the well so that no water remains in the system in winter.
The winter water supply of the bathhouse has a complicated design:
- First you need to determine the source of water, dig a well or borehole;
- Lay the “street” part of the water supply system, burying the pipes below the freezing point of the ground and insulating them;
- Install water supply devices (pump or station). It is advisable to install a water purification filter;
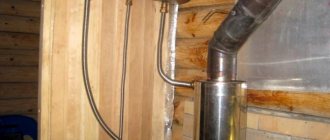
- Arrange the pipework inside the bathhouse, first assembling the vertical parts, then the horizontal ones;
- Connect all necessary devices to the pipeline and check the functionality of the system.
Just like summer, winter water supply for a bathhouse requires the mandatory arrangement of a drainage system. Water should not remain in the valves or check valves, otherwise they may become deformed at low temperatures.
Wet valves
If you choose a water seal for a bathhouse based on the efficiency of locking, then the best option would be a hydraulic circuit with a curved U-elbow, or an annular chamber with a concentric partition.
Eternal knee
A water seal in the form of an elbow requires a free space of at least 150 mm in height for pipes with a diameter of 50 mm and an overhang of 250-300 mm for a full drain with a cross-section of 100 mm. Therefore, knee bellows are used primarily for bathhouse projects on stilts or columnar foundations. To reliably lock the pipe, the height of the water column must be at least one and a half diameters of the channel.
The main advantage of a water seal is its simplicity of design; it is quite possible to make such a siphon for a bathhouse with your own hands from parts of sewer fittings and pipes. It turns out not as beautiful as industrially made drains, but for a bathhouse it is more important that the structure is easy to repair and simple to maintain. The knee can be easily cleaned, either with a brush or with specialized attachments, rotating brushes and even chemicals such as “Mole”.
Comparison with a water seal
Siphons with a water seal are a traditional solution, but in some aspects they are inferior to their dry counterparts . The devices function in different ways: in a wet shutter, water acts as a barrier against odors. However, the water may freeze or evaporate , leaving the door open for sewer odors to enter the room. This is a significant disadvantage of devices that dry valves do not have. They work on the "nipple" principle.
There is a damper inside that acts as a check valve . As a result, such a gate also performs regulatory work, i.e. prevents wastewater from moving in the opposite direction. A dry shutter is more functional; it can work either independently or in tandem with a hydraulic one. Dry valves are easier to install and operate, compact, and durable.
Dry water seal for a bath
Until recently, for most summer residents there was a problem of how to dry the drain in winter, and thereby preserve the pipes and shutter of the bathhouse during the period of frost. Most often, water was simply drained from the water seal elbow through an additional fitting. The solution to the problem was to use a dry shutter for the bath.
Pendulum or leaf shutter mechanism
The design of a dry water seal differs from the ladder or float version only in the presence of two plastic curtains suspended above the outlet window on a pendulum suspension.
The petals do not create obstacles to the flow of water moving from the bathhouse through the window into the sewer pipe. In the opposite direction, the mass of water presses the curtain against the window and blocks it. As a result, the internal cavity remains dry and impermeable to gases from the sewer system.
Controlled type of water seal
Used in bathhouses not connected to a centralized sewerage system. The design of the water seal is almost identical to the drain drain design. The only significant addition is the presence of a controlled valve. At the top of the grille there is a ring, by clicking on which you can snap a ring petal that covers the window into the drain pipe.
In this case, the water is drained directly into a container for collecting dirty water. After completing the procedures, the water seal opens or closes, depending on whether the bathhouse needs to be dried or not.
In this case, the waste collection container can be equipped with an improvised valve according to the diagram below.
It was on this principle that drainage pipes were installed in the Sandunovo steam rooms and baths in the last century.
For example, if a bathhouse is used all year round, then in winter a wet-type water seal can cause failure of the drain and the receiving flank of the sewer pipe. Dry transoms for a bathhouse turn out to be too capricious. The controlled drain option requires no worries at all. Even in winter, after a bath, there is no need to blow out and dry the drainage part. It is enough to open the valve and leave it to dry until your next visit to the bathhouse.
Heated tanks and barrels
Barrel with a heater for a shower You can heat water for a shower in two ways: add water heated in the kitchen until the temperature is as you need; install directly into the container a heating system similar to that used in boilers, or use solar energy. A heated barrel is best suited for a country shower, since the water warms up more evenly in it.
Advantages of a heated shower barrel for a dacha:
- There is no need to heat water in the kitchen and then carry it into a container;
- There is no need to hope for sunny days when the water will heat up just by standing in the sun;
- The water temperature will always be exactly what you need, even in bad weather;
- Nowadays, you can even buy a plastic heated shower tank, so you don't have to limit yourself to just expensive steel tanks.
The disadvantages of such a barrel for a summer shower are the following:
- If there is no thermal insulation, and it is windy or cool outside, the tank will give off heat very quickly, causing electricity consumption to increase significantly;
- Thermal insulation must be installed. This is not difficult to implement, but will require certain financial investments, since finished insulation will require protection from the environment;
- The heater will require quite expensive solar panels or an electrical network;
- It is necessary to monitor the water level in the barrel, since the heating elements may fail when running idle. As a counterbalance, you can suggest using a pump that can maintain a given water level.
A heated tank for a country shower can be equipped with several systems that will find their application in different situations:
Diagram of operation of a vacuum solar collector
The most expensive and effective way would be to install solar panels (solar collector). Heating will occur using vacuum tubes, and the most important advantage is that the water can be heated at any ambient temperature. The best part is that there is no need for direct sunlight. Even in cloudy weather you will get enough energy. It can also be noted that in winter, solar panels can be used to generate electrical energy, for example, to operate a laptop, charge a phone, household appliances, and so on.
The second option is to use a heating element. Essentially, this is the same as in conventional home boilers. And for its operation, it also requires an electrical network, for which you will have to install high-quality wiring and provide protection against interruptions. Also, as already written in the disadvantages, it is necessary that there is always a certain level of water in the barrel with the heating element for the shower. To do this, you should either use a pump or connect to a water supply. Otherwise, the heating element will simply burn out. As an alternative, there are special immersion systems that will heat the water only at a certain level, otherwise they simply turn off.
It should be noted that there is also the possibility of making a shower barrel for the dacha with your own hands, using other heating options, for example, a storage water heater, but here everything depends on the knowledge and desire of the owner.
How to make a water seal for sewerage in a bathhouse
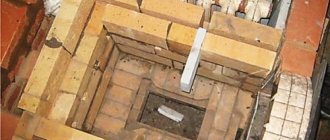
The transom “wet” version of the shutter is considered the easiest to install. First, before the floor equipment, it is necessary to lay a 100 mm sewer pipe with a swivel angle. The upper edge of the corner should be located 20 mm below the level of the concrete screed.
The inlet hole is closed with a plastic plug, in the center of which a weaving nail is installed. After pouring the screed, the nail will help to correctly mark the contours of the future hole for water drainage equipment on the bathhouse floor.
After the base screed of the bathhouse floor has completely hardened, it is necessary to level the hole and give the edges even, rounded shapes. This can be done using a grinder and a stone disc with a diameter of 125 mm. You have to cut not in the radial direction, but in the axial direction, that is, with the entire edge of the disk at the same time.
Next, all that remains is to install the water seal body, cap and external drain grate.
The simplest version of a bolt with an elbow can be made from four plastic corners connected to each other in a U-shaped structure. The only thing that needs to be done is to glue the sealing collars with sanitary sealant, otherwise the structure will very quickly split into two parts.
How does a heat exchanger installed in a sauna stove work?
The design of a furnace with a heat exchanger has proven itself so well that various heat removal design options have emerged, with varying degrees of efficiency. The most common:
Built-in flat-plate heat exchanger (similar to two hollow plates connected to each other).
Samovar heat exchanger installed on a chimney.
The possibility of heating the bathhouse from a stove with a water circuit - in fact, a metal stove becomes a kind of heating boiler. During combustion, enough heat is released to warm up the coolant and heat the required volume of hot water.
The operating principle depends on the device used. Efficiency is determined by several parameters:
Possibility of operation without the use of a heat exchanger.
According to their design, all water heating devices can be divided into built-in and built-on (samovar type).
Built-in heat exchanger
Stoves for baths with a water circuit for heating and DHW needs began to appear after conventional water heat generators received good reviews. According to their design, furnace equipment with an integrated water heating circuit is divided into several classes:
- The coil is the simplest device used in classic solid fuel boilers. Inside the structure there is a bent metal tube. The shape is different and depends on the internal design of the furnace. The coil is positioned so that the flame does not directly affect it, and heating is carried out through flue gases.
A flat heat exchanger is a more complex device compared to the previous one. A flat heat exchanger for a sauna stove looks like two hollow plates connected to each other. In terms of thermal efficiency, the design is superior to the coil and is used in modern models of furnace equipment.
Built-in tank - a separate container is made in the furnace and installed on top of the combustion chamber. The built-in horizontal heat exchanger heats up quickly and maintains temperature while the oven remains hot.
Water jacket - represents the cavity surrounding the entire combustion chamber and smoke channels. The design is often used in the production of solid fuel boilers, but is not widely used in the manufacture of sauna stoves.
The operating principle of the integrated heat exchanger in a sauna stove is as follows. The spiral or plate is heated by flue gases, the temperature of which reaches 450-500°C. When heated, pressure arises, forcing the coolant to circulate in the heating system. In schemes where an indirect heating boiler is used, the hot water supply is heated using heating heat.
Samovar type
Installing a heat exchanger on a sauna stove is a budget solution to the problem of hot water supply and heating. The water heating device is manufactured in two ways:
- Coil - a coil made of aluminum or copper is installed on the chimney pipe. For systems with natural circulation, up to a storage tank or water distribution taps, the dimensions of the coil should not exceed 3 m. The optimal dimensions of a heat exchanger with forced circulation are 5 m.
The design of a samovar-type heat exchanger - experts agree that this particular design is optimally suited for a bathhouse. Hot water for showering is prepared gradually, preventing the liquid from boiling.
The movement of water in a samovar-type heat exchanger occurs according to natural physical laws. The heated liquid rises, creating pressure in the container.
The optimal volume of a samovar-type heat exchanger is selected so that the water reaches the required temperature after 2-3 hours of intense combustion. The design is optimal for providing hot water supply.
Reasons for water seal failure
Often in bathhouses connected to a central sewer, an unpleasant phenomenon occurs such as squeezing out the water seal. The liquid from the water seal can either be squeezed out into the steam room or washing room, or discharged into the sewer pipe.
In both cases, the reason for the release of the water seal is the lack of ventilation of the sewer lines. Excessive pressure inside the pipes squeezes out the contents, and if a large amount of water is discharged into the sewer near the drain point, the water seal, especially the transom seal, can easily be left without liquid in the bellows.
Device and principle of operation
Hydraulic valves are a device with a bend in the shape of the letter U. One end of it is connected to the drain hole, and the other is cut into the sewer at a right or acute angle.
Structurally, the rounded part of the pipe is located below the drain and tie-in into the sewer.
The action of the law of communicating vessels forces part of the drained water (hydraulic seal) to always remain at the bend and cuts off the access of odors from the sewer to the indoor air: toilet, kitchen, bathroom.
The water seal device can be located in a deep glass. The drain pipe enters it from above, and the spout into the sewer is located on the side above the bottom. The principle of operation of this design is the same as that of a siphon - protecting premises from unpleasant odors by creating a barrier of water.
Since waste water is constantly drained, the water seal fluid does not have time to stagnate. The disadvantage of water protection appears during prolonged inactivity of the drain. During this time, the water may evaporate, and an unpleasant odor will penetrate into the apartment.
In addition, the vacuum created by the liquid flowing through the riser can suck water out of the siphon. To eliminate this phenomenon, it is necessary to supply the sewer with a drain pipe or a vacuum valve.