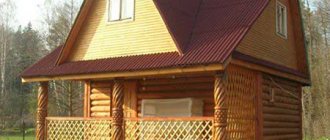
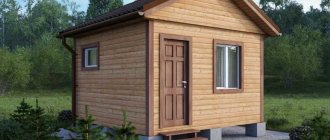
A spacious and roomy bathhouse with a gazebo or a spacious attic is the dream of many, but there is not always enough space to accommodate such a building. If you cannot boast of a large plot of land, this does not mean that you will have to give up building a place to relax; the best option in this case would be a 3 by 3 bathhouse project.
Bathhouse layout 3 by 3 meters
So, you have a small log house measuring 3 by 3 meters. How to place everything in a bathhouse on an area of 9 square meters so that it is convenient to take bath procedures.
Let's start with safety, namely with the placement of the sauna stove. Several layout diagrams show that the stove is located in the corner closest to the entrance.
In this case, naturally, you need to protect 2 walls of the sauna log house at once. In such small sizes, there is no need to install brick walls with an air gap around the sauna stove - every centimeter counts.
It is better to use sheet mineralite, which, of course, should be mounted with an air gap from the wall.
When a 3 by 3 bathhouse is planned, the interior layout, photos and other information can be taken from a larger bathhouse, but with a proportional reduction.
For example, how to place shelves in such a small bathhouse? It is best to place it against the wall opposite the entrance and the installed sauna stove.
What types of wood are best for a sauna?
Whatever type of wood you choose, it is still better to additionally treat timber and logs with special means - against parasites and for fire safety.
Wood is used for both exterior and interior decoration. But rocks rich in resins cannot be used inside. The most popular on the market now are coniferous and some deciduous. Which breed to choose for a sauna? https://youtube.com/watch?v=hjiaG0KCe50
Pine and spruce - only for exterior decoration
For example, pine is one of the most popular wood species. It has strength and flexibility, does not change its size too much under the influence of moisture and when dried, and its low price makes it attractive to the consumer. But it is not suitable for building a steam room. Over time, parasites can develop in it; the presence of a large amount of essential oils can cause suffocation under the influence of steam and high temperature. In addition, pine rots quite quickly, and the released resin causes serious burns.
Therefore, if you want to fill your bathhouse with a pine aroma, use such wood strictly for exterior decoration. The situation is the same with spruce. It smells very nice, but the rich amount of resins makes it impossible to use it directly in the steam room itself. If spruce or pine is used for exterior decoration, the inner surface of the walls must be laid with a vapor barrier and lined.
Larch - health benefits
This type of wood is known for its beneficial effects on the human body: inhaling its vapors improves the functioning of the cardiovascular and nervous systems. Dried larch becomes very hard and durable, and there are practically no parasites in it. However, it is also rich in resins, like other conifers.
Therefore, when arranging a bathhouse made of such material, special attention should be paid to the tightness of the steam room.
Cedar is beautiful, but expensive
As a material for building a bathhouse, it is beautiful in all respects. It is durable, resistant to parasites, does not bend, does not shrink or swell, it contains few resins, and it has a healing effect. However, it has one significant drawback - its high cost.
In addition, cedar is a rare plant, so cutting it down is prohibited. As a rule, it comes on sale from fires or obtained as a result of illegal logging
If you take into account that a 3 by 3 meter bathhouse is your first building of this kind, then it is not recommended to purchase such expensive material for it
Oak - difficulties to use
This is expensive wood, which also should not be used when building a bathhouse for the first time. Firstly, difficulties will arise already at the stage of preparing the foundation. Oak itself is heavy, so you will have to make a major foundation. Secondly, oak logs tend to dry out in hot climates. In order not to be offended by the time and money spent, it is recommended to use more accessible breeds.
Linden and aspen are the best options
These tree species are not so expensive, they are durable and easy to work with. Linden wood, when properly dried, does not shrink, so the sauna can be used immediately after completion of work. A sauna made of such wood quickly warms up, so fuel consumption is reduced.
Where to place the washing compartment in a 3 by 3 bath
Next, how can you place a washing compartment in such a bath?
The only reasonable option is to combine the washing compartment and the steam compartment. Because even if you allocate a 2 by 2 meter “cube” for the steam room, you will be left with an “appendix” only 1 meter wide.
It will be impossible to wash in such an uncomfortable room. Of course, unless you add a 2 by 3 or 3 by 3 frame insulated extension to the 3 by 3 log house, where you can arrange a washing compartment.
Or, just like that, divide the room 3 by 3 into 4 parts at once - a steam room, a shower room, a relaxation room and a furnace room. Well, at least the porch is separate, and then go ahead.
Peculiarities
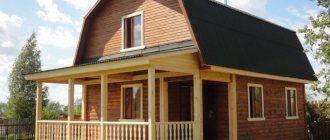
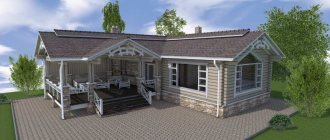
A 3 by 4 bathhouse has many advantages, the main one of which is compactness. Such a building can easily fit even in the smallest area, while it will not lose its functionality and will be easy to use, this is its peculiarity. The advantages of a 3x4 bathhouse also include huge savings on the purchase of building materials, and it can be built with your own hands quickly and easily. As a rule, bathhouse designs of 3 by 4 meters are chosen for summer cottages; they are excellent for families consisting of 4 people.
Before starting the construction of such a structure, you should choose the right location on the site and prepare all the necessary communications. It is recommended to place a home steam room on a hill 8–10 m from residential buildings, 10–12 m from the road, 2–3 m from a neighbor’s fence and away from the toilet and compost pit (at a distance of 20 to 30 m). A 3x4 bathhouse can consist of the following blocks: a relaxation room, a bathroom, a dressing room, a shower room and the steam room itself. Most often, logs are used for buildings of this type, but if you study the overview of popular projects, you can also find options made from materials such as blocks and bricks.
Project options for a small bathhouse
Before creating a project, you need to decide: why you need a bathhouse, how many people can be in it at the same time. But what to do when building planning is limited by the capabilities of a small area?
If your site or its topography does not allow you to choose a room for a large bathhouse, then a 3 by 3 bathhouse will be the most successful solution to this problem.
Of course, with such a shortage of space, you will not be able to connect a steam room, washing room, locker room with a relaxation room. But the solution would be a columnar foundation and a roof with a three-meter offset with the connection of a small frame structure.
Ready-made examples
Today there are many interesting projects in which you can build a 3x4 meter bathhouse with your own hands. Standard designs for such steam rooms include three main rooms: a shower room (1.81 m2), a steam room (3.33 m2) and a relaxation room (5.04 m2). If desired, you can create individual projects, complementing the bathhouse with other rooms.
Classic bath. It is conventionally divided into two rooms: a dressing room (equipped with a door, a large window and has a length of 3 m, a width of 2 m), a washing room (1 * 2 meters) with a steam room (* 22 meters). To build such a bathhouse, you should choose chopped logs. Due to the fact that the steam room will have a square shape, this will allow you to rationally arrange its space. In one of the corners of the steam room (near the wall adjacent to the dressing room) you need to install a stove, and in the wash room you need to allocate space for a small toilet and a shower with a partition.
Construction of a bathhouse measuring 3 by 4 in the video below.
Projects for 3-4 people
- with a veranda (photo);
- with a rest room (photo);
- without a veranda and a relaxation room, but with an enlarged steam room (photo).
By covering such a frame base, you can create additional space. The new space will serve as a lounge during the summer months and will serve as a locker room in the winter. So, you will achieve the most important condition for a comfortable layout, which should include the main rooms: a steam room, a locker room and a washing room.
As an option, you can leave an additional building as a veranda or open terrace.
Bathhouse project for 2-3 people
One of the bathhouse planning projects could be a combination of a steam room and a washing room (photo), which will occupy 4 square meters. 2-3 people can take a steam bath in such a bathhouse.
Baths should be built for 2-3 people, because they not only wash, but also communicate. It will be safer for two or three people to steam, as people look after each other’s well-being.
It is impossible to wash or steam in a room 1.5 meters away; it turns out not to be a bathhouse, but a closet. You cannot install shelves in such a steam room; you will have to steam while sitting.
Therefore, the best option would be to combine a small steam room with a washing room.
- Combining a steam room and a washing room, however, is completely inconvenient, since the air humidity will be high and the air temperature will be lower, for example, than in a bathhouse with separate rooms. You will have to comply with inconvenient conditions: first, everyone will take a steam bath, and after ventilating the room, everyone will wash.
- You will have to completely abandon the combined shower option and try not to splash water. Otherwise, a huge amount of steam can have a bad effect on the well-being of even a healthy person.
- The advantage of small baths is the rapid heating of the room and the possibility of independent construction without the involvement of specialist masons.
- This room can be heated with a metal stove, since there is no possibility of a small area for installing a stove - a heater.
Bath stove
The classic version of the Russian stove - a heater - would be inappropriate for a small room. There are other specific requirements for heating in mini-baths: on the one hand, a stove for a 3 by 3 bath should take up little space and heat up quickly, on the other hand, it should heat all the rooms of the bath.
The stove is installed in such a way that it opens into all rooms: the stones are placed in the steam room, and the combustion process is carried out in the washing room.
Advice! For small baths, metal stoves are suitable (photo). Such heating devices can be installed on any surface, even wood. The weight of metal stoves is small, does not exceed 200 kg, they do not need to be modified, they are completely ready for installation.
Projects
If the building is built without an additional second floor or attic, then usually 4 or 5 m2 are allocated for the steam room, 2 m2 for the sink, and 2-3 m2 for the dressing room. With this approach, a rest room is made from the dressing room. All this, of course, is purely individual, but practice shows that this is the optimal distribution of area.
Mini-sauna structures take up little space, which is especially important for a summer residence. But they look homely, warm and cozy.
There is enough space in the dressing room for a table and a bench, and if you make a folding table, this will greatly facilitate cleaning and lighting the stove. The design with an attic allows you to create a relaxation room upstairs, but if the design plan includes a veranda, then this is a great place for drinking tea with the whole family.
The attic can be used as a utility room for storing prepared brooms, bath items, and tools.
- A structure that is planned to be used only in the spring and summer can be made frame, with one layer of insulation. A bathhouse that will be used all year round should be warm, made of timber or logs. The square shape is convenient because it can be attached to the house or it can be advantageously played up by its location on the site, for example, by planting it with fruit trees.
- Many people associate a bathhouse not only with a place for washing, but also with a pleasant conversation after the procedures. In this case, the size of the dressing room can be increased by combining the steam room with a washing room, then there will be only two rooms in the bathhouse. This is directly a steam room-washing room and a dressing room, combined with a boiler room where the furnace firebox will be located.
- So that users do not have to sit next to the stove, it is best to place the firebox near the door. The entrance door should not be in a corner, but in the center of the building or at the end of the first third of the length. In this case, the firebox will be located near the doorway, and the entire dressing room will be free.
- If the steam room combined with a sink occupies 4 m2, then the dressing room will also get 4 square meters, and this already significantly increases the space. This is quite enough for a pleasant and comfortable pastime. In this case, you can even put a sofa. As a rule, 3 by 3 meter bath designs do not include windows: for such a small room they are not necessary, but sometimes small windows are inserted. In summer, you can greatly increase the area for relaxation by using a veranda or terrace.
- It is very important to consider the ventilation system; it requires no less attention than a sauna stove. Properly arranged ventilation will ensure the distribution of thermal conditions and help timely drying of the premises, which is important. In a bathhouse without ventilation or with poor air circulation, mold and mildew may soon appear.
- The entire load falls on the stove-heater, through which air is taken in. Discharge occurs through the chimney. The main condition for ventilation is equal inflow and outflow of air. When arranging it, you must remember that the air must flow from the rooms in which people are located to the utility rooms.
- The ventilation grille must be at a height of at least 200 cm from the ground surface. Bath experts advise using forced and natural ventilation in the dressing room, arguing that this dramatically increases the efficiency of the process.
- It is believed that the air exchange should be threefold. If the volume of the room is 4 m3, then 12 m3 of fresh air should be supplied in one hour.
Important points
Construction of a tiny steam room: to save or not to save?
Where does the construction of a steam room begin? The first stage is drawing up a project. Of course, it is quite difficult to recreate a masterpiece on paper on your own, so it is advisable to entrust this entertaining process to masters of their craft. Of course, you need to sketch out a sketch so that the specialist understands what you want.
As practice shows, when drawing up a project, every owner of a small plot of land wants to save precious meters and money. In view of this, I consider it not only relevant, but also useful information that allows you to understand what you can save on and what you can’t.
Remember, dear friends, no savings are worth your health, property and, of course, life. Treat the issue of saving wisely.
- Materials of questionable origin. The seller is crucifying himself, praising the product of a “domestic” manufacturer, proudly called ala “The Drunken Neighbor,” operating in a dilapidated basement? Run! And, he claims that it is made using modern raw materials and innovative technologies? And also, probably, he says that there is no difference, there is simply no promotion for a big name, etc.? So, dear readers, remember once and for all, never buy such products, as they can cause irreparable harm to your health.
- Materials not intended for the construction of steam rooms. It's no secret that a bathhouse is a structure where high temperature and humidity reign. Therefore, not all building materials, which, for example, are suitable for the construction of a particular object, can be used to build a steam room. Yes, raw materials intended specifically for a bathhouse are much more expensive, but they have the necessary characteristics that will allow the structure to last for decades and increase the benefits of bathing procedures.
- Hand-made electrical appliances. Did someone tell you that Vanya-Petya makes water heaters, stoves and other devices almost free of charge? Have you, by any chance, heard how many bathhouses burned down and people died because of such “craftsmen”? Same thing. But, of course, there are always amazing masters whose work you appreciate and praise.
- Self-taught masters. Do you want the bathhouse to fall apart in a year or two? Take advantage. I don’t argue that among them there are also builders from God, but, alas, there are only a few of them.
Thus, dear friends, be extremely careful! Do you want to save money? Reduce costs on square meters of construction, but not on specialists, building materials and interior items.
Video: Bathhouse 3 by 3 Classic Russian bathhouse in Kazan
Materials
Any material that is most available in the area where the building will be erected is suitable for construction. In Siberia, it may be cheaper to order logs from nearby sawmills. In steppe regions, buildings made of foam blocks are in great demand.
In the southern regions, bathhouses are made of frames, filling the interior space with clay mixed with straw. But, of course, nothing compares to a wooden structure.
A frame bathhouse is placed on a strip foundation; 100x100 cm timber is used for the building material. A log bathhouse is a classic of Russian architecture. The logs must first lie down and dry; during construction, insulation is used, for example, forest moss. It is difficult to lift a log house on your own; additional workers will be needed.
An excellent option is a rounded log. Beauty and quality speak for themselves. The big advantage is the absence of the need for external and internal finishing. Construction from profiled or laminated timber is the most successful option, but its cost is higher than from logs.
Profiled timber does not require additional insulation, since the grooves tightly close the surfaces, preventing heat leakage.
They also build baths from brick, but this requires special knowledge. An inexperienced builder will not be able to build a brick box efficiently and beautifully. The box itself turns out to be heavy, so the foundation is reinforced with reinforcement.
Materials
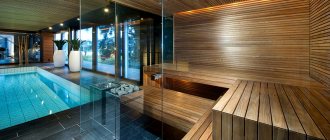
You can build a bathhouse from natural timber if your budget allows you to spend money on the material itself, on insulation, and protection. It withstands dry heat and wet steam, and temperature changes well. But it requires periodic processing. There is an opinion that in a wooden steam room a person receives the greatest benefit from a bath. Especially if coniferous species and cedar materials were used in construction.
Building from timber is not always the best solution. If these are rounded logs, they will take up a lot of space, you will have to look for another material for internal partitions and skillfully combine it with the main one. Paint and varnish coatings are also not always applicable; both high humidity and intense heating must be taken into account. You can install a ready-made log house, but it is expensive. It is difficult to build a bathhouse from timber yourself; you need skills in working with wood and tools, fitting and calculating shrinkage.
A more durable alternative is brick. It is resistant to fire, moisture and does not require periodic treatment with protective compounds. You can choose to make the partitions thicker or thinner, while saving space. Such a bath will last much longer. If wooden buildings need repairs after 6-8 years, then brick begins to wear out 5 years later on average. One of the important disadvantages of this material is its weight. This type of bathhouse can only be built on a foundation.
Instead of bricks, you can use foam concrete blocks, polystyrene or expanded clay. All of them are lightweight and have low thermal conductivity. The sauna will keep the heat for a long time. The risk of fire is also low. There is no need for a complex, expensive foundation. The most convenient material will be blocks. Large, with precise dimensions, they are suitable for quick self-construction
Attention will need to be paid to protecting these materials from moisture and finishing. Their aesthetic properties are noticeably lower than those of brick or wood, so additional work cannot be done without
But you will have to use moisture-proof, non-toxic and not too massive materials. And this significantly limits the choice.
3 by 3 bathhouse project: pros and cons
Modern bath buildings include several rooms, although previously one was enough. Separate rooms can be: washing room, shower room, swimming pool, dressing room, billiard area, locker room, vestibule, etc.
However, it is difficult to implement all the ideas in a small area, so you should think through everything carefully and select the most important aspects. Let's look at the advantages and disadvantages of small buildings.
pros
- Savings on building materials for both interior decoration and foundation construction;
- Less time is spent on the construction of a bathhouse;
- The area is enough even to organize a small recreation room;
- If desired, you can build a veranda or terrace for tea drinking;
- Suitable for small summer cottages;
- To heat a bath you will need the simplest and most inexpensive equipment.
Minuses
- The bathhouse is designed for at least 2-3 people at a time;
- Only a one-story structure can be erected;
- Additional wall insulation may be required if the bathhouse is separate from the residential building and is not an extension.
Typically, linden, cedar or aspen are used for the interior decoration of a 3 by 3 bathhouse. The building is erected from profile timber, logs, lining and log houses, as well as expanded clay, brick and massive blocks. However, it is believed that objects made from timber are of the highest quality and are not subject to shrinkage over time.
To visually expand the space, they resort to building a small veranda. By increasing the useful area in this way, you can organize yourself an additional place to relax.
Baths can be of different types:
- Buildings that are heated by dry steam. In this case, the temperature can reach from 60 to 120 degrees. However, the premises are characterized by low humidity - up to 25%;
- Damp bath rooms with temperatures up to 60 degrees and high humidity levels;
- Hot water baths.
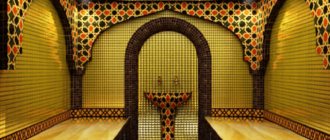
Today there are Roman, Irish, Russian, Finnish baths, ofuros and hammams. Let's consider each type separately:
- Russians are the most common type of bath buildings, implying the presence of a dressing room, washing room and steam room with a large stove;
- Irish - baths of 5 rooms, which are connected to each other by a common corridor in the middle;
- Roman - include 5 separate rooms connected by adjacent walls: a dressing room, a warm, hot and steam room, as well as a unloading room with a lower temperature;
- Finnish are traditional saunas. Consist of one room with low humidity and hot steam;
- Hammam is a Turkish water bath, suitable for people who do not like too high temperatures. The interior layout includes a pool with hot water and several more tanks with cooler water;
- Ofuro - or Japanese baths in the form of a barrel with hot water and herbal infusions.
The area around the bathhouse on the site can be decorated in various ways: plant a beautiful hedge, shrubs, lay out a rock garden, alpine slide or flower garden. It is not recommended to build a sauna house close to a barn or garage to avoid fire.
Selection of oven
For such a structure, you need a stove that is not too large and powerful, preferably with a temperature regulator. This will be useful for both a combined layout and a separate one. Outdated options with an uncovered metal tank are not suitable. There is not too much free space in the steam room and in the wash room, which increases the risk of injuries and burns. It is advisable to protect the heating elements with wooden slats or other materials with not too high thermal conductivity.
On a note!
Electric or infrared heating would be a good solution for a small sauna, but only if the owners like the dry air characteristic of a traditional sauna.
For a separate layout, stoves made of brick and having a separate elongated water tank are better suited. The structure can be installed at the junction of two or three rooms at once. The larger the firebox area, the more evenly all rooms will warm up. But you will need a temperature regulator. An alternative is to install the stove exclusively in the steam room and remove the hot water tank to the washroom and relaxation area. At the same time, less heat will be released in the “cold” zones. But the problem arises of arranging sufficient circulation of hot water if the tank has a large volume.
When choosing a stove, you need to take into account not only the area of the house, but also the seasonality of using the bathhouse and the height of the ceilings. If the owners like to steam in winter, it is worthwhile, in addition to the main stove, to provide a system of heated floors in the relaxation room and wash room. As a rule, even with a foundation, the coatings remain very cold.
Nuances of the internal layout of the bathhouse
Location of window and door openings
There are a huge number of options for planning a bath. However, the most common (especially for 3x3 baths) is:
- the entrance door is located on the south side - the snow melts much earlier and there are much fewer snowdrifts;
- the window openings are located on the western side - the light that is formed due to the setting sun illuminates the steam room inside, and this allows you to save on electricity.
Some, when building miniature baths, refuse windows, but this is wrong, since they are needed not so much for lighting as for ventilating the steam room. There is no need to make large huge openings. A window in a steam room measuring 40×40 cm is ideal. In addition, a window opening in the washroom is appropriate. And also the canvas can be arranged in the vestibule, that is, in the dressing room.
Of course, you can do things differently. The example given is just a frequently encountered option. You can create something exclusive!
Necessary premises in the bathhouse
A few decades ago, a bathhouse was a one-room building, but today a steam room is a real work of art with a bunch of rooms for one purpose or another. Of course, you can’t walk around in a bathhouse measuring 3x3 m, but it’s quite possible to equip a vestibule, a sink and a steam room. For a compact cottage, a “modest” but beautiful bathhouse is an ideal option.
Waiting room
If the health resort is used not only in the warm, but also in the cold season, the presence of a vestibule is mandatory. It plays the role of a buffer zone, as it does not let cold air into other rooms. It can be arranged inside or attached outside. Do you think this is impossible to do?
Look:
- dressing room size – 1.5 m;
- steam room size – 2.0 m;
- washing room size – 2.5 m;
- terrace size – 1.5 m.
- Total area – 7.5 m2.
The dressing room decoration includes hooks for clothes, a bench and a shoe stand. The “outfit” of the steam room is shelves and a stand. The “dress” of the shower is the tray, sink and towel hooks. The “suit” of the terrace is a wicker table and a pair of compact chairs.
Sink and steam room
The washroom and steam room are two vital rooms in the bathhouse. There is still debate about whether these premises can be combined. However, bath gourmets are confident that without a separate washing room, a “house of cleanliness” simply cannot function normally. In principle, you need to focus on personal preferences, since as many people there are as many opinions. Here, dear friends, look at two popular projects:
- vestibule size – 1.5 m;
- steam room size – 2.0 m;
- washing room size – 2.5 m;
- the size of the rest room is 2.0 m.
- Total area – 8 m2.
In the vestibule, items are appropriate - a hanger, chairs, a shoe stand, in the steam room - shelves, in the washing room - towel hooks, a compact cubicle, and in the rest room - a miniature table, a corner sofa, a mirror (a mirrored wall is appropriate) and a TV.
If you want to combine rooms, you can use the project:
- vestibule size – 1.5 m;
- washing and steam room size – 4.5 m;
- terrace size – 2.0 m;
- Total area – 8 m2.
In the vestibule you can put a pouffe and a hanger on a thin leg, in the washing room and steam room - a font or barrel, shelves, on the terrace - a barbecue, a table and a bench.
The above projects are incredibly popular because they are not only optimal, but also universal. Why? Well, they are ideal for:
- frame structures;
- log structures;
- stone objects;
- foam block baths, etc.
Thus, dear readers, a miniature summer cottage is not a death sentence, since you can easily place a beautiful 3×3 bathhouse on it, which is comfortable and attractive.
Who said that a steam room with an area of 9 m2 is a cramped closet? The 3x3 m health resort is a cozy, miniature and welcoming “house of health, beauty and youth”!
Beautiful examples
We offer several beautiful examples that will clearly demonstrate the subtleties of the layout of a 4x6 m bathhouse.
- Universal layout of a bathhouse 4 x 6 m - shower room 2x2 m, steam room 2x2 m, entrance to the locker room from the street 2.5 x 1.2 m. From the locker room you can go to the rest room 2.5 x 3.8 m, door to the shower room on the left, door to the shower on the right – on the attached terrace 1.5x4 m.
- Layout option with a narrow rest room: dressing room 1.5 x 4 m with doors to the right to a room 4 x 2 m and to a washing room 2.5 x 2 m. A steam room of the same volume is located in the farthest corner from the front door, you enter it through the sink.
- From the outside, the bathhouse may look like this.
- You can create such a bathhouse yourself from logs.
Classic 3 by 3 bathhouse project
An area of 9 square meters is not the best size for building a bathhouse. But large-sized structures are not always necessary, especially in small areas.
A traditional bath building consists of several parts:
- dressing room - a room for rest. here it is important to take care of comfort by installing a tabletop and comfortable attributes of seating furniture;
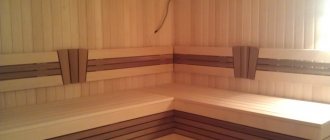
- steam rooms - a stove-heater must be installed to generate heat and steam. It is better to place the steam room between the steam room and the dressing room near the front door. There should be beds or equipped shelves to save space, on which each person should fit at full height;
- sinks - here there will be a container with water for cooling.
The location is chosen in such a way that the building is located at a distance of 15 meters from a residential building. This is advisable from a safety point of view. The best option is considered to be the proximity of the bathhouse to a natural or artificial body of water: a pond, a swimming pool, etc.
The basis for the bathhouse construction should be a sand and gravel area. Otherwise, you will have to dig a hole 1.5 meters deep and then fill it with soil.
Recommendations for setting up a steam room:
- the topmost shelf should not be very close to the surface of the ceiling, so that it is convenient to go down without hitting your head on the ceiling;
- the height of each shelf must be calculated in advance, even at the stage of designing the bathhouse and creating the drawing;
- You need to choose benches both high and low. The latter will be used by beginners and people who cannot stand high temperatures;
- the stove must be positioned in such a way that it is convenient to reach it while lying on a shelf;
- It’s better if the steam room has fairly low ceilings and a threshold at the front door. This is necessary so that the room quickly warms up and steam does not escape through the door cracks.
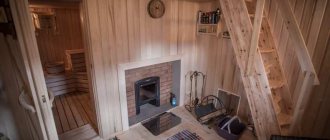
It is important to calculate not only the width and height of the bathhouse building, but also the height of the ceilings. The number of shelves (beds) themselves and their configuration depends on the wishes of the owner and the frequency of use of the room. An example of the layout of a 3 by 3 bathhouse inside is shown in the photo.
Construction technology
Arrangement of the base
If the price obtained as a result of calculations suits you and you have purchased everything you need, you can start working. We begin construction with the installation of a permanent foundation.
The easiest way to build a columnar foundation is:
- We mark the site for future construction.
- At corners and at the intersection points of walls, as well as on purlins more than 1.5 - 2 m wide, we dig recesses for support pillars.
Advice! A separate support should be placed where the stove will be installed in the future.
- At the same stage, we dig and arrange a pit for draining water. We install a pipe in the pit, which we lay to the septic tank, cesspool or sewer.
- At the bottom of each recess we form a concrete pad up to 20 cm thick.
Installed foundation blocks
- We either install concrete blocks on the footing layer or lay bricks, forming vertical supports.
Note! It is important that the ends of the supports are in the same plane.
- On top of each support we lay several layers of roofing material, which will ensure waterproofing of the wood.
Laying crowns
The instructions for constructing the log house itself are not complicated, but some nuances are still worth considering:
- We begin work by laying the first crown. We make it from thicker timber (optimally 200x200 mm), impregnated with antiseptics and connected at the corners in half a tree. To attach the crown to the base, we use steel anchors with a diameter of 10-12 mm.
Advice! Under the first crown, you can lay a layer of thin wooden slats, which will also serve as moisture protection. We impregnate the slats with a waterproofing compound, stir them in increments of about 15 mm, and fill all the gaps with polyurethane foam.
Covering crown made of timber impregnated with bitumen mastic
- We attach logs to the frame crown, on which we lay the floor. In the future, we will need to insulate the lower floor, so we can construct a rough flooring in advance, on cranial blocks attached to the joists.
- We lay the next crowns by combining the locks of the profile beam. For fastening we use birch dowels, which we hammer into pre-drilled holes.
Connecting parts with dowels
- To prevent the walls of the bathhouse from being blown through, we place jute strips between the crowns, which we place in special grooves.
- It is best to cut beam joints “in a warm corner” - this way the heat loss of the structure will be minimal.
“Warm corner” with additional jute sealing
Having brought the log house to the required height, we arrange the roof. To do this, we attach the rafters to the top trim, on which we place the sheathing.
It is best to use metal tiles or euro slate as a roofing material. If you want to completely preserve the style of the bathhouse, then wood chips, shingles or shingles are suitable.
Finishing and equipment
After the log house has stood and the shrinkage of the wood has been completed (this takes about a year when using timber with natural moisture and several months when building from chamber-dried blanks), you can begin finishing:
- We treat all wooden surfaces with a moisture-proofing compound intended for impregnation of wood in baths and saunas.
- We install high-quality windows and doors, carefully sealing the junctions with the walls to protect against drafts and heat loss.
- We lay communications - water supply system pipes, drain pipes, electrical wiring.
- Floors, walls, ceilings and roofs must be insulated from the inside using heat-resistant materials (basalt wool and analogues). We place a vapor barrier layer on top of the insulation, which will protect the thermal insulation from getting wet.
Heat and vapor barrier materials on floors and walls
- We cover the walls and ceilings with clapboards and lay the finished floor.
- We install or make a brick stove to heat the bathhouse and heat the water.
- In the steam room we install shelves made of wooden slats.
After that, all we have to do is install the furniture in the dressing room - and we can start steaming!
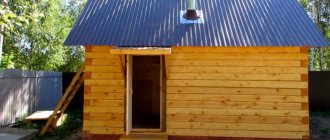
In small steam rooms, the stove must be reliably protected
Simplified bathhouse design
The simplest option involves the presence of two rooms of equal size: a steam room and a dressing room (locker room). You can equip a small porch or mini-terrace, as well as a small vestibule (1 by 1).
The stove itself should be installed on the wall connecting both interior rooms, and the steam room should have a window opening to ventilate the room.
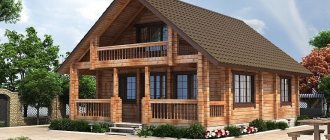
With attic
The bath structure can be supplemented with an attic, which is an inferior second floor. There you can place a recreation area and simply equip a small pantry with a compartment for storing things and household tools. The area of such a 3 by 3 bathhouse can reach 15 square meters; up to 7 square meters can be allocated for the second floor.
Where is the best place to place the sink?
In a one-story 3 by 3 bathhouse with an area of 9 square meters, everything must be placed as conveniently and compactly as possible so that everyone is comfortable and the premises function according to all the rules. It is better to combine a room with a sink with a steam compartment. To make washing more convenient, it is better to attach an additional insulated dressing room to the bathhouse.
The bathhouse can be equipped to the highest standard without going beyond the planned budget.
Standard solutions
In order to make it easier for you to prepare for the construction of a frame bath, we have collected for you the best projects and drawings that will help you cope with the task. These materials will be great for DIY construction if you are faced with the task of building both a rather modest 3x4 frame bathhouse and a more spacious 3x6 one. Let's consider other popular options: 5x5, 6x6, 6x8. Dividing by building area will help you better navigate this variety of promising solutions.
5x5
6x6
6x8
3x6
Useful tips
- A bathhouse with an area of 9 square meters is preferable for small areas. It is easy to place it on an already inhabited area. The main rule is distance from flammable objects and wooden buildings. Bushes and trees, on the contrary, will not suffer from such a neighborhood. The adjacent area can be used for planting non-capricious crops that love shading, high humidity and are not afraid of slight temperature changes.
- Often they try to increase the usable area of the steam room by abandoning the classic benches. However, you can sit comfortably indoors only if the length of the tier is at least 2.2 meters. A person must fit here at full height. It is quite possible to reduce the width of the bench or its height. The more ledges, the greater the opportunities for bathhouse visitors. Even without a temperature controller, you can find a suitable zone for everyone.
- Wooden baths are often imagined as a building made of rounded timber, inside of which the circles of huge logs are clearly visible. However, this option is not very practical in the case of a small area. Such reliefs hide useful space, and visually create a not very pleasant oppressive effect. Therefore, it is better to choose straight lines and finishing materials with a small cross-section.
- Building a 3x3 bathhouse is not an easy task. It’s easy to find a place for a building on any site; you don’t have to think about investing in a capital foundation. However, the layout of the interior space and the choice of materials can cause difficulties. A successful bathhouse with a hot steam room, a comfortable relaxation area and a convenient washroom can be built from wood, brick and even expanded clay.
Foundation installation
The foundation for such a building is made of a strip and not deep. Dig a 50 cm trench. Cover it with a 10 cm layer of sand and crushed stone. Next, install a reinforcement frame into it. After this we install the formwork. We make cement mortar and fill the trench to the level of the foundation. We are waiting for the foundation to dry completely. We water it with water once a day - this will help the base to be stronger. We do this for 21 days, and then remove the formwork.
Tips for location and layout
Following fire safety rules, it is better to locate the bathhouse at a distance of at least 15 m from other buildings. This way, in the event of a fire, the fire will not spread to the house. Suitable soil is sand and gravel. Otherwise, you need to dig a hole for the foundation 1.5 m deep.
- It is better to place doors on the south side if the region is characterized by severe snowy winters. In this case, you will have to clear the passage less before bath procedures.
- Also, don't forget about the windows. This is the simplest ventilation and an additional source of lighting, so it is better to place them on the west side to provide more natural light in the evening. The optimal size is 40x40 cm.
As for the layout inside the 3 by 3 bathhouse, regardless of its type, you can try to implement one of the following options:
- With locker room and steam room. This is the simplest option with dividing the room into 2 more or less equal parts. One contains a locker room, benches and a table for relaxation. In the other there is a steam room.
- With steam room and sink. In this case, the locker room occupies about 4.5 m². The washing zone can be distinguished by dividing the steam room into 2 equal parts. This option will allow you to create separate rooms for smoothly changing the heating temperature.
- With a veranda. If the climate in the region is warm enough, tables can be placed under a canopy outside the bathhouse. In this case, a minimum space is allocated for the locker room, and the steam room is expanded.
There is no need to completely abandon the dressing room. This is a buffer that prevents drafts and protects against a rapid drop in temperature every time the front door is opened.
The only exception is the m² Japanese bathhouse Furako. The barrel can even be located in open space. The main thing is to provide protection from rain and debris that can be blown by the wind.
Additional options/services
All prices for the construction of a bathhouse are current and updated 05/10/2020
| Foundation: pile-screw | 4000 RUR/pile with installation |
| Foundation: support-column | 5,000 rub. |
| Increasing the wall thickness to 140 mm (replacing timber with a section of 90x140 mm with timber 140x140 mm) | 22,000 rub. |
| Metal stove "Ermak-16" with installation and pipe through the roof | 43,000 rub. |
| Brick screen for sauna stove | 10,000 rub. |
| Assembling the log house into a “warm corner” | 24,000 rub. |
| Assembling a log house on wooden dowels | 24,000 rub. |
| Antiseptic treatment of the bottom of the bath (to protect against rotting and harmful insects) | 8,000 rub. |
| Replacing the floorboard with a thickness of 36 mm instead of 27 mm | 4,500 rub. |
| Increasing the insulation layer (floor, ceiling) up to 100 mm | 4,000 rub. |
| Increasing the insulation layer (floor, ceiling) up to 150 mm | 9,000 rub. |
| Additional row of timber (increasing ceiling height by 14 cm) 90x140/140x140 mm | 5000/8000 rub. |
| Painting the outside of the bathhouse in 1 layer (customer's composition) | 17,000 rub. |
| Replacement of ondulin roofing with metal tiles | 12,000 rub. |
| Replacing the entrance door with an insulated metal one | 12,000 rub. |
| Change house 3x2 m for construction workers | 18,000 rub. |
| Generator rental if there is no electricity on site (customer’s gasoline) | 10,000 rub. |
One-story baths made of timber Two-story baths made of timber https://www.youtube.com/watch?v=tqPLDYg1v3k