Brick and stone stove equipment is finished to prepare the surface for subsequent decorative plastering and to increase the sealing of the masonry. Plastering a stove at home is within the power of every beginner, however, the success of the procedure in 80% of situations depends on choosing the right raw materials and mixing them. What composition is used to plaster the stove and the correct application of it are important aspects of success and a guarantee of long-lasting results.
Why plaster the stove?
The answer to the question of when and why it is necessary to plaster a stove is very important. Having understood it, you can accurately decide whether this process is really necessary or whether decorative finishing from ceramic or fireclay tiles is sufficient.
There are several reasons that necessarily require plastering of surfaces:
- The stove was built a long time ago, and the old plaster was partially cracked and began to peel off. As a result, bare areas look unattractive.
- There is a risk of carbon monoxide leaking into the cracking masonry joints of an old stove.
- During the renovation process, it is necessary to change the style of the overall interior, as a result of which the stove needs to be given a more neat appearance or completely transformed.
- There was a need to treat the seams between the rows of bricks, in which settlements of various insects were found. This happens when solutions based on natural materials are used for laying the stove. Plastering the stove prevents the appearance and reproduction of insects.
- The masonry of the stove is not done carefully, which spoils the appearance of both the structure and the entire room. With the help of plaster you can completely solve a problem of this kind.
If we compare plaster with other types of finishing materials, we can note several advantageous points:
- Plastering is the simplest and most affordable way to put the stove in order.
- The mixture for plastering the surface is much cheaper compared to ceramic tiles or stove tiles. This allows you to significantly save material resources.
- The plaster mixture can be used to finish a newly built stove or to reconstruct an old building element.
- The applied layer of plaster makes the walls of the furnace thicker, therefore, the heat capacity coefficient of the structure increases. As a result, the furnace takes longer to cool down, resulting in reduced fuel costs.
- A plastered stove becomes less fire hazardous, and the risk of carbon monoxide entering the room is also reduced.
- After the plaster mixture has dried, you can use various materials to finish the oven. This can be water-based paint, lime mortar or decorative plaster.
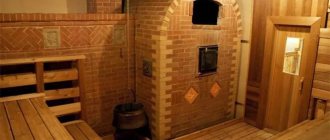
Mantel
If facing work is planned after masonry, it is necessary to wait until the structure has completely dried, and only then begin to transform it.
Final work - finishing the erected fireplace
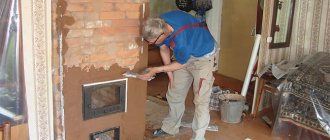
- The first thing they do when starting this process is to apply a special plaster to the masonry, perfectly leveling the walls. When they dry, mark them and only then begin cladding.
- Surface finishing starts from the corners. If possible, it is better to purchase special corner tiles for these areas, which will make the work easier and faster. In addition to marking on the planes of the fireplace walls, for the evenness of the rows and maintaining the thickness of the seams between brick-shaped tiles, special calibration devices are used in the form of crosses or tubes of the required thickness.
- A special adhesive is used to lay the tiles. It is applied in such a way that after pressing the tile it does not protrude on the sides.
- When the glue dries, the seams are sealed with a special mixture intended for this (heat-resistant fugue). This must be done very carefully, trying not to get the solution on the surface of the tile. If this happens, it should be wiped off immediately with a soft cloth.
For greater clarity, a video about building a fireplace with your own hands
This is not to say that folding a fireplace is completely simple, and a beginner will not encounter difficulties during the process. But with a strong desire and a detailed ordering scheme, this can be done. Cladding a structure is a more creative work, after which the building will be transformed and acquire its own “face.” This is what makes it interesting - after finishing laying the tiles, you can admire your work of art.
Tools - how to plaster a stove in the house
The service life of a plastered surface largely depends on the adhesion of materials, and for this it is necessary to correctly apply the plaster and distribute it evenly on the surface of the stove.
You can solve the question of how to plaster a stove without cracking using special tools, which include the following:
- Putty knife. Several types of spatulas are used; with the help of some tools the solution is collected from a container, while with others it is applied to the surface.
- Plastering hammer. This tool is used to drive plaster nails.
- Trowel. Using this tool, the solution is evenly distributed on the stove wall.
- A hammer-cam is necessary for working with a chisel or a trojan.
- Scissors are ordinary and for cutting metal. If you use fiberglass mesh in the process, you will need ordinary scissors; you need to cut the chain-link mesh with metal scissors.
- A grater is necessary for leveling and smoothing a plastered stove wall.
- Using a smoother, the surface is brought to perfect smoothness.
- A chisel is used to make notches on the surface of the stove, this promotes better adhesion of the plaster and the working surface.
- Brushes. It is necessary to purchase several types of this tool, since some are used to apply primer, while others can be used to apply textured plaster.
- Using a building level, check the vertical and horizontal level of the working surface.
- Using a plumb line, the evenness of the walls and the applied plaster solution is controlled.
- As a rule, the mixture is distributed between beacons, which are installed on the walls for even plastering of the surface.
How to plaster a stove - step by step diagram
Step 1: Heat the stove
Before preparing the solution for plastering the stove, heat it thoroughly so that it crackles where it should and warms up the walls. This rule cannot be broken even in the summer, despite the heat.
Step 2: Prepare the surface
Carefully go over the surface of the oven with a broom and brush to remove accumulated dust and remaining installation solution. To improve adhesion, it is better to clean and slightly deepen the cracks in the brickwork, but not more than half a centimeter.
Step 4: Reinforcement
If you decide to use burlap for reinforcement, this step is for you! The fabric, pre-cut into the required pieces, should be soaked in a liquid clay-sand solution and glued to the stove from top to bottom, just like wallpaper is glued. You can combine the pieces end-to-end, but it is better to overlap by at least 5 cm.
Step 5: Apply plaster
Remember that the thickness of each layer of plaster should be no more than 5 mm, and the total thickness of the facing layer should not be more than 1 cm. The solution must be applied from top to bottom, in an even layer, so that the facing dries evenly. As soon as the plaster has set well, it should be rubbed with a wooden float using circular movements. If the composition has hardened too much, moisten it with water. At the end of applying the plaster, people used to smooth it out with a rag soaked in a liquid solution of the same composition.
After completing the process, do not rush to heat the stove; let the layer of plaster dry completely. If cracks form during drying, they should be slightly widened with an ordinary knife, moistened with water and rubbed with the same solution. If over time you notice new cracks on the surface of the stove, analyze your actions - the stove may peel off and crack due to shrinkage, excessive layer thickness, or improper ligation of rows of bricks. In addition, cracks can also appear due to overheating.
Types of mortar for plastering stove walls
The stove is one of the building elements that regularly heats up and cools down, so the chosen plaster composition must be resistant to this phenomenon.
Mixtures for preparing plaster mortar are divided into two types:
- Simple compositions that include only two components, sand and clay.
- Complex formulations contain more than two ingredients.
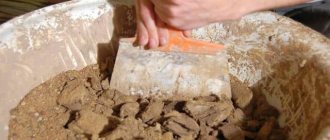
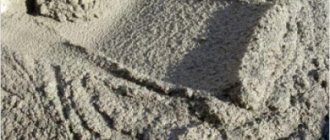
Plastering a stove with clay and sand requires preliminary preparation and cleaning of the materials from various impurities. In particular, sand must be sifted through a fine sieve, clay should be rubbed through a fine mesh to remove roots and small stones.
It is recommended to make the plaster mixture using fatty types of clay, this promotes better adhesion of the solution to the surface. If the clay is too oily, the amount of sand used can be increased.
You need to know how to dilute clay for plastering a stove. To begin with, it should be soaked in a small amount of water and left for several hours, adding liquid in small portions if necessary. The process is repeated until a 10-15 cm layer of water remains above the clay. After mixing the finished clay mixture, the consistency of thick sour cream should be obtained.
In some cases, asbestos, finely chopped straw or fiberglass are added to the mixture for plastering the stove. These reinforcing components make it possible to obtain more durable materials.
When preparing plaster mixtures, special attention must be paid to the environmental side. During the heating process, the materials used should not emit substances that pose a danger to human health and life.
Separately, it should be said about salt; it is also sometimes added to the solution for plastering the stove. It should be noted that the opinion that salt makes it stronger can be considered erroneous. In fact, salt increases the hygroscopicity of clay, making it more flexible and resistant to cracking. Also, a plastering solution, to which a certain amount of salt is added, prevents the proliferation of various insects in masonry joints. For owners of private houses, this fact is of great importance.
Another component that can be added to the plaster mixture is gypsum powder. This material is used as a fixative. However, plaster must be used very carefully, as it hardens very quickly. The initial setting of the solution with the addition of gypsum powder occurs immediately after application, and after 10-15 minutes the surface hardens completely.
Adding lime along with gypsum makes the solution more durable and able to dry in a short time. But when choosing such mixtures, you should remember the properties of gypsum, so it is better to prepare a small portion immediately before plastering the stove. It is very important to understand that it is impossible to dilute the gypsum mixture with water.
Preparation of the solution
There are many recipes for plaster solutions in the world. You need to know how to make your own plaster. Below is the composition of the highest quality and most popular of them (proportions in parts):
- Sand – 2, cement – 1, clay – 1, asbestos – 0.1;
- Clay – 1, sand – 2, asbestos – 0.1;
- Gypsum - 1, lime - 2, sand - 1, asbestos - 0.2 (in this case, asbestos can be replaced with fiberglass in the same proportion).
Now in more detail about each component:
Clay is an important part of any plaster; some stove makers soak it in water the day before finishing work so that it can swell and become saturated with liquid.
Preparation of the solution
It is best to use river sand. Before use, you should clean it of debris (shells, stones, etc.), if any, and dry it to accurately determine the proportions of the future solution.
Lime is an excellent component of such a mixture, because... ensures its secure grip on the surface. However, do not forget that a solution containing lime will take longer to harden than usual.
The same goes for cement. If you are going to use it, be prepared that setting will take at least 12 hours to complete, and final strength will not be achieved until 20-30 days later. A high-quality plaster solution should be easily applied to the oven walls.
How to plaster a brick stove with your own hands
You can finish the stove using plaster mortar yourself; you need to know how to properly plaster the stove and follow the sequence of actions.
Preparatory stage
The quality of plastering in most cases depends on how correctly the preparatory work on the surface is done. Good preparation of the stove walls is the key to better adhesion of the plaster mortar to the surface.
The preparation process involves performing the following actions:
- To reconstruct a stove or fireplace, it is necessary to remove old plaster from the surface using a chisel and hammer. Then the wall is cleaned of dust using a regular or iron brush.
- The newly built stove is cleaned of any remaining masonry mortar. Neglecting this step may cause poor adhesion of the plaster to the working surface. As a result, after some time the plaster will begin to lag behind the walls of the oven.
- After cleaning the surface, it is necessary to deepen the masonry joints. Moreover, this step is necessary both for the structure being restored and for a new stove. It is also recommended to remove dust from the seams.
- The next step is to apply a primer to the stove walls. It is best to work with a thin brush so that the buried seams are not left untreated.
- The process of plastering uneven walls should always be accompanied by surface reinforcement. To strengthen the furnace walls, a metal or fiberglass mesh with cells of 1.5 * 1.5 or 2 * 2 mm is used. Reinforcement helps strengthen the plaster on the surface, making it more resistant to temperature changes. The use of reinforcing materials makes it possible to apply a thick layer of plaster, thereby increasing the heat capacity of the furnace. To fix the metal mesh, use nails with a wide head. When using fiberglass mesh, you need to apply a thin layer of plaster to the wall, embed the mesh in it, apply additional mortar and level it. It is recommended to use fiberglass on walls with slight unevenness.
- To preserve or restore corners, it is recommended to use steel or perforated aluminum corners, which are attached to an adhesive solution.
- For large differences, surface evenness is achieved by installing beacons. They are fixed to a gypsum mortar, which allows you to carry out work almost without stopping. If you have enough free time, you can attach the beacons to the clay solution, but it is better to do this with the reinforcing mesh in close contact with the wall.
- The preparatory layer of plaster can be perfectly smooth or rough. The first option is used for whitewashing or painting, the second – for decorative relief plaster. It should be remembered that ceramic tiles and decorative plaster do not require a very thick preparatory layer.
Plastering a stove with clay - making the solution stronger!
Reinforcement of stove plaster is a separate topic for discussion. And again, traditional methods are by no means inferior to modern ones, the only question is what will be at hand during the plastering process or what will be easier to get. Reinforcement is carried out both by adding components to the solution itself, and with the help of foreign materials, for example, burlap. In the first case, people often added crushed flax fibers, straw, and horse manure. Today, asbestos is added to the clay solution - at least one tenth.
Burlap is still used by many craftsmen to reinforce stove plaster. This method has its pros and cons - such a stove cannot be overheated, but burlap is the simplest, environmentally friendly and affordable way to strengthen plaster. The burlap can be replaced with a thin mesh made of steel wire, the mesh size of which is no more than 1*1 cm. However, the fastening wire must be inserted into the masonry when constructing the stove. If you missed this point, you will have to use additives in the solution or burlap.
Applying plaster to the walls of the oven to prevent cracking
Before plastering the stove in the house, you need to familiarize yourself with the methods used.
Method No. 1 is most often used to level walls that have large distortions. In other words, when a layer thickness of 5-8 cm is required, the process proceeds as follows:
- They set up beacons that allow you to maximally level the surface with large differences. During the installation process, a building level is used, with its help you can achieve perfect evenness.
- Next, the stove is heated so that its walls are warm.
- Using a roller or wide brush, moisten the furnace wall with water to hammer fine dust and dry mortar into the masonry joints.
- The entire surface is covered with a primer and left until completely dry. Priming promotes good adhesion of the working solution to the surface.
- The first layer of plaster is applied using the sketch method; its thickness should not exceed 4-5 mm. In this case, the solution should not be very thick. Throwing the mortar must be accentuated in order to ensure that it gets into the seam between the bricks. After sketching the entire surface, leave the solution for plastering the stove until it dries.
- After this, they begin to apply the next layer; it should protrude 1 cm above the beacons. Work begins in the lower part of the oven, throwing the solution between the beacons to a height of 40-50 cm. By pressing the rule against the beacons, the applied mixture is leveled. After this, move on to the next section and repeat the entire process. Without waiting for the plaster to dry completely, grind the work surface using grout.
To prevent cracks from forming on the surface of the plaster layer during the drying process, stove makers with many years of experience advise covering the stove walls with damp burlap after applying the mixture for plastering the stove. If the fabric dries quickly, you can moisten it.
The burlap is removed from the dried surface, and the surface is rubbed and smoothed using a trowel with a rubber surface.
- For the third layer, it is necessary to prepare a more liquid solution for plastering the stove; its thickness should be 1.5-2 mm, since it is used to smooth the plastered surface. The third layer is applied only before painting or whitewashing.
- Making corners, even those reinforced with a metal corner, is considered a rather complicated process even for experienced craftsmen. To simplify the work, use an angled spatula. With this tool, the solution is easily applied and leveled well. If it is impossible to purchase such a spatula, use a wooden strip. It is fixed on one side of the corner and the solution is applied. After drying, the lath is removed and moved to the other side, and the solution is applied to the other side of the stove corner.
- In some cases, the edge of the corner is rounded. This makes it safer for small children and avoids chipping.
Method No. 2 of solving the question of how to plaster a stove with your own hands involves putting it in order using a metal mesh netting. This material is intended to reinforce the surface and give the required thickness to the plaster layer.
The surface is leveled as follows: pieces of wire no more than 25 mm thick are placed under the fixed metal mesh in the right places, hooking it onto the mesh or pre-installed metal slats.
The plaster is applied in several layers, similar to the first method, but the mesh must be completely covered with a plaster layer.
When applying the first layer, you should make sure that the solution passes through the oven plaster mesh and adheres to the wall. After spraying, the surface is left to dry. When the plaster dries, the mesh becomes motionless, so subsequent leveling layers are applied more easily and easily.
The last layer is leveled, allowed to dry, and the cracks that appear on the surface are covered and rubbed (read also: “How to cover up cracks on a stove - options for solving the problem”).
Finally, the decorative coating is installed.
Plastering stove walls in this way allows you to obtain a durable finish that is securely attached to the surface.
Method No. 3 is used for smooth stove walls that require minor cosmetic repairs, so the solution is applied once or twice, maintaining a total thickness of no more than 5-6 mm.
Surface preparation is carried out by analogy with the first methods, always applying a layer of primer for a brick oven.
It is allowed to use metal slats-beacons, which allow you to control the thickness of the plaster layer. However, when plastering smooth walls, guides do not need to be used.
The plaster mixture for cosmetic repairs of the furnace must contain fireclay clay and crushed asbestos. In this case, you can get a more durable solution and, accordingly, a high-quality finish.
It is best to apply the mixture for plastering stoves from the bottom up, using a wide spatula. It is best to level the plaster using a rule, pressing it against the metal slats. If they are absent, the solution is evenly distributed over the surface, checking the evenness using a building level.
It is also recommended to use a corner spatula to remove corners.
After applying the plaster mortar to the entire surface of the stove wall, carefully level it with grout.
This finish can serve as the basis for ceramic or fireclay tiles, as well as decorative relief plaster.
Set of tools and materials for plastering
Before you start plastering the stove, among other things, you should prepare:
- solution container;
- trowel;
- sandpaper for grouting;
- broom or brush;
- bucket with water;
- construction level.
To plaster a heating stove in a private house or bathhouse, you need to prepare the following set of tools and materials:
- Spatulas of various widths for taking out plaster composition and treating surfaces.
- Trowel (trowel) for distributing the composition on brick and stone walls.
- Grater (grater) for leveling treated surfaces.
- Hammer for driving nails. Nails are used to secure the mesh.
- Wire mesh with cells measuring 10×10 mm to strengthen the treated surface.
- Scissors for cutting mesh.
- Hammer (fist) for use together with a trojan, gear and chisel.
- A trowel for leveling the surface after plastering.
- Chisel for applying notches that increase the adhesion of the composition to the surface.
- Brushes of various sizes.
- An electric drill with a mixing attachment for preparing the plaster mixture.
- Volume container for kneading.
- A wire brush for cleaning surfaces and joints.
- Dry mixtures for mixing plaster.
- Deep penetration antifungal primer.
- Asbestos to increase the stability of the composition.
- Lime for whitewashing.
- Level, rule and staff for leveling corners.
- Personal protective equipment – rubber gloves, goggles.
We suggest you familiarize yourself with drainage in a bathhouse: how to do it right
Decorative finishing
The decorative design of the stove walls is carried out in accordance with the taste preferences of the owner. An evenly plastered surface can simply be whitewashed; by the way, whitewashing is a traditional finishing method that has been used since ancient times. The whitewashed surface was often painted with imported paints, giving the room originality and emphasizing national traditions. In most cases, the ornament was selected according to local traditions.
Modern technologies and materials make it possible to create an imitation of natural stone or a uniform relief structure on the surface of the stove wall.
Quite often, craftsmen with a wide imagination decorate stoves with elements of three-dimensional designs, using various available means for this purpose. In particular, we are talking about plastic film, brushes, brushes and other materials and objects.
Creative people create relief compositions from decorative plaster, allowing them to protrude slightly beyond the stove walls. Subsequently, all this is covered with paints. Moreover, applying the coloring composition to wet decorative plaster promotes deeper penetration and increases the service life of the decorative finish.
In some cases, the dried surface is additionally painted, which allows for a brighter design.
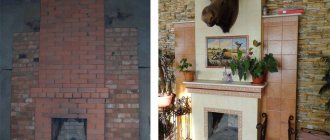
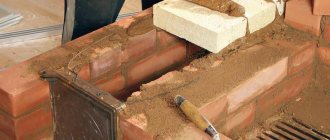
Terracotta or ceramic tiles can be used as decorative finishing for stove walls. The additional purchase of corner finishing elements makes the installation of tiles and decoration simpler and more convenient, allowing you to obtain neat and aesthetic corners. The tiles are installed using a special cement-based adhesive composition, which is resistant to temperature changes.
Characteristics. Why is this good for laying stoves?
Fireclay clay mortars are ideal for laying fireclay bricks, since the brick and the binding paste have the same coefficient of linear expansion.
When heated, such masonry expands evenly and cracks do not form in the seams.
Fireclay mortar is also suitable for laying ceramic bricks. The characteristics of fireclay clay that make it suitable for kiln construction include:
- High heat resistance (the fired solution does not crack at a temperature of 1300-1850 degrees, depending on the initial characteristics of fireclay).
- High adhesion (it transfers water well to ceramic and fireclay bricks and adheres tightly to them).
- Strength in thin seams, which allows you to make masonry with a thickness of 3-5 mm.
- Strength in wide vertical joints (fireclay clay can be used to fill gaps up to 12 mm wide).
Important. The consumption of fireclay mortar for stove masonry depends on the thickness of the seams and is 20 kg per 50-100 bricks
Where and for what is fireclay clay used?
Heat-resistant fireclay clay is used not only for the construction of household stoves. It is used for laying metallurgical and other industrial furnaces. Chamotte is a filler for refractory concrete.
The applied use of fireclay is also widespread. This material is used to make sculptures for the garden, stucco decorations for buildings, decorative ceramics, panels and clay souvenirs, and pottery.
Vessels made from fireclay are durable and elegant. Potters make lightweight jugs, vases, and bowls with thin walls from fireclay clay. The fired dishes produce a melodious, pleasant ringing sound, similar to the ringing of a crystal vessel.
Some subtleties of plastering a stove with a mixture of sand and clay
When plastering stoves with your own hands, it is important to take into account several main points, on which the quality of the work largely depends:
- It is not recommended to plaster a newly erected stove. The structure must go through the drying and shrinking stage. For this purpose, the stove must be heated regularly for 2-3 months, after which finishing work can begin.
- It is best to paint plastered stove walls with water-based paints. The use of other formulations may cause the release of harmful substances and unpleasant odors.
- All materials used to decorate stove walls must have a natural base so as not to pose a danger to human health.
All the methods described for plastering a stove cannot be called simple for independent use. Therefore, in the absence of initial knowledge and experience, it is better to entrust the plastering of a brick stove to professional craftsmen. In this case, you can get a high-quality result and avoid unnecessary consumption of materials.
Why is plastering done?
A sauna stove, like any other stove, operates in difficult temperature conditions. Downtime in a cold state is replaced by work under high thermal loads on its hot part. Any material, even heat-resistant, has its own coefficient of thermal expansion, which leads to a change in the original linear dimensions of an individual element, for example a brick.
The brick heated up, its dimensions increased, the brick cooled, and the dimensions naturally returned to their original sizes. And so dozens, and sometimes hundreds of times. You can imagine the deformation that masonry joints and decorative finishing surfaces undergo. Linear deformations lead to a persistent disruption of the connection of individual elements in a single furnace system, and in the most unfavorable scenario, to the destruction of the structure as such. Therefore, for long-term operation of the stove in a bathhouse, it is necessary to adhere to a number of fairly simple rules:
- Systematically inspect the stove for its performance and the presence of deformation. Initial signs appear in the appearance of tiny, barely noticeable cracks on the plane. Subsequently, they grow, connect with each other and form a network, colloquially called a “cobweb”. If treatment is not carried out at this stage, then in the future, the area and depth of the crack channels will increase, and the plaster “cakes” will peel off from the surface of the masonry, and then it will not be long before the integrity of the brick bond between each other is compromised.
- Carry out repairs in a timely manner and using materials designed to withstand significant changes in operating temperature conditions. A sauna stove, in most cases, operates at a “ragged” pace, that is, it is heated approximately once a week, unless, of course, the sauna is used as a purely commercial facility, on a continuous schedule.
- When carrying out plastering work, it is necessary to strictly comply with all technological requirements and practical techniques in order to obtain the required result in terms of final quality.
Compound
There are many recipes for preparing a solution; the composition of the mixture for plastering a stove can be combined into one formula - a fastening material (clay, sand, cement, gypsum) and water. At the same time, clay is a fundamental component of any mixture, since it costs a penny and is easy to work with.
- Clay. It is recommended to soak the clay for 24 hours before use so that it swells and is saturated with water, then remove debris and other impurities. And after that add dry mixtures. Check the finished clay for fat content. There is a special Shepelev test for this. You need to roll a small ball of this clay, the size of a walnut, and press it with your fingers. According to the standard, when you press only 1/3, cracks will appear, and if the fat content is high, then pressing requires more force.
- Sand. Fine river sand is recommended. Before use, you need to sift it through a sieve, clean it of debris and impurities, and rinse it so that large grains of sand dissolve. It is difficult to say exactly the amount of sand used, since it depends on the fat content of the clay. The larger it is, the more sand will be required.
- Water. Only clean and good quality water is suitable for preparing solutions. The quality of the plaster depends on this. You cannot use rotten or old water; the iron content must be within normal limits. If the settled water has turned yellow, it cannot be used, there is a lot of iron.
- Binders. Asbestos fiber is often used, but some craftsmen use straw, as they are environmentally friendly and do not require large financial outlays.
Surface preparation
Before starting plastering work, be sure to prepare the surface of the oven. This will make it easier to apply the solution, and the resulting finish will look better and last longer.
If we are talking about an old stove, then you will need to prepare the surface according to the following scheme:
- Cleaning the stove surface from old plaster. This can be done using a spatula or chisel.
- The surface is rubbed with sandpaper - this will help eliminate minor irregularities.
- Use a vacuum cleaner or dry cloth to remove any debris and dust that has formed.
In the case where a freshly laid stove needs to be plastered, such work should begin approximately a month after the completion of the brickwork. This period is enough for the mortar used for masonry to dry, harden and gain strength. Before starting work, you need to clear the seams between the bricks that make up the stove to a depth of about 0.5 cm - this will help the plaster mortar adhere better to the masonry.
Advantages
- the simplest and most accessible way for everyone to “ennoble” the stove;
- savings in price compared to tiles, ceramics or facing bricks;
- You can plaster both new, newly built stoves, and old ones that require restoration;
- even a thin layer of plaster multiplies the thermal insulation of the stove and extends the heat retention time;
- plaster completely eliminates the risk of carbon monoxide entering the room, but only if the composition is correctly selected and applied;
- The plaster can be painted over or whitewashed at any time.
Today, you don’t have to worry too much and buy a ready-made composition, which is diluted with water and applied to the stove. Or you can go the traditional route and prepare a solution from clay, sand, lime or cement. First things first.
Cladding or plaster is applied only after the oven has settled. As a rule, this takes one and a half to two months, depending on the frequency of operation. If the stove is used frequently, a month is enough for complete shrinkage, after which you can begin finishing.
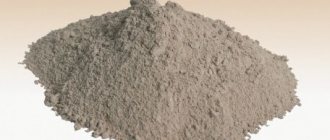
Fireclay (fireproof) clay is the most popular, cheap, but very strong material that was used several hundred years ago.
Before mixing, the clay is passed through a fine sieve to remove foreign matter. The sand should also be sifted.
How to prepare a clay solution
Real fireclay clay is very oily, so sand must be used in a ratio of 1 to 3. First, you need to mix a small amount of sand with different proportions and make small balls out of them. After the balls have hardened, you need to test them for strength. To do this, they are thrown onto the stone floor from the height of their height. The proportions of the composition of the ball, which did not crack and remained unharmed, are suitable for plastering the stove.
To increase strength, you can use crushed fiberglass in a ratio of 1 to 0.1.
If the solution turns out to be of high quality and all proportions are met, it will be very easy to apply and correct according to the rules.
Recipes for preparing popular solutions
(data are given in proportions)
| Fiberglass |
How to apply correctly
- Even on a new stove, dirt and dust accumulate, so before you start plastering, clean it thoroughly, brush out the seams and wipe with a damp cloth.
- In order for the solution to set better, firstly, you need to open the seams a couple of millimeters, and secondly, heat the oven and apply it to a still warm surface.
- For better adhesion, spray the wall with water from a spray bottle before applying the solution.
- The solution is applied with a trowel using sharp movements, after which it is leveled using the rule.
- Carefully monitor the evenness of the applied layers, the thickness of which should not exceed 5 mm. If this condition is not observed, the plaster will dry unevenly.
- You should start from the top of the oven, gradually working your way down.
- It is always applied in two layers - the first liquid, the second thicker.
- You can grout it when the solution is slightly dry, but not yet completely dry. The result is a truly perfectly flat surface, smooth to the touch.
- Slopes are made according to the same rules as windows. First, the straight line of the slope is adjusted using corners or a profile, after which the composition is applied. After a few minutes, when the solution has already set, the slats are carefully removed. And unevenness is smoothed out with a grater or trowel.
Secrets of the masters
- Plaster tends to peel off. This could happen in six months or ten. There are a lot of reasons - a violation of the order, an incorrectly prepared solution, a violation of the layer thickness, overheating, etc. A special burlap sack for clay or a reinforcing mesh can save the situation. Their operating principle is the same - increasing adhesion and ensuring the most complete contact of the mortar with the brick.
- If burlap is used, it is pre-soaked in a liquid clay solution. The mesh is fixed in the corners, stretching evenly over all surfaces.
Burlap is a more difficult material to work with, since it is necessary to constantly monitor the presence of air cushions. If you miss even one such layer, the plaster in this place is 100% likely to peel off.
- After plastering the stove, be sure to cover it with lime milk mixed with regular table salt at the rate of 100 grams per 10 liters. This will provide, on the one hand, an increase in strength, and on the other, a beautiful gloss.
If you don't want to plaster
No matter how beautifully we describe everything here, there are many people who will say: “Laziness”, “No time”, “Why bother, this will do.” It won’t do, because in less than 5 years the stove will lose all its beauty and originality. If you don’t want to plaster, cover it with brick, tiles or ceramic tiles. It will be much faster, but more expensive.
Be sure to pay attention to the quality of the masonry mortar, which should not crack during operation of the furnace or during the shrinkage process.
In a series of finishing materials for the stove, this is the most affordable option, allowing you to create the appearance of a lack of finishing, but keep the unit in good condition.
- For cladding you need a smooth, even material.
- You can enhance the attractiveness of the stove by placing bricks outside its body when laying.
- With single-color bricks, you can make colored grout.
- After finishing the masonry, wipe the surface with a damp cloth and sand with the remaining brick to level out all the protrusions and depressions.
A plastered stove looks better, heats the same way, but retains heat longer. This is one of the facts! Therefore, this kind of work needs to be done. However, not everyone knows how to plaster a stove so that it does not crack.
If you can apply rough plaster with your own hands to the walls of an ordinary room, this does not mean that with a brick stove you will succeed the first time and correctly.
In order for you to collect crumbled mortar from the floor in the near future, immediately after work, when plastering stoves, you must strictly follow certain rules. There are not so few of them, but carefully following and observing the order of work will lead to an excellent and long-term result. Let's figure out how and with what to plaster the stove so that it does not crack, provided that the work is done with your own hands.
Why is asbestos fiber added to the solution?
To impart plasticity and strength to the mixture, asbestos fiber is used. Some craftsmen use straw or burlap fibers, explaining this as an environmentally friendly product. This component also has heat-protective functions.
When added to the mixture, it forms a thermal film that prevents cracks in the plaster. The more asbestos is added, the higher the thermal conductivity. The asbestos mixture is resistant to humidity, low temperatures, fireproof and durable.
Basic concepts and goals
It doesn’t matter whether it’s a new or old heating structure, you will still have to apply a new layer of plaster to a clean brick surface. Therefore, before plastering the stove with your own hands, you need to thoroughly clean all surfaces on which the solution will be applied.
The requirements for a new coating in conditions of constant heating of the base to high temperatures are quite high, therefore both the base itself and the mixture must be correctly selected.
Plastering stoves is a responsible task that must also be approached from an environmental point of view. Indeed, with constant heating and cooling, all substances that are destroyed by increasing the temperature of organic and inorganic inclusions will inevitably be released from the mixture.
Therefore, the base must not only be environmentally friendly in itself, but also be as free from impurities as possible. Also, the material used must meet certain technical requirements, in particular, have a high degree of elasticity so that the plaster does not crack, and also have high thermal conductivity.
For what? This may not be the main question, but still.
After plastering, the stove will look neater and, if not decorated, will be in harmony with the interior. It will be possible to paint the surface later, just choose special paints and varnishes. This is the first.
Second: the masonry will not only be stronger, but also more airtight. As a result, heat loss is eliminated, and smoke from the firebox will not penetrate into the room. Your room will not be smoky, you will need to clean less often, the furniture and curtains will not turn black, and most importantly, your health will not deteriorate. Respiratory tract diseases due to a malfunctioning stove are a common phenomenon.
What results can be expected after finishing its cladding?
The results that indicate the successful completion of the stove plastering work are:
- The deviation from the vertical plane along the entire height of the structure should not exceed 1 cm.
- The horizontal deviation of a similar indicator should not be more than 2 cm.
- The deviation of the thrust between the corners from the straight line should not exceed 0.3 cm.
- The depth of differences from a flat plane formed when applying the two-meter rule should not exceed 0.2 cm.