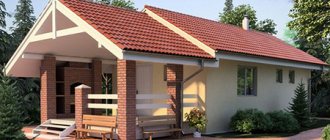
Many owners of country houses or summer cottages have probably thought about building a bathhouse on their property. After all, a bathhouse is a place where you can relax not only with your body, but also with your soul. Do you agree? Next, we will tell you how to build a frame bathhouse with your own hands, and step-by-step instructions will help you cope with this task.
In addition, from the article you will learn what tools and materials will be needed for construction, we will outline the advantages and disadvantages of frame buildings and we will deal with the issue of insulating the structure.
Advantages and disadvantages of a frame bath
Among the advantages of the frame structure of a bathhouse are: the relative cheapness of building and finishing materials, good thermal insulation properties, ease of construction, and environmentally friendly design.
In addition, frame structures do not require a powerful monolithic foundation, and they can be erected at any time of the year.
The main advantage of a frame bath is the ease of its construction. Even a novice home handyman can cope with such a task.
Along with the listed advantages, a frame bath also has several disadvantages. First of all, highly flammable materials are used for its construction, so there is a high probability of a fire if fire safety rules are not followed.
Secondly, insulating a frame bath will require much more time and effort. In addition, this will entail more financial costs than insulating a conventional bathhouse made of timber.
Another drawback is long shrinkage, which can last up to two years. When shrinking, the cladding may be deformed.
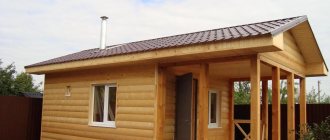
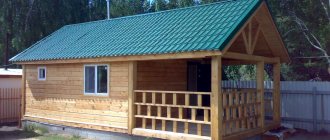
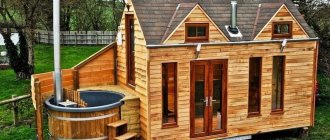
Step 11: Final Result
- I painted the door to match the metal roof;
- I added stained glass with images of birds - this is my new hobby related to the sauna and living fauna;
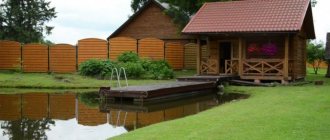
- By next spring I'm going to build a large deck in front of the sauna for a hot tub;
- I screwed a small shelf inside the locker room where you can put a radio and a few sauna accessories;
- Set up several bird feeders using pulleys and cable to make it easy to raise and lower them for cleaning and refilling.
Did you like the article? Subscribe to our Yandex.Zen channel
March 6, 2022
Bath
If you want to express gratitude, add a clarification or objection, or ask the author something, add a comment or say thank you!
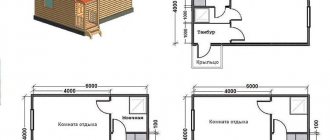
Construction plan development
Before starting construction work, you need to carefully work out the construction plan and project. Only by drawing up a project can you correctly calculate the amount of building materials.
It is necessary to determine the place where the building will be erected. The choice of bathhouse foundation directly depends on the quality of the soil. And after this, they decide on the choice of the most suitable bath design.
The standard bathhouse project includes a dressing room, a vestibule, a steam room and a shower room. The location of the furnace must be indicated on the diagram.
At the project development stage, you need to take into account all possible little things: the type of ventilation, chimney, internal finishing materials, external finishing and even the type of roofing.
In addition to the steam room, for additional comfort in the bathhouse, it is worthwhile to provide a bathroom and a relaxation room. This needs to be done at the design stage, since it will be difficult to change anything at the construction stage.
The project must indicate the dimensions of the premises. It is difficult to heat a large bathhouse, but in a small one you need to think about the maximum permissible number of people so that it does not become crowded. The most suitable size for a steam room is 2.4x2 m with a ceiling height of 2.2 m.
Additional rooms in the bathhouse will make your stay more comfortable and interesting. Therefore, if the budget allows, it is better to immediately include in the project: a swimming pool, a relaxation room, a bathroom, and a billiard room.
A well-designed project will greatly facilitate the construction process of the premises.
Ventilation system
Carefully consider the ventilation system to feel comfortable in the bathhouse. It should be as similar to natural as possible, because forced ventilation during sauna operation is contraindicated.
For proper air exchange, you will need two vents in opposite walls. The inflow point is made half a meter from the floor, and the exhaust is half a meter from the ceiling. The first vent should be equipped with a valve to regulate the air flow.
Materials for the construction of a frame bath
When the project is ready, you need to make a list of materials necessary for construction, after purchasing which you can begin construction.
Below we have provided an approximate list of materials that will be needed for the construction of a frame bath. The list may vary depending on the selected technology. And the required amount of materials is calculated based on the size of the bath.
| Purpose | Material |
| Foundation, subfloor | cement (M400) and coarse sifted sand |
| Bottom harness | timber 100*100 mm |
| Frame | timber 50*100 mm |
| Rack braces | timber 40*50 mm |
| Insulation of ceilings and walls | glass wool, thickness 50 mm |
| Vapor barrier | foil vapor barrier film |
| Waterproofing walls and roof | waterproofing film made of polyethylene |
| Roof | corrugated sheet 0.5 mm |
| External cladding | block house |
| Interior decoration of walls and ceilings | lining, board |
| Drain system | plastic pipes, from 50 mm |
In addition, you will need tools for work, screws, nails, plumbing fixtures, etc.
For interior decoration of the walls of a frame bath, you can use lining. This is an environmentally friendly material that is made by processing wood.
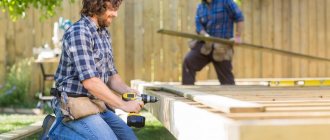
Installation of finished walls
People who have experience in how to build a frame bathhouse advise building and fastening the walls for this building on the ground, after which they should be lifted and installed in place.
It’s more convenient to do it this way, since your hands won’t get too numb. In addition, when using this technology, it is possible to build both walls and a foundation at the same time if several people work.
Foundation construction technology
A frame bath is a lightweight structure, the foundation of which can be of any type. The first option for constructing a foundation - pile - is used on unstable soil, deep freezing of the soil, or when it is not possible to lay a trench on the site.
The most common and lightest is tape. This foundation of the structure is suitable for non-flowing soil, with deep groundwater. If the soil does not freeze, then the foundation does not need to be deepened too much. Consider in advance whether you need to build a separate foundation for the stove.
To organize proper water drainage, the drain must be laid at the stage of pouring the foundation, since it will be very problematic to properly equip the sewer system after the construction of the bathhouse.
Let's look at how to properly build a strip foundation. The first thing that needs to be done is to clear the site for the construction of a bathhouse and the surrounding area, and also level the foundation for the building.
Next, mark the contour of the foundation. To do this, two pegs are driven into the ground, and a rope is stretched between them. Using a construction square at an angle of 90 degrees from the installed stakes, the distance to the next ones is measured and a rope is pulled between them.
Then, using the same principle, the outer contour of the foundation is marked. A distance of at least 100 mm must be maintained between the inner and outer rope. This will be the width of the wall of the structure.
Using the resulting markings, you need to dig a trench with a compacted bottom. The depth of the trench should be 20 cm below the soil freezing level.
The bathhouse must have a drainage system. Before pouring the foundation, you need to dig a hole for the pipe and a drain well. The floor in the bathhouse is poured with a slight slope towards the exit point of the pipe.
The next step is the arrangement of a sand and crushed stone cushion. Its thickness is from 10 to 20 cm. Sand is poured onto the bottom, moistened with water and compacted. You need to pour crushed stone on top of the sand, compact it and level it.
After this, you need to build a formwork from the edged board, which will rise above the ground by at least 30 cm.
To prevent the concrete solution from leaking, the formwork is wrapped in polyethylene and secured with staples. Then, to ensure the rigidity and strength of the future foundation, a reinforced mesh is laid out.
After this, you can pour the concrete solution. To prevent concrete delamination, the mixture must be poured from a height of 50 cm or less.
An example of a properly designed strip foundation. Concrete needs to be dried for about 4 days under a plastic cover, then another couple of days in an open state.
All that remains is to insert the pins into the uncured mixture, onto which the base of the bathhouse frame will be placed.
Installation of foundation piping
After pouring the foundation and drying it, you can begin tying the structure. For the bottom trim you need a strong beam with a section of 100x100 mm.
Start tying from the corner. To do this, you need to connect the beam very tightly with nails, and the pins pre-installed in the foundation will not allow the strapping to move.
Wood used to build a bathhouse must be treated with an antiseptic. This procedure must be done either long before construction, so that the material dries, or after assembling the entire structure
Before laying out the trim, lay a waterproofing material between the concrete and the wood, for example, roofing felt.
The procedure for constructing walls
It is most convenient to assemble the bathhouse frame in an open area in the yard. The distance between the racks must be calculated based on the size of the sheathing boards, so as not to do additional work on fitting and as a result get a dense, even wall.
Typically, the pitch of the racks is 60 cm. This distance also corresponds to the standard width of the insulation. During installation, it will be positioned by surprise and will not fall out.
In a wall with an opening, according to the project, the pitch of the racks needs to be increased by 40 cm. Additional racks are installed in the places where the frame adjoins the lintels. Simultaneously with the installation of the wall frame, floor joists can be installed. Material – board 150x50 mm.
All parts of the frame need to be assembled, leveled and connected. Insulation and waterproofing are laid between the racks.
For reliable insulation, there are recommendations to use two layers of material. The first layer is tile insulation, the second is roll insulation. In this case, there will be no gaps that allow heat to pass through.
The ceiling must be insulated using the same technology. The difference is that the insulation on both sides must be lined with a vapor barrier. Between the cladding and the vapor barrier material you need to leave a little space for ventilation
When performing external finishing work, it is imperative to leave a ventilation gap, which will ensure drying of the wall frame from accumulating condensate.
Internal and external finishing of a frame bath
For the exterior decoration of the bathhouse, it is better to use hardwood. Be sure to lay a layer of waterproofing material under the facing board.
The material for interior wall decoration must respond well to humidity and high temperature. For the steam room, hardwood lining is used so that it does not release resin. In other rooms of the bathhouse, you can use lining made from coniferous trees.
The best option for decorating sun loungers, shelves and ceilings would be to use linden.
Which oven should you choose?
When choosing a stove, you need to consider the following factors:
- room size. As a rule, frame baths are small in size and do not require high heating power;
- fire hazard. Frame buildings in this regard are classified as a risk group, which makes stoves without a strong flame (or without it) more preferable;
- According to SNiP standards, the weight of the furnace should not exceed 700 kg, otherwise it will need its own foundation.
Given these conditions, the best option would be to use an electric oven. Its operation takes place without the use of open fire, and the specificity of frame walls will reduce energy consumption. A gas stove is less suitable - the combustion process in it is smooth and controlled. Wood-burning stoves are not recommended due to the increased fire hazard.
Electric oven
Gas oven
Wood burning stove
The most problematic option is the Russian stove. It is too heavy and requires building its own foundation. In addition, Russian stoves are quite large and take up a lot of space in a limited space. Therefore, to install such a structure it is necessary to use a strip foundation. Most frame baths are installed on light supports and cannot take additional loads.
Arrangement of the roof of the building
For such a small structure as a bathhouse, you can build a gable roof. It is safer to assemble all roof elements on an open plot of land. The rafter system is made of timber with a section of 150x50 mm. To avoid mistakes, it is better to make a preliminary layout and then repeat the assembly of the rafters.
For the roof frame, you need to nail the two rafters together at the top end. The bottom of the rafters must be placed on support points and secured. Use a crossbar (crossbar) to connect the legs of the rafters using screws.
When the frame is ready, you can begin installing it. First fix the front structural elements. Use a construction cord as a guide, stretching it between the pieces. It should run along the line of the roof ridge. The remaining elements must be mounted at its level
The distance between the rafters can be selected individually; usually 1.2 m is used. Between the rafters, the location of the chimney must be taken into account. Use a plumb line to check the level of each element being installed. If there are deviations from the vertical, level the position by placing a piece of board under the rafter leg.
Now start lathing. If you plan to use soft roofing material, for example, ondulin, for example, then the sheathing pitch should not exceed 10 mm.
You can insulate the roof with the same materials that were used to insulate the walls. Next, the roof is covered with roofing. The final step will be to install a galvanized corner on the roof ridge.
More about the steam room
In this room, the central part is occupied by the stove. It is also important to pay attention to the main finishing materials. The steam room should be a small room with excellent insulation. It is important to provide comfortable benches for sitting. It is worth taking into account the high temperature, so do not use materials that can melt or heat up excessively in finishing; wood is the best option in this case.
What's the best way to set up a stove?
There is a special technology. We build a furnace taking into account ideal steam. To do this, it is important to direct the heating, create a compartment with stones, and also choose a reliable system. the structure that is most valued .
It is worth examining in detail the features of such a system; many standard options are offered, among which everyone will definitely be able to find one that is suitable for themselves.
Tips for choosing material
When choosing a material, it is best to give preference to wood. It is best suited for the construction of a classic bathhouse. However, you definitely need to find high-quality options, and also make sure that both timber and boards are carefully processed.
Floor design in a frame bath
Compliance with all recommendations and instructions for installing the floor will increase the service life of the bathhouse. A well-made floor will protect against heat loss and rotting of floor boards.
In bathhouses where there is direct contact with water, the floor is poured. The most important thing in pouring floors is to ensure rapid flow of water into the sewer.
Step-by-step instructions for installing the floor:
- Laying lags. If the distance between the supports is large—more than 3 m—additional support pillars are needed. Use roofing felt for waterproofing in several layers at the junction of the joists with the foundation and supports.
- For clay soil, a tray is made under the structure to direct water into the drainage pit.
- Installation of boards on joists. The gap for pouring flooring between the boards is about 4 mm. A gap of 2 cm should be left between the flooring and the wall of the bathhouse.
In other rooms of the bathhouse, the floor is non-leakage. To arrange it, 5x5 cm bars are mounted on the logs, and a subfloor is laid on top of them.
Scheme of floor insulation in a frame bath. A waterproofing layer is laid on the subfloor, then mineral insulation is laid on top of which a vapor barrier is laid
After the vapor barrier layer, you can begin installing the finished floor.
Warmth and waterproofing of buildings
The frame structure is lightweight, so in order not to accidentally deform the walls, appropriate thermal insulation is needed.
There are a number of criteria that a bath insulation must have: good thermal insulation, high resistance to humidity and high temperatures, and environmental friendliness.
Let's consider the most popular types of insulation for frame baths.
Mineral wool. The wool itself is light, but the facing material can make it significantly heavier. Mineral wool has good insulating properties. It is resistant to temperature changes and humidity does not harm it.
Reed insulation. Natural and environmentally friendly material. Has good thermal insulation. Release form: slabs 15 cm thick. Suitable size for insulating a frame bath.
Sawdust-gypsum insulation. The sawdust-gypsum composition can be made independently. A budget option that is not inferior in quality. For mixing you need a ratio of sawdust to gypsum of 10:1.
Expanded polystyrene . Insulation, which is inexpensive, easy to use and has good thermal insulation properties. Resistant to moisture, but very flammable. Therefore, it cannot be installed near a stove.
Wall insulation is a kind of pie. At the same time, it is very important to follow the insulation procedure in order to avoid loss of precious heat.
Waterproofing in a bathhouse is no less important than thermal insulation. Firstly, without protection from moisture, any insulation will deteriorate over time and lose its ability to retain heat. Secondly, without protection from moisture, the heat-insulating material will begin to rot and mold, damaging the frame of the bathhouse itself.
To protect against steam, you can use foil, glassine (inexpensive but environmentally friendly material) or polyethylene. The material must be laid overlapping, gluing the joints with construction tape.
How much does it cost: prices in the Russian Federation
In our country, it is possible to build an excellent, high-quality bathhouse in a short time in any region. Average prices , taking into account the diameter of the log, size, number of floors, layout and cutting are as follows:
- budget option 3x3m - from 80 thousand rubles. (chopping by hand), from 95 thousand rubles. (chopping into a bowl);
- sizes 3x4m or 3x5m are slightly more expensive by 7-15 thousand rubles;
- 3x6m – from 105 thousand rubles. up to 120 thousand rubles;
- 4x6m – from 114 thousand rubles. up to 132 thousand rubles;
- 5x6m, 6x6m differ little in price - from 120-135 thousand rubles. up to 140-150 thousand rubles.
Cedar logs have the best resistance to moisture, the highest thermal protection, and healing properties, so they are expensive; larch is also considered expensive for its super strength. And pine, spruce, aspen or linden are cheaper.
Log houses made of rounded logs will cost more:
- 2x4m – from 255 thousand rubles;
- 4.6x5.5m – from 550 thousand rubles;
- 5.5x7m, 2 floors. – from 770 thousand rubles.
The choice of materials for finishing and its delivery to the installation site also affect the total cost.