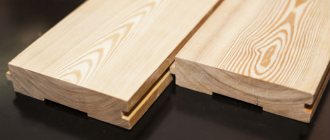
A flat floor in a house clearly illustrates the correct approach to choosing a leveling layer. As a rule, floor leveling was previously resorted to using particle boards or fibreboards. Today, a material has appeared that is much more efficient in operation and installation than those indicated - gypsum fiber sheet.
GVL is used for finishing and is produced by pressing using gypsum powder and cellulose. A distinctive feature of this finishing material is that it does not contain a cardboard sheet coating and is homogeneous in its structure. You can install GVL on a wooden floor yourself. Due to the reinforcing properties of fluffed cellulose, the density of gypsum fiber board is much higher than that of gypsum board, which makes it possible to improve its performance characteristics and the quality of finishing work.
How to lay gypsum fiber board on the floor
GVL is laid on compacted expanded clay. The slabs are installed in 2 layers, which must be carefully glued together. The joints should also be well taped.
It is recommended to start laying gypsum fiber boards from the corner closest to the entrance. The sheets are fixed every 25-30 cm. After installation is completed, it is necessary to putty the joints, remove the edge film and excess waterproofing.
If there are minor defects in the base, you can do without a screed. GVL will smooth out these defects and provide a smooth base.
Before laying GVL, it is necessary to treat the floor with a deep penetration primer. The sheets are attached using tile adhesive, and at the edges they are fixed to the base using self-tapping screws. The suitable thickness of the gypsum plasterboard is 10 or 12.5 mm, and the length of the screws is 30-40 mm. There should be a distance of 35-40 cm between the fasteners; when fixed, they should be recessed into the sheet by a few millimeters.
In this case, for a solid base it will be enough to lay the sheet in one layer. In cases where there is a need to lay several layers, they should be placed with a minimum shift of 20 cm. Each layer must be fixed with self-tapping screws during laying.
After installing the gypsum fiber board, it is necessary to process the seams and joints. The seams are sealed with the glue that was used during installation, and the joints are sealed with reinforced tape, and the tape should also cover the screw heads.
You can proceed to the next stage - directly laying the tiles - 24 hours after processing the joints.
What you should pay attention to?
Layout of a floor with a dry screed and gypsum fiber boards
Unlike the installation of other sheet materials (chipboard, fiberboard, plywood), laying gypsum fiber has its own characteristics. In order for the dry screed to be of high quality, it is necessary to pay attention to and check the following nuances:
- The width of the gaps between adjacent sheets should not exceed 2 mm, and all screw heads should be recessed deep enough into the plaster to avoid damage to the finish coating;
- Residues of adhesive protruding onto the surface after installation must be removed; the composition should not accumulate inside the joints and on the sides adjacent to the walls;
- The extreme folds in two-layer sheets are cut off.
Advice from the experts
- The coating will last longer if the tiles are laid after the impregnations, sealants and other viscous materials have completely dried.
- It is better to adjust the tiles near the walls with a tile cutter, which will create more accurate outlines. This will not work with a glass cutter and wire cutters.
- When laying tiles, you need to monitor the thickness of the applied mortar layer, otherwise the surface will turn out bumpy.
- For convenience, it is better to divide the room into zones (squares) and tile each of them in turn.
- Extruded propylene foam can be used as insulating material between the joists.
These are just general guidelines for laying tiles on wood floors. The instructions require mandatory modification, taking into account the technical and design features of a single bathroom.
Some information about the use of the material
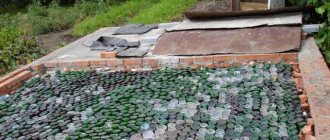
In order to correctly lay gypsum fiber board on the floor, you need to know some nuances that will ensure an excellent final result of the work. For example, special sheets with a thickness of 10 mm are produced for floors - it is better to use them. Before laying gypsum fiber board sheets, it is important to pour a layer of expanded clay onto the base. It will provide additional leveling of the floor and help insulate the base. This is the most accessible and cheapest option. The optimal size of expanded clay fractions is 5 mm.
Also, guides are mounted on the base, which play two roles:
- guideline when adding base . In this case, expanded clay is poured to the edges of the guides, compacted and leveled using a long rule;
- support for gypsum fiber sheets . The installation will be more professional if the material has support and places for fastening.
Leveling the bedding layer
If the installation of gypsum fiber boards will be carried out on a wooden base, then it is important to properly prepare such floors beforehand. Preparation includes checking the floorboards for strength and, if necessary, replacing them. The floor is screeded if there are significant gaps between the individual elements. Although some craftsmen do not screed, arguing that if there are cracks, the floors will be better ventilated. So you can avoid this stage.
Also, GVL sheets on a wooden base must be laid in two layers, which will make the base reliable and durable. GVL sheets are usually mounted on wood if it is necessary to lay a floor covering that is demanding on the evenness of the base - for example, ceramic tiles, laminate. In other cases, the wooden base may not be leveled. The gypsum plasterboard layers are fixed in the following way: the first one is attached with self-tapping screws, and the second one is mounted on the first one using PVA glue (in this case, excess glue protruding between the seams is immediately removed). However, it would not be a bad idea to secure it with self-tapping screws. The two layers must be laid apart so that the seams do not coincide with each other. You need to move the sheets by about 20-30 cm. This will ensure that the base is as strong as possible.
Dry floor screed
Important! When laying gypsum fiber board sheets, it is important to ensure that the gaps between the sheets are not more than 2 mm. Also, if laminate or carpet is used as the finishing coating, the cracks must be puttied.
And one more condition that must be met during the installation of gypsum fiber board sheets if they have folds. At the extreme row, located near the walls, they should be trimmed. Moreover, trimming is done on already laid sheets.
Calculator for calculating expanded clay backfill for dry screed
Prices for GVL from
How to reconcile ceramics with a wooden base?
Due to the organic origin of wood, it cannot be classified as an “unshakable” building material. It shrinks from lack of moisture, swells from excess. A new wooden floor still settles for one and a half to two years after construction, and even after the expiration of the period set for post-construction shrinkage, movement still occurs. Movement imperceptible to the human eye negatively affects the solidity of the tiled surface. Structural connections are broken, tiles peel off and crack. As a result, not only all the work goes down the drain, but also a lot of money invested in finishing.
This means that the task of a home-grown finisher is to create a kind of damper layer that absorbs the characteristic movement of wooden elements. The hard outer part of this layer must be turned towards the ceramic coating, and the elastic rear should be exposed to the shocks and blows of the wood. In addition, the wood hidden underneath needs to breathe, otherwise it will quickly rot, overcome by fungi and mold.
Types of GVL for floors: main types of markings, what it means
Gypsum itself is a hygroscopic material, so it is not recommended to lay gypsum board slabs on the floor if the room is exposed to humidity. For rooms that have constant high humidity levels, for example, kitchens, bathrooms, bathrooms, swimming pools and saunas, it is better to purchase GVLV, that is, moisture-resistant boards. Externally, the sheets do not differ from each other, so it is important to pay attention to the markings.
To decorate the floor covering, special GVL floor elements are produced, marked “EP”. Most often, the material is produced, which is the main supplier of sheet products on the domestic market. All products are distinguished not only by high quality, but also by increased strength characteristics.
Some people prefer to lay ordinary gypsum fiber boards on the floor, but for this, not one, but two elements are taken, which are located offset relative to each other. This distance most often does not exceed 3-5 mm. If special GVL sheets are used for Knauf flooring, they are laid in one layer, because they have sufficient strength.
Products intended for flooring are produced with the “EP” marking
In addition, products are classified according to the type of edge. If the sheets have a straight edge, they are marked “PC”. Slabs with seam edges are also available, which minimizes the visual perception of joints. The fold size usually varies in width from 2.8 to 3.2 mm, depth - 1.7-2.3 mm. It is appropriate to decorate the floor with one or another type of material, but due to the fact that the price of gypsum fiber board for a floor with folded edges is higher, many prefer to purchase sheets with a straight edge.
As already mentioned, the production process of slabs is regulated by GOST standards. Based on this, the following standard size options are distinguished:
- width, cm – 50, 100, 120;
- length, cm – 150, 200, 250, 270, 300;
- thickness, mm – 12.5, 15, 18, 19, 20.
It is not always possible to adhere to these indicators, so a deviation in width is possible, but no more than 3-4 mm. As for the length, the deviations here should not exceed 2-3 mm. In rare cases, if the slabs are long, this figure reaches 4 mm.
The thickness of GVL sheets can vary between 12.5-20 mm
In order not to make a mistake when purchasing a material, you should know what this or that marking means, for example, GVL-PK 2000x1000x12.5. Here you can see that a conventional slab is presented, which does not have moisture-resistant qualities, and is distinguished by a straight edge. If the abbreviation “VGLV-FK” is indicated on the marking, this means that the board is moisture-resistant with a seam edge.
One of the key advantages of gypsum fiber sheets is their fire resistance. Even cellulose, which is added to the gypsum mixture, does not burn or ignite; in the event of a fire, the material does not contribute to the spread of fire, which is especially important, for example, in wooden houses. In addition, the stoves will not emit toxic substances when burning.
Additional recommendations from professionals
Many years of professional experience shared by specialists indicate that some manipulations should be done in a certain way, and not in any other way. After all, the secret to successfully creating a high-quality floor lies precisely in such nuances.
Tying GVL sheets together will provide them with greater resistance to stress. Fixing with self-tapping screws will allow you to hold on better; Before laying the tiles, the gypsum fiber flooring is kept indoors for about 3 days, and only then covered with a primer; When buying tile adhesive in a store, be sure to find out its capabilities regarding gypsum fiber; Laying tiles begins only on a completely dry primer. They do this using a hammer, beacons and a spatula.
In this case, all the rules described above are taken into account.
These are all the nuances that you will encounter in your work.
Laying gypsum fiber sheets correctly
Installation of gypsum fiber board sheets does not require special skills - the main thing is to follow a certain procedure so that the finished floor has the necessary performance characteristics.
First of all, lay a special mounting tape made of basalt wool or foam film around the perimeter of the walls, which will compensate for the expansion of gypsum fiber board sheets under the influence of temperature or moisture.
Then you can proceed directly to laying gypsum fiber sheets, observing the offset. To do this, you can saw one or more sheets of material.
Note! Installation of GVL must be carried out very carefully so as not to displace the expanded clay. Otherwise, the base will need to be re-leveled.
Laying the first sheet should begin from the corner located near the door. To secure the edges well, use special professional glue. Be sure to remove any excess glue that may come out on the seams. And then the GVL is fixed using self-tapping screws, which need to be screwed in with a maximum step of 30–40 cm “flush”. For sheets with a thickness of 1 cm, take 2 cm self-tapping screws, and to fix 1.2 cm slabs, you need 2.3 cm long self-tapping screws. Trimming with a jigsaw or hacksaw is done at the end of each row.
If you decide to use carpet or laminate as the final floor covering, then all joints and fastening points should be puttied. And the mounting tape protruding above the sheet level is cut off using a knife.
Laying tiles on gypsum fiber
To lay tiles, you need to prepare the necessary materials and tools in advance. The general procedure is as follows:
- The premises are being marked out. To do this, lines are drawn from corner to corner and between the center of adjacent walls. This will allow you to stick the products with the pattern adjusted.
- The base is treated with two layers of primer to ensure good impregnation and dried.
- The starting point of installation is determined and a diagram of the arrangement of elements is created. Pre-layout is often required.
- Glue is applied to the surface. You can mix it yourself or purchase a ready-made mixture. The mixture is spread over the base using a notched trowel.
- The parts need to be glued in a clear sequence; to do this, the element is pressed and, if necessary, tapped with a mallet and adjusted to the level.
- The parts are placed at intervals, the joints are formed using plastic crosses or a tile leveling system (SVP).
- The outermost fragments are trimmed taking into account the gap from the walls.
- The coating is left until it dries, after which it is necessary to rub the seams with a special mixture of the desired shade. The composition is applied to the joints and spread with a rubber spatula, the excess is removed.
When working with GVLV, the tiles are laid using regular tile adhesive
If you do not violate the process technology, the surface will last a long time.
Necessary stages of work before laying gypsum fiber board on the floor
- The room should be free of furniture and equipment. It is easier to lay out gypsum fiber sheets in an empty room. They are of impressive size.
- Before laying gypsum fiber boards, the condition of the old floor should be assessed. If the base has become unusable, it must be dismantled and the defects corrected.
- Remove all construction debris.
- If there are bumps, they need to be removed by grinding. Fill deep holes with wet solution. If the depth of the holes is more than 2 cm, they are covered with expanded clay, and then the screed is poured.
- On a wooden floor, it is necessary to check the boards for integrity. To prevent them from creaking, it is advisable to tighten them with self-tapping screws. Self-tapping screws are screwed in a checkerboard pattern into wooden joists.
- Large gaps between the boards are foamed with polyurethane foam.
- If the floor is rotten, gypsum fiber board cannot be laid on it. In this case, in order to save money, you can make a wooden sheathing. A beam is attached to the logs. The thicker the timber is laid, the greater the load the floor can withstand. You can pour expanded clay into the cells between the beams or put insulating insulation.
- Then the GVL is laid on the floor. Gypsum fiber sheets are attached to the beams using self-tapping screws.
Laying technique
To align the GVL accurately enough, you must follow the following steps:
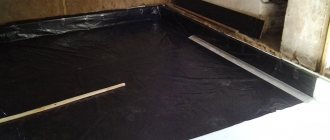
- A waterproofing base material is laid on the finished base. For concrete screed, a polyethylene film 0.2 mm thick is suitable. For wooden bases, glassine is used. It is better to place the edges of the waterproofing towards the wall, and seal the joints with waterproofing tape.
- The perimeter of the walls is covered with edge tape. It helps prevent cracking and deformation of gypsum fiber boards.
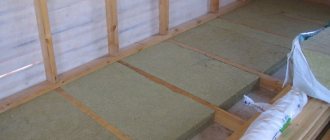
- The surface is covered over the entire base with amorphous insulation to a thickness of 2 cm or more, leveled according to the rule.
- The first layer of slabs begins to be installed from the wall furthest from the door. The folds are treated with PVA glue, and for reliability the material itself is fastened with self-tapping screws in increments of 30 cm, depending on the size of the sheets.
- The entire surface is lubricated with glue, then a new sheet of gypsum fiber board is laid.
- The resulting joints between the plates are sealed with putty. Marks from self-tapping screws are especially carefully sealed.
Tools and materials for installation work
It is impossible to do without piece counting of materials. To do this, you can arm yourself with a calculator, pen and notepad, or enter data into an online calculator for calculating facing materials. Do not forget about openings and niches, complex corners and turns, since the final number of building materials for laying tiles on the surface can vary to a greater or lesser extent.
However, it is not worth taking an even number of slabs. According to experts, all building materials are purchased with an expectation of 10–15%, since operating conditions involve errors. We should not exclude defective parts (manufacturing or received during the installation process).
Accessories for drywall installation
To install GVL (GVLV), you will need the following tools and building materials:
- GVL sheets (GLVL);
- self-tapping screws;
- screwdriver or set of screwdrivers;
- marker, felt-tip pen, pencil or pen for making marks;
- building level;
- corners;
- roulette;
- saw (to adjust the length of gypsum sheets).
To lay tiles you will need the following building materials and tools:
- tile cutter;
- set of plates;
- cement or adhesive mortar;
- spatula for applying adhesive solution;
- rubber spatula for applying the grout layer;
- grout (you can make it yourself or purchase it at a hardware store).
Tools for laying tiles on drywall
GVL from the company Knauf
In any finishing or repair work it is important to use high-quality materials. For arranging floors, many experts recommend using moisture-resistant gypsum fiber board for flooring 1200 x 600 x 20 mm produced by the German company Knauf. Over the years of work on the Russian market, it has confirmed the high quality of its products.
The manufacturer obtains individual floor elements by gluing two moisture-resistant sheets. At the same time, they are slightly shifted relative to each other in two directions, which leads to the formation of folds 50 mm wide along the entire perimeter of the sheet. This design significantly simplifies the assembly of the floor covering, reduces the consumption of fasteners, and facilitates adaptation to structures with complex surface shapes.
Each floor element has a size of 1200 x 600 x 20, a weight of about 18 kg and a useful area of 0.75 m2.
In addition to GVL, to install a floor using Knauf technology you will need:
- Vapor barrier. Usually this is polyethylene film.
- Special Knauf edge tape that provides sound insulation for floors.
- Dry backfill. This can be fine expanded clay, sand or other material that does not shrink.
Before installation, all materials must be allowed to acclimatize to the room for several days. They should be stored flat on a flat surface to avoid the material breaking under its own weight.
GVL parameters
Plates made of gypsum and fiber are produced in two variations.
- Simple products are intended for interior decoration with low to medium humidity levels. They are placed on the floor, used to line walls, to create partitions and original design elements.
- Moisture-resistant - play the role of a hydrophobic layer on wooden floors of kitchens, bathrooms, and bathrooms.
In terms of dimensions, GVL slabs are standard - 1200x1500 mm and small-format - 1500x500 mm or 1200x600 mm. Small-sized gypsum boards are 2 sheets whose central axes intersect and are shifted in vector directions. This is how a rebated locking system is obtained.
When buying GVL slabs, the calculation is made with the condition that the products are laid in 2 layers. Therefore, the total floor area is multiplied by 2 and divided by the GVL parameters.
Main properties of GVL: advantages and disadvantages
Gypsum fiber boards are a material obtained by pressing. The reinforcing function in its structure is played by fluffed waste paper - it is this that gives the gypsum fiber board composition special strength.
Laying GVL slabs
This combination of materials is superior in its characteristics to both plasterboard and wood fiber boards. By the way, this also applies to the resistance of such formations to a humid environment.
In addition, there is a separate category of moisture-resistant GVL (GVLV), which is recommended for use in rooms with high levels of moisture. One of the characteristic features of this type is the ability to regulate and maintain the level of humidity in rooms, which is facilitated by its composition. When the level of moisture is high, it absorbs it, and when it is insufficient, it releases it.
The viscous composition allows the material to be plastic and not crumble. In addition, gypsum fiber has high levels of heat and noise insulation, and is also not subject to combustion. This material is easy to install and seal joints. By the way, high viscosity and strength allow you to hammer a nail and screw a screw into it without using a dowel. This material is easy to process with the same tools as wood.
We list the most important properties of gypsum fiber:
Gypsum fiber sheet.
- Low level of heat conductivity, making it pleasant to touch - it is always warm;
- Good soundproofing properties of the material, which depend on how thick it is;
- Resistant to fire. Such boards are excellent for protecting wood structures from fire;
- Ease of processing. For such sheets, special processing tools are not needed, and there is always very little waste from gypsum fiber board;
- Good flexibility allows this type to be used in the construction of arched structures and various elements of interior decoration;
- Resistance to cold allows the sheets not to crack or deform during defrosting and freezing;
- High hygroscopicity allows you to regulate the level of humidity in the premises;
- The ability to hide engineering communications under the sheets allows, for example, to successfully use the sheets together with a heated floor system.
The disadvantages include the relatively large weight, as well as a much higher cost than, for example, a sheet of drywall.
High-quality gypsum fiber sheets are sanded well during the production process and are also treated with a special compound to prevent the sheet from crumbling. If high strength and good load resistance are required from the finishing material, gypsum fiber sheet will be an excellent solution.
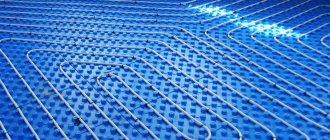
Warm floor under tiles on GVL
The creation of such a design has the following features:
The electrical system is installed most quickly. To do this, mats are laid on the GVL base and all sections of the future heater are connected
It is important to cut the tapes correctly when turning so as not to damage the power cores. After checking the functionality, the tiles are laid
A hydronic underfloor heating system will require much more effort because the pipes must be placed on top of a moisture-resistant gypsum board. This can be done in two ways: Milling for the line elements along which they will be located. The process is quite labor-intensive and is only suitable for two-layer structures. Subsequently, the areas are filled with tile adhesive. The alternative method does not involve milling, but its disadvantage is that many small parts will need to be cut out. The technology involves laying GVL elements between pipes. Stacked adjacent layers should be located in the same plane and completely hide the communications, but not touch them. The gaps are filled with the mixture and leveled.
A heated water floor with GVLV flooring is more difficult to install, but it is considered a more reliable option, and the design pays for itself faster
Regardless of the method, the resulting surface must be primed to ensure reliable fixation of the tile.
Correct completion of all stages will allow you to cover floors made of gypsum fiber sheets with tiles without much difficulty.
Let's compare GVL with analogues
Let's start with the fact that the main analogues include SML and GKL. And now we will look at what is hidden under all these abbreviations.
GVL (gypsum fiber sheet) - A building material consisting of 10-20% cellulose fibers, which serve as reinforcement, 80-90% building gypsum. It is obtained by pressing, without the use of a shell, thanks to which a homogeneous structure is obtained.
GKL (gypsum plasterboard sheet) - A building material consisting of 95% gypsum and 5% cardboard. It is made like a sandwich, cardboard, a layer of gypsum and cardboard again.
SML (glass-magnesium sheet) - A building material consisting of magnesium oxide chips about 40-50%, magnesium chloride about 30%, perlite and composite-based materials for the binder about 7-10%. Obtained by rolling an adhesive mixture of all components.
Let's start with LSU, fairly new Chinese material. The main indicators include non-flammability, which is currently the best indicator.
Also excellent indicators of moisture resistance, strength, non-toxic, not susceptible to mold. It is little known in Russia, which is why many people use GVL or GKL.
GKL is one of the popular building materials. It is widely used for finishing work, both private houses and industrial areas.
Environmentally friendly and safe material. It has good soundproofing and non-flammable properties. Excellent membrane properties, it absorbs excess moisture in the room and releases it in a dry climate.
GVL is a so-called modification of gypsum plasterboard, which is superior to its predecessor in a number of indicators.
The bending strength is several times higher.
It is harder, which allows it to be used to cover walls and partitions with increased impact loads.
A high degree of environmental friendliness; after a certain time, gypsum does not deteriorate like gypsum plasterboard.
The weight of GVL is much greater, which is why it is used as a base for finishing coating.
Types and technical characteristics of GVL
Gypsum fiber sheet - complies with technical documentation - TU 5742-004-03515377-97. The surface of the sheet is polished on one side.
Based on moisture resistance, they are divided into two types:
- Conventional - placed in buildings and rooms with optimal climatic conditions.
- Moisture resistant - used in damp places.
Based on the type of edges, they are also divided into two types:
- Straight edge, usually used when laying subfloors. Under dry screed for GVL Knauf superfloor.
- Seam - gypsum fiber board with mini grooves for building walls and partitions.
Main parameters of GVL
Wide range of gypsum fiber sheet sizes:
- Length from 1500 mm to 3000 mm
- Width from 500 mm to 1200 mm
- Thickness from 5 mm to 20 mm
The weight of a standard sheet (2500*1200*10 mm) is 17 kg.
The density indicator is twice as high as the density of red brick and is 1200 kg/cm3.
The sound insulation coefficient is 37 dB, while for a concrete wall 16 cm thick, this figure is 48 dB.
Thermal conductivity indicators vary from 0.20 to 0.36 W/m C
Vapor permeability coefficient - 0.12 Mg/m h Pa
Advantages and disadvantages
When comparing analogues and building materials, we have already considered a number of advantages of GVL. But there are also other materials, such as chipboard sheets, plywood, OSB boards, etc.
The main advantages of GVL include:
- Environmentally friendly, since the composition includes gypsum, and is also considered anti-allergenic.
- The porosity of the structure, which allows air flows to move, preventing the formation of fungal spores and mold.
- Non-flammable material.
- Easy to install, the slab does not crumble and cuts well.
- It is resistant to temperature gradients, which makes it possible to use it in unheated buildings.
- Durable material, can be used as a finished base for finishing materials. Can be used to construct partitions and niches, but you will need to use self-tapping screws for gypsum fiber boards.
- High coefficient of noise insulation and thermal insulation.
- Possibility of installing heated floors under GVL slabs.
- Significantly less weight compared to concrete screed.
The main disadvantages include:
- The main drawback is the cost.
- The weight of one floor element is high (about 14-16 kg), and it also bends much worse.
The scope and scope of application is huge.
It can be used in decorating elevator shafts, corridors, unheated storage areas and much more. In residential buildings it is used as a rough foundation for floors and for partitions. An aluminum or wooden frame is made and sheathed with gypsum fiber sheets.
If necessary, it is possible to install an additional layer of sound and heat insulation, as well as additional communications, into the cavity of such partitions. Moisture-resistant options are used in bathrooms, under ceramic tiles.
It is possible to use gypsum fiber sheets for cladding wooden structures to prevent fire. A variety of sizes allows you to choose favorable solutions for your needs.
Installation of GVL
First, we dismantle the old coating; if it’s a new house or apartment, then we inspect the surface for defects, holes and chips. We remove debris, repair all defects, cracks and unevenness. It is possible to use dry bedding to level the surface level.
We arrange waterproofing of the floor. If our surface is concrete, then we use plastic film and lay it in such a way that it extends onto the wall, to the thickness of the intended layer.
If you have a wooden surface, then you need to use parchment paper as insulation from water. In case of high humidity, use only moisture-resistant gypsum fiber board sheets.
A damper tape is also installed around the perimeter of the premises. Usually this is isopon or basalt wool. Damper tape is used to compensate for temperature changes.
After we have prepared the base, we begin to install the slabs themselves.
There are two ways to secure the material:
- Frame
- Frameless.
The first method of fastening is using special self-tapping screws. They are fastened around the perimeter at a distance of 30-40 cm from each other. Deepening the screw head by 1-2 mm. inside the stove.
It is important to know that the next row cannot be started close to the previous one. It is required to maintain a distance of half the thickness of the slab. In the future, this distance will be filled with putty.
The second method is rarely used; I glue GVL slabs using a special compound that can withstand the heavy weight of the slab. We also maintain the distance between the seams and seal them.
Features of work
When installing a tiled floor, do not forget about the tile corners - trim (these are special plastic corners that can be purchased at any construction and hardware stores). With their help, there will be no problems with laying tiles.
We should also not forget about the difficulty in performing some finishing work, namely, corner laying of tiles. For beginners in construction and installation work, the classic method of laying joint to joint is suitable, where the tiles, if necessary, are cut off. However, it will not be possible to avoid all the difficulties even with this technique, since corners with trimming of 45 are common, and therefore you cannot do without a special machine - a tile cutter.
If you study all the intricacies of the classic technology of laying tiles, the process will go much faster, and even such issues as laying corners and turns will not raise so many doubts.
Video on the topic: Laying tiles in the bathroom on drywall with your own hands
Selection of questions
- Mikhail, Lipetsk — What discs should I use for cutting metal?
- Ivan, Moscow - What is the GOST for rolled sheet steel?
- Maxim, Tver - Which racks for storing rolled metal products are better?
- Vladimir, Novosibirsk — What does ultrasonic processing of metals without the use of abrasives mean?
- Valery, Moscow - How to forge a knife from a bearing with your own hands?
- Stanislav, Voronezh — What equipment is used for the production of galvanized steel air ducts?
Advantages of gypsum fiber floors
- Environmental friendliness: GVL slabs are excellent for flooring in residential premises, since they contain natural components - building gypsum and wood fibers.
- Strength: during the manufacturing process, the material is impregnated with a special composition and reinforced with wood fiber. All this gives gypsum fiber special strength, which is necessary when constructing floors.
- Fire resistance: this coating practically does not burn. In case of fire it will only char.
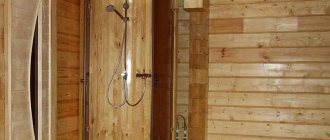
- Water resistance: the use of a special moisture-resistant type of gypsum fiber (GVLV) will allow you to create a structure that is almost completely protected from the effects of water. Therefore, this material is perfect as a base for gluing ceramic tiles in the bathroom, shower, and toilet.
- Thermal insulation: such a surface retains heat well in the room. And if you subsequently lay carpet on the gypsum fiber board, you will get a very warm coating that will be pleasant to walk on.
- Labor intensity and speed of installation: finishing the room with gypsum fiber allows you to avoid many lengthy works on installing the floor. In particular, there is no need to level the base using a “wet” screed, therefore, you will not need to wait until it dries (this can take 3-4 weeks). All major work is carried out very quickly, and the laid floor will be ready for subsequent finishing in 1-2 days.
- Weight: GVL coating has a low specific weight, which will lead to a slight increase in the load on the base floor of the room.
Compatibility issues between wood and ceramics
When laying tiles on a wooden floor in a bathroom on his own, the developer is faced with the problem of incompatibility of these two construction materials:
- the board changes linear dimensions with changes in humidity and temperature;
- tiles and porcelain tiles have a very low coefficient of linear expansion;
- wood is actually a heat insulator, and ceramics perfectly transmit heat through itself;
- boards and beams are destroyed by excess moisture absorbed from the environment;
- By default, tile is a waterproof material, which is why it is chosen for decorating bathrooms.
In other words, there is a high probability that with constant contraction and expansion of the wooden floor elements, the glue will not withstand such loads, the tile will fly off or crack.
Scheme and order
Gypsum fiber sheets have a sufficient number of useful performance characteristics. The main advantage of such material is environmental safety, i.e. it does not pose any problems for human health. In addition, the material has good fireproof protection, which is very important for products used in finishing. GVL sheets can withstand open fire for about 20 minutes.
GVL sheet
In relation to this, other materials cannot boast of such results. In addition, the material does not contain harmful substances in the form of various resins or formaldehydes. Although, for example, in chipboard or fiberboard panels they are contained in sufficient quantities to cause very serious damage to a person in the event of a fire. Due to its general safety, GVL enjoys stable popularity among consumers in the domestic finishing materials market.
Features of the gypsum fiber base
Gypsum fiber sheets are the same drywall, only in a more improved form. These coatings have a number of identical properties. However, there is a difference and it concerns the structure: GVL does not have a double-sided frame with cardboard. There are reasons for this. In this case, strength is imparted to gypsum through reinforcement with cellulose components, as well as through special additives with moisture resistance and fire resistance properties (these characteristics of gypsum fiber board are higher than those of gypsum board).
The strength of gypsum fiber board is an order of magnitude higher than that of gypsum plasterboard, and therefore gypsum fiber sheets are recommended for use when constructing a leveled dry screed base. When a dry screed needs to be done in a bathroom or toilet, then a special moisture-resistant GVLV is used.
To lay a high-quality floor with your own hands, it is important to follow the technology and have an idea of how to lay wall or floor tiles. Creating a new floor involves the following sequence of actions:
- dismantling the old coating, repairing the base;
- arrangement of dry screed made of gypsum fiber board;
- laying tiles;
- grouting joints.
It is possible to lay a sheet of gypsum fiber board on top of a wet screed. However, such work is difficult and is almost never used in modern home finishing practice.
Gypsum fiber for floors: pros and cons
Gypsum fiber sheets are used for covering any surfaces in apartments, private houses, and public buildings. Using GVL, you can quickly and conveniently finish walls and ceilings. They are much better suited for installing subfloors under flooring than plasterboard or fiberboard. Plasterboard boards with moisture-resistant properties declared by the manufacturer, when water gets on their surface, quickly collapse and warp. In addition, gypsum plasterboard is quite fragile; with strong targeted impacts, it can split.
Gypsum fiber boards behave completely differently under similar conditions. They differ:
- fire resistance - gypsum does not burn, the maximum damage that fire can cause to it is charring of the surface;
- strength - reinforcement gives brittle gypsum hardness sufficient for the use of gypsum plasterboard as a floor covering;
- moisture resistance - water does not penetrate into the pores of GVLV (moisture-resistant) boards due to treatment with water-repellent impregnation;
- low thermal conductivity - this indicator makes GVL sheets an ideal material for laying on the floor; they act as insulation;
- resistance to low temperatures - unlike drywall, which can withstand only four cycles of freezing and defrosting, GVL can withstand as many as 15 such cycles.
A small fly in the ointment in a huge barrel of honey - the cost of the material is quite high compared to drywall, however, it is justified by its advantages.
Layout options for floor tiles in bathrooms
The classic rule for ceramic flooring is to lay it out from the middle of the room towards the walls. This allows you to finish each row against the wall with a large piece of tile, more than half its width/length.
The bathroom and toilet are initially the smallest rooms in a cottage or apartment. At least 2/3 of the floor area is occupied by a toilet, shower stall and/or bathtub, washing machine and floor cabinets, washbasin pedestals and laundry baskets.
Therefore, special layout schemes are used here:
- on the floor, not the middle between the walls is marked, but between the free wall and the plumbing or household appliance that is permanently standing on the tile;
- Under the bathtub, washing machine and toilet, the cladding is started randomly.
An example of a tile layout in a bathroom.
Defects in the geometry of rooms, including bathrooms, are masked by diagonal layout schemes. For example, if the walls are not parallel, it will not be noticeable.
Thus, there are several technologies and construction materials that make it possible to tile a wooden floor and ensure a long service life of the coating. All of them are available for independent implementation in a country house or city apartment.
Kinds
Depending on the material, several types of GVL are produced.
Expanded clay
The simplest solution that allows you to carry out planned leveling actions within a strictly defined time frame. The products arrive on store shelves with a small fraction. A tight fit of the particles will be ensured by a fraction not exceeding 0.5 mm.
Depending on the size of the filling, the screed can be made in different ways. For example:
- With a thickness of 2–3 cm, it is possible to lay one layer of gypsum fiber 12–15 mm thick.
- If it is more than 5 cm, then you need to lay 2 levels of sheets with a thickness of 10–12 mm.
- If the expanded clay layer exceeds 10 cm, then three layers of gypsum plasterboard with a thickness of 10 mm or more will be required.
Foam
Suitable for pouring floors that have a more or less level base. At the same time, a specially covered film allows you to increase the energy efficiency of the room many times over. The layer thickness must be at least 30 mm.
Combined option
Expanded clay gypsum plasterboard is laid as the first layer, then expanded polystyrene sheets are applied. Suitable for forming floors from gypsum fiber boards.
Dry screed
Electric heating is preferred. In stores you can find bulk mixtures that improve the quality of the paved surface.
Advice
For simple rooms in an apartment or private house, it is best to choose expanded clay mixture. The material is not a high-quality insulation; insulation is only possible with a layer thickness of 10 cm. If compared with the parameters of a wooden floor, this figure for wood is 25 cm.
We lay pipes for the water floor system
This can be done in two ways. Their differences lie in the design of the channels for placing pipes. As a rule, installation technologies based on modules or rails are used.
For the first option, you should buy special ready-made chipboard modules. Recesses are already cut into them at a certain distance from each other. These intervals depend on the expected heat transfer of the system.
Modular installation of water heated floors
The kit of such a modular system, as a rule, includes everything necessary: the modules themselves with grooves in them, metal plates, fasteners and pipes. All that remains is to assemble the structure in accordance with the diagram supplied with the product. However, flooring in a modular manner is not cheap. Therefore, many prefer an alternative - the budget rack and pinion method.
It does not involve installing channels in chipboard sheets, but stuffing slats. The planks are cut from boards or plywood. The spaces between them must be equal to the thickness of the slats, since in the formed grooves the pipes, the outer diameter of which is 17 mm, must not only fit freely, but also not be destroyed by the displacement of the wood. The width of the guide strips depends on the distance between the pipes in the structure being manufactured. So, with the “snake” method of laying pipes with a pitch of 300 millimeters, a 22 mm plank should have a thickness of 278 mm.
Rack laying scheme
Gypsum fiber sheet: installation guide
When using gypsum fiber sheets for cladding partitions and for cladding, the following general recommendations should be followed:
1. Use gypsum fiber sheets with straight edges; there is no need to remove the chamfer before applying a layer of putty;
2. To fix gypsum fiber sheets, special screws are used that are intended for gypsum fiber boards;
3. When installing sheets, leave gaps that are equal to half the thickness of the gypsum fiber sheet. The sheets cannot be installed closely;
4. Putty work should be carried out using a special mixture for gypsum plasterboard.
Marking and cutting
The sheets must be marked in accordance with the project, cut using a hacksaw or jigsaw. If the edge resulting from trimming is located on the outer corner, then it should be processed with a roughing plane.
Installation of the structure frame
We mark the position of the partition and openings directly on the floor and walls. We use a tape measure and a cord breaker. Laser marking equipment will greatly facilitate your work.
A special sealing tape should be glued to the guide profiles that will be fixed to the floor and ceiling, as well as to the rack profiles near the wall. It allows you to increase the soundproofing properties of the structure.
The guide profiles are attached to the ceiling and floor using dowels, the step is no more than a meter. When installing rack profiles into the guides, it is necessary to observe a step of 60 cm. Monitor the accuracy of the vertical line, use a level and plumb line. In this case, there is no need to fix profiles. When preparing and cutting rack profiles, take into account the fact that the length of the profile should be 10 mm less than the height of the room.
If an opening is provided in the partition , then it is necessary to install a horizontal jumper. A PS profile is used as an intermediate post. The joint of the gypsum fiber sheets should be on this stand.
If it is necessary to strengthen the support pillars of the doorway due to the weight of the door exceeding 30 kg, wooden blocks should be secured in them. It is possible to install an additional rack, which is attached to the main one through PS profile inserts.
Power and low current wiring can be passed through small holes in the rack profiles. It is necessary to take into account subsequent fastening, which in no case should damage the wires. The casing must have holes provided by the design through which the wiring is routed outside. If it is necessary to install electrical boxes opposite each other, then they should be offset by one meter.
Installation of gypsum fiber sheet
To fasten the sheets, we use gypsum plasterboard screws; the fixation step should be about 25 cm. Start fastening the gypsum fiber sheet in the corner, fasten it in two directions, which will be mutually perpendicular. You can fasten from the middle to the edge of the sheet.
Step back at least 10 mm from the edge of the gypsum fiber sheet when installing self-tapping screws for gypsum fiber board. If the sheathing is done in two layers, then the sheets can be attached not to the frame, but to the first installed layer of material.
Please note that the screws must enter the sheet at an angle of 90 degrees. The depth of penetration of the screw into the profile flange should be about 10 mm. The heads need to be recessed into the material by 1 mm.
Leave a gap of 5-7 mm between the sheets. As you work, adjust the position of the racks that fall on the edges and middle of the gypsum fiber sheet. Only after you are sure of their correct position, fix them with screws.
Finishing work
The joints of the gypsum fiber sheets must be puttied. Using a spatula, apply the solution flush into the gap formed at the joint. Screws recessed into the material should also be puttied. Let the solution dry, then finish the surface with putty.
The resulting protrusions and irregularities are removed by grouting. External corners are most often subject to mechanical damage during operation. Therefore, they need to be strengthened with a PU profile. Putty is applied to the surface of the corner, into which the profiled profile is pressed. A leveling layer of solution is applied over the profile.
After grouting the surface, it is necessary to prime the partition with a special compound. The gypsum fiber sheet is pre-treated with a reinforcing compound, so the primer is applied only in areas where the putty is used.
Only after the primer has completely dried can you begin the subsequent finishing of the partition.
Preparatory stage - preparing the base
By wooden floor we obviously mean not only plank floorboards visible from the outside. This is a multilayer structure consisting of powerful beams, lags laid “in a cross” along them and a substrate located under the boards. Before tiles are laid on a wooden floor, all elements of this complex system must be thoroughly inspected and tested.
Inspection of the wooden base
Since it is recommended to finish a new wood floor exclusively with tongue and groove boards, it is not difficult to guess that the floor will have to be dismantled for inspection. After all, the floor with wooden floorboards has already served its purpose. The absence of squeaks and wobbly boards is not an excuse for laziness. It is possible that the problem that is already brewing may simply not be felt.
Let's assume that the design completely satisfies us. Then we carry out inspection, repair and preparation in the following sequence:
- remove the existing floor covering;
- we check beams and joists, replace damaged or beginning to rot elements;
- We check the horizontal position with a level and carry out alignment;
- We generously treat all components of the wooden floor with antiseptic impregnations, preferably mastics with the maximum renewal frequency indicated in the technical specifications;
- After the antifungal impregnation has dried, fill all the spaces between the joists with fine expanded clay. We fill in the insulation so that between the top line of the log and the surface of this heat insulator there remains 5 cm for ventilation;
- We are preparing to re-lay the floorboards; they will serve as a rough base, since gypsum fiber board or waterproof plywood, despite the convincing assurances of the manufacturers, will not withstand intense exposure to moisture and repeated temperature fluctuations. Although dry leveling with plasterboard, chipboards or plywood is quite suitable for arranging a bathroom, a small bath kitchenette and a rest room;
- we lay back the boards that have become rough, leaving 3-5 mm gaps between the floorboards to ensure the possible expansion of the rough floor. We fasten the boards with galvanized self-tapping screws (one in each row joist, two in the outer ones);
- if there are minor defects, holes from former fasteners or knots, they need to be puttied;
- level the laid subfloor with a grinding machine or simply sand it if leveling is not required;
- There should be a centimeter technological gap around the perimeter of the floor. We fill it with silicone foam or glue it with a polymer membrane tape (we bend a 30mm strip of membrane in half, attach one part to the lower edge of the wall, the other to the floor);
- the gaps between the boards, between sheets of plywood, if it was used to level the floor in “dry” rooms, are also filled with foam or glued with membrane tapes;
- To form a monolithic insulating layer, we treat the subfloor with heated drying oil or latex impregnation without the notorious savings.
If it was decided to carry out waterproofing with drying oil or impregnation, and not with roll insulation, without waiting for them to dry completely, the prepared surface must be completely covered with a painting mesh. This will create a continuous insulating layer for laying tiles on a wooden floor, protecting against moisture and compensating for the effects of wood movement.
Lightweight screed device
Now you need to form a solid, rigid base for the ceramic floor cladding. This will be a standard screed, but lighter and more sophisticated, since the wood does not need extra pressure at all.
The base for laying porcelain stoneware, clinker or tiles on a wooden floor can be arranged in three ways, these are:
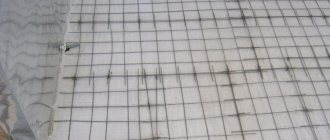
Pouring a standard cement screed, the thickness of which does not exceed 3 cm. First, we lay a metal mesh over the waterproofing and fasten it with self-tapping screws to the rough base, then pour in a traditional cement mortar, which can be replaced with a polymer screed.
That's it, the preparation can be considered complete.
Multilayer prefabricated “dry” screed for gypsum fiber boards
First stage
Before installing gypsum fiber boards, the rough foundation is examined and repaired.
- Check the condition of wooden joists and horizontal parts of the overall structure, their horizontalness and possible depressions and protrusions. If serious defects are detected, damaged elements are repaired or replaced with new ones. Rotten boards and beams are removed, and well-processed, reliable parts of the same format as the old ones are put in their place.
- All structural elements are treated with a protective compound: a special wood impregnation. It will protect the boards and other components of the multilayer device from mold, mildew, and insects. Compositions with fire-retardant inclusions will protect the material from fire.
- If there are differences in height of individual boards of the rough base, grinding and cutting off protruding parts are carried out. The depressions are filled with sealants and wood putty. Sometimes craftsmen use a simple solution: small sawdust mixed with PVA glue. When hardened, the composition acquires special strength and reliably protects the material from any subsequent damage.
- Particular attention should be paid to protruding nails and screws that secure the boards to the beams and joists. They need to be buried in the tree as deep as possible. The dent is sealed with a mixture of sawdust and PVA or any sealant.
Second phase
When the base is prepared, proceed with the installation of the thermal insulation layer under the gypsum fiber board on the wooden floor.
- The rough plank base is covered with a vapor barrier fabric: glassine, corrugated or waxed paper.
- An edge strip is installed along the perimeter of the room to the walls. This can be a narrow strip of basalt wool, foam film, isolon: thickness - 1 cm, width - 0.1 m. It is screwed on with self-tapping screws or placed on glue. Attention! The insulation tape will protect the gypsum fiber board from cracking and bending.
- Next, the main leveling material is cut. When taking measurements, take into account the size of the gaps and the geometric features of the room. The cuts are made with an electric jigsaw strictly along the marked lines. The edges are lightly cleaned of protruding components of the slab.
- A 20 mm layer of fine expanded clay or fine river sand is poured onto the prepared wooden boards. The insulation is leveled using the rules and checked for level.
- Mats of fiberglass or polystyrene are placed on the bulk material, which is cut into squares (rectangles).
- The first level of gypsum fiber boards is placed on top of a “layer cake” created from different materials. For this purpose, moisture-resistant sheets are used. The gap between them should be no more than 1 m.
Attention! Installation of gypsum fiber boards should begin from the doors. This way the thermal insulation layer will maintain its integrity and remain level. If it is necessary to install from the opposite side, you should create “islands” of sheets and move along them.
- The first layer of dry screed made of gypsum fiber parts is covered with an adhesive mass. To do this, use PVA dispersion or special mastic. The composition is applied in an even thin layer. If it has a liquid consistency, use a brush or roller. The thick product is distributed with a fine-toothed spatula. The adhesive solution contains water, but the moisture-resistant characteristics of GVL will prevent the material from deforming.
- Work begins from the corner opposite to the doors. The gluing of the slabs is carried out in stages, in rows. Leveling products of the second level are attached perpendicular to the first. If at first the sheets were laid lengthwise, then the last layer is laid across the base.
- Small-sized leveling products are glued and secured with self-tapping screws in increments of 20 cm. Large-sized ones are screwed at a distance of 30 cm from each other. Attention! To screw the GVL, special hardware with double threads is used.
- Upon completion of laying the sheets, the joints and locations of the screw heads are sealed with putty or sealant, and the protruding edges of the edge tape are cut off with a sharp knife.
To correctly lay gypsum fiber board on a wooden floor, no special skills are required. The main thing is to understand the main technological points, listen to the advice of the experts and follow the installation instructions.
In what cases is laying tiles on a wooden base used?
In Stalinka, Brezhnevka, Khrushchev and later projects, screeds were installed in the bathrooms and combined bathrooms. Wooden floors are very rarely found in houses built in the 50s, built by captured Germans, and in the secondary real estate stock of old cities of the Russian Federation, usually built before 1870.
Therefore, tiles for wooden floors in bathrooms are in demand mainly by individual developers of cottage villages in a number of cases:
- wooden floors on beams;
- impossibility of making a floor on the ground;
- house on a hanging grillage.
To solve the problems of incompatibility between wood and decorative ceramics, several technologies have been developed that a home craftsman can do with his own hands.
Manufacturers produce environmentally friendly waterproofing and antiseptics to protect wood from rotting, two-component glue and ready-made sealants with elastic properties that remain after hardening.
What should a quality floor be like?
What we are used to seeing under our feet in our homes is very rarely the floor in the understanding of building codes. If we look at them, we will see that the floor is a structure on which the life activity or work of people in the room takes place. It must dampen noise, be level, and provide sound and heat insulation.
Almost always floors are delivered in a rough finish. Therefore, even if the slab is covered with linoleum or other covering, such a surface does not fully perform its functions.
The floor must consist of three elements:
- The base, which serves as a ceiling and a base.
- The floor screed creates a heat-insulating and noise-reducing effect.
- Flooring. The finishing coating that people's feet come into contact with.
The use of gypsum fiber boards for screeding is becoming more and more popular, and this is explained by the fact that for a “dry” floor there are currently no alternatives with the same environmental friendliness and moisture resistance. Now GVL is also used in cases where water heating is installed.
Liquid glass coating for plywood base
In order to use this method, we first lay sheets of plywood or chipboard treated with a protective impregnation on the subfloor. Using a wide brush, apply a layer of latex to the surface, onto which we immediately lay a painting mesh. After the latex has dried, securely fasten the mesh to the base with several self-tapping screws.
Plywood additionally levels and strengthens wooden floors
Next, apply a solution of liquid glass, coarse sand and water (ratio 2:2:1) to the resulting surface. We wait until the composition dries, prime it and begin laying the tiles.