Useful tips
Regardless of which finishing option is chosen, load-bearing wooden beams must be treated with antiseptics and fire retardants. The solutions are applied one on top of the other, first antiseptic. Each layer must dry thoroughly.
The natural beauty of wood is always a priority, so it is not recommended to paint beams. It is better to cover it with clear varnish.
If beams have become a decorative element, then you need to take care of their geometric evenness. The best option is to carry out some minor work before installation. If they are installed, you should try to level the ends and the bottom plane with an electric planer. This is not as simple as it might seem at first glance.
If they are hemmed with a finished ceiling (plasterboard, plywood and other materials), the lower surface can be leveled with slats or metal profiles. Or, as was described with plastic panels, using direct hangers. The latter are more often used if the difference in the plane of the beams is significant. For small differences, wooden slats are also suitable.
Video:
What to consider when choosing?
When choosing this or that material, consider the following nuances:
- Surface. How smooth is it? In some cases, you will have to level it using putty.
- Humidity. What will it be like indoors? Will the room be heated during the cold season or not? The fact is that if the room will be without heating, we advise you to consider other finishing options.
- Heat and sound insulation. How important are they to you? If there is a need for thermal insulation, first a draft is created, then insulation is laid, and only then decorative cladding from boards is installed.
Article on the topic: “Which insulation to choose for a wooden ceiling”
The most popular among consumers are tongue-and-groove boards for the ceiling, as well as eurolining. True, the lining is a little narrower, its texture is poorly expressed. This material can be colored in different ways. If we talk about beam-lined structures, they involve either a façade or a deck board. Options with laminate/parquet are also no exception.
We have looked at the advantages and also talked about the subtleties of choice. It's time to get to work!
Adviсe
To decorate a modern home interior, as well as to hide wooden beams in the ceiling, there are many finishing options, among which covering the surface with decorative materials is in great demand. Making a sheathed ceiling is not difficult, but for novice craftsmen, advice from professionals can help with this.
- You need to start working by impregnating the wood with an antiseptic. It will protect the material from moisture and damage, and will also save varnish when painting.
- For insulation, it is best not to use ordinary film, but to give preference to material with a foil coating on a polypropylene base. This way, you will get a high-quality vapor barrier, and condensation will not collect, which can cause damage to the wood. In addition, the film must be laid on the rough ceiling so that there is room for ventilation.
When forming a draft ceiling, it is important to pay attention to its design features and carry out finishing according to a pre-designed scheme. This will not only speed up installation, but will also save ceiling material. The boards are selected according to the length of the room, so there will be little waste left. It is advisable to lay wooden slats from the inside of the structure, placing them towards the opposite wall. After they are adjusted, they are fixed to the beams using self-tapping screws.
The size of the sheathing material must be calculated before installation, and if the panels do not meet the standards, they can be trimmed with a jigsaw
In this case, the length of all boards should be equal to the length of the slats. During sheathing, great attention must be paid to the corners of the structure, since if the vapor barrier is installed incorrectly, mold may appear in them and the wood will rot.
- Places where it is planned to install lighting fixtures must be covered with heat-reflecting foil measuring 20x20 cm. Before installing light sources, you need to take into account their location and provide the system with a protective layer from fire.
- You can sheathe the entire ceiling or its individual sections, leaving the beams as a decorative element. Wooden logs look beautiful in the interior if combined with other types of finishing materials. If the ceiling is uneven and has many defects, then it is better to decorate it with hanging systems.
You can learn more about how to make a decorative ceiling from wooden beams below.
Materials
You can hem the ceiling along wooden beams with various materials. Designs that combine original finishing options from several panels look beautiful, resulting in a completely or partially smooth coating. Such a surface can be additionally covered with foam tiles, textured wallpaper or painted.
In addition, in modern design, a variety of materials are used for cladding ceilings.
Fiberboard. Sheets of the product are cut in such a way that their end parts are placed in the middle of the beam. The fiberboard is attached to the structure using wooden beams measuring 20×40 mm or fixed with special logs. To do this, recesses are cut out in the boards and an additional corner or beam is inserted.
With this type of finishing, it is important to ensure that the fiberboard panels do not sag. Therefore, they are nailed and laid with the seam offset or in a checkerboard pattern.
Plywood
If the texture of the wood is not important for the interior of the room, then the ceilings are sheathed with plywood, it is attached with self-tapping screws and nailed down. In this case, you need to pay attention to the thickness of the beams, since this material is heavy. The thickness of the sheets is selected depending on the distance between the logs. Upon completion of the sheathing, the seams are sealed with wood putty or mastic. Then the surface is well primed and covered with finishing.
- OSB (OSB) boards. This material is considered inexpensive, easy to install and easy to process. OSB boards can be used to cover ceilings in any room. The only drawback of the product is the presence of resin in its composition, but if the material is made with high quality, then during its operation the emission of formaldehyde will be small. The slabs are assembled quickly, since their design is similar to lining and has special grooves. After such covering, the ceilings acquire a smooth and seamless surface.
- Drywall. It is the most common material for covering surfaces; it is easily attached to both wooden and aluminum frames. With its help, you can create beautiful multi-level systems or simply create an insert between wooden beams. After installing the drywall, it is necessary to seal all the joints; to do this, apply a special construction mesh and cover it with putty.
- Sandwich panels. They are an excellent insulation material that is easily joined using a special connection. The panels are screwed to the beams with self-tapping screws and then painted. The material is available with a matte and glossy surface and does not require additional processing. They can either completely cover the ceiling or make separate inserts vertically or horizontally.
- Wooden lining. It is one of the most popular types of material that looks beautiful in the cladding of private houses; wood products are environmentally friendly and have a pleasant aroma. The board-lined ceiling maintains a certain microclimate in the room and absorbs excess moisture. If such a structure is installed correctly, it will last for many years and provide good sound and heat insulation. Most often, clapboards made of cedar, alder, pine and oak are chosen for cladding ceilings. Its width varies from 30 mm to 150 mm, and its length can reach six meters. Of course, such cladding is considered expensive, since, in addition to installation, the boards must be additionally coated with varnish, which, when dried, creates a protective film and makes the coating resistant to moisture.
How to bind
Many people are concerned about the issue of filing a rough ceiling. Before starting work, you need to think through everything.
If you plan to finish with sheets of plasterboard, is it possible to attach the material directly to the beams without hemming it with boards? This can be done, but it is worth considering some subtleties. Since the floor beams are unevenly curved, it is difficult to attach drywall to them. As a result, you will not get a perfectly flat ceiling.
To provide excellent thermal insulation support, you need to nail the block at a certain pitch and then use a special profile for drywall sheets.
Suspensions are suitable for leveling the metal profile. The surface will be perfectly horizontal.
You can attach gypsum boards directly to the timber
But it must be leveled first, quality is also important
Today, insufficiently dried lumber is sold, so deformation of the wood over time is inevitable.
Even a deviation of the structure by a couple of millimeters can ruin the entire plasterboard ceiling.
If you understand that the use of different materials will not allow you to install a ceiling covering of the required quality, but will only inevitably entail new costs, you will get an excellent result for reasonable money. Agree that such savings are a really wise decision.
Ceilings made of siding and plastic, in which rooms is it rational to use these materials?
Plastic is a relatively inexpensive finishing material; it does not look as attractive as natural wood, but plastic panels have the best resistance to moisture.
It is rational to install a plastic ceiling in those rooms where there is often high air humidity:
- bathrooms,
- kitchen areas,
- in the bathrooms.
Plastic panels are installed quite easily and quickly; one person can handle this work, since the material is practically weightless and very light.
It is produced in the form of long panels, which are secured with staples or screws.
To assemble a frame for attaching a plastic ceiling, use bars, the thickness of which is 2.5-3 centimeters. And if the finish is attached to a concrete plane, then the installation of metal profiles will be required.
Installation of plastic ceiling
The guides are fixed in increments of about 50 centimeters. After fixing all the plastic panels, a decorative plinth is attached, which hides the joints of the plastic and the walls.
It is advisable to use siding in the following places:
- on the loggia;
- porch;
- on the veranda.
This finishing material is most often used as exterior finishing. Siding is a durable and moisture-resistant material that is available in a wide range of textures and shades.
It has been used for several decades without changing its color.
They produce vinyl and metal siding panels.
Vinyl is not a very expensive and flexible material that is great for ceilings.
Ceiling siding
Installation of vinyl siding is quite simple, the panels are not heavy, they are mounted on special profiles, and 1 person can handle the installation.
Vinyl increases slightly in size under the influence of temperature changes, so during its installation it is necessary to leave gaps of 0.5-1 cm around the perimeter. ABOUT
The siding can be cleaned with any detergent and water.
Installation of sheathing and ceiling covering on wooden beams with plasterboard
Now let's talk about how to attach drywall to a wooden ceiling. To fix gypsum sheets, galvanized screws are used. Their length is selected depending on the thickness of the rough ceiling. Usually, hardware 3.2-5.1 cm long is sufficient. The head of the self-tapping screw is deepened into the body of the material to a depth of 1 mm.
Plasterboard slabs are laid staggered, that is, four corners should not converge at one point.
- slightly above the bottom edge of the load-bearing elements (in this case, the beams will be visible in the interior of the room);
- hem the ceiling below the beams and completely hide them behind the trim.
- Screws are screwed evenly over the entire plane of the slab in increments of 250 mm. Along the edge, hardware is installed in increments of 150 mm.
- If gypsum boards are cut, then the edge is chamfered at 30 degrees. This is necessary for the convenience of puttying the ceiling surface.
- After installation, the surface is puttied. All seams are reinforced with reinforcing tape. To prevent cracks from appearing on the surface of the ceiling later, bandage tape is glued to the top of the seam.
This method is more suitable for low rooms, because after installation the ceiling surface will not decrease significantly. As a rule, installation is performed on a rough ceiling made of plywood, wooden boards or OSB. The first option is used if they want to make the room visually higher and interestingly play up the beams in the interior of the room.
Some design styles involve the use of ceiling beams, so they are not specifically covered with trim.
Additional information on the topic:
- How to disassemble a plasterboard box with tiles to replace a sewer system
- Design of plasterboard walls in the living room and hallway photo
- What screws are used to screw drywall to a metal profile?
- Photos of plasterboard ceilings for a living room with a bay window
- How to screw drywall to the ceiling alone without any help
The classic version of the ceiling padding
The general rule used when planning to pad a ceiling with a board is as follows: to securely fix lumber, no matter whether it is edged or unedged, it is necessary that the board screwed to the beams touches the walls with its edges. A small shelf, 2.5-3 cm wide, on the top row of brickwork is left at the stage of laying the mauerlat. It is clear that there must be shelves on at least three walls, two of which are supporting for the ceiling beams, and one is the starting one.
In this case, filling the board is not particularly difficult:
- We measure the distance between the walls from shelf to shelf;
- We cut the required amount of lumber in one bag;
- We lay the boards on the shelves and fasten them with self-tapping screws and a screwdriver.
Before attaching the ceiling boards, they must be aligned with the starting strip, beaten with a carpenter's hammer, and only then the fasteners must be installed.
In this case, the fasteners must be oblique, that is, each subsequent screw is placed with a slight offset to the left or right, so that there is no one line weakening the floor beams.
What should the height be?
To make it comfortable for residents to stay in the room, you need to take into account the height of the walls. In a country house or cottage, the owner has the opportunity to think in advance what the finished ceiling height of the room will be, taking into account the height of the family members.
The minimum height must be at least 2.4 m; at a lower height, the ceiling will visually put pressure on the residents. Even at a height of 2.5 m, an adult can catch a chandelier or lamp with his head if it is a pendant model. In a private house, you should choose the optimal height (2.7 m), saving heat in the room, which will be distributed correctly (at the level of human height) and without overheating the air above. You can try to visually increase the height of the ceiling using the advice of interior designers.
By using contrasting colors in the design of a room, you can achieve a visual increase in space. With a light ceiling and walls painted in dark colors, the room will visually seem spacious. A hidden pendant with spotlights will help achieve the same effect.
When decorating the ceiling, the walls play a big role. To visually elevate it, you should choose wallpaper with vertical stripes or an elongated pattern. Wallpaper with wide figures or large patterns can visually narrow the size of the room.
If the house has several floors, the heights on the floors may be different. On the first floor they often have a high ceiling (above 3 meters), on the second floor you can make a lower ceiling. Compared to Finnish wooden houses, its second floor height is 2.4 meters. When determining the height of the room, you should take into account the size of the room. If you have a small room in a country house with a high ceiling, the room will not be cozy.
If desired, the summer veranda can be adapted for housing or a place where vegetables and fruits will be stored all winter. The heat that will come from the house will allow you to maintain a positive temperature on the veranda all winter. On the veranda, smooth ceilings are often made, covering them with different materials. The height from floor to ceiling in this case may be less than in the living room (about 2.3 meters).
Sheathing with boards or clapboard design options and installation technology
Before making a ceiling in a private house, please note that for covering it in a wooden building it is better to choose a board, wooden lining or MDF. Plastic panels in this case will be inappropriate
For an original design, you can choose laminate, and a block house looks great in a house made of timber.
Advantages:
- Environmentally friendly. The panels, like the boards for the ceiling in the house, are made from wood material without the use of resins and harmful phenol.
- Design. The color, texture and width of the cladding can be selected for each specific interior.
- Water resistance. The material is not afraid of moisture, which makes it possible to install it in bathrooms, saunas, and kitchens.
- Easy care. To clean the lining, simply wipe it with a damp cloth without using cleaning agents.
- Functionality. All necessary communications can be easily placed inside the structure of such a ceiling.
Finishing option
Technologically, the installation process is practically the same and includes several stages:
- Construction of the ceiling frame. In wooden houses for this purpose they make lathing from bars. In rooms with possible sudden temperature changes (bathroom, kitchen) and a high risk of deformation of the wooden base, it is better to use metal profiles.
- Before you line the ceiling with a board or clapboard made of wood, it needs to be kept in the room for several days for acclimatization.
- The material is cut to the length of the room. In this case, it is necessary to provide a gap of 3-5 mm. It is needed to allow free expansion of the slats with possible changes in temperature and humidity.
- The installation of the first ceiling element begins from the wall opposite the entrance to the room or from the window.
- The board is nailed to the bars, or with self-tapping screws if the base is a metal profile. The lining, which is attached using the tongue-and-groove method, must be fixed into the groove every 20 cm. From the groove side, the panel is attached to the frame using clamps. This metal plate is attached to the frame with self-tapping screws or a nail on one side, and its second part has a recess into which the panel fits. All subsequent strips are assembled in this way.
- The last plank needs to be cut not only in length, but also in width, not forgetting to leave gaps from the walls. In addition, it must be secured in the same way as the first.
- Holes for spotlights can be made before or after installing the panels on the ceiling.
- Final finishing work includes the installation of lamps and plinths, the function of which is to embellish the interior of the room, as well as hide the seams between the ceiling and the wall. If desired, the material can be coated with colorless varnish.
Ceiling made of lining
What is a false ceiling
Contents of the material
The top floor pie is always multi-layered. Each of its components, covering the base surface, can be called a false ceiling. Therefore, non-specialists include suspended structures made of any finishing materials - plasterboard, tension films, plastic, wood - into this category. But this is a mistaken opinion.
Scheme of false ceiling
Suspended ceiling installation
The construction documentation clearly distinguishes between suspended and false ceiling systems. The first are collapsible structures, which, in turn, are divided into two categories: walk-through (providing access to communications hidden behind them) and non-pass-through (access to communications requires the dismantling of several structural elements). P1-01 to SNiP 2.08.02-89 states that a non-passable suspended ceiling is the active part of the ceiling, behind which utility networks are placed.
Suspended ceilings are non-removable structures that are also an active part of the base floor. There are no distances between the first and second elements of the pie, so laying electrical networks and life support communications is impossible.
The basic requirements for sheathed structures are as follows:
- installation and fastening of structures and materials weighing up to 10 kg is permissible without strengthening the base floor;
- installation and fastening of structures and materials weighing from 10 to 20 kg is carried out by installing additional sheathing made of wooden blocks or metal profiles;
- installation and fastening of structures and materials with a total weight of over 20 kg is permissible provided that additional load-bearing structures are installed in the fastening area.
Installation of ceilings in similar houses
To do the ceiling correctly, you need to have an idea of the scope of future work. To do this you need to know its design. It is quite simple, and consists of the following layers, in order from bottom to top:
- Interior finishing
- Vapor barrier film
- Layer of thermal insulation material
- Waterproofing
- Flooring or flooring of the next floor
The last point can be excluded if you do not plan to use the room directly above the area of the ceiling in question. Also, in the case when the outer side of the ceiling is the roof, this layer is not needed; it is replaced with roofing material.
Preliminary preparation
It is necessary to calculate all the expenses necessary to build a rough foundation.
- Ladder;
- Construction trestle;
- Self-tapping screws, screwdriver;
- Sheathing material, heat and vapor barrier;
- Construction level, stationery knife;
- Antiseptic, construction adhesive, fire-fighting compound.
First, I inspect the beams for defects: cracks, chips, curvature, mold, cover the cracks with putty, clean suspicious areas, treat them with an antiseptic, primer, after which they can be painted, if necessary, to do it once and for centuries.
The rough base together with the beams can be treated with an antiseptic with the addition of a teaspoon of universal construction glue so that the mixture does not drip and creates a more durable film.
Assembly of hydro- and vapor barrier
First, you need to decide what the room will be used for; if there is another heated room on top, then there is no point in installing heat and sound insulation on the sub-ceiling; wooden surfaces distribute noise and heat quite well. The vapor barrier is installed along the entire perimeter of the ceiling, especially well stretched in the corners, laid with an overlap, the boards are mounted overlapping. This will help protect the rough base and wooden ceiling from rotting and mold.
Ceiling vapor barrier - effective and high quality
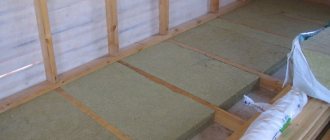
Subtleties of laying insulation
If the insulation is installed incorrectly, it is possible to destroy the baseboards and decor, the rough ceiling, even cause a fire, for which you should slowly study the instructions so as not to confuse the sides, because the markings of different companies may contradict each other.
It is enough to cut circles of about 20 cm in the material around the planned lamp; this will create good fire safety, which is extremely important for a wooden house and wooden decorative elements. It is important to establish these places during the installation of the material - we measure the places from the wall, then put a mark on top, in the form of a circle with a diameter of 20 cm
Integrated thermal insulation reduces building energy losses
The same applies to vapor barrier, although the material is quite durable, but unstable to high temperatures, it can melt and lead to a fire, especially if the rough, facing and decor are made of untreated lining.
Thus, an emphasized design can lead to dire consequences for the interior and the integrity of the room. But since the lamps and decor are not mounted to the sub-ceiling, like the wiring, it is enough to install heat-reflecting foil, 20 by 20 cm squares, on the vapor barrier below, at the mounting points. It will not be visible, but it will help preserve the interior of the room and not damage the intended design with decor.
Installing thermal insulation in a wooden ceiling
As we see, it is quite possible to make a wooden ceiling with your own hands quickly and efficiently. In addition, you can hem the rough base yourself, faster, better than many workers.
sledcomspb.ru
miraclesniydom.ru
kvartblog.ru
pootdelke.ru
How can I hem the ceiling?
The interior and style of the room largely depend on the material with which the rough ceiling will be covered. In addition, the specific features of the repair location should be taken into account.
You can hem the ceiling with the following materials:
- Drywall. GCR is affordable and quite easy to use. It is glued to the rough ceiling or screwed to a spatial frame made of a steel profile. Please note that in damp rooms only moisture-resistant drywall should be installed. External putty of the assembled surface is required.
- Plastic panels. These products have a presentable surface and are light in weight. As a rule, they are fixed to a frame made of timber, steel or plastic profile. If the base is well leveled, then the panels are glued to it using liquid nails.
- Wooden lining. This type of finishing has a pleasant and beautiful appearance, is environmentally friendly and durable. The slats can be attached either to a solid base or to a frame. Fixation is carried out using thin nails without heads or self-tapping screws.
- MDF panels. The front part of these products can imitate wood, natural stone, sky or plants. Fastening is carried out using special clamps (clasps), which press the edge of the slats to the base or frame.
- Plywood. Before installation, plywood sheets must be treated with an antiseptic and primer. If installation is carried out on a frame, then the joints of the sheets should be on its guides. After installation, seams are sealed and painted.
- Siding. Plastic siding is an ideal material for finishing non-residential and damp rooms, such as a bathroom, summer kitchen, garage and balcony. Installation of this coating is quite simple and does not take much time.
The choice of material for lining a rough ceiling depends on the purpose of the room, the taste and financial capabilities of the owner of the building.
Sheathing with boards or panels
To hem the ceiling with fiberboard or plastic along beams or counter-lattice, work begins with the most visible wall in the room.
There is a certain procedure for hemming the ceiling in a house with a board:
- The material is measured with a tape measure or locally and cut with a jigsaw from the wrong side.
- It is attached to nails or screws. The first of the boards is fixed at the places where it intersects with the counter-lattice.
- The lining or tongue-and-groove board is hammered with a wooden hammer or block until a complete tongue-and-groove connection is achieved and secured to the outer elements of the sheathing. They are fixed to the intermediate bars one after another in a checkerboard pattern to avoid damage to the cladding.
- After finishing the covering of the entire ceiling surface, the places of contact with the walls are covered with skirting boards made of wood or polymer materials.
- The boards are coated with water-based wood impregnation or a coloring compound.
When fiberboard is planned to be used only for filling niches between beams, the finishing material is attached to pre-nailed bars. At the same time, the filing technology is similar. The same method is used for finishing with plastic panels or MDF, but to prevent chipping, experts recommend pre-drilling small-diameter holes in the products at the attachment point.
How to make a rough ceiling from boards on wooden beams
The construction of a plank sub-ceiling is carried out in two stages:
- first of all, you need to secure the boards to the joists - as mentioned above, they can be nailed or screwed onto self-tapping screws;
- then you need to put insulation and waterproofing on top of the boards.
We make the rough ceiling from boards slightly smaller than the span between the beams
A rough ceiling made from boards located below the joists is a simple and practical option. Its construction takes a minimum of time, so anyone can handle it. The disadvantage of this design is that the beams will be covered by the ceiling, and it will not be possible to reach them easily and quickly if necessary. However, there is another, more complex option for attaching boards.
We suggest you familiarize yourself with How to properly install a ceiling-passage assembly for a chimney in a bathhouse
In this case, they are located on top of the beams:
- first, it is necessary to secure the cranial bars to the logs;
- then boards are laid on them;
- then you need to lay thermal insulation and a vapor barrier layer; they can be placed both above and below the boards.
This option is often used if the beams will be used as a decorative element, that is, they will remain visible when the construction of the interfloor ceiling is completed. This approach allows you to create a rather harsh, textured interior that will look very impressive and stylish.
Beams on the ceiling as a decorative element
In order to build a ceiling from plywood, you need to correctly assemble the sheathing and then fasten the plywood to it. As with boards, you need to carefully ensure that the sheets fit snugly against each other and there are no gaps between them.
The work is carried out in the following order:
- first of all, you need to shoot a vapor barrier membrane to the joists;
- since the vapor barrier membrane will not withstand the insulation layer, after laying it you need to make a frame that will simultaneously perform this task and serve as the basis for attaching the plywood itself;
- Sheets of plywood are attached to the resulting sheathing;
- After this, insulation is laid on top.
Plywood rough ceiling
Self-installation
The arrangement of the ceiling surface is carried out in several stages, each of which is important; if one of them is neglected, this can negatively affect its appearance and shorten its service life. After you have decided what is best to hem the ceiling in the house, you begin to prepare the tools and purchase the necessary materials.
The work is performed in the following sequence:
- Beams are processed. Before lining the ceiling, the timber is coated with fire-bioprotection - a complex impregnation intended for wooden elements - and then it is thoroughly dried. This will extend its service life and prevent rotting, insect damage and reduced load-bearing capacity.
- Aligning beams on the ceiling. To ensure a smooth surface, the location of the beam is checked with a laser level or with a rope that is pulled diagonally across the room between the outer elements. If there are unevennesses, leveling is performed. If the lining is continuous, you can make the ceiling even by constructing lathing along the bottom plane of the beams, using 40x60 or 50x50 millimeter bars or a plasterboard profile. If there is a significant difference, U-shaped brackets for gypsum boards are used. Read also: “How to make a suspended ceiling - installation sequence.”
DIY wall decoration
Tools for working with drywall.
Before starting installation work, you need to pay attention to the fact that wood is a moving material that has temporary shrinkage, due to which distortions, cracks and other defects may occur on the finishing base. Wood is a material very sensitive to changes in humidity and temperature; it can shrink and swell
Wood is a material that is very sensitive to changes in humidity and temperature; it can shrink and swell.
This fact must be taken into account when carrying out repair work.
Tools and materials
Wall cladding in a wooden house begins with the construction of a frame, which can be made of wooden blocks or a metal profile. The second option, although it has a slightly higher cost, is much easier to work with, since the wooden blocks are not perfectly smooth.
The metal frame consists of the following elements:
- UD profile (guide) – attached along the entire perimeter of the walls;
- CD profile (load-bearing) – mounted vertically in increments of no more than 60 cm;
- U-shaped fasteners - used to fix load-bearing elements;
- dowels or screws.
To cover walls with your own hands, you will also need some tools:
- electric drill;
- screwdriver;
- stationery knife;
- roulette;
- level;
- plumb line
Installation of the frame and fastening of drywall sheets
To simplify the task of constructing a frame, a diagram of the fastening of the profiles is drawn on a sheet of paper at the selected scale. It should be taken into account that the supporting profile must be installed in such a way that the joints of the drywall fall in the middle of it.
Then, using a building level, lines are drawn on the ceiling with an indentation of 10-15 mm parallel to the walls. After this, the resulting lines are projected onto the floor, for which you can use the same level and plumb line. On the lower projection, the attachment points of the supporting profile are marked.
Once the markings are completed, you can proceed to installing the frame. Along the perimeter of the walls, exactly along the drawn line, guides are attached to the floor and ceiling with self-tapping screws. Load-bearing elements are installed between the UD profile according to the markings and secured with short screws.
If you plan to insulate the house, then a layer of thermal insulation material is laid between the vertical posts, for which it is recommended to use mineral wool. To give the frame rigidity, after 100-150 cm the supporting profile is attached to the wall using U-shaped hangers.
At the last stage of work, the metal frame is sheathed with gypsum board. Small screws are used as fastening elements, which are mounted in increments of 15-25 cm. The heads of the screws should be pressed into the drywall so that they do not interfere with further finishing.
Basic properties of wood
When choosing an option for installing a ceiling, you should take into account the basic properties of wood. First of all, you need to understand that wood is a natural material with many microscopic pores. Quite often you can hear that a tree is breathing. This means that wood is able to absorb moisture from the environment during periods of high humidity and release it into the space when a dry microclimate is established in the room. In this case, the wood itself swells slightly and then shrinks again. From this we can conclude that maximum strong fastening of materials to a wooden surface is not allowed, otherwise deformation and warping cannot be avoided. In addition, in order to ensure a normal air exchange process, you should not choose materials that do not allow moisture and water pores to pass through.
In conclusion, it can be noted that installing a ceiling in a wooden house can be done with your own hands.
It is only important to know the features of the materials used, as well as adhere to the technologies developed by professional builders. If self-confidence is not enough, then you can always hire qualified craftsmen who will help create exactly the kind of ceiling that the owners have dreamed of all their lives.
After all, only a competently and correctly finished ceiling surface can positively influence the atmosphere and create truly homely coziness and comfort.
Rough ceiling finish
There are many durable materials for lining a rough ceiling, embodying the intended interior, a special design of the room, even without cladding, in an antique style. Depending on the purpose of the interior of the room, finishing and decor are selected.
Filing the rough ceiling
For example, for rough renovations, interior design, when planning a design or decor in a bathhouse, you cannot use the following elements:
Various wooden ceiling panels: chipboard, fiberboard, plywood, because with high humidity they will deform. Plastic, it can be used to decorate a rough base, a ceiling with a wood and antique look, to emphasize the design even without facing cladding, but it has poor thermal insulation properties, condensation will form, and then mold on the finish. Timber containing resins that will drip when heated
This can be lath or MDF, it is important to check before purchasing.. https://www.youtube.com/embed/LeOoQZaFNc0
Construction of a wooden rough covering
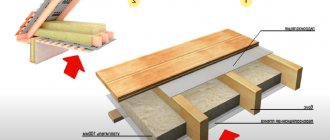
Before hemming the ceiling surface, you should understand the layers that make up the interfloor ceiling in a wooden house.
Floor layers from top to bottom:
- The topmost layer is plank flooring, which can be the base for the topcoat or serve as a final finish.
- A vapor barrier membrane is a mandatory layer. Membrane fabric prevents the formation of condensation on wooden structures, prevents the formation of wet areas, mold and fungal growth.
- Thermal insulation. It can be installed in any case, regardless of whether the premises are residential or not on the floor above. If the attic is not residential, the energy efficiency of the house increases; if the attic is residential, the sound insulation of the floors increases.
- Waterproofing. The layer is designed to protect insulation and wooden structures from moisture. If you do not lay waterproofing, humid air and hot steam, rising to the ceiling, will destroy the thermal insulation material - which will reduce the practical characteristics of the product.
- The rough ceiling is the last layer that is finished with the finishing cladding.
Sometimes boardwalks are left unlined, especially when good quality boards are used. If, after arranging the floors, the floor needs to be laid on the floor above, then a layer of vapor barrier is laid on top of the insulation, then the plank base of the floor can be laid.
Load-bearing beams as a decorative element
So, it was decided to leave the beams in the form of timber as a decorative element. What is done in this case, what work is carried out. The simplest option is to lay 30-40 mm thick boards on top of them, which will determine either the rough ceiling or the finished one.
As for the finishing design. To do this, use tongue-and-groove boards with a moisture content of no more than 20%. Before laying them on top of the beams, the latter are leveled in a horizontal plane by removing a layer of protruding surfaces, for which an electric planer is used. You can, of course, carry out leveling by raising or lowering each beam, but this is a more complicated option. Moreover, if high-quality beams were chosen as load-bearing ceiling structures, then their dimensional parameters are quite accurate, which will reduce the number of layers removed with a power tool.
After leveling work, the tongue and groove boards are laid, as if they were being installed on the floor. It's done like this:
- The first board is laid with a tenon towards the wall with a gap from the wall surface within 10 mm (in case of thermal and moisture expansion of the wood).
- The board is aligned with the wall.
- The board is attached to wooden beams with self-tapping screws, the length of which is twice the width of the board.
- A 50x50 mm rail is fixed along the beams parallel to the board. The distance from it to the first board is 2-3 cm greater than the thickness of the already laid ceiling element.
- The second board is installed with a tenon in the groove.
- Several wedges are driven between it and the hammered lath, which will tightly press the second board to the first.
- Fastening is done with self-tapping screws.
- The rail is dismantled and moved with the fastening further to the same distance. And the entire installation process is repeated.
Plank flooring is laid on wooden beams to form a ceiling
What happens in the end? The load-bearing beams are visible from inside the house; plank flooring is laid on them without gaps or cracks. All that remains is to finish the overall structure from the inside: paint or varnish.
As for the ceiling itself:
- on the upper side, the tongue-and-groove boards are covered with a waterproofing membrane;
- insulation is laid on top;
- another layer of waterproofing.
Second option
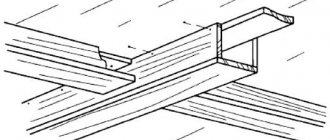
If the load-bearing beams serve as supports for the floor of the upper floor, then the process of forming both the floor and the ceiling is carried out differently. Skull bars are punched along the beams (along them), to which pieces of finishing ceiling material are attached from below. It can be the same boards, plywood, drywall and others.
Skull bars on beams
A pie of waterproofing, insulation and another waterproofing layer is placed on top of the resulting structure. The last material is laid on the beams. And already on them the floor of the upper floor is formed.
It turns out that on the lower floor the beams will not be visible to their entire height, but only to part of it. At the same time, the amount of materials used for finishing increases. And one moment. This design does not have a draft ceiling as such. Here, most likely, there will be a subfloor, which is mounted on wooden beams (from above).
Basic techniques for lining a ceiling with boards
In fact, the decision about which ceiling boards will be used is made by the customer; it all depends on the financial capabilities and desires of the manager. The three most common filing options are most often used:
- Ceilings made of edged boards are the most expensive and high-quality method of arranging ceiling flooring. The surface of the padding turns out to be quite flat, like a table, which makes it possible, after laying the vapor barrier, to sheathe the ceiling with any lath, MDF board or plasterboard sheets;
- Rough floorings made from unedged sawn logs are stuffed only as a sublayer for further finishing. A ceiling made from unedged boards costs half as much as sheathing made from graded material, but unplaned lumber always has to be additionally hemmed with plywood or cardboard to eliminate cracks;
- Stacked ceilings made from “shorts” - scraps of boards left after laying sheathing or other roof parts.
Lining the ceiling with scraps makes it possible to significantly save on lumber. This option is suitable for any ceiling structures; moreover, for the ceiling you can use lumber of any thickness, preferably at least one inch.
The most important stages of ceiling cladding
Depending on the construction and finishing technology you choose, the ceiling can be:
- Embossed. Characterized by an original design, it attracts with its quality and ease of assembly. Assembled from chipped timber or unedged boards.
- Rack and pinion. It is considered the highest aerobatics in the art of artistic decoration. The result will definitely please you - it is a successful combination of box-shaped caissons and protrusions-battens, alternating with depressions.
- Hemmed. It is this option that interests us most. The material used is lining, panels or ordinary boards. All of them are mounted on a frame mounted on the ceiling. Such species as oak, linden, as well as conifers (larch, pine, etc.) were and remain relevant.
We advise you to immediately stock up on tools such as a tape measure and a pencil, lacing, a hacksaw, a square, a hammer and a screwdriver.
Insulation during the installation process is desirable, but not mandatory. It is necessary if you have a completely cold superstructure above your head. Insulation (often with flashing for soundproofing) is applied to the ceiling that separates the attic from the space below. The spacer can simply be nailed, secured with twine, or glued to the attic beam.
The final stage will be cladding. The longitudinal classic styling looks very solid and solid. The combination of boards in dark and light colors looks no less interesting. Most often it can be seen in country houses and baths. And if we do not hem the ceiling with a board ourselves, but hire some virtuoso carpenter, even from one type of board he will be able to make something spectacular: trapezoids, fans, checkers.
Types of ceilings
- Installation of a monolithic slab
- Slab floor
- Wooden floor
Every person who has ever encountered the construction of buildings or structures with their own hands knows that one of the most difficult elements is the ceiling.
You can do without a foundation when building a house, a bathhouse, or a gazebo without impenetrable walls, but the construction of the ceiling must always be of high quality.
The ceiling is divided into three types of slabs, monolith and wood. Each of them has its own advantages and disadvantages, and the installation process varies greatly.
The ceiling can be of three types: slabs, monolith and wood. Each has its own advantages and disadvantages, and the installation process varies greatly. There are a number of other features that should be taken into account before installing a ceiling, since not everyone may be suitable for a particular case.
Installation of a monolithic slab
Monolithic ceilings are the most durable, but also the most expensive and labor-intensive. It is also not suitable for all building structures.
Material options for lining a rough ceiling with wooden beams
If you plan to frame the ceiling along wooden beams, then most often the owners use gypsum plasterboard sheets and lining. But if the rough covering is made of good quality boards, you can do without decorating the surface.
Wooden boards, plywood - the price of materials is affordable, you can choose plywood from $20 (RUR 1,300) per sheet, and solid boards from $85 (RUR 5,500) per m3
When choosing boards for hemming that you plan to leave without finishing, you should pay attention to the quality of the cut - cutting without falling out knots or black spots will look more aesthetically pleasing on the ceiling
Materials and tools
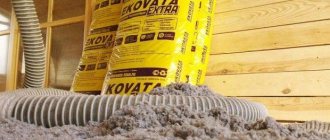
The materials you will need are a 25 mm thick board, screws or nails with a pin length of 45-55 mm, and skull blocks. But the insulation is selected according to the characteristics of the premises. Most often, mineral wool is used in wooden houses. The sheets are already sold with a foil insulating layer that reflects heat back into the room. Also, the elements have a stable shape and are convenient for display alone.
Set of tools:
- construction stapler and staples;
- screwdriver;
- hammer;
- saw;
- square and pencil.
Technology of hemming the ceiling with boards
To make a rough ceiling made of wood, you should choose a cladding option - below or above the beams. The algorithm is simple - first, boards are nailed, then layers of heat, hydro, and vapor barriers are laid.
And now in more detail how to fix the boards on the joists:
- It is easiest to sheathe the bottom side of the joist. The board covers the bottom surface of the beam, fastening it with nails or self-tapping screws. Thus, the beam structures are hidden behind the plank flooring, so if it is necessary to replace elements, the entire surface of the ceiling will have to be dismantled.
- Sheathing above the beams is a little more difficult. Moreover, the beams will remain open, which means they will require decoration so as not to spoil the aesthetics of the room.
How to make a rough ceiling higher than the beams:
- attach cranial bars to the side surface of the log - this is a bar with a cross-section of 40x40 mm;
- cut the boards for hemming according to the pitch of the beams;
- fasten the boards for the rough ceiling along the bottom of the skull beam so that the direction of the board is perpendicular to the location of the beams;
- fix the boards with nails or screws.
All that remains is to lay insulating materials on top of the boards and sew up the entire surface. You can consider an option in which the board is laid out on top of the cranial block. Here both the beams and the cranial block remain visible - it looks beautiful, but you will have to choose high-quality timber and decorate it with protective varnish.
Design features of floors
The main feature of such ceilings is that they consist of several layers.
- Support beams. They form the base, are placed on the surface of the ceiling at a certain distance and are attached to each other using timber.
- Attic floor. It is a flooring made of wooden planks that separates the roof from the floors.
- Insulation. Polyurethane foam, mineral wool and polystyrene are most often used as thermal insulation. This layer of construction protects the room from cold air currents that can penetrate through the roof or interfloor ceilings.
- Vapor barrier. It is laid in order to prevent the accumulation of condensation and create an optimal microclimate in the room.
- Rough ceiling. It is a coating that is attached to the sheathing; OSB boards, boards or plywood sheets are used as the finishing material for cladding. The sheathing is usually made from slats. After installing the rough ceiling, decorative cladding is performed, with the help of which the covering is either completely sewn up, or the beams are simply hidden.
Before making a black ceiling, in order to obtain a high-quality result, you should understand what constitutes an interfloor ceiling in a wooden building. It consists of several layers and each performs a specific function. Provided that all elements are assembled correctly, the ceiling will be reliable and will last for a long period.
The interfloor ceiling in the basic version has 5 layers:
- Plank floor. If there is another floor on top, you also need to lay a floor for it. The plank layer can be rough, for finishing, it can be used as a finishing option.
- Vapor barrier. Despite the fact that some owners do not make this layer, to obtain a high-quality result it is advisable to lay a vapor barrier material.
- Insulation. Creating thermal insulation is necessary to keep the house warm. This is especially important when there is an unheated attic or roof above the ceiling.
- Waterproofing. This layer is needed to protect the wood from destruction due to moisture.
- Rough ceiling in a wooden house. It is used to attach finishing trim. It is also a support for waterproofing, insulation and vapor barrier.
There are different options for completing the final finishing of the ceiling. The most popular is the use of plasterboard boards. To secure them, a metal frame is assembled. This finishing method is practical, easy to implement and inexpensive. The result is excellent if everything is done correctly.
To install a rough ceiling on wooden beams, first boards are attached to them, then insulation and waterproofing are laid, and then all that remains is to finish the ceiling surface with plasterboard or other material.
Any wooden ceilings are laid on the frame and frame-panel structure of the house, since its walls are not designed for heavy loads.
Here the ceiling is a horizontal fence, a kind of wall, but the installation of this ceiling differs from the construction of walls.
Sections of ceiling beams
- The load-bearing base of the ceiling is made of wood - beams, the size of which is calculated in the diagram of the power frame of the house.
- The beams are made from round timber, processed into beams, edging or boards with a thickness of at least 60 mm, which are installed on the edge. You can use 50mm thick boards paired with nails or staples. But it’s better to construct a box from boards.
On large spans, the beam is also supported on internal walls, or even on intermediate pillars
- Sheet flooring is made in non-residential premises due to its low noise-absorbing and heat-insulating qualities. The essence of the ceiling: plank flooring is placed on the load-bearing beams - the floor of the attic.
- A hemmed ceiling is made in a country house or attic house, since the thermal insulation properties of such a ceiling are sufficient only for seasonal use of the premises. To do this, we fill tongue and groove boards on both sides of the beams.
- We lay sound-absorbing material on the bottom lining. The insulation backfill on the boards of the lower floor should be light so as not to tear the boards away from the beam. Sawdust or husk will do. This is the ceiling of the lower floor.
- The top flooring is the attic floor.
1 – sheets of drywall; 2 - tongue and groove boards - floor panel; 3 - waterproofing; 4 - sound insulation; 5 – floor beam; 6 - lag; 7 - floor boards; 8 - cranial beam bars