Each bathhouse has a stove to heat the room. For finishing and isolation, a portal for a sauna stove is used. This structure favorably emphasizes the beauty of the firebox, covers poorly located structural elements, gives seriousness to the entire structure, and protects nearby wooden elements from fire. Each person who thinks about arranging a bathhouse personally decides how to approach the arrangement of the frame. It is made from simple or designer materials and can withstand hours of heat from a hot oven.
Chimney for sauna stove
To remove combustion products from metal sauna stoves, the chimney can be made of brick, metal or ceramics, and there are three types depending on location:
Mounted chimneys are built on top of the heating device and are its continuation. It is this type of construction that is most often chosen for installation above a metal furnace, and sandwich pipes have recently been most often used for it.
Root chimney - there are no restrictions, but still it is rare in bathhouses.
Prices for chimney pipes
chimney pipes
- Main chimneys are a free-standing brick structure to which a sauna stove can also be connected. To build this type of chimney, it is necessary to build a separate foundation for it. If the bathhouse is planned to be located in the area of the house where the stove or fireplace will be built, or in an adjacent extension, then sometimes one common main chimney can be installed for them. But this case is clearly atypical.
- Wall chimneys are a type of flue duct installed in the brick wall of a house. If the bathhouse is built of brick, then you can use this design. However, it has one significant drawback, since the pipe actually runs completely along the street, there is a risk of condensation occurring in it, which can negatively affect the performance of the stove. Therefore, wall chimneys require high-quality insulation. It is also rarely considered as an option.
Chimneys for a sauna stove can be made of different materials - it can be brick, ceramics, metal or insulated sandwich pipes.
The sandwich chimney can be located indoors and pass through the ceilings and roof, or it can be directly discharged through the wall to the outside.
As shown in the illustration above, the chimney can be installed indoors or almost immediately connected to an external wall
The first option, with a passage through the attic floor and roof, is good because the heat emanating from the pipe remains in the bathhouse. In addition, a strictly vertically installed pipe provides good draft for the stove.
The obvious disadvantages of the internal arrangement of the pipe include the complexity of installation work, since careful insulation of penetrations through the ceiling and roof is required. If the joining seams of individual parts of the sandwich pipe are damaged, combustion products will enter the steam room, which is not immediately noticeable, and this is dangerous for the lives of people in the room.
External chimneys are led out into the street through the wall, and then rise to a set height along its outer surface. Therefore, they are easier to install both in a bathhouse under construction and in an already built one. Higher level of operational safety, more accessible maintenance.
The disadvantages of this arrangement include the need for additional insulation and careful sealing of the pipe passage through the wall. However, if correctly selected sandwich pipes are used to construct the chimney, then their additional insulation will not be required.
Sandwich pipe prices
sandwich pipes
*******
So, the installation of a sauna stove with an external firebox must be carefully calculated, and the parameters prescribed in SNiP must be observed without any simplification. It must be remembered that the safe operation of not only the stove, but also the entire structure of the bathhouse, especially if it is built of wood, depends on the correct installation and insulation of metal structural elements from flammable surfaces.
At the end of the publication, there is a video in which I show an example of installing a sauna stove with the firebox leading into the dressing room.
Making the project safe: basic principles
Traditionally, the oven is built near the wall opposite to the shelves in the steam room. The stove design must be created in such a way that a minimum distance of 30-40 centimeters is maintained between the heating parts of the finished unit and everything that supports combustion. If special protection is installed, for example, made of asbestos cardboard, this figure can be reduced to 15-20 cm.
Prices for asbestos cardboard
asbestos cardboard
A gap must be maintained between the smoke exhaust pipe and the floor/roof elements that come into contact with it, which is subsequently filled with fireproof material. Asbestos is most often used for protection. From above, the mentioned gap with insulation is closed with a steel shaped plate.
For additional protection, the area of the floor in front of the stove firebox is covered with a metal sheet about 10 mm thick. It will protect the flooring material from fire if coals fall out of the firebox.
The standard option for placing a stove in the bath space is shown in the following image. Here you can also see the order of organizing the water circuit, which can be taken as a basis if the supply of warm water will be provided by the stove unit, as well as the features of connecting and removing the chimney.
Standard option for placing a stove in a sauna space
Ways to increase furnace efficiency
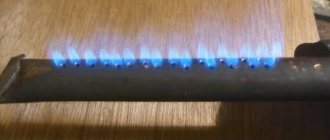
Increased equipment efficiency, economical fuel consumption is possible with complete combustion.
When the firewood is on top of the grates, the primary air passes from below through the grate from the ash pit. This air promotes the oxidation of fuel, releasing water vapor and carbon dioxide. As soon as the temperature of the wood increases, flammable gases begin to be released. They burn out in the space directly above the fuel and come into contact with coke elements, forming carbon monoxide.
If this is not done, there will be underburning of the wood and increased deposition of soot on top of the stones. The consequence is that heat transfer decreases and the risk of fire increases due to the large amount of soot in the pipes.
At the beginning and at the end of the firebox, excess air enters the firebox. The intensity of wood burning decreases. Heat leaves through the chimney along with flue gases. To reduce heat loss, it is better to close the dampers on the chimney.
Other ways to increase efficiency include:
- Increase in the volume of stones.
- Increasing the heated surface area.
- Reducing the thickness of the walls of the structure (material – metal).
It is necessary to take into account the direct relationship between the size of the firebox and fuel consumption. The larger the volume of the firebox, the greater the fuel consumption. At the same time, the heat transfer of the furnace also increases.
How to improve the efficiency of an iron stove
Effective methods include:
- Furnace lining. The point is to line the inside of the firebox with fireclay bricks. It is enough to place it on the edge, then the lining will be up to 6 cm thick, when using narrow fireclay for masonry - 3 cm. It will be the heater that warms up, not the steel walls of the stove. It is recommended to plan the lining at the drawing development stage in order to increase the size of the firebox for lining in advance. The disadvantage of this method is the production of hot smoke. The solution is to install the heater on the pipe.
- Creating a brick screen around the stove. Material – ceramic brick. An opening is left in the brickwork for the doors so that the air heating can be regulated. The downside is overheating of the rear wall. The solution is to use thickened heat-resistant steel for the firebox.
Advantages of mineralite
- Having made the insulation with mineralite, you will forget about replacing them for a long time. They serve well and properly.
- The panels do not burn or ignite. This fiber cement board meets the most stringent fire safety requirements.
- Minerite is considered a universal material. It can be used not only for insulation, but also for decorative finishing.
- Installation of the plates is extremely simple.
- You can do everything yourself without resorting to outside help.
A mineralite slab for a bath, like any other material, in addition to its undeniable advantages, also has disadvantages. And most buyers note only one thing - the unpresentable appearance of some types of such panels. If you choose more decorative specimens, they will cost a little more.
General description of the design
In fact, this is a special frame made around the heating source. U-shaped, it, as a rule, visually stands out from the general background, although it can be made of the same material as the masonry. Its other common names are “gate” or “front entrance”, given precisely because of its appearance.
It can go both into the living room - a separate kindling room - and into the rest room. In the latter case, the aesthetics of execution are especially important.
An already finished structure cannot be adjusted in any way - if changes are needed, it will have to be built anew. Therefore, it is worth paying special attention to its design: to calculating the dimensions and quantity of materials.
When a portal needs protection
In the event that the room is small, and the heating equipment is too powerful and therefore not only heats itself up, but also overheats everything around, including the surrounding air. In such a situation, the frame must be made of heat-resistant material to prevent its rapid failure. At the same time, you will protect yourself from burns and excess heat.
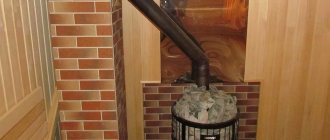
Fire protection system in the partition
To achieve maximum heating efficiency in a bathhouse, it is advisable to place the stove in a partition. In this case, it will heat the partition, and not the outer wall or corner, which is much more rational and profitable, since firewood or gas will be well saved.
The partition in the bathhouse near the stove should be well protected. All the same methods are suitable for this as for the usual placement of the furnace. You can use all the techniques described above (brick, tile, metal) both for the outer wall and for the partition.
A brick partition in a bathhouse near the stove will be the most convenient option. It should be noted that brick partitions are often found in wooden bathhouses. Basically, they are made there for design reasons because of the beautiful facing bricks, but the option with a stove is much more functional.
The result is a highly efficient bathhouse for heating; the partition-stove in it is located in the center of the building and does not lose heat. In this case, the portal around the furnace is made lighter. For its construction, it is appropriate to use the same brick as for the rest of the partition. In this case, you will not need to purchase additional materials. If the design requires it, you can use any other option.
Solution
In addition to the question of which brick to line the stove in the bathhouse with, you also need to decide on the mortar for the masonry. There are two options: make it yourself or buy a ready-made refractory composition intended for laying stoves. It is a dry mixture, which is diluted with water to a certain consistency in accordance with the manufacturer's recommendations. It includes components that ensure the reliability of the masonry when exposed to high temperatures.
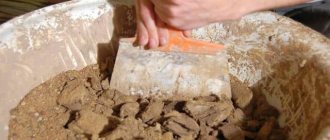
If you follow the traditional path and mix the solution yourself, you can use a simple and cheap clay solution with the addition of sand. This mortar is usually used for laying brick ovens. The process of preparing the mixture is as follows:
- the clay is soaked in water and then rubbed through a sieve to prevent foreign particles and debris from getting into the solution;
- sift the sand;
- Combine the components, mixing thoroughly.
The solution must be plastic. Sometimes 5-10% cement is added to the sand-clay mixture. For furnace work, cement-lime, clay-chamotte or cement-chamotte mortars are also used.
Possible errors and recommendations
The main mistake that beginners encounter is uneven row placement. To avoid this, each row must be checked with a level. Professional recommendations:
We must not forget about tying the rows. It will make the structure more durable. You can line the wall with completely white bricks
The top can be decorated with various colors. It is important to take the calculations wisely in order to perform fewer trims.
Modern metal stoves do not look beautiful if they are not covered with natural stone. To improve the appearance of the device, you can assemble a homemade portal. It will help decorate metal surfaces.
Recommendations for performing the work
- The creation of a furnace portal must be approached after careful preparation.
- Correct preliminary calculations will help achieve the desired result.
- In order not to complicate the work with alternating layouts, make a wall entirely of white brick, which is very easy to decorate using paint.
- If you do not have masonry skills, it is better to entrust the work to a professional.
But despite the simplicity of this device, the brick portal is the main element of decoration in the bathhouse. Nothing will decorate it better than a self-made portal, a photo of which you will be proud to show to your friends and acquaintances.
Subscribe to our Social networks
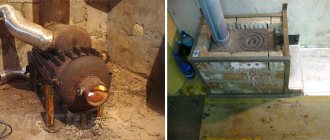
Sauna stove made from a pipe or an old cylinder
The difference between this design and the previous one is that the water tank is located directly above the firebox. For work you will need: a pipe for the stove and tank (wall thickness 1 cm, diameter 50 cm, height 150 cm); pipe for the heater (the wall thickness is the same, and the diameter is 35cm); mortise valve; metal fittings; hinges for doors; steel sheets with a thickness similar to pipes; tools for welding, metal cutting.
Pipe sauna stove
- We divide a pipe of larger diameter in two using a grinder. From one part (length 60 cm) we will mount a water tank, from the second (90 cm) we will construct a heating device for a bathhouse.
- We make markings on a sheet of steel to cut out a circle equal in diameter to the pipe - the furnace body. To do this, it is convenient to use a can of paint or a marker. This circle will serve as the bottom of the structure. We weld it hermetically to the pipe.
- We immediately make the legs of the structure. To do this, we strengthen the bottom of the sauna stove with a metal frame made of profiles. Frame height 10-15 cm.
- After the stove stands firmly on its legs, draw a 25x7 cm rectangle on the body. This piece of metal will be the blower door. We cut it out with a grinder, equip it with hinges, a handle and a latch.
- We make a grate. Its task is to pass air from the ashpit into the combustion zone, hold fuel and not prevent ash and ash from entering the lower chamber of the furnace. Such a grid can be made from pieces of reinforcement or a sheet of metal with holes cut in it. The grate must be secured by welding in the inner part of the pipe at a height of 12-15 cm from the bottom.
- The firebox will be located above the grate. We cut out a door for it measuring 25x30 cm, departing from the level of the grate about 20 cm. We install the door in the same way as the ash door.
- We will construct the heater from rebar. By bending it in different directions, we give the reinforcement rods the shape of a basket, and fasten them together with plastic wire. This is where we will place the stones for the stove. We install the “basket” on the top of the pipe. Here we cut a door of any shape and again equip it with hinges and a latch.
- Next we'll take care of the water tank. The tank body is a pipe, 60 cm long. For this pipe we cut out the bottom, in which we in turn cut a hole and pass the chimney pipe through this hole. We secure the parts by welding. We cut in a tap closer to the bottom of the tank.
- Now we assemble the two parts of the stove together so that the tank is located strictly above the firebox. We make a weld.
- It is convenient to make the lid for the tank double-leaf. We cut out a circle, divide it into two equal parts, one of which is tightly welded to the tank, the other is attached to the first half with loops. To make it more convenient to open the tank, we equip the lid with a bracket handle made of reinforcement.
Thus, from the simplest materials you can quickly and cheaply build a sauna stove with your own hands, and it will not be functionally different from its purchased counterpart! By doing the work efficiently and slowly, you will get a result that will delight you and your guests for many years!
Strengthening the base and performing masonry
The stove is a fairly heavy structure, weighing about 100 kilograms. If it is placed on the floor of the bathhouse (sometimes it is even placed on the ground - for this, a hole is made in the floor and a foundation is poured for the stove), then the floorboards require strengthening. For this purpose, metal concrete slabs or at least sheets of iron are used.
Structurally it consists of the following elements:
- chamber for firebox and ash;
- heater (place where stones lie);
- iron water tank;
- chimney base.
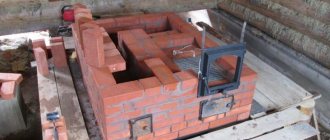
The laying is carried out as follows:
- lay the first row of bricks along the perimeter of the future structure;
- in the second row there is room for a door;
- at this stage, install the frame for the door and secure it with wire;
- the third row is erected under a place for the door;
- in the fourth row they place a grate - this is a grate through which air will penetrate;
- in the fifth - they make a chamber for the firebox;
- in the sixth, the door for the combustion chamber is strengthened;
- the seventh and eighth rows are placed taking into account the door;
- ninth - closes the doorway;
- in the tenth they provide space for water tanks;
- the eleventh–nineteenth rows increase the height of the stove;
- From rows 20 to 25 we lay bricks to form a smoke path and block the stove.
Arrangement of the foundation for a metal furnace
Before laying brick over the unit, you need to thoroughly prepare and strengthen the base for it. Since metal structures are light in weight, they do not require a separate foundation for the furnace, but brick cladding will provide an additional load of tens of kilograms.
Not every floor covering can withstand such a mass. For this reason, before covering the boiler with bricks, it is imperative to dismantle the floor and arrange a separate foundation - columnar or monolithic.
Most often, a monolithic base is made. To do this, the floor under the stove is dismantled. The foundation parameters should be such that there is a gap of 10 to 15 centimeters between the future brick cladding and the metal body of the unit.
First, they dig a hole approximately 30 centimeters deep, pour crushed stone and sand onto the bottom, compact it, install reinforcement and fill it with concrete mortar. The foundation will harden in about 2 weeks.
To arrange a columnar foundation, pillars are installed at the corners of the facing box and in places of the highest load. The advantage of this base is that no drainage or waterproofing is required.
The sequence of actions during the construction of a columnar foundation is as follows:
- Markings are made at the corners of the furnace for mounting the pillars.
- Dig holes located strictly vertically, having a depth of about 50 centimeters.
- A 10-centimeter layer of sand is poured into the bottom of all holes and compacted.
- Prepare a solution of cement and sand in a 1:2 ratio; it should have the consistency of thick sour cream.
- The solution is poured over the layer of sand in a 10-centimeter layer. Crushed stone or brick chips are added to it.
- After hardening, brick pillars are laid out so that they rise 7–10 centimeters above the floor.
- Install the lower trim beam. The most reliable way would be to lay the channel around the perimeter and weld the edge.
The use of concrete pillars is allowed. You can make sure that they are vertical using a building level.
Chimney outlet through the roof
A more complex option requires increased care and the purchase of additional elements. Consider the option of a metal roof.
Step 1. Make precise markings in the ceiling where the pipe exits, make a hole
Make sure that the hole does not hit the roof beam! The dimensions of the hole in the ceiling should be 10 cm larger around the perimeter than the diameter of the pipe. The ceiling is made of boards - making a hole in it is not a problem
Scheme for arranging a hole in the ceiling
Pipe passage through the ceiling
Pipe passage through the attic
Step 2. Mark the place where the pipe exits on the roof, watch the verticality and location of the rafters and sheathing. The hole in the roof should not damage the elements of the rafter system.
Step 3. Use a cylindrical grinder to cut a hole in the roof; its size should correspond as much as possible to the diameter of the pipe.
Step 4. Fix the vertical position of the chimney in the ceiling with pads, insulate the opening with mineral wool and nail galvanized steel sheets on both sides.
Insulating the opening with mineral wool
Step 5. To seal the pipe outlet on the roof, you need to buy special additional products: a metal skirt and a glass. The diameter of the glass must correspond to the diameter of the pipe. It is quite difficult to make such products yourself; it is better to buy them ready-made.
To close the pipe on the roof, roof penetrations, for example, of circular cross-section, are used
Step 6. Use a metal clamp to attach the chimney pipe to the rafter system structures. There is no need to insulate anything; at this distance from the boiler, the metal chimney has time to cool down.
Step 7. Place the glass skirt over the chimney. The glass has the ability to rotate and tilt in the skirt, which greatly simplifies the installation process.
Chimney passage through the roof
Step 8. You need to cut off the roofing sheet. The width should be 10÷15 centimeters greater than the width of the skirt, the length should correspond to the distance from the top edge of the skirt to the nearest formwork strip. When marking, carefully ensure that the waves in the cut piece of roofing coincide with the waves on the roof.
Materials and tools needed for work
- monolithic (entirely consisting of cement);
- brick (made from different types of bricks).
The material is priced carefully, taking into account its quality. After all, the heating efficiency and durability of the structure depend on the selected component.
The main work that will have to be done during construction is brickwork and leveling the cement on the sides of the structure.
To start making a device, you need to have some tools available.
Before you start, you need to prepare everything you need.
- Trowel for leveling walls.
- Hammer for laying bricks at one level.
- Level for measuring and maintaining equal angles and sides of the frame.
- Tape measure for measurements and calculations.
- Brick. To complete the work, you should use standard bricks. You can use both solid and fireclay bricks.
Calculation and dimensions
At the beginning of the work, you should correctly calculate the dimensions of the future frame, as well as calculate the required amount of brick for masonry. You should decide how far the brick sauna stove portal will be higher and wider than the stove.
Calculate the area of the masonry and add to it the reserve for the base (1-2 rows of bricks). The height of the portal may be greater than the width. But horizontal options are also common. Here you should rely on your taste and the size of the oven.
How to determine the amount of brick needed? To do this, you need to divide the area of the masonry by the area of the side of the brick and add about ten percent of the amount that came out. This is necessary in case the material is damaged during installation.
Approximate dimensions of the portal for a sauna stove:
How to fold a sauna portal
As with any large-scale construction, a preliminary construction plan is required.
To ensure an exact match between the expected and the obtained results, it is necessary to measure all sides and adhere to the planned dimensions when laying the walls.
- Clay - 2 parts.
- Sand - 1 part.
- Water - 0.5 parts.
Construction of walls
Having marked a place for the door, they continue to work, erecting the side parts to the right and left of them. There is nothing complicated here, you need to be careful.
To ensure the quality of the resulting frame, bandage the seams.
Remove excess cement with a trowel so that there are no unnecessary reliefs on the wall.
A hammer is used to level the height of all bricks. Tap each brick so that the walls come out even along the stove.
Decorative completion
On the front side of the stove, where the firebox and woodshed are located, you can lay out various figures. For example, as most people do, line up the front frame with the letter P. You can alternate bricks around the firebox: white with red, yellow with white, etc.
Step-by-step instructions for laying bricks
How to lay out a portal for a sauna stove? When all the calculations have already been made, you should prepare: brick, jointing, sand, mortar for masonry, trowel and grinder. You will also need a tape measure, buckets for mixing the solution, and a level to check the evenness of the surface.
Here are the instructions:
- Prepare the mortar for masonry. You can connect the rows with a solution of clay and sand (in a ratio of 2:1), water should be 1/4 of the amount of clay. 20 liters of mortar is enough for about 45-50 bricks (laying flat). The sand should be fine, so you will achieve uniformity of the finished mass. The clay should be of normal fat content.
- Start laying the brick at the base. This must be done strictly with the help of a level, since errors at the initial stage will ruin the entire structure. And the work will have to be redone.
- Consideration should be given to the ligation of seams in subsequent rows.
- To make the product more beautiful, you can use seam stitching when finished. This way your portal will have a beautiful and neat appearance.
If all the calculations are made correctly and the work is done efficiently, then the result will be a beautiful decoration for your bathhouse - a brick portal for the stove.
Portal for the stove in the bathhouse: what are they?
The material that is suitable for decorating the portal must be fireproof, it can be:
- stone;
- ceramic tile;
- tiles;
- ordinary brick.
And a little more about each.
Brick
It can be anything, because high temperatures are extinguished by the wall, most likely it will be finishing or even clinker tiles imitating brick. The main thing is that the color and texture (smooth or torn) match. In stores you can also purchase decorative parts made from the same brick.
Note! When laying, the seams should not be completely filled from the front side; let them remain empty by 7 millimeters - you will then fill this space with grout.
Advice! After removing any remaining mortar and grout from the surface of the brick, you can make it shine by running a solution of hydrochloric or sulfuric acid over it.
A natural stone
Marble
In the relaxation room, it is permissible to use not only volcanic or metamorphic rocks, but also sedimentary rocks (which are not suitable inside the steam room) for finishing the portal. The latter include:
- sandstone;
- shell rock;
- marble;
- travertine.
But if the structure of the rock is porous, it should not be laid around the door, because the soot will simply eat into the stone and you will not get rid of it. So such material is only suitable for elements located on the sides or high above the firebox (a shelf, for example).
In addition, you have at your disposal volcanic or metamorphic rocks without pores:
- serpentine (aka serpentinite);
- soapstone;
- granite;
- slate.
Another possible use of stone is to lay not slabs or tiles from it, but untreated pebbles fixed with glue on a vertical surface.
Ceramic tile
The choice is huge, it all depends on the taste of the owner or designer. And if I advise, then only the following:
Advice! You should not cover the portal with large tiles. It's better to take the regular one.
The advantages of this type of cladding include low maintenance and the fact that ceramic tiles do not absorb soot.
Tiles
Photo source: Wikipedia
This is a special type of tile that has a cavity on the back side.
The tiles are usually richly decorated with relief, which can be hand-painted. There are also smooth tiles, plain or with patterns (not necessarily made by hand). In any case, this type of tile is expensive, but it looks very attractive.
Well, it’s unlikely that we will be able to somehow cover the stylistic diversity available when using all these materials, but you should take into account the design of the bath itself. Of course, someone thought through the stylistic unity, others simply relied on the utility of things and materials
In the first case, it will be easier to choose a suitable design, because the choice is limited by style. In the second case, we advise you to choose a portal design that is also simple and utilitarian, that is, without decorations that do not find “support” in the rest of the environment
Of course, some thought through stylistic unity, others simply relied on the utilitarian nature of things and materials. In the first case, it will be easier to choose a suitable design, because the choice is limited by style. In the second case, we advise you to choose a portal design that is also simple and utilitarian, that is, without decorations that do not find “support” in the rest of the environment.
Advice! Take a photo of the bathhouse, and then select portal options for it yourself or with the help of the store’s or manufacturer’s in-house designers.
Materials for portal design
Marble is not afraid of sudden temperature changes, so it lasts longer.
Materials adjacent to the stove must be non-flammable. For the stove portal in the bathhouse, non-combustible materials are selected, or flammable materials are separated by heat-reflecting screens. The following apply:
- brick;
- metal;
- stone;
- glass;
- tile;
- tree;
- drywall.
In addition to brick and metal, gates using natural or artificial stone masonry are popular. Decorative stone makes a simple stove look like an elegant fireplace. Several types of hard rock are used:
- elements away from the door can be laid out from sedimentary materials - slate, marble, shell rock or foam blocks;
- cladding options with river pebbles, embedded in the solution, look great.
Stone products are heavy and increase the load on walls and supports, so the foundation must be massive.
When finishing wooden baths, wooden portals are used, made of moisture-resistant plywood, parquet boards, and chipboards. The tree is decorated with carvings and ornaments. Wooden materials are attached to a metal base, which provides additional rigidity to the structure. Over time, the wood darkens and warps. To avoid this, material made from dense rocks or well-dried raw materials is used. Sometimes inserts made of brick, stone, concrete are installed, and heat-reflecting screens are used.
The use of laminated wood will reduce deformation. Darkening of the material is prevented by varnish coating in 2-3 layers.
Wooden boards, plywood and drywall are attached to the frame with self-tapping screws. The frame is made of metal or slats. Self-tapping screws are disguised. It is easy to assemble a figured portal from these materials.
The use of ceramic tiles depends on the vision and taste of the owner. The main advantage is easy surface cleaning and resistance to soot contamination.
Preparation for construction
The amount of material can be accurately calculated if you make a project plan. You need to think through each step and transfer it to the drawing. Any miscalculation is critical, since it is impossible to remake a ready-made portal. It can be destroyed and rebuilt. During the calculation, a number of factors need to be taken into account:
Oven dimensions (width, height)
You need to take into account the presence of legs of the furnace equipment. Width between metal surfaces, brickwork. You need to leave 3 cm for fireproof material. Leave the gap necessary to expand the furnace walls. Masonry, which should protrude beyond the dimensions of the stove by 25 cm on the sides, on top. You need to buy more building materials in case of failure.
How to secure a bathhouse
In order to make the walls of the steam room fireproof, special cladding materials are used.
They not only reduce the intensity of the impact of infrared rays on the structure of the building, but also prevent fire.
Without fail, the height of the casing must be at least 120 centimeters above the surface of the heating device.
There should also be a small gap between the sheathing and the wall surface, usually no more than three centimeters.
Also, do not forget about the technical gaps that should be located at the top and bottom of the skin; they will ensure uninterrupted air convection.
Preparing the foundation for a brick sauna stove
A hand-made brick stove for a bathhouse weighs several tons. Occupying a small area, its weight exerts a large specific pressure on the base. Therefore, stone sauna stoves are installed on their own foundation.
To select the location of the foundation, lower the plumb line strictly in the middle of the hole in the roof for the chimney pipe. The plumb line will indicate on the ground the location of the projection of the center of the smoke channel. Starting from this point, with an allowance of 10 cm in each direction, we mark the plan of the hole for the foundation.
The depth of the hole should be below the freezing point of the soil. The foundation for a brick bathhouse stove should not be connected to the foundation of the building itself. Sand is poured into the bottom of the hole and small stones, gravel and concrete chips are placed on top of it. All this is carefully compacted. Then the welded foundation frame is laid and cement mortar is poured.
The upper cut of the foundation for a brick sauna stove must be perfectly horizontal. Any deviation from the horizon is fraught with the risk of the stove being pulled to the side, both during construction and during its use.
The top cut of the foundation should be a few centimeters below the floor. Then, for waterproofing, two layers of roofing felt are laid, on top of which one layer of brick is laid, and on top of it is a metal sheet that serves to protect the wooden floor from fire.
Manufacturing
To make a brick sauna stove with your own hands, you need to prepare tools, consumables, a place for construction, draw up a project, make a foundation, build a structure.
Material and tool
Before you begin assembling the stove, you need to prepare:
- required number of bricks;
- trowel, trowel;
- building level;
- container for mixing the solution;
- grout for seams;
- pipes for chimney assembly;
- asbestos, roofing felt;
- drill with mixer attachment;
- doors for the combustion chamber, ash pan;
- metal wire for tying rows.
Additionally, you may need hand tools - a hammer, a pry bar, a set of keys, screwdrivers.
Preparation
After preparing the consumables and tools, you can begin developing the project and preparing the mortar for laying bricks.
Design
Regardless of the masonry method, a brick kiln project must have several basic elements:
- water tank;
- chimney with its individual elements;
- combustion chamber;
- ash box;
- doors (at least two).
Additionally, the diagram can indicate the location of the heater and grate.
Preparation of mortar for masonry
To build a brick oven, you cannot use classic cement mortar. It cannot withstand high temperatures and begins to crumble with constant changes in temperature. To prepare the solution you will need:
- sand sifted through a sieve;
- fireclay clay.
The components are mixed in a separate container and filled with a small amount of water. The liquid should not have an unpleasant odor.
Construction of the foundation
Foundation assembly process:
- First you need to apply markings for the future foundation. To do this, wooden pegs are driven into its corners, and threads are stretched between them.
- The depth of the pit is 60 cm. The bottom layer, 15 cm thick, needs to be expanded 10 cm to the sides.
- Cover a space 15 cm high with sand. Place a layer of crushed stone (10 cm) on top of the sandstone. Compact the crushed stone.
- Lay a layer of waterproofing over the crushed stone. For this it is better to use roofing material.
- Make formwork from boards. Place it inside the pit.
- Mix the cement mortar.
- Tie a reinforcing frame from individual reinforcement rods. Place it inside the formwork.
- The size of the formwork should be 5 cm smaller than the pit on each side.
- Concrete must be poured into the formwork so that 15 cm remains before the beginning of the masonry level.
After a week you can remove the formwork. The vacated space is filled with gravel.
Laying the “body” of the structure
Furnace laying:
Make a base for the furnace equipment, which consists of two rows of fireclay bricks. Cover the surface of the walls around the stove with asbestos sheets. Fix metal sheets on top of them, which will reflect thermal energy. The walls of the stove structure must be laid out in order. Seams on adjacent rows should not match. After laying each row, it must be checked with a building level. Simultaneously with the manufacture of the outer walls, it is necessary to lay the combustion chamber. Fireclay bricks are used for this.
It is important to leave free space for the ash hole door. You need to secure the grate on top of it, leaving space for the firebox door.
When laying, you need to check the verticality of the walls and the thickness of the seams.
Installation of a water heating tank
The location of the water tank is selected depending on the dimensions of the furnace equipment. It should be in a place to receive more heat. To calculate the volume of the tank, you need to take into account that approximately 25 liters of water are required per adult.
Chimney laying
For a brick stove, it is recommended to assemble a chimney from the same material. An asbestos pipe is installed inside the brick frame. The space between the brick walls and the pipe is filled with non-combustible material to increase the tightness.
Choosing a stove for a steam room: types of designs
To make the right choice, you need to have an idea about other features of sauna stoves. Today we can talk about classification according to the following criteria:
- heating rate;
- layout features;
- method of heating the heater;
- fuel used.
Depending on the temperature of the outer walls, all sauna stoves can be divided into “hot” and “cold”. In the former, the surface temperature reaches more than 100°C, which allows you to very quickly heat a large area. Such a stove is indispensable if the steam room is used occasionally, and constant heating is not provided in it. But the advantages of such structures also entail significant disadvantages. Firstly, touching hot walls can cause burns. Secondly, rapid heating is difficult to control, so the likelihood of accidental overheating of the air increases, and, as a result, getting heatstroke.
“Cold” stoves require longer heating, but the temperature of their walls, even with the most intense flame, does not rise above 50–60 degrees. It is impossible to accidentally burn yourself on it. In addition, the ability of “cold” stoves to accumulate heat allows you to maintain the desired air temperature for several hours. This makes it easier to operate structures intended for regular use.
It is also important that heating extended over time allows you to set the optimal temperature and humidity in the room.
As for the layout, there are options for placing the stove both in the steam room itself and in the dressing room. The first design is certainly cheaper and easier to install. However, it has several disadvantages. So, when opening the door to add fuel, smoke may come into the room. In addition, due to high humidity, it will not be possible to store firewood next to the stove, and each time it will not be very convenient to run to another room to get it. The safety of the structure will also suffer, since in a cramped steam room the risk of touching a hot door increases many times over. Therefore, it is better to install an external combustion part, which can be placed in an adjacent room, and leave only the heater in the steam room. Of course, this option has the right to life only if the bathhouse has sufficient area.
The stove design with an open heater is the most popular
If we talk about the method of heating a heater, today stoves in which the stones do not come into contact with the fire are especially popular. They are placed in a special enclosure welded to the casing of the heating device, or in metal baskets that are placed on the walls or chimney. In this case, the temperature of the stones reaches 400 degrees. The advantage of this method is the ability to heat the stove and regulate air humidity simultaneously with taking water procedures.
Batch ovens are designed in a completely different way. In them, the stones come into contact with combustion products, so they heat up to a very high temperature - 1000°C or more. But you can begin health measures only after the firewood has completely burned out and carbon monoxide has been removed from the interior of the stove. And in order to prevent the heater from cooling quickly, it is covered with a casing or a hinged door.
Knowing all the features of sauna stoves, it is not at all difficult to choose the right design, focusing on the features of a particular building, operational requirements and personal preferences of the owner.
How to make it yourself
For those who like to do everything themselves, we have prepared instructions on how to make a partition in a brick bathhouse with your own hands.
Instructions
First of all, it would be worth mentioning the soaking of bricks. Since you are doing it for yourself, it’s worth soaking, even if you are not a beginner. What does this give? Of course, the solution will be mobile longer, like on clinker - the slightest movement and everything will move. But there is time to do everything smoothly. But the result will still please you - the adhesion to the solution from this simple manipulation will be stronger.
ADVICE! Well, and without fail, wet the used bricks.
Preparatory work in the room begins with the waterproofing flooring. At least on the base on which the partition will be located. This could be a concrete foundation, screed, or curb. (In general, it is laid over the entire floor, but we assume that everything was done correctly when installing the floor, and waterproofing is present on the lower layers, and on top you most likely have a drain on which nothing needs to be laid.)
A tape a few centimeters wider than a brick one is enough.
Next, use a laser level or an old-school tool to mark the location of the future masonry. There is no need to talk about cleaning. You can use a special mason’s hammer to chop it in advance or use a grinder with a brick cutting disc to cut the bricks for the sling. You can calculate in advance how many bricks you will have in height. In general, try it on.
And the lace can be set as shown in this video:
BY THE WAY! You can generally use metal profiles nailed to the walls as guides for your partition. They do the same thing - they put a brick between two corners.
The first row is the most difficult. It starts with the fact that you lay the solution in a layer thicker than usual, level it and let it adhere to the base. If there are uneven foundations, it’s time to take them into account and correct them.
Next, a thinner layer is laid, there is no need to let it stick, bricks are laid immediately. Everything is aligned very carefully - by level, by cord.
Up to the 5th row, maximum attention - you form a plane, which you will then catch visually. Check and double-check.
If you are making a brick on an edge, then reinforcement with mesh or another method is mandatory; if not, then optional. Masonry of a quarter of a brick must be reinforced, because it is too thin; masonry of half a brick is optional. Reinforcement options - mesh, reinforcement, strips of metal. The reinforcement is inserted horizontally into the masonry joint. The thickness of the reinforcing materials should not exceed the thickness of the masonry joint. Just like the reinforcement bars in the wall, which are placed in the seam. You can attach it with corners - one side into the wall, the other side of the corner into the brick. In a wooden bathhouse, you shouldn’t tie a wooden wall to the partition at all - the wood takes a long time to shrink, and it also changes dimensions due to moisture.
How exactly the masonry is done can be understood from the following videos (we hope that you will find useful information in them):
Don't forget to leave some space under the ceiling. It is proposed to fill it, for example, with tow soaked in cement mortar and scrap bricks (small).
You can see how the door frame is inserted in the video above, where they teach how to position the lace on magnets.
You need to get rid of excess mortar on the wall immediately, but if anything remains, remove it with a metal brush.
If the partition is under the insulation, it is not necessary to unstitch the seams; if not, unstitching comes down to creating a concavity or convexity of the seam. Both are purely for beauty. For the first one, simply scrape out the solution with a wire loop.
***
In general, nothing difficult if you have a little experience. But we wish the newcomers success!
Metal oven
Stoves made of steel and cast iron are much lighter than brick structures, they heat up faster and provide good heat transfer. In addition, such a structure can be created anywhere, while a brick oven can be created directly at the place of future use. There is no difficulty in welding a sauna stove with your own hands.
First of all, you need to cut sheets of steel or a large piece of pipe. A metal stove is made in the same way as a brick stove; you need to create the same parts. It will just look completely different, and the performance will be higher.
Before choosing a homemade metal sauna stove for construction, it is worth considering that the disadvantage of such a design is the occupied overheated area of the unit.
That is, it is easier to get burned in a steam room with a metal stove than in a brick stove. But coping with such a disadvantage will not be difficult and will take a lot of time. The furnace can be lined with bricks with fire-resistant characteristics and a converter can be hung on the body of the unit.
Diagram of a homemade metal stove
Another advantage of metal structures is their long service life, which is achieved due to the fact that the firebox cools due to the air circulating inside the structure.
You should not make a unit yourself that runs on electricity or gas, since the design of a sauna stove is quite complex and the likelihood of an explosion due to improper construction is quite high. Even factory stoves with such fuel do not always live up to expectations and are not safe to use.
Masonry of furnace walls
The brick must be wetted before laying. Then apply the required amount of solution.
The brick fits tightly into place. The mortar displaced by the brick is removed.
There is no need to plaster the internal surfaces with clay; excess mortar is unacceptable here. Once dry, it peels off and clogs the chimney duct.
Furnace casting is installed directly during masonry and fixed with wire. To ensure that the doors fit tightly to the masonry, they are wrapped around the perimeter with asbestos cord.
The cord will seal the contact points and will not allow the cast iron door, which expands when heated, to destroy the masonry.
Portal for a sauna stove - what is it?
A mantel with a clock and candelabra is an attribute of the English living room in any historical film or TV series. In addition to the shelf, the fireplace opening is framed on both sides by a kind of “columns” supporting the shelf. It was this U-shaped structure that received the name “portal”, which translated means “gate”. While the design of the furnaces themselves may have different configurations.
But when it comes to the portal for the stove to the bathhouse, this is just an imitation by analogy. In fact, a stove and a fireplace are significantly different from each other. When we bring the firebox into the rest room, we do not have the opportunity to greatly vary the size of the “window” behind which the firewood will burn - such doors are made in several standard sizes, the largest of which is called “panoramic”. A separate publication is devoted to the dimensions of furnaces.
If you want to learn more about fireplace stoves for baths, with a detailed analysis of the types and sizes of glass, self-cleaning systems, tips for purchasing and installation, we recommend reading this article.
Also, the stove manufacturer can offer its own version of the “portal” - most likely it will be a wide metal frame, a kind of “platband”, which is installed as decoration.
But wiring a fuel channel through a wall is usually accompanied by replacing the combustible wall material with a non-combustible one, that is, for example, a piece of a log house is cut out and a brick wall is put in its place. This meets fire safety requirements. And at the same time, we have a basis for creativity, because it is this brick wall that they try to decorate in one way or another, including by creating a beautiful portal for the sauna stove.
Let us clarify what minimum dimensions such a cutting partition should have.
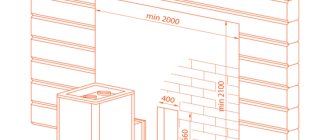
IMPORTANT! According to SNiP, the shortest distance from the stove to the combustible wall material should be at least 38 cm. In height, it should not be lower than the top edge of the stove. However, in both cases it is better to add extra centimeters than to regret it later
It is better to increase the distance on the sides of the fuel channel to half a meter, and in height - whatever you like, even up to the ceiling. Although you can limit yourself to the comfortable height of that same mantelpiece. It's up to you to decide
However, in both cases it is better to add extra centimeters than to regret it later. It is better to increase the distance on the sides of the fuel channel to half a meter, and in height - whatever you like, even up to the ceiling. Although you can limit yourself to the comfortable height of that same mantelpiece. It's up to you to decide.
The connection between the combustible wall and the brick wall is not made directly; a layer of refractory material must be placed between them, for example, special mineral wool without organic fillers or basalt cardboard. The same applies to the gap between the fuel channel and the brick. All these joints are later masked using decor.
Oven in the steam room
passage through the wall of the fuel channel of the same furnace
portal of the same furnace from the firebox side
Long-burning potbelly stove
The potbelly stove has become a real symbol of Russia since the times of the Revolution and Civil War.
This is the name given to the simplest iron stove of a cylindrical or cubic shape. Its advantage was that the smoke channel - an ordinary iron pipe - could be taken out anywhere - through a wall or roof, into a window.
Taking the simplicity and practicality of a potbelly stove, you can make a small stove that will embody some simple ideas that significantly increase its efficiency, safety and environmental friendliness.
Basic scheme
The classic potbelly stove has a cylindrical design. However, it is difficult to do this when making it yourself, so you need to take a cube or parallelepiped as a basis.
Contains the following structural elements:
- Firebox. This is the chamber in which fuel combustion occurs, most often wood. The walls and bottom of the firebox must be thick, since they bear the main temperature load. There is a door in the front for storing firewood in the firebox; if desired, it can even be equipped with heat-resistant glass.
- Ash pit (ash pan). The compartment under the firebox is separated from it by a grate. The ash pan is also equipped with a door, only of a smaller size. It is used to remove ash and ash. which fall through the grate from burnt firewood. But this is not the only point of the ash pan - air is sucked in through the ash door and passes through the fuel layer from below, ensuring the best combustion.
- Smoke channel. To arrange it, a round hole is cut out in the upper part of the stove, a piece of steel pipe is inserted into it and scalded. In the future, you can attach other sections of the pipe here or use a factory sandwich chimney with special locks.
Expert opinion Dmitry Konstantinovich Levin
Some manufacturers of homemade stoves believe that the design with a blower and grate is not suitable for a sauna stove - it creates too much draft, which prevents complete combustion of the wood. Instead, it is proposed to lay the firewood directly on the bottom of the stove, and ensure air flow by drilling several round holes in the lower part of the combustion door and equipping them with a sliding damper.
How to make a door
The door is made of a thick sheet of metal. For fastening, you can use store-bought factory hinges or make your own. To seal the fit, an asbestos thread is used - it is wedged in a groove cut by a grinder.
If there is a suitable sheet of heat-resistant glass, it is inserted as follows: cut a window in the door and grind the cut area. Then they lay the glass, lay asbestos fiber around the perimeter, invisibly from the outside of the part, after which, using small steel tongues, I make tacks on each side.
The turning handle of the latch is easiest to make from the outside.
Homemade secondary gas afterburning system
The main disadvantage of a potbelly stove is its low efficiency. A stream of air passes quickly and strongly through the entire oven, carrying with it not only unburned food, but also heat. As a result, the case does not warm up sufficiently and gives off less heat. To solve this problem, a simple but ingenious modification was invented.
By placing two steel sheets above the firebox, the smoke passage channel can be significantly increased the length of the path that burnt gases travel before exiting through the chimney opening:
- The first horizontal sheet is welded directly above the firebox so that a channel remains for the passage of gases in the rear part of the stove.
- The next sheet is cooked higher, offset so that the passage is now at the front of the oven. It turns out that smoke, gases and heat, once in this labyrinth, snake through it all the way to the chimney. Along the way, they give off all the accumulated heat to the sheets, side walls and top plate of the oven.
If you drill several holes from the bottom from the back and cover them with a screen made of steel sheet, then at the top point, when fresh air, but already heated by the screen wall, meets unburned gases, the process of afterburning secondary gases will take place in the channel, which will lead to a significant increase in efficiency ovens.
Steel case
Steel is also a fire-resistant material. It cannot be left untreated, as it will instantly rust in a bathhouse. When finishing the space around the stove with steel, you need to keep in mind that unlike brick, tiles and stone, steel does not insulate heat at all.
A protective portal around the stove made only of steel will be completely pointless, since it will not be able to fulfill its main task - to protect wooden walls from overheating. In order for this function to be fulfilled, it is necessary to provide a good heat-insulating layer of another material, and then cover it with a facing steel sheet.
This heat-insulating separation layer is created from mineralite. Other fire retardant insulation materials can also be used. Simple mineral wool is not suitable, since after getting wet once it shrinks in volume, and this defect cannot be corrected by anything.
The insulation near the stove should not get wet. You need to take care of its waterproofing. Moreover, this waterproofing should only be on the side of the cold wall, but not on the side of the stove.
Steel has a metallic luster. This effect can be used to greatly increase the efficiency of the portal.
If made from uncoated polished stainless steel, it will act as an infrared reflector.
A similar element can very often be seen in electric fireplaces, heating stoves and any other heating devices.
The main difficulty of this solution is the need to use only stainless steel. Compared to ordinary steel, it costs 10 times more, but the total thickness of the sheets for the reflective screen can be small.
Stainless steel perfectly withstands any humidity. It can even be placed in rooms such as a steam room in a bathhouse; the decoration around the stove will be compact and with a modern design. In a steam room, all interior elements are usually made only from wood. Stainless steel would be appropriate next to a metal stove-stove.
Covering bathhouse walls with non-combustible insulating materials
To prevent the walls from overheating, you can use materials with increased thermal insulation properties and inertness to high temperatures. Two types of materials are used:
- reflective;
- fireproof with lining.
The first type includes materials for wall cladding, consisting of thermal insulation with fire-resistant properties and a metal covering in the form of a sheet.
Insulating walls with reflective sheathing
A protective cake with reflective materials is done this way. First, the thermal insulation is attached using ceramic bushings directly to the wooden walls, then it is sewn up with a stainless steel sheet.
Advice! It is better not to use galvanized metal, since heating may release heavy metals harmful to the human body.
Stainless steel with a polished surface reflects the heat flow inside the steam room, reducing heat loss. In this case, reflected heat is more useful than direct heat. For thermal insulation use:
- basalt cardboard or cotton wool, the only material with increased hygroscopicity, non-flammable, environmentally friendly;
- asbestos cardboard, which reliably protects against flames and has a long service life;
- mineralite, an artificial material made specifically for these purposes.
Protective sheathing requires ventilation gaps of 2 cm from the wall to the insulation, 2 cm from the insulation to the steel sheet. If it is necessary to install the stove as close to the wall as possible, make a double skin of non-combustible insulation, use ceramic bushings to maintain gaps of 2-3 cm and sew them up with a steel sheet.
Insulation with cladding
Measures to protect walls with cladding are necessary in order to preserve the interior decoration of the room. They are more expensive, but no one has canceled the aesthetic advantages of the bathhouse. It is based on tile cladding, which is laid on fire-resistant cladding made of gypsum plasterboard, non-deformable gypsum-based cardboard with fiberglass, mineralite, non-flammable cement-fiber material, moisture-resistant and resistant to biochemical influences, LSU, fiberglass material bound with magnesium additives, resistant to high temperatures, high humidity. Heat-resistant glue is used for installation.
Advice! Use heat-resistant reinforced Terracotta glue, made from fireclay dust bound with kaolin additives, intended for tiling stoves, fireplaces, and all heated surfaces.
The recommended facing materials are quite varied, the best of them are:
- terracotta tiles, they are made from specially fired clay, which gives increased heat resistance and durability;
- clinker, denser clay tiles with a surface of various colors, similar to facing bricks;
- tiles, also made from clay, having an original embossed surface;
- porcelain stoneware made from a mixture of clays, kaolins, quartz sand, feldspars by high-temperature firing under a pressure of 400-500 kg/cm², with imitation of stone, wood, durable artificial material;
- soap chloride, a rock mineral consisting of talc, magnesite and chlorite, an environmentally friendly natural material that does not absorb moisture at all, has an attractive appearance, does not crumble, and is not afraid of high temperatures.
Advice! Use soap chloride to finish the steam room, this mineral has a healing effect on the human body, regulates blood pressure, stimulates cerebral circulation, expels viruses and microbes due to the release of vitamin D when heated.
All of the listed tiles are an element of protection that forms a cake, the basis of which is a fire-resistant material. Just like a screen, sheet material is installed on ceramic bushings with a gap of 2-3 cm from the wall. The minimum distance to the heat source from the tile should be 20cm.
Protection with cladding decorates the room, creates a positive mood, and helps to increase the efficiency of procedures. And most importantly, properly installed insulation prevents wooden walls from overheating and catching fire. Have a nice steam!
Nuances of choice
A wide variety of species often makes you doubt the correctness of your choice. To avoid problems and to avoid regretting your decision, you need to decide on the material that will protect the walls next to the stove, chimney or fireplace.
For finishing walls around stoves and in boiler rooms
Fireproof finishing of walls around furnaces and in boiler rooms is prescribed by fire safety rules and is mandatory.
- Fire-resistant plasterboard panels can be used as a basis for cladding walls near the stove.
- Using fireclay bricks and/or mortar, create fireproof protection in the form of a screen near the furnace. The surface inside the furnace is laid out (lined) with bricks, and cracks and cracks are sealed with mortar.
- But the most effective protection for surfaces adjacent to fireplaces and stoves is made of stainless steel. Steel sheets are used to construct fireproof screens. They are mounted at a distance of 1-5 cm from the body of the stove or fireplace.
- Thermal protection can be further increased by fiberglass laid under steel sheets.
- Cast iron screens are also popular.
- Basalt rolls and mats, flexible and lightweight, are also used for shielding stoves and fireplaces.
- Terracotta or porcelain tiles are ideal for fire protection of boiler rooms, as well as baths. They do not deform or burn, and are also easy to maintain - they are easy to clean and wash. Due to their high decorative properties, they can also be used to decorate various surfaces.
For pipe
To avoid fire, chimney outlets must be reliably thermally insulated. For this purpose, mullite-silica boards and cardboard are used, which are excellent for processing. You can cut holes in them of any configuration for chimney pipes and other structural elements of stoves.
For the bath
The walls of the baths are finished with heat-resistant materials so that they have fire-resistant properties. For this use:
- “pie” made of a metal reflective coating and a heat-insulating gasket;
- superizol;
- fire-resistant plasterboard;
- glass magnesite;
- minerite;
- terracotta tiles.
Fire protection for sauna stoves is also provided by products made from foamed vermiculite. For the layer between the first rows of the stove masonry and the wooden floor, vermiculite boards are preferable, since they are stronger than cardboard.
For the fireplace
The main product used for facing the fireplace, along with fire-resistant plasterboard, is fire-resistant ceramics:
- terracotta tiles or majolica as its variety;
- tiles;
- clinker tiles;
- porcelain stoneware
All of them are moisture resistant and resistant to temperature changes. Choose tiles marked A - they are of higher quality than tiles marked B.
Device
The portal is a “P”-shaped structure that frames the furnace firebox.
Since the portal is constantly warm, it must withstand long-term heat. To do this, it is important to pay attention to the material from which the decorative casing was made. A stove with such a lining will create the desired microclimate and quickly warm the room. In addition, the portal will delight you with its beautiful appearance and protection from damage. It also allows you to avoid getting burns during operation, retains heat for a long time and does not create the effect of dry air.
In order to make a portal, you need the following tools: a tape measure for calculations and a level for aligning corners and sides; hammer for laying bricks. Before work you need to do some preparatory steps :
- It is necessary to carry out the masonry and level the cement along the sides of the portal device. This is the most important part of the job.
- Then the wall under the portal is plastered and primed. It is possible to install the portal on a wall covered with wood, but subject to the use of elastic SM sealants.
- The strength of the floor must be stable to support the weight of the cladding. It should not sag or deform from gravity when approaching the stove.
- Combustible wall elements are replaced with fire-resistant materials.
- Finishing is done with decorative components. Decorative casing can withstand long-term heating depending on the material from which it is made.
Article on the topic: At what distance do corrugated fence posts be placed?
Portals for sauna stoves come in several types, of which the last two are most often used:
1. Monolithic (made of cement); 2. Brick (different varieties); 3. Ceramic tiles; 4. Natural stone.
The durability of the structure depends on the quality of the material chosen.
More about protective screens
Very often, in order to protect the walls in the bathhouse near the stove from the effects of infrared radiation, protective screens for the stove in the bathhouse made of stainless steel, for example, are used.
They can be attached either directly to closed parts of the stove or to adjacent walls.
Such protective elements not only prevent IR radiation from affecting the walls, but also completely reduce the intensity of its spread.
Screens can be divided into two groups:
- Metal;
- Brick.
Let's look at each of them in more detail, and the question “how to cover the walls near the stove in the bathhouse” will disappear by itself.
Made of metal
The material used to make metal screens is usually steel or cast iron. They are attached around the entire perimeter of the sauna stove, but with small gaps. In order to provide additional air convection, a small distance is left between the surface of the oven and the metal sheet.
Metal screens can also be divided into two groups:
- Lateral;
- Frontal.
They are selected based on the design of the walls and the type of stove, respectively. Such screens are attached using additional metal legs.
They are usually adjustable and bolted to the floor.
Among other things, the arrangement of such legs allows for additional air convection, which is a definite plus.
To ensure that the screen lasts as long as possible, we recommend covering it with fire-resistant paint.
So, the key advantages of a protective metal screen:
- Infrared rays affect the environment less intensely;
- Air convection, which is ensured by the gap between the screen and the stove surface;
- The temperature of the walls of the heating device is significantly reduced.
Made of brick
Information. Brick screens are used to protect bath walls from a hot stove.
They are laid out in half a brick along the entire perimeter of the stove, but a technological gap is also observed, the size of which must be at least 6 centimeters. Additional air ducts are installed at the bottom of this structure, the distance between which must be at least 25 millimeters.
The brick used for the construction of such a structure is fireclay, hollow. It is very important to pay attention to its fire resistance, since ordinary brick will not work here. And the masonry itself is done using thick cement or clay mortar.
The erected protective brick screens must exceed the level of the furnace by at least 25, or even 30 centimeters. The advantages of this design include:
- Low thermal conductivity of the brick, which prevents injuries upon contact with it;
- The brick is absolutely resistant to constant exposure to increased levels of moisture and excessively high temperatures;
- Accumulates heat in the room for a long time;
- Provides soft heat from the stove.
Advantages of locating a furnace with an external fuel channel
Sauna stoves with an external fuel channel can be made of cast iron or steel. The design of this device differs from a conventional furnace for heating a bath precisely in the presence of a remote firebox, which can be removable - in heavy cast iron versions of products, or have an integral structure - in steel models. Thanks to this configuration of the stove, the combustion chamber door is moved into the room adjacent to the steam room or even outside.
Moving the furnace firebox into the dressing room provides many advantages during operation:
- When the stove is fired, two rooms are heated at once - the steam room and the dressing room.
- It becomes possible to add firewood, constantly supporting the combustion process while the steam room is in use.
- Since there will be no need to open and close the firebox door from the steam room side, the stove can be protected with a safety barrier (brick screen), which will eliminate the risk of burn injuries during water procedures.
- Garbage, which is often brought into the room along with firewood, will not get into the steam room.
- It becomes possible to place a niche next to the firebox for drying firewood, which, of course, cannot be done in a steam room.
- It ensures that clean air is maintained in the steam room, since when the door is opened to add firewood, gaseous products of wood combustion can enter the room in small quantities.
- The absence of a firebox door in a steam room will significantly save the free space of the room, and so, as a rule, it will not be too voluminous. Therefore, it becomes possible to install the heating device in a convenient location on the wall dividing the room.
However, it must be taken into account that modern factory-made appliances are equipped with a glass cooling system installed in the combustion door. Therefore, the waiting room will not warm up properly. And in order for heat to flow more intensely into the dressing room, you will have to open the combustion chamber door slightly - this factor must also be taken into account when choosing a place to install the stove. If the device cannot be installed so that the open door does not interfere with free passage, then in winter this room will require additional heating.
Prices for a stove in a bathhouse
sauna stove
As an example, the design of the Termofor Kalina Inox BSE anthracite NV PRA furnace
The remote fuel channel can be rectangular, or have a narrowed shape near the firebox. Panoramic heat-resistant glass installed in the door not only allows you to control the fuel combustion process, but also gives the design an aesthetically pleasing appearance to the fireplace. If the dressing room is used as a relaxation room, then you can install chairs in front of this “fireplace” and, while relaxing after visiting the steam room, admire the play of the flames.
The system that cools the glass also performs the function of cleaning it, so soot does not accumulate on the inner surface, and it always remains transparent.
Installing a stove with the combustion channel removed to the dressing room provides a lot of operational advantages. The disadvantages are minor, and the most significant of them is more worries when installing the device.
The fuel channel of a sauna stove can even be taken outside. This is usually done in the following cases:
- When the steam room and dressing room have a very small area.
- If the stove is planned to be heated with coal, which traditionally leaves a lot of dirt behind, and its combustion products are quite toxic.
- In the case when the bathhouse is used for commercial purposes, that is, it is temporarily rented out to strangers. And its owner acts as a stoker, who does not disturb clients with his presence at all.
In some cases, this option is also used - the combustion window is generally placed outside.
In other cases, a stove installed in this way will be extremely inconvenient to operate, especially in winter. Agree, there is little joy when you have to jump out into the street in order to add firewood to the firebox.
The only advantages of moving the furnace of a sauna stove outside are the absence of garbage in the premises and the fact that the fuel does not have to be brought inside the sauna.
Ceiling preparation and chimney installation
Many fires have started in the area of the ceiling where the chimney runs. There are many mistakes associated with arranging the passage of a chimney through ceilings. The cause of the fire may be:
- pipe overheating;
- cracks in the pipe through which sparks escape;
- errors in the distances between the pipe and the combustible ceiling.
Not the most competent way to pass the ceiling for a bathhouse
If you did not design the position of the stove in advance, there may be a beam above it. In this case, you will have to cut out part of the beam and fasten it with jumpers to adjacent beams. The empty space above the center of the pipe passage should be about 90 cm in diameter.
The ceiling slabs are cut out square to install a cutting box, which is a tin box closed at the bottom and top with stainless steel sheets in which a hole is made for the pipe (see photo above).
The chimney is mounted from the pipe coming out of the stove. If the monopipe is larger in diameter, you will have to put an adapter on the pipe. But in any case, the first pipe running through the steam room will be a monopipe
A gate is mounted on it, then it continues again, but before reaching the ceiling (this is important!), a “start” is put on it - an adapter from a mono to a sandwich pipe that will go through the ceilings. Pipe connections must not go into ceilings
It is worth noting here that sandwiches, of course, are the most common, but this is a dangerous type of chimney - so what if the gap between the two pipes is clogged with thermal insulation? This will in no way prevent the inner pipe from burning out if the owner is often in a hurry to heat the bathhouse. And the properties of the insulation, when condensation forms in it, will not be the same as stated - it will transmit heat perfectly, overheating the outer pipe.
An alternative to sandwich pipes is ceramic or brick-lined chimneys, but both are heavier and more expensive. Therefore, the majority prefers to risk the entire bathhouse.
OK. This means that through a hole in the stainless steel the sandwich pipe enters the cutting box.
There is still space around it that can be filled:
- expanded clay;
- mineral wool;
- sand.
Attention! The height of the box must be several centimeters greater than the thickness of the ceiling
The outside of the box can be wrapped with basalt cardboard so that it does not touch the wood.
Next, the pipe is brought out through the roof, through a hole of a larger diameter than the pipe. On the outside, the area nearby is coated with sealant, a master flush is put on top, secured to the roof with self-tapping screws at intervals of up to 5 cm, and the connection between the flush and the pipe is also sealed. All that remains is to install an umbrella or deflector.
master flush
Do not forget! It is necessary to constantly check the vertical position of the chimney with a plumb line, and also secure it for greater stability using a clamp with a bracket to the wall or other stable structural elements.
The second stage - type of stove
It is necessary to decide on the type and appearance of the sauna stove. Whether your design will have a water tank or not. What type of heating will the hot water have (with direct gas outlet through the firebox). What type of heater can be used (open heater or with exposed stones).
Having decided on the type and type of stove for the bath (in white), do not forget about the removal of gas from the stove. Fortunately there are not many options here. With a straight chimney or with a side chimney. It depends on your location of the structure and the possibility of venting your chimney. When building a new chimney, be sure to insulate the distance between the chimney and the roof with heat-resistant material to prevent the roof from catching fire.
More about firebox rules
It's no secret that the heart of the entire sauna room is the stove. That is why it needs very careful and reverent handling. The length of time that the stove will last depends on how to heat a bathhouse correctly with an iron or brick stove.
The first step is to ensure that you have high-quality firewood, which must be placed in the stove in such a way that the flame from it is even. In addition, hot coals should be formed during the combustion process.
Attention! It is important to remember that the firewood must be dry, since when using raw fuel, a smoky and carbon monoxide flame cannot be avoided, which will lead to smoke in the steam room.
All surfaces in the bath are heated evenly, while avoiding the appearance of unpleasant odors, only when the steam is dry and very hot. This can be achieved if the heated stones are crimson in color, and their volume in relation to the steam room in the heater should be 1:50.
Any experienced steamer has his own secrets about getting truly intense heat, but there is also a set of certain rules that must be followed by everyone without exception:
- You need to carefully splash water in small portions on the hot stones. Usually this is 50-100 ml, but during the vaping process the volume decreases. Under no circumstances should stones be allowed to flood;
- In order to cover a large area of stones during the pouring process, it is necessary to use a fan;
- To keep the steam as dry and hot as possible, water should be splashed between hot stones;
- If the moistened stones shine with bright crimson shades, then you are doing everything right;
- Evidence that the temperature in the bathhouse is decreasing will be the hissing of water when it hits hot stones.
You should also know and follow some recommendations on how to light a stove in a bathhouse:
- It is necessary to stack the firewood so that there are small gaps between them. This is done for better air circulation;
- There should be a gap of at least 2 centimeters between the topmost log and the surface of the stove;
- In order to save firewood, the pipe valve can be slightly closed;
- For greater heat transfer, you can open the oven door slightly;
- Keep an eye on the coals, as bluish-yellow flames emanating from them indicate carbon monoxide.