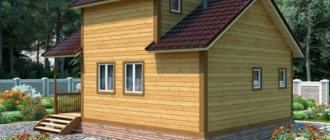
Construction of a bathhouse from aerated concrete with your own hands - from laying the foundation to finishing work
For any construction you need high-quality and durable materials.
Aerated concrete, which appeared not so long ago, meets all these requirements and is suitable for the construction of baths. Aerated concrete blocks are large in size and light in weight, so building a bathhouse from aerated concrete with your own hands will not be difficult. A traditional bathhouse on a personal plot is a reliable structure built from natural wood.
However, a cheaper and more practical alternative to a wooden structure can be a bathhouse made of aerated concrete.
Due to its availability, durability and ease of construction, aerated concrete is becoming an increasingly popular building material.
Is it necessary to insulate?
If with other materials it is appropriate to argue about whether insulation is necessary or not in their case, then there is no reason to doubt: insulation of a brick bathhouse is mandatory. Brick has high thermal conductivity, so without insulation it will take a very long time to heat a bathhouse, but, on the contrary, it will cool down very quickly.
Just imagine how much time and firewood it takes to heat walls that have frozen at sub-zero temperatures. By the way, insulation is always compared to a brick wall, saying that where meters of masonry are needed, you can get by with a few centimeters of insulation.
However, the next question requires more detailed consideration.
Features of plastering walls made of foam blocks
But is it necessary to plaster foam blocks? If a bathhouse was built from them, then it is a must. But this is different: first they need to be cleaned and sanded - so that the top hydrophobic layer is completely removed. And in order for the plaster on such foam blocks to hold up well, it would not be superfluous to attach a reinforcing mesh to it in advance. Also, foam concrete as a material does not absorb moisture well, and therefore it is first necessary to spray a layer of solution onto the wall to increase adhesion, and only then the main layer is applied. But even before this, the foam blocks must be well treated with a primer - for better adhesion and protection from fungus and mold. Moreover, you need to prime deeply, filling all the pores.
It is important to remember this “golden rule” of plasterers - for foam blocks, the inner layer in thickness should be exactly twice as thick as the outer one - this is the only way to achieve good vapor permeability and retain heat inside the bathhouse.
Characteristics of aerated concrete products
This building material has many advantages:
- Ease. Despite the fact that the blocks are large in size, they are very light, which greatly simplifies the work. Even an inexperienced builder can build a bathhouse from an aerated block with his own hands.
- Thermal insulation. Due to its porous structure, aerated concrete has good thermal insulation properties. If you build a bathhouse from aerated concrete, it will need less insulation.
- Durability and fire safety. This is a durable material that is resistant to rot, mold and attack by small rodents, and resistant to fire. Such properties ensure a long service life of aerated concrete products.
- Compliance. Aerated concrete blocks lend themselves well to manual processing. This allows you to build any complex structure with virtually no waste.
- Harmlessness. From an environmental point of view, aerated concrete is completely safe, which is confirmed by leading experts in this field.
- Affordability. Compared to other building materials, aerated concrete is low in cost.
In addition to its positive properties, aerated concrete material has one drawback - moisture absorption, and therefore requires external finishing.
Is it reasonable to build a bathhouse from an aerated block, where there is already high humidity? Professional builders advise using aerated concrete, but in this case additional powerful finishing will be required inside.
Features of the material for washing
The washing compartment is not exposed to high temperatures, but constant contact with water makes it unfavorable for wood. If the overall design of the bathhouse is wood, and you don’t want to disturb it, then use lining or imitation timber made of larch or aspen. But the material will not be cheap.
Finishing materials for a bath are selected according to the following criteria:
- High water-repellent characteristics.
- Environmentally friendly.
- Easy to install.
- Washing design.
- Price.
Unfortunately, it is difficult to find combinations of all indicators. Among the most commonly used are: ceramic tiles, natural or artificial stone, wood, water-repellent paint and plastic panels. They are divided according to their purpose: for cladding ceilings, walls and floors. Each of the options has positive and negative qualities; let’s consider them in more detail.
Ceramic tile
Ceramic tiles are moisture-repellent materials. It is used for finishing floors and walls of the washing compartment. If the walls in the bathhouse are wooden, then before cladding you need to lay waterproofing and level the walls. The tile adhesive used is moisture-resistant. The size and color scheme are selected individually, and a large assortment in construction stores makes ceramic tiles accessible to any budget.
Ceramic tiles are most often used for floors. In the washing department, it is important to properly organize the drainage and perform the screed. The floor should have a slight slope towards the drain, which is discharged under the bathhouse or into the general sewer system.
The advantages of ceramic tiles include:
- Does not allow water to pass through.
- Durability.
- Does not lose strength over the years.
- Does not change color.
- Environmentally friendly.
- Easy to care for.
- Price starts from 120 RUR/m²
- More than 200 colors.
The cons are mainly taken from user reviews:
- The floors in the wash bay slip and it is easy to get injured.
- The walls stop breathing.
- It is difficult to do the installation yourself without a certain skill.
- May break if hit by a heavy or hard object.
If the floors in the washing room are tiled, an overlap should be made on the walls, at least 40 cm, so that water will not get to the wooden structure of the walls. Above the tiles, you can use water-repellent paint on a natural basis.
Wood - pros and cons
Wood in the finishing of the washing room is used for walls. If all other rooms are finished with imitation timber, clapboard or block house, then the washing room can also be finished with this material. But it is better to use cladding made of coniferous wood. A high resin content will make the walls more resistant to moisture.
Larch and aspen are considered the most resistant, but the price for panels made from this wood starts from 350 rubles.
Insulation of a brick bath: inside or outside?
Aerated concrete blocks are one of the best materials in terms of thermal insulation characteristics. Baths built from them are distinguished by good heat resistance, not inferior to wooden buildings, and durability, comparable to structures made of stone. Since aerated block is a porous material, its weight is significantly less than cinder block or brick, so lightweight construction does not require a powerful foundation. However, for the durability of an aerated concrete bathhouse, careful internal and external finishing is required.
Find out what builders think about aerated concrete blocks.
Types of floors for saunas made of gas block
The next step after building the walls and roofing is installing the flooring. Inside the bathhouse, floors can be of three types:
- wooden leaking;
- wooden solid;
- concrete.
A flooring option that is easy to make yourself is a leaky wooden floor. As with any flooring, you will first need to install and secure the joists and rest them on the edges of the foundation (or make special bookmarks). Parallel to one of the walls of the bathhouse, boards or beams are sewn onto the beams, and gaps of several mm are left between them.
All draining water on such a floor will flow directly into the underground room. This option is most suitable for baths located in areas with a mild climate, or for country steam rooms, which are used only in the warm season.
A wooden non-leaking floor has a more complex design and is made of 2 layers: rough and finishing. It is possible to place insulation between the floorings. The upper floor boards are placed at a slope to the place where the water will be collected. This can be either a hole in the floor connected to the drainage system, or a tray located at an angle, installed along the entire wall of the bathhouse and leading into the sewer.
A concrete floor in a bathhouse built from aerated concrete will be a practical solution. It is also made of 2 or 3 layers, the top of which is sloping towards the places where excess water is collected. The optimal coating for such a floor is ceramic tiles with a rough surface.
In the event that you have to choose between which side it would be better to sheathe the bathhouse with insulation, it is worth looking at what will happen in both cases.
It is clear that when sheathing the outside, the entire brick of the building ends up inside a warm “fur coat,” which means that it will have to be warmed again, because in a room that is heated only from time to time, the temperature of the walls drops even with insulation. And again, the lion's share of the heat will go to waste, as if you had not insulated your bathhouse at all.
If you carry out insulation from the inside (including with your own hands), then all the heat will go to heating the air in the room, which, in fact, is what we need.
BUT! If it is possible to sheathe the bathhouse on both sides, then there are no obstacles to this, but this will be a matter of the owner’s taste, because good installation of internal insulation can single-handedly solve all problems.
Now that we understand the mechanism of how insulation works and have decided on the choice of side, it’s worth talking about how brick differs from other materials.
If we compare brick with other materials from which walls are built, for example, wood, frame or foam concrete, then the main difference will be that these walls are colder than others. In fact, brick can be considered an artificial stone, and this speaks of both advantages and disadvantages:
- strength;
- heavy weight (full-bodied);
- low moisture permeability (for a burned person);
- increased thermal conductivity;
- frost resistance;
- low shrinkage;
- fire resistance.
Wood shrinks much more and is flammable. But you can do without additional insulation of wooden walls.
Foam concrete is cheaper than brick, but it must be protected from moisture. But the presence of numerous air bubbles in it, which has low thermal conductivity, makes this material warmer, which means it requires less time to heat the room and retains heat longer. In low-rise construction, foam concrete has more advantages than disadvantages.
Frame buildings are much less durable than brick ones, but they need insulation no less than the latter.
The creation of bricks with internal voids has reduced the thermal conductivity of the material, but their use is limited to the thermal insulation layer, and the base of the load-bearing walls remains solid brick. But even laying in several rows will not solve all the problems with bath insulation, so it is more profitable to insulate a brick bath by covering the walls of the building with insulation.
The main difference between the steam room and all other rooms in the bathhouse is that it is here that the temperature reaches its maximum. In this regard, great restrictions are imposed on materials that, when heated, begin to deform or release substances harmful to humans.
For example, if you decide to use mineral wool as insulation, then you need to look for basalt, because phenolic impregnations are not used for it. You should not use flammable materials, reducing the risk of fire.
The second specific property of the steam room is high air humidity due to steam. Therefore, the insulation layer must be covered with a layer of vapor barrier and complete sealing must be achieved using tape. It is also necessary to leave a ventilation gap between the vapor barrier and the finish.
In addition, it is in the steam room that the task is to quickly heat up and maintain the set temperature for a long time. Increasing the thickness of the insulation and using foil as a vapor barrier can help with this. Both of these transform the steam room into a real “thermos”, that is, the heat does not find a way out and remains in the steam room.
Why do you need moisture-resistant plaster?
Moisture-resistant plaster is designed to protect premises from excess corrosion. Special additives help repel water. This prevents the appearance of rust on load-bearing structures and prevents the growth of mold and fungi.
In order for the composition to withstand moisture for many years, it is produced with average vapor permeability. Thus, thin layers continue to “breathe” and the natural microclimate in the room is not disturbed.
With everything else, you should not ignore high-quality ventilation at the place of use.
Plasters of this type are suitable for aggressive internal and external conditions. They are used to treat bathrooms, bathhouses, basements, swimming pools, basement floors, utility rooms and toilets without heating.
In addition, moisture-resistant plaster perfectly prepares walls for subsequent finishing. Paint, tiles, decorative materials, and drywall adhere to them as firmly as possible. There is a huge scope for design with both thin and thick finishing layers.
Laying the foundation
Due to the lightness of the aerated concrete structure, the foundation does not require special power, so the most popular strip type of foundation can be used to build a bathhouse from an aerated concrete block.
- First you need to measure the area of the territory, then mark the outline. To do this, you will need to drive pegs into the ground and pull a cord along them. It must be taken into account that the width of the foundation should be 15–20 centimeters wider than the walls.
- Next, a trench is dug to a depth below the freezing point of the ground in a specific area. The first layer is made of sand approximately 10 centimeters thick. After compaction, the next, same layer of gravel is poured in and compacted again.
- Next, for waterproofing, there is a layer of roofing material, after which the formwork is installed.
- To install the reinforcing structure, reinforcing bars are used, the thickness of each should be at least 1.2 centimeters. The reinforcement is connected by welding or tied using baked steel wire. To join at the corners, the rods are bent and then secured.
- After the preparatory work on assembling the reinforcement frame, concrete is poured. Horizontal fill lines must be smooth, so you need to monitor their level. It is best to use a concrete mixer and pour the foundation right away.
After one month, the foundation hardens, but according to the advice of professionals, it should be allowed to stand in the winter.
Tile laying process
The most difficult moment in wall cladding is to lay out the bottom row as evenly as possible, since the laying of subsequent rows will be oriented specifically towards it. To do this, take a metal UD profile, which is used to make a frame for drywall, and secure it level around the entire perimeter of the room. You can use a flat wooden block.
To control the vertical and horizontal rows of tiles on the walls, vertical markings are made using a plumb line. But my advice in this case is this: use a laser level (level). I installed it, turned on the vertical and horizontal planes, and all your quality of work is under control, right around the entire perimeter. I've been using it for three years now. I installed plastic windows and door frames according to the level, laid ceramic tiles on the stove, assembled wardrobes and shelves in them. A very convenient thing.
Insulation of a steam room in a brick bath
Today, owners of a brick bathhouse can choose between several methods of internal wall insulation with final finishing either with tiles or lining. Let's start with the method where plaster is used:
- The first layer on top of the brick wall is to waterproof it, for example, using bitumen mastic. For this purpose, talc, asbestos and lime are added to the mastic. The resulting mass is applied directly to the walls.
- Then the surface is plastered, and expanded clay and finely chopped slag are mixed into the plaster solution.
- A lathing is placed on the layer of plaster, between the bars of which fiberglass is laid - a non-flammable heat insulator, similar to asbestos, but environmentally friendly.
- A layer of insulation is placed on the fiberglass - for example, basalt or kaolin wool.
- Then everything is covered with a vapor barrier, for example, foil or foil fabric.
- All that remains is the finishing layer - the same lining, for example. It is mounted on a sheathing with a ventilation gap.
Tile option:
- waterproofing;
- sheathing;
- insulation between the sheathing posts;
- vapor barrier;
- reinforcing mesh;
- plaster;
- tile.
Method without plaster:
- The first layer on top of the inner surface of the wall is waterproofing - either film or the one described above.
- The sheathing is made of timber with a section of 5x5. The step between the beams is equal to the width of the seal minus 1 cm, so that it lies tightly in the spacer.
- Fiberglass is attached to the sheathing without tension.
- Insulation, for example, basalt wool (not containing phenolic impregnation) is laid in the remaining spaces between the posts in two layers, shifted by half the width in the second layer, so that cold bridges do not appear. The total insulation layer is 10 cm.
- A reflective vapor barrier is placed on top of the insulation, for example, simple foil for the steam room and Penofol for other rooms. The vapor barrier is overlapped and sealed with aluminum tape.
- If the finishing is done with clapboard, then there must be a ventilation gap between the foil and it. To do this, a sheathing is made of bars of the required cross-section, on top of which the lining is attached.
The essence of internal insulation is shown using the example of a foam block wall; the principles are the same.
IMPORTANT! Metal fasteners will last longer if you use galvanized nails, screws, etc.
Another way is to build an additional wall from timber:
- The first layer on top of the brick is sheathing.
- Waterproofing is attached on top of it.
- A wall is erected from 10x10 cm timber, self-tapping screws are used for fastening.
- The sheathing is again placed on top of the timber.
- It is covered with fiberglass fabric with a slight sagging.
- Insulation is placed in the gaps.
- It is covered with a vapor barrier, for example, foil.
- A ventilation gap is made using a sheathing onto which the lining is nailed.
Useful video
Here is a new material that sounds tempting, but has not yet been tested by many years of use. There is some risk.
Bathhouse finishing work: stages of rough work
Where to start finishing work? After all, there are several surfaces in the room that need to be done aesthetically beautifully. This includes finishing:
Floor finishing
The whole process starts from the floor. As a rule, no subfloor is made during construction. It is for this reason that it is worthwhile to initially tackle floor structures. For this, a concrete screed is made. For the solution used:
Advice. If this does not work out, then after the concrete screed solution has completely hardened, it will be possible to use a liquid floor, which will ideally level the surface.
Finishing work on the floor is carried out only after complete completion of work on the walls and ceiling of the room. Interior finishing of floors can be done with any modern and affordable floor coverings.
Walls
After work on the floor, the whole process switches to the walls. Rough finishing of walls is considered to be their leveling and preparation of the surface for final finishing work. In what cases will finishing be needed:
Advice. To save time and money, it is best to opt for preparatory work using drywall.
Using plaster to prepare the surface. To use plaster you will need:
Advice. For such work, it is better to choose coarse sandpaper. It will very quickly help get rid of various irregularities that could have formed as a result of applying the starting layer.
Advice. To sand the final plaster layer, use finer sandpaper.
Once the walls have already been prepared, it will be possible to carry out finishing work on them.
Using drywall in finishing
Drywall has been used for many years to level and prepare surfaces. Very often, in order to finish a bathhouse made of rounded timber, plasterboard is used in the work. To install drywall you will need:
Decorating the inside of a bathhouse with your own hands using drywall will be quite simple. The video shows this finishing process. There is nothing complicated in all the actions:
In some cases, it is not necessary to pre-prepare the ceiling surface.
Walling
You can build a bathhouse from aerated concrete quite quickly:
- Three layers of roofing material are laid on the finished foundation for waterproofing purposes.
- At the next stage, lay out the first row of blocks, starting from the corners. Bonding to the foundation occurs through cement mortar mixed with sand. The thickness of the seam is made from approximately 1.2 to 1.5 centimeters.
Particular attention is paid to the masonry of the first row; the reliability and strength of the structure depends on this. To check the horizontality of the blocks, use a level.
- Next they make a special adhesive to hold the blocks together. Usually they use dry glue, which is added to water; it is important to do it this way, and not vice versa. The mixture must be stirred until smooth using an electric drill with an attachment, then left for several minutes and stirred again.
- The adhesive solution is applied to aerated concrete products with a trowel horizontally and on the sides to a thickness of about 0.7 centimeters. For strength, every 4th row can be covered with reinforced mesh.
If you need to cut a block for laying in a corner, use a hacksaw.
- After the construction of each block row, sanding is done and then the dust is swept away.
- The top row of windows and doors is laid with U-shaped tray blocks. To do this, a support from boards is made under the window or door. Blocks are installed on top, into which a frame made of reinforcement is embedded. After such preparation, concrete is poured.
- The walls are built from products of various configurations; they can be large in size, resembling bricks. The same adhesive composition is used for connection.
The initial stage of construction of buildings of any type and complexity is laying the foundation. All work is carried out in the following order:
- Selecting the appropriate type of foundation. Experts recommend choosing a shallow strip base for the construction of a private bathhouse from aerated concrete blocks. For heaving soils, a pile foundation with a grillage is suitable.
- Preparing the construction site for the foundation, leveling the top layer of soil.
- Applying markings in accordance with the finished project.
- Construction of a pit up to 65 cm deep.
- Laying a waterproofing cushion of gravel and sand up to 16 cm high.
- Installation of wooden formwork from chipboard, plywood sheets or slate. Performing a mandatory check of the verticality of the finished structure using a building level.
- Installation of armored belt.
- Pouring the formwork with concrete. To prepare the concrete mixture, it is recommended to use M200 or M300 concrete.
- Arrangement of a waterproofing layer after the concrete base has hardened. Sheet roofing material can be used as waterproofing.
The next stage of construction is laying the walls. It involves performing the following work:
- For an aerated concrete bath, it is recommended to maintain an optimal wall thickness of 25–50 cm.
- Calculation of the high angle of the foundation for laying the first block.
- Laying blocks on a cement mixture level in 3 corners.
- Grouting the surface after the solution has hardened.
- Installing corner slats and pulling the cord for proper laying of blocks.
- Prepare the adhesive mixture according to the instructions.
- Installation of blocks with glue, maintaining a seam thickness of 70 mm.
- Installation of a reinforcing frame every 4 rows of blocks. Arrangement of grooves with a small indentation from the outer edge of 60 mm along the entire perimeter of the building using a cutter. Pouring the adhesive mixture into the grooves, inserting the rods until they stop, pouring the concrete mixture.
- Block masonry with a bandage of 0.5 blocks. A hacksaw is used to cut blocks.
- Installation of jumpers and strength belts using U-shaped blocks. Pouring reinforcement with M200 concrete.
- Laying the top row with additional arrangement of the strength belt.
- Installing waterproofing material with waterproof tile adhesive.
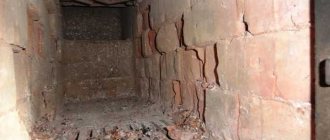
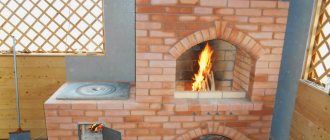
How to plaster a stove with clay?
Plastering with clay: how to properly plaster a stove You should start plastering the stove from the top. To do this, moisten a small area with water and, using a grater, carefully apply first a less thick layer of solution, and then a thicker one. The thickness of each layer should not exceed 5 mm.
Interesting materials:
How to disable Aero in Windows 10? How to disable Dr Web antivirus on Windows 10? How to disable hardware acceleration in Windows 7? How to disable archiving in Windows 10? How to disable automatic search and installation of drivers on Windows XP? How to disable automatic brightness change in Windows 10? How to disable automatic maintenance in Windows 10? How to disable automatic downloading of Windows 10 drivers? How to disable automatic system recovery in Windows 10? How to disable automatic screen shutdown in Windows 10?
Choice of insulation
| mineral wool | a good material for external insulation, but should not be used inside, because when heated it releases harmful organic substances. |
| basalt wool | in a bathhouse for internal insulation you should only use it, because it does not have phenolic impregnation. |
| cotton wool rockwool | Among the products of this company there is stone wool, which is specially designed for baths and saunas; its use is safe. |
| ecowool | excellent insulation for a bath - does not support combustion, low thermal conductivity, environmentally friendly. It is placed dry on horizontal surfaces and wet on vertical surfaces. |
| Styrofoam | It is flammable and can release harmful volatile substances when heated; it is better not to use it in a steam room. |
| expanded polystyrene | It should be used as one of the layers of floor and ceiling insulation. |
| foam glass | a material that borrows the best features from mineral wool and polystyrene foam. Does not require a vapor barrier, lightweight, porous, does not emit anything, fireproof. |
| foil and foil materials | There is a reason to use these materials in a brick bath, but ultimately everything is decided by the tastes of the owner. With foil and its derivatives, the temperature becomes higher and the steam becomes harsher. |
How to do the work yourself
Preparing brick surfaces for plastering is also a mandatory step in the process. Direct application of fireproof plaster to the stove in a bathhouse can be carried out using several methods. You can get the job done without additional skills in handling tools and solutions. However, if you are not confident in your own abilities, it is better to entrust this matter to professionals.
You can apply a layer of fireproof plaster using one of the available methods. The first method is used when we are talking about an uneven surface with a large number of defects. In this case, it is necessary to apply a layer 5–8 cm thick.
Instructions for plastering a stove in a bathhouse with your own hands
Stages of work
Useful tips
For the last stage you will need a liquid solution. Layer thickness – no more than 2 mm. After applying it, the stove can be whitewashed or painted.
To ensure that the plaster is applied as evenly as possible, use an angled spatula in the corners.
Some experts prefer to use a wooden board. Secure it to one side of the stove while you apply a layer of plaster. After the solution has hardened, move the bar to the other side and proceed to applying the solution on that plane.
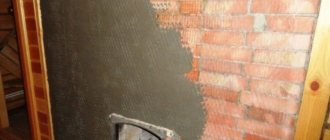
Applying plaster to metal mesh
This is another, no less popular method. The composition is fixed on the surface, allowing the plane to be leveled as much as possible. The maximum distance from the mesh to the oven is 25 mm.
The solution is also applied in several layers. The first and second - in the same way as in the previous case. After applying and curing the last layer, which will hide the mesh, eliminate the defects using grout. This method will make the oven walls stronger and more reliable.
Using a small layer
Another common technology for plastering a stove is to apply one or two thin (no more than 2 mm in thickness) layers of liquid mortar with the addition of asbestos. It is used if the surface of the oven is sufficiently smooth and neat. This will update the look of your home bath.
A primer must first be applied to the surface to be treated. The composition is applied from bottom to top. Use beacons to ensure a flat, level surface. The plaster is leveled with a regular wide spatula.
You can choose fire-resistant inexpensive plaster for the stove in any construction supermarket or on the Internet, and its use ensures complete safety while maintaining the high aesthetics of the interior decoration. It is recommended where there is a lack of finishing coating: in places exposed to high temperatures, which causes cracking, especially when it comes to plastering a stove in your own bathhouse.
Fire-resistant plaster is an excellent alternative to traditional coating and, in some respects, differs for the better.
Cancel reply
By clicking on the “Submit” button, you consent to the processing of your personal data.
| First, apply markings on the wall to fix the beacons. | Install them using a building level. |
| Now you need to warm up the oven, and then moisten its surface with a damp roller or wide paint brush. | This is necessary in order to finally get rid of dust and remaining dirt in the cracks. After the surface of the oven has dried, it is necessary to apply a layer of primer. |
| After this, proceed directly to plastering. | The first layer of fireproof plaster should not be thicker than 5 mm. The consistency of the solution is thick sour cream. Carefully work through every centimeter of the surface so that the thick solution penetrates into all the cracks. Once finished, allow the mixture to dry completely. |
| The second layer of plaster is applied from below and leveled parallel to the beacons. | Make the layer thickness such that the plaster protrudes 8 mm beyond the installed beacons. The height of the layer should be approximately 50 cm. After leveling the lower level, apply the next one, and so on until the entire surface of the stove is covered with a uniform, dense layer of refractory plaster. |
| To smooth out defects, use grout after applying this layer. Experts recommend that at the end of this stage, cover the oven with a damp, dense and coarse cloth (burlap, for example). | If the oven is warm enough so that the fabric dries quickly, repeat the procedure a couple more times. |
Interior finishing
Aerated concrete is very good for building a bathhouse - it is the best thermal insulation material. But one of its drawbacks - absorbing moisture - can be eliminated by interior decoration. Waterproofing walls must be done correctly so that there is no obstruction to natural air circulation, and the walls do not crack after freezing.
The plaster finishing of a bathhouse made of aerated concrete should serve as a barrier and allow evaporation only to the outside.
In order to do the job efficiently, you need to choose special mixtures for plastering aerated concrete products.
There are several important properties characteristic of high-quality cladding:
- the material must be environmentally friendly (at high temperatures, the release of fumes and harmful substances is not permissible);
- durability, increased resistance to moisture and temperature;
- thermal insulation qualities (accidental contact with the casing should not cause burns or irritation);
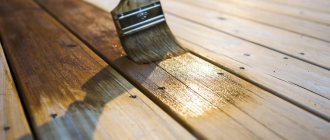
Of the deciduous tree species, ash is the most resistant to moisture and temperature. Coniferous species are traditionally more resistant, but they can release resin, although, as practice shows, small drops that appear are simply removed and do not cause any particular inconvenience.
The internal and external finishing of the bathhouse should provide maximum waterproofing, since aerated concrete, due to its structure and production technology, easily absorbs moisture.
It is also important to ventilate the room well after each use - this will give additional durability to the interior decoration of the bathhouse and will avoid the formation of fungi and corrosion. In this regard, the steam room can be lined with ash or alder, and pine or spruce are perfect for the washing room, dressing room and rest room.
At the same time, a bathhouse made of aerated blocks opens up more possibilities in the design of a dressing room or washing room, where ceramic tiles can be successfully used to decorate walls made of aerated concrete, which, if you have some construction skills, are easy to lay with your own hands.
Frame for lining and insulation of the bathhouse from the inside
After the electrical wiring is assembled, the cables are inserted into grooves and sealed, finishing of the internal surfaces begins. To improve the hydro- and thermal insulation of a bathhouse made of aerated blocks, it is advisable to plaster the walls not only outside, but also inside. According to the instructions, this work is carried out after the structure has stood for some time and shrinks.
The process of interior finishing of the bath continues by securing the supporting beam for clapboard cladding. The use of wood is mandatory in the steam room and preferably in the relaxation room. The sink can be lined with ceramic tiles.
The free space in the frame between the sheathing bars is filled with insulation. Under no circumstances should you use expanded polystyrene (foam), otherwise moisture will accumulate behind the interior trim and remain there for a long time. The insulation must be vapor-permeable; glass and mineral wool have proven themselves well in this matter.
Aerated concrete is a crumbling material, so when attaching the installation beam for lining to the walls, special metal dowels are used to work specifically with this type of block.
The inside of the bathhouse is covered with clapboards in such a way that the boards are attached to the frame vertically. This will make it easier for condensation to drain onto the floor and further remove excess moisture through the drainage holes.
The sheathing with insulation is covered with a layer of vapor barrier film, after which they begin to attach the lining itself to the frame. Fixing the sheathing panels can be done with nails, however, if dismantling is possible in the future, it is better to use self-tapping screws. This way, walls made of aerated concrete will be sufficiently protected from moisture absorption from the inside.
Nuances of finishing baths
1. Building a bathhouse frame from aerated blocks is the easiest to do with your own hands; the material is quite strong and reliable, but it requires a responsible approach to internal and external cladding and wall finishing.
2. Aerated concrete has a crumbling structure, so when attaching elements of internal and external decor to it, you should use only special metal dowels.
3. Increased moisture absorption by blocks requires careful waterproofing of the foundation of such a bathhouse, as well as its internal and external wall surfaces.
4. The cladding and finishing of the steam room and washing room can differ radically from each other in the materials used: ceramic tiles are suitable for the dressing room and shower, while the cladding of the steam room and rest room is strongly recommended to be made from wood species that are least susceptible to moisture, high temperature, and fungi and corrosion.
5. It is highly undesirable to use artificial materials (expanded polystyrene, polystyrene, plastic, polyethylene and others) in decorative elements, cladding, cladding and insulation from the inside - this can lead to the release of harmful fumes into the internal atmosphere of the room when heating the steam room, and, as a result, to the negative impact of bath procedures on the general health of its visitors.
6. After each visit to a bathhouse made of aerated concrete, lined inside with wooden lining, the room should be thoroughly ventilated and dried to avoid the appearance of mold, fungi, as well as corrosion of decorative elements and destruction of load-bearing walls made of aerated blocks.
A distinctive characteristic of aerated concrete is its porous structure, which lends itself well to cladding.
For interior finishing of the floor base, it is recommended to use ceramic tiles, porcelain stoneware and wooden lining.
Before finishing work begins, it is mandatory to waterproof the ceiling and wall surfaces. This will provide additional protection for decorative materials from the negative effects of increased moisture and high temperatures.
The best material for finishing the walls of a steam room is lining made from deciduous trees. Linden, alder, oak and aspen are suitable for this. This wood is most resistant to hot steam and humidity, while providing rapid heat accumulation.
It should be noted that for high-quality cladding of the facade of a bathhouse made of aerated concrete blocks, the following modern materials are suitable: brick, decorative plaster, slabs, siding, ventilated facades and block houses.
Taking into account all the operational characteristics and advantages of the material, we can safely say that a do-it-yourself aerated concrete bathhouse is a reliable and practical structure. At the same time, compliance with the rules for performing work at each stage of construction will allow you to get a decent result with minimal financial and time investments.
Everything about plastering stoves and fireplaces: preparing solutions and working technology
Brick and stone stoves are plastered in order to prepare the walls for further decorative finishing and increase the tightness of the masonry. Plastering a stove yourself is within the capabilities of every home craftsman, but 80% of success lies in the correct selection and mixing of the plaster mixture. What solutions are suitable for furnace equipment and how to apply them correctly - this knowledge is the key to success and a guarantee of long-lasting results.
Standard cement mortar is not suitable for finishing stoves and fireplaces. Firstly, high temperatures will lead to cracks, and secondly, not all components of modern plaster mixtures are safe after heating - some components emit substances that are unpleasantly smelling and harmful to health.
What types of oven solutions are there?
Traditionally, clay mixed with sand, straw, sawdust, and salt was used for plastering heating equipment. Nowadays, for plastering stoves with their own hands, they use not only recipes that came from time immemorial, but also modifying additives that improve adhesion to the surface and resistance to sudden temperature changes.
The most popular among stove makers are lime-clay, lime-gypsum and cement-clay-sand mortars. You can make plaster for stoves and fireplaces yourself or buy ready-made heat-resistant mixtures in stores. For beginners, it is better to stick to factory formulations and strictly follow the manufacturer’s instructions.
Popular recipes for clay plaster mixtures
Clay has a high thermal conductivity and is similar in nature to brick, so it makes an ideal plaster for a brick oven. Before mixing the solution, the clay is soaked for two days in settled water and then passed through a sieve.
The amount of sand in the solution is on average twice the volume of clay, but it is always determined experimentally - the higher the fat content of the clay, the more sand is required. The solution should be thick but plastic. To bind it, sawdust, crushed fiberglass or asbestos is added.
In addition to clay-sand mortar, for plastering the stove with your own hands, they use compositions with additives that increase the strength and durability of the structure. Here are proven recipes from stove makers:
Before preparing the solution for plastering stoves, all components must be sifted through a fine sieve. Professional kiln makers first mix the dry ingredients and then add them to the wet clay. Gypsum is pre-diluted with water and added to the mass as work progresses, as it hardens very quickly.
It is allowed to plaster a new stove no earlier than a month after laying - during this time the stove will finally dry out and the process of shrinkage of the structure will be completed.
Before plastering the stove with your own hands, the outer surface must be cleaned of residual masonry mortar, dust and other contaminants. The seams should be deepened by 5-10 mm - this will improve the adhesion of the plaster mixture to the masonry. Immediately before starting work, the oven should be heated well and then immediately moistened. To moisturize, you can use a water sprinkler.
It is recommended to cover brick and stone masonry with reinforcing mesh - this will increase the strength of the plaster layer several times, enhance adhesion and prevent the formation of cracks. The mesh must be used if tiling is planned in the future.
Sequence of plastering work
Plastering of red brick and stone stoves is carried out in several stages, during each of which one layer of mortar is applied.
Instead of a simple covering, decorative plaster for the stove can be applied, replacing painting and cladding. In this option, stone, lime-sand, terrazite and other compositions with the addition of heat-resistant pigments are used for the finishing coating.
If plastering the stove with your own hands was carried out with errors, defects will appear on the surface that require repair. When applying the solution to dry brick, peeling is inevitable, and excessive moisture leads to peeling, requiring redoing the work after drying.
Dutiki are miniature tubercles that appear as a result of the use of poorly slaked lime. In this case, extinguishing continues even in a dry coating, forming small swellings that are prone to crumbling.
Cracks appear due to incorrectly mixed solutions. In most cases, the culprit is oily clay diluted with insufficient sand. Also, plaster can crack when applying too thick layers or as a result of insufficient adhesion of the previous layer.
To avoid mistakes when plastering stoves and fireplaces, beginners are advised to entrust the work to a professional craftsman. Observing the process will help you consolidate your theoretical knowledge and do the work yourself next time.
renting an apartment in the southwest
Plastering a stove with your own hands: preparing the solution and operating procedures
Technology for preparing clay-based plaster for stoves and fireplaces. Plastering a brick oven with your own hands. Typical defects and their causes.
Ceiling insulation
Warm air and steam always collect near the ceiling. Therefore, the owner of a bathhouse should definitely think about insulating it so that the heat is not wasted.
This applies to any type of ceiling - hemmed, floor or panel, regardless of what is on top: a cold attic or a warm attic.
The following requirements apply to the ceiling insulation used:
- incombustible;
- moisture resistant;
- does not emit harmful substances when heated;
- with low thermal conductivity.
Expanded clay is good in this regard - it is poured onto a waterproofed rough ceiling between the floor beams on the attic side. And then they are again isolated from moisture. Instead of expanded clay, you can add a layer of ecowool.
It is also a good idea to use basalt wool without phenolic impregnation. But it easily absorbs water, so it needs high-quality insulation from water and steam. The wool can be laid either on top of the flooring boards or hemmed underneath.
Polystyrene foam would be good for the ceiling, but it is flammable and, if manufactured poorly, releases harmful substances when heated.
When insulating the ceiling, clay or mixtures with clay are often used; find out if it is suitable here.
We recommend that you familiarize yourself with the materials from the section Insulating the ceiling of a bathhouse and Insulating the roof.
IMPORTANT! Above the steam room, the ceiling needs a double layer of vapor barrier.
A brick bathhouse can become very comfortable, but it will require a large investment of labor and money from the owner. Therefore, it is worth going to build such a bathhouse only if it seems completely acceptable.
Recipes for plaster solutions
A plaster solution that contains cement will be dark in color when it dries, so the stove repair will not end there. The stove will need to be whitewashed.
The solution with lime and asbestos will be white; if, when applied to the stove, it is well leveled, or as experts say: “rub it,” then whitewashing the stove will not be required.
I would like to say a few words about the shelf life of solutions; it is limited for any composition. A solution containing cement is only good for an hour. A solution containing asbestos, or simply gypsum, is good for only 5 minutes. Therefore, you need to work with it very quickly, and if you are new to this business, then I do not recommend using such a plaster solution.
Lining for room cladding
You should take a responsible approach to choosing wood for cladding. The greatest resistance to decay is inherent in coniferous species, but when heated they are capable of releasing resin. Therefore, it is better to use them when covering a dressing room or washing room. Of the deciduous species, oak has the optimal resistance; however, when wet, it becomes slippery.
Windows and doors in the bathhouse
It is advisable to make them wooden, for which pine or ash are suitable, and varnishing is allowed only on the outside, otherwise harmful fumes cannot be avoided. For the same reasons, it is not recommended to use polyurethane foam as a sealant; it is better to use natural materials, such as felt.
The windows in the bathhouse serve only for lighting, therefore, in order to reduce heat loss, they are made small and placed low.
Special attention should be paid to the door to the steam room - it should open exclusively outward and close only with a ball latch, so that it can swing open simply from a push or under the weight of the body if one of the visitors becomes ill. Dimensions are smaller than standard (to avoid waste of heat).
Electrical wiring in the bathhouse
When installing the electrical network yourself, you should not forget that in aerated concrete walls the cable, wound into a corrugated tube, is laid along grooves cut into the blocks. It is first recommended to carefully develop a layout of electrical appliances, as well as lighting points, sockets and switches inside the room.
According to the calculated power of lamps and other electricity consumers, it is necessary to select a cable of a suitable cross-section in order to avoid overloads and heating of the wire. Since the bathhouse is a room with high humidity, the insulation of the electrical network should ensure maximum safety, and sockets should not be located too close to the floor.
It is recommended to install a circuit breaker at the entrance of the electrical network to the bathhouse. It is also advisable to provide each wiring branch, in accordance with the diagram, with a separate fuse. This is a fairly important part of the work in installing electrical equipment, so if you can’t do it yourself, it’s better to invite specialists.
A truly working legal way to save money. Everyone needs to know this!
Start of construction
It is recommended to lay 1.5 or 2 bricks with voids, which corresponds to 38 cm and 51 cm, since this method has better thermal insulation properties. The construction of masonry indoors can be done in ¼ and half brick, respectively 6.5 and 12 cm, provided that standard building material is used, according to GOST.
The plinths and the fundamental base of the bathhouse, located below the surface layer of waterproofing, must be built from red refractory solid brick. When constructing a surface level, hollow brick can be used above the waterproofing, and the walls themselves can be made of standard white (silicate) or red brick.
The strength of brickwork largely depends on the correct execution. It is necessary to begin laying by installing a corner plumb line at the junction and intersection of the walls. The first row of corners starts with 2/4 or ¾ brick. Lightly loaded parts of the wall, for example, a window opening, are made of half a brick. Between horizontal and butt rows, the thickness of the gap between bricks should not exceed 12 cm. To control the quality of masonry, installation fines, or construction beacons, are used.
Why choose aerated concrete
Aerated concrete blocks are a special modified concrete with a porous structure, which ensures high energy intensity of the material. Due to its unique performance characteristics, aerated concrete is successfully used in modern construction.
Using an aerated block to build a bathhouse is a rational solution for private developers with minimal investment. The video shows examples of such baths.
Does an aerated concrete bathhouse have pros and cons? The operational characteristics of the future building are determined by many factors, which include the correct choice of building material.
- Availability and ease of laying blocks. The gas block is suitable for constructing a private bathhouse yourself, so even a novice master can do the installation work.
- Light weight. To lay the blocks, you do not need to use specialized equipment; all work can be done manually.
- Affordable price. Construction of a bathhouse made of aerated concrete will cost much less than the construction of a similar structure made of wood.
- Fire resistance. Aerated concrete is resistant to combustion and overheating even in direct contact with fire.
- High thermal insulation. A bathhouse made of aerated concrete blocks reliably accumulates and retains heat for a long period of time.
- Strength and wear resistance. Aerated concrete blocks are not susceptible to mechanical damage and negative environmental influences.
- Long service life. If the construction technology is followed, it can be guaranteed that a building made of aerated concrete will last at least 25 years.
- Resistance to biological effects. This material is absolutely inert to the formation of fungi, mold, and damage by pathogens.
- No shrinkage. Unlike wood, aerated concrete does not shrink, which allows you to begin interior finishing work immediately after construction.
But even with undeniable advantages, the material has serious disadvantages:
- Susceptibility to increased moisture. Aerated concrete blocks quickly absorb excess moisture outside and inside the premises, which can lead to deformation and destruction of the finished structure. High-quality interior finishing of aerated concrete baths, as well as timely insulation of the facade, will help prevent negative consequences.
- Requires a high-quality foundation. Any violation of the foundation construction technology can lead to serious deformations of the finished structure.
Plastic panel lining
This method of finishing a sink is considered the most budget-friendly. The material is lightweight and resistant to moisture; it is mounted on a special grid. If you look visually, it is difficult to distinguish the lining from wood. Any design can be realized here. Such cladding has its drawbacks - toxins can be released when heated, the material is not environmentally friendly, airtight, and can quickly suffer mechanical damage.
To install plastic panels, you must first make waterproofing using PVC or foil film.
Development of a standard project
The working design of a bathhouse made of aerated concrete is the first stage of construction of a structure, which takes into account all the main technical and operational characteristics of aerated concrete blocks.
Design involves the preparation of the necessary documentation for work related to waterproofing, vapor barrier of the bathhouse, as well as the arrangement of a dry steam room.
Various projects of aerated concrete baths include basic data:
- General dimensions of the construction site.
- Type of foundation.
- Dimensions and layout of the main premises: steam room, dressing room, rest room, sanitary unit and others.
- Type of heating equipment - location and installation method, operational characteristics.
- Arrangement of utilities - ventilation ducts, chimneys, cold and hot water supply, drainage and sewerage.
- Dimensions of openings for doors and windows.
A finished bathhouse made of aerated concrete, the design of which was developed at a professional level taking into account the main characteristics, will last for many years without the need for major repairs.
The construction of an aerated concrete bath is carried out in stages and includes:
- Laying the foundation. The best solution for buildings made of aerated concrete is a shallow strip foundation.
- Construction of wall structures with the installation of a reinforcing frame every 4 rows.
- Installation of roof truss system, covering of roofing material.
The photo shows similar projects.
Practical and organizational implications
The main room of the bathhouse is the steam room, and especially close attention must be paid to the insulation of this particular room due to the constantly high humidity and hot air. When moist air is heated in a steam room, most of the insulation materials produced by our industry emit toxic fumes to one degree or another. Therefore, the selection of not only high-quality, but also safe material is a paramount problem. We already know that mineral wool is the presence of formaldehyde, and polystyrene foam or expanded polystyrene is the evaporation of styrene, which in large quantities can be harmful to health. When buying insulation, you need to pay attention to this aspect, and any fastening technology can be used.
vote
Article rating
Installation of roof truss system
The next stage is the arrangement of the rafter system for the gable roof. The work package includes the following:
- Installation of the base, rafter and transom for the finished structure. For the rafter system, an edged board is used (dimensions 100 × 40 mm).
- Installation of triangles for gables.
- Installation of wooden sheathing from beams with a step width from 60 to 100 cm.
- Arrangement of the attic floor base in compliance with technological gaps for ventilation.
- Gable trim.
- Installation of waterproofing material on wooden sheathing.
- Laying roofing material.
What is plastering done?
Traditionally, the most affordable and yet effective binding material is high-quality gully clay. Why is it gully, because the mineral of the required quality lies at a certain depth from the surface. Which, however, does not at all prevent the extraction of clay raw materials in quarries and banal pits.
In general, there are a lot of binding materials for plastering a stove; in addition to clay, they include: cement, alabaster, commonly known as gypsum, and slaked lime. In addition to binding materials, the solution contains an inert material, in our case quarry or gully sand. Moreover, its chemical composition can be different; certain sands have feldspar as their raw material, others have quartzites.
A word from Experienced! Practice shows that good inert sand is made up of different fractions, or, in more professional terms, has a different coarseness modulus. Grains of sand that are different in size adhere to each other better and create a denser mass. Therefore, you should use fractionated or, as it is also called “calibrated” sand, with caution.
In addition to the binder and inert substance, the plaster mortar must also contain alloying substances, that is, materials the addition of which to its formulation will make it possible to obtain a mortar with certain properties. In our case, the key properties are: temperature stability, strength, ductility, the ability to maintain working qualities for a sufficient amount of time and be ready for use.
Alloys include: liquid or silicate glass, table salt, asbestos, various kinds of heat-resistant plasticizers, fireclay grains, fiberglass.
Attention! The World Health Organization classifies asbestos as a material that has carcinogenic properties, so its use should be limited by rationalism and common sense and accompanied by strict compliance with safety standards for handling potentially hazardous substances.
Here are the basic recipes for plastering solutions. For ease of use, we provide this information as a table:
| Component name | Volume fraction in the formulation, in parts |
| Clay | 1 |
| Lime | — |
| Alabaster /gypsum/ | — |
| Cement | — |
| Sand | 2 |
| Asbestos | 0,1 |
| Liquid glass | 0,2 |
| Table salt | 25 gr. per 1 kg of finished solution |
Important! The clay in the given recipe, which is noted in the reference literature as fire-resistant plaster for the stove, should be thinned, ordinary. If enriched or otherwise fatty clay is used, the number of parts of sand should be increased to 4. Clay is added to the mixture only in soaked form, in the state of a clay mash that has matured for at least 4 hours. The fat content of the clay and its overall quality are determined through instrumental control, and at home in a simple but effective way, testing “on a stick”.
Determining the quality of clay at home
Since ancient times, stove makers have determined the quality and fat content of clay, in particular, by testing it “on a stick”. To do this, a smoothly planed stick is lowered into a mature clay mash; in modern conditions, this can be a clean and preferably uncracked handle from a factory-made shovel. The stick is lowered to the entire depth of the container and slowly removed. Good quality clay should cover the stick with an even layer about 1.5 - 2 mm thick. This is the norm.
If the stick is covered in places, grooves and traces of runoff are visible on the surface, then the clay is thin. This is either “tortured” or used in a ratio of 1 to 2 with sand. If the stick is covered with a thick, uneven layer, including loose lumps, then the fat content of the clay is excessive, and the rate of adding sand to the solution should be increased to 4 parts.
Plaster mortars based on alabaster
Gypsum plaster mortars belong to the class of high-strength, but have an unpleasant quality to use; their life time is about 6 - 8 minutes. Within 20 minutes, the solution completely and irrevocably sets.
Here is the recipe:
| Component name | Volume fraction in the formulation, in parts |
| Clay | — |
| Lime | 2 |
| Alabaster /gypsum/ | 1 |
| Cement | — |
| Sand | 1 |
| Asbestos | 0,2 |
| Liquid glass | — |
| Table salt | — |
| Polyvinyl acetate glue /PVA/ | 50 gr. per 1 kg of finished mixture |
Attention! To mix alabaster-based mixtures, you need clean and cold water. PVA glue is used, partly, as a plasticizer, and in general, as a reaction inhibitor, that is, it somewhat slows down the setting process of gypsum. But it must be remembered that gypsum mixtures are demanding in terms of speed of work and their full use.
Cement based plaster mixtures
Cement is a good binder, but classic cement mortars are characterized by low temperature stability, so heat-resistant plaster for stoves includes several components that increase its characteristics:
| Component name | Volume fraction in the formulation, in parts |
| Clay | 1 |
| Lime | 1 |
| Alabaster /gypsum/ | — |
| Cement M-500 | 1 |
| Sand | 2 |
| Asbestos | 0,1 |
| Liquid glass | 0,1 |
| Table salt | — |
| Polyvinyl acetate glue /PVA/ | — |
The order of mixing such solutions is generally accepted. The dry ingredients are mixed in a separate container, then added to the aqueous clay solution.
Important! The consistency should be close to the thickness of sour cream and the finished solution should be firmly held on the surface of the trowel. An exception is the mortar for the first layer of masonry. It should be somewhat thinner and confidently fill masonry joints.