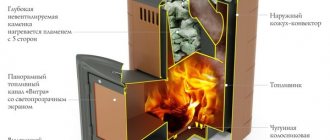
Brick oven
The brick kiln is still in demand by people. Some populated areas are not gasified and a stove in a residential building is necessary. Sometimes it is an additional source of heat in order to save gas or electric heating.
In a country house you can not only spend the summer, but also celebrate New Year, Christmas and other holidays - romantic, unusual and healthy. A simple stove or fireplace will create comfort in the house; you will want to be at the dacha on weekends, sitting comfortably in the warmth.
When installing the stove, a number of conditions must be observed. In addition to choosing the correct design, installation location, components and materials, you need to understand what stoves are coated with so that they do not crack or crumble. A responsible attitude to the work at the construction stage of the building itself and the use of appropriate quality materials does not lead to cracks in bricks and finishing materials.
Exterior finishing of stoves
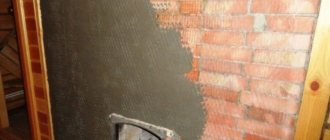
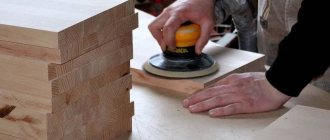
You can increase heat transfer, hide minor deformations and give the stove a more aesthetic appearance by plastering or tiling.
Plastering is the most common; it is possible after settling and complete drying of the masonry.
Important! The walls of the oven intended for plastering should not be dirty and smooth; the solution will not have the necessary adhesion to them. The plastered surface will have defects after drying.
Tiling gives an elegant look and protects the room from the penetration of flue gases when small cracks appear in the masonry.
DIY artistic painting
If the classic white stove seems boring, it makes sense to decorate it with artistic painting. One should not think that only natural artists can do such work. As a basis, you can take ready-made stencils intended for painting walls, or transfer the image you like onto thick paper.
If the stencil does not have a self-adhesive base, it is first secured to the surface of the oven with tape. The outline is carefully transferred with a simple pencil and the missing lines are completed. For beginners, it is better to choose simple ornaments and patterns with large elements that do not require artistic skills.
Simple patterns for beginners
For coloring, you can use the same whitewash, giving it the desired shades using gouache. Heat-resistant acrylic or water-dispersion paints are also suitable - they are not afraid of high temperatures and do not emit harmful substances when heated.
The most convenient way to apply the design is with artistic brushes of various thicknesses. Some patterns allow you to use spray paint. For decorative stripes, you can use a roller. After painting, the stove cannot be heated for at least 1-2 days.
To get a professional result from whitewashing or painting, it is better to call on experienced craftsmen for help. In this case, you will not need to worry about the strength and durability of the finish.
What causes cracks
When malfunctions of the furnace equipment are discovered during use, the first thought that arises is: the furnace is cracking, what should I do? To begin with, it doesn’t hurt to figure out what led to this.
The following factors may be the reasons:
- donkey foundation or structure itself;
- unscrupulous craftsmen and unprofessional work;
- low quality material or unsuitable mortar for masonry or plastering was used;
- the drying process of the masonry is disrupted;
- long heating breaks, sudden temperature changes;
- the technology was not followed when applying each layer during plastering;
- The ventilation system is faulty, condensation.
Note!
Chipboard: what is it? Types, application features, photos, sizes, thickness, explanation, manufacturers
DIY houses made from shipping containers step by step: instructions, diagrams, pros and cons, photos, design
Working pressure in the heating system in a private house: what it should be, how to create it, instructions for adjusting it yourself
Is it possible to use a stove with cracks?
There is only one answer to this question: it is prohibited. Do not use a stove with cracks and endanger people’s lives. If there are no structural defects, it is necessary to begin troubleshooting as soon as possible.
Important! Fires in most cases result in death due to carbon monoxide released, not fire.
Diagnosis of problems
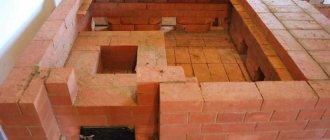
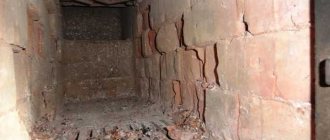
The diagnostics of all surfaces will answer the question why a brick stove is cracking. The worst option would be widening through brick cracks. You can’t do this without the help of a specialist; you may need to re-lay the furnace.
Small cracks in bricks caused by high heat allow you to carry out the work yourself. The cracks need to be filled and the surface re-plastered.
Oven adhesive
In building materials retail outlets there is a dry adhesive special mixture, as well as a ready-made solution of fireclay clay and cement. This glue is durable and fire-resistant. It is convenient to fill the voids of bricks with ready-made plastic material.
The dry composition is not difficult to dilute in accordance with the instructions. It is recommended to work with a small amount of material, as it dries quite quickly. Along with the advantages, ready-made glue has the disadvantage of being quite expensive.
Clay-sand mixture
Affordable economy class material. To prepare the proper quality solution, only high-quality clay and river sand are used. The clay is poured with water in a convenient container and diluted to the state of milk, then rubbed through a fine sieve.
When the clay and water settle, the liquid top layer is drained. Sand, sifted twice, is added to the clay mixture, ratio 1:2. The liquid composition is diluted from the clay mixture to a creamy consistency and mixed thoroughly.
Note!
Three-way valve in a heating system: instructions on how to choose and install correctly in a private home
Why the bottom of the battery is cold and the top is hot - let's look at the reasons. Review of recommendations on what to do and how to fix it
How to insulate a dog house for the winter with your own hands and inexpensively - step-by-step instructions with photos and descriptions of all stages
It’s easy to check whether the solution is ready. If small pieces of the mixture remain stuck to the stirrer, then the solution is ready, and if large enough pieces remain, then by diluting with water the mixture is brought to the required condition.
A solution containing clay is more likely to lead to defects. There are no exact instructions for preparing the solution; it is prepared based on the experience of the master. There are not many professional craftsmen, so such a solution is not often in demand.
Chalk based whitewash
Chalk is an inexpensive natural material that is easy not only to apply, but also to wash off. Using chalk you can get a rich white color, but every time you touch the stove it will leave white marks on your clothes. For whitewashing, chalk is used in powder form, which is sold in hardware and construction stores. When diluting chalk, do not be afraid of the gray tint of the solution - after drying, the stove will become crystal white!
The chalk solution may have a gray tint, but the dry oven will be snow-white
To prepare the solution per liter of water, take 800 grams of dry chalk, but stove makers advise using skim milk instead of water, and adding natural laundry soap and wood glue for strength.
First, one and a half kilograms of sifted chalk are diluted in 3 liters of milk, after which the mixture is heated and a piece of grated soap and 100 grams of wood glue are added, continuing heating until the ingredients are completely dissolved. It is important to prevent the liquid from boiling! Before whitewashing the stove, the solution is filtered through cheesecloth and applied to the surface while warm.
Fireclay clay
One of the best materials to cover the stove so it doesn’t fall off. Affordable, sold in stores, packaged in 20 kilograms. Resistant to moisture and temperature. Also intended for plastering surfaces.
The finished solution is obtained as follows: fireclay clay is mixed with cement and sand, the ratio of the components is 2: 1: 7, respectively, water is added. For better pliability of the material, you can initially fill the clay with water, then wipe out the lumps, add cement and sand. The thickness of the mixture depends on what type of work is being carried out, and skill experience also plays a role.
How long will it take to dry?
The oven cannot be used after repair until all applied layers are completely dry. How long this will take depends on the composition used. Heat-resistant glue dries in a matter of hours; the sand-clay mixture will take a day.
Important! Try to plan repairs for the summer, when the furnace is not in use. This will allow enough time for any composition to dry completely.
Oven grout
To eliminate defects that occur in the oven, ready-made heat-resistant grout is sold. Because of its high cost, home craftsmen prefer to make such a solution themselves.
The clay is prepared as for a clay-sand mixture. The soaked clay slurry is combined with sifted sand and while mixing, chopped straw is added, the component ratio is 1:4:5. 1 kg of coarse salt is added to the finished solution, which makes the composition more plastic and resistant to cracking.
Grout perfectly fills voids. You can also use it to plaster the stove surface with the first rough layer.
Mixing the solution
Regardless of the nature of the defects, you will need a solution to cover them. Sometimes chamotte (fireclay clay) or a traditional mixture of sand and clay is used for this. The modern market of finishing materials offers a large selection of different grouts and adhesives. You can make regular grout yourself. There are several recipes for traditional putties:
- Sandy. To mix the composition, you need 4 parts of river sand, 2-3 parts of lime mortar and 3-4 parts of cement mortar. All components are kneaded until smooth to form a plastic mass.
- Fireclay and clay. This type of putty consists entirely of fireclay or clay. Both materials can be purchased at a specialty store.
- Lime. One of the simplest and most common putty for Russian stoves is lime solution. To do this, buy a liquid mass or extinguish the dry composition.
- Cement. For furnaces, it is optimal to use the M400 composition; 0.5 cement is diluted to 1 part water.
Covering stove cracks
The material for the upcoming work has been selected, and another question arises: how to properly seal the stove?
You can start working only after cleaning the brick from decorative finishing and plaster. Using a suitable tool, the gaps between the masonry with cracks are widened to fill an area of about 10 mm with adhesive.
When using ready-made adhesive solutions, it is advisable to adhere to some rules:
- prepare the working solution in a limited volume due to the drying speed;
- Wet all cracks with water;
- tightly fill the gaps with adhesive;
- Lubricate the top of the oven with the prepared solid mixture;
- wait for it to dry completely and start plastering.
An unheated stove is a bad option for carrying out repair work with materials containing clay. It is recommended to heat it slightly; this will help you see imperfections and eliminate defects before the putty dries.
The sequence of work will be slightly different:
- Before sealing the cracks, stir the mixture again until smooth (the contents have different densities);
- make sure the material is of high quality. To do this, you can manually make a spherical object, and if cracks appear on it, add a little water;
- wet all the cracks with water and fill tightly with glue (it’s safer to use your hands);
- Plaster also after final drying. Next you can use whitewash.
Putty materials
Inventive people are ready to give advice on any matter, including the choice of materials for repairing stoves. Recommendations must be taken carefully, separating the wheat from the chaff.
A mixture of clay and sand
There are well-known putty compositions that have been tested many times over. You can use them without any doubt.
It is customary to cover stoves with clay. The material definitely inspires confidence, but first you need to check what type and grade of clay is suitable for making mechanically strong, heat-resistant putty. The stove should be sealed so that it does not crack later.
The composition is prepared by mixing equal parts of clay and sand. Both components must first be sifted and separated from large impurities. Due to the fact that the clay composition in different deposits varies greatly, it is advisable to check the strength of the mixture.
Advice! You need to make balls from the slurry formed after adding water, let them dry well and examine them carefully. If cracking is not visible, the materials are suitable.
It would be advisable to tighten the inspection requirements by throwing dried cakes from a low height. If they did not collapse and successfully passed the tests, the chances of making a high-quality repair of the furnace increase.
When preparing homemade putty, monitor the condition of the wooden mixing spatula. The gruel should not stick to it. If clay adhesion is noticeable, it is better to increase the amount of sand in the mixture.
Of course, if possible, it is advisable to take a special type of clay - fireclay. It is characterized by fire resistance and strength. You can buy it in building materials departments. Before use, fireclay raw materials should be kept in water for a couple of days.
Adding straw and horse manure
A popular folk method of preparing grout for stoves is to add chopped straw or chaff (husks, chaff) to the mixture of clay and sand. You need a lot of it. So, if 4 buckets were taken of clay, one bucket of sand will be needed, and straw - from 40 kg to 45 kg. You can hear advice about the benefits of adding salt to the grout at the rate of half a regular glass per bucket of the mixture. It is recommended that the quality and quantity of additional components be determined based on the local situation.
Important! You cannot use mortar with straw for laying. It is only suitable for covering surface cracks, for plaster.
In some places, people recommend covering stoves with a mixture containing horse manure. Now it is not so easy to find it, it makes no sense to insist on such technology.
Special formulations
If there are building materials stores nearby and you are willing to spend money, it is better to buy ready-made adhesives: soft or hard. The viscous solution is convenient for covering small cracks. Complete plastering of the stove can be done with solid compounds. Sometimes cracks in the masonry are sealed with a special heat-resistant sealant, and small cracks are filled with asbestos fiber.
Note! The finished product contains clay, sand, cement of proven quality, mineral and synthetic additives.
If the solution or paste is prepared correctly and the work is done correctly, the result is guaranteed by the manufacturer. What is important is that special putty compounds can be used if the stove is finished with tiles or decorative bricks. They are plastic, prevent the formation of repeated cracks and provide reliable adhesion to the masonry.
Oven overheating
Having installed a new stove, or repaired damage to the old one, you should not test its strength by heating it to its fullest.
The first fire must be carried out with a small amount of firewood, increasing the amount each time. And then there will be no need to get rid of the next problems again.
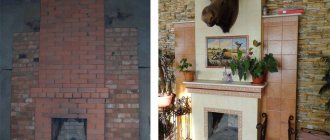
Photo
Below are the best real photos of properly plastered stoves:
Tags: putty for stoves, mortar for the stove to prevent cracking, repair of a brick stove, what to put on the stove