Brick oven
The brick kiln is still in demand by people. Some populated areas are not gasified and a stove in a residential building is necessary. Sometimes it is an additional source of heat in order to save gas or electric heating.
In a country house you can not only spend the summer, but also celebrate New Year, Christmas and other holidays - romantic, unusual and healthy. A simple stove or fireplace will create comfort in the house; you will want to be at the dacha on weekends, sitting comfortably in the warmth.
When installing the stove, a number of conditions must be observed. In addition to choosing the correct design, installation location, components and materials, you need to understand what stoves are coated with so that they do not crack or crumble. A responsible attitude to the work at the construction stage of the building itself and the use of appropriate quality materials does not lead to cracks in bricks and finishing materials.
Types of sealant for stainless steel chimneys
By sealing the cracks of stove or fireplace pipes, combustion products will not enter the room through them. Reliable insulation makes using a stove, fireplace or boiler as safe as possible.
Watch video - high-temperature products for stainless steel and other materials
Review of high-temperature sealants: which are not suitable for joining chimneys, and which are suitable
All sealing agents can be divided into several types:
- based on silicone or silicate;
- by composition: one-component or two-component;
- according to temperature characteristics: temperature-resistant sealants and heat-resistant.
As the name suggests, one-part sealants consist of a single component and do not require mixing of ingredients before sealing. This makes them easy to use and popular with home owners who appreciate the ease of use of the insulation product.
Two-component ones must be mixed before starting work, strictly observing the proportions specified in the instructions. In this case, the finished product should be used within several hours after mixing. This option is not suitable for sealing joints with your own hands; professional builders usually use two-component insulation.
In addition to chimney insulation, sealing compounds are also used to insulate the seams of a heating system structure based on an electric boiler when eliminating pipe leaks.
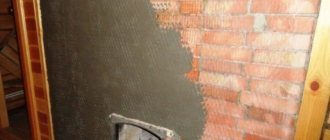
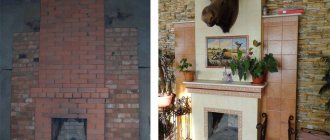
Exterior finishing of stoves
You can increase heat transfer, hide minor deformations and give the stove a more aesthetic appearance by plastering or tiling.
Plastering is the most common; it is possible after settling and complete drying of the masonry.
Important! The walls of the oven intended for plastering should not be dirty and smooth; the solution will not have the necessary adhesion to them. The plastered surface will have defects after drying.
Tiling gives an elegant look and protects the room from the penetration of flue gases when small cracks appear in the masonry.
Cracks
Cobweb. On the walls you can see cracks similar to poutine. Such cracks are small and do not penetrate the wall and harm the appearance. It is imperative to get rid of such defects. The surface was cracking due to the mixture not being prepared correctly. Work order:
- The surface must be cleaned with a special alloy brush.
- Moisten the area where the work will be done with groundwater. Groundwater contains cement and water.
While the surface is drying, it is necessary to prepare a solution for the plaster. For the correct proportion of clay and sand, you need to know what the fat content of the clay is:
- It is necessary to take several samples of the solution and mix it with sand in different proportions.
- Sift the mixture.
- Add water.
- We make balls from the mixture and throw them onto a hard surface; if the ball does not break, then the solution is mixed correctly.
After determining the thickness, mix the solution in the appropriate amount and begin plastering; the surface must be damp.
- Using a trowel, apply the mixture to the wall of the oven (throwing pieces of the solution onto the wall)
- Using a grater, level the solution, pressing it slightly against the wall.
- The surface must dry.
- Using a triangular trowel, we seal the cracks with a clay substance. If the crack is at a corner, then it is necessary to limit the surface with planks.
- Let's do the grouting.
- Using a trowel made of an alloy, we spray the solution and carry out movements from bottom to top.
- After the solution has dried, rub the surface with radial movements.
If the covering is made of tiles, then it can be rubbed down with chalk; those elements that have deteriorated due to heating are replaced. Before installation, the space is cleaned and wetted. Cracks can be caused by loosening, then it is necessary to pull out the part one hundred percent.
- A slot is made in the masonry for the wire.
- It is necessary to attach a wire to the door frame and wrap it around the perimeter with asbestos cord.
- Apply clay mortar. Place the door tightly into the groove.
Stages
- If the cracks are deep, then it is necessary to remove the layer of plaster and create wide gaps between the bricks. Even small cracks need to be seen. In this way, you will improve the grip properties.
- It is imperative to treat the surface with water, then heat the oven. All surfaces must be dry.
- The oven must be warm. It is necessary to apply clay on it in a thin layer using a brush, this is the basis for the work.
- You can lay a mesh on top and secure it with screws, glue the alloy mesh with glue and seal it into the joints located between the bricks.
- Apply the solution in 2 layers.
- After the mixture has dried, the surface can be whitened.
What causes cracks
When malfunctions of the furnace equipment are discovered during use, the first thought that arises is: the furnace is cracking, what should I do? To begin with, it doesn’t hurt to figure out what led to this.
The following factors may be the reasons:
- donkey foundation or structure itself;
- unscrupulous craftsmen and unprofessional work;
- low quality material or unsuitable mortar for masonry or plastering was used;
- the drying process of the masonry is disrupted;
- long heating breaks, sudden temperature changes;
- the technology was not followed when applying each layer during plastering;
- The ventilation system is faulty, condensation.
Note!
Chipboard: what is it? Types, application features, photos, sizes, thickness, explanation, manufacturers
DIY houses made from shipping containers step by step: instructions, diagrams, pros and cons, photos, design
Working pressure in the heating system in a private house: what it should be, how to create it, instructions for adjusting it yourself
Silicone sealants for structures made of stainless steel, glass and other materials
When wondering how to seal a chimney made of stainless steel, glass, plastic or ceramics, you should pay attention to fireproof silicone. This material promotes close contact of structural parts with each other and reliable insulation. The main advantages of silicone composition:
- thanks to elasticity, the quality of contact is maintained for a long time, even when, due to high temperatures, structural elements are deformed and change position relative to each other;
- after completion of the polymerization process, the material becomes very durable;
- silicone is absolutely waterproof;
- the material has a high degree of resistance to ultraviolet radiation and other weather conditions;
- Silicone is characterized by high thermal and heat resistance.
Silicone sealants come in two types:
- Acidic. They release acetic acid during hardening, which can damage the pipe or roofing. Such a remedy will definitely not help in solving the problem than sealing a chimney made of stainless steel or a material of natural origin: cement, stone or concrete, as it can contribute to the formation of corrosion of metal elements, destruction of the areas of the pipe and roof in contact with it.
- Neutral insulation products, unlike acidic ones, release water and alcohols into the environment when they harden. This is a suitable sealant for stainless steel chimneys.
An additional advantage of silicone-based products is that as a result of heating, the iron oxide contained in it turns brown, which makes the insulation more invisible against the background of a roof or brickwork.
Is it possible to use a stove with cracks?
There is only one answer to this question: it is prohibited. Do not use a stove with cracks and endanger people’s lives. If there are no structural defects, it is necessary to begin troubleshooting as soon as possible.
Important! Fires in most cases result in death due to carbon monoxide released, not fire.
Solution
Bricks are usually held together with cement-sand mortar. You can make it yourself, but experienced builders strongly recommend purchasing ready-made compounds in which all proportions are carefully observed and special additives are present that increase adhesion, frost resistance, etc. Consistency is also very important. Too liquid a mass will flow into the voids of the brick, and this is not only inconvenient, but also uneconomical. Thick ones are very difficult to evenly distribute and level.
You can determine the mobility of the solution by lowering the so-called standard cone onto it and observing how deeply it sinks (on average from 7 to 14 cm). For hollow bricks, you need a mixture with a mobility of no more than 7-8 cm of cone draft, and for solid bricks - about 12-14 cm.
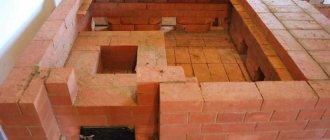
Diagnosis of problems
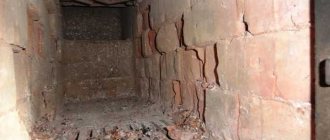
The diagnostics of all surfaces will answer the question why a brick stove is cracking. The worst option would be widening through brick cracks. You can’t do this without the help of a specialist; you may need to re-lay the furnace.
Small cracks in bricks caused by high heat allow you to carry out the work yourself. The cracks need to be filled and the surface re-plastered.
Heat-resistant and heat-resistant sealants: what are the differences?
According to their temperature characteristics, insulation products are divided into heat-resistant and heat-resistant. They are used to seal joints between different sections of a structure, as they can withstand different temperatures. If heat-resistant ones are only suitable for external surfaces, then heat-resistant ones can seal the cracks of a high-temperature chimney, where temperatures are especially high.
Oven adhesive
In building materials retail outlets there is a dry adhesive special mixture, as well as a ready-made solution of fireclay clay and cement. This glue is durable and fire-resistant. It is convenient to fill the voids of bricks with ready-made plastic material.
The dry composition is not difficult to dilute in accordance with the instructions. It is recommended to work with a small amount of material, as it dries quite quickly. Along with the advantages, ready-made glue has the disadvantage of being quite expensive.
Expert opinion
It is worth cutting cracks only in a hot oven, when the brick has expanded as much as possible and gained its expansion. First you should scrape out the seams as much as possible. Most often, 2-3 centimeters will be enough. The brick above the door most likely rested on an iron corner or a strip of iron, which is why it falls out, as the metal burns through and leads it out. Or it simply hung in the air, resting only above the door. It is best to rearrange such a knot by placing bricks above the door in a “lock”, otherwise there will be no point.
It is convenient to deepen the seams using a metal bracket; its ends are sharp. Next, deepen and well-moistened using a regular flower sprayer, compact the seams on a hot stove with a small hammer and a sliver of wood with an end to the thickness of the seam. The recess that appears should be sealed with a very thick clay mortar. Usually, after such techniques, cracks no longer appear.
Clay-sand mixture
Affordable economy class material. To prepare the proper quality solution, only high-quality clay and river sand are used. The clay is poured with water in a convenient container and diluted to the state of milk, then rubbed through a fine sieve.
When the clay and water settle, the liquid top layer is drained. Sand, sifted twice, is added to the clay mixture, ratio 1:2. The liquid composition is diluted from the clay mixture to a creamy consistency and mixed thoroughly.
Note!
Three-way valve in a heating system: instructions on how to choose and install correctly in a private home
Why the bottom of the battery is cold and the top is hot - let's look at the reasons. Review of recommendations on what to do and how to fix it
How to insulate a dog house for the winter with your own hands and inexpensively - step-by-step instructions with photos and descriptions of all stages
It’s easy to check whether the solution is ready. If small pieces of the mixture remain stuck to the stirrer, then the solution is ready, and if large enough pieces remain, then by diluting with water the mixture is brought to the required condition.
A solution containing clay is more likely to lead to defects. There are no exact instructions for preparing the solution; it is prepared based on the experience of the master. There are not many professional craftsmen, so such a solution is not often in demand.
Briefly about the main thing
If cracks appear on the stove, it is important to find out how critical they are and what to do about them. Inspection of the masonry allows you to determine the cause
We can easily eliminate the defect if the cause of the cracks is infrequent or improper use, finishing errors or design flaws. Restoration will not help if a problem with the foundation or an error in the calculations is revealed.
Ready-made and home-made compounds are used for smearing. All of them, from sand-clay mixtures to ready-made adhesive compositions, are capable of qualitatively eliminating defects. To prevent cracks from appearing again, a technique has been developed for applying a plaster layer to the stove; special sealant pastes are used to restore metal surfaces.
Source
Fireclay clay
One of the best materials to cover the stove so it doesn’t fall off. Affordable, sold in stores, packaged in 20 kilograms. Resistant to moisture and temperature. Also intended for plastering surfaces.
The finished solution is obtained as follows: fireclay clay is mixed with cement and sand, the ratio of the components is 2: 1: 7, respectively, water is added. For better pliability of the material, you can initially fill the clay with water, then wipe out the lumps, add cement and sand. The thickness of the mixture depends on what type of work is being carried out, and skill experience also plays a role.
Replacing the hob
It may happen that as a result of long-term use (5-6 years), smoke began to smoke from under the stove around the edges. There's nothing terribly wrong with this, but it needs to be fixed. Doing it yourself is much cheaper than inviting a professional.
The work is carried out with a warm stove, so it is heated. Then they remove the old slab and perform a thorough inspection of the entire structure, not just the area around the slab.
The following picture is very likely: the seams have crumbled, there is soot and ash in them and in the grooves of the slab. Therefore, soot, ash, and the remains of the previous solution are cleaned out, the seams are thoroughly washed, a primer is applied from glue diluted with water in a ratio of 1:1, a ceramic heat-resistant insulating cord, felt or basalt wool is laid around the perimeter of the hob (on heat-resistant glue, which is used through some gaps drip into the gap around the slab). Then they are coated with a solution of fine-grained sand, sifted clay, 10% cement and 10% heat-resistant glue. There should be no voids in the seams. Next, the seams are rubbed down so that they do not stand out too much from the others, or a border of ceramic tiles is laid on the seams without glue.
When purchasing a ceramic heat-resistant cord, you need to be vigilant and try to light it right in the store. If it catches fire, they can exchange the fake, and if they refuse, then there is still a benefit from checking, because such a cord cannot be used in an oven. A day later, a control fire of the furnace is performed - there should be no smoke leaks.
Oven grout
To eliminate defects that occur in the oven, ready-made heat-resistant grout is sold. Because of its high cost, home craftsmen prefer to make such a solution themselves.
The clay is prepared as for a clay-sand mixture. The soaked clay slurry is combined with sifted sand and while mixing, chopped straw is added, the component ratio is 1:4:5. 1 kg of coarse salt is added to the finished solution, which makes the composition more plastic and resistant to cracking.
Grout perfectly fills voids. You can also use it to plaster the stove surface with the first rough layer.
Fire-resistant silicates
The group of silicate sealants can withstand significantly greater heat.
Temperatures equal to 1200-1500 °C and the action of open fire are not scary for them. Silicate sealants are used to seal cracks directly in the fireboxes, through gaps, and places where cast iron elements meet the furnace masonry. The fire-resistant composite will withstand the effects of heating parts of sandwich chimneys and heating boilers.
The silicates that form the basis of heat-resistant sealants often have grayish or black tints, which determines the color of the paste. The heat-resistant composite adheres well to the surface of the oven.
If necessary, smooth fragments can be lightly treated with abrasives before processing to increase the area of contact with the sealant. The heat-resistant sealant composition completely loses its elasticity after curing.
Seams made from silicate agents should not be subject to vibration or mechanical stress. Silicates are used to seal problem areas in ovens that have already undergone shrinkage. The advantage of non-flexible seams is that they can be safely painted. No cracks or defects will appear on the paint layer.
Before using any heat-resistant sealants for primary finishing or repair of furnaces, you should carefully study the accompanying information.
The compositions can only be used in the temperature ranges indicated on the packages. Some products consist of two components. They must be mixed in a strictly defined proportion. You need to apply the paste quickly. It must not be stored open.
Covering stove cracks
The material for the upcoming work has been selected, and another question arises: how to properly seal the stove?
You can start working only after cleaning the brick from decorative finishing and plaster. Using a suitable tool, the gaps between the masonry with cracks are widened to fill an area of about 10 mm with adhesive.
When using ready-made adhesive solutions, it is advisable to adhere to some rules:
- prepare the working solution in a limited volume due to the drying speed;
- Wet all cracks with water;
- tightly fill the gaps with adhesive;
- Lubricate the top of the oven with the prepared solid mixture;
- wait for it to dry completely and start plastering.
An unheated stove is a bad option for carrying out repair work with materials containing clay. It is recommended to heat it slightly; this will help you see imperfections and eliminate defects before the putty dries.
The sequence of work will be slightly different:
- Before sealing the cracks, stir the mixture again until smooth (the contents have different densities);
- make sure the material is of high quality. To do this, you can manually make a spherical object, and if cracks appear on it, add a little water;
- wet all the cracks with water and fill tightly with glue (it’s safer to use your hands);
- Plaster also after final drying. Next you can use whitewash.
You need to know this
Before you start sealing the seams, you need to prepare them: remove residual clay, rinse thoroughly with water using a brush, then prime with heat-resistant glue (50% solution is suitable). When grouting joints, you need to ensure that the repair mixture fills the joints completely, leaving no voids. If a gap is too large in the masonry, in addition to the mixture, you also need to place a ceramic cord into it. Due to its physical properties, it not only withstands open fire, but also very high temperatures - over 1000 degrees.
Ceramic cord is often counterfeited, so before purchasing it, you need to hold a lit match or lighter to it to evaluate the heat resistance of the product. The cord is placed in the masonry seams around the perimeter of the cast iron slab, using heat-resistant glue for fixation.
To protect stove parts that do not need repair, they must be covered with masking tape.
Oven overheating
Having installed a new stove, or repaired damage to the old one, you should not test its strength by heating it to its fullest.
The first fire must be carried out with a small amount of firewood, increasing the amount each time. And then there will be no need to get rid of the next problems again.
Replacing the grate
Repairing a grate that has lost its performance is simple. To do this, remove it, clean the grooves from ash and put in a new grate. If the old grille was installed with a certain slope, then the new one is mounted in the same way. At the same time, along the entire perimeter between adjacent masonry bricks and the grate, a gap of 5 mm or more in width is left in order to fill in sand, ash, or lay a ceramic insulating cord.
This cord can withstand heating up to temperatures exceeding 1000 °C. It is placed in the groove between the grating and the masonry and fixed with heat-resistant glue.
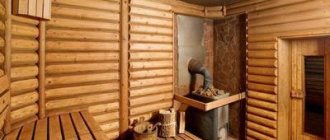
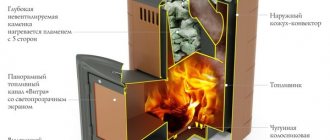
What requires more attention: a stove in the country, a wood-burning stove in the countryside, or a sauna stove?
Furnaces in which coal and brown coal are burned .
A few years after construction, repairs are required for bathhouse and country stoves. Heating appliances in which tin bread, loaves and pizza are baked .
Italian Pompeii ovens are built in many countries. Pizza baked in such facilities has a special taste and smell. This oven is usually built outdoors. Food is cooked under a brick vault, under the influence of fire and the heat of heated bricks. There are two types of Pompeii ovens - Neapolitan (with a low arch, intended mainly for baking pizza) and Tuscan (with a high arch, which allows you to put a pot or pan inside and cook not only pizza, baked meat and fish, but also soups).
Facade repair
If there are few defective areas, then they are not difficult to repair with fresh cement mortar. Repairs begin with preparation: using improvised means (screwdriver, chisel, etc.) you should remove all remnants of the dried mortar. Under no circumstances push the chipped pieces deeper. The brick wall is moistened with water so that it does not absorb it from the applied mortar. After this, you can begin to carefully fill the space between the bricks with cement mortar.
The consistency of the solution should be thick so that it does not leak. To do this, add water carefully during the cooking process, controlling the resulting mass. The first step is to seal the vertical seams, and then the horizontal ones. They are sealed as tightly and flush as possible. In all areas there should be good adhesion to the existing masonry.
The solution that is located at the outer surface should contain less water than the one that fills the seam in the depths of the masonry.
Unstitch the seam in the same way as other sections of the wall so that there are no visible differences. For this purpose, not only a trowel, but also cuttings of a hose will do. When the repair comes to an end, excess mortar and other inclusions are removed from the brick wall. After drying, the influx of cement mortar is mechanically removed.