Despite the fact that the main room of any bathhouse is undoubtedly the steam room, the washing room is also an essential element. Between short visits to the steam room, vacationers go to the washing room, where they can cool off in cool water, relax in the plunge pool and undergo various cosmetic procedures (scrubbing, massage, etc.).
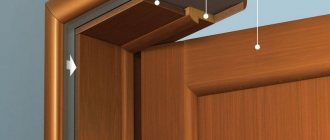
A washing room is a room whose distinctive feature is a high level of humidity, so when decorating it, it is necessary to take this factor into account. The floor deserves special attention, as it will be exposed to water regularly.
How to make a floor in a washing bath - preparing drainage and materials
Before starting construction, you need to determine the type of future floor drain, as well as where and how exactly to install it:
- The most convenient, but difficult to implement on your own option is to drain it into a general drainage system or sewer system. With this option, the drain volume is not limited. It is quite difficult to connect a drainpipe to a general sewer system, but the volume of wastewater will not be limited.
- Installation of a septic tank on the site. It is installed only by specialists. This is an element of local treatment equipment, but its volume must be taken into account in advance when designing. It can fill with water quite quickly. However, this is the easiest way to install it yourself near a bathhouse.
- Discharge of water into the ground near a reservoir. But when using chemical detergents, this method should not be used without first purifying the water.
So, the floor in the bathhouse sink should not only take into account high-quality and safe drainage. Floors must withstand not only large amounts of water, but also temperature changes. Also – the constant ingress of cosmetics and chemicals and the heavy weight of bath equipment.
Bathroom floors in the steam room and sink must be constructed so that they last a long time and are wear-resistant. Required conditions:
- The floor must be built at an angle so that water flows by gravity to the openings of the drainpipes.
- The floor covering must be made non-slip and not too smooth. It's simply dangerous.
- Multilayer waterproof coating.
- Carry out additional insulation of the concrete floor.
Calculator for calculating floor insulation on the ground
Explanations for using the calculator
First, using the proposed map diagram, you need to determine the normalized heat transfer resistance for your region.
Moreover, the indicator is for floors (these values are shown on the map in blue). Map-scheme for determining the values of normalized heat transfer resistance for your region in Russia.
Next, the general insulation scheme is determined.
Explanation No. 1.
— Floors on the ground can be insulated exclusively with expanded clay. True, the thickness of the layer has to be made serious.
— Insulation using other materials may also involve the use of expanded clay as a primary thermal insulation “cushion” under the rough screed. But it can also be done without expanded clay, only with the selected insulation.
Explanation No. 2
It is worth taking into account only the coating that will make some sensitive contribution to the overall “ensemble” of floor thermal insulation. For example, it could be a solid board or thick plywood. Laminate, linoleum, ceramic cladding - in fact, they do not add any insulation - their thermal resistance is too low. Therefore, they are ignored - the default layer thickness field is left at “ZERO”.
Explanation No. 3
Expanded clay bedding under the screed can reduce the thickness of the main insulation. In this case, the thickness of this auxiliary “pillow” is indicated in the corresponding regiment. If you decide to do without expanded clay completely, the default thickness is left in this field, equal to “ZERO”.
Calculation results
If previously a calculation with only expanded clay was chosen, then the result of the calculation is the thickness of the expanded clay layer, which ensures complete insulation of the floor.
If some kind of insulating material is selected, then exactly its thickness after pressing the button will be shown as a result of calculations. It is given in millimeters, is the minimum level, and this value is then rounded up to some standard value characteristic of this material.
The floor in the bathhouse is made of various materials: which is more practical?
Use it to make a floor in a bathhouse in a washing room? There are several options here: tile flooring on a concrete base. The next option is solid wooden floors with a provision for water drainage. Also – wooden lattice. It is best to insulate a tiled floor additionally, since usually the tiles take away all the heat and in the cold season it will be uncomfortable to walk on it barefoot. This is done using an additional layer of insulation before laying the tiles. Almost always in modern construction, the base of any floor is concrete.
Usually the most popular and common option for installing floors in a bathhouse in the washing department is using wood. To make the floor more durable, a metal reinforcing mesh is placed on the concrete base. This makes the coating more even. Wooden boards or solid fabric (fibreboard, OSB, plywood, etc.) are attached to the top.
In addition to wooden boards and ceramic tiles, the floor in the bathhouse is made entirely of concrete. This is a more durable option for the floor in a washing bath and will definitely last for decades. This option is more expensive and requires organization than wood floors, but it is also more durable and durable.
Video description
This video describes how to create a floating screed in a bathhouse:
Pouring a concrete floor
This method of installing a floor in a washroom is not a complicated option. Although only specialists can handle the work professionally. They pour the concrete floor in stages. Moreover, their every movement is honed to the point of automaticity.
The work is often carried out when installing a rough wooden floor. It is created on the foundation and beams. The top of the rough base is often covered with clay, since it is a good thermal insulation material. Its ability to retain heat increases when straw or sawdust is added.
Specialists carry out pouring a concrete floor as follows:
- Level the base using a semi-dry mortar, which is mixed from cement and sand in a ratio of 1:8. It is applied in an even layer. Then the solution is compacted well. After this, check the evenness of the surface using the rule.
- Cover the dried base of semi-dry cement-sand mortar with plastic film. The edges of the waterproofing are overlapped. It is 100 mm. At the same time, plastic film is also placed on the walls to a height of 300 mm.
Waterproofing of the rough base Source krainamaystriv.com
- Secure the damper tape around the perimeter of the washing room. Folgoisol strips can also be used. Typically the width of this material is from 70 to 100 mm.
On a note! Foam or penoplex slabs are suitable for additional floor insulation. They are mounted on plastic film. When using them, it is necessary to monitor the height of the screed. It should not be higher than in other rooms.
- Place cuttings of plastic pipes on the floor.
- Rolled metal in the form of rods is laid parallel to each other on the pipe scraps. Often its cross-section is 12 mm. Typically the pitch between the rods is 250 mm.
- Place the second reinforcing layer. It is laid perpendicular to the already laid rods. The reinforcement is placed with the same spacing - 250 mm. The intersections of the rods are connected using wire.
- Lay out the chain-link mesh. It is attached to the reinforcement frame also using wire.
- Prepare a solution, which is poured onto the prepared base with reinforcement. The process is performed without beacons, because they cannot be fixed evenly to the grid.
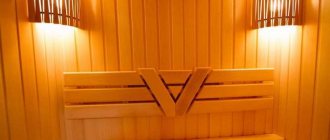
The floor in the sink in a wooden bath – what is important to consider
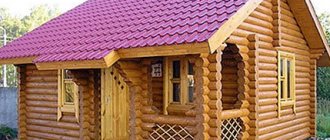
In modern log baths, high-quality, durable wooden floors are laid in the sink. Construction technologies now make it possible to provide the floor with heat, so that walking on it barefoot at any time of the year will be pleasant and comfortable. It is important to insulate both the bathhouse itself and the wooden floors - they are raised with an additional layer of insulation. Cold, moisture, soil or fungus do not penetrate through the insulation layer.
It is necessary to install a reliable ventilation system in wooden baths. If the ventilation is poor, the floor in the washing compartment of a wooden bathhouse can become damp and begin to rot. High-quality air exchange quickly evaporates water from the surface of natural wood. Ventilation of a wooden room is also useful because condensation after using the steam room evaporates much faster and the surfaces remain dry.
Do-it-yourself floors in a washing bath are not difficult. First, you should decide on the type of coating you want and the method of water drainage. After these mandatory planning stages and taking into account all the features of the bathhouse itself, you can begin work. The most popular option for flooring in a wooden bathhouse sink is wooden planks. They can be laid in two types: leaking and non-leaking.
Leaking flooring made of removable panels
A leaky floor is also made from removable wooden panels. They are made from 5 by 5 cm bars and boards placed crosswise on them. The dimensions of the shield itself are chosen so that in the future it is convenient to remove it and dry it.
Floor made of removable panels
The design of the floor under the shields is the same: the soil is well compacted and a sand and gravel cushion is arranged. The insulation is a 15-centimeter layer of expanded clay concrete. Ceramic tiles are laid on top of it at a slope. Then you won’t have to worry about how to paint the flooring or how to install the stove. This surface does not require additional treatment, and a stove installed on ceramic tiles will last for many years. The boards are laid so that the base bars lie along the slope and do not interfere with the flow of water.
Installing a ceramic floor is an expensive proposition, however, unlike wooden planks, ceramic tiles do not rot and will not have to be replaced over time. So in the long run this becomes the best option. And from the point of view of visitors, tiles look more presentable than wooden boards.
Arrangement scheme
How to make leaking and non-leaking floors in a sink
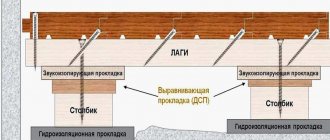
These installation methods are suitable specifically for wooden floors. This is the most popular and used option for a modern bath. The foundation can be absolutely anything. Be sure to provide space for drainage. This could be a water inlet or a sewer pipe, and in this case the wooden floors are made at a slight slope to allow water to flow by gravity. Wooden floors in leaking bathhouses are most often made from materials such as larch and pine. Logs are attached to the base of the floor (concrete or metal screed) at a distance of a meter from each other. Boards are laid on them with a distance of up to 10 mm. This distance is enough for water to flow down.
Wooden floors in a non-leaking washing bath are laid on logs laid on a concrete foundation. The seams must be sealed against leakage with sealants, and a layer of waterproofing protection must be placed between the joists and the insulation. Next, an additional layer of waterproofing film is applied on top. The so-called subfloor is made at an angle to drain water, and polyethylene is placed on top. The main wooden covering is being installed. Typically tongue and groove boards are used.
Safety regulations
Despite the fact that there is no threat to human life in the creation of a concrete coating, this is still not the case.
Check out the basic rules to follow:
- Protection of the skin of the hands and face - these substances contain a large number of chemical elements. When dry mixtures are mixed with water, alkali is formed. If this mixture comes into contact with human skin, you may get burned.
- Wear a respirator - dust rising from the dry concrete mixture can enter the respiratory tract, which can also cause irreversible harm to a person.
- Wear glasses - if dust and grains of chemical elements get on the mucous membranes of your eyes, they can cause burns.
If dust gets into any of the above areas, you must follow these instructions:
- Rinse the area of contact - this will help remove any remaining substances.
If deep damage has already formed at the site of the impact, call an ambulance. Don't even think about putting it off.
- Leave the room for fresh air (if the incident happened indoors)
- Cough - this action will remove any remaining substances from your mouth.
- Rinse your nose - the residue on the mucous membrane will be washed away.
Seek medical help, especially if you experience pain in the lung area.
Do-it-yourself floors in a washing bath - concrete screed
As you already understand, there is nowhere without a concrete base for the floor in a bathhouse. This is the basis of a strong, reliable foundation. How to make a concrete screed yourself - let's figure it out:
- The soil must be compacted in a dense layer. Next, pour a thick layer of gravel or similar material. For example, crushed stone. The layer should be about 20-35 centimeters.
- Only after preliminary preparation of the soil can concrete be poured. This is best done in thin, successive layers. Remember about water flow.
- Subsequent layers of concrete are laid after the previous one has completely dried. This is the only way to achieve the strongest and most durable base coating.
- A heating water system for a heated floor can be laid on the final layer of concrete.
- You can lay clapboard or wooden boards on top.
Do-it-yourself floors in a washing room are a convenient option for those who follow safety precautions and do not want to spend a lot of money on construction and installation.
Laying technology for leaking wooden floors
A step-by-step guide to installing a leaking floor provides for step-by-step work: preparing the underground, installing joists and wooden flooring.
Preparation of the underground
In order for water entering the underground to be discharged into the ground, it is necessary to properly prepare the base - for this, the top layer of soil is cut off and a waterproofing cushion made of small crushed stone up to 26 cm thick is backfilled.
For soils with a low level of moisture absorption, soil removal is carried out at a slight angle, and wastewater is discharged into a 30-centimeter pit through a drain pipe. The soil is covered with clay and leveled.
Important! Before backfilling the pillows, supports are installed under wooden logs, and a foundation is erected for heating equipment.
Installation of support beams
How to install logs correctly? They are mounted on concrete supports equipped with a brick stand. The height of the lag is determined by the height of the pillars (column foundation) or strips (strip foundation).
The installation of the logs is carried out opposite the short wall of the building. To avoid deformation of the joists or their swelling, the supports are covered with a double layer of waterproofing made of roofing felt treated with hot bitumen.
To ensure natural ventilation when laying logs to the walls, a minimum technological gap of 4 cm should be observed.
Wood flooring
To lay the floor, use boards that are fixed perpendicular to the installed joists. In this case, it is necessary to maintain 5 mm gaps between individual floor elements and 2.5 cm between boards and walls. The wooden panel is fixed to the joists using metal nails.