What is a barrel sauna?
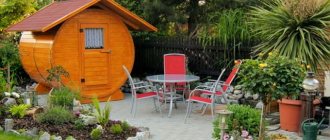
It often happens that a person loves a bathhouse, but there is not enough money, time, space, or all together to build a full-fledged structure. It is in such cases that a barrel sauna is built. This design is inexpensive, compact, interesting, original and can have the same functions as a full-fledged one.
Barrel sauna on a summer cottage
It is not known exactly who invented this structure. In this regard, there is only an assumption that the roots of its origin come from Japan. There people go to a place called sento. They don't really hang out there. They rather wash themselves in a hot bath, which is kept at a strict temperature of 55°C. They go there in groups. Visually, sento resembles a large deep basin or barrel. Before getting into this font, the Japanese wash themselves in the usual way, and then climb in, relax and talk. Those who do not always have the opportunity to visit a public sento build a smaller analogue - furo - at home. The Finns, seeing such a structure, decided to build something similar. They turned the barrel over to a horizontal position and enlarged it several times. This is how we got a barrel sauna, which has a steam room, a vestibule and a relaxation area.
Pile-screw foundation
A pile-screw foundation can be made on any soil except rock. Often this is the foundation that is used to prepare the site for a barrel sauna. Invited craftsmen will make you a foundation from screw piles in 1-2 days. And it will serve you for at least 50 years.
A screw pile is a metal pipe treated with a special anti-corrosion compound. Its lower end is pointed and has a tip with blades. The pile is screwed into the soil like a self-tapping screw, without damaging it, but only compacting it as it sinks.
Screw piles come in several types:
- With a screw blade imitating threads along almost the entire length of the pile. They are used on soils with poor bearing capacity, usually in northern regions with permafrost,
- With different pipe diameters. The larger diameter of the pile is selected for the greater weight of the building. It is not possible to tighten a pile with a diameter of more than 108 mm by hand; special equipment is required.
- With different blade diameters. The less durable and more saturated with water the soil, the larger the diameter of the blade. For dry and dense soils, the diameter of the blade should be smaller,
- The type and shape of the screw pile depends on the manufacturer.
Installing a foundation on screw piles
- In corners and at the intersections of internal walls, piles are screwed into the ground in increments of 1 to 3 meters,
- Screwed-in piles are cut to one level and fastened with metal or wooden beams. This creates a single rigid structure - a grillage,
- Between the ground and the grillage there is a free ventilated space.
In order not to overpay for piles of greater length and diameter, or to prevent your structure from “swinging” due to instability, piles should be selected strictly in accordance with the calculation. It is necessary to take into account the depth of soil freezing on your land plot and the weight of the future structure.
If you carry out the work manually, you also need to take into account the presence of large trees and tall shrubs with a powerful root system, as well as fences or other buildings in the immediate vicinity of the foundation construction site. All this can create additional difficulties for you.
It is better if this is done by a specialist designer based on hydrogeological studies of your site. When ordering the installation of screw piles through contractors, carefully choose a company, since not all of them follow the technology and do their job efficiently. Everything you need to know about screw piles can be seen in this video:
Advantages of screw pile foundations
- No extensive excavation work is required;
- There is no need to pre-level the site;
- You can carry out work at almost any time of the year,
- The foundation can be made on any soil. The exception is rock formations.
This video explains all the pros and cons of screw piles:
Pros and cons of the structure (table)
| + | — |
| Compact size and light weight. It follows from this that the construction of a capital foundation for it is not necessary. | The outer covering of the boards requires periodic repair. |
| Easy and quick to install. Three days are enough to build a small bathhouse. | There won't be enough space for a large group to relax. |
| There is no need to use special equipment for construction work. | In order to use such a bathhouse in winter, it must be thoroughly insulated. |
| The bathhouse is mobile due to the fact that it has a rigid structure and low weight. If you put it on a trailer, you can take it with you anywhere. | |
| Heats up quickly. | |
| Originality of design. |
Wood processing
Since the walls of the bathhouse are joined in a special way - like log cabins, all the boards need to be mechanically processed with cutters on a machine; cutting out semicircular grooves by hand is unrealistic. The developer needs to contact a woodworking workshop and provide sketches with the parameters of the workpieces. The exact dimensions of the ridges, grooves and profile of the cutter are indicated in the drawing.
To facilitate further construction work, process the trimmed workpieces in advance according to the instructions:
- Using an electric jigsaw, cut the workpieces, clearly marking the lengths with a tape measure, a square and a pencil.
- Using a hacksaw, hammer and chisel, make grooves at the ends of the boards. The width is equal to the thickness of the end walls (45-50 mm). The length of the outlet depends on the chosen design, the minimum is 7 cm.
- Lay out the blanks into sets - separately for the round end walls and side trim.
- Treat the surfaces of the lumber that will be inside the steam room with a grinding machine.
- Cover all boards without exception with antiseptic protective agents and apply a primary coat of varnish. Do not skip the grooves and ridges on the ends - they also need processing.
Advice. Cover the surfaces of the workpieces going outside and inside the barrel with various protective compounds. From the inside, apply a special product for baths and steam rooms.
After painting, stack the boards to dry, laying thin strips between the tiers. How to properly carry out preparatory work, watch the video:
Selecting materials
Take your choice of building material seriously
To make spending time in a barrel sauna as comfortable as possible, pay special attention to the choice of wood from which it will be built. A stationary bathhouse can be built from almost any material, because inside it you can build a lining from more suitable raw materials. This option is not suitable for a barrel sauna. For it you need to immediately select good material.
For example, coniferous trees are completely unsuitable material for the construction of such a structure due to the release of resinous substances when heated, which can burn the skin. The exception is cedar. The numerous healing and aromatherapy properties it is endowed with are perfect for baths. The technical qualities of this type of wood are also high: the material is not subject to deformation, cracks do not appear on it due to temperature changes, does not shrink, is moisture resistant and is not afraid of microorganisms. The variety of color shades and textured patterns of cedar is impressive.
Another great option for building such a bathhouse is oak. It has a strong and solid structure, due to which the structure will be durable. Moisture does not act destructively on oak, but, on the contrary, hardens it. The tree becomes more durable. Oak is famous for its deep, rich dark shades, has excellent textured patterns and healing properties. The disadvantage of oak wood is its high price. Because of this, it is very rare to come across a barrel sauna made entirely of oak. More often, separate parts are constructed from this rock.
The traditional material from which baths are built is linden wood. Creating a soft and healing microclimate in the bathhouse is its main advantage. Since ancient times, people have tried to treat the respiratory system, liver and kidneys with the help of a linden bath. Linden wood vapors have a positive effect on the skin: they rejuvenate and cleanse it. This material does not shrink and is easy to process. A bathhouse built from this type of wood will heat up quickly and retain heat well.
Aspen wood is also used to build a barrel sauna. Its properties are almost the same as linden. Their advantages and disadvantages are the same. True, linden is much less susceptible to the destructive effects of moisture, does not deform and much fewer cracks appear on it. Due to its relatively low price, this tree can be called the most popular in the construction of baths.
In addition to the above-mentioned species, alder, fir, and birch wood are also used to build a regular bathhouse. But these rocks are not entirely suitable for building a barrel sauna.
Criterias of choice
To choose a suitable barrel bath model, it is important to decide on the following parameters:
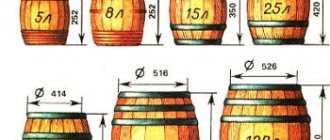
Number of branches
This criterion depends on the size of the barrel: 1 compartment - steam room - 2 - 3 m; 2 compartments – steam room and relaxation room – 3.5 – 4.5 m; 3 compartments - washing, steam room, rest room - 5 - 6 m.
Form
The cost and size of the usable area of the bathhouse depends on this parameter: round – tight design. Square - has more usable area due to a more even floor and ceiling. Its cost is slightly higher than that of the round one. Oval - the largest usable area due to the entrance from the side (wide part). The corridor does not go through the entire rest room and frees up useful space.
Bake
There are 2 options for installing the stove: internal - supplying firewood from the inside, the fire burns directly in the steam room, but you have to carry the firewood into the steam room; external - firewood is loaded outside, there is no garbage, but you need to go outside to throw it in, so most buyers prefer to install an internal stove.
Roof
The most reliable and durable roofing material is flexible tiles. It fits well on the roof of any type of bathhouse. There are models covered with polycarbonate. This is not a very suitable material for roofing. Polycarbonate is very fragile in the cold and is not resistant to mechanical stress.
Floor construction
It is preferable to take a model with a sloped floor. This ensures that the water drains away. If the floor is straight, make sure there is a drainage system.
Board thickness
High-quality models are made from boards from 30 to 40 mm. The barrel’s ability to retain heat and overall durability depend on this parameter.
For your information! You should be especially careful when buying cheap baths. They are most likely not made from solid wood. There are manufacturers who make baths from the cheapest types of lining. The walls are a sandwich: 25 mm board, OSB sheet and again lining. This is a wall of dubious quality. Moisture will destroy the structure in a year. Black fungus will appear on the material, the inner lining will warp and begin to crack.
Types (table)
Barrel sauna layout option
| Name | Description |
| Ordinary Russian bath | Features hot and humid steam. You can steam in it with brooms. Usually consists of 2 rooms: a steam room and a washing room. After sitting in the steam room for a while and sweating, you can go wash in the shower. In this design option, it is imperative to consider a water drainage system. To prevent it from stagnating, the barrel sauna is placed at a slight slope. The stove in it is installed between two rooms. It is equipped with a tank for heating water. This tank should go into the shower. In the steam room there is a net with stones on which water is poured. They are heated by the firebox. The combustion part of the furnace is located in the washing room. It is better to fence it off so as not to get burned during bath procedures. There is not much space in such a ben, so the stove should be as small as possible. The walls near the stove are insulated with fireproof material. |
| Sauna | It differs in that the air in it is dry. It may consist of one room. Often this design is equipped with a font into which cold water is poured. If there is little space, sometimes a bucket is used for dousing with water. It is considered a tradition to plunge into cold water after a sauna. It's easier to set up than the previous one. The room must be airtight: the doors close tightly, there are no gaps in the floor or walls. The sauna has only a small hole in the roof or wall with a special valve that can be closed partially or completely. Water is not used in the sauna, so there is no need for a drain. It has comfortable benches and a stove with a heating stove. You cannot pour water on the stones in the sauna. You can add a few drops of essential oil or tincture of medicinal herbs. Thus, therapeutic and preventive aromatherapy is created. The sauna can be installed both vertically and horizontally. |
| Ofuro | Similar to Japanese sento. Visually it resembles a font. Heated by a built-in stove. It has no roof, but it is used all year round. They place it on a wooden floor. The inside is equipped with a wooden bench and a stove, which is fenced with a wooden partition so that no one gets burned during bath procedures. According to Japanese wisdom, the ofura bath unites all four elements: earth, fire, water and air. The earth is the wood from which it is made, the fire is the stove. And the creation of complete harmony occurs thanks to the water and air surrounding a person in this bath. In it he relaxes and becomes healthier. Visually it may resemble a simple barrel or be elongated. The stove does not have to be installed inside the structure. Sometimes they place it next to it and run pipes from it that heat the water inside. This is a safer option. True, heating requires much more time, and, consequently, fuel consumption increases. Usually they spend 10–20 minutes in it, and then the steamed body must be wiped with a hard mitten. |
Paving slabs or gravel area
The weight of an average barrel bath does not exceed 1500-2000 kg, which means the design does not require a special foundation. The only condition is that the platform on which you install the barrel bath must be level. You can place the bathhouse on a well-leveled compacted area, covered with paving slabs or filled with gravel for beauty.
The tiles are laid on a sand cushion or concrete screed. To lay paving slabs on sand:
- Remove the top layer of soil (10 cm for normal soil) and compact it well,
- If you do not want to subsequently pull out the grass growing between the tiles, lay geotextiles or other protective filter over the entire surface,
- Lay two slats parallel to each other along the edges of the pit with a height up to the top edge of the pit minus the height of the tiles. They will serve as a level,
- Cover the entire area with a 5-6 cm layer of sand and level the sand with a rake. If you want to add cement to the sand, then take a ratio of 1 bag of cement to 5 wheelbarrows of sand. Then, for a finer alignment, use a wooden or metal ruler, sliding along the two guide rails that were previously laid. At the same time, you yourself are on an area that has not yet been leveled, moving backwards,
- After leveling, carefully pull out the slats and fill the resulting void with sand. You cannot walk on the leveled surface!
- Lay the tiles as close together as possible, adjusting them using a rubber hammer or board. Move row by row forward on your knees, placing a board under you. Try to stay further from the outer rows of tiles so as not to displace them,
- As you progress, check the surface of the new row using a level, adjust the height by adding sand or level the tiles using a rubber hammer,
- Make borders. The site is ready!
To lay tiles on a concrete base:
- Pressure wash the concrete,
- Place a 1.5-2 cm layer of cement mortar on the wet concrete. The ratio for the mortar is: 50 kg of cement + 200 kg (volume 135 l) sand + 25 l of water,
- Lay the tiles in the same way as on a sand bed.
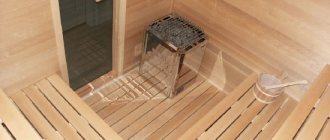
Photo gallery: varieties of barrel saunas
Barrel bath sauna from the inside
Another option for a barrel bath
Ofuro barrel sauna extended
Ofuro barrel sauna
Russian barrel bath
Construction work
Upon completion of installation, proceed to the internal arrangement of the barrel. The following work remains to be done in the bathhouse:
- Make a ventilation hole in the rear end covered with a lid.
- Place the oven using a metal stand. Protect the section of the wall behind the stove with fireproof materials - roofing steel or mineralite slabs.
- Make a chimney from a sandwich pipe by making a hole in the ceiling. Read the separate instructions for how to install chimney pipes correctly.
- Make shelves and a floor drain (lattice tray), attach the elements to the walls.
- Lay out the electrical wiring, install a bath lamp and a switch.
Under the barrel - Russian bathhouse, it is advisable to dig a pit in advance to drain water through a hole in the floor. There is another way of drainage - connect a flexible pipe to the drain, laid to a storm drain gutter or other place.
How to organize water drainage
Such a need exists for a design in which a lot of water will be used.
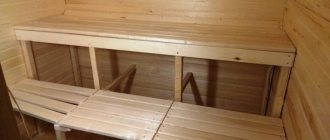
Lattice floor in a barrel sauna
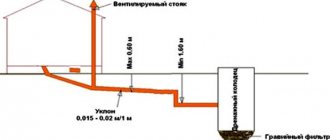
Of course, if the bathhouse is used infrequently, then it is enough to make holes in the floor through which the liquid will flow out and go into the soil. But if you plan to use the structure frequently, then the water drainage system needs to be thought out in more detail. Otherwise, the water may stagnate under the bathhouse, which will have a bad effect on the bathhouse. The first sign will be the appearance of an unpleasant odor. This means that a fungus has appeared under the knowledge and it begins to rot. After this, the floor begins to deteriorate, become unreliable and, ultimately, may collapse.
To build proper water drainage, the barrel sauna is placed at a slight slope. This way the water will drain towards the end of the sink. There you need to make a hole in the floor and attach a pipe to it that will go into the drainage hole. To prevent this pipe from cracking due to temperature changes in winter, it must be insulated.
Inside the bathhouse itself, a floor is made in the form of a lattice. This is necessary not only to make walking more comfortable. Thus, water will not linger on the surface and the floor will dry out on all sides.
Harvesting lumber
The beams and boards for a bathhouse made in the form of a barrel must be sawn from hardwood - aspen, linden, and so on. Of the coniferous species, the use of cedar and larch, which are resistant to temperature changes and moisture, is allowed. Pine and spruce, when heated strongly, release resin, whose drops can burn people in the steam room.
Advice. If the choice of wood is limited only to coniferous species, for the cladding of the upper part of the body, select boards without knots, which are sources of resinous secretions.
To make a barrel-type sauna, purchase the following timber:
- timber with a minimum cross-section of 10 x 10 cm for stands;
- a board 45-50 mm thick and 10 cm wide is used for assembling end and side walls;
- wooden door 0.7 x 1.8 m with a frame (you can buy a ready-made one or make it yourself from timber 50 x 50 mm and boards 2.5 cm thick);
- lumber for the manufacture of shelves and lattice trays.
Knowing the diameter of the body, it is easy to calculate the consumption of timber
The number of boards on the end walls of the barrel is calculated as follows: the area of the circle is determined, the resulting value is divided by the width of the product and multiplied by a safety factor of 1.2. Do not forget to add bars - power jumpers that connect the boards to each other during the panel assembly process.
Side paneling timber is calculated by the circumference divided by the width of the board. Apply a safety factor because the wood must be mortise-and-tongue-faced on a woodworking machine.
Note. On sale it is not difficult to find ready-made kits for assembling bathhouses - barrels of various sizes and layouts. But often the quality of these products does not correspond to their cost.
What else will be needed in the process of building a round bath:
- metal ties - steel cables or strips;
- fasteners – galvanized screws and nails;
- compositions for external and internal wood treatment – antiseptics, varnishes;
- materials for the manufacture of the roof - shingles, plywood, beams and roofing (common options are bitumen shingles or corrugated sheets);
- sauna stove of appropriate power, calculated according to the volume of the steam room;
- chimney pipes - sandwich;
- special lamps and switches for baths, non-flammable cables.
If you plan to use the barrel year-round, it is worth making external insulation. A suitable thermal insulation material is mineral wool; the use of polymers is not recommended.
Video: building a barrel sauna
The construction of a barrel sauna has many nuances, after studying which you can build this beautiful structure, which in terms of functionality is almost no worse than a stationary sauna. It will cost you much less and can be built in a matter of days. Good luck!
- Author: Olga Morozova
Hello. My name is Olga. I am 27 years old. A journalist by training. Rate this article:
- 5
- 4
- 3
- 2
- 1
(20 votes, average: 3.7 out of 5)
Share with your friends!
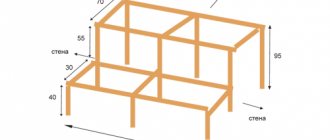
Preparation for construction: drawings and dimensions
A barrel of standard sizes should reach a height of 2–3 meters, and a length of at least three and no more than six meters. A room for water treatments of this size will be comfortable and functional.
The length of the barrel bath should be from three to six meters
But if you wish, you can move away from the rigid framework. You can customize the drawing of the future building to suit your ideas. The main thing is to take into account how many people will visit the bathhouse at a time and how much money has been set aside for construction.
In the project, it is necessary to display the dimensions of the door and the radius of the circle
Stage 3 - frame assembly
Assembling the frame
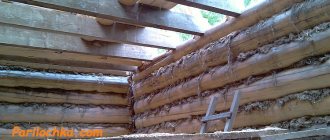
Next, you should lay the embedded boards on the prepared base. All elements are connected using the tongue and groove method.
Boards pre-cut to the required size are laid on the bottom. Fasten them along the required circumference until it is sufficient to install the end partitions. The boards must be nailed to the base or screwed.
Once this height has been reached, install the end partitions in the desired places and continue assembling the structure, securing the boards around the partitions. Each board must be nailed or screwed to the end of the partition.
To simplify the task of installing partitions on the inside of the embedded boards where the partitions will be installed, you need to cut grooves whose width is equal to the width of the partition. Then installing it will be much easier and faster.
The barrel is tightened with clamps.
After you have laid the last board, you need to ensure the rigidity of the structure. To do this, the barrel is tightly tied with iron hoops. To connect the ends of the hoop, use iron clamps. After a long period of use, when the wood dries out a little, the clamps need to be tightened so that the gaps are minimal.