- home
- We are building a house
- With your own hands
- Bath
Wooden floors in a bathhouse can be of two types:
- leaking,
- not leaking.
Leaky floors mean a structure in which water freely flows into the cracks between the boards and is absorbed into the ground under the bathhouse.
Choosing a floor type
Before starting work on building a floor in a bathhouse, you need to decide what requirements it must meet.
As a rule, you choose from two options:
- concrete floor;
- wood.
Creating a concrete foundation will require a lot of time and money. However, it will serve for quite a long time - about 50 years, and if you update it according to all the rules and use it correctly, then you will not need to change it.
Making a wooden floor is easier and cheaper. It has a beautiful appearance, as you can see by looking at various photos, but it needs to be changed periodically, approximately every 5-10 years.
When making wooden floors in a bathhouse, you should choose one of two types of construction:
- leaky;
- leak-proof.
It is easier to implement a leaking design and its appearance is more interesting. The boards are laid on the logs without fastening. The minimum distance between them is 3 mm. If there is a need to dry them quickly, the boards can be collected and taken outside, where they will dry quickly enough.
It is not necessary to make floors in the dressing room with a gap. In other rooms there should be a gap of approximately 2 mm between all walls and boards. It looks like a frame around the floor.
Physical and technical characteristics
When choosing a floorboard, be sure to pay attention to the physical and technical characteristics, which are divided according to several indicators:
- strength;
- stability;
- appearance.
Floors must be durable and stable in high humidity conditions. But at the same time, do not forget about the decorativeness and appearance of the coating.
Strength
This indicator of wood determines its resistance to wear under the influence of elevated temperatures and humidity. If it is not strong enough, it will quickly lose its original appearance, especially in areas of high stress.
Stability
The stable structure of wood is characterized by a slower rate of shrinkage of floors. If floors are unstable, they will quickly lose their strength.
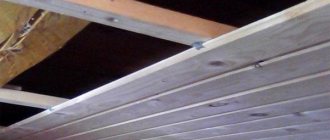
The ceiling in the bathhouse must be stable
The stability of the material is determined by:
- quality and type of wood;
- cutting method;
- drying method and quality.
Shrinkage under the influence of high temperature and humidity is characterized by:
- longitudinal cracks;
- cracks between the floorboards.
In order for the stability indicators to be at the proper level, it is recommended to use the same material for subfloors and joists as for the final finishing coating. This is explained by the fact that the shrinkage of the floor “pie” occurs at the same speed and will not allow cracks and cracks to appear.
External characteristics
Lamels in appearance are divided into several aspects. One of the criteria for the decorativeness of a floor covering is color:
- light and dark tree species;
- Neutral wood shades are also possible. Valuable and exotic tree species will cost much more, which is why they are not used so often for baths.
The texture of wood is the decorative aspect for which wood is so loved. If it weren’t for the texture, it would hardly have been used so widely for interior decoration. Some arrays have a pronounced structure: oak; and there are homogeneous ones like beech.
The texture of wood material is a decorative technique used by designers
Changes in the appearance of flooring occur due to oxidation, which depends on the chemical composition of the wood, exposure to sunlight and moisture.
Pros and cons of leaking floors
A leaky floor has the following advantages:
- The floor is done very quickly.
- It is the cheapest compared to other types of flooring.
- To drain water from the room to the underground, a drainage pit is installed. There is no need to install any other sewer systems.
- There is no need to perform hydro- and thermal insulation.
There are also some disadvantages, which include:
- Fragility.
- Not suitable for use in winter.
- You can use a bathhouse with a leaking floor all year round only if it is built in a place with a warm climate.
- To ensure a reliable floor, you should choose well-hewn boards, and the installation should be done evenly.
How to make it in a frame
A frame bath typically uses a floor structure with double planks and insulation between them. This composite floor structure incorporates multiple waterproofing layers. A floor with a drain is created on a subfloor (the one located to support the insulation from below). Even at the construction stage of the rough flooring, it needs to be strengthened so that it can withstand the weight of the waterproof screed.
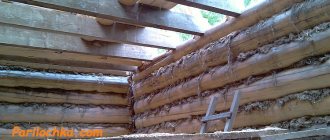
The main material of a frame bath is wood, which is in an even more vulnerable position in relation to water than a regular wooden frame. In a log house we are dealing with a large mass of wood.
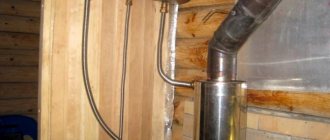
In a frame bathhouse, boards and bars are used, which get wet much faster, which is why you need to pay special attention to waterproofing the floor in the washing room. Frame baths are often placed on screw pile foundations with an entirely concrete floor, which is poured into a steel grillage
Frame baths are often placed on screw pile foundations with an entirely concrete floor, which is poured into a steel grillage.
In this case, the device for draining water in the bathhouse in the washing room will be similar to that described above (a regular concrete floor with a slope and a pipe in the center).
Standard bath floor
The floor in the steam room must be above the zero level. You can maintain a high temperature in the room by raising the floor not much at all, about 8-10 cm. In the washing room, the floor should be below the finishing level (read: “How to properly make a washing device in a bathhouse - tips with examples”). Thanks to this design, water will not get into other rooms of the bathhouse.
The most popular floor construction consists of the following layers (listed from bottom to top):
- Waterproofing (the material spreads directly to the ground).
- Wooden beams for sheathing.
- Rough floor.
- Layers of insulation (if there are cold winters in the area where the bathhouse is being built, it is necessary to insulate the floor and protect it from moisture).
- Lathing.
- Layers of insulation (hydro- and thermal insulation must be performed; if the bathhouse is located next to any production, club or any other establishment from which a lot of noise comes, then sound-proofing material is laid).
- Lining (small layer).
- Air space.
- Concrete or wood.
- Finish coating.
Choosing the type of wood for making benches and deck chairs
To determine suitable raw materials, consider the following:
- The use of softwood lumber is contraindicated. Otherwise, when heated, resin begins to release, which sticks to the body.
- The wood must be resistant to conditions of high humidity, constant temperature changes, and have high-quality antiseptic protection. Otherwise, the shelves will rot and quickly become deformed.
- There should be no chips, burrs or other defects on the surface.
- Low thermal conductivity of the material is necessary so that the benches do not heat up and this does not cause discomfort for vacationers.
Let's look at the properties of the most popular breeds that are suitable for shelving in a Russian bathhouse.
Aspen
Very popular among residents of the private sector due to the availability of raw materials and low price.
Other benefits of aspen include:
- resistant to moisture;
- does not rot;
- does not deform;
- has healing properties;
- cleans the air of bacteria and germs;
- does not require maintenance.
It is generally accepted that products made from aspen restore strength, give vigor, and act as a neutralizer of negative energy.
From constant exposure to moisture, aspen can change its shade to grayish.
Thermal aspen
Thermal aspen is wood that has been treated with high temperatures (over 200 degrees) and steam.
Resulting in:
- The humidity of the raw materials has decreased.
- Essential oils evaporated from the structure, which means the material became more resistant to fire.
- Density has increased. Therefore, thermoaspen absorbs less moisture.
Thermal aspen does not swell, does not rot, and lasts a long time. This material is considered a reliable decorative option for finishing bath rooms. Thermal aspen shelves and furniture look very beautiful.
Disadvantages: fragility and high price.
Larch
It is characterized by increased resistance to moisture. Has a strong solid structure. It is chosen for the manufacture of furniture, decoration in saunas, open verandas and gazebos.
Alder (black alder)
Alder is the optimal raw material for making steam room benches yourself.
Its advantages:
- high strength;
- low thermal conductivity;
- durability;
- wear resistance;
- does not deform;
- does not change color even after years;
- perfectly tolerates temperature changes and constant humidity.
More expensive than linden. The structure is uniform.
To contrast the colors in the steam room, you can assemble racks of light and black alder.
Linden
Linden is often used to decorate steam rooms. It has a pleasant aroma that has a relaxing effect on a person.
Among the advantages of raw materials:
- it is convenient to handle;
- a light weight;
- ease of installation;
- smooth surface;
- even over the years it does not lose its attractiveness;
- tolerates temperature changes and humidity well.
For homemade shelves, it is recommended to take thoroughly dried linden, otherwise the structures will begin to darken.
Linden is more expensive than alder, but in terms of quality and properties these species are almost equal.
Poplar
It is distinguished by soft and easy-to-work wood. Solid poplar has a light brown, sometimes white tone. Light in weight.
In terms of resistance to moisture and temperature changes, it is inferior to other breeds.
It is customary to make furniture and carved decorative elements from poplar.
Maple
The main advantage of maple is its strength. Products made from this raw material are difficult to break or damage, they do not crack.
Other advantages:
- long service life;
- ease of processing;
- affordable price;
- resistance to moisture, wear;
- homogeneous structure.
Examples of maple with a beautiful texture are the “sugar” and “bird’s eye” types.
Abacha (abashi, abash)
Abash has gained wide popularity in recent years for finishing and making furniture for baths and saunas.
This is the name of African oak. It differs from other breeds in a lot of advantages:
- The raw material tolerates temperature changes well.
- Due to its strength, it can withstand heavy weight loads.
- Looks beautiful.
- Lasts a long time.
- Does not rot, does not crack.
- When heated, abash emits a pleasant odor, which has a positive effect on the human respiratory system.
- Wood without knots. It is easy to handle. The surface is smooth.
- Even over time it does not lose its original appearance.
In the absence of high-quality ventilation in the steam room, the abash begins to darken in places. This is expensive material.
But benches made from budget alder or linden will look no worse and last a long time.
Wooden floor in the bathhouse
To obtain beautiful and durable floors in a wooden bathhouse, it is best to use larch.
However, if it is not possible to purchase it, then you can use other common wood species such as:
- pine (low cost);
- birch (has an unusual color);
- cedar (has a pleasant smell and is good for health);
- aspen (not afraid of moisture, has healing properties);
- linden (fills the air with essential oils that remain in it for a long time);
- fir;
- alder.
Sometimes the floor in the bathhouse is made from boards of various types of trees. A more expensive material is used as a finishing coating, and the cheapest material, for example, pine, is laid underneath it.
An important step when laying a wooden floor in a bathhouse is preparing the finishing coating. This must be done in advance. The boards must be dried. If this is not done, then the likelihood of floor deformation increases significantly.
Solid boards are most susceptible to deformation. It will take longer to dry them, and the likelihood of deformation is higher. Therefore, thin beams are laid. Of course, they are not able to withstand as much load as solid boards, but this disadvantage can be eliminated by laying transverse joists. The thin board is practically not deformed. Therefore, it is recommended to choose boards for floor joists in a bathhouse up to 4 cm thick.
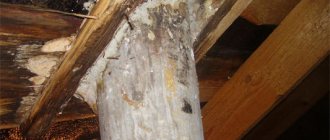
How to waterproof a bath
There is always damp and very humid air in the bathhouse; there is always moisture in such a room. Therefore, waterproofing and treating wood with special antiseptic agents is important. And for wood this is especially true, since mold will immediately appear, and even together with the fungus.
The entire subfloor and all boards used in the installation must be treated with an antiseptic . Modern technologies make these compositions accessible to everyone; they are sold in stores with building materials. In addition, processing must be carried out more than once. A layer of thermal insulation materials is placed on the waterproofing layer, this will extend the service life of the bathhouse.
Arranging a wooden floor
To raise the floor level in the steam room, additional bars are used, which will be used as a lining. It is better to take a beam with a cross-section of 7x10 cm. It allows you to make the base more durable, since the beams take on a significant part of the load.
Here is a step-by-step guide for making a wooden floor in a bathhouse with your own hands:
- Roofing material is laid on the base in 2-3 layers. Massive bars are taken and laid around the perimeter of the foundation. There should be some distance between them, distributed over the entire surface of the floor. All beams rest on two opposite walls. Two pillars are installed for additional support.
- Logs are laid on the beams. They are gradually trimmed to create a slope towards the drain hole. The total difference in slope should be at least 2 cm. Before making logs for the floor in the bathhouse, cranial bars are first attached. This creates a subfloor.
- A moisture-proof membrane is spread over the lag and secured. It should be laid in such a way that there is an overhanging edge on all sides, approximately 20-30 cm. This is necessary in order to later attach them to the waterproofing of the walls.
- Next, the insulating material is laid. It is recommended to choose a material that has thermal insulation and moisture protection properties. A large number of types of such material are now produced. However, the best option for the floor in the bathhouse is mineral wool.
- For finishing wooden flooring in a bathhouse, it is recommended to use tongue and groove boards. Their installation should be done as carefully as possible.
Laying lags
For floors that do not leak, laying the joists begins from the walls to the pit. The outermost joists have the highest point relative to other floor joists. Cuttings in the outer joists are not performed. In subsequent lags, cuts are made with a small bevel (about 2 mm - 3 mm).
The same notch is made in the joist where it comes into contact with the support (the size of the notch is equal to the width of the support). The slope of the floor should be 10 degrees. If we are talking about leaky floors, then the lags can be laid without a slope and from any of the walls.
The beams for the logs must first be cut according to the size of the bathhouse. In this case, it is necessary to take into account that the logs at both ends do not reach the walls by approximately 3 cm - 4 cm. This gap will allow for ventilation between the logs and the bath walls. Logs can be laid on support pillars and embedded beams only through waterproofing (roofing felt, glassine, etc.). In addition, each lag must be pre-treated with an antiseptic.
Please also take into account the fact that near the foundation, the logs should be located along its edges at a distance of approximately 12 cm from each edge.
After laying the logs, they begin to lay the floorboards. It is also necessary to bring the furnace foundation to the level of the flooring. For this purpose, it is recommended to lay out a stove foundation made of baked red brick or concrete (monolithic) on a pre-made site.
Required clearances
There should be a ventilation gap of 2-3 cm between the insulating membrane and the floor. The membrane is laid so that free edges remain; they must be secured to the vapor barrier layer of the wall.
This is done to combine the free air located under and above the membrane, as well as to ensure that the movement of air is unimpeded. The heated air flow, while moving under the floor, will push out the cooled and wet air, as a result the floors remain dry.
The distance between the support beams and the logs should be 1 cm. If the building shrinks slightly, this gap will compensate for the pressure on the floor and prevent deformation of the structure.
Drain pipe wiring
Pipes must be laid sparingly in length and without making unnecessary bends. It must be remembered that a simple structural device not only saves on construction, but also convenient operation and maintenance. The drain will not become clogged. Unfortunately, this is not always observed. In many pictures you can see floors with a drain, where water stagnates in the trench and gutter.
The best way to lay a pipe in the floor is to lay a straight section at an angle.
The pipe runs from the funnel to the outer surface of the foundation.
There is also the option of connecting the drain to other sewer pipes under the floor.
The entrance in the center of the floor funnel or under an inclined gutter near the wall is shaped like a cup.
This cup is located completely under the front plane of the floor and at its lowest point.
The cup in the floor is covered with a fine grate. It must be protected especially carefully if there is no exposed wooden flooring on the floor. For a bathhouse this configuration is rare, but for a sauna it is the most common.
In a bathhouse, as a rule, several plumbing fixtures are used, so proper pipe wiring is very important.
Fastening floor parts
The floor will be of high quality and reliable if you choose good materials and follow the rules for their fastening.
There are the following ways to fix the floor in a bathhouse:
- Anchors are used to secure the timber to the foundation. They must have the following parameters: cross-section 12 mm, length at least 14 cm. Holes must be drilled for fasteners, but this must be done carefully so that the foundation does not crack.
- Fastening can be done on top of the timber or through it. When using the second option, the anchor should be slightly shorter. To fix one beam you will need four fasteners.
- To fasten the beam to the support post, metal corners 6x6 cm are used. First, the corner is attached to the beam using self-tapping screws, and then connected to the post with the same screws. One mounting angle is used to secure one side.
- Corners are also used to connect lags and beams. If the floor is not made of integral joists, the connections must be secured with special fasteners - joist holders.
- The tongue and groove boards are connected using a groove system. In this case, the screws must be screwed in well so that they do not interfere with the fastening of subsequent boards.
What is taken into account when preparing material
In addition to the choice of wood species, other characteristics also play an important role. First of all, it is necessary to take into account quality indicators:
- Grooved board. For the floor in the bathhouse, a regular or tongue-and-groove board can be used. The difference lies in the formation of the end. In the tongue-and-groove version, a longitudinal tenon is formed on one side, and a corresponding groove is formed on the other. As a result of the use of such products, a locking connection is provided, which makes it possible to tightly fit and create a leak-proof floor covering. Naturally, profiled boards have a higher cost, but the quality of the floor also increases significantly.
- Humidity. A very important parameter for any wood is the presence of residual moisture in the structure of the material. For the floor it is necessary to use only well-dried products, i.e. with minimal humidity. Wet wood will warp as it dries, causing an uneven surface. The optimal humidity value is considered to be within 7-9%, at least not more than 12-13%.
- Dimensions. The thickness of the board for the bath floor ensures its mechanical strength. In principle, it significantly depends on the properties of the wood, i.e. depending on the type of tree. So, when using an oak board, a thickness of 20-25 mm is sufficient; to ensure the same strength, a pine board with a thickness of 40-45 mm is required. Typical tongue and groove boards are offered in thicknesses ranging from 27-37 mm. The choice of this parameter is determined by real loads taking into account the area of the room.
On a note! The width of the board also affects the reliability of the flooring and the likelihood of deformation. The narrower it is, the lower the risk of its curvature in cross section.
The most commonly used board is 10 cm wide. If you use well-dried material, you can safely choose a width of about 17-20 cm.
Concrete floor installation
To install floors in bathhouses using concrete, the following sequence of actions should be followed:
- The base is covered with sand , then the formwork is placed on it. The boards are connected using anchors. If necessary, additional reinforcement posts are made with a cross-section of 2-4 cm.
- A concrete solution is prepared in compliance with certain proportions. You need to mix 1 part cement, 3 parts sand, 5 parts gravel. Gravel is not always used, but it makes concrete more durable. Enough water must be added to obtain a homogeneous liquid solution. The resulting mixture should be poured in a uniform layer, which should be more than 5 cm. This is the primary coating; a rigid frame will be mounted on it.
- Reinforcement is placed inside the formwork ; it must be evenly distributed. To connect the rods, wire with a cross section of 2-5 mm is used or welding is used. First, thick pegs are driven into the ground. Then they should be connected to each other with 1-2 rows of reinforcement. In this case, long rods are used. The distance between the formwork and the reinforcing mesh should not be more than 5 cm.
- The reinforcing mesh is completely filled with concrete mortar . To make it uniform, it should be compacted. For this, a concrete vibrator is used, which should be used to process the entire surface. If there is no such equipment, then holes are made in the freshly poured concrete using any rod, through which the air that is formed when pouring the solution will escape.
- The concrete must be allowed to dry thoroughly , this will take at least 2 weeks. However, some builders do not wait for this time and begin work. It is not recommended to carry out further construction on a still wet concrete base.
- on a flat surface .
- are laid between the beams . It is better to purchase thermal insulation material in mats.
- Next, a waterproofing membrane is spread.
- The finishing flooring in the bathhouse is made from boards of the same size. When laying, proportions should be observed.
Step by step
There are several variations of the floor arrangement, so we will provide installation instructions according to the basic diagram above.
Working with soil and bedding
The base for the bathhouse is prepared in advance, at the stage of ground work before installing the foundation. The fertile soil layer is removed to a depth of 10-15 cm, stronger rocks are compacted with vibrating plates.
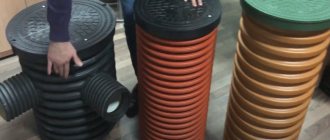
The compacted base is backfilled with gravel 10 cm thick and sand 10-15 cm thick, textiles are laid between them. At the same stage, the location of the drainage system is designated - a pit is dug and pipes are laid at an angle to the assembly well. Then the top layer creates a slight slope towards the drain.
Then it is recommended to make the initial screed with M75 concrete: pour it in a thin layer of about 5-7 cm and wait 1-2 weeks until the strength of the stone reaches 60-70%. The area of the water drainage pit should be well lubricated.
Waterproofing and insulation
Insulation work against water and heat loss determines how warm the coating will be and how long it will last.
Bitumen-based composites are suitable as insulating materials: glass elast, hydroisol and similar ones. They are laid out with an overlap of at least 20 cm on the walls (the excess ends will go under the finishing). The canvases are rolled out with an overlap of up to 10 cm or along the markings, the joints are glued with polymer compounds, and the second layer is laid in the same way for reliability.
It is imperative to work out the entrance to the drainage pipe - from the inside, going onto the floor, it is also covered with waterproofing.
EPS (extruded polystyrene foam) is used as insulation for the bathhouse floor - it is highly durable and resistant to dampness, and does not absorb water. Mineral wool and other soft slabs are not suitable for flooring. A layer of insulation of 50-70 mm is laid over the entire floor area; it is necessary to make a cutout for a drain or pit. Eps boards have tongue-and-groove joints, so there is no need to further process them. The distance between the floor and the walls is 1.5-2 cm - this is a compensation gap; it should not be closed.
Reinforcement
The screed works primarily in compression and bending, on both sides - both indoors under the weight of people and bath equipment, and they take the load from the ground. To prevent the concrete from cracking and the coating from losing its integrity, the screed is reinforced with mesh; you can buy it or tie it yourself from wire with a diameter of 8 mm with a mesh size of 10-15 cm.
The mesh must be laid at a height of 3 cm from the insulation so that it is inside the screed and not under it. It is convenient to insert steel clamps into the EPS and secure the frame sheet or place it on 3 cm thick blocks.
Preparation of the solution
For floor screed, concrete mortar M200-M250 is used. The required components and their quantities are presented in the table:
| Concrete grade | Cement brand | Ratio cement: sand: crushed stone | Volume of concrete from 10 liters of cement, liters |
| M200 | M400 | 1 : 2,8 : 4,8 | 54 |
| M500 | 1 : 3,5 : 5,6 | 62 | |
| M250 | M400 | 1 : 2,1 : 3,9 | 43 |
| M500 | 1 :2,6 : 4,5 | 50 |
To improve the plasticity of the solution, it is necessary to introduce a complex additive into the water, which increases the elasticity and water resistance of the mass without loss of strength.
For mixing you will need an autonomous concrete mixer.
How to fill a screed
Concrete screed on a wooden floor is carried out on a waterproofing film, on a floor on the ground - on insulation.
The solution is laid starting from the far corner towards the exit. When leveling the surface, be sure to create a surface slope in the direction of the drain. The drainage area in the bathhouse must be concreted separately by hand - all cracks must be sealed and the inner diameter of the resulting hole must be smoothed.
The floor is poured continuously so that structural transitions do not form - these are potential weak points of the structure.
After laying the mortar, you can scatter dry cement over its surface and smooth it (make iron). This creates a durable and water-resistant base for the cladding.
You can begin cladding after 3 weeks, at which time the cement reinforcement should be rubbed smooth again.
Recommendations for creating a floor
Let's give some tips on organizing a wooden floor in a bathhouse with your own hands:
- The boards should be laid in such a way that water can flow freely along the joint line.
- Moisture will not accumulate under the floor if large beams are laid, thanks to which a gap of approximately 15 cm is formed between the internal backfill and the wooden base.
- Under the floor, on the waterproofing layer, fiberglass pads should be laid, which are sold in rolls and consist of a thick tape. This will eliminate the noise made when walking.
- Wooden floor elements should be treated with an antiseptic. You should choose a composition that can destroy all microorganisms and prevent damage to the wood.
- Only well-dried boards can be laid.
- When creating ventilation, it must be properly drained. From under the floor it should be led along the wall into the attic; a separate pipe is made for this. Holes are made in the monolithic foundation that connect ventilation gaps with street air.
The given recommendations on how to lay a floor in a bathhouse apply to a specific structure and are adjusted if necessary. The main standards for the manufacture of floors in a bathhouse cannot be changed, since they are determined by the natural characteristics of the materials and the operating characteristics of the building.
Preparing the soil surface underground
After installing the supports, you can begin preparing the underground, i.e. underground soil surface.
Let's say the floors in the bathhouse should be leaky and the soil is sandy (i.e., it allows water to pass through well). Then you need to fill it with crushed stone about 25 cm thick. Water, flowing through the cracks in the floor, will easily pass through the crushed stone and be absorbed into the sand. In this case, the crushed stone will act as a filter, due to which the surface of the soil in the underground will not silt, and the humidity will be moderate. This way the underground will dry out quite well.
Well, if the soil under the bathhouse does not absorb water well, then it is necessary to make a tray for the water to flow into the drainage pit. From the pit the water will flow outside the bathhouse. To create a tray under leaking floors, a clay castle is created, equipped with a slope towards the pit. The castle can also be made of concrete, but in order to avoid unnecessary costs, it is quite possible to get by with a clay castle.
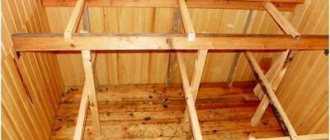
If we are talking about non-leaky bathhouse floors, then it is recommended to insulate the underground surface with expanded clay. In this case, it is necessary to pay attention that there is a distance of 15 cm between the logs and the expanded clay layer - this space will allow ventilation of the underground.
In the washing room near the wall, it is necessary to create a pit, compact its walls, securing them with clay. A pipe is brought outside from the pit - through it the water will flow outside the bathhouse. It is necessary that the diameter of the pipe is at least 15 cm.
Floors with direct drain
To create floors with direct drainage, unedged boards are taken, which are pre-treated with a planer
The direction of laying the boards does not matter, it is only important to remember that the length of the boards should be 2 cm less than the distance between the walls perpendicular to the direction of the floor
The boards are placed on the joists and nailed down. The length of the nail should be twice the thickness of the board.
When nailing the boards, leave a gap of 3 mm between them, which will go away when the boards swell from water. There is no need to leave a gap in the waiting room.
When all the boards are nailed, you need to cover them with drying oil in two layers.
Tile on the steam room floor
In Russian baths with ceramic tiles, wooden gratings are often placed on the floor, on which people already walk.
You can also use ceramic tiles as a material for the floor in the steam room. This option is ideal for Finnish saunas, where the temperature does not rise above 90 degrees. In higher temperature conditions there is a possibility of burning your feet. Therefore, in Russian baths with ceramic tiles, wooden grates are often placed on the floor, on which people walk.
Of course, installing a ceramic floor is an expensive pleasure, however, unlike wooden boards, ceramic tiles do not rot and will not need to be replaced over time. So in the long run this option is the best. And from the point of view of visitors, tiles look more presentable than wooden boards.