What size should shelves be for a bath?
Experts have established acceptable dimensions for shelves installed in bathhouses.
The development includes floorings that allow you to sit comfortably during bath procedures, sit on them or lie down. The main parameters were derived based on the person’s convenient location:
- The average length of the shelf was calculated so that a person could bend his knees when lying down. It turned out to be 1.5 m.
- So that a person can sit comfortably on the shelf at full height, the length was set to 1.8 m. Then the legs no longer have to be bent at the knees.
- In addition to standard parameters, there are custom sizes. Since it happens that a person is taller than average and needs a longer shelf to enjoy the process, he feels comfortable in the steam room. Lengths up to 2 meters or exceeding this parameter are selected.
- The smallest parameter for the width of the shelf is chosen to be 40 cm. This can be the size of the bottom shelf on which you stand with your feet and which plays the role of a stand. You can stand on it, but you can also sit on it when you need to cool down.
- The width can reach up to 60 cm. But such benches are not comfortable for steaming while lying down.
- The most comfortable width shelves are 90 cm. A person of any size can sit comfortably across them, tuck his legs in, or lie down.
An important role is played not only by the properly constructed structure of the bathhouse, but also by its internal arrangement.
Dimensions and shape
All kinds of shelves in the bathhouse
The lower shelves are made in the form of a bench with a seat, a back, four legs and reinforcing crossbars. Portable benches with two supports and without a back are unstable and quickly fail. The seat boards must be secured at intervals necessary for water drainage and ventilation.
The height of the first level is made 35 - 50 cm, the second shelf is placed so that when sitting on it, a person rests his feet on the previous floor. Lying down, the visitor must stretch his legs along the length, so the minimum size is 1 m 50 cm, but if possible they do more.
The width for sitting in a Russian bath is 50–60 cm; in a dry sitting sauna it is 40–50 cm. For lying down, the width according to the instructions is taken so that a person in a supine position can freely place his arms along the body. Usually a width of 90 cm is sufficient.
Types of steam room shelf designs
Depends on the area and height of the room.
The standard placement of benches is along one or two walls, parallel, perpendicular to each other.
Stepped
They are of the stationary type. They are more common than other species.
The shelves are fixed to one wall where there is no window. A multi-tiered structure is created according to the principle of steps.
This arrangement is convenient because with each tier the degree of heating increases.
It is important to take into account that the distance from the ceiling to the top shelf must be at least 1.2 m. This distance will be comfortable for a person to sit or hover
In addition, the upper tier is attached above the line of the heating boiler or stove.
Folding
Another name is a compartment shelf. The principle of arrangement and operation is reminiscent of wall shelves on a train, which can be folded down when necessary.
Suitable for a steam room with a small area. The shelves are fixed on two opposite walls parallel to each other. The upper shelves fold down, the frame of which is formed from support legs with transverse crosspieces.
There is an option for fixing without racks, as if in a hanging position. Used for light weight loads. Requires competent calculations. Not suitable for DIY production.
To remove the pull-out bench, it is lifted towards the wall and lowered to its original position to open it.
Removable
They are also called collapsible, folding. This mobile design is convenient in steam rooms with a small area. Simplifies the process of drying the flooring.
The upper and lower benches are completely removable.
Corner (L-shaped)
For small steam rooms, corner benches are often installed.
They take up little space, but are not inferior in comfort to other types.
The upper and lower elements are adjacent to one partition along the longest wall, the middle ones along the short one, which is located nearby.
There can be 2-3 steps along each partition.
Shelf material
Without question: the only(!) suitable material for shelves in a bathhouse is wood.
Below we will look at the properties of the most popular species, but for now let's take a closer look at how the method of cutting the trunk affects the properties of the lumber obtained from it. Of the entire variety of lumber that is made from felled trunks of different trees, we are only interested in the following varieties:
- log and half-log;
- unedged, edged and slab boards.
Log shelves
We call a log a tree trunk with the bark removed. It may be rounded, that is, have the same diameter along the entire length, or it may not be, if we are talking about some kind of individual project with non-standard material. A half-log is half of a whole log, sawn lengthwise down the middle.
Well, in our opinion, it would be extremely inhumane for visitors to the steam room to make shelves in the bathhouse out of logs. Unless, of course, the owner wants to reduce the time spent in the steam room in this way. You can make arms or legs from a solid log.
If the fantasy has come to make shelves in a bathhouse from a log, then let it be at least half a log, with the flat side facing the person.
WARNING! Before choosing solid shelf material, think about how good the ventilation is in your steam room. After all, it takes longer to dry than ordinary slats with gaps.
Of course, such a choice may be a tribute to the style - “wild” or “taiga” - they are now called differently, but in general they are drawn to antiquity, to ethnicity.
Board
With a board everything is more complicated. The trunk can be cut into boards in different ways: tangential and radial.
They will differ from each other not only aesthetically (by the presence or absence of texture stains), but also in physical and mechanical parameters. In particular, the ability to collect water.
ON A NOTE! Radial cutting is more practical than tangential cutting: shrinkage and swelling are two (!) times less, deformation (warping) is practically absent, wear resistance and resistance to other environmental influences are higher.
But because of the smaller yield of radial boards when cutting, their cost is higher than that of tangential ones.
Now let’s pay attention to the tangential varieties: it is clear that each trunk will have two “humps” - they are called “slab”. (The diagram above is not the most indicative; there are less rational ones.)
Gorbyl
Everything else without additional processing can be an “unedged board,” that is, with remnants of bark and a more or less beveled edge. The edged board will be formed only after the uneven edges have been cut off.
Aspen board on a shelf
So, in most cases, carpentry (which includes our shelf) is made from edged boards with the correct geometry. But when it comes to art or its imitation, anything becomes acceptable material.
In ethnic style, the effect of antiquity and artlessness can be achieved through the use of an edge that is uneven in shape, but sufficiently polished. Therefore, you can find polished slabs and bathhouse shelves made from unedged boards.
Selection of materials for manufacturing
When choosing a material to make shelves in a bathhouse with your own hands, you should immediately forget about metal, plastic, glass and other modern options. Only wood is used, and the requirements for it are quite stringent:
- low thermal conductivity;
- high resistance to the destructive effects of moisture and heat;
- uniform and high density;
- no pungent odor or resin content.
As can be seen from the table below, coniferous wood (cedar, larch, fir, spruce) is quite small - but the high resin content makes them unsuitable for use in a steam room. If you want to enjoy the aroma of cedar or larch boards, they can be used to decorate a relaxation room; in a steam room it is better to use linden shelves for a bath.
The density of wood is usually determined at normal humidity; at elevated humidity it increases, thereby changing thermal conductivity. However, on average, when choosing a material, you can rely on the data in the table.
According to aggregate data - the absence of resins, low thermal conductivity and relatively high density - three “budget” wood options are usually chosen: linden, aspen, alder. The fourth option, African oak (abashi or abash), with other higher parameters, is disappointing with its high price, twice as expensive as linden.
On sale are usually prepared boards for shelves in a bathhouse, already sanded, with rounded corners. Its width is convenient for installing a set-up bed of any width; the length is selected as a multiple of the full length of the bed or its half. When planning to cut boards yourself in order to make a bathhouse shelf with your own hands, you should remember the need for careful processing. To prevent warping and cracking, we take into account: the width of the board should not exceed four times its thickness.
Mandatory rounding of edges and corners, sanding until smooth will help avoid damage during operation and extend the life of the lumber.
How to treat shelves in a steam room
Processing boards (beams) to create a bathhouse environment is not limited to mechanical
It is more important to protect the wood from moisture with a special impregnation. The usual options - drying oil, primers, varnishes, paints - are excluded
The reason is that when heated, the substances begin to emit harmful fumes and unpleasant odors. The lack of constantly running ventilation in the bathhouse and high humidity, combined with high temperature, create a risk of intoxication of the body.
To avoid problems, bath shelves are treated with natural non-toxic impregnations:
- acrylic varnish on a natural basis, designed specifically for baths and saunas. Apply in two or three layers after sanding and washing (drying) the wood surface. Includes antiseptics, available colorless and tinted;
- special impregnations and antiseptics. Depending on the type and capabilities of the manufacturer, they provide a greater or lesser degree of preservation of the wood after processing. They are applied to the prepared surface in two or three layers, have no color, penetrate deeply into the fibers;
- linseed oil, pure or mixed with natural beeswax. Despite the high cost, this composition will protect the tree from rotting, cracking, delamination and swelling as safely as possible for health. Before application, the surface is sanded until smooth; the composition can be applied with a brush, roller or thick cloth (cotton, wool, linen). The proportions of linseed oil and wax are 5:1...2:1, depending on the desired degree of protection. The composition is applied heated to a temperature of 35...45 degrees, this promotes rapid absorption, after application the surface is polished with a thick cloth;
- beeswax, carnauba, special protective waxes with synthetic additives. The method of application and surface preparation are specified by the manufacturer; bee and carnauba are usually used heated to a liquid or semi-liquid state.
The choice of natural impregnations allows you to ensure the necessary durability of the sauna shelves and at the same time create a pleasant atmosphere of natural odors in the steam room.
What material is suitable for manufacturing
To make bathing procedures enjoyable, you need to choose the right material for the shelves. Wood used in steam rooms must have a number of qualities:
- Heat resistance, resistance to sudden transitions from cold to extreme heat. The tree should not be subject to deformation or destruction.
- Moisture resistance.
- Low thermal conductivity so that the flooring does not overheat and you can lie on it.
- No defects or damage on the boards. The lumber must be of good quality. The presence of resinous inclusions, which will become a problem when heating the room, is unacceptable.
Different types of trees are used to make shelves:
- Linden is light, easy to process, durable, and does not lose its smoothness. It is recommended to use well-dried linden boards - they do not darken over time. When heated, the linden shelves will release a relaxing aroma.
- Aspen – has healing properties, purifies the air in the steam room. An aspen shelf will last for many years without losing its appearance and will not require special care. The cost of aspen material is minimal, but it has a drawback: the fibers inside the boards can begin to rot. Therefore, you need to dry the bath well from time to time.
- Poplar is a soft, lightweight wood that can be processed. It also has decorative qualities. Such shelves will become an expressive addition to the interior of the bathhouse.
- Alder has proven itself well in extreme conditions. This wood has the lowest thermal conductivity. An additional plus is the uniform structure of the wood and the non-darkening shade.
- African oak (abashi) is a durable and beautiful tree that can withstand heavy loads and does not develop defects. Such shelves will not only last for many years without losing their appearance, but will also delight those relaxing in the bathhouse with the pleasant aroma that comes from the wood when heated.
- Maple is an inexpensive and very durable material that is easy to process. Maple shelves are wear-resistant and will not dry out. The tree has a fiber-free structure.
Step-by-step instructions and manufacturing stages
It is quite possible to make sauna shelves with your own hands if you follow a simple sequence of actions.
The most important thing is to pay due attention to the quality of materials, the reliability of fastenings, as well as the surface treatment of the benches
Frame
The first stage involves installing the racks.
They ensure the reliability of the finished structure of the sun lounger.
For the top row, they usually use from four to six racks with a length of one meter and a cross-section of 1 cm (more precisely, you need to calculate based on the length of the beds).
You can fasten the racks to each other using wooden blocks, which are located along the entire perimeter of the bed. In order to securely fasten the racks to the wall, you should use the longest dowel screws.
Important! To arrange the racks of the upper shelf, you can use unpolished timber, the main thing is to make sure that there are no chips or cracks on it.
Bearing beam
After the racks are securely fastened, you can focus on arranging the directly supporting structure of the shelves in the bathhouse.
This is a very important step, since this design supports not only the weight of the people who will be on top, but also the weight of the shelf itself.
That is why the cross-section of the supporting beam must be at least 5x10 cm.
The top row of this design is installed across the length of the upper plane of the bed. The width of the step depends on the thickness of the boards used to arrange the shelf.
Attention! The thinner the top boards of the bath seat, the smaller the step between the supporting beams.
In order to ensure that all visitors to the bathhouse are comfortable enough, the width of the top shelf should be made at least 60 cm, optimally 90 cm.
Front surface
After the load-bearing structural elements are completely ready, you need to take care of the upper bed.
The boards for it must be prepared in advance, that is, carefully sanded and processed. The optimal thickness of boards for arranging the surface of a shelf is from three to six centimeters. They should be attached at a distance of 1-2 cm from each other. This is done to ensure unhindered circulation of steam and moisture.
Next, we’ll find out how to attach the shelves in the bathhouse to the frame. To ensure your own safety, it is recommended to use wooden wedges. They need to be inserted into holes previously prepared for them.
You can fasten the boards both along and across the sunbed. The second option is more economical, since in this case the installation of additional support bars is not required.
Important! Under no circumstances should you leave the caps of metal fasteners on the surface of the shelf, as this can cause burns.
In order to avoid danger, metal elements are driven 5-10 mm deep into the board.
Lower tier
The shelf located on the lower level must be installed at least 30 cm from the floor level.
This rule applies to those cases when the lower seat plays not only the role of a step for the bath attendant, but also the role of a sun lounger.
In order to install the lower shelf, you need to attach four wooden blocks to the posts of the upper deck. This quadrangle acts as a frame for a shelf in a bathhouse.
Next, the boards for the surface of the bench are attached using the technology described in the third stage.
Processing, impregnation
It's no secret that under constant exposure to high temperature and humidity, wooden elements in a bathhouse deteriorate very quickly. It is for this purpose that the final stage in finishing the shelves in the steam room is the treatment of all structural elements made of wood with special substances.
Information. To treat shelves in a bathhouse with your own hands, you should use only environmentally friendly substances so as not to risk your life and health.
Regular flaxseed oil is considered an excellent protective agent against fungi and mold, which is why it has been used for many years to treat sauna shelves.
To treat the shelves in a Russian bathhouse with your own hands, use a solution of turpentine and beeswax.
Protective substances should be applied in at least two layers, but it is worth remembering that it takes about eight hours to dry one layer.
After complete drying, the bath shelves acquire a matte shine and a water-repellent surface.
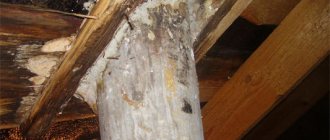
To see this, look at the photo below. The wooden element on the left was treated with special protective substances, but not on the right. Therefore, it is always better to take care of protecting the shelf in the bathhouse with your own wooden hands.
Choosing material
Fortunately, now is not the heyday of Soviet perestroika and the choice of both finished products and materials for their manufacture is quite large. Let's evaluate the possibilities and, so to speak, prospects.
Plastic products
The most affordable and most practical material in the finished product. The world of plastics and polymers is phenomenally diverse. As a rule, you can make only the simplest plastic shelves for a bathhouse with your own hands, taking as a basis planes with a minimum number of roundings, decor and other difficult-to-reproduce elements.
Industrial products are made by injection molding, which in the vast majority of cases cannot be reproduced at home. An interesting material in this regard is acrylate, better known in wide circles as plexiglass. Outwardly very similar to ordinary glass, it is much more resistant to mechanical destruction, although at the same time it is scratched more easily. It is more difficult to work with than other structural plastics, but easier than with glass.
Glass shelves
They look appropriate in oriental baths - hammams and modern saunas, made in the currently fashionable interior style - minimalism. You can make your own glass shelves for a bathhouse in the simplest geometric shapes, but you can decorate the product with purchased fittings. Copper, bronze, brass parts, stainless steel and nickel products look especially advantageous. The main disadvantage of glass, in addition to the fact that it is difficult and unpredictable to process, is the increased risk of injury in the event of its destruction. Naturally, it is necessary to give preference to shelves made of thick tempered glass, which, with a strong impact, breaks into many cubes according to the “stalinite” principle of automobile glass, but processing such material is far from easy.
Hardware
Let's be honest, metal has not found proper application in bathhouse use. The only exceptions are stainless steel and products made of non-ferrous metals, primarily bronze and copper. How convenient and practical they will be is the question.
This is where metal certainly rules, in the world of fittings: holders, brackets, hooks, racks, fences, spacers, fastening hardware
However, when choosing them, you should pay attention to corrosion resistance in a humid environment. Products made of ferrous metal must, at a minimum, have a protective coating
Well, of course, we shouldn’t forget about the high heat capacity of metals; therefore, rooms with very high temperatures are by no means their element.
Wooden shelves
Wood is the most common, convenient and practical material in a traditional bathhouse. Why are they so good and attractive:
- Firstly, wood is available, both in terms of price and, thank God, also in terms of choice;
- Easily processed with a tool from the arsenal of an average home craftsman;
- Products made from it, subject to some simple rules, are quite practical and quite durable;
- In the event of a breakdown, their repair is not particularly difficult;
- Fits perfectly into any classic interior, with the possible exception of the oriental one;
Let's face it, do-it-yourself wooden shelves in a bathhouse are the most common and commonplace occurrence. From here - a small master class.
How to make a sauna bench
The dressing room needs a full set of furniture, including benches for sitting and resting. But in the bathhouse they have two specific functions: they are used as a lower tier or for sitting next to the shelf. It is very convenient to keep bowls and brooms on the bench.
Tools and materials
The tools needed are the same as for previous products. Additionally, you will need a flexible ruler to draw a curve on the seat supports. The principles of manufacturing and subsequent processing of materials are also no different.
Table: bench materials
| Name | Size, mm | Quantity |
| Pine beam for legs. | 100x100x3000 | 1 PC. |
| Pine board for sitting. | 25x100x3000 | 5 pieces. |
| Self-tapping screws for wood. | 50 | 1 kg |
| Wooden plugs for self-tapping screws. | Diameter 10 | At least 10 pcs. |
| Impregnation for wood is waterproof and pyroprotective, oil-based, ecological. | According to the specified consumption per m2 |
Manufacturing procedure
We begin work immediately after preparing all materials.
- We cut boards and timber according to the dimensions indicated in the drawing.
- We draw a curve on all the supports under the seat: we step back on them from the bottom edge of the board 75 mm from the edge and 45 mm in the middle, connect the curve using a flexible plastic ruler.
- We cut out the supports with a jigsaw.
- We remove chamfers on the boards intended for the seat, lower drawers and beams.
- We process all the parts with a grinding wheel using a drill.
- Assembling the seat box. We recess all the screws.
- We insert the remaining supports into it and fix them.
- We mount the boards on all six supports. Don’t forget to drill holes to deeply recess the screw heads into the seat. We close the holes with wooden plugs.
- Then we put timber legs into the resulting structure and fix it with self-tapping screws.
- We strengthen them with lower drawers on four sides, recessing the screws. We make our task easier by placing a piece of wood under each drawer. The bench is ready.
Material
High humidity and bath temperature are the determining factors when choosing materials for its arrangement. Here we are talking about washroom shelves, where the temperatures are low, but the humidity is still high. Therefore, water resistance should be one of the properties of the selected material.
Wooden for shampoos
Wooden shelf for shampoos in the bathhouse
In this sense, wood is the least suitable material, because under the influence of moisture, most types of wood are destroyed, in addition, a humid environment is ideal for the proliferation of various microorganisms, which also render the tree unusable.
And yet we build bathhouses from wood, equipping them with wooden objects. So it's not all that bad. In any case, once it gets wet, it will not immediately fail. In addition, we can protect it - cover it with a compound that will make it more resistant to rot, close the pores and make it water-repellent. The use of such compositions in a washing room is quite acceptable.
Wooden shelves are great for baths in any style. Only the form changes.
If we have always strongly advised not to use conifers for the steam room, since they emit resin, then in the washing room the temperature allows the use of these particular species. Here their best sides will appear - resistance to rot, water resistance, as well as the low cost of the main conifers - pine, spruce, etc.
In addition, larch and oak only become harder from water.
Metal
Metal in the bathhouse is a controversial material. If we use it, then alloys of non-ferrous metals or stainless steels. However, there are also ordinary steels with a coating that prevents them from oxidation - we constantly use such things in bathrooms, these are chrome-plated plumbing parts.
It is clear that the shelf itself is rarely made directly from metal, but brackets and other types of fastenings - yes, very often are made from one or another alloy, with or without coating.
If the design of a shelf with metal parts suits your design, check with the seller whether they will rust due to high humidity. (No need to ask about chrome ones - it’s clear that they won’t).
Bath shelf size: correct calculation
Before you make shelves in a bathhouse with your own hands, you should carry out many calculations. It is necessary to decide on the number of tiers. Recently, more and more owners of steam rooms are making two- and three-tier shelves. Single-tier shelves are traditional for Russian baths. Multi-level benches are more typical for saunas, where people sit rather than lie down. Next, you need to decide on the dimensions of the structure.
- Height. This parameter is selected in such a way that the steamer can easily work with his hands and does not have to bend too much. Experts recommend placing shelves at the level of the bend of the thumb of the hand lowered down. The height of the product ranges from 70 to 90 cm. Many people like to take bath procedures while sitting, so it should be comfortable to lie and sit in the steam room. A distance of 110 to 150 cm should be maintained between the shelf and the ceiling.
- Lenght and width. A bathhouse is a place where a person wants to relax as much as possible, so the length should allow him to lie down at his full height. On average, the length of a standard shelf is 220 cm and the width is 90-100 cm. Traditionally, the product is placed along the walls, and their number largely depends on the size of the steam room. If you are the owner of a large bathhouse, you can double the width of the shelf so that 2 people can sit on it at once. Before you add more shelves to your bathhouse, make sure that it will not take up too much space and interfere with the steamer. In small spaces, the “compartment” option is often found. In this case, the bench with the shelf is attached to one of the walls; if necessary, the shelf is folded back and secured to the bench. It can be easily returned to its original position. Often there is an option when a stationary shelf is combined with a mobile bench.
The sizes of the shelves are selected depending on the position and number of people steaming
Shape of shelves for bath accessories
In this case, we mean by “shape” design features. Inside the quadrangular room, shelves in the bathhouse for shampoos can be placed either along the wall or in the very corner. In addition, they can vary in support or fastening, because they can not only be screwed to the wall, but hung from the ceiling or made into a floor version (although this is already a bookcase).
Wall mounted soap
Wall-mounted options differ in the presence or absence of a support that evenly distributes the load across the entire width of the shelf. Typically, the support is a bracket - a triangle, one side of which is attached to the wall, the other supports the shelf, and the third transfers the load from the shelf to the wall and imparts rigidity to the structure.
Shelf for shampoos in the bathhouse on brackets
This is a reliable, time-tested option, but for our case it is not so important, because we are talking about shelves in the bathhouse for soap and shampoo, and they have little weight, so the bracket can be omitted, or made decorative.
ON A NOTE! Shelves on brackets are optimal if the shelf itself or the objects standing on it are heavy.
In addition to brackets, various fasteners are used to hang a wall shelf. They can be visible or hidden. You can learn more about fastenings from this article.
Wall mounted for accessories
This type involves placement along the wall and fastening directly to it. Fasteners (by the way, this applies not only to wall-mounted shelves, but also to corner shelves) can be very different: from traditional corners and eyes to different types of hidden fastening (on hidden hinges, on metal pins or wooden pins, on eccentrics).
This video shows a hidden mount for mensolo holders:
Watch this video on YouTube
And here - for eccentrics:
Watch this video on YouTube
It is important to estimate in advance the weight that will be required for the mount. It includes the weight of the shelf itself, as well as future items that you intend to place on it
IMPORTANT! Please check the “endurance” (maximum load) of the fastening elements when purchasing. The most important shelves are best made on brackets - triangular supports, the vertical of which is attached directly to the wall, and the corner piece transfers the load from the board to the wall across the entire width of the shelf
The most important shelves are best made on brackets - triangular supports, the vertical of which is attached directly to the wall, and the corner piece transfers the load from the board to the wall across the entire width of the shelf.
If we are talking about a shelf for accessories, then the weight of it with all the items will be small, and the fastening can be done in any convenient way.
Hanging
The number of fastenings can be reduced if the multi-storey wall shelf is made suspended. Thick rope, cable or metal cable are often used as suspensions. But you can also hang it on leather strips.
The hangers can be attached directly to the wall using an anchor or dowel, or they can be attached to brackets located above. The third option is ceiling mounting.
Manufacturing
To make shelves of the required size for a suitable number of people, you should prepare the necessary tools and materials. To work you will need:
- wooden boards from the selected wood species;
- wooden beam;
- stand boards for fastening the structure;
- self-tapping screws;
- corner;
- nails.
At the initial stage, the instructions provide for assembling a frame for future shelves.
Assembling the frame base and installing the flooring
The wooden frame base is assembled from 10 prepared beams with a cross-section of 5 × 7 cm and 5 rack boards for attaching shelves. The beams for the frame are mounted vertically and fastened horizontally to each other using strapping. Fixation to the racks is carried out using a paired connecting element.
To provide additional strength, the structure is additionally mounted to the wall surface.
Smooth boards pre-treated with an antiseptic are used as flooring. Installation of boards is carried out in compliance with the technological gap between them of 6 mm. For the lower shelf, 3 boards are used, for the upper bench - 7.
Next, the flooring is installed on the prepared frame with fixation using self-tapping screws, which must be recessed 5 mm deep into the wood. The fastening elements are driven in from the reverse side of the shelves. The boards are laid with a gap at a slight inclination of 2 degrees.
Fixation of the structure
The shelves are fixed to the wall while maintaining a gap of 11 cm. The bottom shelf has a movable structure mounted on special mechanisms - runners, which simplifies the process of cleaning the steam room.
The photo shows a step-by-step algorithm.
In places where the wooden frame of the shelves comes into contact with the floor surface, special rubber gaskets are installed for additional waterproofing.
What do they depend on?
Today, in conversations about baths and saunas, we hear many references to seats and loungers in a steam room. Some people talk about how they love to stretch out on a cozy board at full length, while others prefer to just sit on them. But the most interesting thing is that these vacation spots are called differently by people. Loungers, benches, benches, multi-tiered. In principle, these are not errors, which cannot be said about the concepts of “canopy” and “shelves”
It is important for every lover of bath procedures to remember that the bench in the steam room is called a shelf. Many people still call the shelf in the sauna a canopy
In fact, a canopy is a canopy over a bed, which was previously used in the interior of bedrooms, and today it is complemented by children's cradles.
Particular care should be taken when approaching the issue of multi-tier structures. There should be sufficient distance between the top resting board and the ceiling.
According to traditional indicators, the width of the bath shelves should be at least 40 cm. The length in this case depends on the arrangement of the steam room and its square footage. In order for a person to take a comfortable sitting position, the width of the shelf should be 85-90 cm.
As mentioned earlier, multi-tiered structures require special attention. The lowest step must have a minimum width
In principle, it is intended for use by children, but adults can use the lower tier as a storage area for bath accessories. The middle tier assumes an average width, and the top one is the most bulky. You can, of course, install a two-tier shelf, especially since you can use it to play with different shapes of sun loungers. The distance between the top tier and the ceiling covering should be at least 1 m. This way it will be comfortable for a person to stand up, and he will not worry about accidentally hitting his head. In multi-tiered structures, the lower shelf is for sitting, and the upper one is for lying.
The design of the bath shelves themselves is very simple. In most cases, these are wooden benches located near one or more walls of the steam room. The frame of the structure is made of wooden flooring with supports and jumpers between them.
It is worth noting that it is important not only to install the shelves according to the recommended parameters, but also to take care of maintaining an acceptable distance between the slats. Lamels - processed beams that form the basis of the seat
The distance between them should be approximately 4-5 mm to ensure free air circulation.
Properly designed steaming racks ensure convenience, comfort and safety for steam room visitors. Accordingly, special requirements are put forward for these structures:
- wooden decking should have rounded corners;
- the frame of the benches should be characterized by maximum strength, since its main task is to withstand heavy weight loads;
- To prevent a person in the steam room from getting burns, the metal fastening parts should be located at the bottom of the bench.
Do not forget that the quality of the shelves depends entirely on the material used. The tree must be strong and durable. The surface of each lamella must be clean and polished, without even minimal signs of defects
It is very important that the selected wood easily tolerates moisture and exposure to hot steam. To prevent visitors from experiencing a burning sensation and discomfort in general, the material of the shelves must have low thermal conductivity
Among other things, there are a number of nuances that bathhouse owners should pay special attention to when arranging the interior space
- The structures, open at the bottom, allow for easy cleaning of the steam room. The same feature has a beneficial effect on air circulation and rapid ventilation of the room.
- The lounger should be installed at a slight angle. Thus, the incoming water flows freely onto the floor without creating any inconvenience for the visitor.
- When installing shelves, it is recommended to use plastic or rubber pads. They should be installed under vertical posts. Thanks to the presence of spacers, the service life of the wood base increases.
- During use, the shelves should not creak or wobble. It is necessary to regularly check that all structural elements are securely fastened.
The information presented allows you to understand the meaning of the presence of shelves in the steam room, their properties, and on what factors the dimensions of the structures depend.
But the calculation in this matter will not be difficult. You will have to add 10 cm to the height of the oven. The result obtained is the optimal height for the lower bench.
Pull-out shelves in the steam room (sauna)
A convenient design option is a pull-out type of shelves. It allows you to sit comfortably on the upper tier with your feet on the lower one. Also, the lowest shelf slides in, which frees up the passage and increases the space for movement. Steamers use a pull-out shelf to place a container with water for supply, a steamer with brooms, etc.
To create shelves with a sliding mechanism, place bars on the end walls of the room. The next step is to secure the axes. Attach one end to the block on the wall, and the other to the end of the lounger (from the inside). Then put special wooden strips on the axle, which will act as levers. We make cuts on the upper parts of these planks (at the corners), which will allow the mechanism to work easily and freely.
The thickness of the bars that are fixed in the wall should be the same as the thickness of the end elements of the board. According to the principle of operation, this mechanism resembles the device of a sliding sofa. Therefore, when designing it, be guided by an already familiar scheme. This mechanism allows you to extend the shelf to almost any required distance. The lounger is supported on the legs.
The main condition for installing fasteners is careful camouflage of metal elements. Under no circumstances should any part be placed on the surface of the wood, otherwise there is a risk of burns. Recess the caps of the elements as deep as possible into the surface of the shelves. It is also possible to place the screws on the back side of the wooden device.
The safest (and also environmentally friendly) option is to use special oak wedges. They are hammered into pre-prepared holes. However, this method is difficult to implement and requires strength, dexterity and experience.
It is possible to mount a special backrest on the wall for future shelves. It is made of three boards that are attached to vertical posts. Thanks to this backrest, the risk of skin damage or minor burns in contact with the steam room casing is eliminated.
What should the height be?
First of all, you need to understand that the optimal ceiling height for the steam room is 2.1 m. However, this indicator is not a standard. Owners of bath complexes can make the ceiling height of any size, but not less than 2 meters, otherwise the resulting steam will circulate incorrectly. Based on this, it becomes clear that for comfortable vaping, the height of the shelves must correspond to the characteristics of steam generation and steam content.
According to the owners of bath complexes, the ideal height of a multi-tiered shelf is 80 cm. The upper tier should be located a meter from the ceiling level. At this distance, a person will be able to sit on the upper bench or lie down.
The result obtained is the optimal height of the shelf from the floor. To make it easier to climb onto the bench, you can consider a small podium-step.
Only in some steam rooms the height of the shelves is characterized by other requirements. If the ceilings are low, the standard minimum height is 30 cm. With this value and the openness of the structure, proper ventilation of the benches is ensured. You can install another shelf, but the distance between the benches should be on average 1 m. A similar value should be the difference between the top shelf and the ceiling.
Location
Once the dimensions of the future shelf have been determined, you can begin planning the location of the bath furniture. It is worth remembering that, for example, in a traditional Russian bath it is customary to steam while lying down, and the shelves consist of one or two tiers. Another thing is the Finnish sauna, in which visitors, as a rule, steam while sitting. There should be at least three tiers, which means the distance from the bottom tier to the ceiling should be much greater.
A correctly drawn up diagram before starting installation work should greatly facilitate the work of the master and subsequently allow those relaxing in the sauna or bathhouse to enjoy the steam room with maximum comfort. The diagram should show all the dimensions of the room, and also note where the equipment, door and window openings are located.
It is worth taking into account many nuances, such as the fact that curtains should absolutely not be installed under walls with windows, because due to hot steam and high temperatures, the glass can crack and injure vacationers.
Shelves can have unique frame legs onto which the flooring will be placed. However, this is not a prerequisite, but only one of the options. You can make shelves without racks, then the wooden frame will be attached directly to the wall.
It is important to remember that the shelves should never fit tightly against the walls. Indeed, for wooden bath furniture, free air circulation is very important, providing the wood with complete drying and protecting it from rotting processes and the formation of fungus and mold.
Therefore, during the installation process, a gap of about 10 cm is left between the flooring and the wall (pieces of timber are first attached to the wall, onto which other frame elements are subsequently attached). The screws used for fastening should be carefully sunk into the wood so that their heads do not remain on the surface.
It cannot be said that the options for shelves are very diverse, but if necessary, depending on the size of the bathhouse room, you can choose the most suitable furniture. For small rooms, for example, you can find space-saving options. Folding shelves, which are made in the manner of shelves in trains, are suitable. Another option is folding or retractable shelves. When assembled, they look like part of the wall and take up almost no space. There are also removable shelves that, if necessary, can be brought into the steam room and put in place, or can be removed.
Purpose and location of regiments
The ancestors of steam baths, as historical data indicate, were primitive buildings that were used occasionally for washing. The main element of any primitive bathhouse was a hearth, lined with stones, or a massive brazier with stones, with the help of which steam was generated. In view of the cramped conditions that reigned in the primitive baths, it can be assumed that they either did not have shelves at all, or that they were portable weasels and stools that served to accommodate those washing and as stands for bath accessories. Archaeological finds and old bathhouses that have survived in some places, dating back more than a century, indicate that multi-story shelves were installed mainly in Finnish saunas. In Russian steam rooms, which were heated primarily “black”, when the smoke from the stove/hearth accumulated under the ceiling, they did not make multi-story shelves. Being under the ceiling, in a place where there was a concentration of hot air mixed with smoke and steam, was simply dangerous due to the danger of inhalation - CO poisoning. In addition, the soot that settled on the ceiling and walls of such a bathhouse negated the effect of washing. In the old days, bathhouses made do with benches along the walls, or with one shelf located no higher than ½ the height of the building.
Traditional bathhouse of the ancient Slavs
DIY bath shelf
Choosing material for bath shelves
- Linden
. Heats up slowly and dries quickly. The wood has no knots, it is easy to process, does not crack or rot. When heated, a pleasant amber appears. There are no traces of sweat on the surface. Has healing properties. The only drawback is that it gets dark quickly in the steam room. - Aspen
. The most popular material among bathhouse attendants due to its low cost. In folk medicine, it is considered a material that absorbs negative human energy, a healer of mental adversity. Disadvantages include the ability to rot from the inside; it is difficult to externally identify defective boards. - Abash
. A tree from Africa, accustomed to high temperatures and moisture. Heats up slowly and does not lose color under extreme conditions. The wood is knot-free and easy to process. The only drawback is the high cost of the blanks.
Design options for shelves in the bathhouse
- Stepped shelves
. Installed in a large steam room for large companies. The flooring is placed along one wall in two or three steps. The top one is the hottest. - L-shaped shelves
. Designed for medium-sized steam rooms. The lower and middle shelves are located on one wall, the middle one on the adjacent one. This design visually increases the volume of the room. - Shelves-compartments
. Suitable for small buildings. The floorings are placed one above the other. The top shelf can be folded up and secured in this position.
Dimensions of shelves for a bath
- To lie on a shelf with your legs bent, you need 1.5 m.
- 1.8 m is the average size for a lying position, but everything is decided by the height of the owner of the bathhouse. If there is space, the size can be increased to 220 cm.
- The width of the bottom shelf is 0.4 m. The size is sufficient for the bathhouse attendant to stand on it and wave a broom, as well as to sit and cool off.
- For small steam rooms, instead of a rectangular bottom shelf, a step in the form of a right triangle is made. One leg of the triangle is placed along one wall, and the second along the shelf.
- For seated shelves, a common width is 0.6 m; you can lie on them, but not comfortably.
- The reclining seats are made 0.9 m wide, the size allows you to sit across the step with your legs tucked. If the size of the steam room is not limited by anything, the shelves can be made double, then you get floors.
- The dimensions of the shelf in the bathhouse and their number are selected based on the recommended size of 1.1-1.2 meters between the ceiling and the top flooring. With this size, it is convenient for the bathhouse attendant to swing a broom, and the visitor can not only lie down, but also sit comfortably.
- The height of the first step (distance from the floor) is at least 20 cm.
- The height of the steps is 40-60 cm. The range allows you to provide the required number of steps of convenient sizes.
- Another guideline when choosing the size of the distance between steps is that the surface of the flooring with a reclining visitor should be at the level of the thumb bone of the lowered hand of a standing bathhouse attendant. On average, the height of the shelf is 70-80 cm. This is a comfortable height for the bathhouse attendant, at which he does not have to climb or bend over during the procedure.
Methods for attaching shelves in a bathhouse
- Self-tapping screws are preferable to nails.
- Recess the fastener heads into the wood by 5-6 mm.
- If possible, install fasteners from the underside of the shelf.
Bath shelf assembly technology
- Make a sketch or drawing of a bath shelf with dimensions, taking into account the previous recommendations.
- Cut structural elements from blanks.
- Carefully sand the boards and beams and round off sharp corners.
- Place the beams vertically and fasten them together with thick boards. Install rubber pads under the vertical beams for waterproofing. The distance between the beams is no more than 60 cm. The frame can be fixed to the wall or left unfastened in order to remove the structure from the room for drying.
- Between the beams, attach thin cross beams on which the flooring boards rest.
- Attach boards to the frame to form the deck. Leave gaps of 1-2 cm between the boards, and secure the flooring itself with a slight slope for free flow of water. The boards are chosen thin (within 20 mm), the proportion of thickness and width is 1:4, in this case the boards dry quickly.
- The flooring boards can be left unattached and removed to dry after using the steam room.
- Leave 10 cm gaps between the boards of 2 and 3 tiers and the wall.
- Seal the space between the levels with wooden slats with 2 cm gaps between them. This space is often sewn up to reduce the volume of the heated space when steam is let in, but the boards will take longer to dry. The choice is up to the owner, but you can seek advice from experienced bathhouse attendants who will tell you how to make shelves in the bathhouse - whether sewn or not.
Coating
The starting material of the shelf can be coated with various compositions. Some of them will have a decorative function, others will protect the material from the effects of the environment.
What paint to paint
Well, we immediately dismiss alkyd enamels, because the film they form does not have the ability to allow air and moisture to pass through. The wood from which your shelf is made has a certain moisture content and during operation will “breathe” - change not only the humidity, but also its own volume. Changes in volume will affect the coating, which will crack and eventually peel off unevenly.
Acrylic paints look much more attractive. They do not smell, dry quickly, as they are water-based. But this very water base is the reason that the coating turns out to be finely porous, that is, the wood will “breathe,” but excess humidity in the washing room will lead to the fact that it may begin to deteriorate.
The main difference between varnish and paint is its transparency. Of course, with the help of varnish you can tint (change the shade) the surface, but the structure of the wood, nevertheless, will remain visible.
Example: NEOMID Sauna - acrylic-based wood protective varnish
Varnishes are in some ways preferable to paints, especially those designed for rooms with high humidity. Of course, they are expensive, and you can use the remainder on shelves if you have already purchased such varnish for other purposes.
Water-based varnishes have the property of being well absorbed into wood, while slightly raising the relief of its structure. This means that it will be difficult to limit yourself to one layer, and most likely there will be more than three, only in this case will it be possible to get rid of surface roughness.
Alternatively, you can first treat the surface with a primer, then sand it to the desired smoothness, only then proceed to varnish. By the way, the primer is also an antiseptic. We recommend using a deep penetration primer.
Oil and wax impregnations
All coatings have their own service life, at the end of which varnishes and paints look unattractive. You can protect the surface of the shelf without resorting to painting or varnishing - just saturate the wood with special oil or oil wax. The same compositions that we recommended to you in the section on bath shelves will do. Take a look, for example, at this article. If there are residues after processing the steam room, use them for items in the washing room.
Dimensions of shelves for baths and saunas
The pleasure of using a steam room in a bath or sauna largely depends on the design, size and location of the shelves. In this article we will look at the main dimensions of the shelves in a bathhouse designed for people with a height of 160 to 185 cm. The dimensions of the shelves in the steam room of this sauna were specially selected for maximum convenience and comfort.
First, let's look at the main types of designs and proportions of shelves for a bathhouse. Most often, in traditional Russian baths, located directly on the ground or with a cold, uninsulated floor, there were three levels of regiments. In modern steam rooms or saunas, where the floor is well insulated and does not blow on the legs, there is no need to arrange three levels of shelves. In order to warm up well, two levels of shelves in the steam room are quite enough.
Diagram of the dimensions of the shelves in the bathhouse (click on a larger version of the diagram to open in a new window)
New book about the bath!
Now let's look at the main dimensions of shelves for a modern steam room in a bathhouse or sauna. In the example shown, the shelves are made of African abashi deciduous wood, which has low density and, therefore, low heat capacity and thermal conductivity. Therefore, the abash warms up slowly. At the same time, abashi does not have knots, has excellent water resistance, hardness and retains its geometric dimensions during fluctuations in temperature and humidity, which makes it an indispensable material for arranging shelves in baths and saunas.
However, a serious disadvantage of Abash wood is that this material can cause contact urticaria, allergic rhinitis and even asthma, especially among professional sauna builders who deal with Abash wood dust. [Information sources: Kanerva L, Tuppurainen M, Keskinen H. Contact urticaria caused by obeche wood (Triplochiton scleroxylon).
The height of the sauna from the ceiling is 208 cm. This height is quite enough for a comfortable stay and movement in the steam room when it is well heated.
The length of the shelves in this sauna is 202 cm. This size of the shelves allows you to comfortably sit on the shelf while lying down. The length of the shelves can be longer - if the size of the steam room in the bathhouse or sauna allows
Please note that there is a gap of 3-4 mm on each side between the wall cladding of the steam room and the shelves - a margin for wood expansion when heated or moistened
The height of the lower level of the shelves from the floor is 45 cm.
The height of the second (upper) level of shelves is 88 cm from the floor, or 43 cm from the lower level of the steam room shelves, or 120 cm from the ceiling of the steam room of a sauna or bathhouse.
The width of the top row of shelves is 70 cm, allowing one person to lie comfortably on the shelf.
The side shelves serve as a stand for bowls, basins or for placement in the steam room in a sitting position. The width of the side shelves is 40 cm.
Dimensions of the articulation area of the L-shaped shelves in the sauna. Between the flooring boards of the shelves we leave a gap of 3-4 mm on each side.
Approximate dimensions of the area for joining L-shaped shelves in the bathhouse.
Laying abashi boards diagonally enhances the look of the sauna.
Basic dimensions of the back of the upper level shelves. The dimensions of the back of the shelves are adjusted to the height of people from 160 to 185 cm.
To mount the backs of the shelves, a 2 cm thick abashi strip is used.
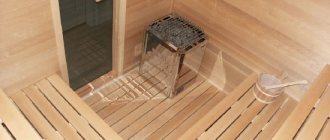
General view of the shelves in the steam room of a sauna or bath. See how to cover a sauna or bathhouse steam room with clapboard.
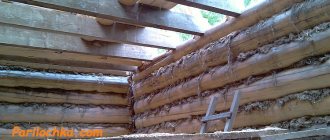
Read how to make Siberian shelves for a bathhouse from massive half-logs. Such shelves remain cool for a long time, and after heating they retain a pleasant warmth for a long time. Special connoisseurs of the bathhouse cover the shelves with sheets, on which they lay hay mown in the morning dew and cover it with small branches of oak and birch. The feeling of floating on such shelves is absolutely fantastic!
DIY sauna shelves in a steam room: what material to choose?
The next stage is the choice of the material from which they will be made. Of course, the obvious option is wood. But you need to keep in mind that not every type of wood is suitable.
Materials have their own requirements.
It is important that the wood has low thermal conductivity. Please note that you will sit and lie on the shelves; they should not get too hot. The shelves must easily support the weight of one or several people, so you need to choose durable wood
The resin content should be minimal; a large amount of resins can be hazardous to health, and they can burn the skin when heated. In the steam room there are temperature fluctuations with a large amplitude, and there is also high humidity; the tree must cope with such a load
The shelves must easily support the weight of one or more people, so you need to choose durable wood. The resin content should be minimal; a large amount of resins can be hazardous to health, and they can burn the skin when heated. In the steam room there are temperature fluctuations with a large amplitude, and there is also high humidity; the tree must cope with such a load.
Many people prefer to make shelves for a bathhouse with their own hands from aspen. It does not emit resin, has good resistance to temperature changes and moisture, and does not deform or fade over time. In addition, aspen has been famous since ancient times for its healing properties. But it also has an important drawback - it can rot at the joints on the inside. You can protect the tree from this process using a special antiseptic.
Linden will also work well. It is practically not subject to drying out and does not become cracked, thanks to which it retains its original shape. Linden lends itself well to processing, has a dense texture and low thermal conductivity.
Abash is the most expensive and beautiful material for making shelves. African oak can withstand temperature changes well and has low thermal conductivity. It has a flat and smooth surface, it is elastic and durable.
Coniferous trees are considered undesirable, but they can be used for shelves. For example, in Finland, sauna shelves are made from pine or spruce. But only high-quality, well-dried boards are suitable for production. There should be no knots or cracks on them. The advantage of conifers is their pleasant aroma, which has a healing effect. Coniferous boards are cheaper than hardwood boards.
Advantages and disadvantages of different homemade bath shelves
Wood has aesthetics and complements the interior of the steam room better than metal shelves. In most cases, standard baths are made of wood, so this material is more popular as a base for shelves. As for the disadvantages of wood as the main material for creating shelves in a bathhouse, here are the following:
- release of resin from some types of wood (pine);
- over time, the tree may lose its color;
- there is a risk that the tree will be susceptible to attack by parasites and beetles;
- deciduous trees have a lot of weight and are also particularly durable - not every craftsman can even screw in a self-tapping screw.
At the same time, metal cannot be discounted either. Fashionable shelves will serve as an excellent option for storing bath accessories in their place. Such products also have advantages:
- aesthetic appearance;
- strength and durability;
- ease of installation;
- bath hygiene support;
- ergonomics and functionality.
How to attach shelves in a bathhouse. Angular: Step by Step Guide
So, make a corner shelf for your bathhouse with your own hands. This means that you will stretch it along two adjacent walls. Exactly what length is up to you to decide based on the dimensions of the steam room. As you understand, we cannot adapt to your specifics, so we will give one example of how to make shelves in a bathhouse, and you will act by analogy.
The first step is to build a drawing. To do this, we measure the room and determine the size and number of tiers of the future shelf.
In our case, the shelves are corner, three-tiered, with dimensions of 280 by 220 cm. It has three tiers on the short side and two on the longer side. The first two tiers are the L-shaped structure itself, a solid one that has to be made. Fans of Russian baths don’t have to worry about the third tier - it is only needed in the sauna.
The figure shows a plan with a top view and with drawings of supports on one and the other side of the L-shaped structure. Your task is to make a drawing yourself to fit the dimensions of your steam room. Focus on the following:
ATTENTION! Mortise-tenon joints provide rigidity. It is enough to make a cut in the beam 20 mm deep to make the connection much stronger. Afterwards the tenon and groove are additionally attached to self-tapping screws.
The depth of the grooves is 20 mm throughout. The board used was 75 by 50 mm, processed, that is, its linear dimensions could have decreased during the leveling process.
Please note that the structure is made autonomous from the wall. When installing in a steam room, you do not need to attach the shelf in the bathhouse to the wall; they will stand autonomously, only point-wise fastened to the wall with corners with a gap of 1 cm.
The first stage after drawing the drawing is calculating the amount of material. Assume that there will be 5 large supports, 4 small ones. Or, proceed from the ratio of one support per half meter.
The next stage is preparing the lumber. You can even use cheap spruce or pine for the frame. Linden is better for flooring.
IMPORTANT! It is better to cut lumber in the following way: first the longest parts, then the shorter ones. And, on the contrary, take first from the shortest available pieces. You can get confused and find out in the store how long the timber is sold in order to calculate with the least amount of waste.
When the parts are ready, grooves are made in them. To do this, you should make a pattern and go over it with a milling cutter in the right places. Ideally, the inserted part should fit fairly easily, but should fit tightly so that the connection can be lifted by hand without it falling apart.
ADVICE! Distinguish between parts where defects are acceptable and where they are unacceptable. It is clear that the first refers to parts invisible from the outside, and the second to seats, flooring, and cladding.
It is better to take galvanized ones that do not rust
The bars inserted into the groove are fastened from the outside with self-tapping screws - directly along the connection. The fastening of the remaining parts of the shelves in the bathhouse is done end-to-end and also with self-tapping screws. However, some may prefer corners.
The finished support should be sanded, after which it is covered everywhere with impregnation for saunas (you can read more about impregnations suitable for steam rooms here). It is advisable to do this: soak it, dry it, lightly sand it, soak it again.
Please note that for now we are just assembling the supports, each separately. We have not yet gotten to the point of assembling the shelves, because we will be doing this directly in the bathhouse. In the meantime, work can be carried out in a workshop outside.
The next stage is assembling the frame without flooring. You will need a plumb line and a level to ensure everything is level. In this case, the supports are assembled onto connecting crossbars, which will later become a support for the flooring.
The difficult point is the jibs, which are needed for the future flooring at the junction of two shelves at an angle of 90 degrees. Through this jib from below, you should later attach the boards, edged at 45 degrees, to the shelves in the bathhouse.
You can begin to sheathe the finished frame with boards, but first you should install it in the bathhouse and install the corners between the wall and the structure. Only then can you begin to equip the flooring.
The first step is to mount the canopies - these are boards that will be under the knee of the person sitting on the shelf. The canopy is made from an ordinary linden board for a shelf, rounded on both sides, which is cut on one side to a flat surface. Then a 40 mm long block is glued from below to such a board, also straight on one side and rounded on the other. See picture below.
In the same picture you can see the chamfer removed after the visor has dried. It should be removed so that there is nothing digging under the knees.
Next, you screw all the other flooring boards onto self-tapping screws from below, not forgetting about the gaps, which are best set using inserts of the required thickness. All flooring boards are also prepared in advance - sawed, sanded, impregnated with the same composition for baths or saunas - as described above.
Since in this design each tier forms a kind of niche, you can safely sew up the gaps between the tiers - this is done with clapboard or shelf board.
IMPORTANT! Don’t forget about the gaps, and leave them wider in the vertical panels so that air can pass through more easily, so that there are no “pockets” where steam does not get in, and therefore they do not warm up.
"Clothes" for the bath
The most important “clothes” for a bath are hats, sheets and towels. Hats will protect your head and hair from overheating (they really don’t like high temperatures), and sheets and towels are necessary for timely removal of sweat. The best sheets for a bath are linen, and towels are preferably high density and 100% cotton.
Bath caps
The best hats in the steam room are felt, flannel or wool. The main thing is that this specific headdress is soft, pleasant to the touch and does not irritate you, and absorbs sweat well. You cannot wet hats before visiting the steam room: this greatly reduces their protective properties. Wearing a wet hat can cause heatstroke.
A must-have accessory in the bathhouse is a hat.
Their bath caps need to be washed periodically. Of course, woolen and felted items cannot be washed in a machine. Only use your hands in a warm (not hot) soapy solution. Then rinse the hat well again in warm water.
They also wring it out in a specific way - they spread out an old terry towel and place a wet hat on top of it. The towel together with the hat is rolled into a roller and wrung out in this form. Then they straighten it, giving it a shape - you can put it on your head while wet and smooth it with your hands as needed. Dry flat.
Footwear for baths and saunas
The list of required bath accessories includes flip flops. An option for washing is flip-flops made of rubber or modern plastics: they are light and hygienic, you can stand in the water in them. But some can be slippery on tile floors, so look for flip-flops with non-smooth, grooved soles.
Bath shoes can be made of different materials
If you also need slippers in the steam room, rubber and foam are suitable for a Russian steam room - there in the floor area the temperature is no higher than +30 or 35°C. But saunas require felt slippers. Caring for them is the same as for hats - gentle hand wash in warm water.
They also offer bast shoes made from natural straw. It is not clear how long they will last and how comfortable they are, but they look interesting. There are wooden slippers - women's and men's versions. It’s hard to say about convenience, but that’s for sure that they will last a long time.
Cloth
Today there are special bath sets for men and women. These are towels with Velcro, men's are also called kilts by analogy with a Scottish skirt. Women's ones have straps and sometimes have pockets. They are comfortable and functional: they do not fall off when moving awkwardly. But you can get by with an ordinary towel, or sew Velcro onto it (they are sold in dry goods stores). With Velcro on the towel you will be more comfortable.
You will feel more comfortable in such bath clothes
There is another type of clothing for saunas and baths - bathrobes. It is also better to choose them from pure cotton: they do not cause allergies and absorb sweat better. For more creative bathhouse lovers, there are kimonos - shortened versions of terry cloth robes. The sizes are mostly universal - they can be wrapped in clothes in the sauna and bathhouse. For some reason it’s more comfortable.
Length and width of shelves
In many baths, stepped shelves are installed. They can be 2- and even 3-level - this nuance depends on the height of the ceilings. The minimum width of the shelves is 40 cm. This is enough for a steam room visitor to sit down and enjoy the steam. Some owners of bath complexes, when equipping a steam room with benches, choose their width to be 50-60 cm. It is customary to sit on such bench options. Of course, a small child will be able to lie down, but children do not always visit such establishments.
In fact, it is not customary to sit in a traditional Russian bathhouse. Visitors must steam in a lying position. And so that a person does not experience a feeling of discomfort, the width of the lying shelf should be at least 85 cm. The maximum is 120 cm. On such wide shelves it will be possible to spread out your arms and legs. However, the most common width is 60 cm. This distance is quite comfortable for sitting, but it is almost impossible to lie down on a shelf of this width.
So, the acceptable width of the sitting type of shelves is 40 cm. The width of a lying bench ranges from 85-120 cm. Now you need to figure out the length of the benches, the minimum of which is 2 m. In miniature steam rooms, the length of the bench may not even reach 185 cm. But if you are building a bathhouse complex for personal use, it is preferable to listen to the advice of experienced bathhouse attendants. They also recommend keeping the length of 2 m as the bare minimum. Ideally, the length of the shelves should be 2.2-2.5 m, where even the tallest visitor can easily fit.
The thickness of the shelves is important. The ideal figure is 6-8 cm. This is much greater than the thickness of the boards sold in construction stores that are used to arrange sauna benches. However, in a Russian bathhouse, the thickness of the shelves plays an important role. The larger it is, the better it accumulates heat and transfers it to the steam room visitor.
If the steam room in the bathhouse has a large square area, then the furniture can be installed in large sizes. This nuance depends on the wishes of the bathhouse owner. The main thing is not to put miniature shelves in a large steam room or, on the contrary, try to fit large benches in a small steam room.
The size of the shelves in the steam room. Sequence of assembling a canopy with a retractable bed
This design is optimal for small steam rooms, with parameters of 220x180x210 cm in height, width and length.
The size of the shelf in the steam room of the bathhouse in this case will be such as to occupy a space of 110 × 210 × 220 cm. Then the stove can fit in the steam room, and there will be room for the bathhouse attendant. To assemble such a structure with your own hands, you will need 16 boards 210 cm long, corners, screws, frame beams, as well as special impregnation for wood, for example Tikkurila brand.
The upper tier is located 113 cm from the floor. Here the width of the shelf in the bathhouse reaches 69 cm, and the length is 210 cm. But the retractable bed with a similar length has a width of 49 centimeters. Moreover, the distance from it to the upper canopy is also 49 centimeters. This gap is left for ease of use of the structure - in a sitting position, a person can put his feet on the lower lounger.
Despite the quite acceptable size of the shelves in the steam room, the height of such a structure is still not convenient enough for the bathhouse attendant. Therefore, a special stand is built on the floor from 3 boards 36 cm wide. The height from this bench to the top shelf is 70 cm, which is optimal for performing bath procedures.
The canopy design includes two elements - a frame and a flooring. For the frame, two load-bearing beams are used, which are installed along the width of the shelves in the steam room and are connected by transverse beams every 50 cm. In this case, the transverse bars and one of the beams are adjacent to the walls along their entire plane, and the second is adjacent to the end parts. To install the crossbars, special grooves are cut out in the beams. Read also: “How to make shelves in a bathhouse correctly - instructions.”
The second beam is additionally supported by racks that rest on the wall. These supports are filed so that the ends are tightly adjacent to the beam. The structure is fixed on each side with two screws.
For flooring, boards with rounded edges and carefully sanded are used. They are stuffed with a gap of 1-2 cm for ventilation and water drainage.
It is best to use boards whose width is 4 times or less than their thickness - they dry faster and do not crack during use.
Although in this example the canopy is made with a width of 69 cm, nevertheless, this size of shelves in the steam room is clearly not enough. The standard width is 90 cm, which requires 7 boards.
You need to make the lower pull-out shelf according to the same principle as the stationary one. Its base will be made of two long bars with crossbars, and the flooring will be made of 5 boards.