For an experienced roofer, installing a modern drainage system is not particularly difficult, but an inexperienced person may not be aware of some of the nuances that lead to serious problems in the future. Of which, the most common are deformation, bending of the gutter, leakage and destruction of the facade from constant moisture.
Moreover, just one small installation error can cause all this. Therefore, we will now tell you in great detail how to fix the drain so that it serves faithfully for many years.
What does the drainage system consist of?
Brackets
They serve to solve the problem of how to properly install gutters on the roof surface. They can have different shapes and different materials. However, the color of the products must match the color of other roofing elements.
The shape of the brackets directly depends on the method of their fastening:
- On the front board. This is the most common way to install gutters if the roof is already covered. Most often, these brackets are included with PVC systems. Reinforced vertical ribs give the products good load-bearing capabilities. For metal systems, such brackets are shortened. When there is no frontal board, the installation of the drainage system on the finished roof can be carried out using combined brackets.
- The second method involves installing gutters before the roofing material is laid. In this case, the place where the gutter is attached is the rafter leg. Typically, extensive roofs are installed in this way, on which roofing coverings of significant weight are used. To ensure reliable fastening, the pitch of the rafters is made up to 60 cm.
- The third method is used to equip roofs with a pitch between rafters of more than 60 cm. Most often they are decorated with ondulin or metal tiles. In this case, combined brackets or hooks of considerable length are used. The place of their attachment is the first plank of the frame or the lower part of the flooring.
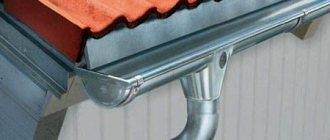
Gutters
Their shape can also be different. It can be round, semicircular, oval, rectangular or combined. It is recommended to use gutters and brackets from the same set: in this case, their shape is the same. The most universal is the symmetrical form, the configuration of which can be selected very quickly.
There may also be differences in how to properly attach the gutter system. The simplest of them is the snap method. In this case, rotary latches are used, which make it possible to dismantle the desired part of the gutter very quickly. When choosing products, metering also requires the degree of linear vibrations, which PVC structures are especially famous for. In this case, compensation is carried out through couplings that have a notch inside the cavity.
Although metal gutters do not expand as much when heated, it is also advisable to use a compensator in the form of a coupling when installing them. To prevent structures from becoming covered with ice, they are often equipped with a cable heating system.
Seals
For their manufacture, EPDM rubber is used, which is a modern substitute for rubber sealing. It is characterized by good elasticity, thanks to which the product is able to retain its shape for a long time. Such seals are not afraid of moisture and other harmful influences. For ease of installation, they are additionally coated with silicone grease.
Funnels for catchment
With their help, they collect water that flows down the gutters, redirecting it inside the drainpipes. Plastic systems are equipped with funnels in the form of separate elements. Funnels are left, right and through. In the first two cases, there is a wall in the form of a plug, which means they are installed at the end of the gutter. The passage element can be installed in any area.
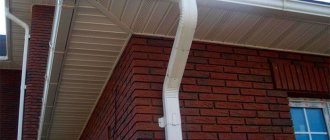
Knees
They look like a short bent pipe. With their help, drainpipes and funnels are connected, and water is also drained from the base of the building. Each drainpipe is usually equipped with three elbows: two upper and one lower.
Making a drain with your own hands: budget options
Ready-made drainage systems are good, but not cheap. What to do if drainage needs to be done at the dacha and you need to spend a minimum for this? There are several very budget options. The first is to make a drain from plastic sewer pipes. Take pipes of large diameter (110 mm or more), good quality with a thick wall, cut them in half and use them as gutters. The same diameter or slightly smaller can be used as drain pipes. It’s more convenient to buy ready-made brackets, but in principle, you can make them yourself.
An even more budget-friendly option is drainpipes made from plastic bottles. They cannot make a normal gutter, but the pipe funnels work normally.
How to attach a gutter to the roof: methods
Several basic methods have been developed for attaching gutters to a house:
- Attachment to the windshield (wind board);
- Fastening to the sheathing;
- Attachment to rafters.
The most reliable fastening option is that the hooks for fastening the gutter are attached under the roof to the top of the rafters before installing the sheathing and finishing coating. The hooks are additionally pressed against the sheathing. This method is applicable only during the construction process and if the pitch between the rafters does not exceed 0.6 m.
It is somewhat easier to install it yourself on the roof using a finished sheathing. The hooks are not additionally pressed, but this is the only difference from the first method (unless the sheathing boards are very thin). This option has the advantage that it allows you to hang a gutter with a large distance between the rafters.
Holders can be attached to the front board only if the reliability of the board itself and its fastening to the roof elements allows.
A covered roof makes it impossible to choose among most convenient options. How to secure a drain to a fully finished roof, under corrugated sheeting or other covering, will be discussed below. Depending on the design, you can consider the following mounting methods:
- To the side surface of the rafters (with the same criteria for the distance between them);
- To the front board;
- To the wall of the building.
Installation on the side surface of the rafters should be done with long hooks, since nails or screws will take the bending load and over time may become loose or break off. For fastening to the side surface of the rafters, special hooks with a mounting plane curved by 90° are used.
Note! To ensure reliable fastening and avoid damage to the rafters, they must be made of timber with a cross-section of at least 120x50 mm. If the diameter of the rafters on the roof is smaller, then this method is not recommended. To install a gutter on a wind board, it does not matter whether the roof is covered or not.
The main requirement is the reliability of the base, that is, the wind board. Its thickness should be at least 20-25 mm
When installing a gutter on a wind board, it does not matter whether the roof is covered or not. The main requirement is the reliability of the base, that is, the wind board. Its thickness should be at least 20-25 mm.
Attaching the drain to the roof can be done using several hook options:
- Regular hooks with a long mounting platform;
- Hooks with supporting surface;
- Hooks with adjustable mounting surface for installation on inclined boards;
- Using a special guide profile and a specially shaped hook.
The use of a profile greatly simplifies the installation of a drain, especially in terms of maintaining the required slope and alignment of all fasteners. The downside is the rather high cost.
You can attach the brackets to the sheathing if it is possible to dismantle or move the bottom row of the roof covering. This is easiest to do on a tiled roof made of metal tiles or corrugated sheets, and is almost impossible on one covered with classic slate.
To secure it to the wall, special steel pins of the required length are used. Hooks are attached to the pins, and on them, in turn, are the drainage gutters.
Reliable roof covering - metal tiles, polycarbonate and other hard and durable materials allow you to fasten gutter elements to the roof directly to the roof covering using special clamps.
Important! Despite all the obviousness and convenience, it is impossible to attach the drain to the end surfaces of the rafters, since the fasteners will run along the wood fibers, and the reliability of holding the fasteners will be extremely low
Device and functions
The roof drain is a structure consisting of a gutter, drains, and water intake funnels, which are hermetically connected to each other. It is installed along the roof overhangs to collect and transport rain and melt water to a specially equipped place (storm drain, ditch or container). To determine the number and size of drainage elements, a simple calculation is performed, taking into account the slope and area of the roof slopes and climatic conditions in the construction region. A properly calculated and installed drain performs the following functions:
- Provides organized drainage of melt and rain water from the surface of the slope. Liquid flowing from the roof ends up in gutters and drains, transporting it to specially designated areas. If the house is equipped with a drainage system, during rain, water from the roof will not splash on random passers-by.
- Protects the blind area and foundation from destruction. Fastening the drain prevents water falling from the height of the roof from penetrating the concrete of the blind area and foundation. When contacting water in the foundation of a house, microcracks form over time; to eliminate these defects, large investments of money and labor will be required.
- Preserves the finish of external walls. An organized drain prevents melt or rain water from entering the surface of the house facade. If the calculation was performed correctly, then the liquid does not leave the gutter, due to which the walls retain their aesthetic appearance and integrity longer.
Construction of the drainage system
Note! Professional roofers say that all pitched roofs must be equipped with a drainage system. An exception can be made if the roof overhangs of the house exceed 80-90 cm and extend beyond the concrete foundation area. The drain must be installed for any area and slope of the slopes.
Installation sequence
Installation of a catch basin
- Install the end bracket 5 taking into account clause 2 of the “General Provisions”.
- Install funnel brackets 11. For the version with a frontal plate, funnel 11 is attached without brackets.
- Hang the slope of the gutter from the end bracket to the funnel bracket. For the option with a frontal board - from the cavity of the end bracket 5 to the lower edge of the funnel cut 11.
- Install the gutter connector brackets 7. For the option with a frontal board, install the connector 7 itself.
- Connector 7 or its bracket is installed taking into account clauses 1 and 3 of the “General Provisions”.
- The distance between the centers of funnel 11 and connector 7 should not be more than 3080 mm.
- Install intermediate brackets 9 taking into account paragraph 3 of the “General Provisions”.
- Secure the funnel 11 and the gutter connector 7 to the fastening elements (bracket, connector). For the option with a frontal plate, funnel 11 and connector 7 are attached without brackets.
- Cut the gutter to the required length 8 and connect funnel 11 and connector 7 with it.
- Cut the gutter to the required length 6 and lay it on the connector and end bracket.
- Repeat the operations for the adjacent side of the roof (bracket 2, gutter 3).
- Install the corner element of gutter 4 into gutters 3 and 6.
- Place funnel plug 12 onto the open end of the funnel.
- Place gutter plug 1 onto the open end of the gutter.
- Insert funnel mesh 10.
Installation of a spillway
- Push the coupling or elbow 13 onto the drain hole of the funnel 11 until it stops, depending on the specific features of the installation site. Secure coupling or elbow 13 to funnel 11 with a self-tapping screw.
- Assemble the required configuration of the figured part of the spillway. (Elbow 13, Pipe section 14, Elbow 15).
- Secure the lower fitting 15 with clamp 16 in the “Fitting” position.
- Place pipe 18 until it stops on the bottom fitting 15 of the figured part of the drain.
- Install the pipe in a vertical position, marking the installation locations of the universal clamp in the middle of the pipe 17.
- Place pipe 18 onto fitting 15. Fix it in clamp 17.
- The middle clamp is installed in the “Pipe” position.
- Cut off the final piece of pipe of the required length 21, putting it on the coupling 19, put the coupling with the pipe on the lower part of the fixed pipe 18.
- Mark the installation location of clamp 20 on the wall of the house at the level with the place where the clamp is fixed on coupling 19. Move 10 mm lower.
- Place the coupling with the pipe (19 and 21) on the lower end of the fixed pipe 18. Fix the assembly in the clamp 20. The clamp is installed in the “Fitting” position. If the length of the pipe section is more than 1500 mm, it is necessary to fix it in the middle with a universal clamp. The clamp is installed in the “Pipe” position.
- Place the tip on the pipe. 23. Mark the installation location of the clamp 22. Move 10 mm lower.
- Place the tip 23 on the pipe 21, fixing it in the universal clamp 22.
- The clamp is installed in the “Fitting” position.
- Let's assume the option of attaching the tip to the pipe with a self-tapping screw.
Installation of drainage pipes on siding
- If there is a significant distance to the wall of the house, instead of an M6 screw stud 1, it is recommended to use an M8 screw stud. If necessary, cut the pin to the required length and drill a hole in the clamp support to the diameter of the pin.
- When installing, it is necessary to drill a hole with a diameter of 10 mm to 12 mm on a flat section of siding.
- Screw pin 1 through the center of the hole into the wall of the house to a depth of at least 40 mm; if the wall is not wooden, you need to install a dowel. The screw part should protrude 20 mm above the siding.
- Screw nut 2 onto the screw part of the stud flush with the siding surface. Place washer 3 with a diameter of 15 mm.
- Place clamp support 4 onto the stud. Screw nut 5 with washer 6 with a diameter of 15 mm from inside the clamp support until it stops.
- Install the clamp in the desired position (“Pipe”\”Fitting”). Tighten nut 2 under the clamp support until it stops, using a wrench to do this.
- Insert the clamp 9 into the clamp support, securing it with an M5x40 screw 7 and an M5 nut 8.
Installation tools
- For marking: tape measure, pencil.
- For attaching brackets: screwdriver, screwdriver, drill.
- To install the brackets: cord, spirit level, hose level.
- For bending metal brackets: bending machine.
- For cuts: hacksaw, miter box, fine-tooth saw.
Pipe holders
To securely fix the drain riser, you will need pipe holders with fasteners suitable for your wall material - brick or wood.
Mount the holders to the building wall in one meter increments. Also, regardless of the distance, holders must be installed at all pipe joints. Drain pipes can be cut to the required length on site.
Connect them together by inserting them into holders and secure them with special locks.
Adviсe
- The heavier the pipe material, the smaller the distance between the hooks should be. All auxiliary parts (hooks, funnels and plugs) must be installed before installing the main line of gutters.
- Copper is considered the most durable material for drainage systems. Copper pipes do not react in any way to atmospheric phenomena. The service life of copper parts can be more than one century. However, such a system is expensive. It will not pay for itself if it is installed on a modest house or a simple industrial building.
- Methods of connecting elements are selected depending on the material used in the structure. For example, for plastic, the method of cold welding using clamps and rubber seals will be relevant.
- In areas with cold weather conditions, you can install a heated gutter system. This pleasure is not cheap, but it effectively prevents icing, and therefore the collapse of the entire system.
- There is no need to cut metal gutters with an angle grinder, especially if they are polymer-coated elements. The best tool for cutting gutters is a hacksaw.
- Do not forget about the need to periodically clean the system. Open gutters easily become clogged with fallen leaves, and small debris and dirt get into the pipes. Any debris that gets into the drain will have to be removed manually. Good water pressure, for example from a hose, will help with cleaning. There are specialists who will do this work for a monetary reward.
- It is better to mount the gutter with all connections and plugs on the ground. An assistant will be required to lift the system under the roof. If a person works alone, then it is better to assemble the system upstairs, under the roof, but this is not entirely convenient.
- The optimal adhesive for joining PVC pipes is a two-component one, based on a polymer compound (the second component is tetrahydrofuran). This is a heat-resistant composition that is resistant to aggressive chemicals. Hardening of the substances is observed within 4 minutes. The glue is sold in containers weighing from 0.125 to 1 kg. The mechanical strength and safety margin of this adhesive composition are very high.
- For metal, you can use clamps and seals. If installing the system is beyond your capabilities, then it is better to call professional installers for installation. The work will be done efficiently and quickly.
To learn how to install gutters, see their subtleties and secrets in the video below.
General provisions
1. Ensuring the slope of the gutter
Option with a frontal plate, mounted on a plastic bracket
The brackets are located at the level of the cord, which is stretched between the end bracket and the funnel. The difference in height between the end points of the cord should provide a slope of up to three millimeters per linear meter.
Option without frontal plate, mounted on a metal bracket
This option is used for roofing with a small sheathing pitch. The difference in height is ensured by the arching of the bracket at the calculated location. The distance from the end of the supporting part of the bracket to the bending point decreases as the intermediate bracket moves away from the final one.
Option without frontal plate, fastening with an extension and a plastic bracket
This option is used for roofs with large sheathing pitches. The fold lines of all extensions are located at the same distance. Moving the plastic bracket along the extension provides a slope. The bend point should be located no closer than ten millimeters from the attachment point of the bracket clamping plate or no closer than ten millimeters from the end of the slot in the extension.
2. Ensuring the optimal position of the elements relative to the roof
3. Ensuring stability from deformation under vertical load
- The distance between the gutter brackets should not be more than 600 mm.
- The funnel is fixed at two points, or on two brackets/extensions
- The gutter connector is secured to one point or to one bracket/extension.
- The end of the corner element is located no more than 150 mm from the nearest bracket.
- The distance from the plug to the nearest bracket should not be more than 250 mm.
4. Ensuring compensation for linear temperature expansions
- The gutter is mounted into the mating elements up to the line marked “Insert so far.” For ease of installation, point microstops are formed along the edges of the line, before contacting which you need to insert the gutter.
- The distance from the end surface of the plug to the structural elements of the house should not be less than 30 mm.
5. Ensuring the system is sealed
- Before starting installation, you should clean the mating surfaces from dirt, and also make sure that the rubber sealing gaskets are present and that they are securely installed in the sockets. The spacers should extend to the ends of the sockets.
- All plugs must be installed. The ends of the gutters protrude beyond the side cut of the roof by 50 mm -100 mm.
Comparison of gutter performance under load
In what situations is the drain attached only to the front board?
Installation of drainage system hooks only on the front board is possible in cases where the ventilation of the under-roof space is carried out using special holes in the eaves lining - the so-called. "perforated soffits". This is the simplest and most inexpensive type of ventilation, but its effectiveness leaves much to be desired.
For a more complete air flow, use a gap under the sheathing. This implies a lower location of the frontal board and fixation of the brackets exclusively to the sheathing. The disadvantage of this method is the risk of the board collapsing under snow load. The decision on the advisability of one or another approach to the installation of gutters is made by the owner of the house.
Another reason for installing drainage hooks on the front board is to carry out the installation of drainage structures after the completion of the main construction work. A common situation is when an unfinished house with an expensive roofing is purchased: in order to avoid the labor-intensive procedure of dismantling it, it is easier to attach the gutters to the front board. The same algorithm of actions is selected when replacing the drainage system.
The third reason why brackets can only be installed on the surface of the front board is the use of anti-condensation waterproofing film. As the installation rules state, it must necessarily go to the overhang of the cornice, which implies the possibility of installing gutters exclusively on the front board.
Material calculation
To calculate materials according to SNiP, the following data is required:
- roof area;
- amount of average annual precipitation;
- temperature minimum in winter in the region;
- presence of rainwater drainage.
This calculation helps determine the number of gutters, or rather the total length of the overhangs, which is divided by the length of one gutter. For example, the total length of the overhang is 40 meters. Subtract the length of the corner elements (15 cm on one side) It turns out: 12*15 = 1.80. Then: 40 – 1.8 = 38.2 m.
The standard length of one galvanized gutter is 3 meters. This means that 13 gutters will be required (38.2/3 = 12.7). The number of connecting elements is selected according to the number of connection points in the structure. A drawing will help you with this, in which you need to depict a rectangle with schematically located drainage elements. For our example, 18 couplings will be required.
If the system is not closed, and the gutters will be installed with open ends, then the number of plugs must be determined. For example, for a gable gable roof on which a two-strand system is mounted, you need to install four plugs. If the roof is hipped, hip-type, caps are not required at all.
The number of corner elements will be equal to the number of external and internal corners of the house. The number of pipes is selected so that it matches the number of drains, and their length must correspond to the height of the structure. In some cases, curved knees are needed. Their necessity is determined by the width of the overhang.
A clamp must be put on each section connection. If the pipe is three meters long, then there should be two clamps: one at the top, the other at the bottom.
Calculation of internal drainage is carried out according to the rule - one funnel per 0.75 square meters. The pitch between the funnels is determined by dividing the length of the roof, measured along the longitudinal axis, by the number of funnels. In addition to water intakes, the system will require:
- risers;
- outlet pipes
- release.
For internal drainage, you can choose pipes with a diameter of 100, 140, 180 mm. The length can be 70 or 150 m. Incoming moisture is transferred to the storm sewer. If drainage systems are intended to be used year-round, then it is better to place the system in a heated area.
The internal system often suffers from debris that can enter it from the roof. The design of the protection is extremely simple - a cap and a glass. This is an auxiliary element, but it does a good job of retaining various debris.
Such an auxiliary device is not required if the internal drain is installed with a siphon. This is a special valve for storm sewer connected to a drain. It maintains the pressure of the water in the pipes. When the drainage system is filled, the valve opens and sediment is released very quickly. Blockages in the siphon system rarely occur; there is practically no need to clean it.