An important stage in any major or cosmetic renovation is finishing bathrooms and kitchens and laying tiles.
Tile cutting
The most common material for the walls of these rooms remains ceramic tiles.
Due to its qualities and environmental friendliness, long service life, and simple maintenance method, this type of finishing is quite suitable for self-installation, when you have some knowledge of how to lay tiles on a wooden wall.
As with any type of construction or finishing work, the entire process of laying tiles can be divided into three stages:
- Preliminary stage of preparation for masonry;
- Directly laying ceramic tiles on the wall;
- The final stage to consolidate the result.
Of course, when working on your own, it is better to follow the instructions on how to lay tiles on a wall than to proceed by trial and error. Otherwise, you will have to make new masonry instead of correcting errors.
Combine incompatible
Ceramics and wood are two materials with different properties, which, at first glance, do not go together:
- Ceramics are characterized by absolute waterproofness, for which they are preferred when tiling wet rooms and surfaces - bathtubs, showers, kitchen splashbacks;
- Wood is characterized by vapor permeability - the surfaces do not interfere with the natural air exchange between the room and the street, due to which a house made of logs and timber always has a favorable microclimate.
The complexity of combining these materials is obvious: wood constantly communicates with the environment (temperature, humidity) and reacts to it by changing its volume and size. It turns out that if you cover the floor or walls with impenetrable tiles, this property is lost, and the use of classic masonry mortar will only aggravate the situation.
However, a bathroom in a wooden house is no different from a similar room in a stone building, which means that the surfaces still need to be protected from dampness, and ceramic tiles for walls and floors made of wood cope with this task brilliantly.
Method No. 2
It is effective if the floor is in almost deplorable condition, but inspection still allows us to conclude that installation is possible.
First, you need to dismantle the old coating to get to the concrete. Next comes waterproofing. For this purpose, there are enough special materials on the modern market.
To get a flat floor, you need to use a level and thread to cut a horizontal line around the perimeter of the room. Then we place beacons in increments of about a meter; the distance from the walls should be 10 cm.
The following can be used as beacons:
- Bars. After the solution hardens, they are removed and the space is filled with the mixture.
- Gypsum profiles. They are secured using self-tapping screws.
- Plastering. Mounted on plaster marks.
Recommendation: to mix the screed mortar, use a container with a capacity of up to 15 liters.
If the layer turns out to be too high, most of the space can be covered with expanded clay. It is filled with the mixture and waited for 24 hours. After this, the surface is primed and filled with solution. Alignment is performed by the rule, moving towards the door.
Then you will have to wait 3 days and then knead the self-leveling mixture.
Coating methods
To prevent the cladding from harming the wood, special adhesives are used for its installation and an additional base is installed. The general rule is to allow the wood to “breathe” even under a layer of protection.
The first way to fulfill the condition is to lay the tiles on a wooden wall or floor on which an additional base is installed, for example, plywood or plasterboard. The sheets are mounted in such a way that there is a small gap between them and the timber, although a loose fit will also help to cope with the problem of wood ventilation.
Another way to install cladding is to use elastic adhesive mixtures based on a polymer base, but in no case cement! On the one hand, specialized compounds do not clog the structure of the tree and do not saturate it with water; they still close the path for air, therefore, from a practical point of view, direct installation on timber is not recommended.
Block house for wall cladding
Block house for wall cladding
Some apartment owners strive to make their homes original and even extravagant in some ways.
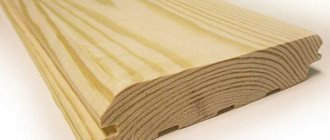
So if you are tired of boring solutions, then pay attention to the block house, that is, a board whose cross-section imitates the rounded log known to everyone from village landscapes. Using this material you can achieve a real “rural” interior in your home.
To make the design look even more impressive, it is recommended to resort to a method such as artificial “aging” of the wood. For this, the method most often used is “brushing”, that is, processing the material with a wire brush. During the processing of wood, fibers are removed from it, which creates an interesting relief. After this, the material is painted and, without allowing the paint to dry, it is removed.
Which tile adhesive to choose
To install ceramics on a wooden or plywood base, you should choose an elastic adhesive based on:
- polyurethane;
- epoxy resins.
These materials serve as both fasteners and waterproofing. Glue with natural and artificial resins is sold in finished form, and two-component adhesives are sold in powder form, which must be diluted with water before use according to the instructions.
You can also use “liquid nails”, which are suitable for working in wet conditions. These retain their load-bearing properties even when exposed to moisture; the usual composition for bathrooms and kitchens is a short-lived option.
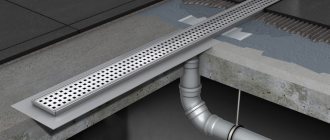
Waterproofing
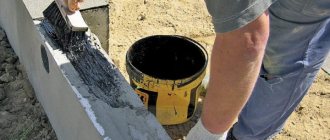
Under a wet screed, it is imperative to use waterproofing to prevent the wood from picking up moisture from the solution. The main requirement is continuity and uniform thickness of the layer, processing adjacent log walls to a height of 100 mm. A budget option is PVC or polyethylene film, but most often it is coated with bitumen or polymer mastics in two layers.
Laying tiles on a wooden wall or floor
Let's take a step-by-step look at how to install tiles directly on a wooden base.
- First of all, the wood must be coated with a deep penetration primer with antiseptic additives. The solution will kill pathogenic microflora and provide surface protection of the material, improve adhesion.;
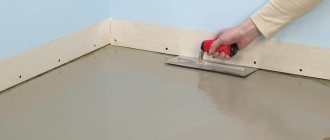
- The next step is to apply the elastic adhesive with a notched trowel. At this stage and beyond, the algorithm is the same as during conventional installation - the solution is applied to a small area that can be covered in a short time. When working with liquid nails, they are applied to the tiles.
- Press the ceramics onto the adhesive base. Laying of subsequent fragments is carried out using plastic crosses, which fix the distance between the tiles.
- The final stage is grouting the joints with colored epoxy or polyurethane compounds.
Expert advice
It is not difficult to do the cladding yourself. Expert advice:
- If during finishing it is not possible to lay a whole number of tiles in a row, then the excess is cut off at the corners with a tile cutter, diamond glass cutter or grinder. The fragments that remain can later be laid out in the corners or covered with a shelving unit or cabinet.
- Finishing work needs to be carefully planned, because good facing tiles are expensive. You need to buy material with a reserve of at least 10% of the total quantity for trimming.
- Textured requires docking and adjustment. Its quantity needs to be increased by 15–20% of the total volume.
- If you need to make holes when finishing, it is best to use a crown or a ballerina. Just don't press hard on the fragment. This will help prevent the icing from chipping and keep the edges of the hole smooth.
Even the most expensive facing materials will not be able to ensure the durability and strength of the coating if the base was poorly prepared at the initial stage.
It is necessary to perform a complex of simple works - clean the base from dirt and dust, oil stains and other substances that reduce the adhesion of the glue, eliminate all irregularities and add strength. Then the result will please the apartment owner for a long time.
Installation with additional base
Laying tiles on wood with the installation of an additional base made of plywood or gypsum board is a more reasonable move. In this case, the wall material or the ceiling made of joists and boards will not be damaged; it will be the plywood or plasterboard layer that will bear the blow.
- First of all, the timber must be treated with a wood primer solution to disinfect the surface and protect it from any unpleasant situations.
- Plywood cannot be screwed directly to the base with self-tapping screws; the ideal solution is to install it on a sheathing of bars 1-2 cm thick. They form a ventilation corridor for the wood to “breathe.” When working with drywall, you will need to install a frame made of wooden or special metal guides.
- Plywood also needs to be treated with a primer.
- When gluing tiles to wood, that is, plywood, use only elastic epoxy or polyurethane glue. In the case of using plasterboard (or GVLV) sheets, you can use ordinary cement adhesive. The algorithm is the same: applying glue to the base, laying tiles.
- Grouting joints is a mandatory stage of cladding. It will protect the areas between the tiles from getting wet.
Grouting joints
After finishing the laying work, the tiles are left for some time (1-2 days) so that the glue fixes the tiling. Then they begin to grout the tile joints. This will require the appropriate tools and materials.
It is recommended to choose special antifungal mixtures. This is a necessity in rooms with high humidity.
Apply the grout carefully with a rubber spatula so that the seams are equally beautiful. After the filler has dried, the tiles should be wiped with a dry cloth to remove any remaining mixture from the tiles.
Summary
It is possible to lay tiles in the bathroom on the walls and floor in a wooden house, the main thing is to find the optimal approach.
Gluing ceramics directly to walls and floors is possible only with special adhesive solutions based on epoxy resins or polyurethane; the use of cement-sand glue with additives can cause damage to the base - saturating it with water and insulating it from air.
Experts still recommend using an integrated approach to cladding and installing an additional base of plywood or drywall - this is exactly what real professionals do. This method has a number of advantages:
- the main wood does not suffer in any way, therefore it retains its properties and integrity longer;
- the cladding can be dismantled at any time, again without harm to the main wall or floor;
- The wood has constant contact with air, which means it does not accumulate moisture and does not dry out, and the natural balance of moisture inside the timber is maintained.
Whatever installation method is chosen, special attention should be paid to adhesive compositions: read the instructions and description. Perhaps the mixtures have narrowly targeted properties that are suitable specifically for your room (humidity, type of materials used, etc.).
- Exterior finishing
Technology options
Methods for laying tiles on top of a wooden base are conventionally divided into dry and wet. At the same time, different structural materials solve the same problem:
- creating a layer between the plank floor and ceramic cladding with high rigidity and stable geometry;
- waterproofing the base and ensuring ventilation of wooden structures;
- selection of materials with high adhesion to the adhesive composition.
In the first case, sheet materials are used - DSP and GVL, moisture-resistant plywood.
In the second option, a screed of sand concrete or self-leveling floor 30 mm thick is poured, but, again, on top of two layers of plywood with water-repellent impregnation.
The thickness of the floor structure pie should be taken into account at the design stage. According to existing standards SP and SanPiN, the height of the finished flooring inside the bathroom should be 15 - 20 mm lower than in adjacent rooms (usually in the corridor).
Sheet materials
Dry technologies are cheaper than screed production and are produced in a short time. The general principle is to lay sheet materials on top of the plank flooring. The following materials can be used:
- cement particle board - one layer, thickness from 12 mm, fastening to a tongue-and-groove board with self-tapping screws;
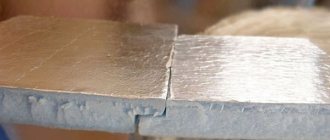
Installation of tiles on DSP. - gypsum fiber sheet GVL - two layers, each thickness from 10 mm, seam spacing is mandatory, gluing along the contour and fixing with self-tapping screws;
Laying gypsum fiber board on a wooden floor. - Multi-layer waterproof plywood - two layers with offset longitudinal and transverse seams, fastening with self-tapping screws.
Tiling a plywood base.
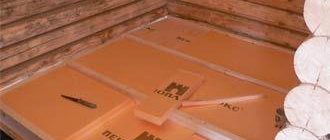
GVL sheets are quite fragile, so they are mounted either on a layer of plywood or on a high-density thermal insulation material - EPPS from domestic manufacturers or XPS from Western brands. The most well-known brands of high-density extruded polystyrene foam are URSA, TechnoNIKOL, Technoplex, Stirex, Penoplex and Ekstrol.
A step-by-step guide to installing sheet materials over a wooden floor is as follows:
- surface grinding to ensure perfect flatness;
- laying sheet material.
At the last stage of the technology, options are possible depending on the sheet materials used:
- plywood for tiles - two layers with spaced seams, sheets are cut into pieces to reduce the load on each of them and get rid of internal stresses inside the structural material, fastening with self-tapping screws with a protective coating, gaps between sheets from 1 mm;
- plywood as a rough layer - one layer using a similar technique;
- GVL - sheets are glued together with PVC glue with an offset of 5 cm, then laid on the base, the joints are coated with glue, then additionally fixed with galvanized self-tapping screws;
- DSP - standard laying in one layer with fastening with colored screws.
The format of the plywood pieces should be small.
It is not recommended to use moisture-resistant gypsum board, since this material does not contain reinforcing fibers. Black self-tapping screws become centers of corrosion inside the adhesive layer, rust can appear in the seams, and the structure of the floor cake can delaminate over time.
Ties
Wet technology increases the repair period, since the screed must dry and gain design strength before facing with porcelain stoneware or tiles. It is not recommended to pour screed onto a plank base, since each linear element of this structure does not have the same internal stresses, linear deformations and tendency to warp.
Therefore, first, plywood is laid on a tongue and groove board in two layers with the seams offset. The main nuances of wet screeds are:
- the correct thickness of the sand concrete layer is exactly 30 mm, reducing this value will increase the fragility of the structure, increasing it will reduce the service life due to increased loads on the wooden floor elements;
- When using a self-leveling floor, you should follow the instructions of the specific manufacturer of the dry mixture.
Concrete screed 3 cm thick in a log house with a wooden floor.
Ceramic tiles can be laid only after the screed has gained strength and is completely dry.
Dry floor screed with the following step-by-step manufacturing scheme is included in a separate category:
- Beacons made of galvanized profiles are installed on the plank flooring in the bathroom in a single horizontal level;
- adjacent to the floor, the walls are covered with damper tape around the perimeter;
- Expanded clay chips are poured between the beacons, the level of which is leveled by the rule;
- All that remains is to correctly place double sheets of gypsum fiber board on top of the bulk material, the seams of which are glued and additionally pressed together with self-tapping screws.
You can lay tiles on a dry screed on the same day, but the budget for its production is higher than that of wet options.
Insulation and heated floors
In a private cottage with wooden floors, it is important to insulate the floor of the lower level and the ceiling of the second floor to reduce heat loss. Insulation is usually installed between the subfloor and tongue and groove boards. However, if additional insulation of load-bearing structures is necessary, the heat insulator can be placed both under sheet materials and under screeds.
The main condition is the use of high-density insulation, that is, XPS or EPU. They do not wrinkle when residents walk and heavy plumbing fixtures (bathtub, shower, toilet, washing machine) are installed on the tiles.
To ensure the highest comfort for users, heated floor systems are installed in the bathrooms. For the case under consideration - tiles on top of a wooden floor - the only heating option is an electric roll-up system with a thin cable.
The electric heated floor is laid on top of the waterproofing and embedded in the adhesive directly under the tiles.
Finishing the floor base
Next, it is proposed to understand how the process of gluing ceramic cladding to a wood base occurs. First of all, in addition to plywood flooring, experts recommend performing a light screed, having previously provided a waterproofing layer for the substrate.
To mask gaps and joints and allow the coating to move under changing circumstances, it is recommended to use construction foam. The top of the base is covered with additional membrane-polymer waterproofing. Why are the pieces of material overlapped and secured to each other with adhesive tape? Next, construct a concrete screed by pouring a thin layer of mortar. To do this, purchase a ready-made mixture for wood surfaces. This composition is distinguished by the fact that it retains elasticity after setting and integrity when the substrate moves. Hardened concrete is treated with a primer.
Next, we begin finishing the floor. Laying of ceramic elements is carried out according to the standard scheme. In the kitchen, for example, it is recommended to start installation from the farthest visible corner or from the central point of the room. If the tiles are laid from the center, the floor surface is delimited into quarters from the middle point and each section is carefully processed. Upon completion of installation, a mandatory step is rubbing the seams. Why choose epoxy or latex based compounds?
Bathroom location
First of all, even at the design stage, you need to decide where the bathroom - or rooms - will be located. Why is this necessary?
- It is necessary to correctly calculate the load on the floors between floors and further strengthen them.
- To prevent the house from flooding in the event of force majeure, the floor in the bathroom area is made slightly lower than in other rooms.
- You need to carefully consider the communications and electrical wiring diagram, plan the location of risers, valves and plumbing.
A convenient location option is on the ground floor, not far from the kitchen, in order to organize a single water supply system and not distribute it along the entire perimeter. If the house is large and several bathrooms are planned on different floors, it is better to place them one below the other.
Instagram @designer_polina_s
Instagram @gala.interior
Design: Chenchow Little Architects, chenchowlittle.com
- Bathroom, toilet
7 designer bathrooms that meet modern trends